Basics of Android App Development
Overview
Android app development is the process of creating Android applications that act as an extended layer above the core functionality that the Android OS provides. However, the basics of Android app development are important to comprehend before we can think of creating even a simple application. Let's have a look at the basics and know what Android apps are all about.
Introduction to Android App Development
Android app development is the root of equipping all Android-powered devices with an assortment of applications that can extend the core functionality of this operating system. The devices can either be a smartphone, tablets, smartwatches, or smart TV. Programming languages such as Kotlin, Java, and C++ are mostly used for the development of Android applications. We first need to delve into the basics of Android app development before getting into the development realm.
Tools and Resources for Android App Development
To get started with the basics of Android App development, some sets of tools are required at the basic level. Let's have a look.
Integrated Development Environment
Integrated Development Environment (IDE) offers a complete environment for software development. It's a place where you have everything you need to create a single application rather than juggling several tools for the same job.
Android Studio, Eclipse, Visual Studio, and Xcode are a few examples of well-known IDEs. Android Studio is based on IntelliJ IDEA Community Edition and provides an enhanced user experience with features such as code auto-completion, refactoring support, instant run, and more.
Git and GitHub
Git is a Version Control System (VCS) that makes tracking our code changes easier. As the name suggests, it creates different versions as per the update, so that the collaboration as well as reverting to the safest version becomes easier.
GitHub is a web-based platform that enables hosting a Git repository and tools for simple collaboration. On GitHub, features like issue tracking and pull requests are easily available.
Android Debug Bridge
Android Debug Bridge (ADB) enables connection between an Android device and a computer system. It is primarily used to install apps, debug them, transfer files, and run terminal commands. It can be accessible over a network or a USB. ADB gives expert users and developers access to the Android system, enabling them to modify or debug their devices.
Building your First Android App: A Step-by-Step Guide
Here's a quick guide to creating your first Android app.
- Install Android Studio and Android SDK from the official website.
- Following the installation process comes the creation of a new project. To do so, click on File > New > New Project. This will open a new project wizard.
- Now, in the project wizard, you need to select a project template. Since we wish to have our custom view, we'll choose an Empty Activity and then click Next.
- On the next screen, you will be prompted to configure your project. You can give your app a name and select the minimum API level that your app will support. You can also choose a programming language for your app, either Kotlin or Java. Let's choose Java for now.
- After the configuration process, click on Finish to create an app. For your convenience, Android Studio simply creates a MainActivity.java file with the "Hello World!" message. And the code in MainActivity.java looks something like this:
- The method setContentView() sets the content view of MainActivity.java as activity_main.xml. The activity_main.xml comprises a TextView that shows the text message at the center of the screen.
- Now, before running the application, make sure that the Android Emulator (AVD Manager) is configured properly. If not, then you need to set up a virtual device.
- Run the application with the green Play button in the toolbar. And you have your first Android app.
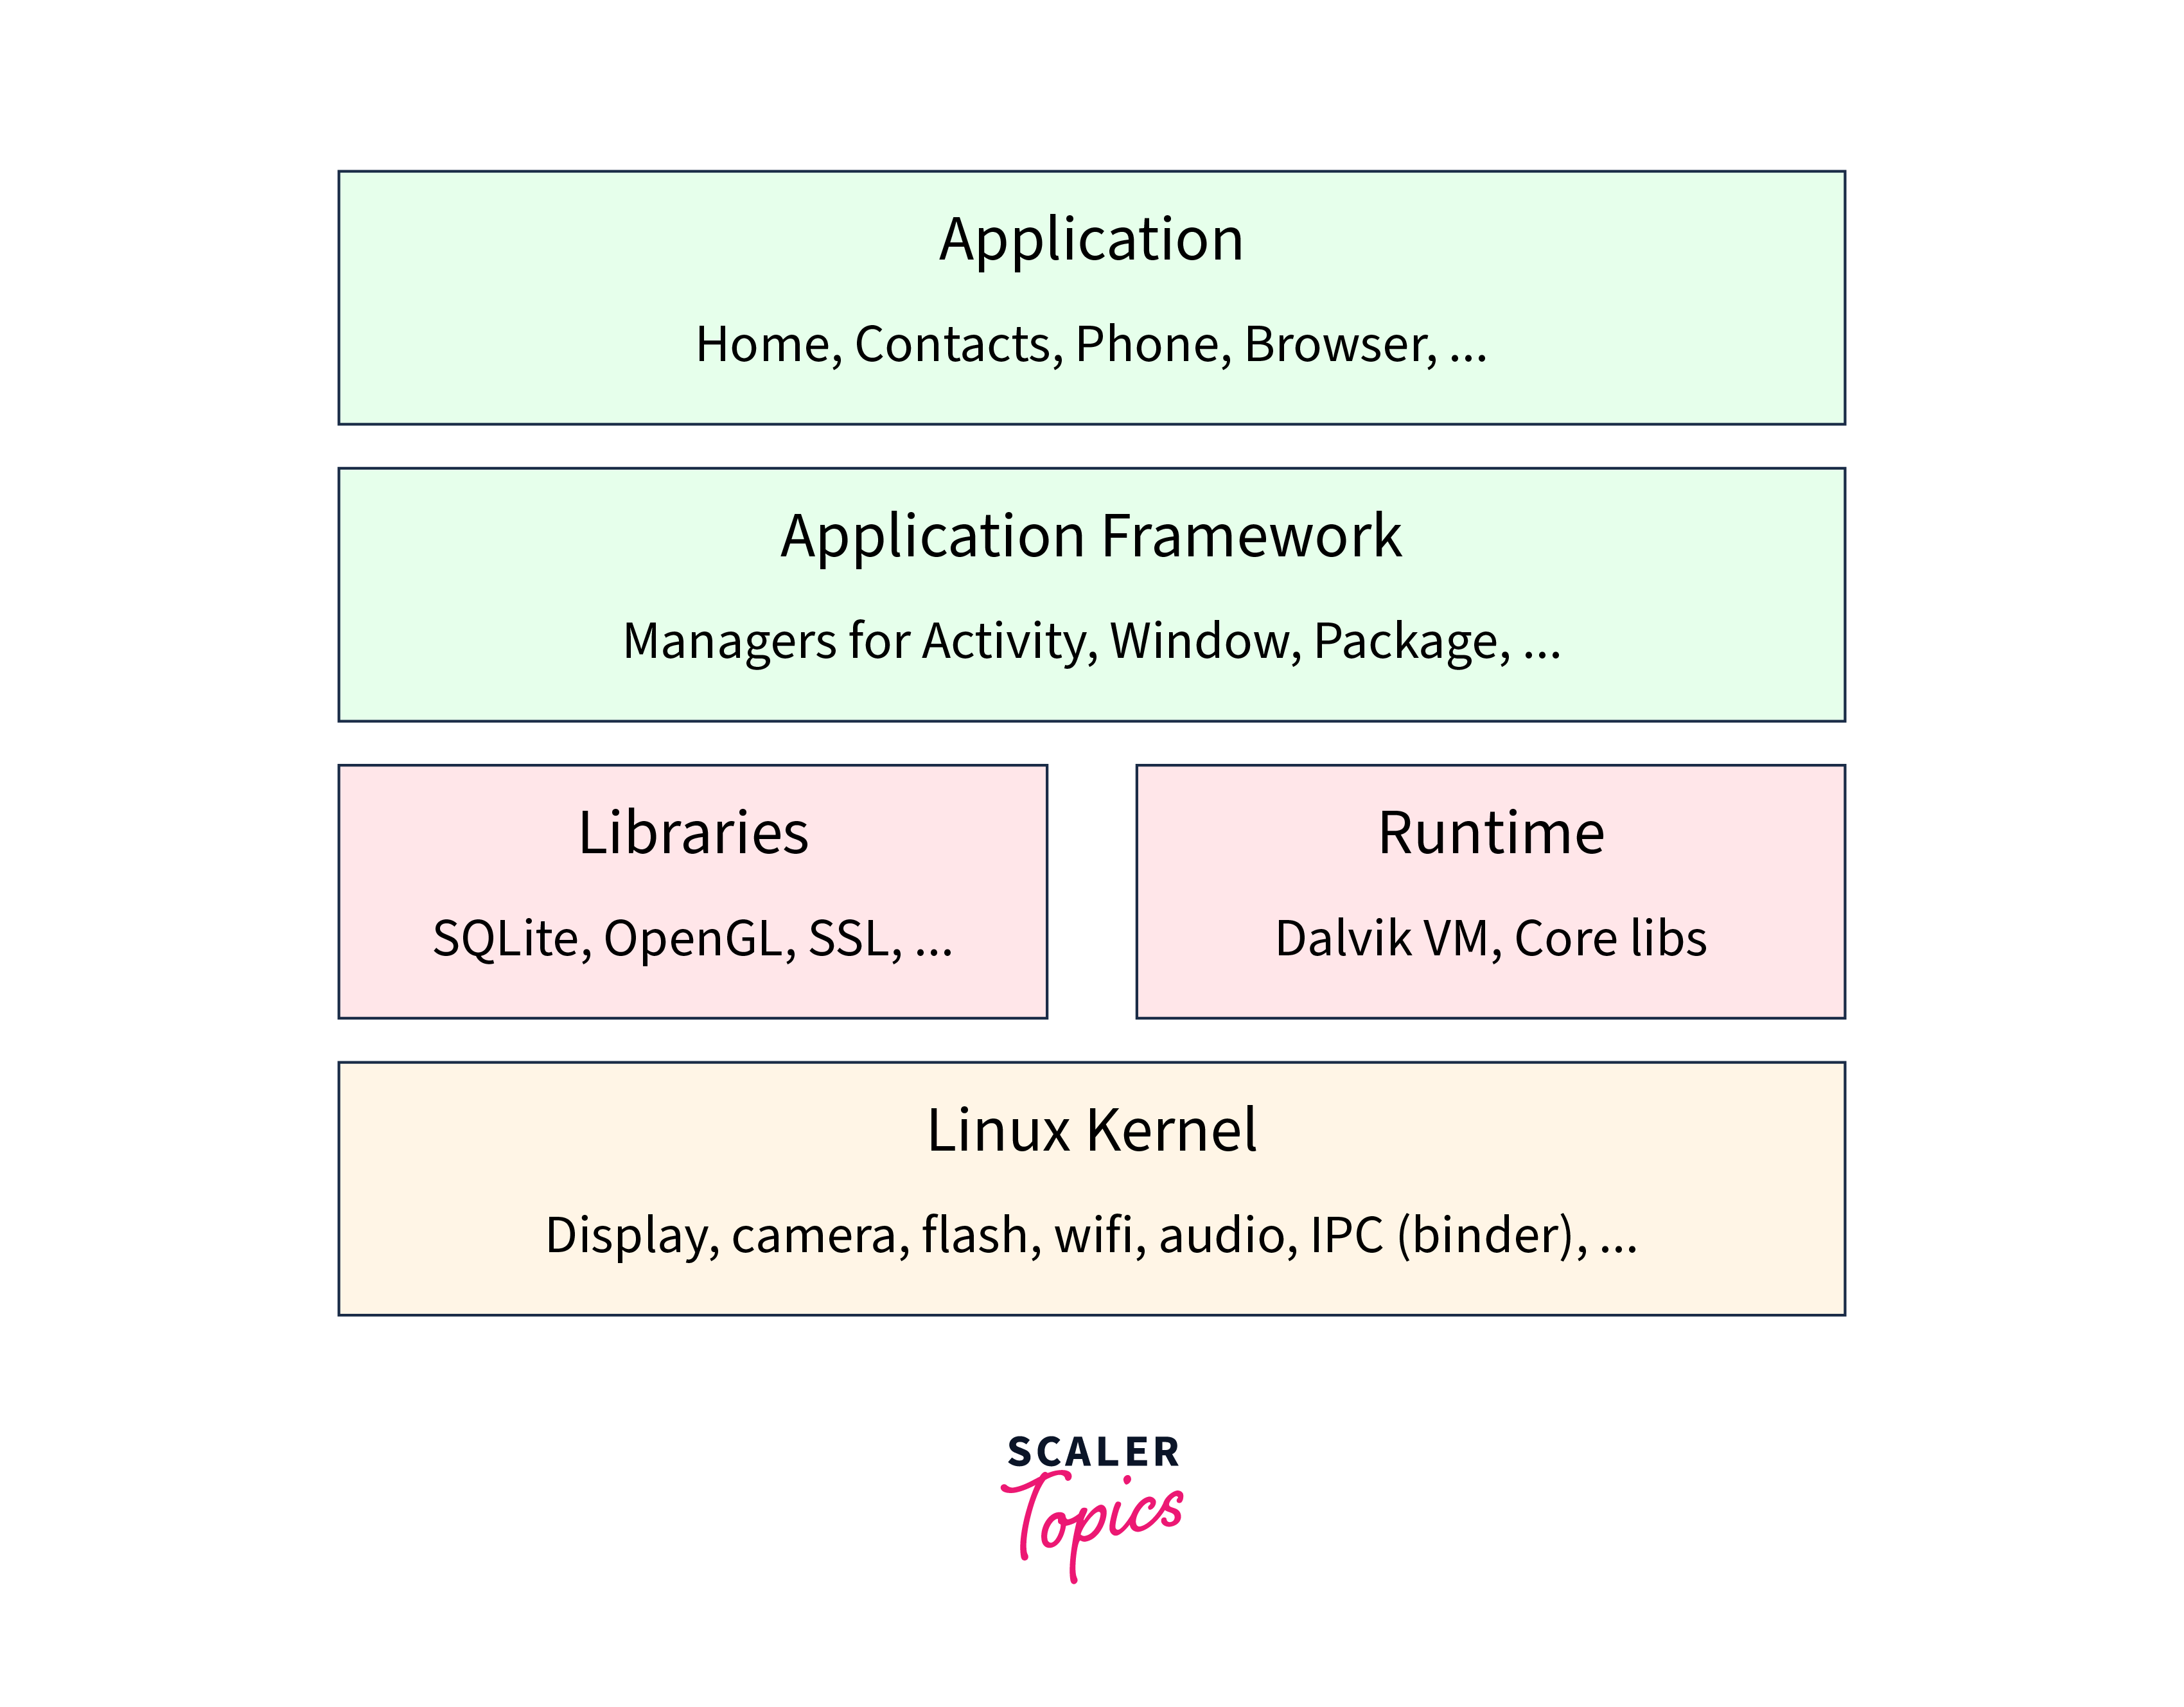
Understanding Android Architecture
Android architecture is based on a layered architecture that includes several components. Here is a brief overview of each component:
Linux kernel: The Linux kernel, which provides the core functionality of the Android operating system, also controls the hardware resources, including the CPU, memory, and input/output devices.
Libraries: A large number of the libraries included with Android provide supplementary functionality, such as support for graphics, databases, and network connectivity.
Android Runtime is made up of the Dalvik Virtual Machine (DVM) and the fundamental libraries. Their selection makes it simpler to launch and keep an eye on the applications while they work.
Application frameworks: The Application Framework is a collection of APIs that speeds up developers' development workflows. It includes several different elements, including activities, services, broadcast receivers, and content sources.
Applications: Android devices have a variety of pre-installed, subscription-based applications. Moreover, several apps are used for testing purposes before the release.
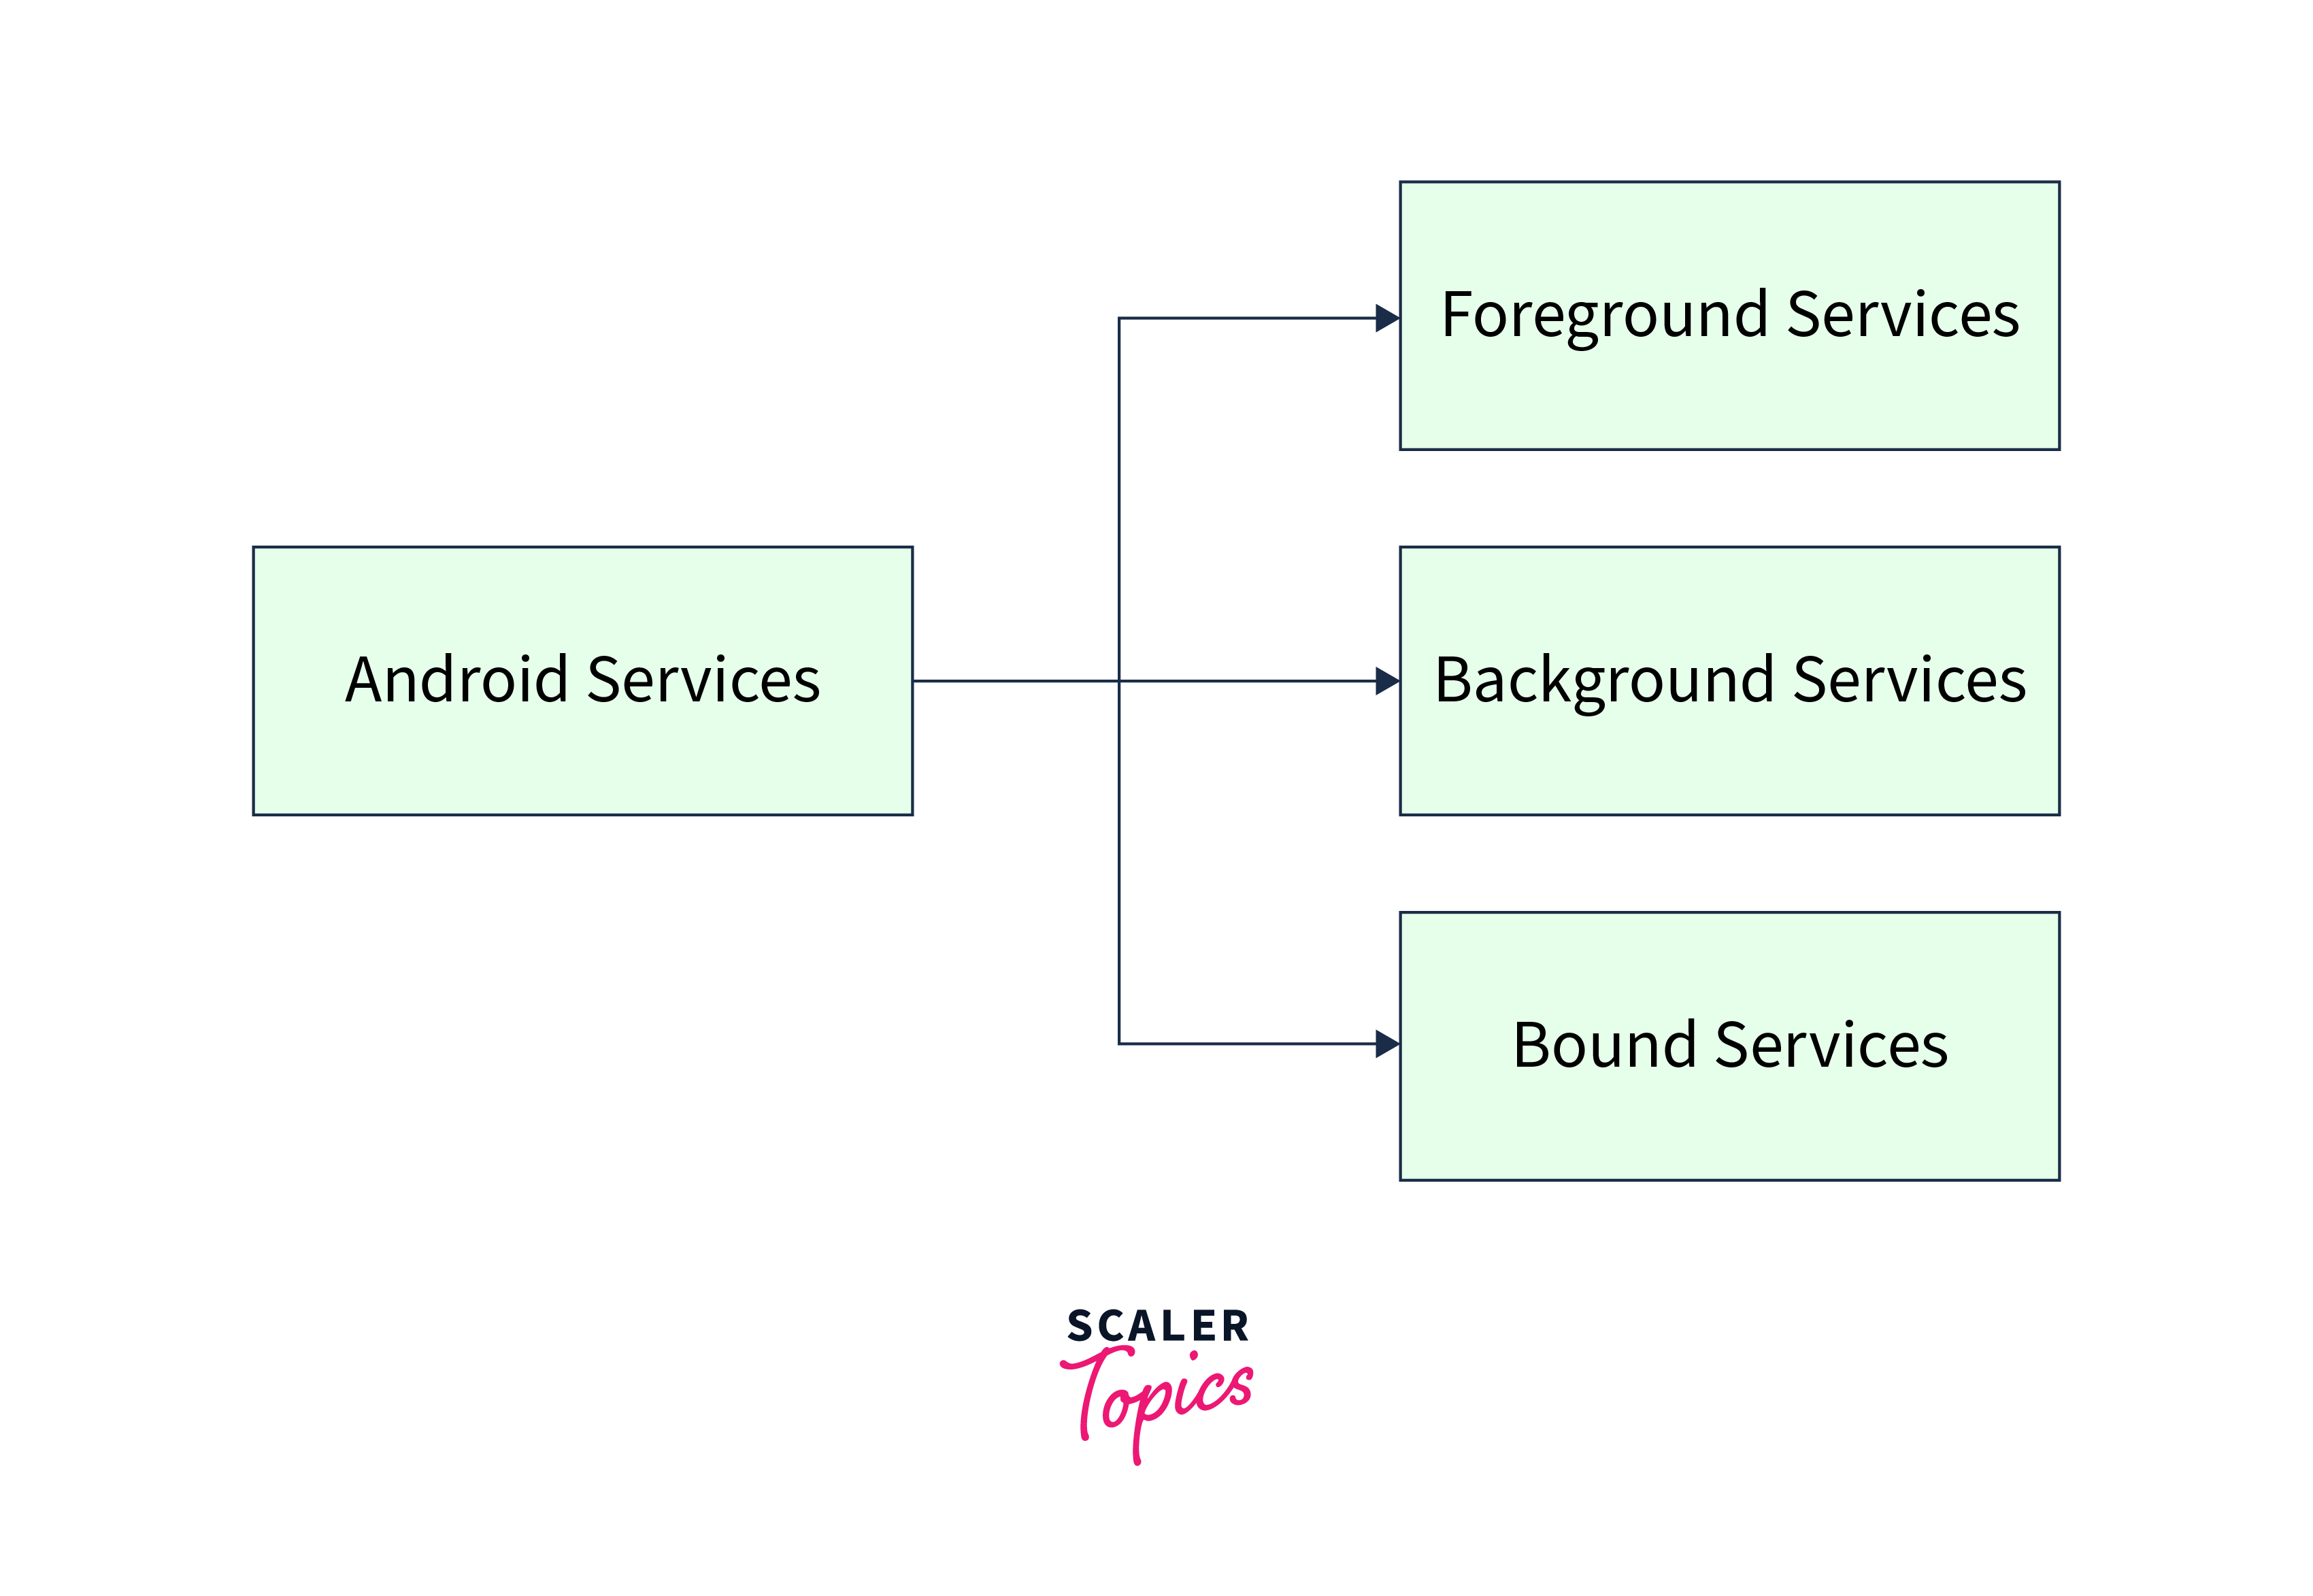
Android components are the basic building blocks of an Android application that perform particular functions. Activities, services, broadcast receivers, and content providers are some of these elements.
An activity is a visual interface or UI screen with which users can interact. It can be anything, from a simple screen with a "Hello World!" message to a login or signup page.
A service is a component of an Android app that operates in the background and can carry out a wide range of operations. Services do not require a user interface and can run in the background even when the app is not in use. For example, it can be used to download data or play music.
Broadcast receivers are components that can receive and respond to system-wide broadcast messages such as notifications or battery level changes in Android applications.
Content providers allow apps to share data with other apps securely and under controlled conditions. They are responsible for granting or denying access to data, depending on permissions granted.
User Interface Designs
There are several key factors to bear in mind while creating the user interface (UI) designs for an Android app. These are some important things to contemplate:
- Material Design: It is a set of design concepts and recommendations for making user interfaces that are simple to use and visually appealing on all platforms, including Android. It places a focus on the use of dependable visual components and animations, as well as on the use of simple, direct language and iconography.
- Screen Layout: Screen sizes and resolutions on Android devices vary widely, so it's critical to keep this in mind when designing your app's user interface. To make sure that your UI scales correctly across various screen sizes, take into account employing responsive layout strategies, such as using ConstraintLayout.
- Navigation: Navigation is an important part of any app's UI, and there are several options available in Android. The most common are the ActionBar (appears at the top of the screen) and the NavigationDrawer (slides in from the left).
- Color Palette: Using a consistent color palette throughout your app can help give it a cohesive and professional look.
- Custom Views: Creating custom views and widgets can offer unique and functional interfaces.
Building More Complex Apps
- Before beginning to code, plan out your app's architecture. You can use this to define what different parts your app will have, how they'll work together, and how data will move through it.
- Dividing your software into separate sections will help. As a result, the code is simpler to manage and debug, and the app may be updated or changed with more flexibility.
- When creating your app, consider user experience. Consider how your users will engage with the app, put themselves in their position, and make sure the user interface is simple to understand and use.
- As the complexity of your app increases, optimize your application for performance. Database queries can be simplified or cached to achieve this.
- To make sure that your software functions as intended and is free of bugs and mistakes, test it carefully using both manual and automated testing techniques.
Testing and Debugging Your App
Debugging and testing are essential stages in the creation of apps. It is crucial to properly test your software before publishing it to make sure it is reliable and functions as planned. Both manual testing and automated testing software can be applied to this.
To ensure that your software functions properly across several platforms, test it on a variety of hardware and operating systems before developing it. If defects or failures are discovered, it's crucial to properly debug them to find the root cause and fix it as soon as possible.
Have a look at some of the techniques for effectively testing and debugging your app:
- Real-time app debugging is possible with Android Studio's integrated debugger. To find bugs and errors, you can place breakpoints in your code and walk through them.
- Another crucial tool for app debugging is logging. View logs and look for problems in your app using the Android Logcat tool.
- You may track and report app crashes using crash reporting tools like Firebase Crashlytics. This enables you to find the problems causing your app to crash and resolve them.
Publishing Your App
- Create a Developer Account: You need to create a developer account on the Google Play Console website and pay a one-time registration fee.
- Prepare Your App: Ensure your app is ready for release by testing it thoroughly, optimizing it for performance, and adhering to Google's guidelines and policies.
- Create a Listing: Create a listing for your app on the Google Play Console, including a title, description, screenshots, and other information that will help potential users understand what your app does and why they should download it.
- Upload Your App: Upload your app's APK file to the Google Play Console, along with any other necessary files, such as graphics or videos.
- Publish Your App: Once you've completed all the necessary steps, you can publish your app to the Google Play Store. It will usually take a few hours for your app to become available for download.
- App Monitoring: After publishing your app, you can use the Google Play Console to manage your app's performance, track downloads, and user feedback, and push any updates to your app when needed.
Further reading
If you want to learn more about the Android Operating System, you can read it here.
Conclusion
- Integrated Development Environment (IDE) offers a complete environment for software development to create a single application.
- Version Control System (VCS) makes version management and collaboration possible by tracking changes made to a codebase or file over time. version control system (VCS) makes version management and collaboration possible by tracking changes made to a codebase or file over time.
- Android architecture consists of different layers including Linux Kernel, Libraries, Android Runtime, Application Framework, and Applications.
- Material Design emphasizes creating user interfaces that are straightforward, simple to use, and visually appealing across all platforms. It also places a strong emphasis on iconography, uniform visual elements, and animations.