Dependency Injection in Android
Dependency injection (DI) is a technique widely used in programming and well suited to Android development. By following the principles of DI, you lay the groundwork for good app architecture. Implementing dependency injection provides you with the following advantages: Reusability of code Ease of refactoring Ease of testing
What is Dependency Injection?
What is Dependency?
In software development, a dependency represents the relationship between different parts of a program, just like the interdependencies of components in a house. Components or modules rely on each other to function correctly, and dependencies can be other modules, libraries, or resources necessary for proper operation.
For example, a login feature may depend on a database module to handle user information. Without dependencies, components cannot work as intended.
What is Injection?
Injection in software development refers to the process of supplying dependencies to a component or module from an external source. It allows modules to receive the necessary dependencies they need to function without creating or managing them internally.
Injection promotes loose coupling and modular design by decoupling modules from specific implementations of their dependencies.
There are different types of injection techniques commonly used, such as:
- Constructor injection
- Field injection (or setter injection)
- Method injection
These techniques determine how dependencies are passed to a module or component.
Definition of Dependency Injection
In simpler terms, dependency injection is about "handing over" the required dependencies to a component, rather than the component creating or finding them on its own.
Dependency Injection Android is a design pattern and technique used to manage and provide dependencies to various components of an Android application. It is a way to implement an inversion of control, where the responsibility of creating and providing dependencies is shifted from the components themselves to an external entity.
Three Major Ways to Perform Dependency Injection in Android
Constructor Injection
Constructor injection involves passing dependencies to a component through its constructor. The dependencies are declared as parameters in the constructor, and when an instance of the component is created, the dependencies are provided and initialized. This ensures that the component has all its dependencies available right from the start. Constructor injection promotes immutability and makes dependencies explicit.
Field Injection (or Setter Injection)
Field injection involves injecting dependencies into the fields of a component using annotations or setters. The dependencies are directly assigned to the fields or injected through setter methods after the component is created. Field injection allows for flexibility in terms of optional dependencies or late initialization.
Method Injection
Method injection involves injecting dependencies into a component through methods other than the constructor or setter methods. These methods are typically invoked after the component is created, and the dependencies are passed as arguments. Method injection provides flexibility for injecting dependencies at specific times or when certain conditions are met.
How Dependency Injection Works in Android?
The general workflow of how dependency injection works in Android can be summarized as follows:
Creating Dependencies
The dependencies used in the application are registered with the dependency injection framework or library. It involves associating an interface or abstract class with its concrete implementation.
Creating Components
When a component, such as an activity or fragment, needs to be created, the dependency injection framework is responsible for instantiating the component and resolving its dependencies.
Resolving Dependencies
During the component creation process, the dependency injection framework identifies the dependencies required by the component based on their registered types or annotations.
Injecting Dependencies
Once the dependencies are resolved, the framework injects them into the component using the chosen injection method (constructor injection, field injection, or method injection).
Utilizing Components
With the dependencies injected, the component can now use them to perform its intended functionality and the dependencies will now be provided externally.
Dependency Injection Advantages
Reduced Boilerplate Code
Dependency injection eliminates the need for manual instantiation and passing of dependencies, resulting in cleaner code with fewer boilerplate components and more focus on the actual business logic.
Improved Testability
By decoupling dependencies and allowing for easier mocking and substitution, dependency injection greatly enhances the testability of code and enables comprehensive unit testing during development.
Easier Maintenance
With dependency injection, Android apps can have changes to dependencies that can be centralized and managed through the configuration, making it easier to modify or update the behavior of an application without extensively modifying the codebase.
Better Modularity and Scalability
Dependency injection promotes modular design by breaking down complex systems into smaller, independent components, making them easier to understand, modify, and extend.
Implementing Dependency Injection in Android
Identify Dependencies
The first step is to identify the dependencies that would be required by an Android app. It can be an object or service that the app needs to function correctly, such as network clients, database managers, or API interfaces.
As an example, let's consider a simple scenario where our app requires a NetworkClient dependency to make API calls.
Create an Interface for the Dependency
Now, we need to define how these dependencies would be created. Here in our example, we'll have a NetworkClient.java that comprises the following code:
Implement the Dependency
As we have now created the interface for the dependency, we need to have a class that implements this interface and is also the actual implementation for it. We'll name it NetworkClientImpl.java and it will override the method from the interface and provide its implementation.
Create a Component
Let's create a component that defines the dependency graph and provides instances of the dependencies when requested.
While using Dagger, a component is an interface annotated with @Component. We'll get to know more about Dagger in the upcoming section.
We'll now create a file called AppComponent.java which has the following code:
We also need to create a module that provides the implementation for the NetworkClient interface. Modules define how a dependency should be created.
Let's create a module NetworkModule.java with the following code:
Inject the Dependency
Now, the dependency needs to be injected into the desired class. Using Dagger, this injection process is performed by annotating the field, constructor, or method with the @Inject annotation.
In our example, the dependency NetworkClient will be injected into the ApiService.java class which contains the following code:
Popular Dependency Injection Libraries for Android
Dagger
Dagger is a widely used dependency injection framework for Android development.
Dagger helps in managing and injecting dependencies into various components of an Android app, such as activities, fragments, services, or other classes. It promotes modularity, testability, and maintainability by decoupling the creation and management of dependencies from the components themselves.
Key features associated with Dagger:
- Compile-time code generation
- Annotation-driven classes to specify dependencies, define injection targets, and configure the injection process (@Inject, @Component, @Module, and @Provides).
- Dependency graph to represent the relationship between the components and their dependency.
Koin
Koin is a lightweight dependency injection framework for Kotlin-based Android applications. It aims to provide a simple and easy-to-use API for managing dependencies in Android projects. Koin focuses on reducing the learning curve and minimizing boilerplate code associated with more complex dependency injection libraries.
Key features associated with Koin:
- Quick and easy to integrate into the Kotlin-based Android project
- leverages the power of Kotlin's domain-specific language (DSL) to define and configure dependencies with a clean and concise syntax.
- The module-based approach provides fine-grained control over dependency configuration.
- Flexible injection methods including constructor injection, property injection, and function injection
Toothpick
Toothpick is a dependency injection library for Android that provides compile-time validation of dependencies and offers a flexible and powerful approach to managing dependencies in your Android application.
Key features associated with Toothpick:
- Compile-time validation
- Constructor injection
- Lazy injection for any scenario to reduce the hassle of unnecessary dependency creation.
Hilt
Hilt is an official dependency injection library for Android that is built on top of Dagger and provides a simplified and streamlined approach to dependency injection in Android apps.
Key features associated with Hilt:
- Integration with Android Jetpack components like activities, fragments, services, and view models.
- Predefined injection components such as @AndroidEntryPoint and @ViewModelInject can handle the injection logic for Android classes
- Scoping of dependencies (@Singleton, @ActivityScoped, etc.) helps define the injected objects' lifespan and visibility.
Start Working with Dagger2 in Android (Field Injection)
Let's walk through an example to understand Dagger2 and its components. In this example, we'll create a simple Android app that displays a list of users fetched from a remote API.
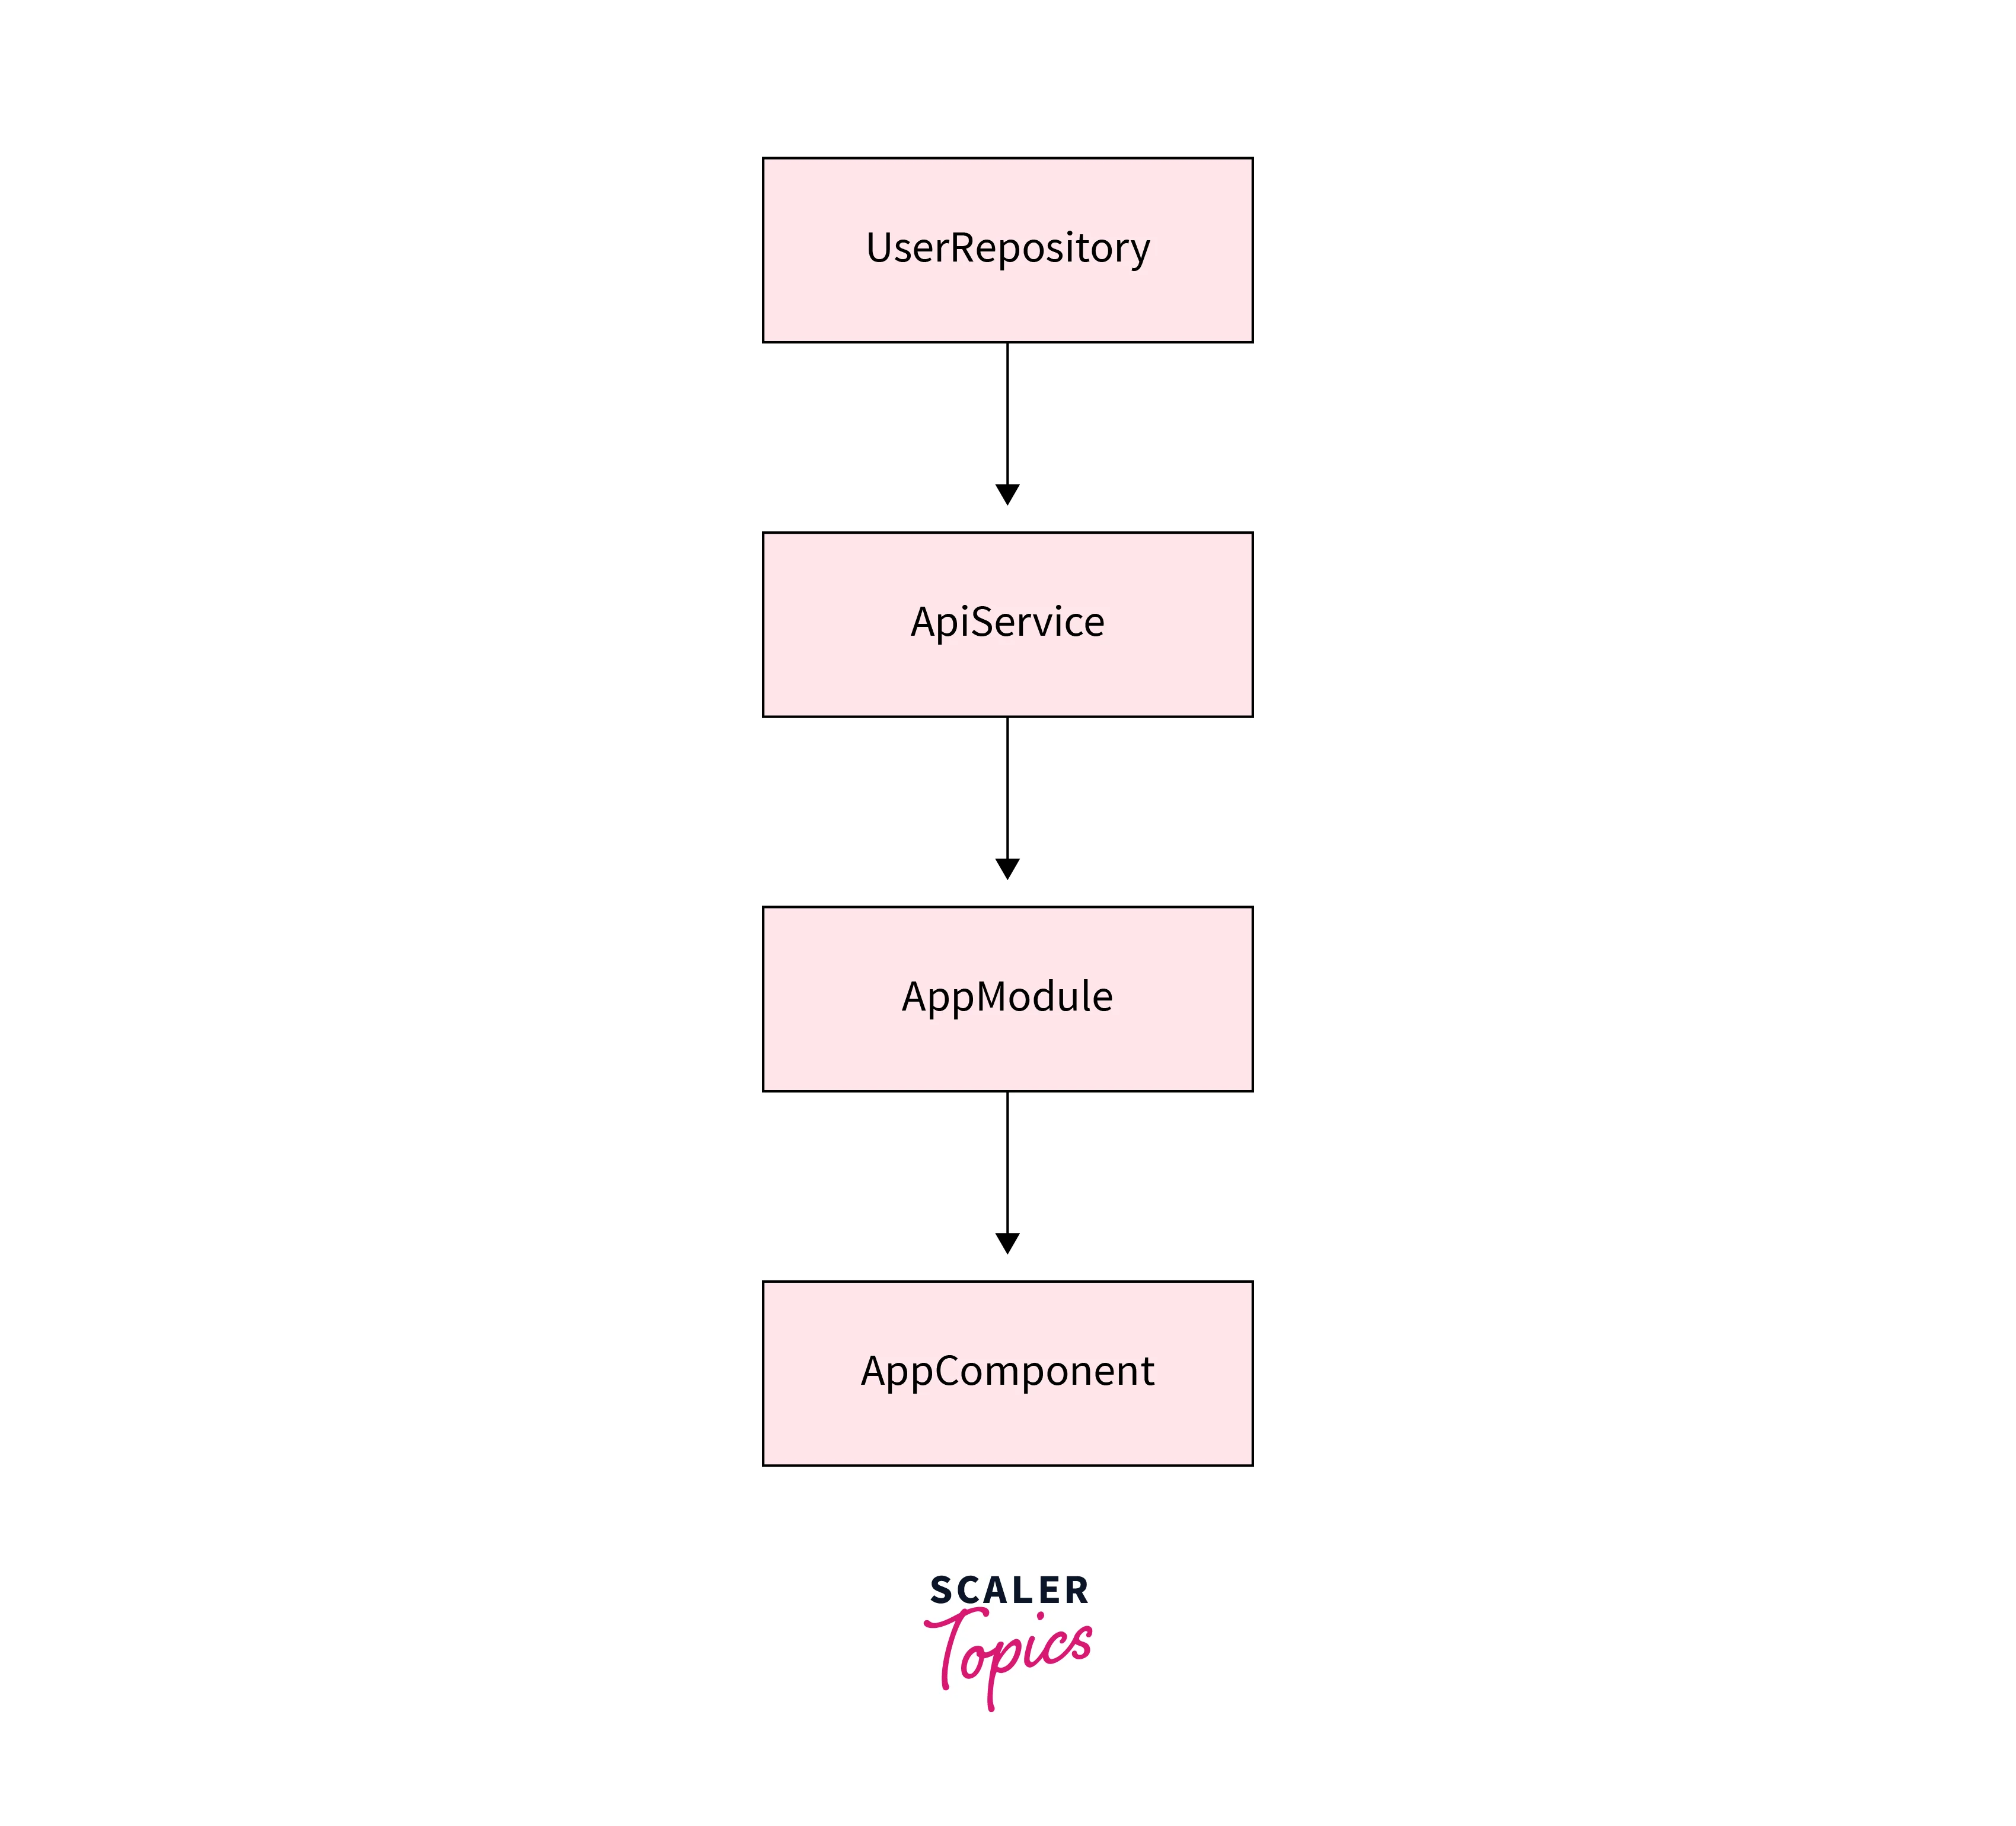
Let's start by defining the dependencies. We have a class UserRepository.java that handles the retrieval of user data from the remote API. It requires an instance of the ApiService class to make network requests.
In Dagger2, we also need to define a module that provides all the dependencies. Let's create a module by the name AppModule.
In this module, we define two @Provides methods. The first method provides an instance of ApiService, and the second method provides an instance of UserRepository, injecting the required ApiService dependency.
In Dagger2, we also need to define a module that provides all the dependencies. Let's create a module by the name AppModule. In this module, we define two @Provides methods. The first method provides an instance of ApiService, and the second method provides an instance of UserRepository, injecting the required ApiService dependency.
Now, we need to have a component interface that comprises the code with @Component annotation, which tells Dagger2 to generate a container for the dependencies in the specified modules. In our case, we'll include AppModule.java.
The AppComponent interface also contains an inject() method that takes an instance of the MainActivity class. This method allows Dagger2 to inject the required dependencies into the MainActivity object.
Here's an illustration of the dependency graph:
Now, to use Dagger2 in the MainActivity file, here are some steps to follow:
Initially, begin with declaring a field for the UserRepository in the MainActivity.java and annotate it with @Inject.
Now, create an instance of the AppComponent and use the inject() method to inject all the dependencies into the MainActivity.java file.
By calling inject(this) on the AppComponent, Dagger 2 will automatically inject the dependencies into the MainActivity, including the UserRepository.
Adding Dependencies
In our example, we already have the UserRepository and ApiService classes. Now, let's add another dependency, UserAdapter, which is responsible for displaying the list of users in our app.
Dagger Modules
To provide the UserAdapter dependency using Dagger modules, we can define a module called AdapterModule:
Explanation:
The @Provides method in the AdapterModule provides an instance of UserAdapter, taking the UserRepository as a parameter.
Dagger Subcomponents
To create a subcomponent for MainActivity, we can define an interface called MainActivityComponent:
Explanation:
The @Subcomponent annotation is used to create a subcomponent. Here, we include the AdapterModule as the module used by the subcomponent.
To expose the MainActivityComponent in the main component, we need to modify the AppComponent interface in this manner:
By adding the mainActivityComponent() method to the AppComponent, we expose the factory method for creating instances of the MainActivityComponent.
Now comes the final part: injecting the MainActivity class:
Explanation:
By doing this, Dagger will automatically inject the dependencies into the MainActivity, including the UserRepository and UserAdapter.
Best Practices for Using Dependency Injection in Android
Use Constructor Injection
Constructor injection is considered the recommended approach for injecting dependencies. By using constructor injection, you ensure that the required dependencies are explicitly defined and provided when creating an instance of a class.
Keep Dependencies Simple
It's advisable to keep your dependencies as simple as possible. Complex dependencies can make the code harder to understand and maintain. It's better to aim for single responsibility and modular design when defining dependencies.
Use Scopes
Scopes allow you to control the lifespan and sharing of dependencies. By defining custom scopes, you can specify that certain dependencies should have a specific lifespan tied to a particular context or component. Scopes can help manage resource usage and prevent unnecessary object creation. Popular DI frameworks like Dagger provide built-in support for scopes.
Avoid Injecting too Many Dependencies
Be mindful of the number of dependencies you inject into a class. Having too many dependencies can make the class complex and hinder its reusability. If a class requires a large number of dependencies, it might be a sign that the class is taking on too many responsibilities. Consider refactoring the class into smaller, more focused components.
Common Pitfalls of Using Dependency Injection in Android
Overuse of Dependency Injection
While dependency injection Android is a powerful technique, it's important to avoid overusing it. Injecting every single dependency can lead to an overly complex and rigid design.
Complexity of Dependency Graphs
As your project grows, the dependency graph can become complex, especially in larger applications. This complexity can make it challenging to understand and maintain the dependencies between different components.
Performance Overhead
Dependency injection frameworks like Dagger introduce some performance overhead compared to the manual instantiation of objects. The framework needs to analyze and generate code during the compilation process, which can increase build times.
Conclusion
- Dependency injection Android is a design pattern that allows for the inversion of control in software development.
- It helps reduce boilerplate code by providing dependencies to classes rather than requiring them to create their dependencies.
- Popular dependency injection libraries for Android include Dagger, Koin, Toothpick, and Hilt.
- Hilt is a dependency injection library designed for Android that integrates with Jetpack libraries and simplifies Android-specific dependencies.
- When implementing dependency injection, it is important to identify dependencies, create interfaces for dependencies, implement the dependency classes, create components to manage the dependencies, and inject the dependencies into the desired classes.