View Binding in Android
Overview
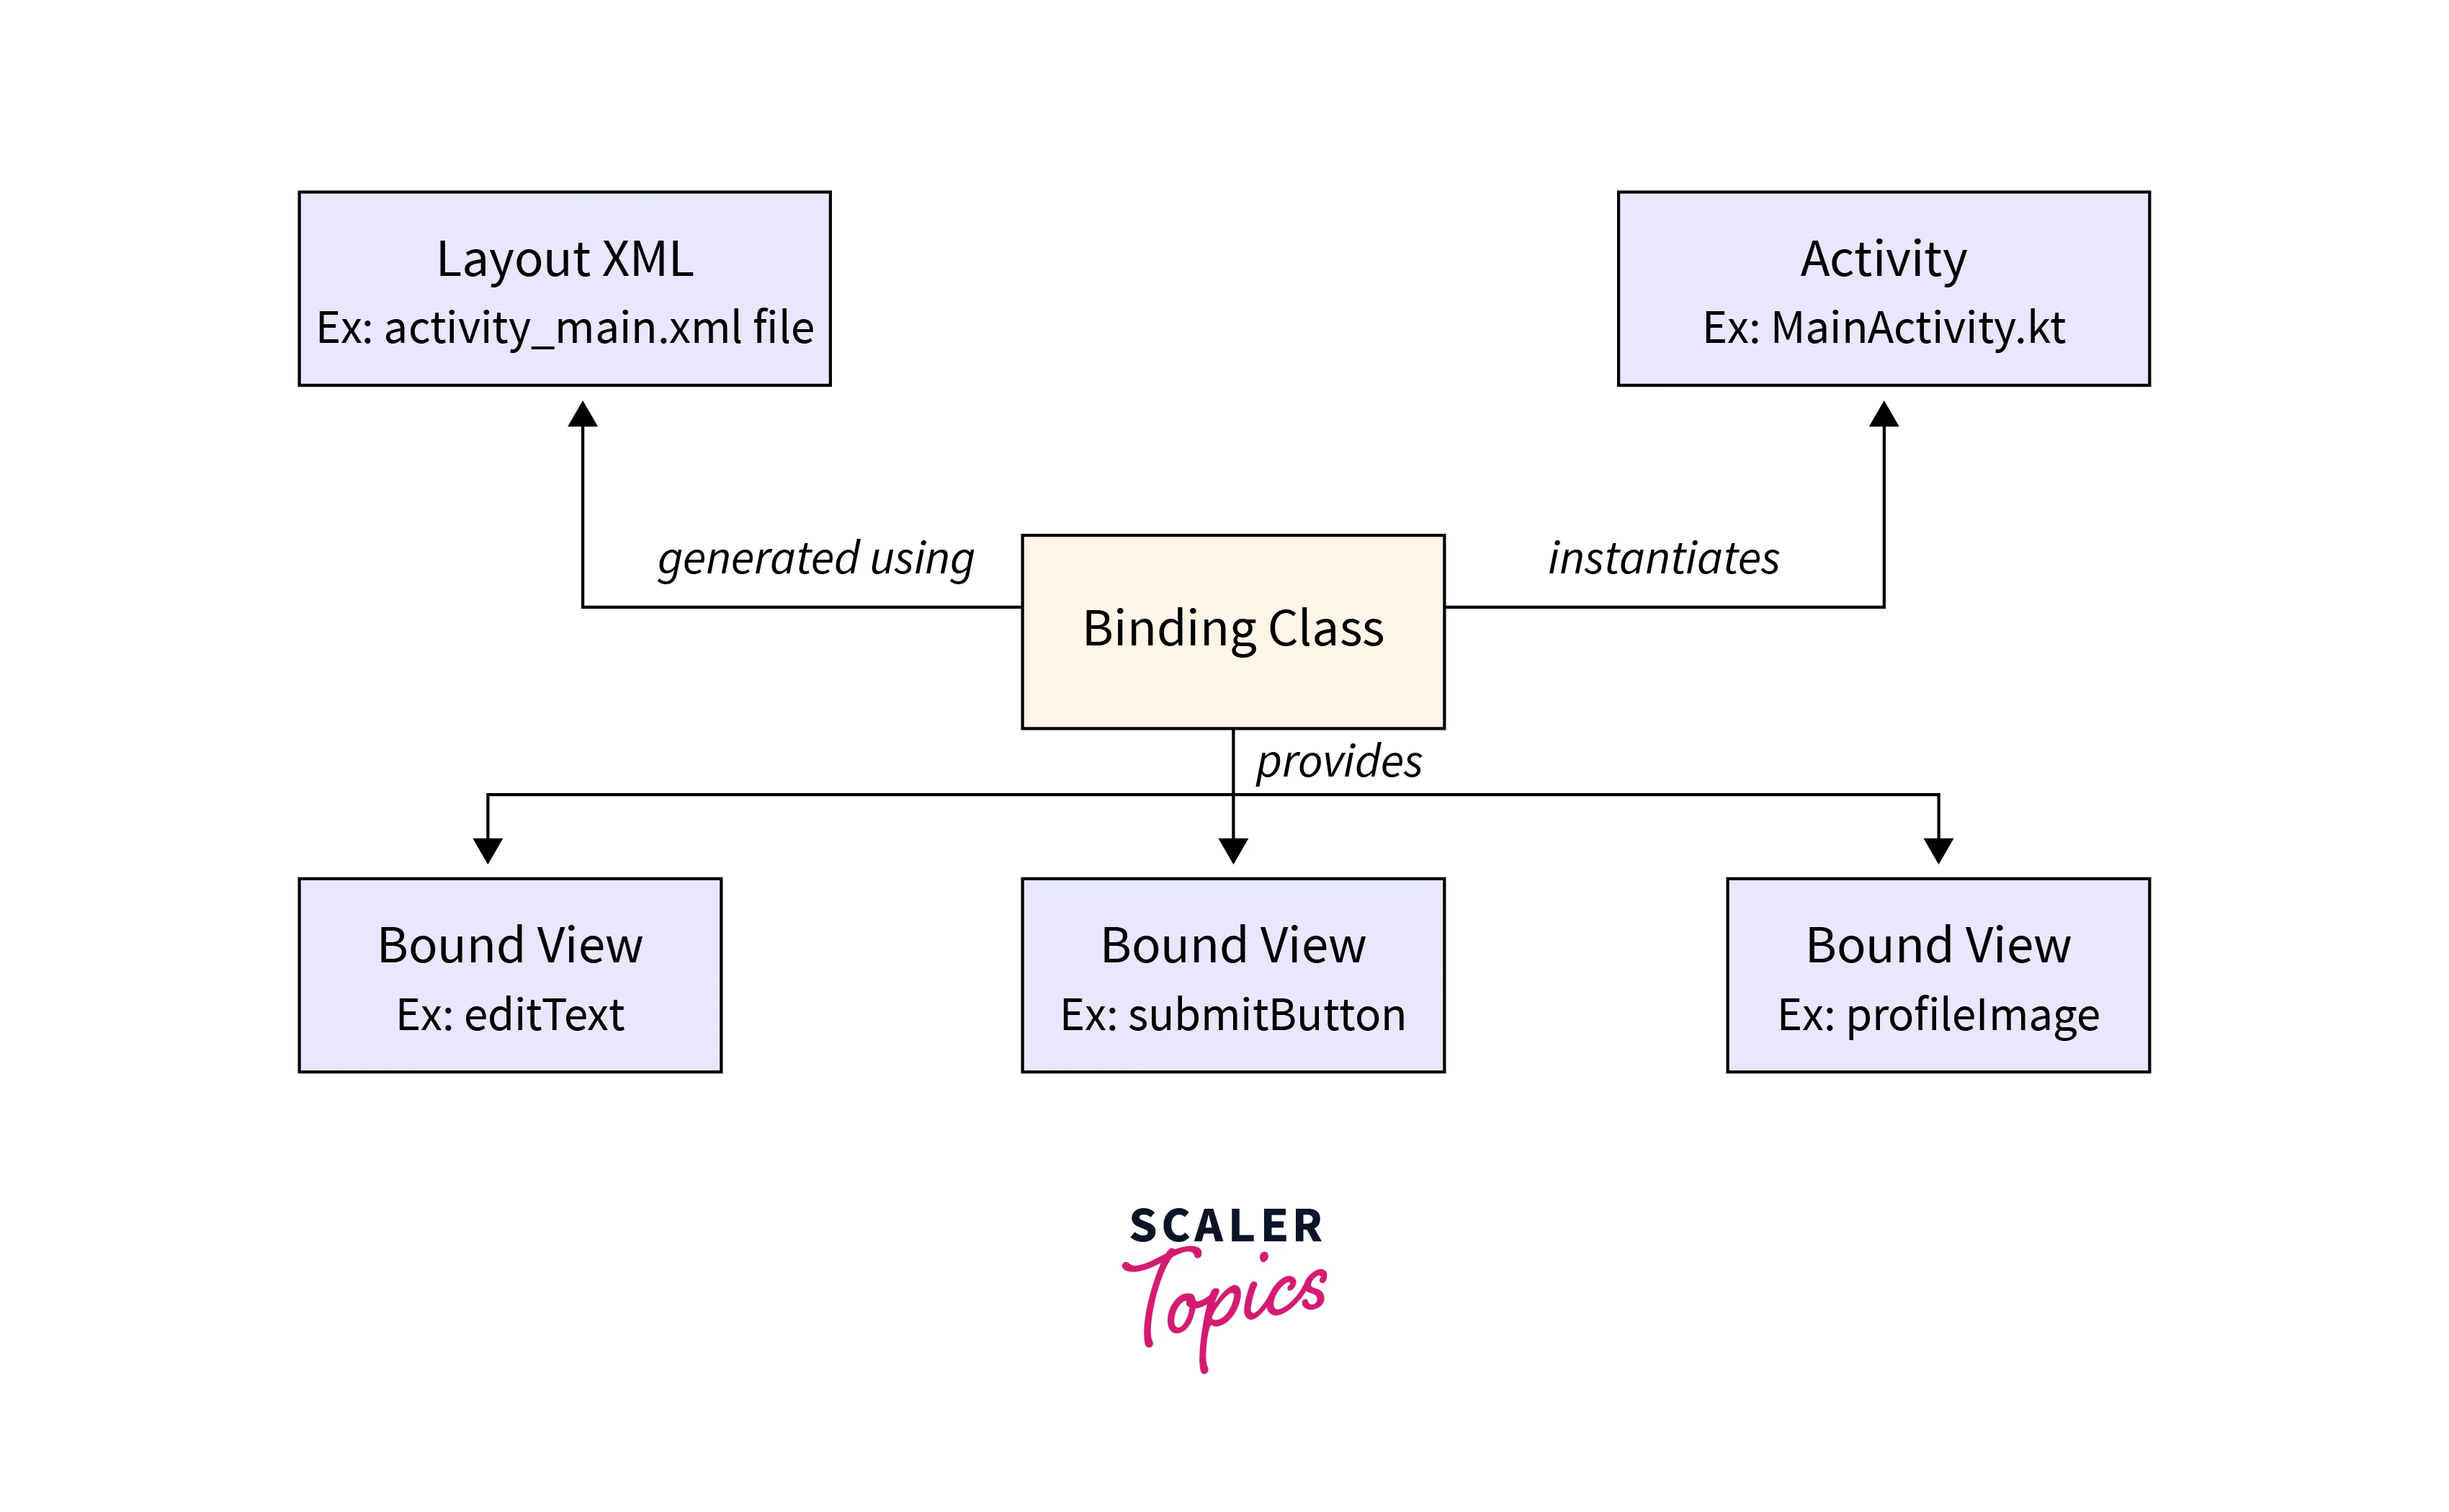
View Binding is a feature in Android Studio 3.6 and above that simplifies the process of interacting with views in Android applications. It serves as a replacement for the traditional findViewById() method, offering a more efficient and type-safe way to access views in XML layouts.
It provides compile-time safety, as the binding class contains references to views with their correct types, eliminating the possibility of runtime errors due to incorrect view casting.
Why do we Need View Binding?
When it comes to View Binding, Android Jetpack Library simplifies the process of accessing views in an Android application. Without the need for findViewById() calls, it generates a binding class for each XML layout file in your project, which allows you to directly access the views defined in that layout.
It enhances code efficiency, readability, and safety while reducing the likelihood of bugs and crashes. By adopting View Binding, you can streamline your development workflow and create more robust and maintainable Android apps.
Advantages of View Binding
Null Safety
View Binding Android provides null safety guarantees, ensuring that views are non-null when accessed. This eliminates the risk of facing NullPointerExceptions and improves the stability of an application. The generated binding classes ensure that views are available for use without the need for null checks.
As an instance, here's a TextView in a layout file where we'll try to directly access it without the need to consider the possibility of null references. Why? Because View Binding ensures safety against null references.
Since View Binding guarantees that textView is non-null, we can confidently access its properties and methods without the need for explicit null checks.
Type Safety
View Binding Android provides compile-time type safety, ensuring that you access views with the correct types. The generated binding classes have references to the views with their appropriate types, avoiding potential class cast exceptions or type mismatches at runtime. This helps catch errors early during compilation.
For instance, we can deliberately try to access a TextView as an EditText.
Explanation:
With the help of View Binding, Android can perceive the issues before running the application.
In the above case, a class cast exception would occur as we are trying to cast a TextView to an EditText and they are both different view types. This is possible because the generated binding class ensures type safety and prevents any incorrect type assignments.
It can also be useful for any type of mismatches or view casting issues.
Here are a few examples of such issues.
Ease of Use
View Binding Android simplifies the process of accessing views in your layout files. It eliminates the need for manual view lookup using findViewById() and provides a more straightforward and concise way to reference views. By accessing views directly through the binding object, you can write cleaner and more readable code.
For example, without View Binding, we need to assign the view id to the button via the findViewById() method and then apply a click listener so that it responds to any event in a specific way.
Explanation:
Now, we can directly reference the button by using the binding object and concisely handle the click event.
Here's how the objects are created from the layout file.
What do you Need for View Binding?
Android Studio 3.6 or Higher
View Binding was introduced in Android Studio 3.6, so you need to have this version or a newer one installed on your development machine.
Android Gradle Plugin 3.6 or Higher
The Android Gradle Plugin is responsible for building and packaging your Android app. To use View Binding, you need to have the Android Gradle Plugin version 3.6 or a higher version specified in your project's build.gradle file.
Which Language you can Use for this?
For using View Binding in Android development, you can use both Java and Kotlin as the programming language. The View Binding feature is supported by both languages.
The View Binding can be enabled by just a simple configuration in the build.gradle file and it's the same for both Java and Kotlin.
Here's a common example to demonstrate how we can use View Binding in both languages.
Java
Initially, the generated binding class has to be imported in the Activity file and the setContentView() inside the onCreate() method has to be replaced in this manner.
Kotlin
Setup Step-by-Step Implementation
Step - 1: Create an Empty Activity Project
- Open Android Studio and create a new Android project.
- Select an Empty Activity as the template for the project creation.
Step - 2: Enabling the Viewbinding Feature
We need to enable the View Binding feature in the build.gradle file by setting it as true. We just need to add the following code inside the android{} in the gradle file.
For your convenience, you can see here in the complete build.gradle file where the above code has to be added.
Step - 3: Working with the "activity_main.xml" File
The layout of the MainActivity will have a TextView and a button. The content of the TextView can be altered at the click of the button. A simple LinearLayout can be used for this application.
Step - 4: Working with the Mainactivity File
Here, we need to create an instance of View Binding and access the same with the help of the setContentView() method.
Output:


Comparison with Data Binding
View Binding is primarily focused on simplifying view access by generating a binding class for each layout file. It provides direct references to views, enhancing code readability and eliminating the need for findViewById() calls.
Data Binding, in addition to simplifying view access, enables the binding of data between views and data sources (e.g., model classes). It allows for automatic updates of views based on changes in the data and facilitates two-way data binding.
| View Binding | Data Binding | |
|---|---|---|
| Complexity | Provides a straightforward way to access views in a type-safe manner without introducing additional complexity. | Provides advanced data binding capabilities, including data conversion, binding expressions, observable data, etc. |
| Performance | generates direct references to views, optimizing view access and improving app performance. | Comprises additional layer of data observation and binding expressions. It has no direct impact on the performance of most applications. |
| Ease of Integration | Requires minimal steps and integrates well with the Android Gradle Plugin. Compatible with Android versions from API level 14 and above. | Requires additional steps and configuration in the build.grade file. Supports backward compatibility via Data Binding Support Library. Compatible with Android versions beginning from API level 7. |
| Use cases | Provides simpler view access by providing view references. | Used for complex data manipulation between different views and models. |
Conclusion
- View Binding Android generates a binding class for each XML layout file, providing direct references to the views defined in that layout.
- It eliminates the need for findViewById() calls and makes the code more concise and readable.
- View Binding offers null safety by generating nullable or non-nullable references to views, reducing the risk of NullPointerExceptions.
- View Binding provides type safety by generating references with the correct types for each view, eliminating type-related errors.
- View Binding requires Android Studio 3.6 or higher and the Android Gradle Plugin 3.6 or higher.
- The tools:viewBindingIgnore attribute is used in an XML layout file to instruct the View Binding system to ignore that specific layout file during the View Binding process. It is typically used when you have certain XML files that you do not want to generate a corresponding binding class.
- View Binding requires minimal steps and integrates well with the Android Gradle Plugin.
- It is also compatible with Android versions from API level 14 and above.