AWS CLI Assume Role
Overview
Assume-role gives you access to a set of temporary security credentials that you may use to access AWS resources that you would not have ordinarily. These temporary credentials are made up of a security token, a secret access key, and an access key ID. AssumeRole is often used for access across accounts or inside your account. To call AssumeRole, you cannot use the root user credentials for your AWS account. To call AssumeRole, you must have credentials for either an IAM user or an IAM role.
Introduction
AssumeRole automatically generates temporary security credentials with a one-hour expiration time. The duration of your session, however, can be specified using the optional DurationSeconds argument. Up to the role's maximum session time option, you can enter a number between 900 seconds and 15 minutes. A value of 1 hour to 12 hours may be entered for this parameter.
In the IAM User Guide, under View the Maximum Session Duration Setting for a Position, you may find information on how to see the maximum value for your role. Both the AssumeRole API operations and the assume-role CLI commands have a maximum session duration limit.
A user must also have rights granted by the user account administrator to access a role in another account. A policy that enables the user to call AssumeRole for the ARN of the role in the other account must be attached by the administrator. You can choose between the following options if the user and the role are in the same account:
- Include a policy with the user (identical to the previous user in a different account).
- Directly include the user as a principal in the trust policy for the job.
The trust policy serves in this instance as an IAM resource-based policy. No specific authorization is required for users in the same account as the role to take on the position.
An administrator must grant you the permissions necessary to pass session tags. The administrator can also create granular permissions to allow you to pass only specific session tags. For more information, see Tutorial: Using Tags for Attribute-Based Access Control in the IAM User Guide.
Tag key-value pairs can be sent forward to your session. Session tags are the name given to these tags. Visit Passing Session Tags in STS in the IAM User Guide for additional details on session tags.
The session tags can be made transitive. During role chaining, transitive tags remain active.
Pre-requisites
Configuring Your AWS Connection
The OneLogin admin portal's AWS Multi-Account app must first be configured before you can use this CLI utility.
You should check the OneLogin portal login to AWS after the initial setting is finished. You're ready to go on to the enjoyable portion if everything went according to plan.
There are two versions of the CLI client select Java and Python:
-
Java Runtime:
It is necessary to have Java 7.0 installed to use this CLI client, which was created in Java. -
Python:
Python is compatible with versions 2 and 3.
Installation of the Java Version
Although the OneLogin AWS CLI client's whole source code is accessible on Github, we advise utilizing the precompiled distribution if you want to get started right away.
-
From the GitHub repository's /dist folder, download the onelogin-AWS-cli.jar binary file and onelogin.sdk.properties configuration file. These files must all be located in the same location on your computer.
-
A valid set of OneLogin API credentials should be added to onelogin.sdk.properties. You will at the very least require login credentials that have Authentication Only access set up.
To learn more about creating credentials, visit Working with API Credentials.
- client_id:
The OneLogin API Client ID, client id, must be legitimate. - client_secret:
The relevant OneLogin API Client Secret. - region:
the territory of the OneLogin instance is indicated by the word "region". US or EU are both valid values. - ip:
Provide this parameter and set its value to the whitelisted IP address that has to be disregarded if you're using this API in a situation where MFA is required and you need to be able to abide by the MFA requirements about IP address whitelisting.
Installation of the Python Version
On Github, you can get the whole source code for the OneLogin AWS CLI client.
The GitHub repository has detailed instructions for usage and installation that are comparable to those for the Java version.
Configuration Options
Check out the instructions included in the jar for a comprehensive list of setup options.
How Does It Work?
Using this tool is as easy as following the steps, provided your AWS Multi-Account app is configured appropriately and you are using valid API credentials.
-
Run the jar file at a terminal after opening it.
-
The following OneLogin account information will be requested of you right away.
- Username
- Password
- AWS App Id:
By looking at the URL for the AWS Multi-Account App in your OneLogin interface, you may get this number. - OneLogin Instance Sub Domain:
Using the example above, your subdomain would be awesome if you logged in at https://amazing.onelogin.com.
-
The choice of a device and the entry of a token will be requested if MFA is enabled. You will omit this step if that is not the case.
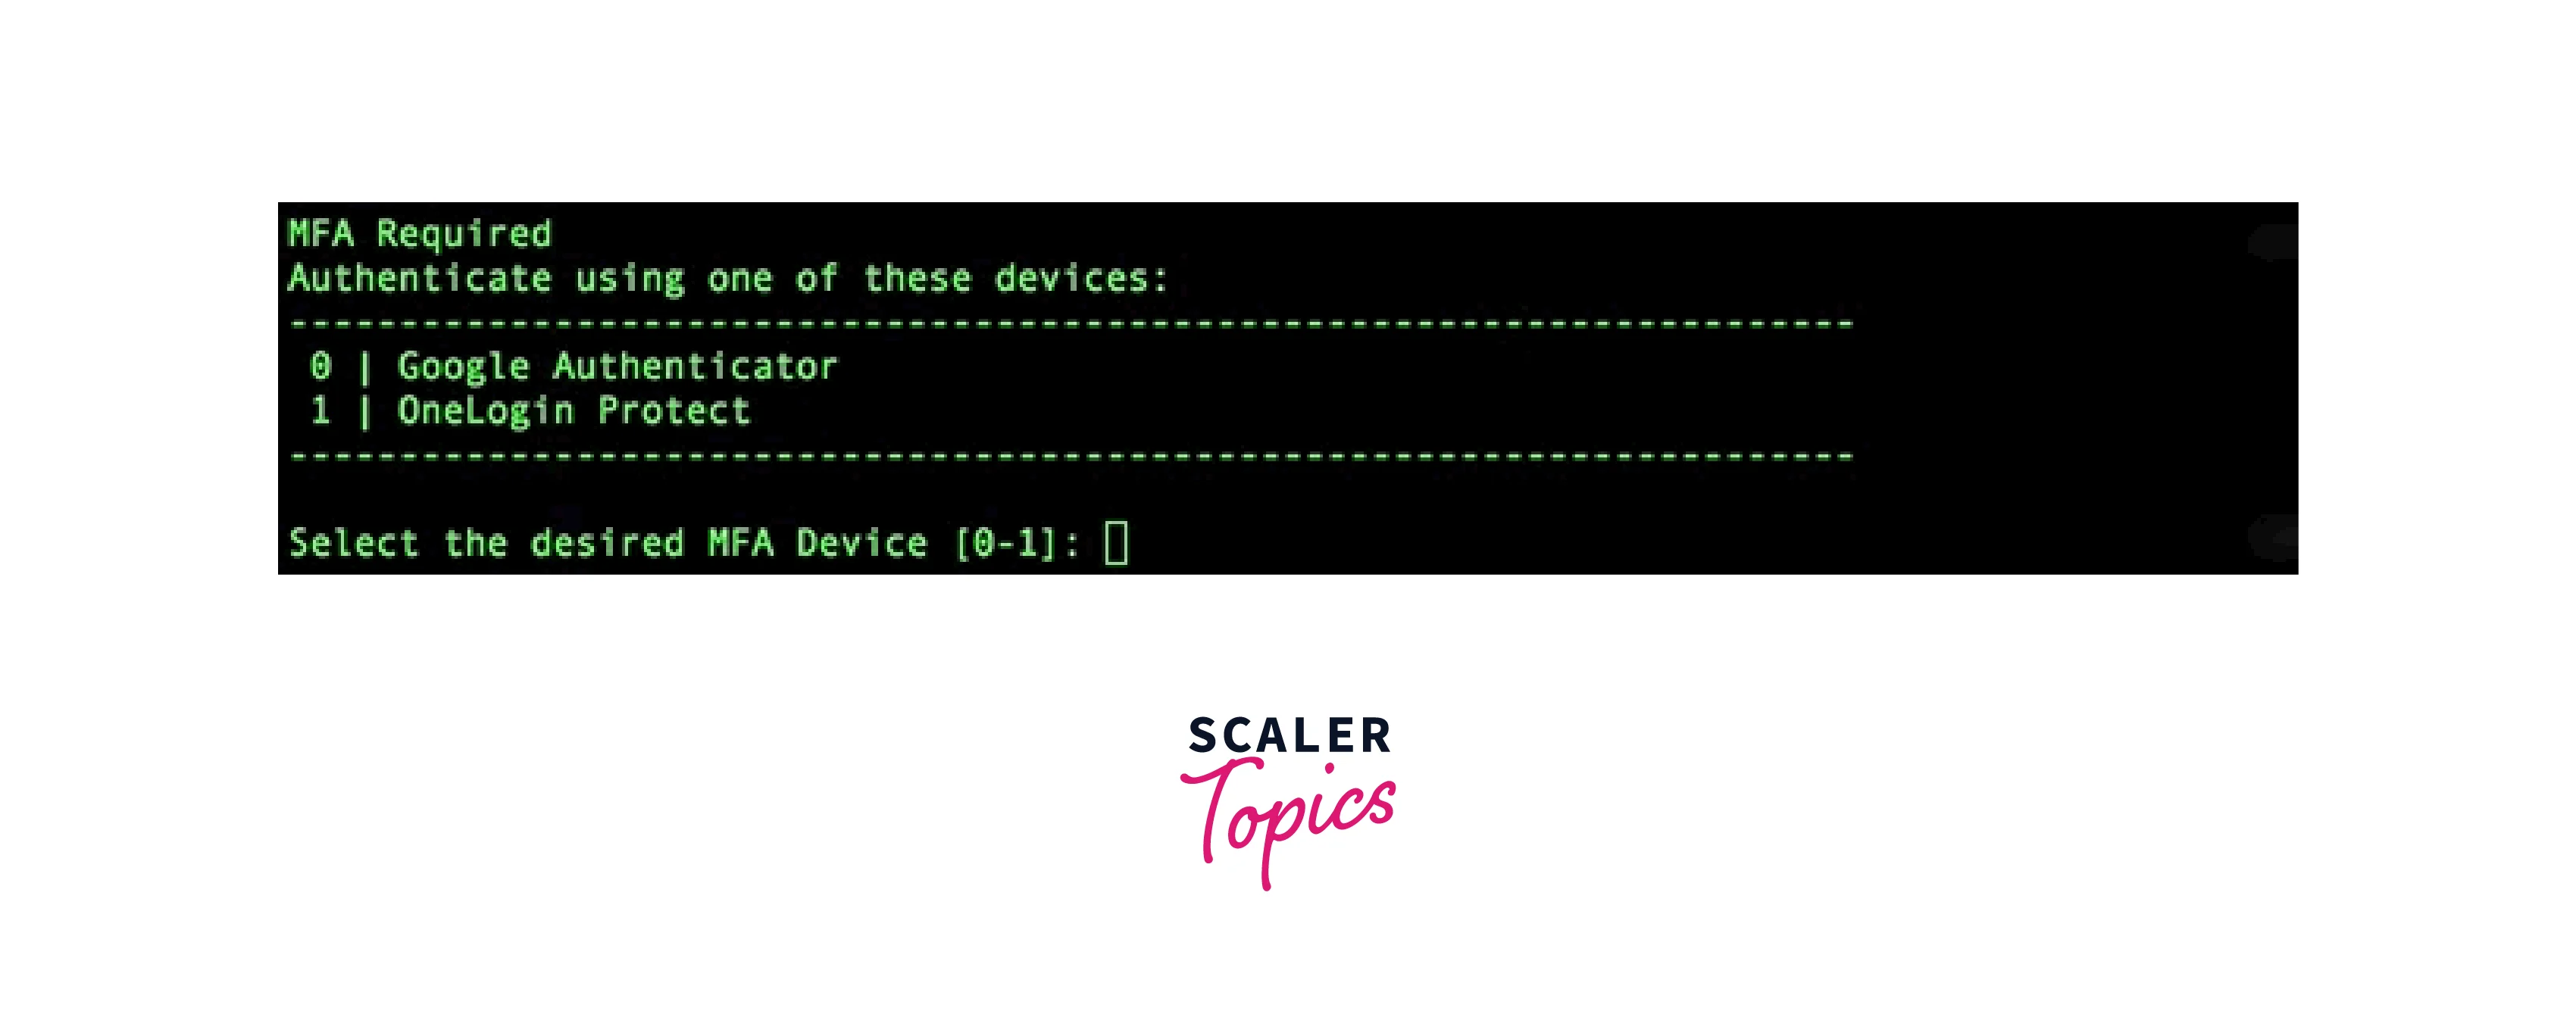
-
The AWS Roles that are accessible to you are now presented to you in a prompt. Type the role's number into the appropriate field.
-
The AWS region you want to access should be entered.
-
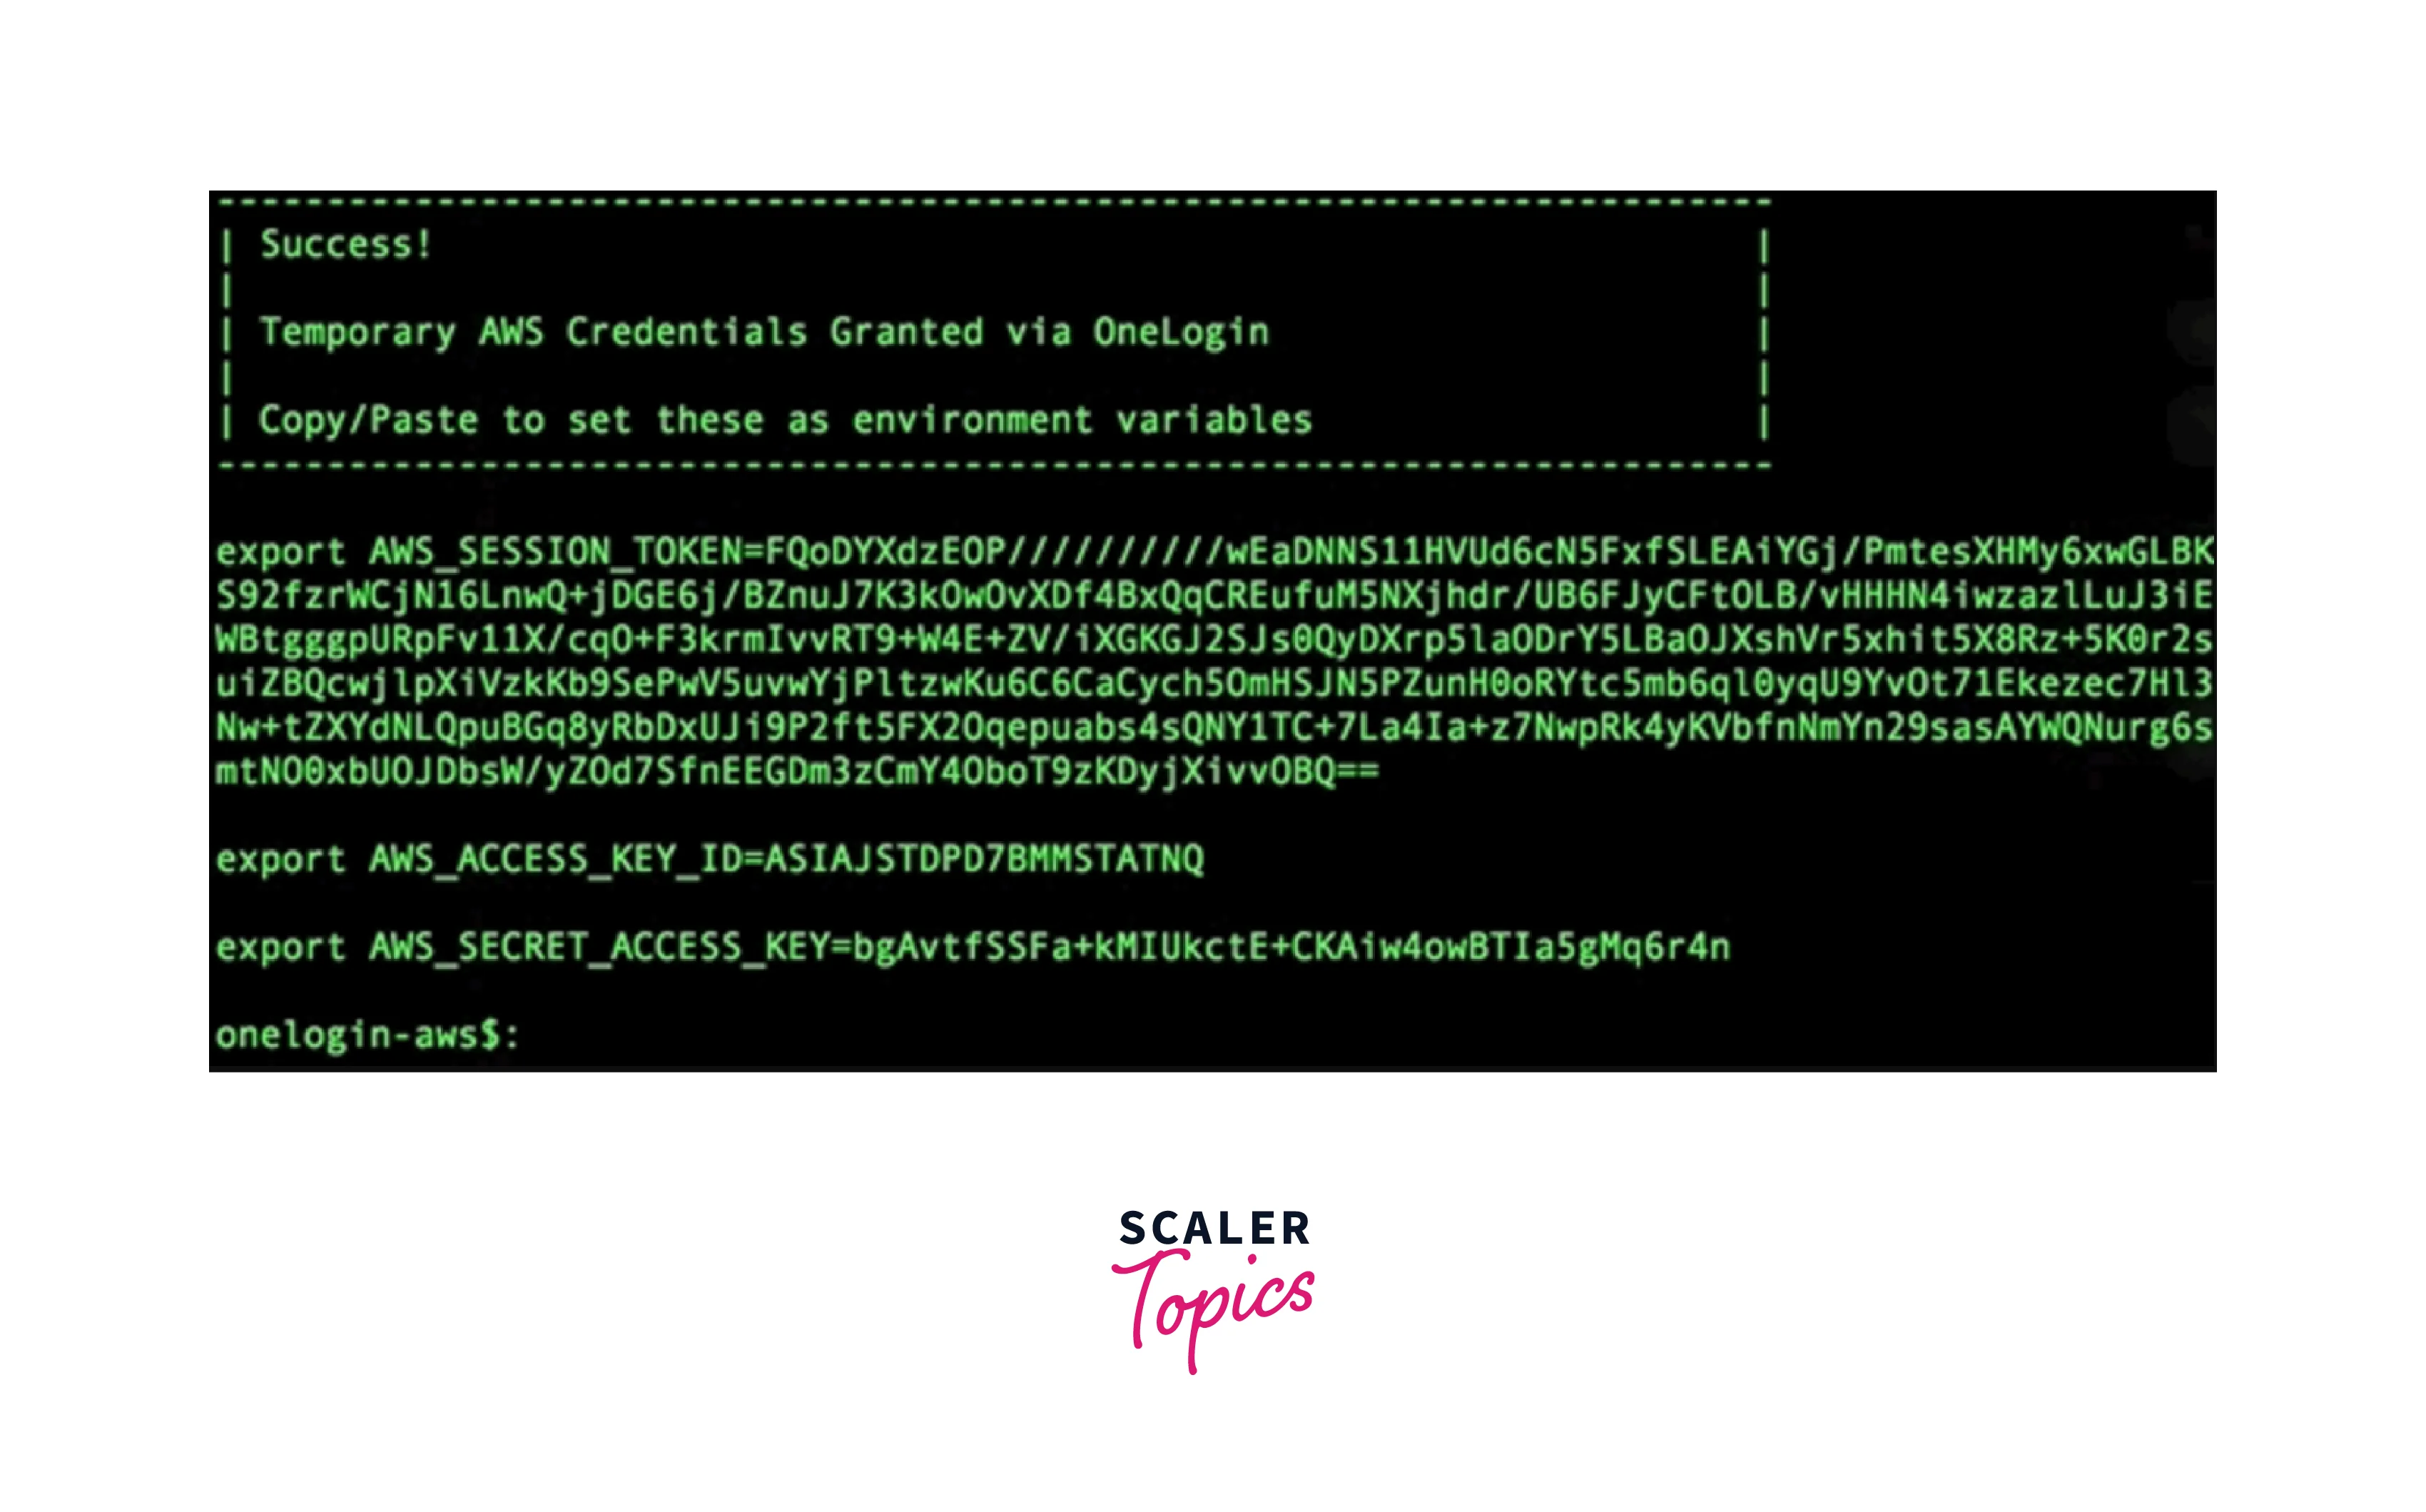
You've finished. The following temporary AWS credentials will be output by the CLI script and may be used right away to access AWS resources.
AWS CLI Assume Role Use Cases
Run the following command to use an AWS profile and okta authentication:
For all supported auth args, run pyokta-aws auth --help.
For all supported commands, run pyokta-aws --help.
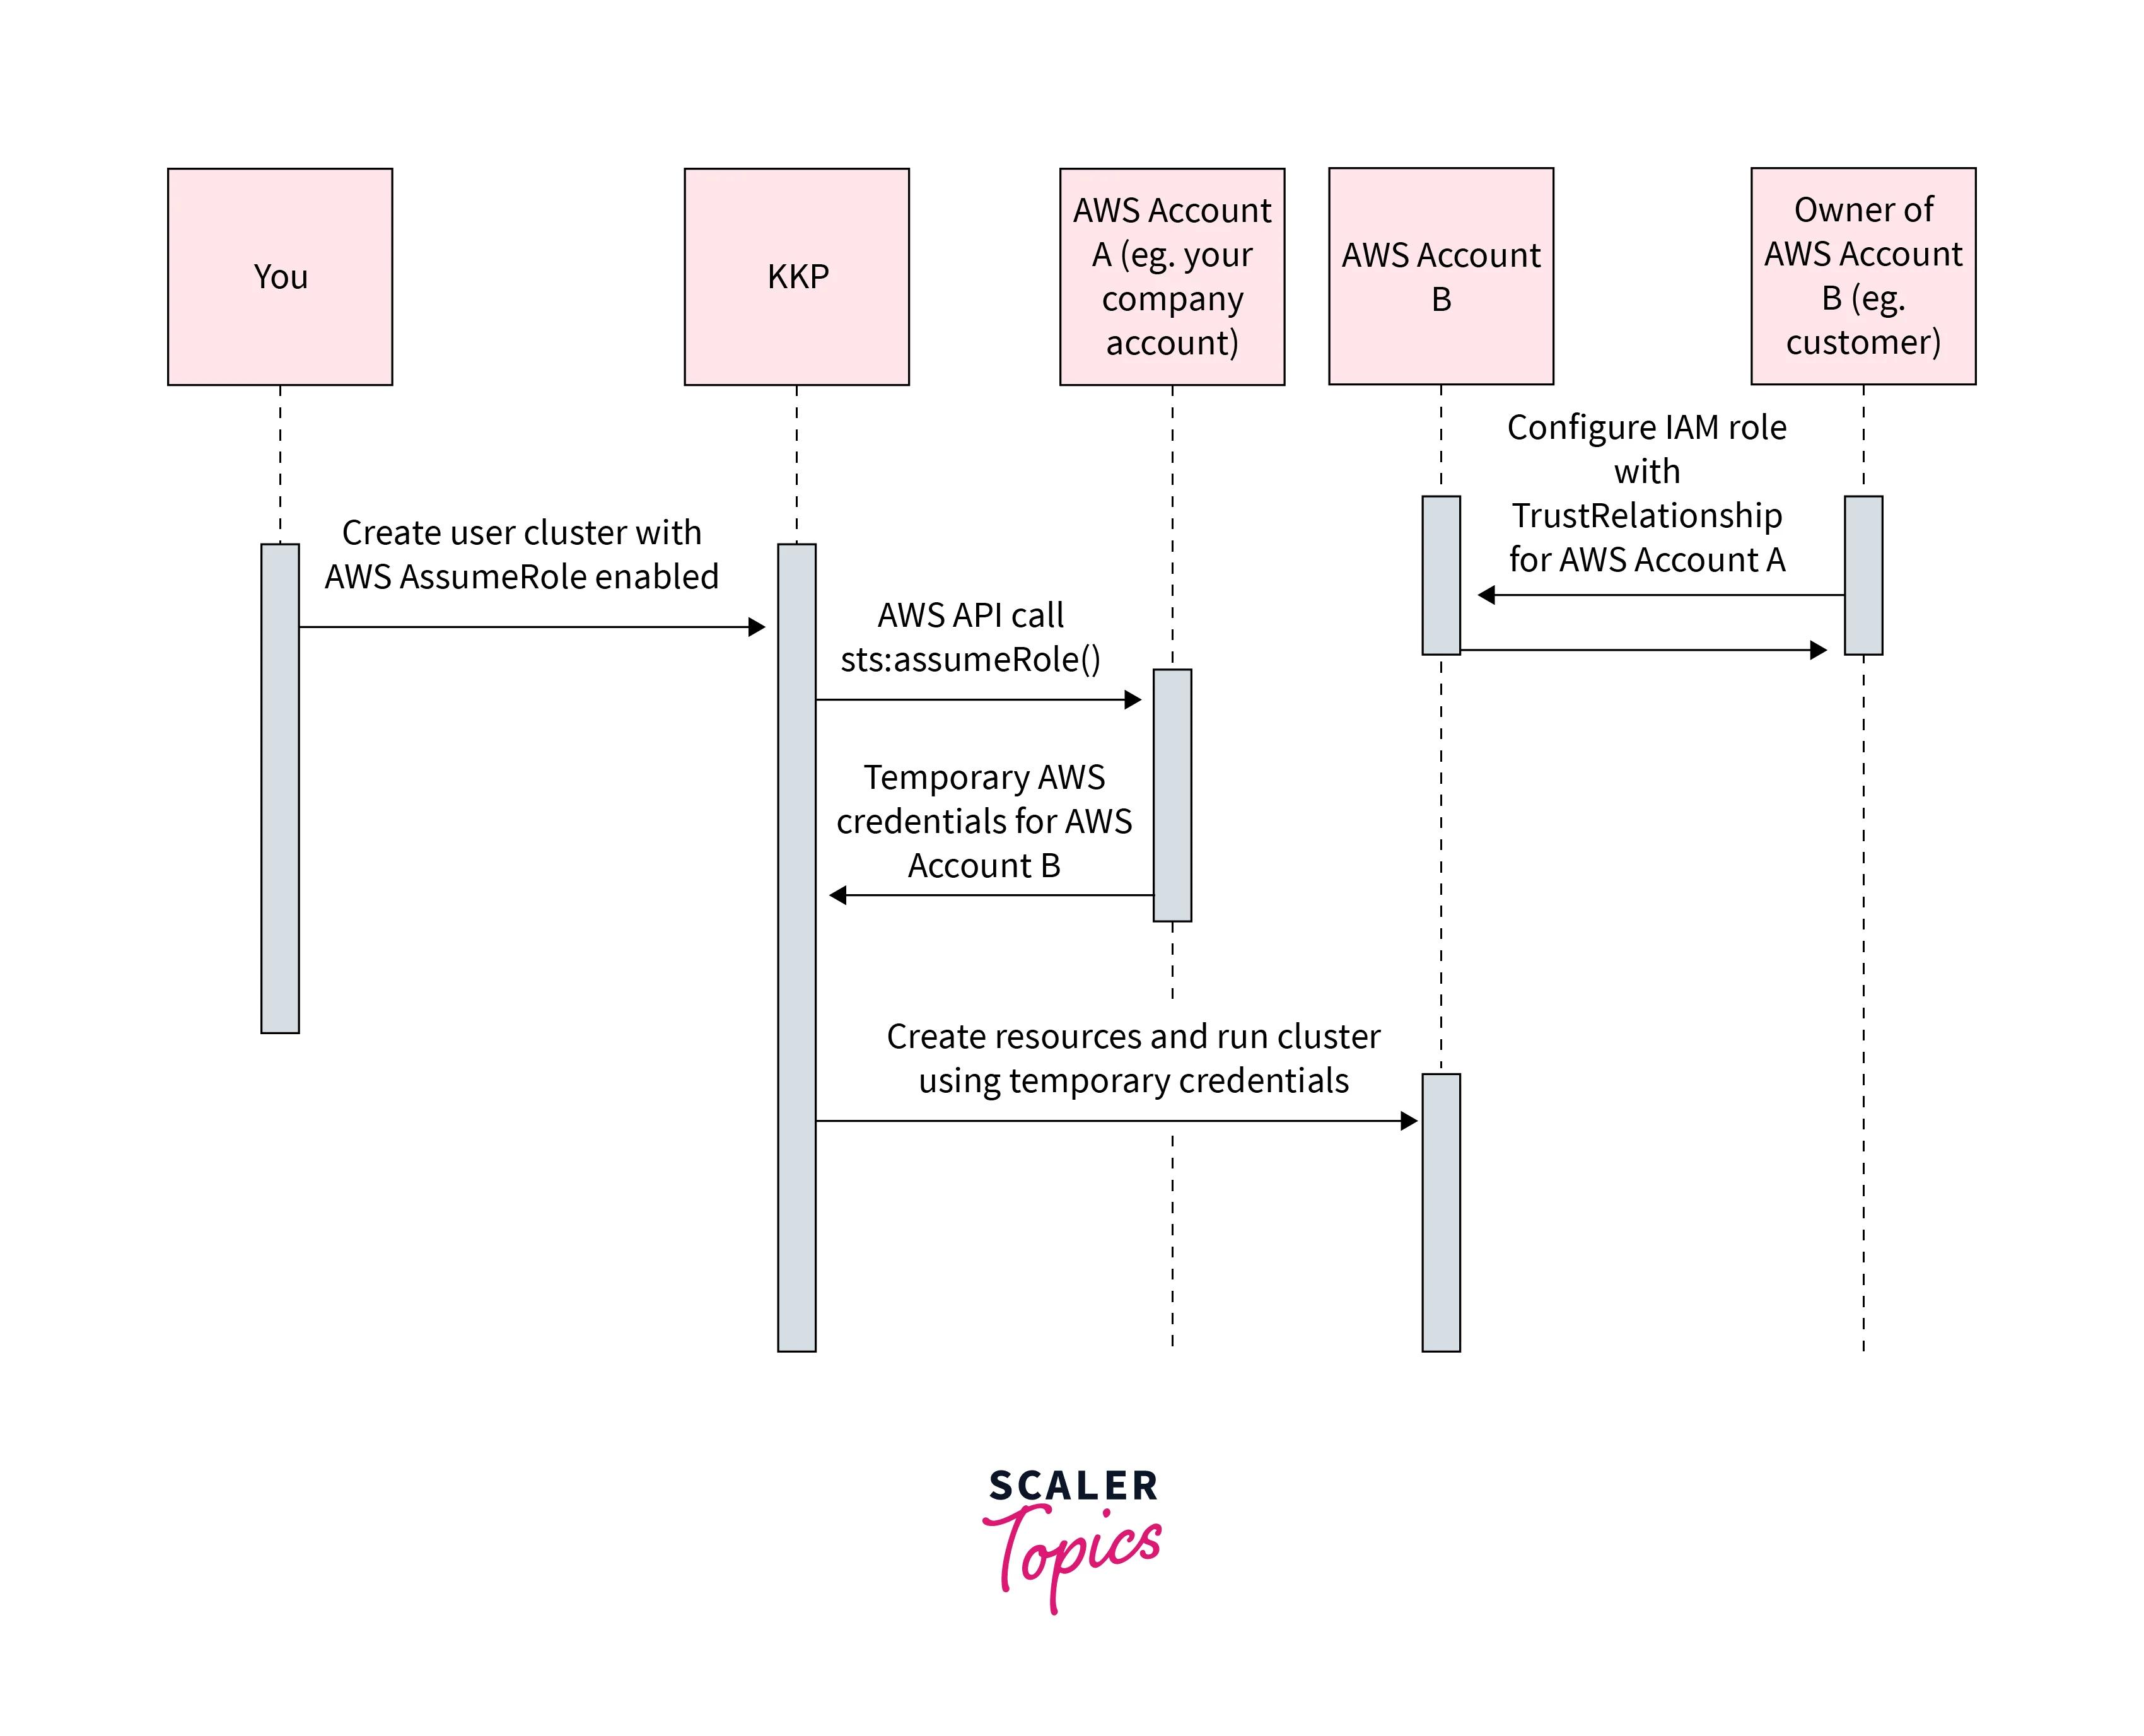
It's simple to create a new cluster using an assumed role. Select AWS as your provider when creating the cluster, then customize it as desired. IAM role ARN should be entered in the following format: arn:AWS:iam::ID OF AWS ACCOUNT B: role/ROLE NAME. If the IAM role has an optional External ID, put it in the field (2) after choosing "Enable Assume Role" (1) and supplying your AWS access credentials (access key ID and secret access key) (3). You can then carry on as normal after that.

When using a role, you typically have two options: interactively in the IAM console or programmatically using the AWS CLI, Tools for Windows PowerShell, or API.
- IAM users in your organization who are logged into the IAM console can transition to a different role to momentarily access that position's permissions. Users renounce their prior permissions in favor of those granted the position, which they now possess. When people leave a position, their prior permissions are reinstated.
- By asking for temporary security credentials for a role that may be used to send programmatic requests to AWS, an application or service provided by AWS (like Amazon EC2) can take a role. This method of using a role saves you from having to share or keep track of permanent security credentials with each entity that needs access to a resource (by, for instance, creating an IAM user).
The easiest method to utilize roles is to provide your IAM users access to roles that you establish in your own or another AWS account and allow them to transition between those roles. If you don't want someone to have certain rights, they may simply swap roles using the IAM interface, utilize those permissions, and then leave the role once they've used them. Inadvertent access to or alteration of critical resources can be avoided in this way.
You may utilize the AssumeRole API to employ roles for more complicated purposes, such as allowing access to programs and services or federated remote users. A set of temporary credentials are returned by this API request, which the application can use to make other API requests. Only the rights given by the related role are available for use when performing actions using the temporary credentials. A program just has to cease utilizing the temporary credentials and start making calls again using the real credentials; it doesn't need to "leave" the role as a user does in the console.
How to Assume a Role Using the AWS CLI?
Utilizing the AWS CLI, adhere to these directions to take on an IAM role. This user has read-only access to Amazon Elastic Compute Cloud (Amazon EC2) instances and is allowed to take on an IAM role after completing the procedures in this example.
Check that you are using the most recent AWS CLI version if you get issues when executing AWS CLI instructions. When the instructions in this resolution are executed, your login information, including passwords, is shown in plaintext. The ideal practice is to update your password as soon as you take on the IAM job.
Create an IAM User with Permission to Assume Roles
-
Use the AWS CLI to create an IAM user:
Remember to substitute your IAM user name for Bob. -
Create the JSON file that outlines the IAM policy using your preferred text editor, then use the AWS CLI to create the IAM policy that gives Bob the rights. This illustration makes use of the popular Linux text editor vim. Please note that the policy name, user name, role, JSON file name, profile name, and keys in the sample should be changed to match your own.
-
These are comparable to the contents of the example-policy.json file:
Create the IAM Policy
-
The aws iam create-policy command should be used.
-
The ARN (Amazon Resource Name) of the IAM policy is one of several pieces of information that the AWS iam create-policy command returns.
-
Take note of the IAM policy ARN from the output and use the attach-user-policy command to attach the policy to Bob. Next, use list-attached-user-policies to confirm that the attachment is present.
Create the JSON File that Defines the Trust Relationship of the IAM Role
-
Establish the trust connection by creating a JSON file: vim example-role-trust-policy.json
-
This is identical to what the example-role-trust-policy.json file contains:
Users and roles of the account 123456789012 are permitted to take on this role under this example trust policy if their permissions policies permit the sts: AssumeRole action. The trust relationship can also be limited such that only particular IAM users are allowed to assume the IAM role. This is accomplished by defining principals like those in arn: AWS:iam::123456789012:user/example-username.
Create the IAM Role and Attach the Policy
-
Create a read-only Amazon Relational Database Service (Amazon RDS) role that Bob may use to access instances of the service. You need to choose a principal that permits IAM users to take on this IAM role since it is one that an IAM user assumes. The account's IAM identities can all adopt that role, for instance, if the principal is identical to arn:AWS:iam::123456789012:root.
-
The IAM role with read-only access to Amazon RDS DB instances must be created. Following the level of protection you require, attach the IAM policies to your IAM role. The JSON file that you prepared in the previous step is used to specify the trust relationship and construct the IAM role using the AWS iam create-role command. The AWS Managed Policy AmazonRDSReadOnlyAccess is attached to the role using the AWS iam attach-role-policy command. Following your security needs, you can attach various policies (including Managed Policies and Custom Policies). The IAM policies that are associated with the IAM role example-role are displayed using the AWS iam list-attached-role-policies command.
Examine Bob's ability to take on the example role and that he has read-only access to EC2 instances.
-
Use this command to generate Bob's access keys: AWS iam create-access-key --user-name Bob
In response to an AWS CLI command, a secret access key and an access key ID are produced. Always keep these keys in mind.
Configure the Access Keys
-
Either the default profile or a particular profile should be used to configure the access keys. Run the command "aws configure" to set the default profile. Use the AWS configure —profile example-profile-name command to establish a new specialized profile. The default profile in this illustration is set up as follows:
Assume the IAM Role
Choosing one of the following:
By establishing a profile in the /.aws/config file, you may use an IAM role. To learn more, go to Using an IAM role in the AWS CLI.
-or:
To take the IAM position, follow these procedures.
-
Run the following command to obtain the role's ARN:
-
IAM roles are listed by the command, however, the result is filtered based on role names. Run this command to take on the IAM role:
-
The AWS CLI tool returns several different kinds of data. The AccessKeyId, SecretAccessKey, and SessionToken must be included within the credentials section. RoleAccessKeyID, RoleSecretKey, and RoleSessionToken are environment variables used in this sample. Please take note that the expiry field's timestamp is in the UTC zone. The timestamp provides the day and time when the IAM role's temporary credentials expire. You must make another sts: AssumeRole API request if the temporary credentials have already expired.
AWS CLI Assume Role Options
--role-arn (string)
The role's Amazon Resource Name (ARN) is provided.
--role-session-name (string)
A session ID for the assumed role.
When the same role is taken on by several principals or for various reasons, use the role session name to specifically identify a session. In cross-account circumstances, the account that owns the role may see and log the role session name. The ARN of the assumed role principal also makes use of the role session name. The role session name will be visible to the external account in subsequent cross-account API calls that employ the temporary security credentials, according to CloudTrail logs.
--policy-arns (list)
The IAM-managed policies that you wish to utilize as managed session policies' Amazon Resource Names (ARNs). The same account as the job must also include the policies.
This element is not required. Ten managed policy ARNs are allowed to be provided. However, the maximum character count for the plaintext you use for managed session policies and inline session policies is 2,048.
For a role session or federated user session, a reference to the IAM-managed policy is supplied as the session policy.
arn -> (string)
The policy's IAM-controlled Amazon Resource Name (ARN) that will be used as the role's session policy.
Shorthand Syntax:
JSON Syntax:
--policy (string)
You wish to apply an inline session policy using an IAM policy that is in JSON format.
It's optional to use this component. This procedure will produce new temporary credentials if policies are passed to it. The identity-based policy for the role intersects with the session policies to provide the permissions for the resultant session. The temporary credentials for the role can be used to access resources in the account that owns the role in later Amazon Web Services API requests. You are not able to provide additional permissions through session policies than the identity-based policy of the role being taken on permits.
--duration-seconds (integer)
The time in seconds that the role session lasted. The number entered can be in the range of 900 seconds (15 minutes) and the maximum session length designated for the role. The maximum session length option has a range of 1 to 12 hours. The process is unsuccessful if you enter a value that is greater than either this setting or the administrator setting (whichever is lower). For instance, your operation would fail if you provide a session duration of 12 hours but your administrator only allows sessions to last a maximum of 6 hours.
The value is initially set to 3600 seconds.
--tags (list)
A list of session tags you wish to pass. A key name and its accompanying value make up each session tag. See Tagging Amazon Web Services STS Sessions in the IAM User Guide for additional information on session tags. This element is optional. Up to 50 session tags may be sent. The plaintext session tag keys cannot be longer than 128 characters, and the value cannot be longer than 256 characters.
The same key that is used to pass a tag that is already associated with the role can also be used to pass a session tag. If you do, a role tag with the same key is overridden by a session tag.
When you take on a role or federate a user, you can pass unique key-value pairs of characteristics. They are referred to as session tags. Then, you may restrict access to resources by using the session tags.
Key -> (string)
The session tag's key.
A maximum of 50 session tags may be sent. Keys for plain text sessions cannot be longer than 128 characters.
Value -> (string)
The session tag's value.
A maximum of 50 session tags may be sent. The length of a plain text session tag cannot be longer than 256 characters.
Shorthand Syntax:
JSON Syntax:
--transitive-tag-keys (list)
A list of the session tag keys you wish to make transferable. A tag key's associated key and value are sent to succeeding sessions in a role chain if you specify the tag key to be transitive. It's optional to use this component. Session policy and the maximum number of packed binary tags are unaffected by setting session tags to be transitive.
A transitive tag key is optional, and if you don't supply one, no tags are transmitted from this session to any following sessions.
Syntax:
Global Options
--debug (boolean)
Activate the debug logging.
--endpoint-URL (string)
Replace the supplied URL with the command's default URL.
--no-verify-ssl (boolean)
When interacting with AWS services, the AWS CLI by default use SSL. The AWS CLI will check the validity of SSL certificates for each SSL connection. The SSL certificate verification default behavior is overridden by this option.
--no-paginate (boolean)
Turn off pagination on auto-pilot.
--output (string)
The format used for command output.
- json
- text
- table
--query (string)
A JMESPath query is to be used for response data filtering.
--profile (string)
Select a specific profile from your credential database.
--region (string)
The area to utilize. changes the config/env parameters.
--version (string)
Show the current version of this utility.
--color (string)
Toggling the color output.
- on
- off
- auto
--no-sign-request (boolean)
Requests should not be signed. If this parameter is supplied, credentials won't be loaded.
--ca-bundle (string)
The bundle of CA certificates to utilize while examining SSL certificates config/env settings are overridden.
--cli-read-timeout (int)
The maximum socket read time is in seconds. If the value is set to 0, the socket read will block and not time out. 60 seconds is the default setting.
AWS CLI Assume Role Examples
To assume a role:
The command's output includes an access key, secret key, and session token that you can use to log in to AWS:
A named profile linked to a role can be created for usage with the AWS CLI. The AWS CLI will make the call to assume-role and take care of managing credentials when you utilize the profile. Instructions may be found in the AWS CLI User Guide under Assuming a Role.
Benefits of AWS CLI Assume Role
To appropriately grant access permissions to any application that executes AWS API requests running on your Amazon EC2 instances, use IAM Roles/Instance Profiles rather than IAM Access Keys. IAM roles enable you to prevent sharing permanent credentials and safeguard your instances from unauthorized access.
-
Access control with precision:
You may describe and manage access to AWS services and resources using permissions. You may attach a policy that details the kind of access, the actions that can be taken, and the resources on which the actions can be taken to provide IAM roles rights. You may provide access to particular AWS service APIs and resources using IAM rules. Additionally, you may specify the circumstances under which access is given, such as giving access to IDs belonging to a certain AWS organization or via a particular AWS service. -
Use IAM roles to assign access:
You can grant users or AWS services access to operate in your AWS account by using IAM roles. Users from your identity provider or AWS services can assume a role to obtain temporary security credentials that can be used to submit an AWS request in the account of the IAM role. As a result, IAM roles offer a way for users, workloads, and AWS services that must carry out operations in your AWS accounts to rely on temporary credentials. -
Roles Anywhere for IAM:
By utilizing X.509 digital certificates issued by your registered Certificate Authorities. With IAM Roles Anywhere, you may access AWS resources with temporary AWS credentials and the same IAM roles and policies that you've set up for your AWS workloads. -
Analyzer for IAM Access:
A continuous cycle to grant the appropriate fine-grained permissions as your requirements change is known as the least privilege. The setting, checking, and fine-tuning permissions are made easier with the aid of the IAM Access Analyzer. -
Safeguards for permissions:
All IAM users and roles in an organization's accounts must abide by the permissions boundaries set by service control policies (SCPs), which are possible with AWS Organizations. Whether you're just getting started with SCPs or you already have SCPs in place, you can utilize an IAM access adviser to support you in restricting rights confidently throughout your AWS company. -
Access management based on attributes:
You may build fine-grained permissions based on user attributes like department, job position, and team name by using the authorization approach known as attribute-based access control (ABAC). The number of separate permissions required to create fine-grained restrictions in your AWS account can be decreased with ABAC.
Conclusion
- Assume-role gives you access to a set of temporary security credentials that you may use to access AWS resources that you would not have ordinarily.
- A policy that enables the user to call AssumeRole for the ARN of the role in the other account must be attached by the administrator.
- A security token, a secret access key, and an access key ID make up these temporary credentials. In most cases, you utilize AssumeRole for access across accounts or within your account.
- With the following exception, API calls to any Amazon Web Services service can be made using the temporary security credentials generated by AssumeRole.
- The provided session rules and session tags are compressed via an Amazon Web Services conversion into a packed binary format with its cap.
- Even if your plaintext satisfies the other standards, your request may still fail for this restriction.
- A set of temporary credentials that we may use to access AWS services linked to the IAM Role we want to assume are returned by the command.
- Using an intuitive command line interface, the OneLogin + Amazon Web Services (AWS) CLI client enables you to safely get temporary AWS access credentials.
- You must permit to switch to the role before an IAM user, application, or service can use one that you created. The required permissions can be granted using any policy that is attached to either the user's IAM group or the user.