S3 Bucket Policy
Overview
The S3 Bucket policy is an object which allows us to manage access to defined and specified Amazon S3 storage resources. We classify and allow the access permissions for each of the resources whether to allow or deny the actions requested by a principal which can either be a user or through an IAM role. Every time you create a new Amazon S3 bucket, we should always set a policy that grants the relevant permissions to the data forwarder’s principal roles.
What is an S3 Bucket Policy?
Let us start by understanding the problem statement behind the introduction of the S3 bucket policy.
Problem Statement: It's simple to say that we use the AWS S3 bucket as a drive or a folder where we keep or store the objects (files). The problem which arose here is, if we have the organization's most confidential data stored in our AWS S3 bucket while at the same time, we want any of our known AWS account holders to be able to access/download these sensitive files then how can we (without using the S3 Bucket Policies) make this scenario as secure as possible. As we know, a leak of sensitive information from these documents can be very costly to the company and its reputation!!! We must have some restrictions on who is uploading or what is getting uploaded, downloaded, changed, or as simple as read inside the S3 bucket.
One option can be to go with the option of granting individual-level user access via the access policy or by implementing the IAM policies but is that enough? What if we want to restrict that user from uploading stuff inside our S3 bucket?
Think! Think!
Well, worry not. This is where the S3 Bucket Policy makes its way into the scenario and helps us achieve the secure and least privileged principal results.
S3 Bucket Policy: The S3 Bucket policy can be defined as a collection of statements, which are evaluated one after another in their specified order of appearance. This S3 bucket policy defines what level of privilege can be allowed to a requester who is allowed inside the secured S3 bucket and the object(files) in that bucket. All the successfully authenticated users are allowed access to the S3 bucket. Hence, the S3 bucket policy ensures access is correctly assigned and follows the least-privilege access, and enforces the use of encryption which maintains the security of the data in our S3 buckets.
The S3 Bucket policies determine what level of permission ( actions that the user can perform) is allowed to access, read, upload, download, or perform actions on the defined S3 buckets and the sensitive files within that bucket. This way the owner of the S3 bucket has fine-grained control over the access and retrieval of information from an AWS S3 Bucket. The S3 bucket policy solves the problems of implementation of the least privileged. Only explicitly specified principals are allowed access to the secure data and access to all the unwanted and not authenticated principals is denied. The data remains encrypted at rest and in transport as well.
The next question that might pop up can be, What Is Allowed By Default? To answer that, by default an authenticated user is allowed to perform the actions listed below on all files and folders stored in an S3 bucket:
- Create files/folders.
- Get the files/folder metadata.
- Delete files/folders.
- Delete all files/folders that have been uploaded inside the S3 bucket.
- Deny Actions by any Unidentified and unauthenticated Principals(users).
- List all the files/folders contained inside the bucket.
- Deny Unencrypted Transport or Storage of files/folders.
- Put files/folders inside the bucket.
You might be then wondering What we can do with the Bucket Policy?
To answer that, we can 'explicitly allow' or 'by default or explicitly deny' the specific actions asked to be performed on the S3 bucket and the stored objects. If the permission to create an object in an S3 bucket is ALLOWED and the user tries to DELETE a stored object then the action would be REJECTED and the user will only be able to create any number of objects and nothing else (no delete, list, etc).
Also, Who Grants these Permissions? The S3 bucket policy is attached with the specific S3 bucket whose "Owner" has all the rights to create, edit or remove the bucket policy for that S3 bucket. The owner has the privilege to update the policy but it cannot delete it. As to deleting the S3 bucket policy, only the root user of the AWS account has permission to do so.
Also, AWS assigns a policy with default permissions, when we create the S3 Bucket. So, the IAM user linked with an S3 bucket has full permission on objects inside the S3 bucket irrespective of their role in it. But when no one is linked to the S3 bucket then the Owner will have all permissions.
Quick note: If no bucket policy is applied on an S3 bucket, the default REJECT actions are set which doesn't allow any user to have control over the S3 bucket. All Amazon S3 buckets and objects are private by default. Also, The set permissions can be modified in the future if required only by the owner of the S3 bucket.
We learned all that can be allowed or not by default but a question that might strike your mind can be how and where are these permissions configured. Suppose you are an AWS user and you created the secure S3 Bucket. Now you might question who configured these default settings for you (your S3 bucket)?
The answer is simple. All this gets configured by AWS itself at the time of the creation of your S3 bucket. When we create a new S3 bucket, AWS verifies it for us and checks if it contains correct information and upon successful authentication configures some or all of the above-specified actions to be ALLOWED to YOUR-SELF(Owner). The owner of the secure S3 bucket is granted permission to perform the actions on S3 objects by default. However, the permissions can be expanded when specific scenarios arise.
A sample S3 bucket policy looks like this:
Here, the S3 bucket policy grants AWS S3 permission to write objects (PUT requests) from one account that is from the source bucket to the destination bucket.
S3 Bucket Policy Elements
For granting specific permission to a user, we implement and assign an S3 bucket policy to that service. An Amazon S3 bucket policy consists of the following key elements which look somewhat like this:
As shown above, this S3 bucket policy displays the effect, principal, action, and resource elements in the Statement heading in a JSON format. This S3 bucket policy shall allow the user of account - 'Neel' with Account ID 123456789999 with the s3:GetObject, s3:GetBucketLocation, and s3:ListBucket S3 permissions on the samplebucket1 bucket.
Now, let us look at the key elements in the S3 bucket policy which when put together, comprise the S3 bucket policy:
Version— This describes the S3 bucket policy’s language version. This key element of the S3 bucket policy is optional, but if added, allows us to specify a new language version instead of the default old version.
ID— This optional key element describes the S3 bucket policy’s ID or its specific policy identifier. The Policy IDs must be unique, with globally unique identifier (GUID) values.
Statements— This Statement is the main key elements described in the S3 bucket policy. This contains sections that include various elements, like sid, effects, principal, actions, and resources. We can find a single array containing multiple statements inside a single bucket policy.
Let us discuss each in detail below:
SID or Statement ID This section of the S3 bucket policy, known as the statement id, is a unique identifier assigned to the policy statement. We can assign SID values to every statement in a policy too. With AWS services such as SNS and SQS( that allows us to specify the ID elements), the SID values are defined as the sub-IDs of the policy’s ID. It's important to keep the SID value in the JSON format policy as unique as the IAM principle suggests.
Effects The S3 bucket policy can have the effect of either 'ALLOW' or 'DENY' for the requests made by the user for a specific action. The default effect for any request is always set to 'DENY', and hence you will find that if the effect subsection is not specified, then the requests made are always REJECTED. This is majorly done to secure your AWS services from getting exploited by unknown users. It also allows explicitly 'DENY' the access in case the user was granted the 'Allow' permissions by other policies such as IAM JSON Policy Elements: Effect.
Principal Principal refers to the account, service, user, or any other entity that is allowed or denied access to the actions and resources mentioned in the bucket policy. Here the principal is the user 'Neel' on whose AWS account the IAM policy has been implemented.
Actions With the S3 bucket policy, there are some operations that Amazon S3 supports for certain AWS resources only. You specify the resource operations that shall be allowed (or denied) by using the specific action keywords. For example, in the case stated above, it was the s3:ListBucket permission that allowed the user 'Neel' to get the objects from the specified S3 bucket.
Resources Resource is the Amazon S3 resources on which the S3 bucket policy gets applied like objects, buckets, access points, and jobs. We can identify the AWS resources using the ARNs.
Conditions The Conditions sub-section in the policy helps to determine when the policy will get approved or get into effect. We can specify the conditions for the access policies using either the AWS-wide keys or the S3-specific keys.
How Do the S3 Bucket Policies Work?
Before we jump to create and edit the S3 bucket policy, let us understand how the S3 Bucket Policies work.
The S3 bucket policies work by the configuration the Access Control rules define for the files/objects inside the S3 bucket. When a user tries to access the files (objects) inside the S3 bucket, AWS evaluates and checks all the built-in ACLs (access control lists). AWS then combines it with the configured policies and evaluates if all is correct and then eventually grants the permissions. When no special permission is found, then AWS applies the default owner’s policy.
It's important to note that the S3 bucket policies are attached to the secure S3 bucket while the ACLs are attached to the files (objects) stored in the S3 bucket. We do not need to specify the S3 bucket policy for each file, rather we can easily apply for the default permissions at the S3 bucket level, and finally, when required we can simply override it with our custom policy.
Creating and Editing a Bucket Policy
Now that we learned what the S3 bucket policy looks like, let us dive deep into creating and editing one S3 bucket policy for our use case:
Let us learn how to create an S3 bucket policy:
Step 1: Login to the AWS Management Console and search for the AWS S3 service using the URL . Now create an S3 bucket and specify it with a unique bucket name.
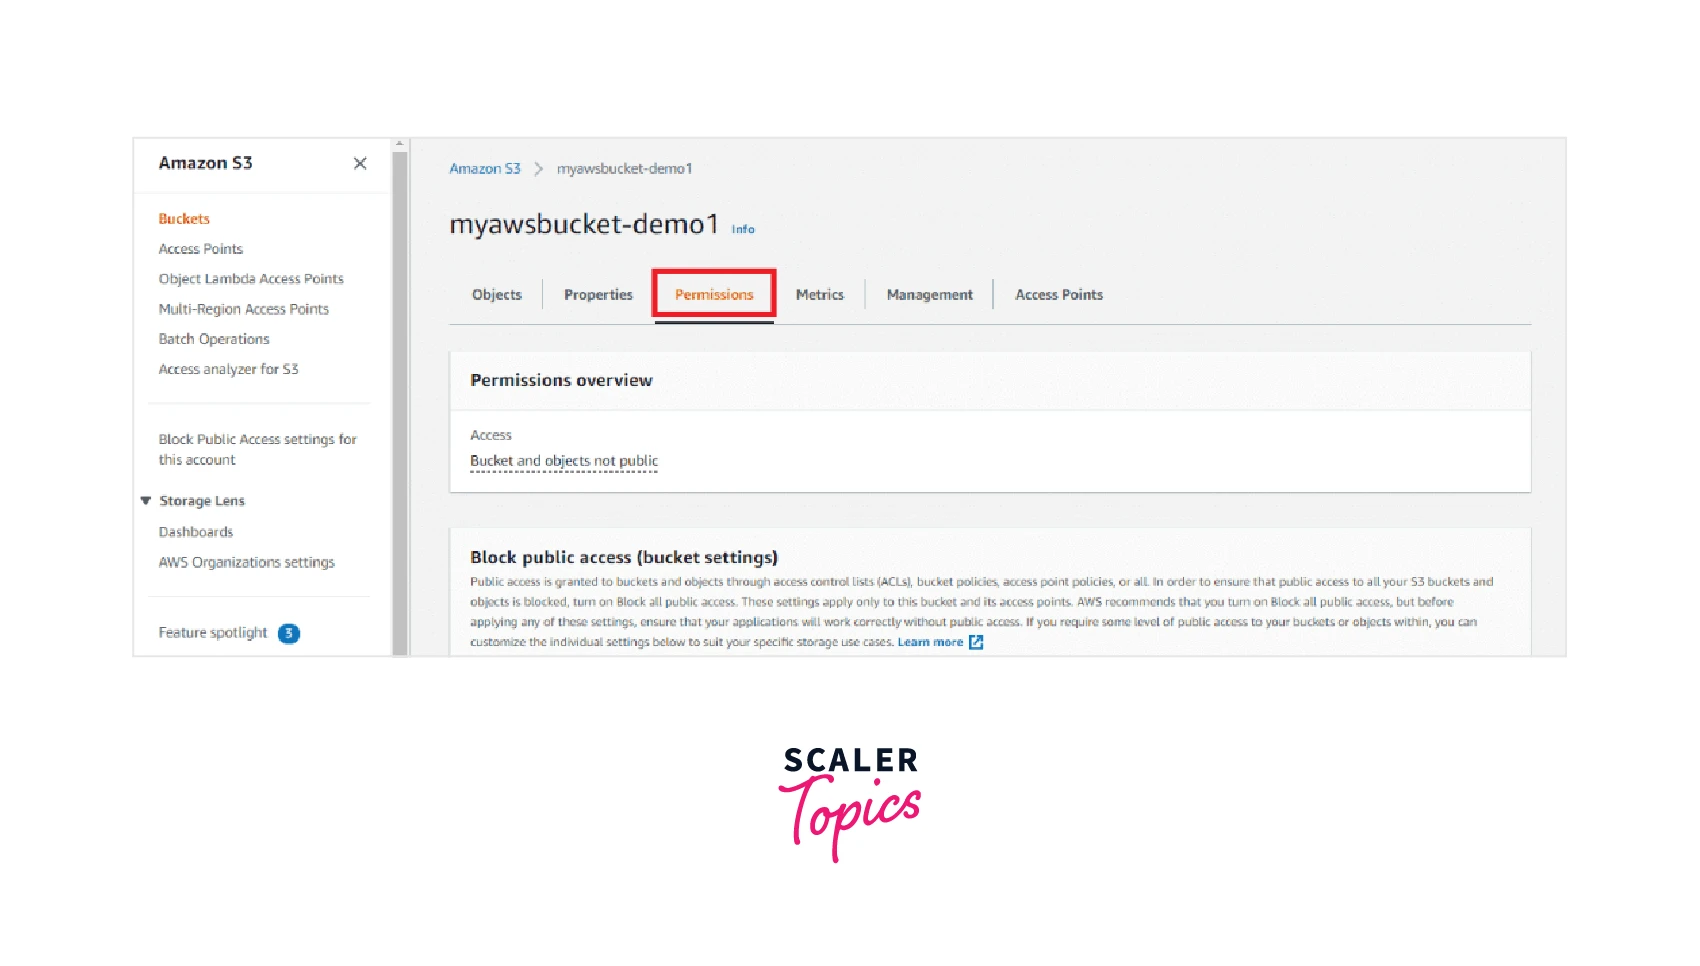
Step 2: Now in the AWS S3 dashboard, select and access the S3 bucket where you can start to make changes and add the S3 bucket policies by clicking on Permissions as shown below.
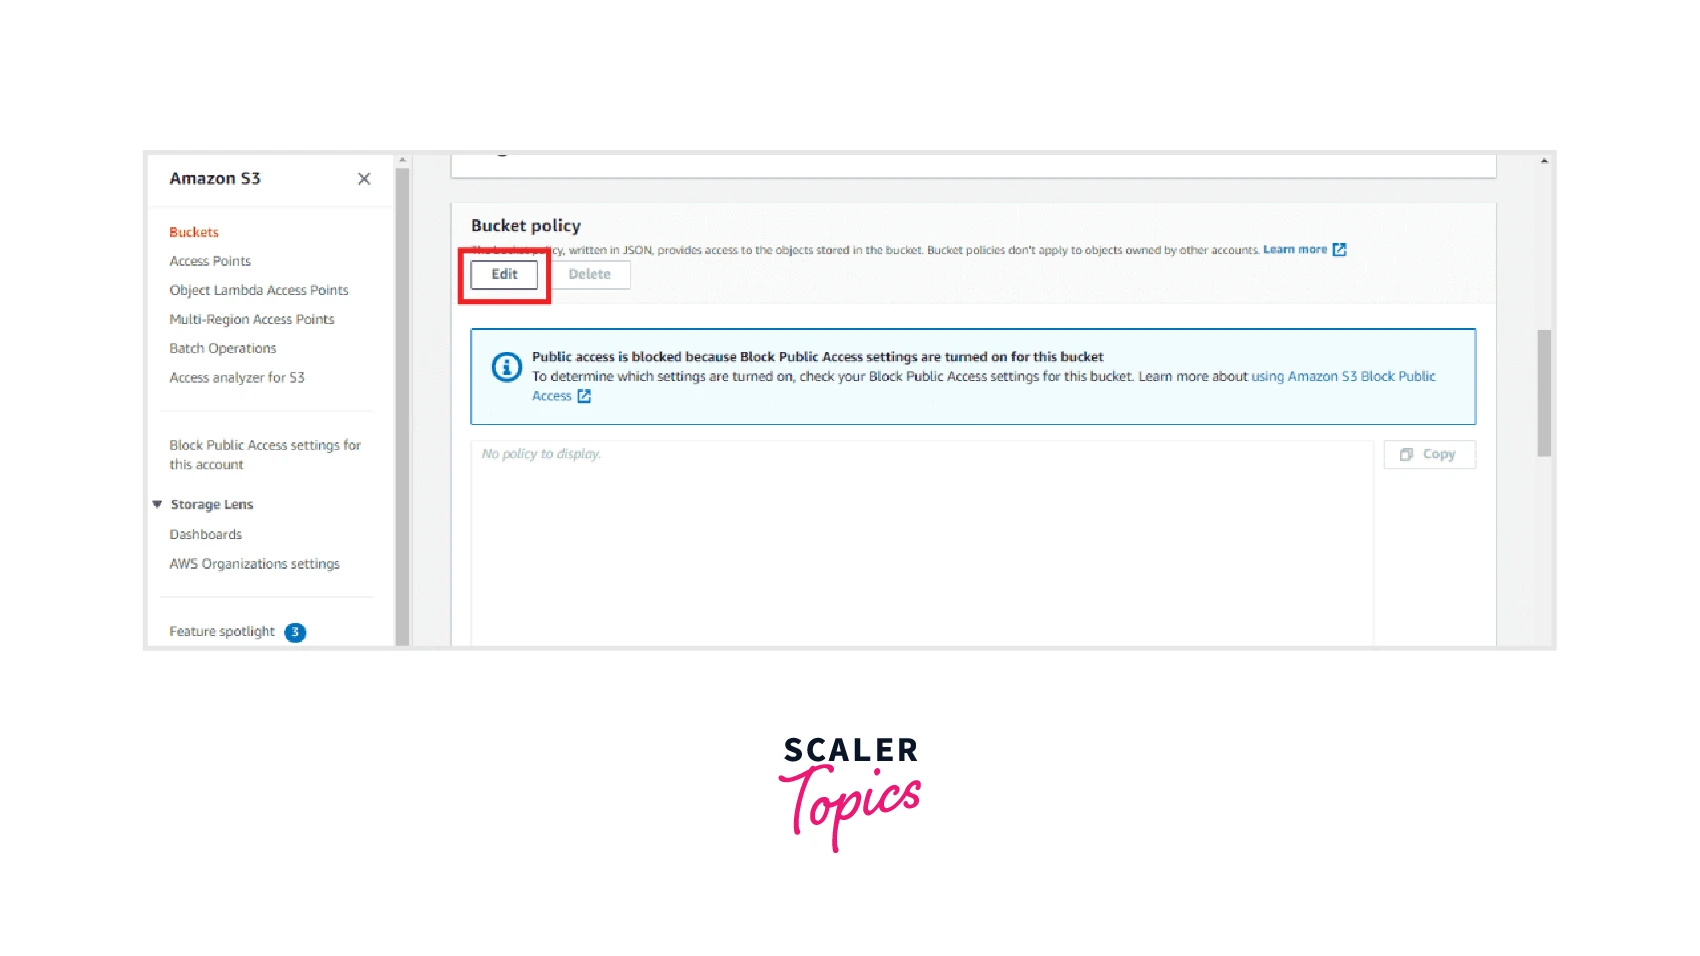
 Step 3: You will be able to see the Bucket Policy section where you need to select the Edit option as shown below.
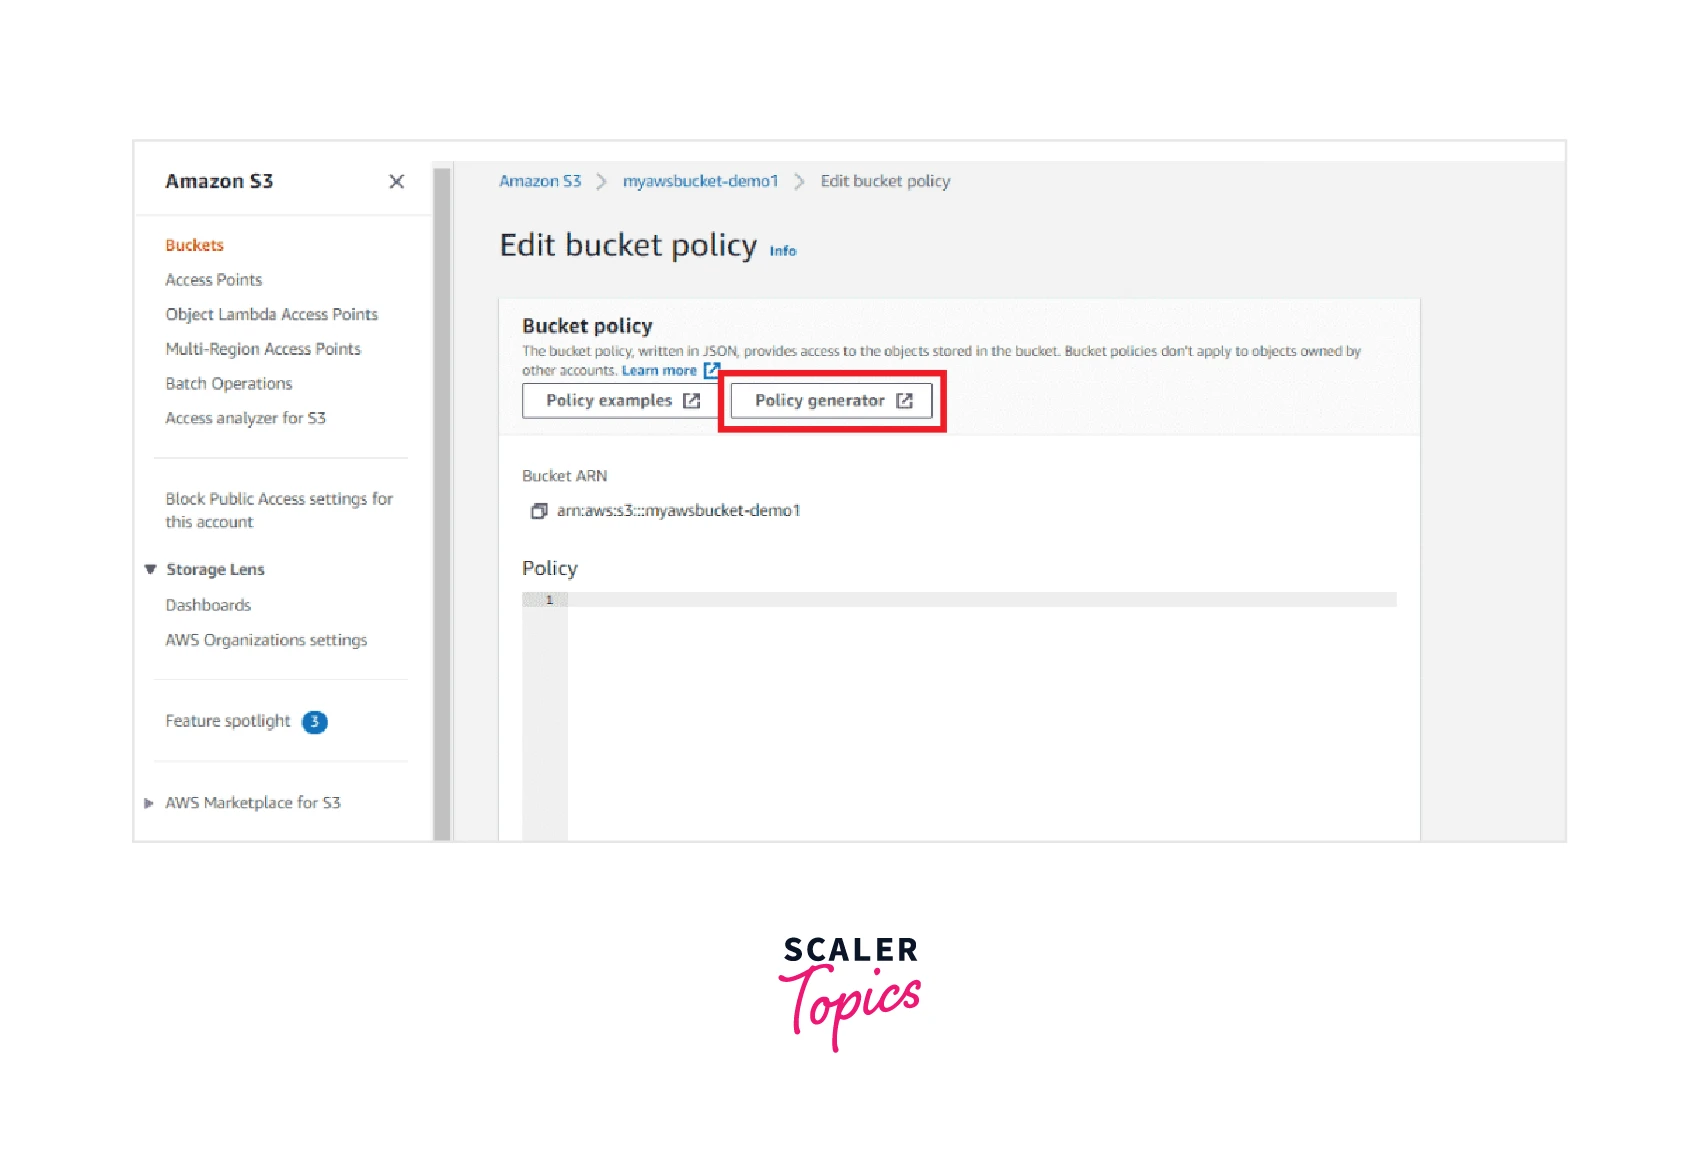
Step 4: You now get two distinct options where either you can easily generate the S3 bucket policy using the Policy Generator which requires you to click and select from the options or you can write your S3 bucket policy as a JSON file in the editor. For simplicity and ease, we go by the Policy Generator option by selecting the option as shown below.
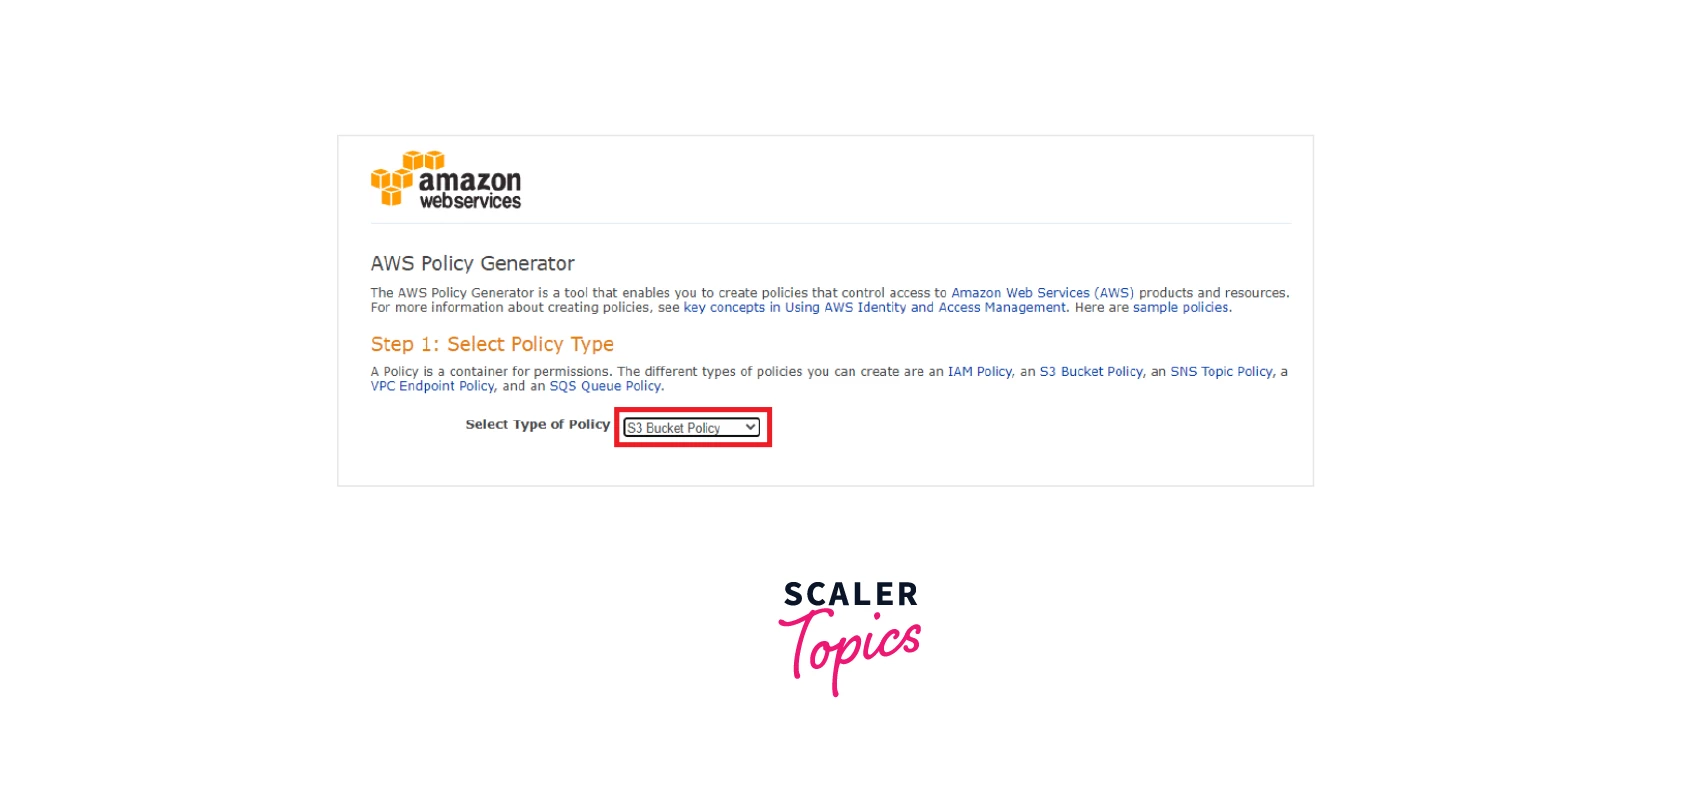
Step 5: A new window for the AWS Policy Generator will open up where we need to configure the settings to be able to start generating the S3 bucket policies. This can be done by clicking on the Policy Type option as S3 Bucket Policy as shown below.
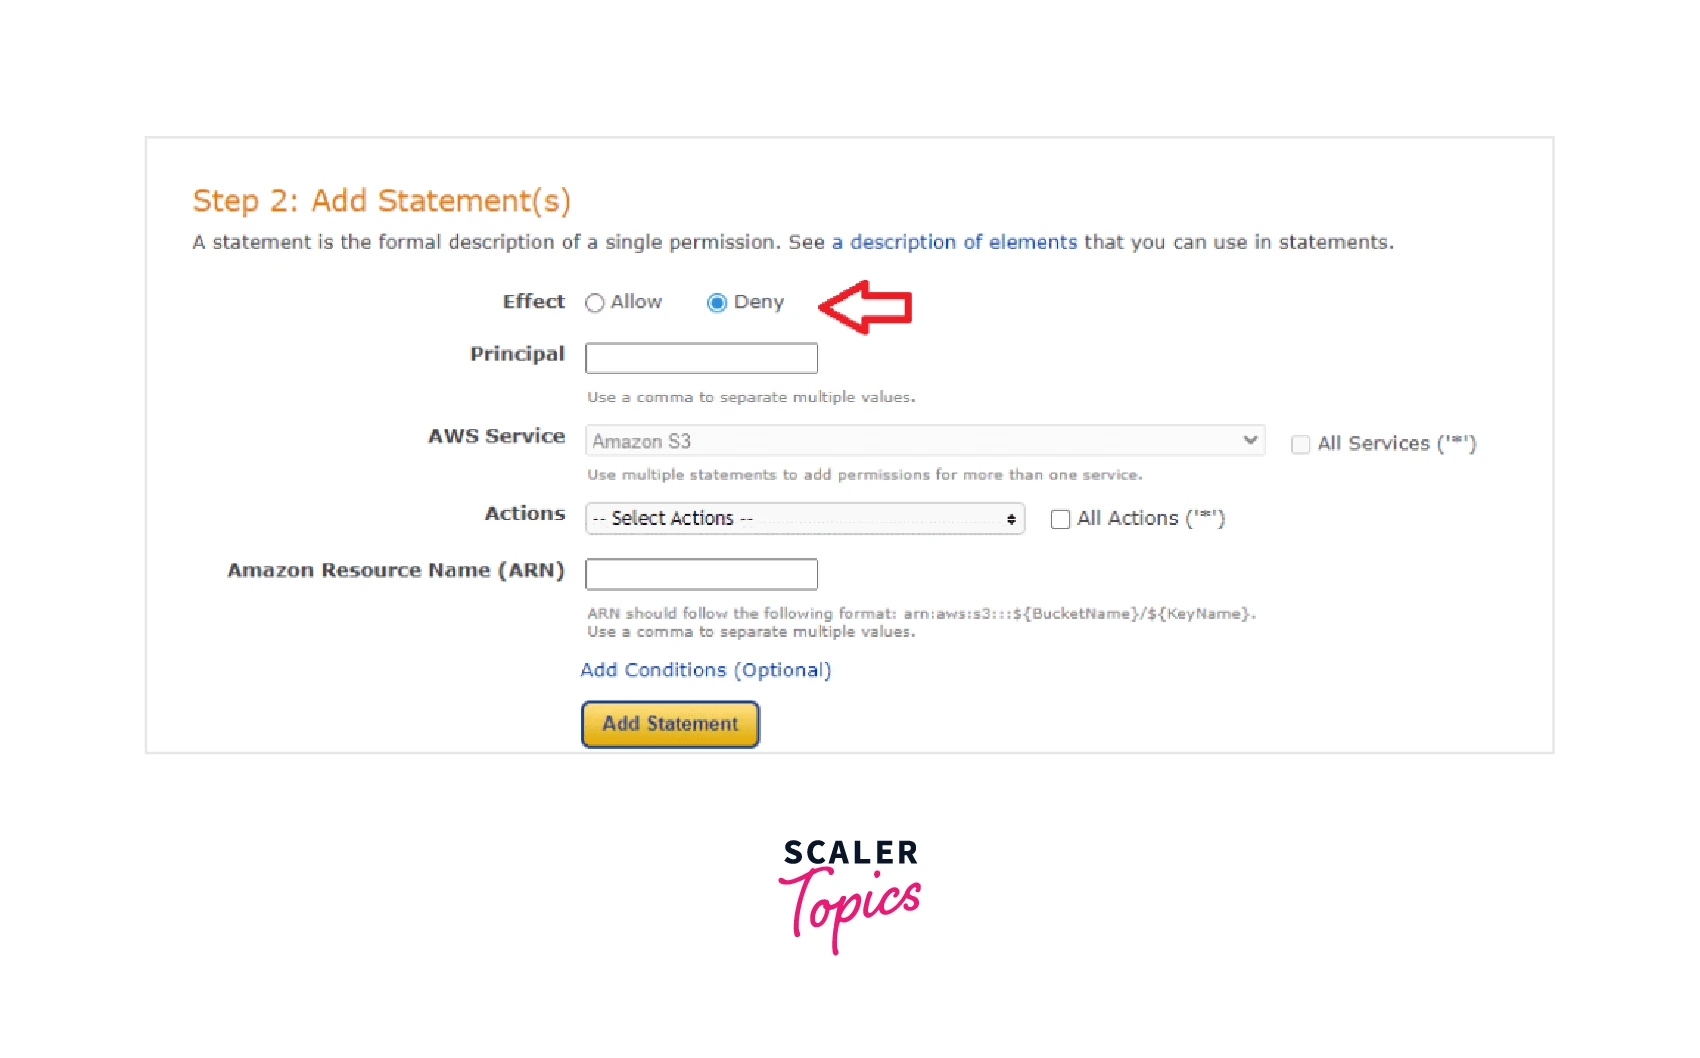
Step 6: You need to select either Allow or Deny in the Effect section concerning your scenarios where whether you want to permit the users to upload the encrypted objects or not. Also, in the principal option we need to add the IAM ARN (Amazon Resource Name) or can also type * that tells AWS that we want to select all the users of this S3 bucket to be able to access the objects by default as shown below.
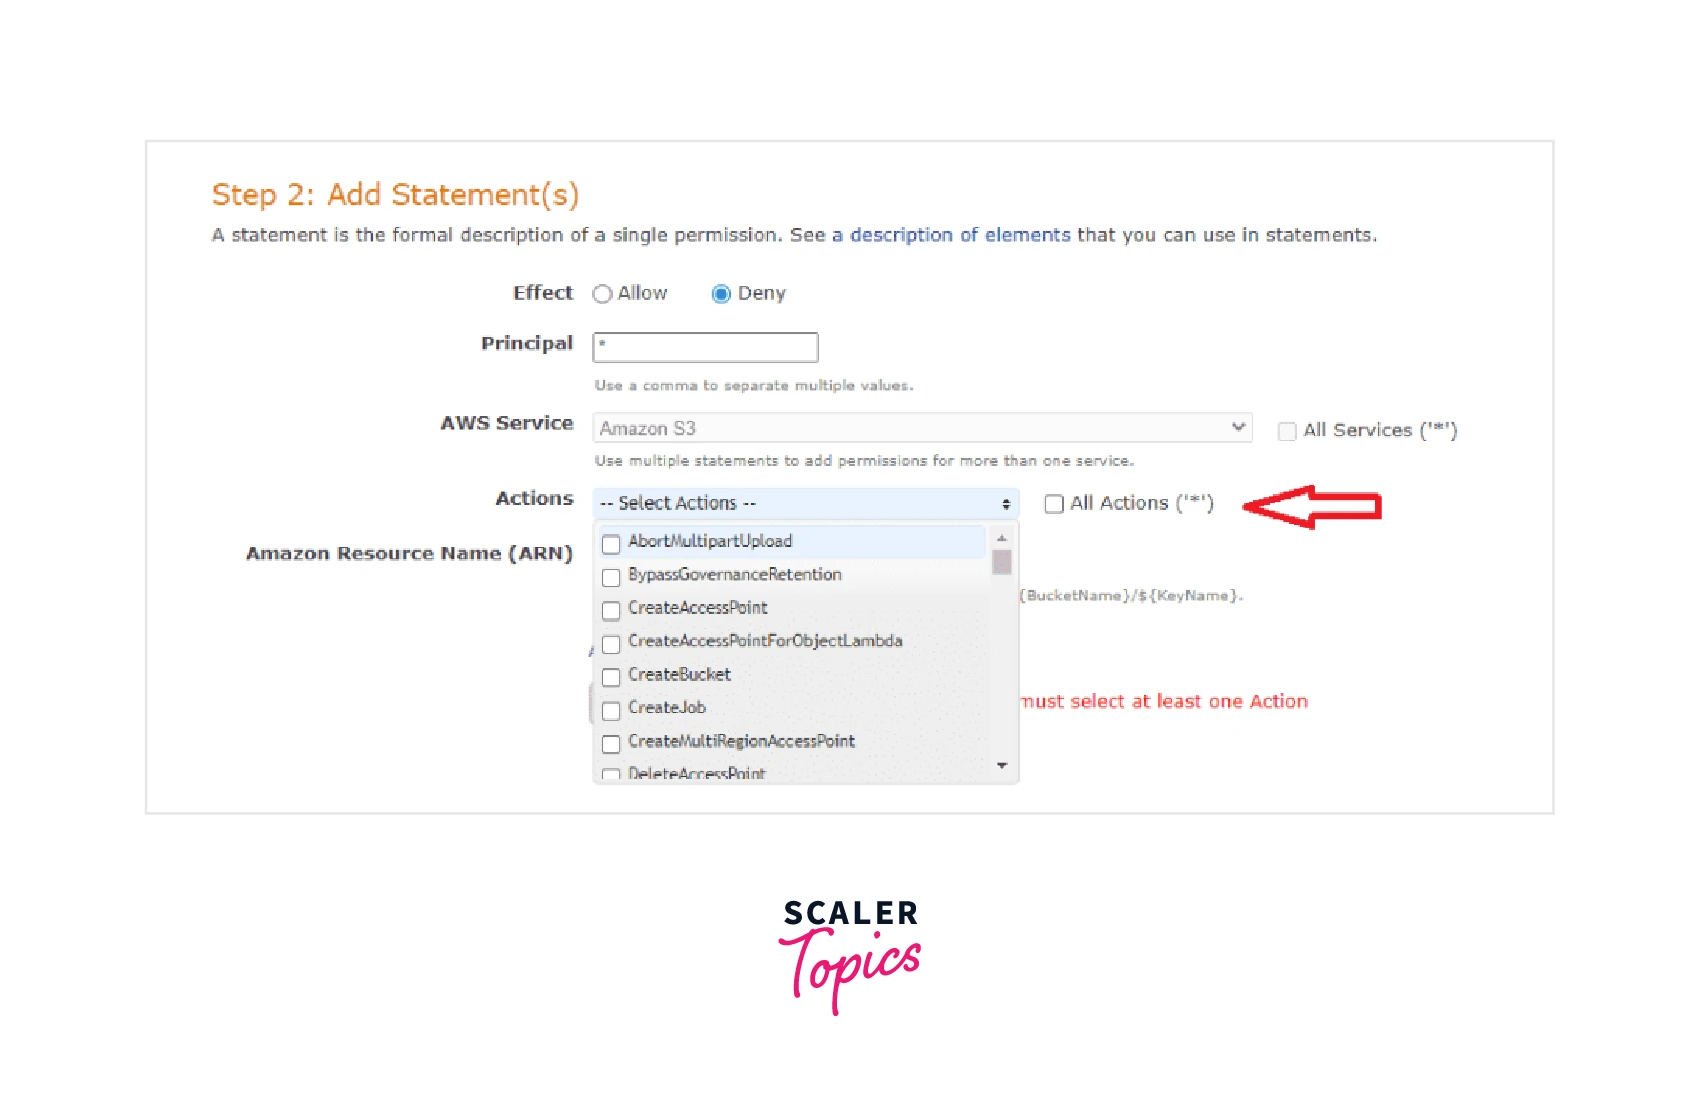
 Step 7: Now in the Actions option from the drop-down list we can either choose the specific actions that we want to apply to the S3 bucket or can also select All Actions if accessing the S3 bucket by all the users will not pose any threat to the sensitive information leakage or anything.
 Step 8: For the Amazon Resource Name (ARN), we need to specify the S3 Bucket name on which we want the S3 bucket policy to be applied. For this step, either you could have saved the bucket name or you can also switched to the previous page to copy the S3 Bucket name. Also, add /* after the S3 bucket name to select all the objects and their subfolders.
As an optional section, you also get the Add Conditions section. Based on these conditions, it is decided if the access shall be allowed or denied as shown below.
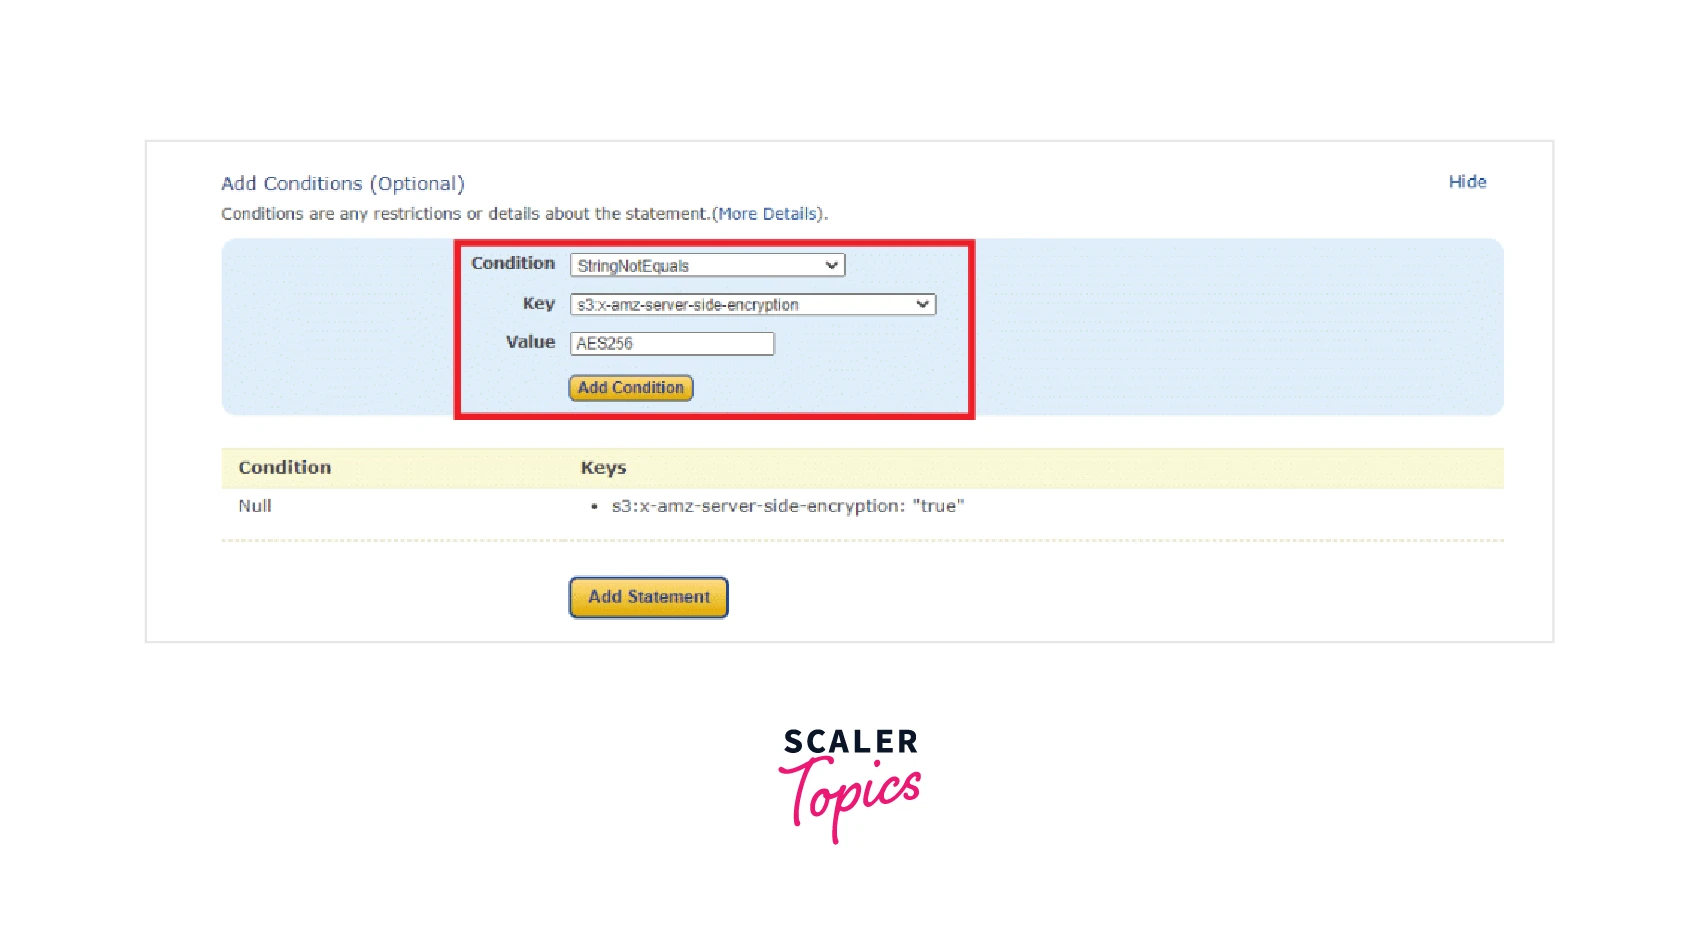 Step 9: Click on the Add Statement option, followed by clicking on the Generate Policy option.
You successfully generated the S3 Bucket Policy and the Policy JSON Document will be shown on the screen like the one below:
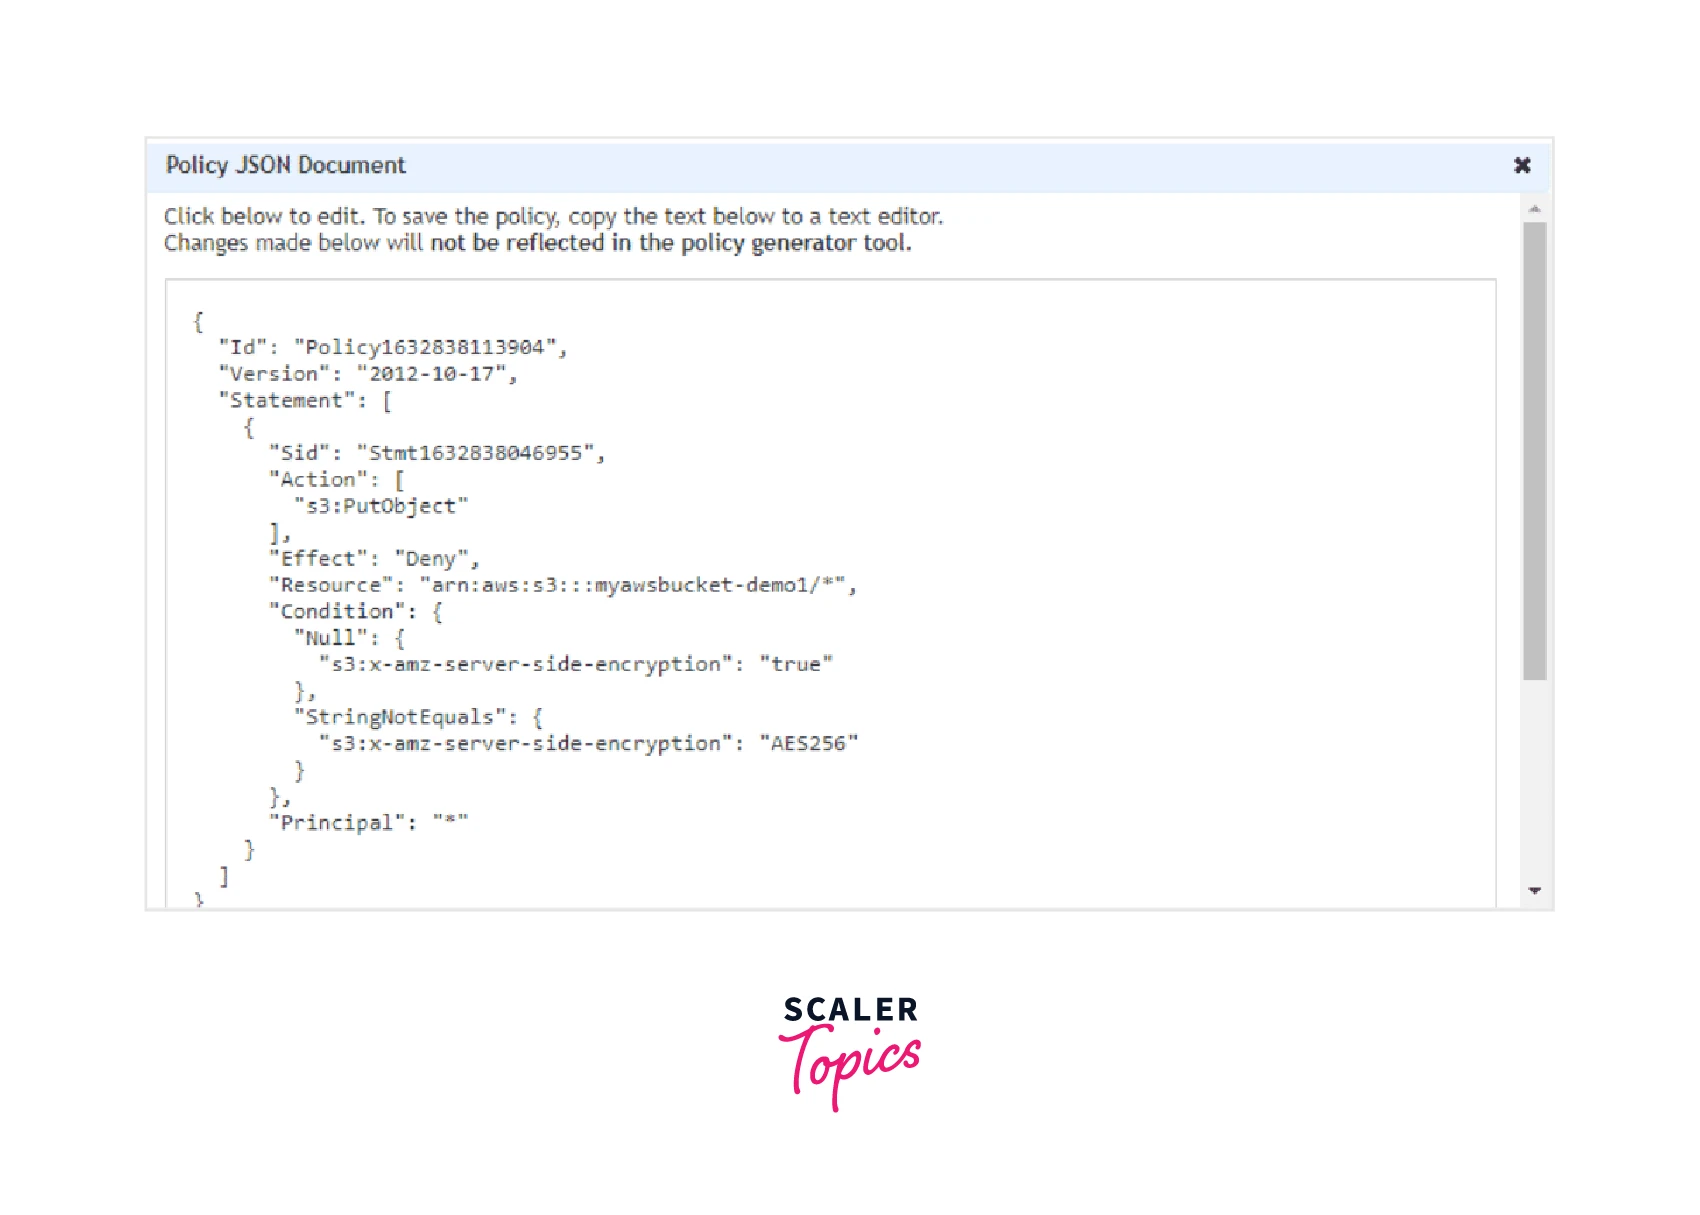
Step 10: Now you can copy this to the Bucket Policy editor as shown below and Save your changes.
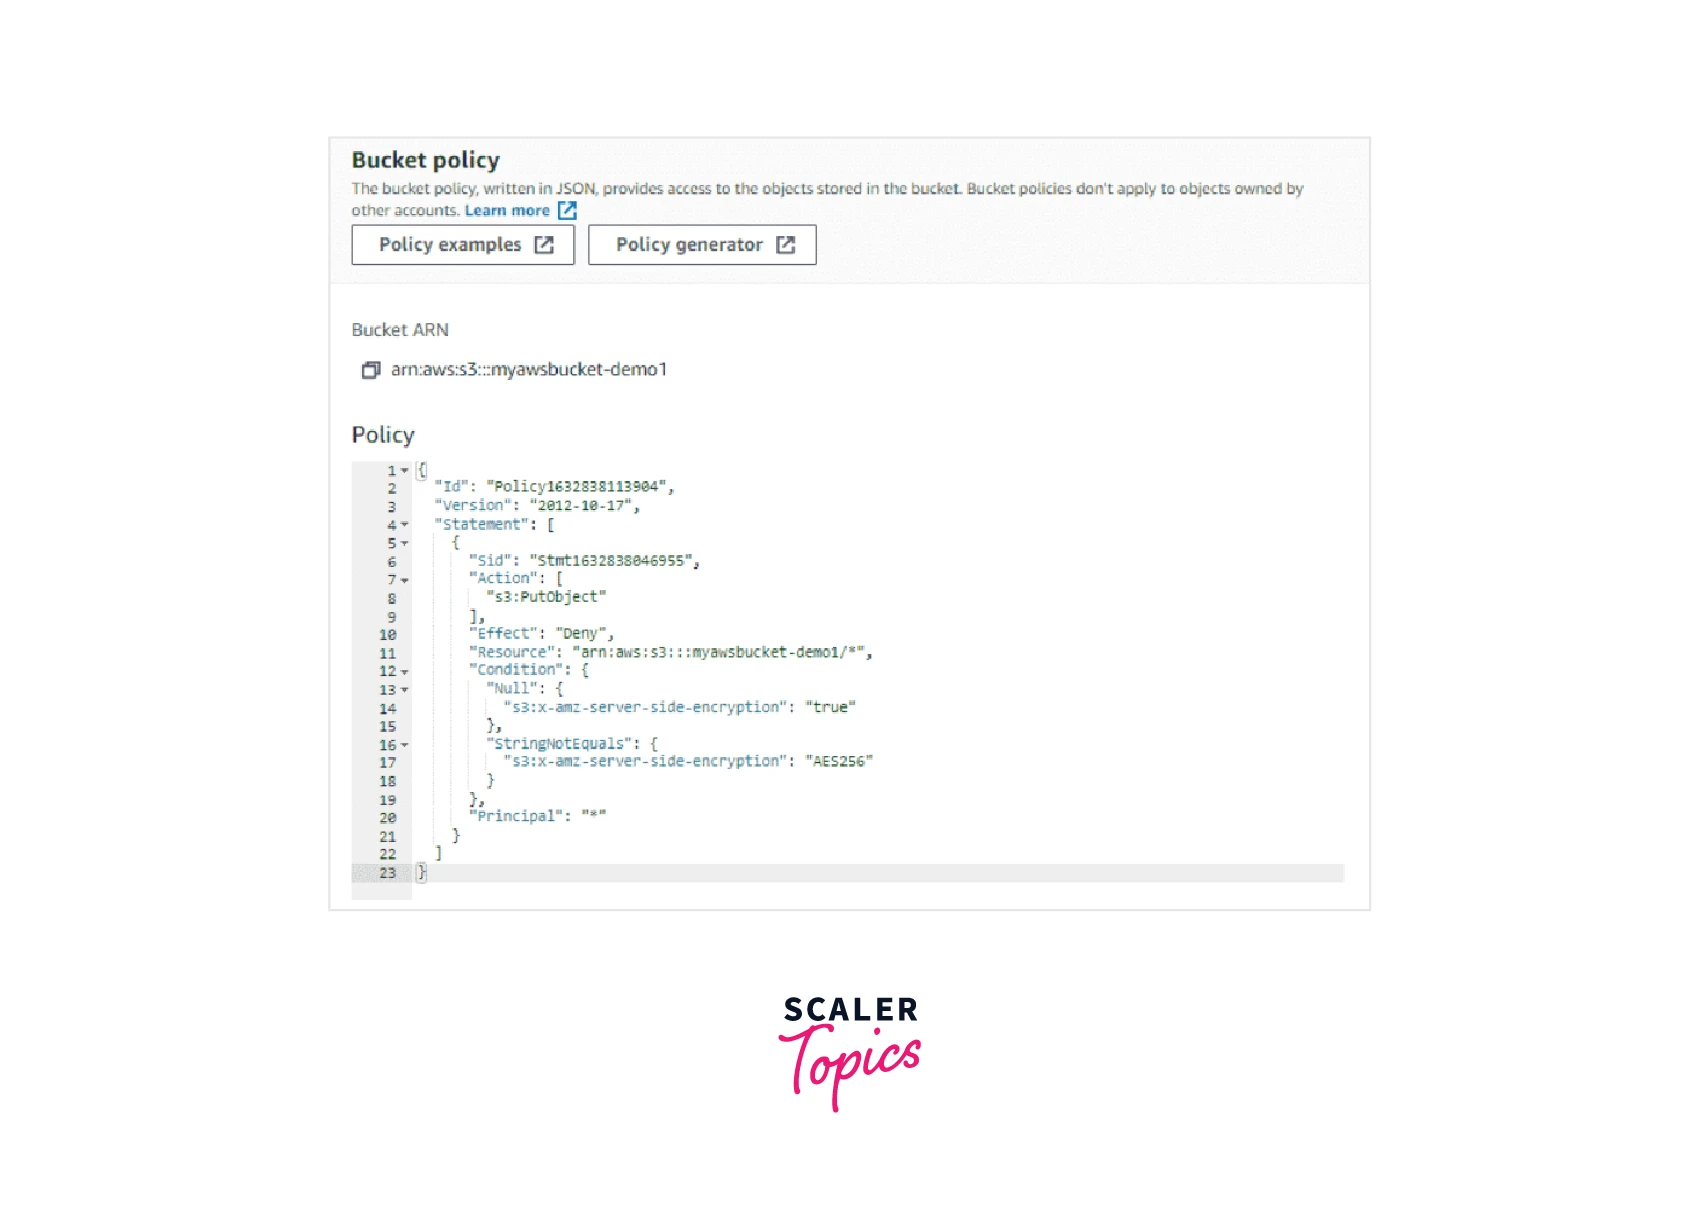 Hurray! We successfully created the first S3 Bucket Policy.
Editing an S3 Bucket Policy
Now let us see how we can Edit the S3 bucket policy if any scenario to add or modify the existing S3 bucket policies arises in the future:
Step 1: Visit the Amazon S3 console in the AWS management console by using the URL.
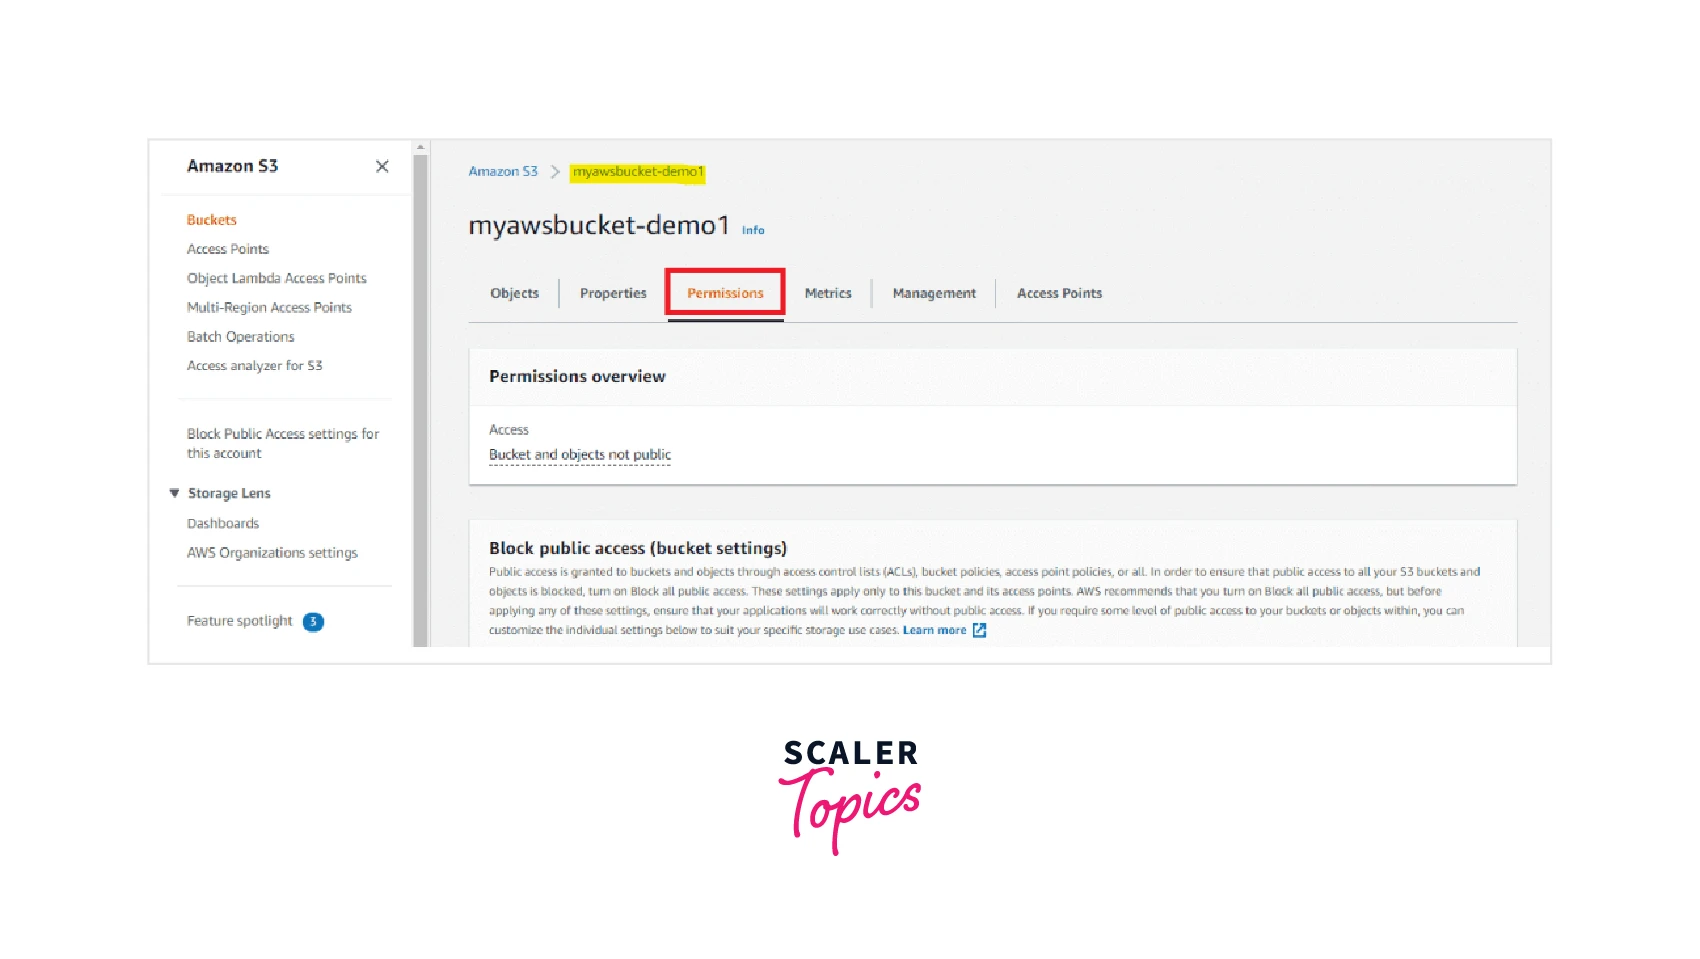
Step 2: Click on your S3 bucket for which you wish to edit the S3 bucket policy from the buckets list and click on Permissions as shown below.
 Step 3: Now enter your desired S3 bucket policy text or can even edit the pre-existing S3 bucket policy text in the designated text box of the bucket policy editor.
Quick Note: The S3 Bucket policies work on the JSON file format, hence we need to maintain the structure every time we are creating an S3 Bucket Policy.
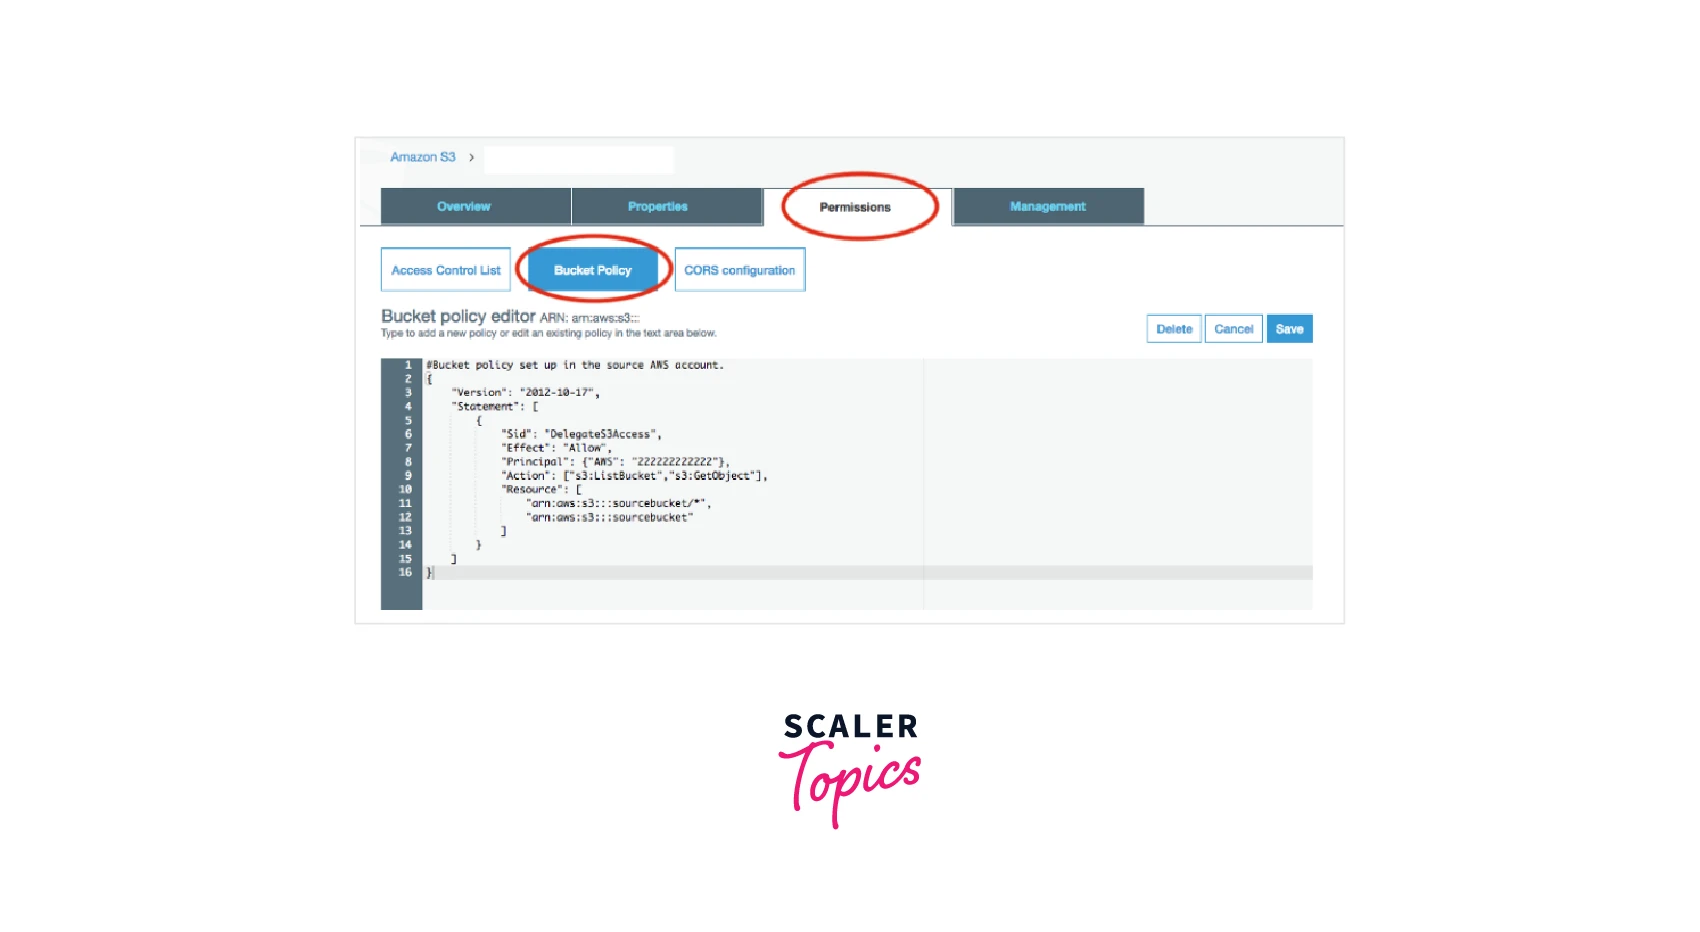
Step 4: Once the desired S3 bucket policy is edited, click on the Save option and you have your edited S3 bucket policy.
Bravo! Now you know how to edit or modify your S3 bucket policy.
Bucket Policy Examples
The below section explores how various types of S3 bucket policies can be created and implemented with respect to our specific scenarios. It also tells us how we can leverage the S3 bucket policies and secure the data access, which can otherwise cause unwanted malicious events.
For the below S3 bucket policies we are using the SAMPLE-AWS-BUCKET as the resource value. For your testing purposes, you can replace it with your specific bucket name.
Scenario 1: Grant permissions to multiple accounts along with some added conditions
S3 bucket policy:
Explanation: The above S3 bucket policy grants permission by specifying the Actions as s3:PutObject and s3:PutObjectAcl permissions to multiple AWS accounts specified in the Principal as 121212121212 and 454545454545 user. This policy also requires the request coming to include the public-read canned ACL as defined in the conditions section. A public-read canned ACL can be defined as the AWS S3 access control list where S3 defines a set of predefined grantees and permissions.
Scenario 2: Access to only specific IP addresses
S3 bucket policy:
Explanation: The above S3 bucket policy denies permission to any user from performing any operations on the Amazon S3 bucket. If the request is made from the allowed 34.231.122.0/24 IPv4 address, only then it can perform the operations. The Condition block in the policy used the NotIpAddress condition along with the aws:SourceIp condition key, which is itself an AWS-wide condition key.
Scenario 3: Grant permission to an Amazon CloudFront OAI
S3 bucket policy:
Explanation: The above S3 bucket policy grant access to only the CloudFront origin access identity (OAI) for reading all the files in the Amazon S3 bucket. Here the principal is defined by OAI’s ID.
Scenario 4: Allowing both IPv4 and IPv6 addresses
S3 bucket policy:
Explanation: The S3 bucket policy above explains how we can mix the IPv4 and IPv6 address ranges that can be covered for all of your organization's valid IP addresses. Hence, the IP addresses 12.231.122.231/30 and 2005:DS3:4321:2345:CDAB::/80 would only be allowed and requests made from IP addresses (12.231.122.233/30 and 2005:DS3:4321:1212:CDAB::/80 ) would be REJECTED as defined in the policy.
Scenario 5: S3 bucket policy to enable Multi-factor Authentication
S3 bucket policy:
Explanation: To enforce the Multi-factor Authentication (MFA) you can use the aws:MultiFactorAuthAge key in the S3 bucket policy. As shown above, the Condition block has a Null condition. This is set as true whenever the aws:MultiFactorAuthAge key value encounters null, which means that no MFA was used at the creation of the key. Also, using the resource statement as s3:GetObject permission on the bucket (SAMPLE-AWS-BUCKET) allows its access to everyone while another statement restricts the access to the SAMPLE-AWS-BUCKET/taxdocuments folder by authenticating MFA. Lastly, the S3 bucket policy will deny any operation when the aws:MultiFactorAuthAge value goes close to 3,600 seconds which indicates that the temporary session was created more than an hour ago.
Best Practices to Secure AWS S3 Storage Using Bucket Policies
Listed below are the best practices that must be followed to secure AWS S3 storage using bucket policies:
-
Always identify the AWS S3 bucket policies which have the access allowed for a wildcard identity like Principal * (which means for all the users) or Effect is set to "ALLOW" for a wildcard action * (which allows the user to perform any action in the AWS S3 bucket). This will help to ensure that the least privileged principle is not being violated. hence, always grant permission according to the least privilege access principle as it is fundamental in reducing security risk.
-
As you can control which specific VPCs or VPC endpoints get access to your AWS S3 buckets via the S3 bucket policies, you can prevent any malicious events that might attack the S3 bucket from specific malicious VPC endpoints or VPCs. With the implementation of S3 bucket policies to allow certain VPCs and reject others, we can prevent any traffic from potentially traveling through the internet and getting subjected to the open environment by the VPC endpoints.
-
Creating Separate Private and Public S3 Buckets can simplify your monitoring of the policies as when a single policy is assigned for mixed public/private S3 buckets, it becomes tedious at your end to analyze the ACLs. For example, you can create one bucket for public objects and another bucket for storing private objects. The entire private bucket will be set to private by default and you only allow permissions for specific principles using the IAM policies. For creating a public object, the following policy script can be used:
- Data inside the S3 bucket must always be encrypted at Rest as well as in Transit to protect your data. For this, either you can configure AWS to encrypt files/folders on the server side before the files get stored in the S3 bucket, use default Amazon S3 encryption keys (usually managed by AWS) or you could also create your own keys via the Key Management Service. The following snippet of the S3 bucket policy could be added to your S3 bucket policy which would enable the encryption at Rest as well as in Transit:
- Only allow the encrypted connections over HTTPS (TLS), by using the aws:SecureTransport condition under the Statement subsection in the S3 bucket policy.
Conclusion
Some key takeaway points from the article are as below:
- The S3 Bucket policy is an object which allows us to manage access to the specified Amazon S3 resources. We classify and allow the access permissions for each of the resources whether to allow or deny the actions requested by a principal, which can either be a user or through a role.
- The S3 bucket policy is always written in JSON format.
- The elements that an S3 bucket policy includes are: Version, Id, and Statement.
- Under the Statement section, we have different sub-sections which include- Sid, Effect, Principal, Action, and Resource, and an optional Condition element.
- When we create a new S3 bucket, AWS verifies it for us and checks if it contains correct information and upon successful authentication configures some or all of the above-specified actions to be ALLOWED to YOUR-SELF(Owner). This gives the owner the right to perform all the actions on the secure S3 bucket.
- The IAM user linked with an S3 bucket has full permission on objects inside the S3 bucket irrespective of the role on it.
- The S3 bucket policies are attached to the secure S3 bucket while their access control lists (ACLs) are attached to the files (objects) stored in the S3 bucket.
- Only the root user of the AWS account has permission to delete an S3 bucket policy.
