What is VPC in AWS?
Overview
Virtual Private Cloud (VPC) is a private section of the virtual cloud where you can define and launch your resources. An Amazon Virtual Private Cloud (Amazon VPC) enables you to define and launch AWS Resources in the virtual network of your AWS Account. Before we begin, let us find out what you will learn from this article.
What is a VPC?
A Virtual Private Cloud (VPC) in AWS is a private segment of the AWS Cloud that enables you to use your isolated resources and provides complete control over the underlying resources within the AWS Cloud. The resources in the VPC will not be shared in public infrastructure as they will operate in isolation. The term “virtual” lends to the trait that these resources are not dependent on physical hardware.
Amazon VPC (or) AWS VPC offers a logically secluded region of the AWS Cloud where you can customize the resources in your fashion. You can create resources in the VPC which can be accessed through the Internet and can also create private-facing resources which are not accessed through the Internet. The publicly accessible resources need to be placed in a public subnet and the private resources are to be placed in a private subnet.
Within the VPC - we can create subnets, select the IP address ranges, configure route tables, create internet gateways and NAT gateways, define security settings using security group rules and Network Access Control Lists (NACL), and many more configurations.
Elements of VPC
IPv4 and IPv6 address blocks
The VPC IP ranges are defined using CIDR (Classless Inter-Domain Routing) which is a method for allocating IP addresses. Amazon VPC supports IPv4 and IPv6 addressing. A VPC must have an IPv4 CIDR block associated with it. You can optionally associate multiple IPv4 CIDR blocks and multiple IPv6 CIDR blocks to your VPC.
When you create a VPC, you must specify a range of IPv4 addresses for the VPC in the form of a CIDR block. AWS recommends specifying a CIDR block from the private IPv4 address ranges as specified in RFC 1918.
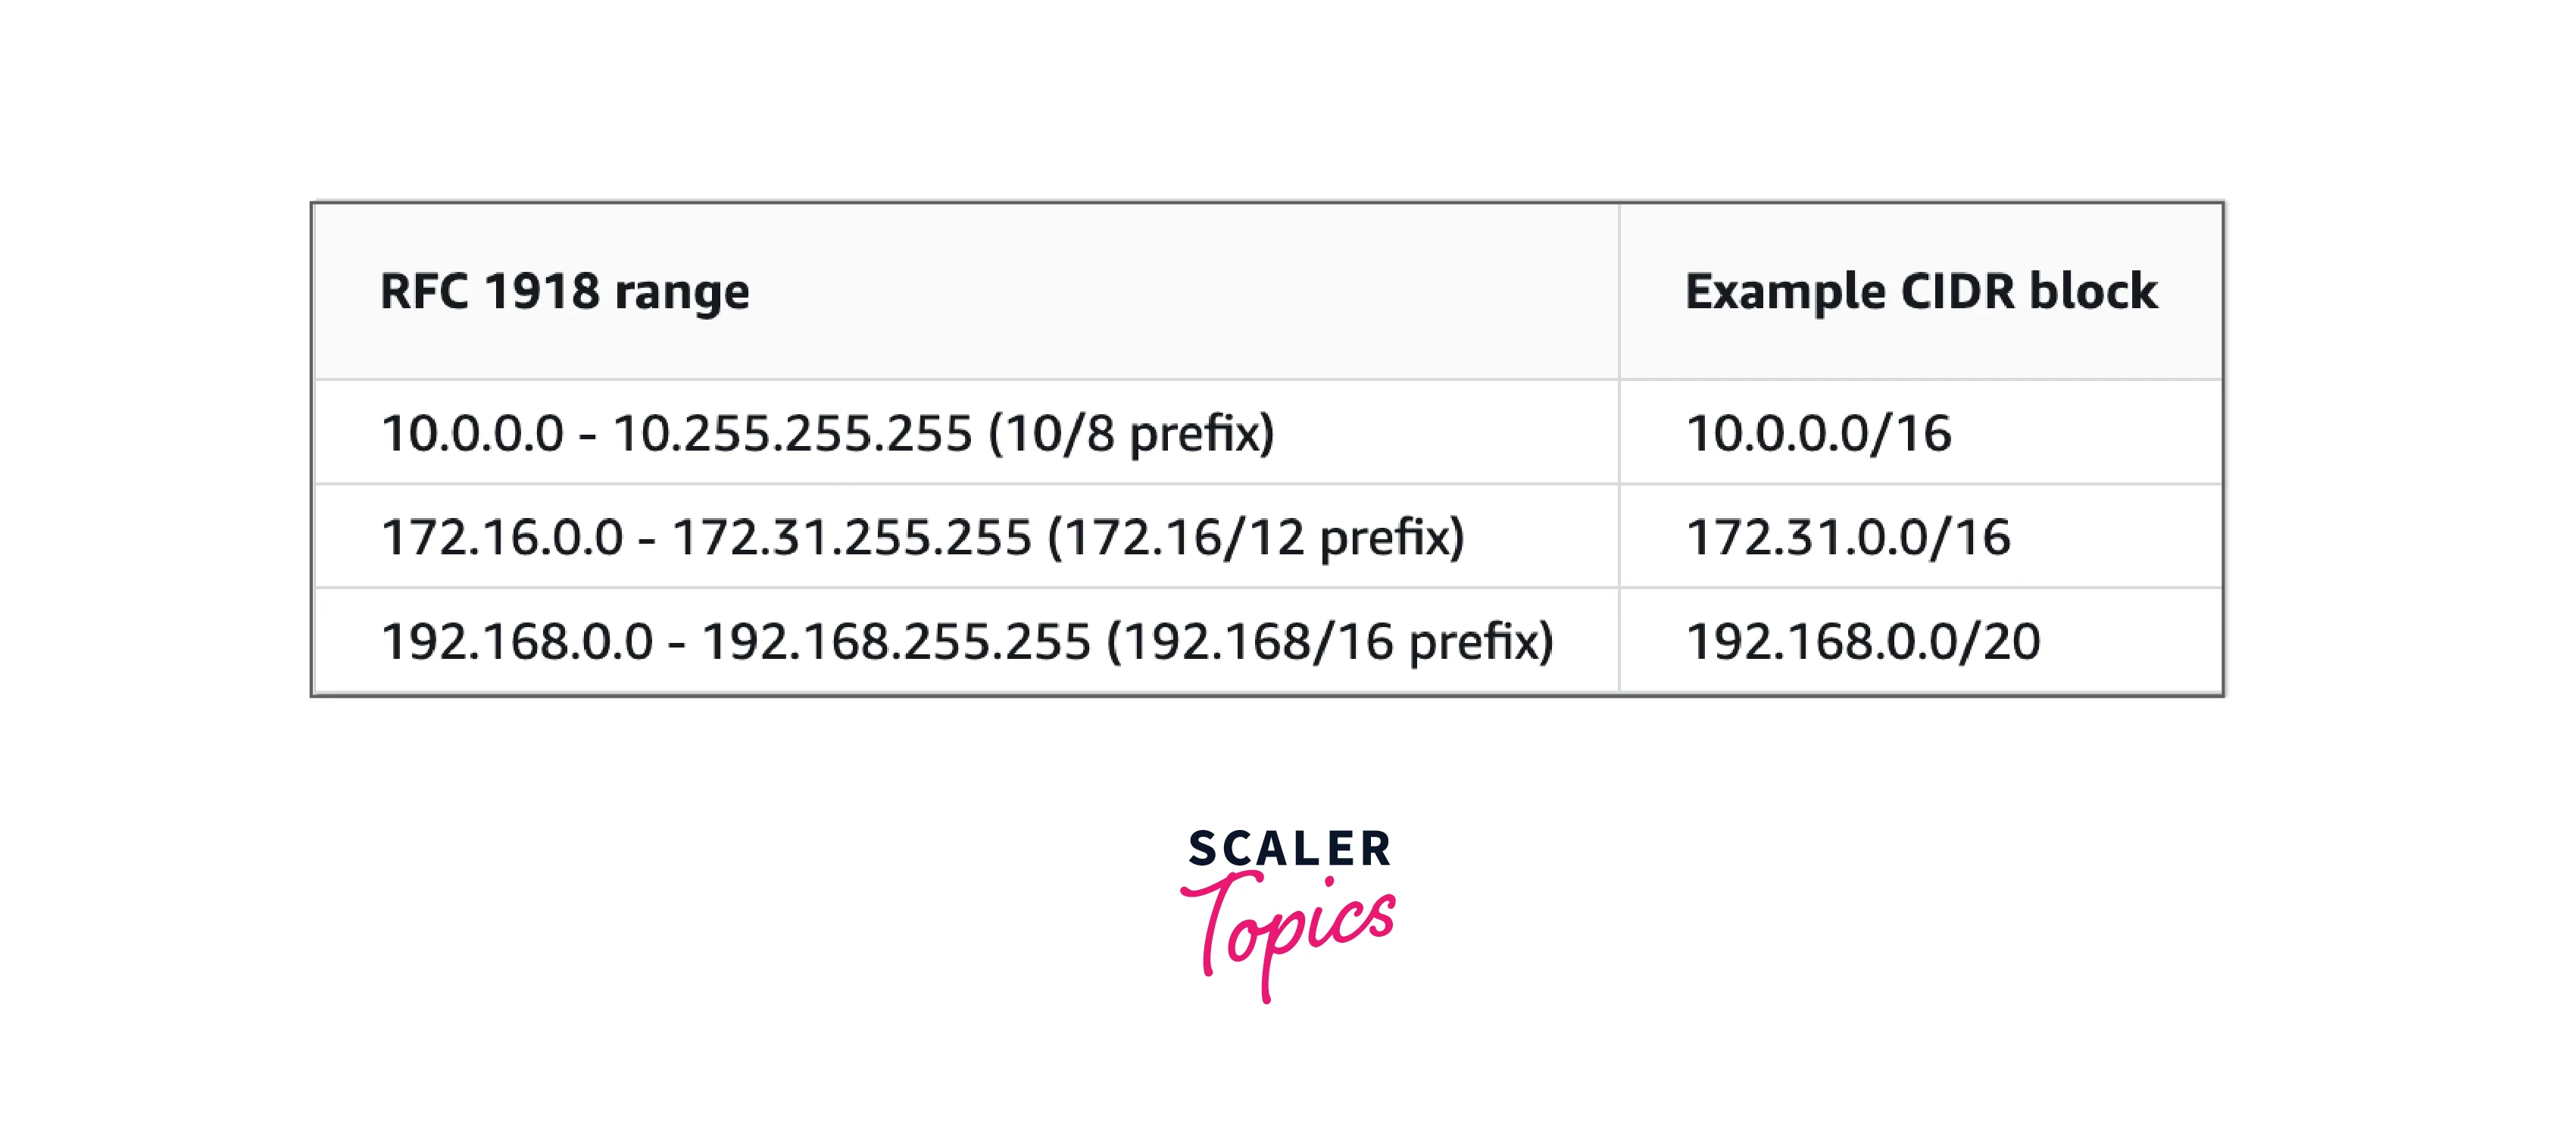
For more information regarding VPC sizing, refer to VPC sizing
Subnets
A subnet can be assumed to be a smaller network that is part of a larger network. This smaller network is a range of IP addresses in your VPC. Generally, a public subnet is used for those resources that need to be connected to the internet, and a private subnet is used for the resources that won't be connected to the internet. You can define security groups and network access control lists (ACLs) to provide more security and protect the resources in the subnet.
Route Tables
A route table comprises a set of rules called routes which determines where traffic has to be directed. In simple words, a route table tells where the network packets need to go to reach their destination. Each subnet in your VPC must be associated with a route table, which controls the routing for the subnet.
Please remember that a subnet can only be associated with one route table at a time, but you can associate multiple subnets with the same route table. Also, you can have multiple route tables in a VPC.
Internet Gateway ( IGW )
An IGW is a horizontally scaled, redundant, and highly available VPC component that allows communication between instances in the VPC and the internet which is outside the VPC. To connect to the internet, there should be an IGW in the VPC. Only one IGW can be attached to a VPC at a time.
Internet Gateway allows resources in public subnets to connect to the internet. In the same way, resources on the internet can initiate a connection to the resources in your public subnet using IGW (IGW works two-way).
NAT Gateway
NAT stands for Network Address Translation. NAT Gateway works similarly to Internet Gateway but the significant difference is that resources in the private subnet can connect to services outside the VPC through NAT Gateway but external services cannot initiate a connection with those instances/resources (NAT GW works only one way unlike the IGW).
Security Groups
Security Groups(SG) are a set of firewall rules which control the traffic that is allowed to reach and leave the resources that it is associated with. For each security group, you add rules that control the traffic based on protocols and port numbers. There are separate sets of rules for inbound traffic (traffic coming into the instance) and outbound traffic (traffic going out from the instance). Using Security Groups, we can only create rules with allow action and cannot create rules with deny action. They operate at the instance level and you can assign a single security group to multiple instances.
Network Access Control Lists
NACLs are an additional layer of security to your VPC which allows or denies specific inbound or outbound traffic at the subnet level. NACL rules are similar to Security Group rules but have denied rules as well unlike SG rules. Multiple subnets can be bound with a single NACL, but one subnet can be bound with a single NACL only, at a time.
Other Networking Services
Apart from the above elements, AWS VPC also provides a few additional networking services:
- Virtual Private Gateway
- Virtual Private Network (VPN)
- VPC Flow Logs
- VPC Peering Connections
- Transit Gateway
- Direct Connections and Direct Connect Gateway
- VPC Endpoints (gateway type endpoints and interface type endpoints)
- Traffic Mirroring
Architecture of VPC
Now that we have learned about the elements of VPC. Let us try to understand the architecture of VPC. Consider a VPC in an AWS Region (of your choice) with one public subnet and one private subnet. Each of the subnets has one EC2 instance launched inside it.
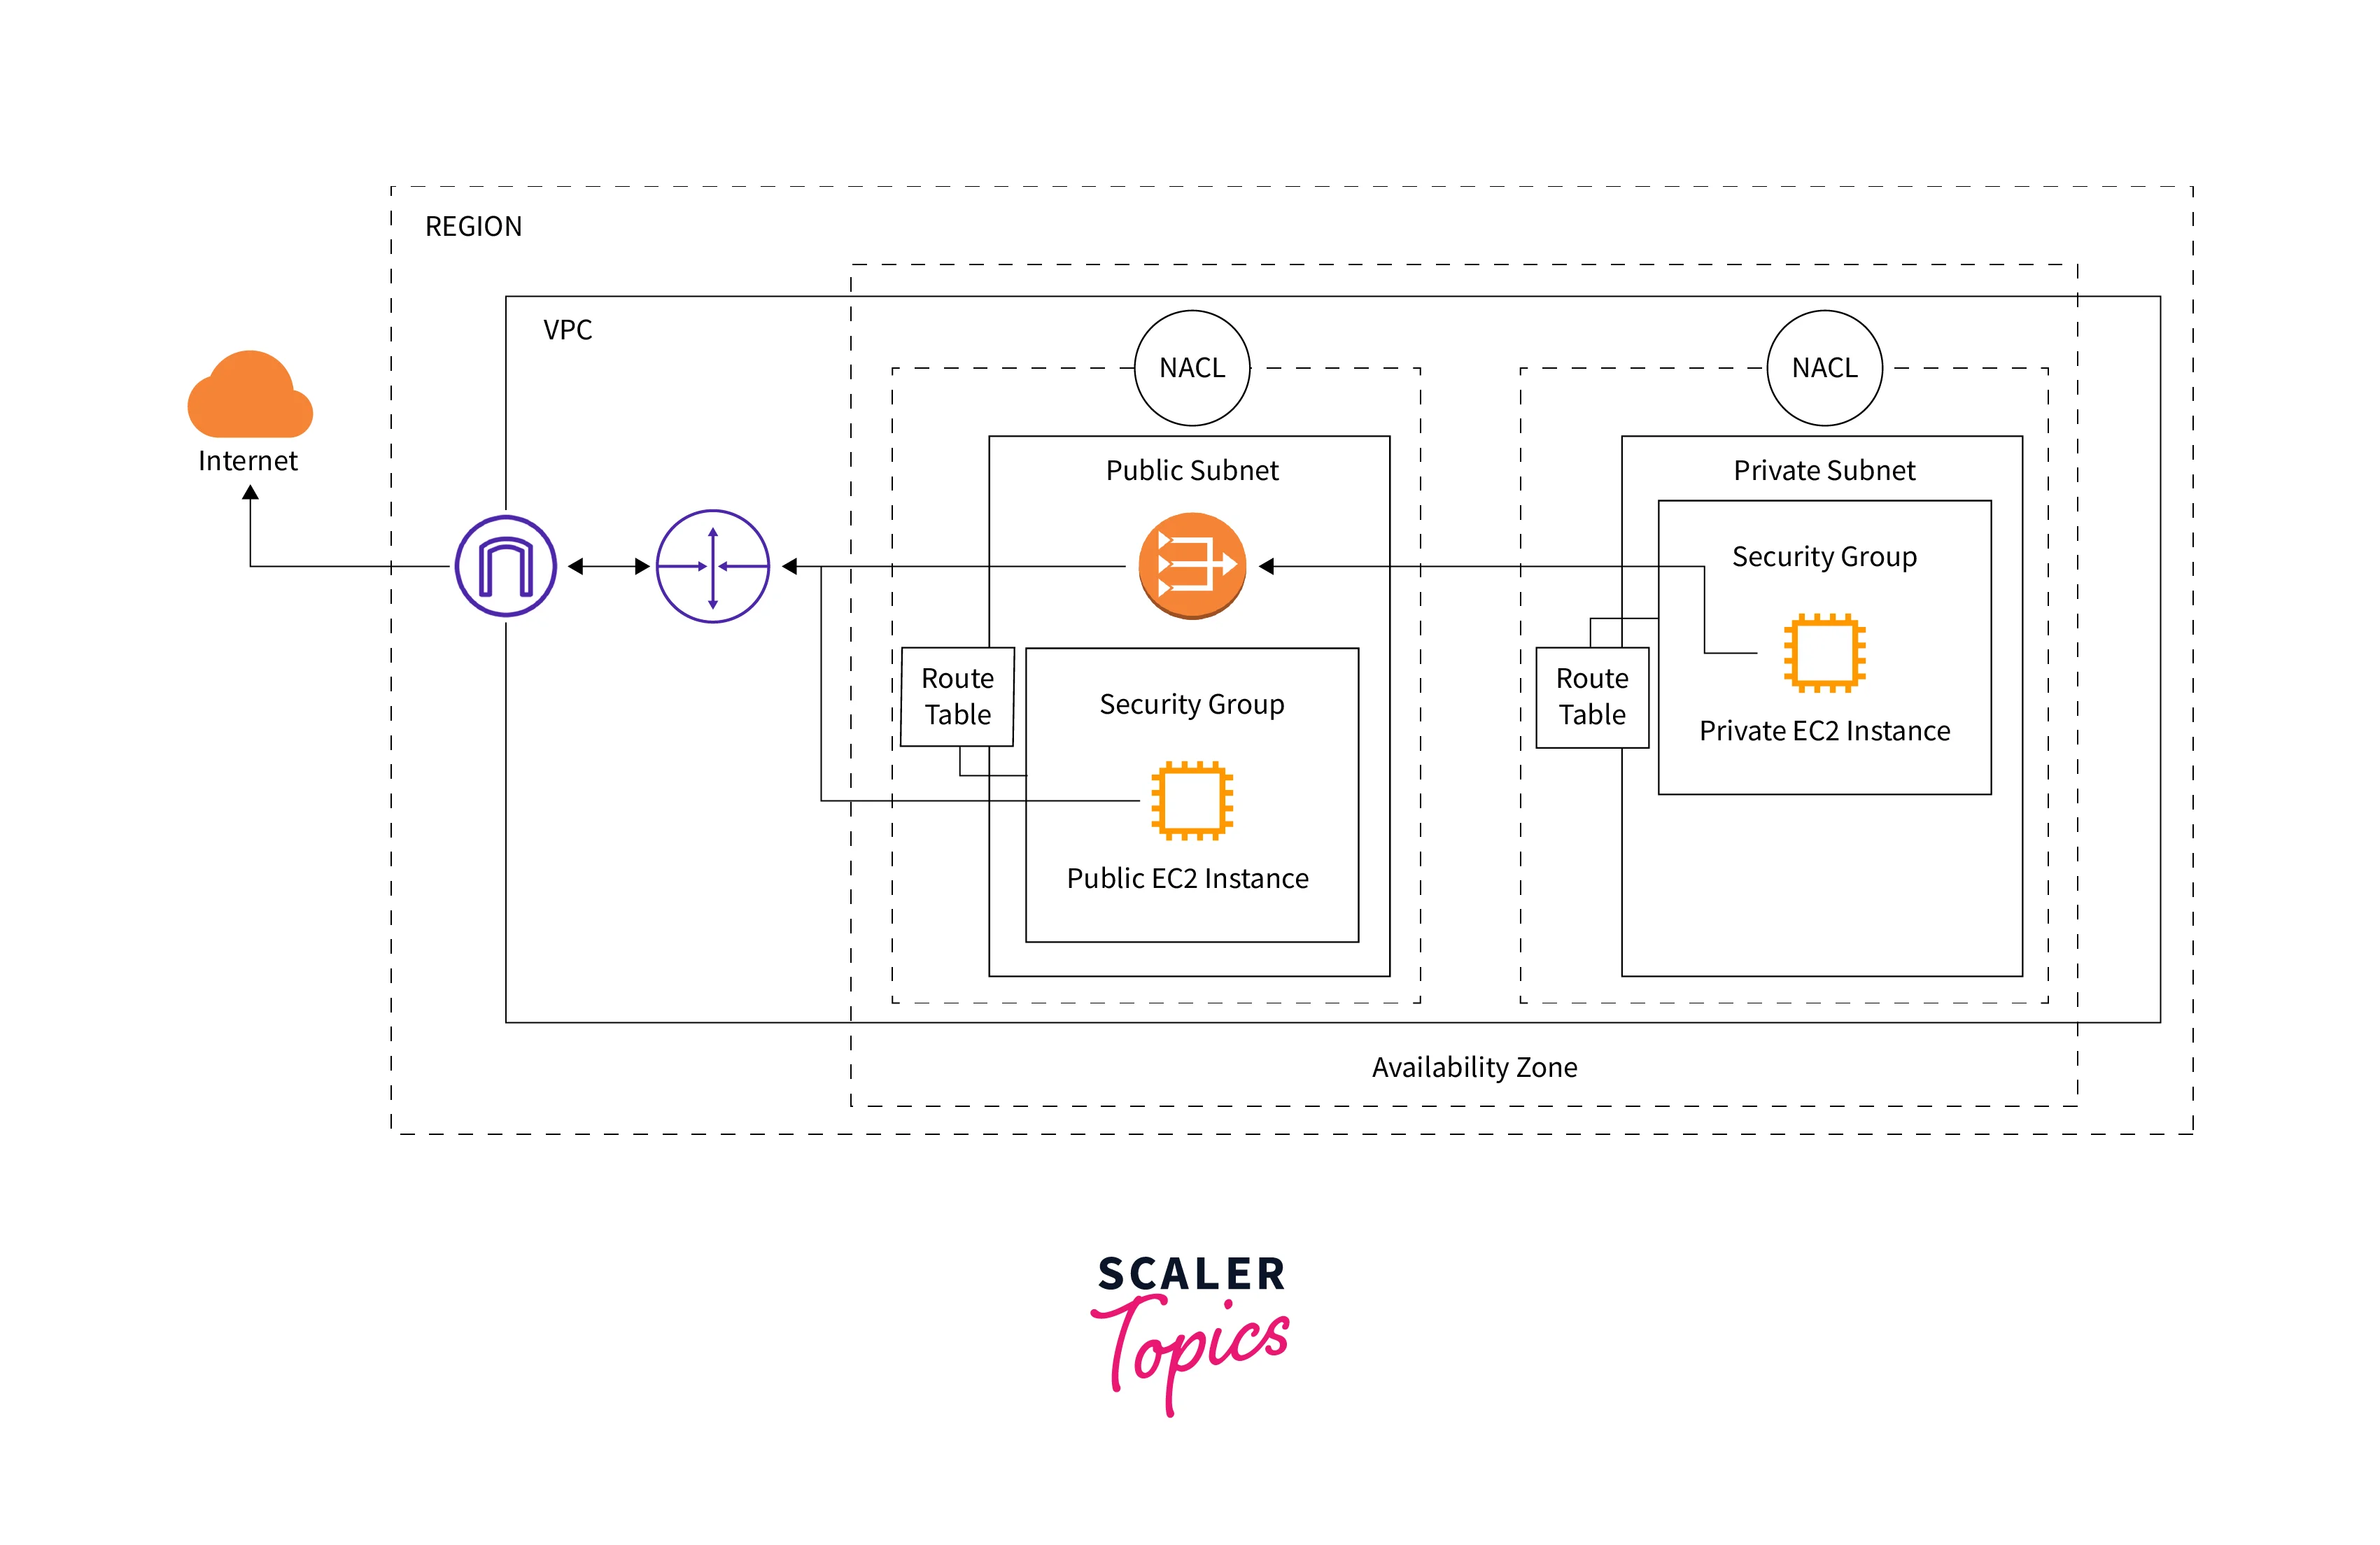
The outer box represents an AWS Region and inside the region, a Virtual Private Cloud (VPC) will be created. This VPC will be created in an availability zone (Availability zones are the distinct locations within AWS Regions which are highly available data centers that provide scalability, reliability, and disaster recovery) corresponding to the particular region. In the VPC, there are two subnets defined - one public subnet, and one private subnet. EC2 instances are launched in each of the subnets. Here separate subnets are used for unique routing requirements. Public subnets are used for external-facing resources and private subnets are used for internal resources. The EC2 instance in the public subnet is accessible over the internet whereas the instance in the private subnet cannot access the internet on its own. Note that to connect to the Internet, place an Internet Gateway (IGW) inside the VPC and add a route to the public subnet's route table (Destination as 0.0.0.0/0 with the target as Internet gateway) that directs internet-bound traffic to the Internet gateway.
For the private instances to access the internet, place a NAT Gateway in the public subnet and edit the route table of the private subnet to contain the NAT Gateway route (Destination as 0.0.0.0/0 and Target as NAT gateway). The NAT Gateway in the public subnet connects to the IGW which connects to the internet. Security Group rules are attached to the EC2 instances which can be modified to allow inbound and outbound traffic. As an additional layer of security, NACLs can be configured as firewalls to control inbound and outbound traffic at the subnet level.
Flow of traffic from the internet to the instances
IGW acts as the gateway connecting VPC to the outer world i.e internet. This connection goes over the router in VPC which redirects the traffic to the route table. The targeted traffic moves to the route table which redirects to the NACL. NACL consists of allow and deny rules by which the traffic will be verified (can be allowed or blocked depending on the rules) and further sent to the security groups to control the inbound & outbound traffic based on the SG rules.
The traffic reaches the EC2 instances in public and private subnets as defined using the IP addresses. The traffic reaches the public instance (EC2 instance in the public subnet) and now the instance is accessible over the internet. For the traffic to reach the private instance (EC2 instance in the private subnet), it has to pass through the NAT Gateway in the public subnet and then the route table in the private subnet and reach the EC2 instance.
Features of VPC
Amazon Virtual Private Cloud (Amazon VPC) provides the following features that let you increase and monitor security for your VPC.
- Flow Logs: Logs consist of the information about the traffic that is going in and out of the VPC network interfaces.
- IP Address Manager (IPAM) : With IPAM your VPC gets IP addresses automatically . IPAM is mainly used to track the assigned IP addresses and monitor the usage of these IPs across multiple accounts.
- IP Addressing: This allows you to add IPv4 and IPv6 addresses to the resources inside your subnet and VPC.
- Ingress Routing: Using ingress routing you can route all your traffic (incoming/outgoing) to/from an IGW to an ENI of your EC2 instance.
- Network Access Analyzer: This feature helps to analyze if your network meets the security and compliance requirements.
- Network Access Control Lists: NACL acts like a firewall to control the incoming and outgoing traffic from one or many subnets.
- Reachability Analyzer: This tool helps you in inspecting the reachability between 2 resources in your VPC.
- Security Groups : The groups act as a firewall for the EC2 instances .
- Traffic Mirroring: Using this feature you can carry the internet traffic of a network interface in the VPC and send it to any monitoring tool that lets you do a deep packet-level inspection.
For more information about the VPC features, refer to Amazon Virtual Private Cloud Features.
What Can Be Done With a VPC?
- Amazon VPC enables you to build a virtual network in the AWS cloud - no VPNs, hardware, or physical data centers are required.
- You can define your own network space, and control how your network and the Amazon EC2 resources inside your network are exposed to the Internet.
- You can also leverage the enhanced security options in Amazon VPC to provide more granular access to and from the Amazon EC2 instances in your virtual network.
How do the VPCs Work?
AWS VPC lets you provision a logically isolated section on the cloud where you can create or launch your AWS resources in a virtual network that can be configured or defined as per your requirement. It creates a private virtual network in the AWS Cloud dedicated to your AWS account. This virtual network is comparable to a traditional network that you'd operate in your data center. But the physical components that are used in the data center do not certainly exist in the VPC and they have been remodeled into the Cloud Software.
A VPC behaves like a traditional TCP/IP network with the benefits of using the scalable infrastructure of AWS. Using VPC, you can quickly spin up a virtual network environment favorable for the AWS resources to be launched into. You can define the components required for your AWS resources in the VPC. You can control the customization of the network of Amazon VPC.
Where do VPCs Live?
AWS VPCs are created and situated in AWS Regions. AWS Regions are separate physical locations across the world where the AWS Cloud data centers are clustered. These regions are used by AWS to house its infrastructure. They are independent and isolated from each other regions. These regions are shared around the world so that the users could choose their closest region and host their cloud infrastructure there. Because, the closer the region is, the lesser the network latency for the end users.
There are 27 AWS Regions as of 2022 and 7 more regions are yet to be launched. Each Amazon account can host multiple VPCs but each AWS Region has a default limit of 5 VPCs i.e 5 VPCs per AWS Region. This limit is adjustable and can be increased upon request.
When you view the AWS resources, you can see only the resources that are tied to the AWS Region that is being specified. This is because AWS Regions are isolated from each other, and we don't automatically replicate resources across AWS Regions.
Working with Amazon VPC
The creation and management of VPCs are handled using any of the following interfaces:
- AWS Management Console: Provides a web interface that can be used to manage and access the VPCs.
- AWS Command Line Interface (AWS CLI): Provides Windows, Linux, and Mac commands for many AWS services including Amazon VPC. With AWS CLI, you can control multiple AWS services from the command line and automate them through scripts. After you install and configure AWS CLI, you can make calls to your AWS services from the command line.
- AWS SDKs: Provides language-specific APIs for AWS services including AWS VPC. Software Development Kit (SDK) takes the complexity out of coding by providing language-specific APIs for AWS services
- Query API: Provides low-level API actions that you call using HTTPS requests. Using the Query API is the most direct way to access Amazon VPC, but it requires that your application handle low-level details such as generating the hash to sign the request and error handling. Check Amazon VPC actions in the Amazon EC2 API Reference.
Getting Started with VPC
Let us get started by launching an EC2 instance in the default subnet. After launching, we will connect to the instance and then understand how to terminate the instance.
Before getting started, make sure you sign up for an AWS Account which allows you to sign-up and use all AWS Services including AWS.
Step1: Understanding the configuration of your default VPC
-
Open the VPC console on your AWS Dashboard. You can do this by either typing VPC in the search bar on your dashboard (or ) directly by clicking on this link https://console.aws.amazon.com/vpc/
-
On the left-hand side of the screen, you will find a navigation pane. In the pane, you'll see "Your VPCs". Once you click on that, you will find a list of your VPCs.
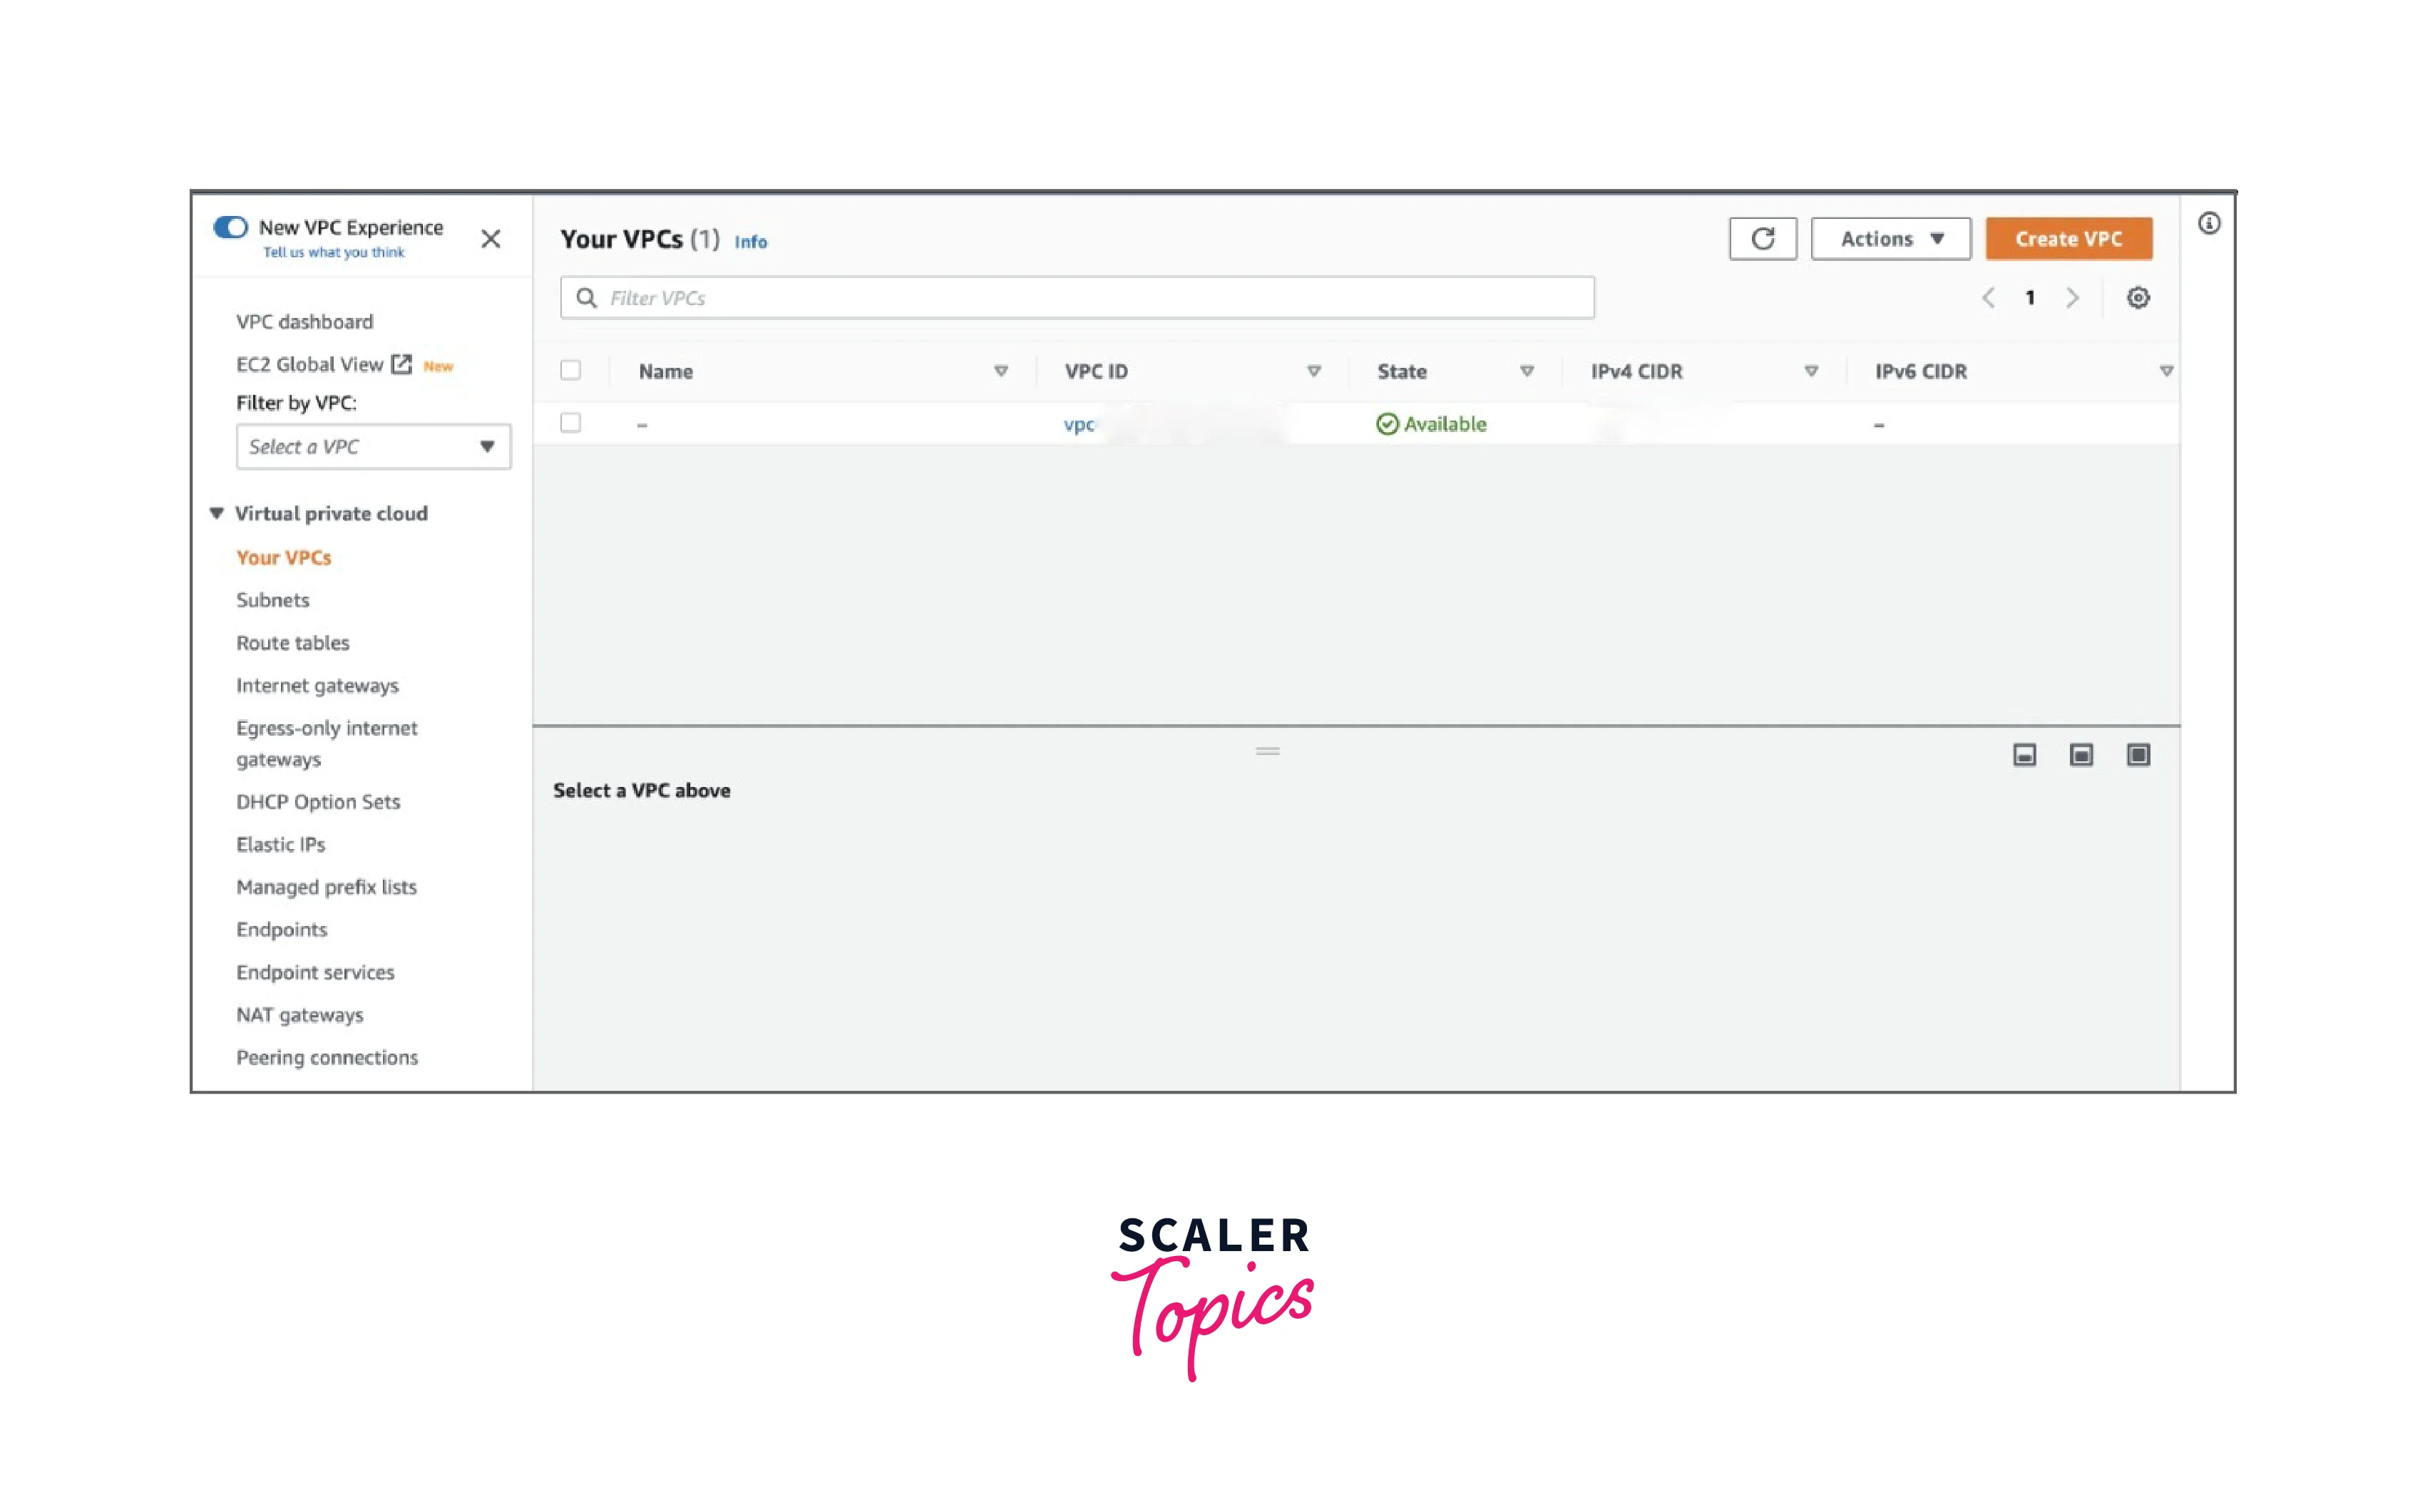
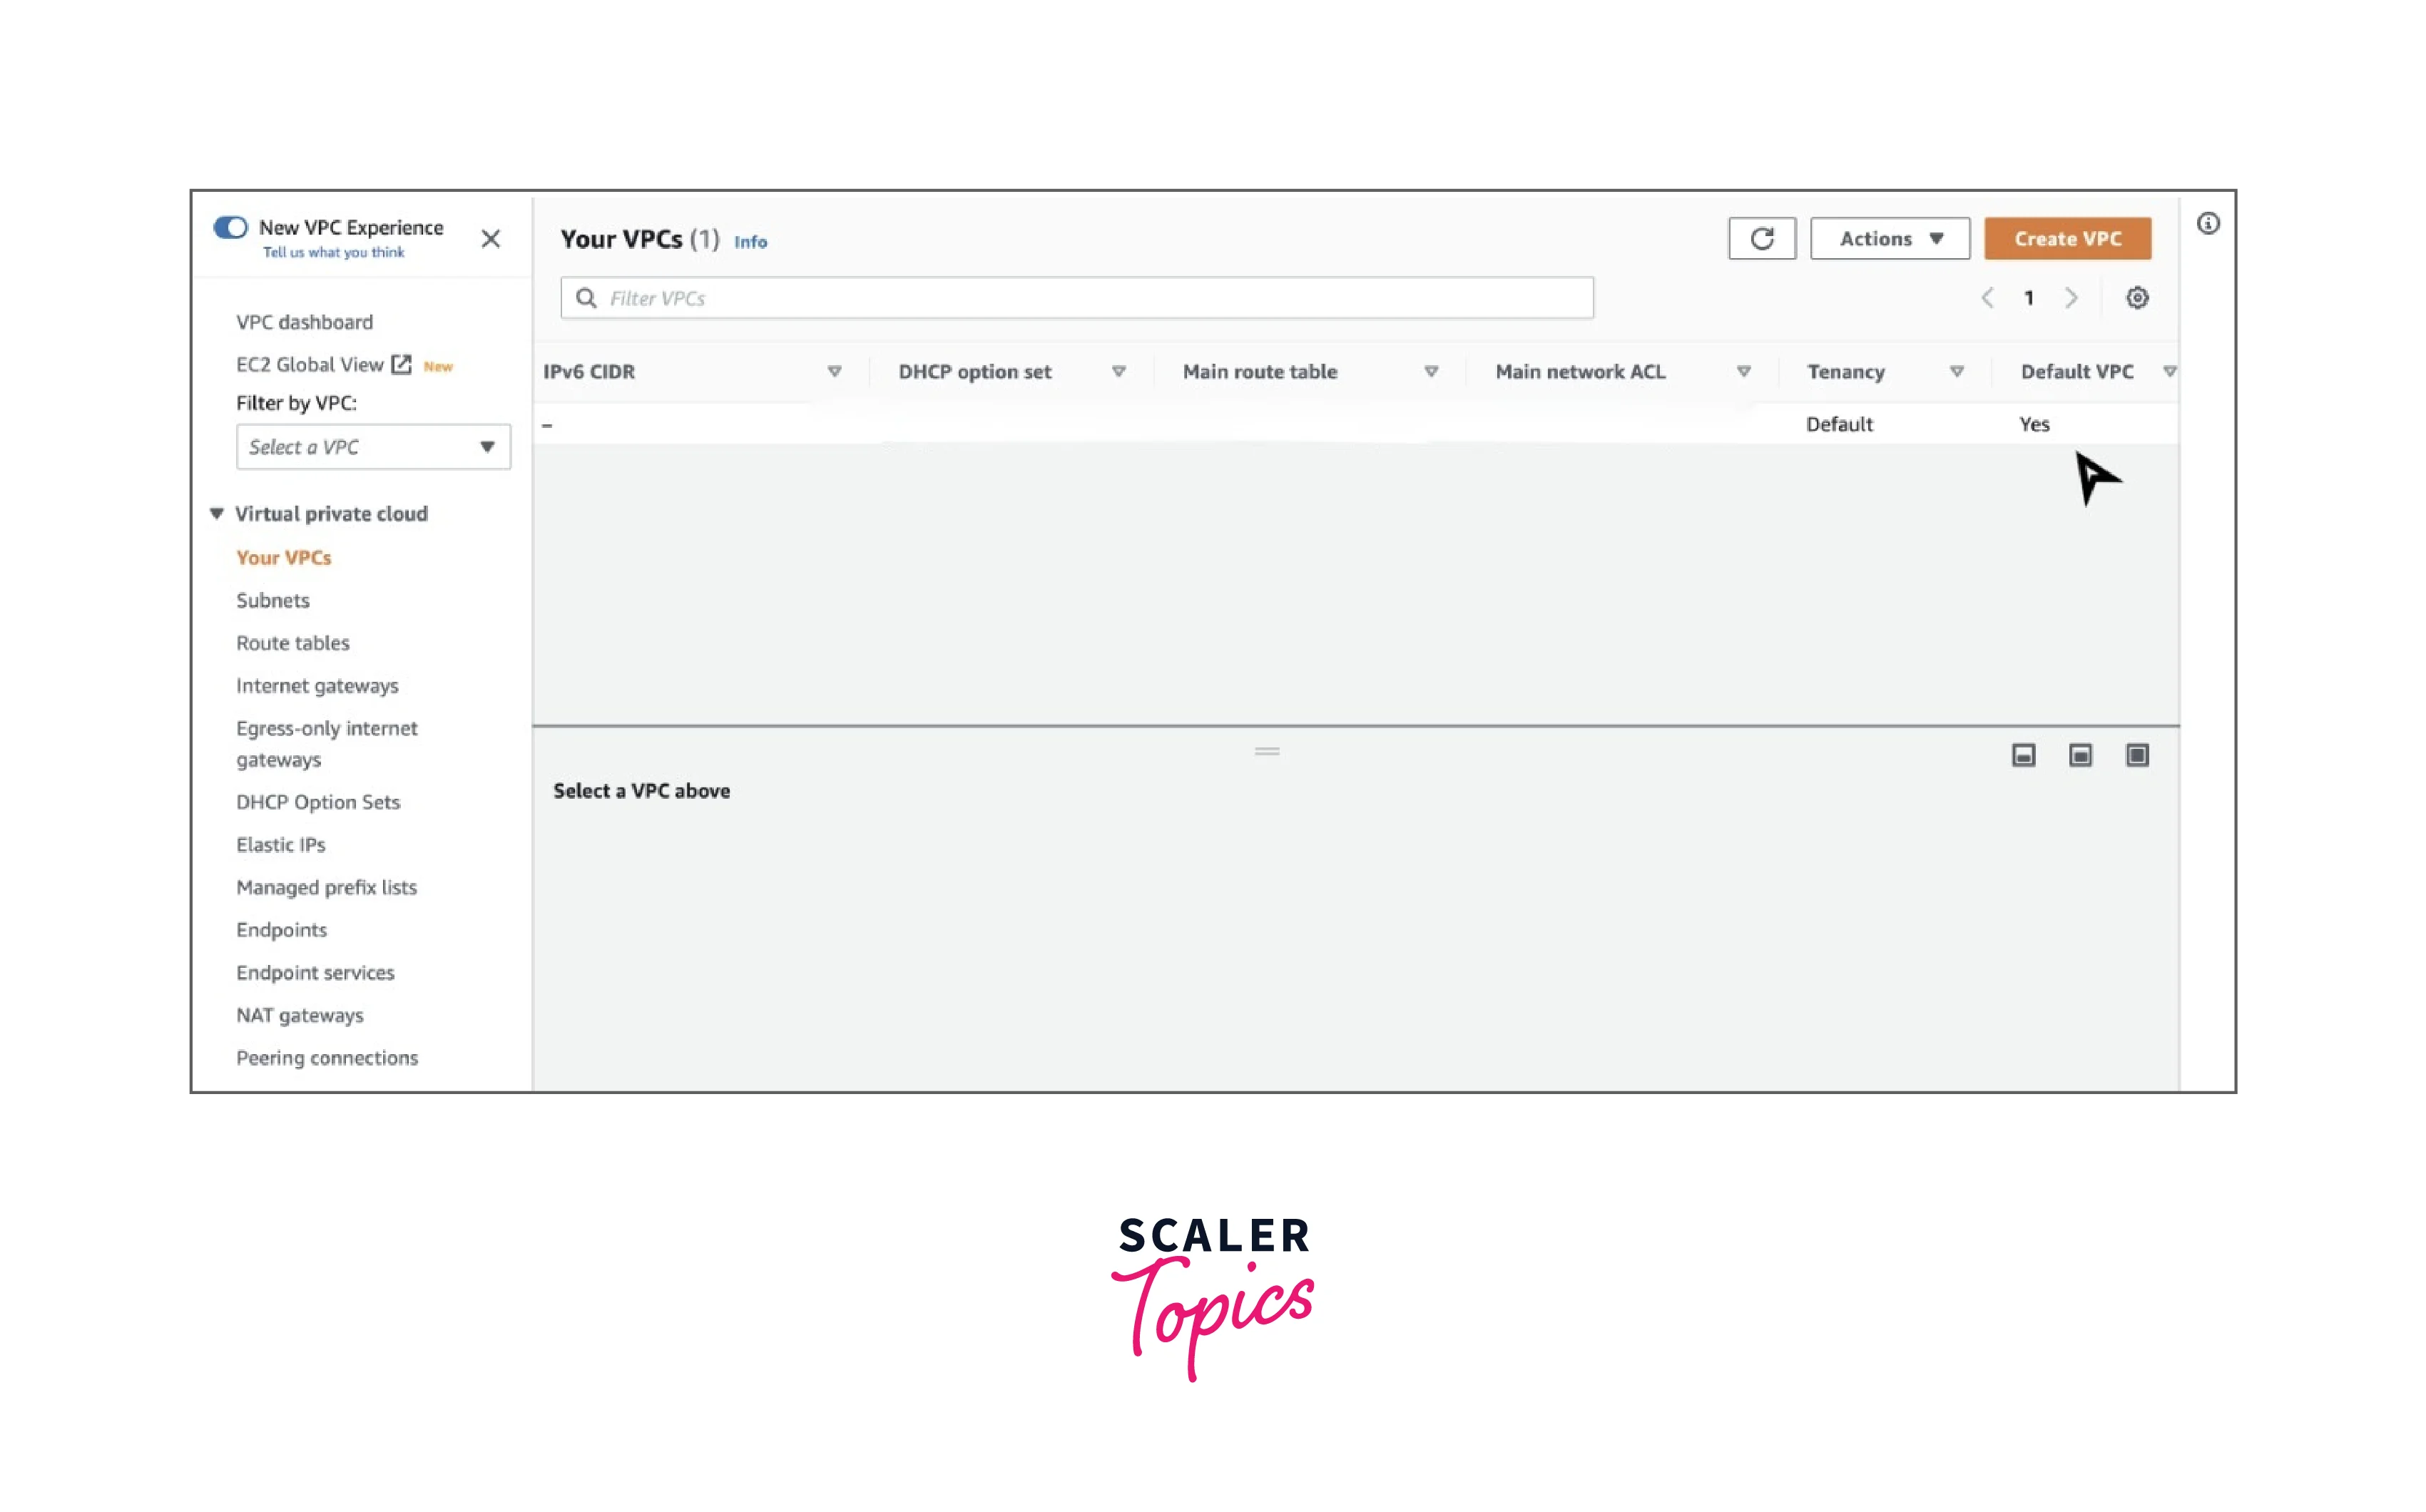
- Scroll right on the list of VPCs. In the default VPC section, you will see a "Yes" if that VPC is your default VPC. For all other VPCs, you will see a "No" in the default VPC section.
-
Every VPC in your account would have a main route table. T see the main route table, you can go ahead and click on the checkbox of the default VPC. A window called "Details" opens when you scroll down. There you will find the main route table.
-
To see subnets in your VPC, click on subnets in the navigation pane. There is only one subnet per Availability Zone in a VPC. By selecting a subnet, you can see its information such as the CIDR block, the routes in the route table, and the rules for the default NACL.
-
To see the IGW, click on Internet gateways in the navigation pane.
Step2: Launch an EC2 instance in your default VPC
-
Search for EC2 in the AWS dashboard search bar (or) simply click on the following link https://console.aws.amazon.com/ec2
-
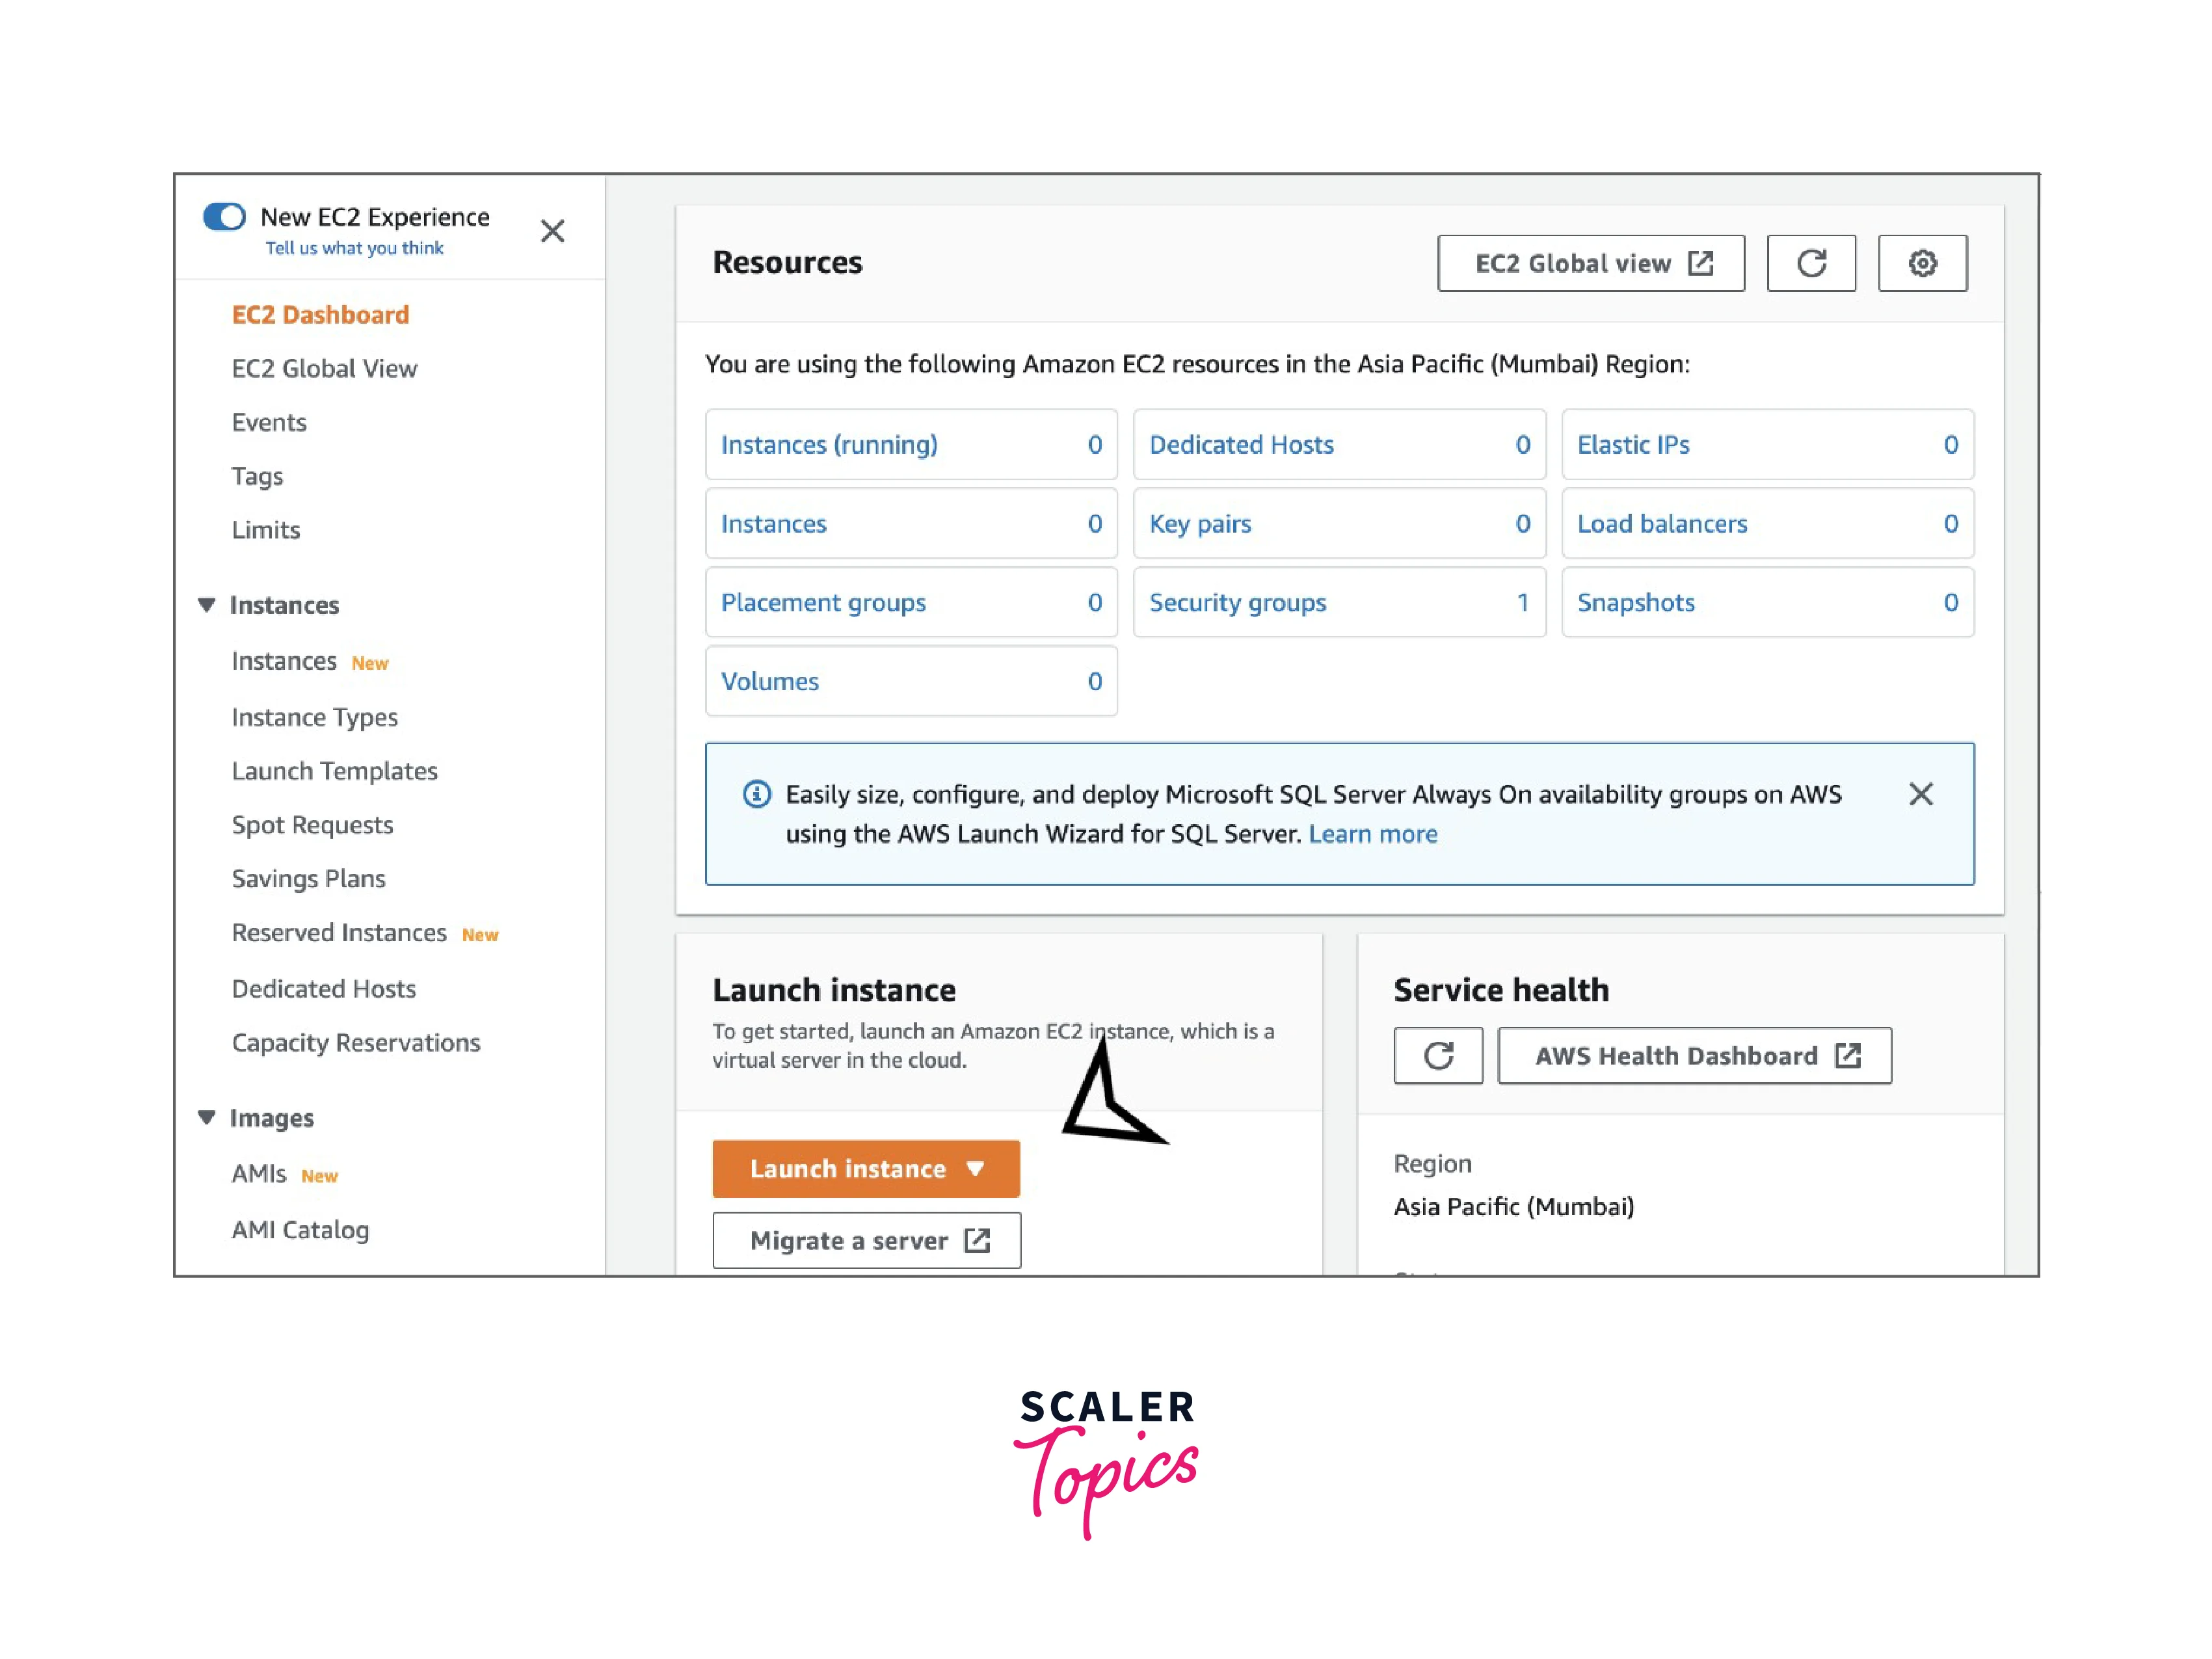
Click on "Launch Instance"
-
Also see that you have selected the region where you want to launch your EC2 instance by clicking on the region present on the navigation bar on the top.
-
Give a name for your instance
-
Under Application and OS Images (Amazon Machine Image), by default Amazon Linux would be selected. If you want you can choose the OS of your own (or) just leave it like that.

-
Under Instance type the free tier instance "t2.micro" would be there by default. If not there by default, please select the "t2.micro" free tier to avoid any costs.
-
Under Key pair (login), you can choose an existing key pair if you have one (or) create a new key pair. Also, you can choose to Proceed without a key pair if you are not planning to connect to the new instance that you are creating.
-
Under Network settings, AWS assigns the default VPC for the Region that you selected, and also AWS assigns the default subnet for your EC2 instance, and a public IP address is assigned to the instance.
-
Click on the launch instance.
Step3: Connect to the EC2 instance that you created
Now you can go ahead and connect to the EC2 instance that you created in the default public subnet using SSH (or) RDP.
-
If you created a Linux instance, follow this link to connect to the instance https://docs.aws.amazon.com/AWSEC2/latest/UserGuide/AccessingInstances.html
-
If you created a Windows instance, follow this link to connect to the instance https://docs.aws.amazon.com/AWSEC2/latest/WindowsGuide/connecting_to_windows_instance.html
Step4: Terminating the EC2 instance
After performing the above 3 steps and understanding how things work in a VPC, you can go ahead and terminate the EC2 instance that you created to avoid any further charges for a running EC2 instance.
To terminate the instance, just open your EC2 console and click on "instances" in the navigation pane. Click on the checkbox for the instance that you want to terminate. Now click on the "instance state" drop-down. Lastly, click on "Terminate Instance', you will get a prompt, and again click on "Terminate".
Conclusion
- AWS VPC is a private cloud computing environment where you can launch AWS Resources in a logically isolated virtual network that you customize and define.
- You can specify an IP address range for the VPC, create subnets, configure root tables, set up network gateways, and define security settings using security groups, and network access control lists.
- Within VPC, you can create instances that are accessible over the internet (public instances) and instances that are not publicly accessible i.e the instances which cannot connect to the internet on their own (private instances).
- Making use of AWS VPC eliminates the dependency on physical hardware, data centers, etc whilst providing an extra layer of security and easy integration.
- AWS VPC also provides Scalability, Availability, Fault Tolerance, and Disaster Recovery.
