Azure Container Service
Overview
Azure Container Service, now known as Azure Kubernetes Service (AKS), is a managed container orchestration platform by Microsoft. It empowers businesses to efficiently deploy, manage, and scale containerized applications using Kubernetes. AKS abstracts complex infrastructure management, enabling developers to focus on building and deploying applications seamlessly. It offers automated updates, scaling, monitoring, and integration with other Azure services, ensuring a streamlined development and operations experience for modern, cloud-native applications.
What is Azure Container Service?
Azure Container Service (ACS) was a cloud computing service provided by Microsoft Azure that enabled users to deploy, manage, and scale containerized applications using various container orchestration systems. The service aimed to simplify the deployment and management of containers by abstracting away the complexities of infrastructure management, allowing developers to focus on building and running their applications.
 Key features of Azure Container Service included:
- Orchestrator Choice:
ACS offered multiple choices of container orchestration platforms, including Kubernetes, Docker Swarm, and DC/OS. This allowed users to select the platform that best suited their application's requirements and their team's familiarity with different orchestration tools. - Scalability:
The service allowed dynamic scaling of containers based on application demands. This meant that as the workload increased or decreased, the number of containers could automatically adjust to maintain performance and efficiency. - Automated Updates:
ACS simplified the process of updating container runtime and orchestration components. This helped ensure that applications remained up-to-date and secure without causing significant downtime. - Integration with Azure Services:
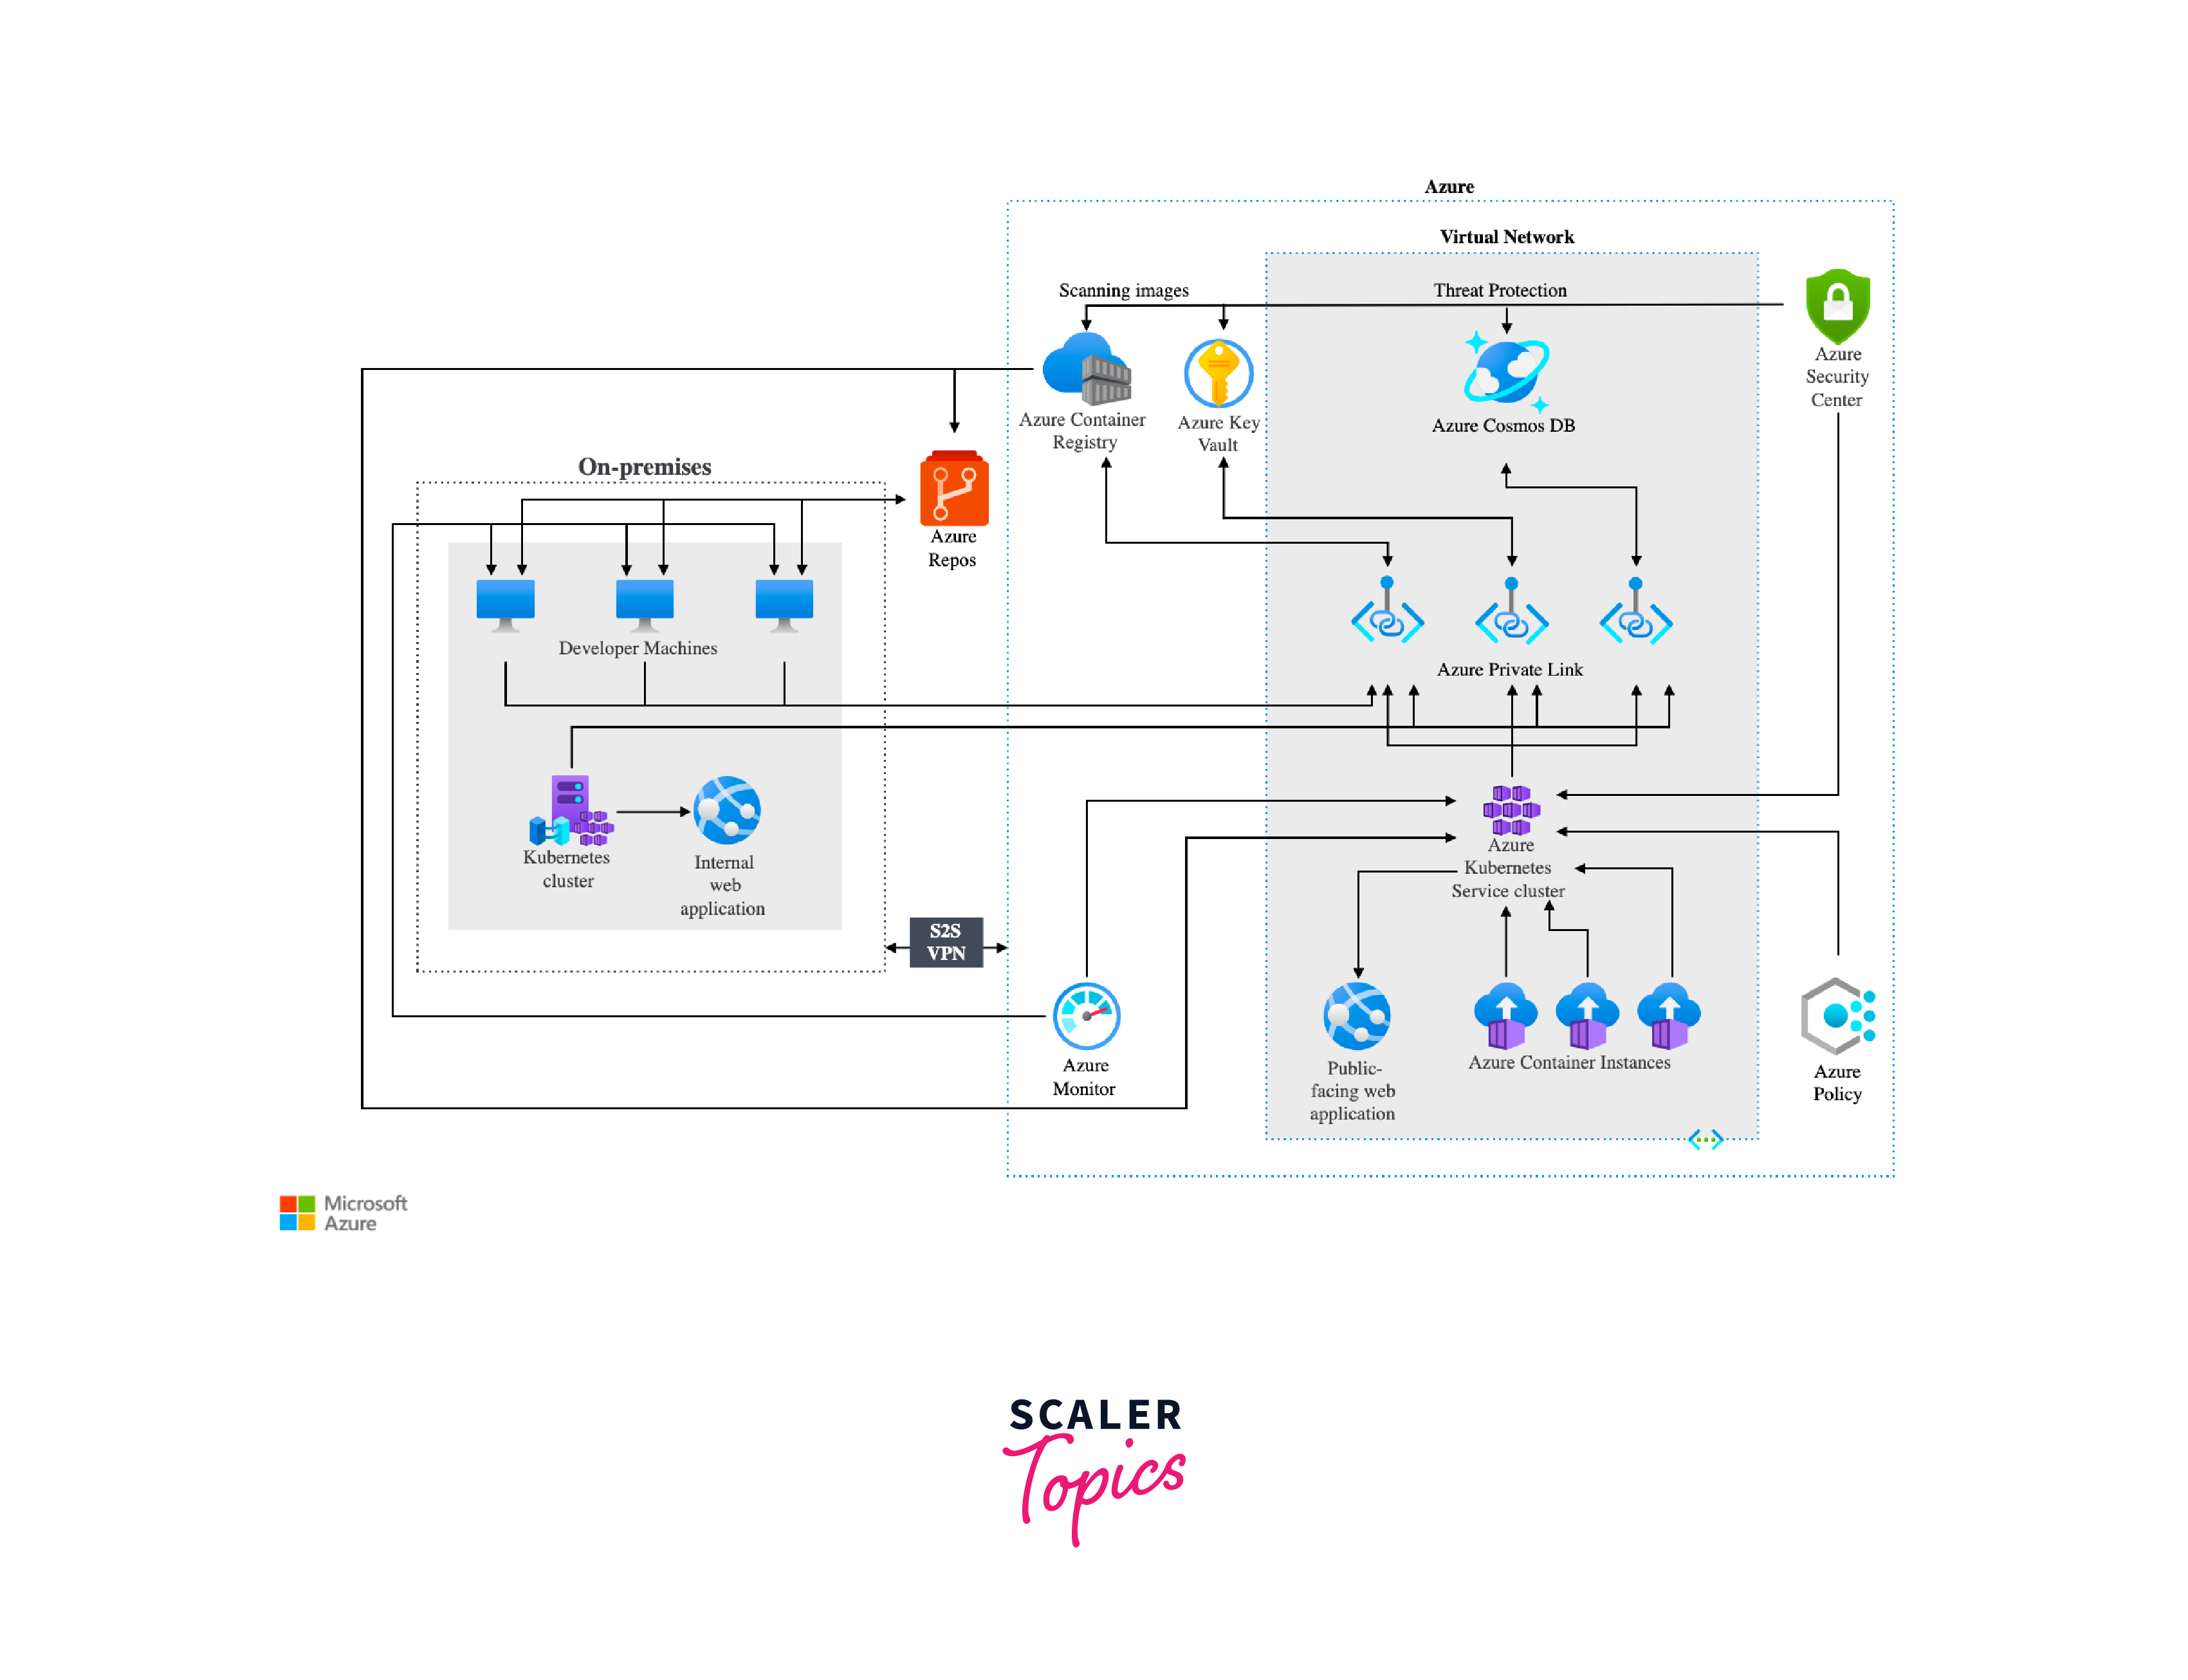
ACS seamlessly integrated with other Azure services, such as Azure Active Directory for authentication, Azure Monitor for monitoring, and Azure Storage for data persistence. This integration provided a holistic environment for containerized applications. - Networking:
The service offered networking capabilities to create isolated virtual networks for containers and manage communication between containers. This helped maintain security and control over the interactions between different components of an application. - Hybrid Deployment:
ACS allowed for hybrid deployment scenarios, enabling users to deploy containers across both on-premises data centers and the Azure cloud. This flexibility was particularly useful for organizations transitioning to cloud-based infrastructure.
Prerequisites
Before using Azure Container Service (ACS) or any container orchestration platform, there are several prerequisites you should consider and prepare:
- Azure Account:
You need an active Azure account to access and utilize Azure services. If you don't have one, you can sign up for an account on the Azure website. - Azure Subscription:
Ensure that you have an active Azure subscription associated with your Azure account. This subscription is where you'll deploy and manage your container instances and other resources. - Knowledge of Containerization Concepts:
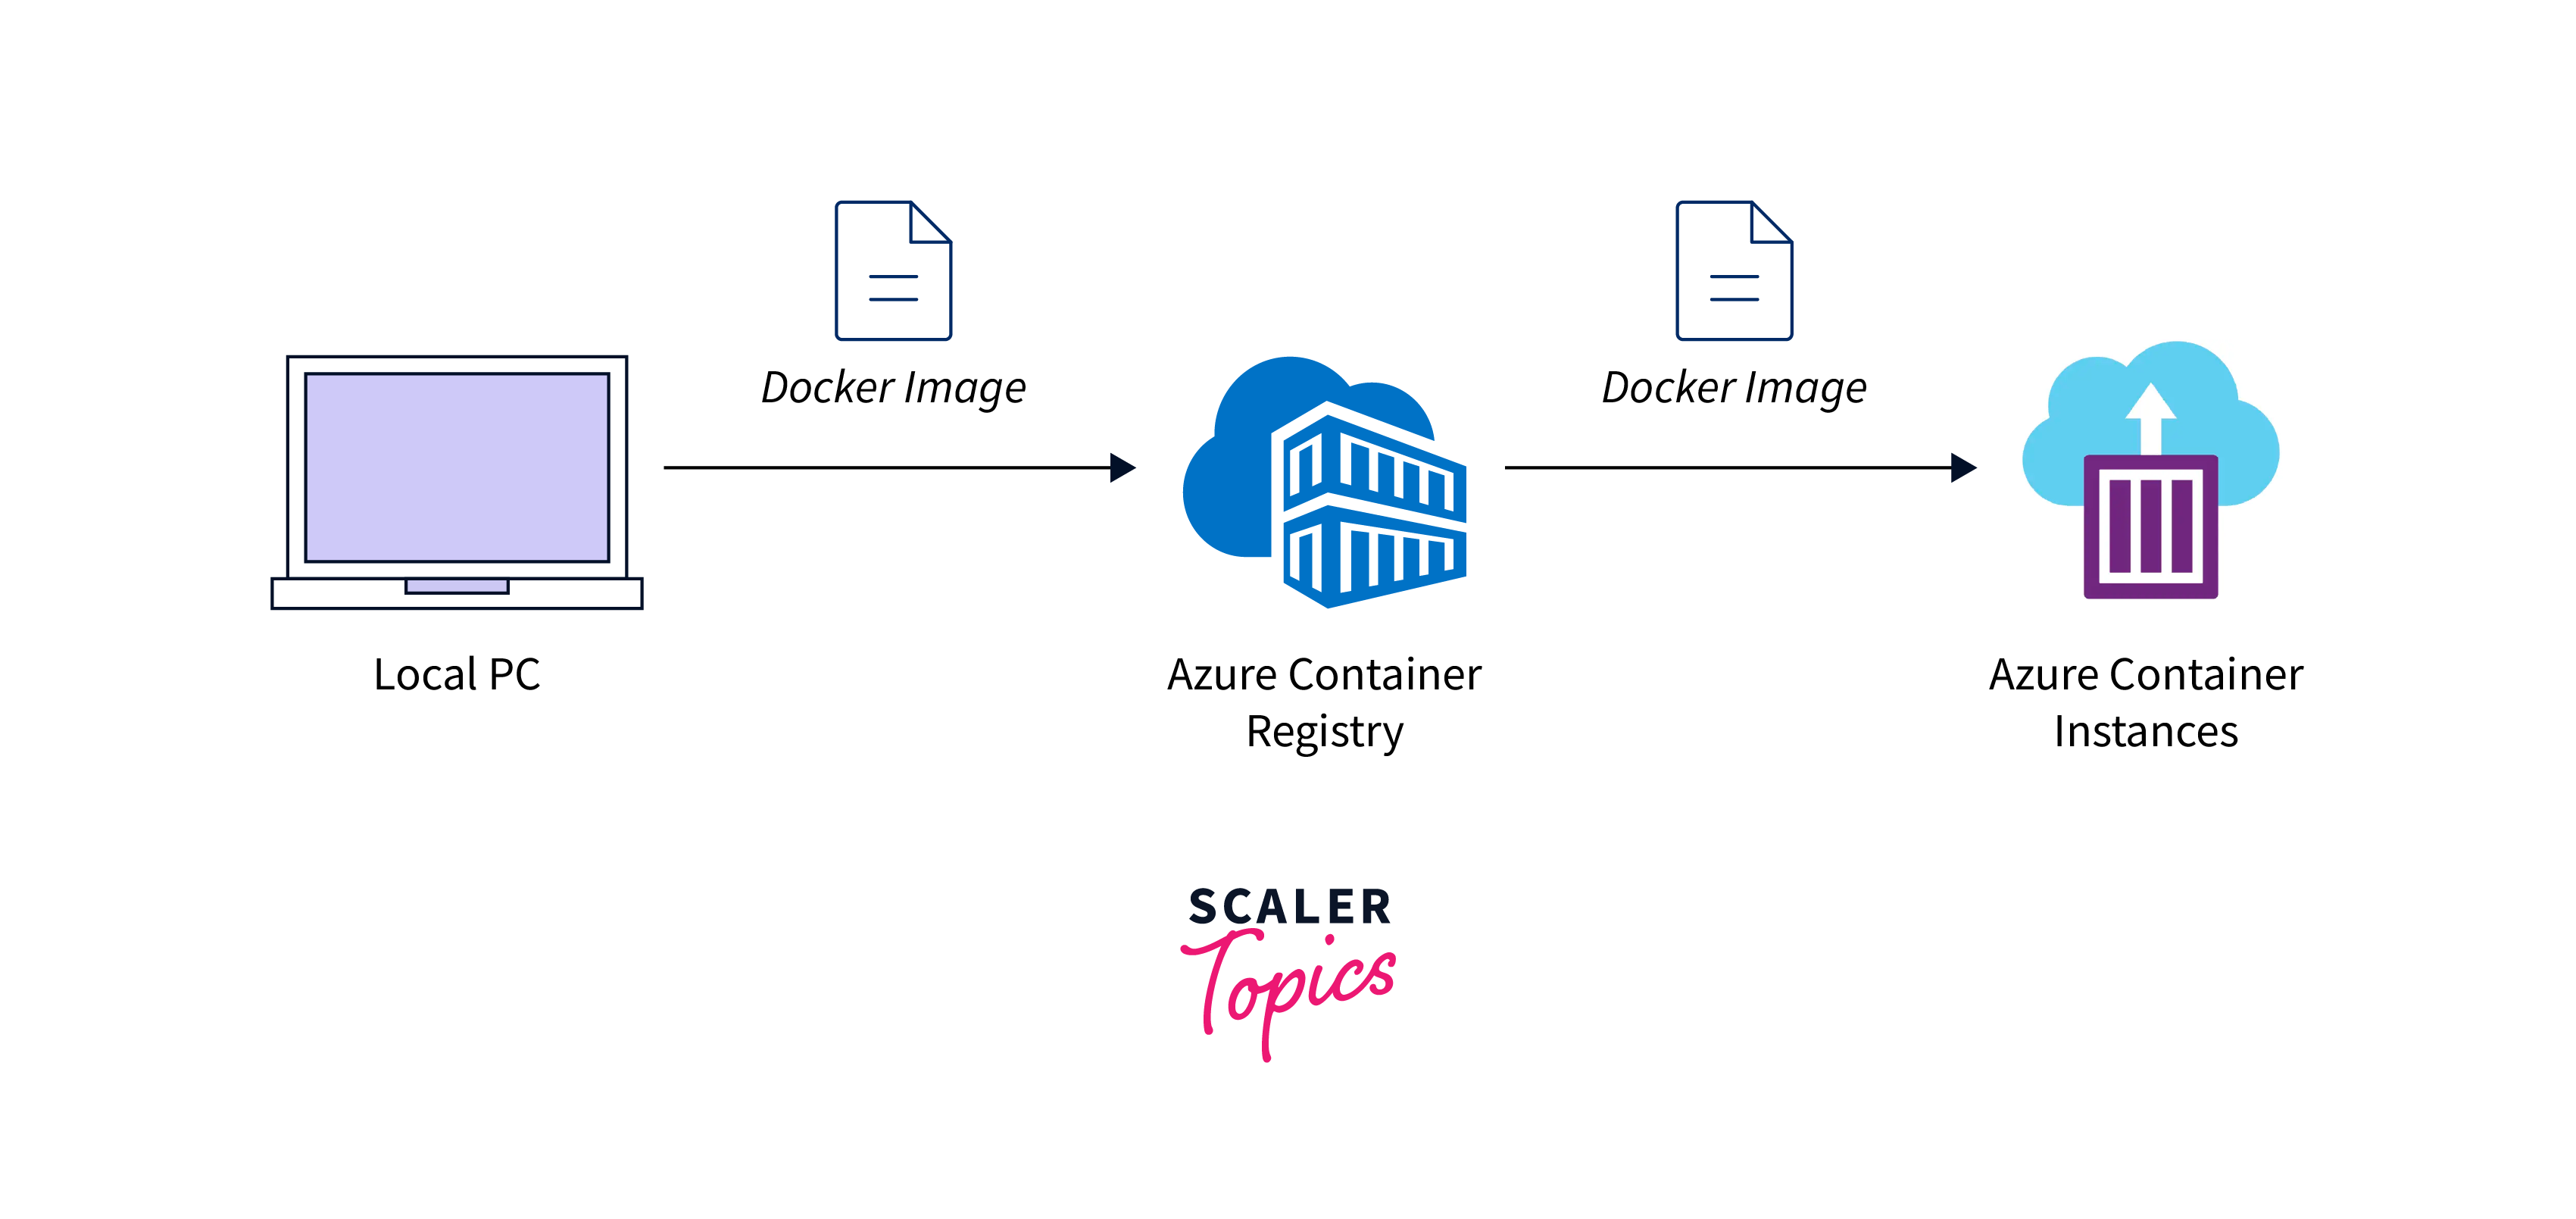
Familiarize yourself with containerization concepts, including what containers are, how they work, and the benefits they offer in terms of application isolation, portability, and consistency. - Container Image:
Prepare the container image of your application. This image contains your application code, runtime, libraries, and other dependencies required for it to run. Images are the building blocks of containers. - Container Orchestration Platform:
Decide on the container orchestration platform you want to use. While ACS offered multiple options (Kubernetes, Docker Swarm, DC/OS), you might want to focus on the platform that aligns best with your project's requirements and your team's familiarity. - Docker:
If you're using Docker-based solutions, make sure you have Docker installed on your local development environment. Docker is used to build, test, and manage container images. - Azure CLI or Azure Portal Access:
You can interact with ACS using the Azure Command-Line Interface (CLI) or through the Azure Portal's graphical user interface. Ensure that you have the necessary access and permissions to create and manage resources. - Resource Group:
Organize your ACS-related resources by creating an Azure resource group. Resource groups help manage and organize related resources in your Azure subscription. - Networking Considerations:
Plan your network setup, including virtual networks, subnets, IP addresses, and any required security groups. This is crucial for configuring communication between containers and external services. - Authentication and Authorization:
Depending on your use case, you might need to set up authentication and authorization mechanisms for accessing your containerized applications. - Monitoring and Logging:
Consider how you will monitor and log your containerized applications. Azure provides various monitoring and logging solutions that you can integrate into your deployment. - Scaling and Load Balancing:
Understand how you plan to scale your application based on demand and how you'll distribute incoming traffic across your container instances. - Storage Requirements:
Determine if your application requires persistent storage. Azure offers different storage solutions that can be integrated with your containerized applications.
Register Required Resources in the Subscription
Registering resources in your Azure subscription is an important step to ensure that you have access to the necessary features and services for deploying and managing containerized applications. Before you can use specific Azure services or features, they need to be registered with your subscription. Here's how you can register the required resources:
-
Using the Azure Portal:
- Log in to the Azure Portal: https://portal.azure.com/
- In the left-hand menu, click on "All services".
- Search for and select the service you want to register. For example, if you're planning to use Azure Kubernetes Service (AKS), search for "Kubernetes Services".
- In the service's overview page, you might see a message indicating that the service is not registered for the subscription. There should be an option to "Register" or "Register provider". Click on it.
- Wait for the registration process to complete. This might take a few moments. Once the registration is successful, you'll be able to create and manage resources related to that service.
-
Using Azure CLI:
-
Open the Azure CLI or Azure PowerShell on your local machine.
-
Run the following command to register a specific resource provider. Replace <provider-namespace> with the namespace of the resource provider you want to register. For example, to register the Kubernetes provider (used by AKS), you would run:
-
Wait for the registration process to complete. You can check the status using the following command:
-
Once the registration state changes to "Registered", you'll have access to the resources provided by that resource provider.
-
Creating an AKS/Azure Container Service Cluster Using the Azure Portal
Creating an Azure Kubernetes Service (AKS) cluster or an Azure Container Service (ACS) cluster using the Azure Portal involves several steps. Below are the steps in brief for creating an AKS cluster using the Azure Portal:
- Sign in to the Azure Portal:
- Log in to the Azure Portal using your Azure account credentials: https://portal.azure.com/.
- Create a New Resource:
- Click on the "Create a resource" button (+) in the upper left corner of the Azure Portal.
- Search for "Kubernetes Service":
- In the "Search the Marketplace" bar, type "Kubernetes Service" or "AKS". Select "Kubernetes Service" from the search results.
- Create a New AKS Cluster:
- Click the "Create" button on the "Kubernetes Service" page to start creating a new AKS cluster.
- Basics:
- Choose your subscription.
- Create a new resource group or select an existing one.
- Choose a unique cluster name.
- Select your preferred region.
- Choose the Kubernetes version.
- Node Pools:
- Choose the number of nodes for the initial node pool.
- Configure the node pool's virtual machine size.
- Adjust the number of nodes for availability and scaling.
- Authentication:
- Choose how you want to authenticate to your AKS cluster. Options include SSH keys or Azure Active Directory.
- Networking:
- Choose the networking configuration, such as virtual network and subnet settings.
- Enable network policies if required.
- Monitoring:
- Choose whether to enable monitoring and diagnostics for your AKS cluster.
- Configure the workspace for monitoring data.
- Review + Create:
- Review your configuration settings and make any necessary adjustments.
- Create:
- Once you're satisfied with your configuration, click the "Create" button to start the deployment process.
- Deployment Progress:
- The Azure Portal will display the deployment progress, including the creation of the AKS cluster, associated resources, and node pools.
- Access the AKS Cluster:
- After the deployment is successful, you can access and manage your AKS cluster through the Azure Portal, using the Azure CLI, or using tools like kubectl for Kubernetes management.
Creating an Azure Container Service Cluster Using the Command Line
Here's how you might create an AKS cluster using the Azure Command-Line Interface (CLI):
-
Install Azure CLI:
If you haven't already, install the Azure CLI on your local machine. You can download it from the official Microsoft Azure CLI website. -
Login to Azure:
Open a terminal and run the following command to log in to your Azure account: -
Create a Resource Group:
Run the following command to create a new resource group (if one doesn't already exist): -
Create the AKS Cluster:
Run the following command to create an AKS cluster:- --resource-group:
Specify the name of the resource group. - --name:
Choose a name for your AKS cluster. - --node-count:
Set the number of nodes in the cluster. - --enable-addons monitoring:
Enable monitoring and diagnostics. - --generate-ssh-keys:
Automatically generate SSH keys for authentication.
- --resource-group:
-
Configure Kubernetes CLI (kubectl):
After creating the AKS cluster, you need to configure the Kubernetes command-line tool, kubectl, to interact with your cluster. Run the following command: -
Verify Connection:
Run the following command to verify that you can access your AKS cluster: -
Interact with the Cluster:
Now that your AKS cluster is set up and configured, you can use kubectl commands to manage and deploy applications to the cluster.
Accessing the Kubernetes UI Locally
To access the Kubernetes UI locally, follow these steps:
Download Cluster Credentials
After creating an Azure Kubernetes Service (AKS) cluster, you need to download the cluster credentials to authenticate your local kubectl tool with the cluster.
Replace MyResourceGroup and MyAKSCluster with your actual resource group and cluster name.
Browse the Cluster
To access the Kubernetes Dashboard UI locally, you can use the following command to start a proxy server that allows you to access the dashboard using a local URL:
The Kubernetes Dashboard should be available at the following URL:
Note that this method uses kubectl proxy to forward the Kubernetes Dashboard's API to your local machine.
Access the Kubernetes Dashboard:
Open a web browser and navigate to the URL provided above. You might be prompted for a token or a kubeconfig file to authenticate. If prompted for a token, you can generate a token using the following command:
Copy the token and use it to authenticate when accessing the Kubernetes Dashboard.
Clean Up Your Resources
After you're done exploring the Kubernetes Dashboard, it's a good practice to clean up the resources to avoid incurring unnecessary costs:
This command will delete the entire resource group along with all the resources associated with it.
Let the Cloud Manage the Kubernetes Cluster for You
Certainly! One of the major benefits of using managed Kubernetes services like Azure Kubernetes Service (AKS) is that the cloud provider handles many of the operational tasks related to managing the Kubernetes cluster. This approach allows you to focus more on deploying applications and less on managing the underlying infrastructure. Here's how letting the cloud manage the Kubernetes cluster works:
- Managed Control Plane:
With managed Kubernetes services, the cloud provider takes care of the control plane components of Kubernetes, including the API server, etcd, and controller manager. These components are crucial for managing the cluster, ensuring high availability, and handling tasks like scaling and load balancing. - Cluster Deployment:
You can provision a Kubernetes cluster with a few clicks using the cloud provider's interface (Azure Portal in the case of AKS). The cloud provider takes care of creating the necessary virtual machines, networking, and configurations. - Cluster Upgrades:
Cloud-managed Kubernetes services offer automated cluster upgrades. The provider handles the process of upgrading the control plane and node components to the latest Kubernetes version, reducing the burden of manual upgrades. - Scaling and Load Balancing:
You can easily scale the number of nodes in your cluster up or down based on demand. The cloud provider automatically manages load balancing and distributes incoming traffic across your nodes. - Monitoring and Logging:
Managed Kubernetes services often come with integrated monitoring and logging solutions. You can view metrics and logs directly from the provider's interface, helping you identify and troubleshoot issues more efficiently. - Security Patches and Updates:
The cloud provider takes care of security patches and updates for the underlying infrastructure. This ensures that your cluster remains secure and up to date without manual intervention. - Auto Healing:
Cloud-managed clusters often have built-in mechanisms for detecting and replacing unhealthy nodes automatically. This enhances the availability of your applications. - Integration with Other Cloud Services:
Managed Kubernetes services seamlessly integrate with other cloud services. For example, in AKS, you can easily connect to Azure Active Directory for authentication, Azure Monitor for advanced monitoring, and Azure DevOps for continuous integration and deployment. - Reduced Administrative Overhead:
By offloading many operational tasks to the cloud provider, you can free up your team's time and resources to focus on application development, improving efficiency. - Pay-as-You-Go Pricing:
Managed Kubernetes services often follow a pay-as-you-go pricing model, allowing you to scale your cluster based on actual usage while avoiding upfront infrastructure investments.
Conclusion
- Azure Container Service (ACS) facilitated containerized app deployment with Kubernetes, Docker Swarm, or DC/OS.
- Prerequisites: Azure account, container familiarity, Docker, Azure CLI, networking setup.
- Creating AKS cluster: Azure Portal steps - setup, networking, accessing Kubernetes Dashboard.
- Managed Kubernetes (e.g., AKS) handles scaling, and monitoring, and integrates with Azure services.
- Reduced admin work, and pay-as-you-go pricing with managed Kubernetes.
- Emphasis on ease of deployment, management, and cloud-enabled automation.
- Managed Kubernetes services typically implement a pay-as-you-grow cost structure, permitting you to expand your cluster according to real consumption without the need for upfront capital expenditures.
- The cloud provider assumes responsibility for implementing security patches and maintaining the underlying infrastructure, guaranteeing the ongoing security and current status of your cluster without the need for manual intervention.