Microsoft Azure Storage Account
Microsoft Azure Storage Account offers a secure, scalable cloud storage solution, ideal for various data types like files, blobs, queues, and tables. This service ensures high availability and redundancy with geo-replication and automatic backups and is known for robust security features, including encryption in transit and at rest. Seamlessly integrated with other Azure services, it provides global access, ensuring data is always within reach. Its flexible design, enhanced by REST API and SDK support, makes it a comprehensive choice for managing and accessing data in the cloud.
Types of Storage Accounts
Azure Storage Accounts offer different types based on their capabilities and pricing models. The types of storage accounts available in Microsoft Azure are:
1. General-purpose v2 (GPv2): This is the default storage account type, offering a broad range of features and capabilities. It supports various data services like blobs, files, queues, and tables. GPv2 storage accounts provide high scalability, performance, and access tiers to optimize cost.
2. Blob storage: Designed specifically for storing and managing unstructured object data such as images, videos, and documents. Blob storage offers three tiers: hot, cool, and archive, allowing users to optimize costs based on data access frequency.
3. File storage: Provides fully managed file shares accessible via the Server Message Block (SMB) protocol. It enables users to mount file shares on virtual machines (VMs) or on-premises systems, making it suitable for file-based workloads.
4. BlockBlobStorage: This storage account type is optimized for scenarios that require high-performance block blobs and is well-suited for scenarios like Virtual Machine Disks, Hadoop, and Azure Data Box.
5. Premium BlockBlobStorage: Offers premium performance and low-latency access for block blobs. It is ideal for workloads that require high transaction rates and fast response times, such as big data analytics and real-time data processing.
Types of Performance Tiers
Azure Storage offers different performance tiers to cater to various workload requirements. The performance tiers available in Azure Storage are:
1. Standard: This is the default performance tier and provides a balanced combination of performance and cost-effectiveness. It is suitable for most general-purpose storage workloads.
2. Premium: The premium performance tier offers high-performance storage optimized for I/O-intensive workloads. It provides low latency and high throughput, making it ideal for applications that require high transaction rates and low response times.
3. Ultra: The ultra performance tier is designed for the most demanding, mission-critical workloads that require extreme performance and high scalability. It delivers the highest level of performance in terms of IOPS and throughput.
The choice of performance tier depends on the specific needs of your workload. Standard tier is suitable for most common scenarios, while premium and ultra tiers are tailored for high-performance requirements. It's important to consider factors such as workload characteristics, performance expectations, and budgetary constraints when selecting the appropriate performance tier for your Azure Storage account.
Types of Access Tiers
Azure Storage offers different access tiers to optimize cost and availability based on the frequency of data access. The access tiers available in Azure Storage are:
1. Hot Access Tier: The hot access tier is designed for frequently accessed data. It provides low latency and is optimized for applications that require real-time access to data. The pricing for the hot access tier is higher compared to other tiers, but it offers the lowest retrieval costs.
2. Cool Access Tier: The cool access tier is suitable for data that is accessed less frequently, but still requires quick access when needed. It provides a lower storage cost compared to the hot tier but has slightly higher retrieval costs. The cool tier is ideal for backup, long-term storage, and archival data.
3. Archive Access Tier: The archive access tier is the most cost-effective option for long-term storage and archival data that is rarely accessed. It offers the lowest storage costs but has higher retrieval costs and longer retrieval times. The archive tier is best suited for data that needs to be stored for regulatory or compliance purposes.
By selecting the appropriate access tier for your data, you can optimize storage costs while ensuring that data is available when needed. It's important to consider the access patterns and requirements of your data to determine the most suitable access tier for your Azure Storage account.
Advantage of Access Tiers
The advantage of using access tiers in Azure Storage is the ability to optimize cost and availability based on the frequency of data access. Here are the key advantages of each access tier:
1. Hot Access Tier:
- Low Latency: The hot access tier provides quick access to frequently accessed data, ensuring low latency for applications that require real-time access.
- Immediate Availability: Data stored in the hot access tier is readily available for immediate retrieval and processing.
- High Performance: It offers fast read and write speeds, making it suitable for applications that require high-performance storage.
2. Cool Access Tier:
- Cost Optimization: The cool access tier offers a lower storage cost compared to the hot tier, making it ideal for data that is accessed less frequently but still requires quick access.
- Data Retention: It provides a cost-effective solution for long-term storage and archival data while maintaining the ability to retrieve data relatively quickly.
3. Archive Access Tier:
- Cost Efficiency: The archive access tier offers the lowest storage costs, making it highly cost-effective for storing rarely accessed data or data with strict compliance requirements.
- Long-Term Retention: It is designed for data that needs to be stored for a long time, such as regulatory or compliance data, while providing infrequent access.
Azure Storage Replication
Azure Storage offers several replication options to ensure data durability and availability. The replication options available in Azure Storage are:
1. Locally Redundant Storage (LRS): LRS replicates data within a single storage scale unit, which is typically a single datacenter. It provides a cost-effective replication option with three copies of data within the same region. LRS offers a high level of durability but does not protect against datacenter-level failures.
2. Zone-Redundant Storage (ZRS): ZRS replicates data synchronously across multiple availability zones within a region. It provides higher durability and availability compared to LRS by ensuring data redundancy across different physical locations within the same region.
3. Geo-Redundant Storage (GRS): GRS replicates data synchronously across two regions, providing redundancy against regional failures. It maintains multiple copies of data in the primary region and asynchronously replicates them to a secondary region, ensuring data durability and availability even in the event of a region-wide outage.
4. Read-Access Geo-Redundant Storage (RA-GRS): RA-GRS provides the same redundancy as GRS but also allows read access to the data in the secondary region. This enables read operations in the secondary region for scenarios like disaster recovery and reduced latency for geographically distributed applications.
5. Geo-Zone-Redundant Storage (GZRS): GZRS is similar to GRS but provides replication across three or more availability zones within the primary region, offering enhanced durability and availability. It replicates your data to a secondary region, which is hundreds of miles away from the primary region. This secondary region is designed to be geographically distant from the primary region to protect against regional-level disasters. GRS offers high durability and availability, as data is stored in both the primary and secondary regions.
6. Geo-Zone-Redundant Storage with Read Access (GZRS-RA): GZRS-RA combines the benefits of GZRS with read access to the data in the secondary region.
Storage Account Ndpoints
Azure Storage Account provides different endpoints to access and interact with the storage resources. The storage account endpoints available are:
1. Blob service endpoint: This endpoint is used to access Blob storage resources within the storage account. It allows operations like uploading, downloading, and managing blobs (objects) such as images, videos, documents, and other unstructured data.
2. Queue service endpoint: The queue service endpoint is used to interact with the Azure Queue storage resources. It enables reliable messaging between components of an application or different applications. Queues are commonly used for decoupling and asynchronous processing scenarios.
3. Table service endpoint: The table service endpoint is used to access the Azure Table storage resources. Azure Table storage is a NoSQL key-value store that allows storing structured data. It is suitable for scenarios requiring massive amounts of structured data, such as logging and IoT applications.
4. File service endpoint: This endpoint is used to access the Azure File storage resources. Azure File storage provides fully managed file shares accessible over the Server Message Block (SMB) protocol. It allows storing and sharing files in the cloud, and the endpoint facilitates accessing file shares from VMs and on-premises systems.
5. Disk service endpoint: The disk service endpoint is used to manage virtual machine disks in Azure. It enables creating, attaching, and managing the virtual disks associated with Azure virtual machines.
Creating & Configuring Azure Storage Account
To create and configure an Azure Storage account, you can follow these steps:
-
Log in to the Azure portal (https://portal.azure.com).
-
Click on the "Create a resource" button (+) in the Azure portal.
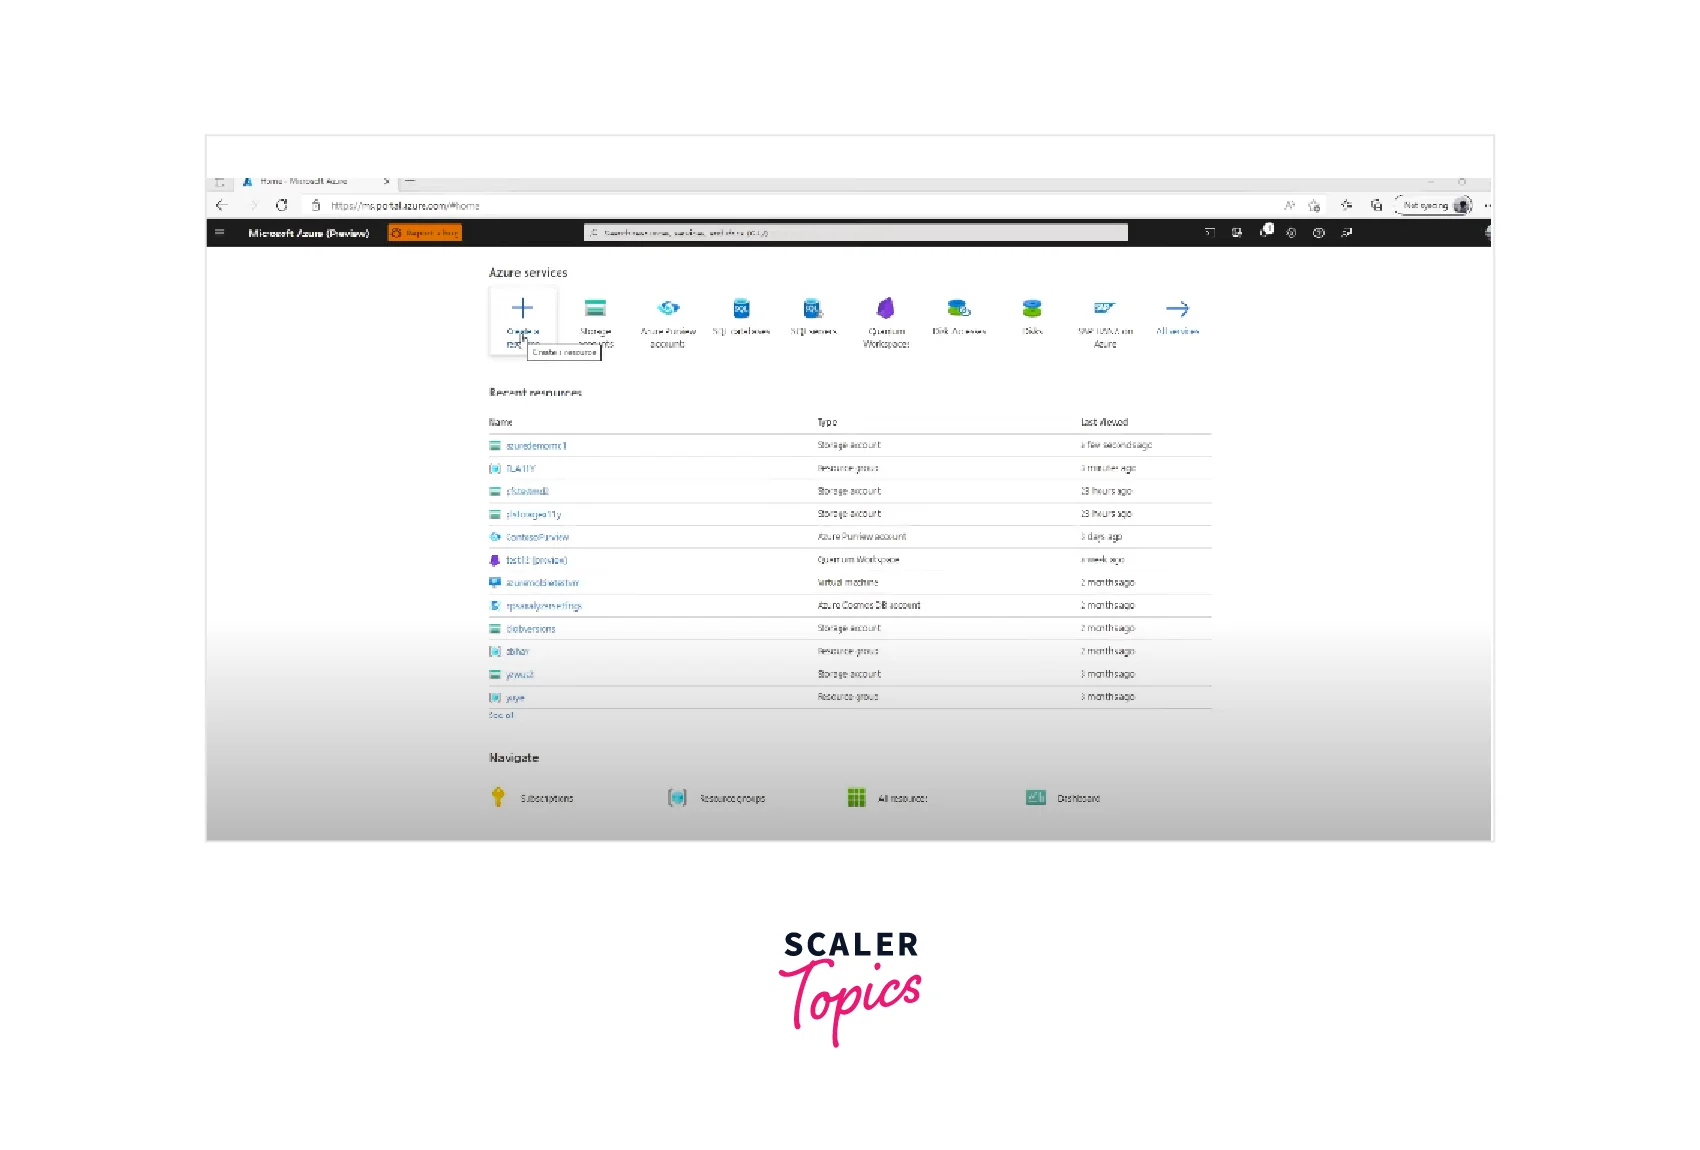
- In the search box, type "Storage account" and select "Storage account - blob, file, table, queue" from the search results.
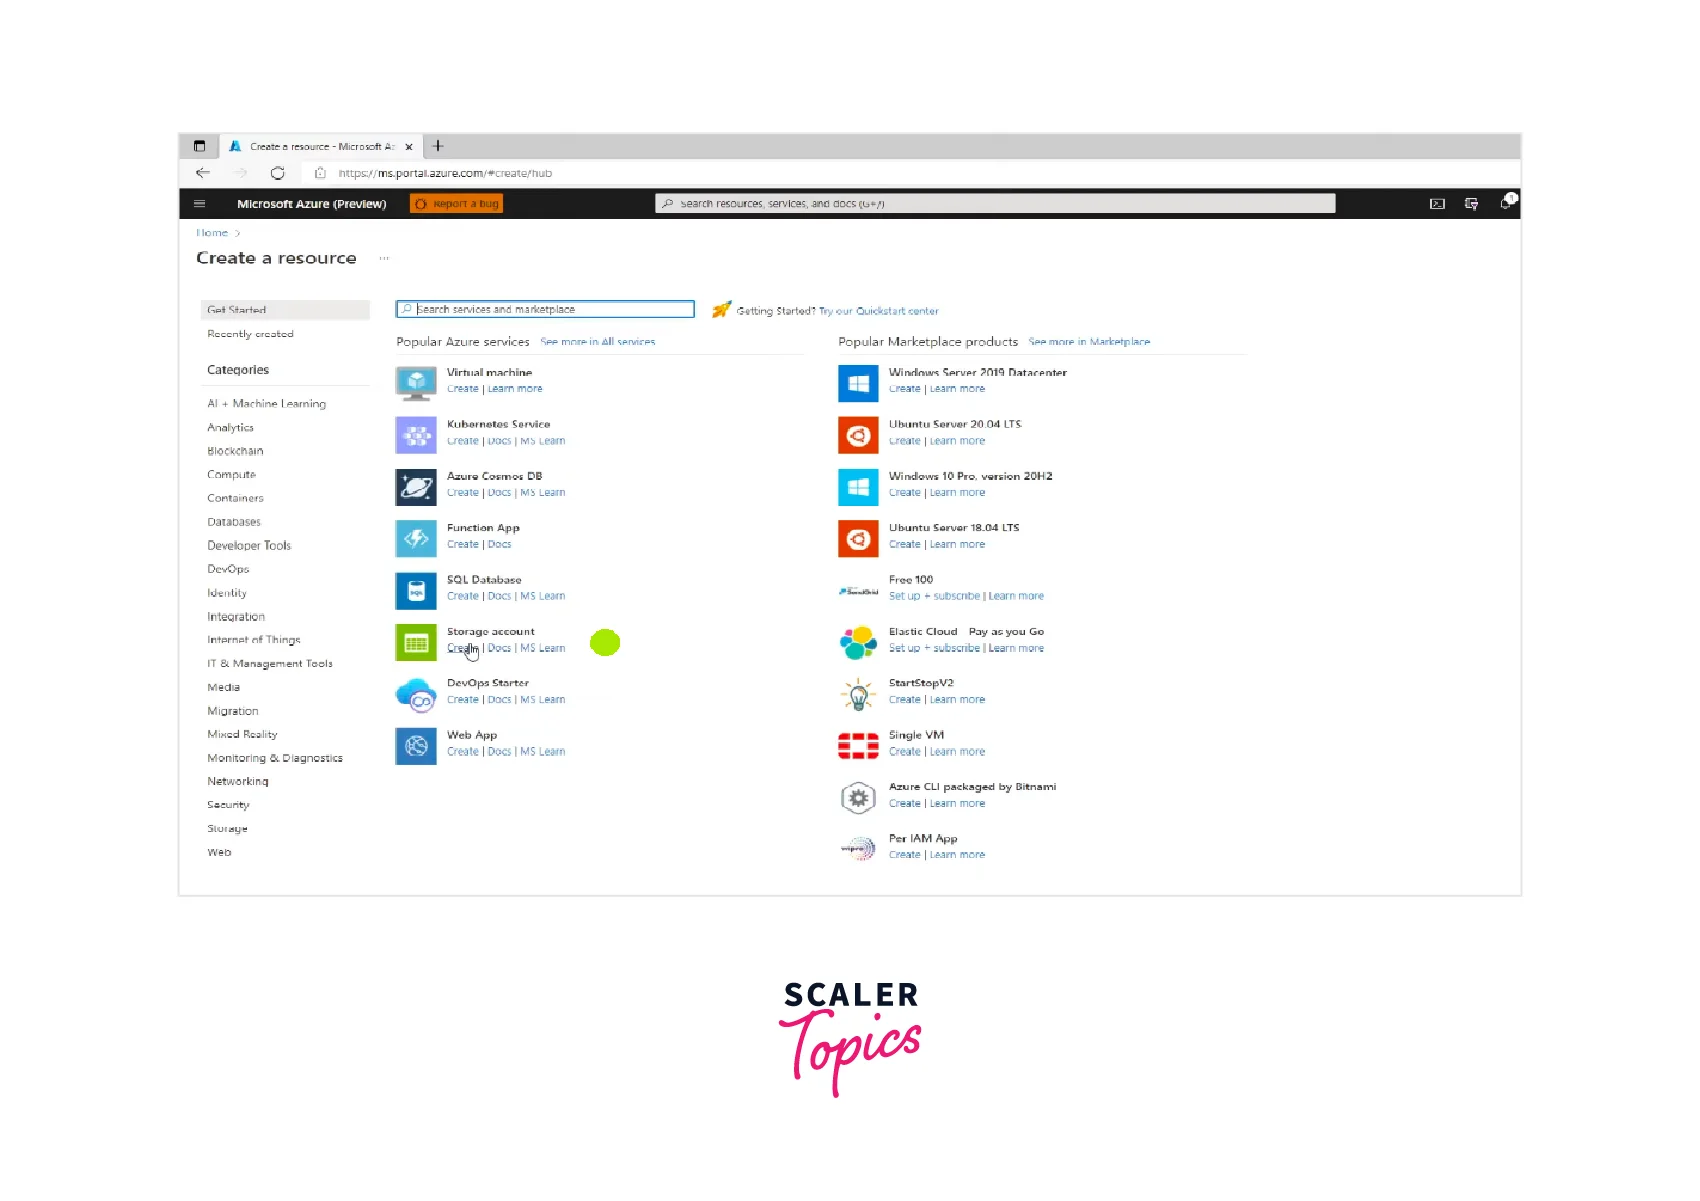
-
Click on the "Create" button to start creating a new storage account.
-
Fill in the required information:
- Subscription: Select the Azure subscription under which you want to create the storage account.
- Resource group: Choose an existing resource group or create a new one to logically group your resources.
- Storage account name: Enter a unique name for your storage account.
- Location: Select the geographic region where you want your storage account to be located.
- Performance: Choose the desired performance tier (Standard, Premium, or Ultra) for your storage account.
- Account kind: Select the appropriate storage account type (General-purpose v2, Blob storage, File storage, etc.).
- Replication: Choose the replication option that meets your data redundancy and availability requirements (LRS, GRS, etc.).
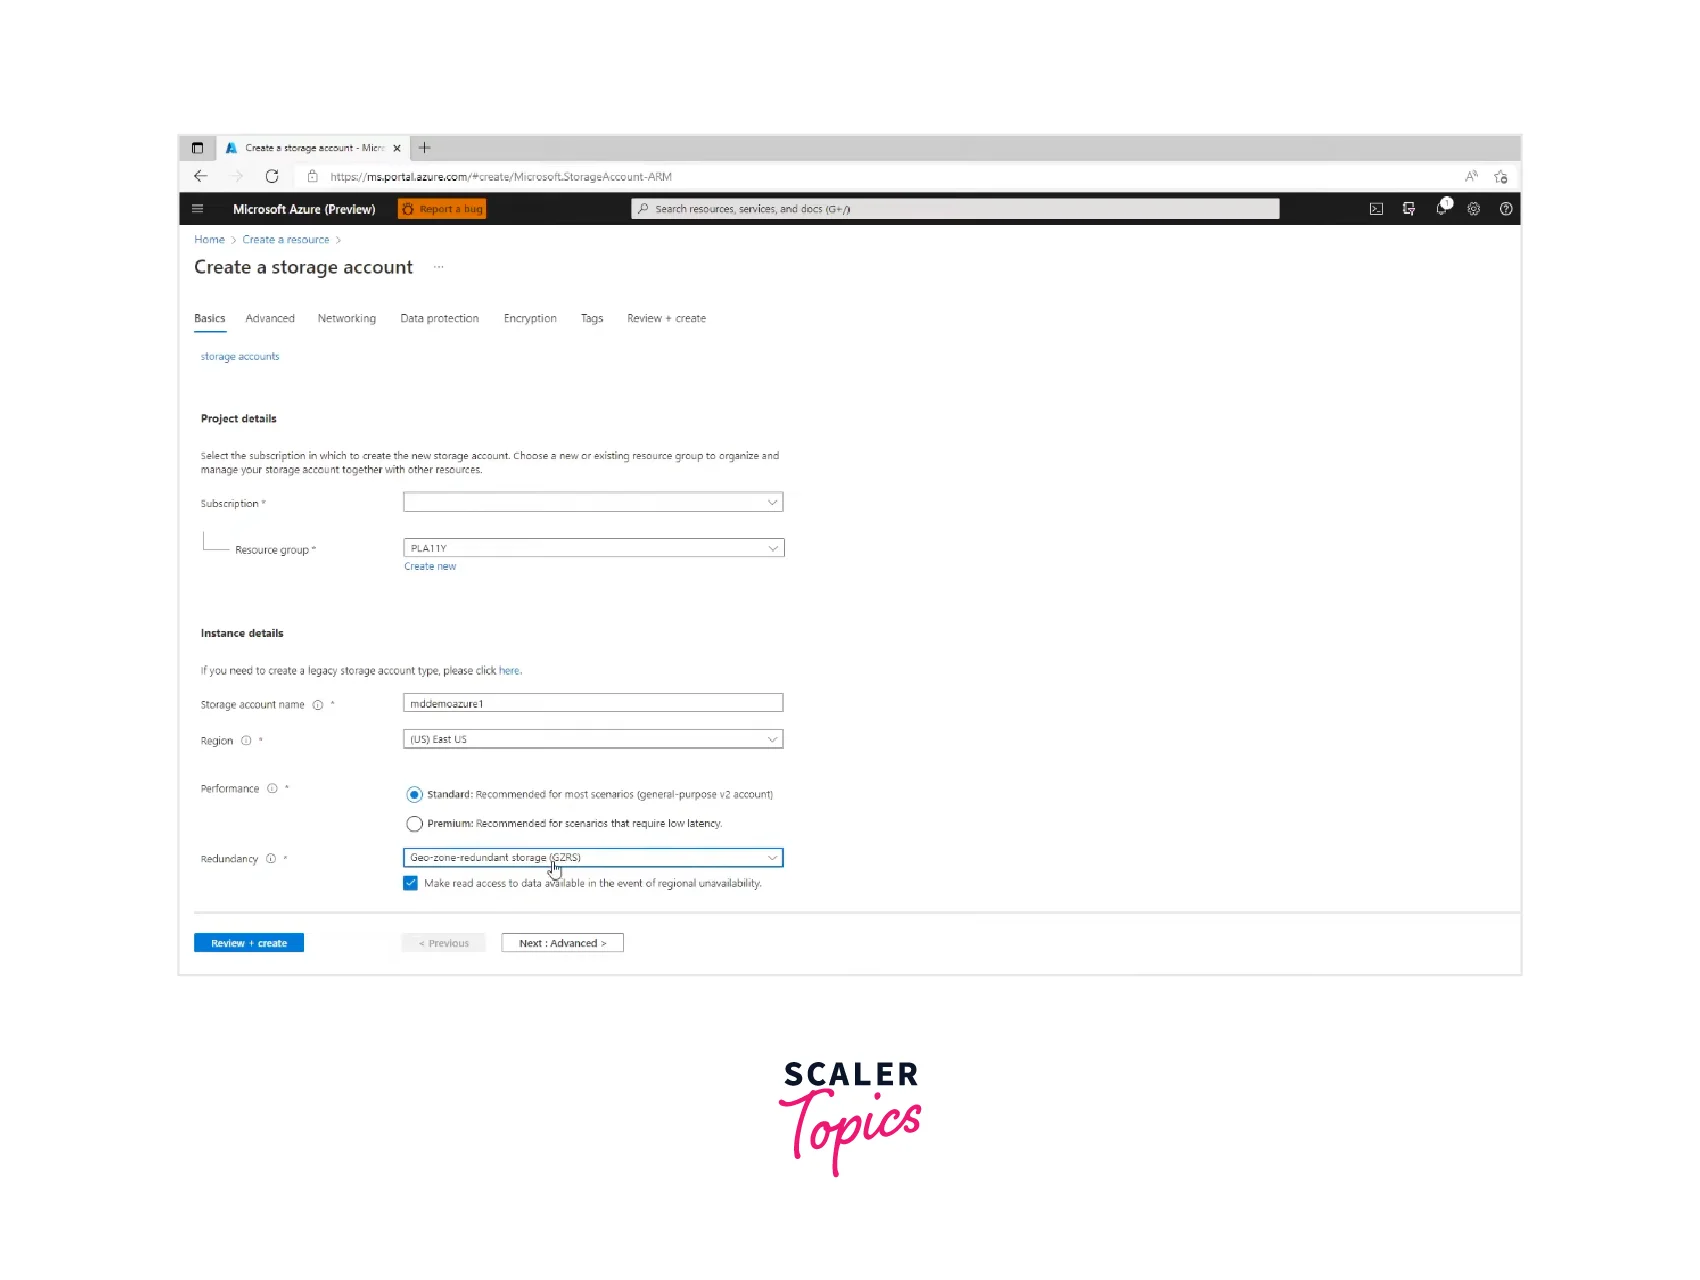
-
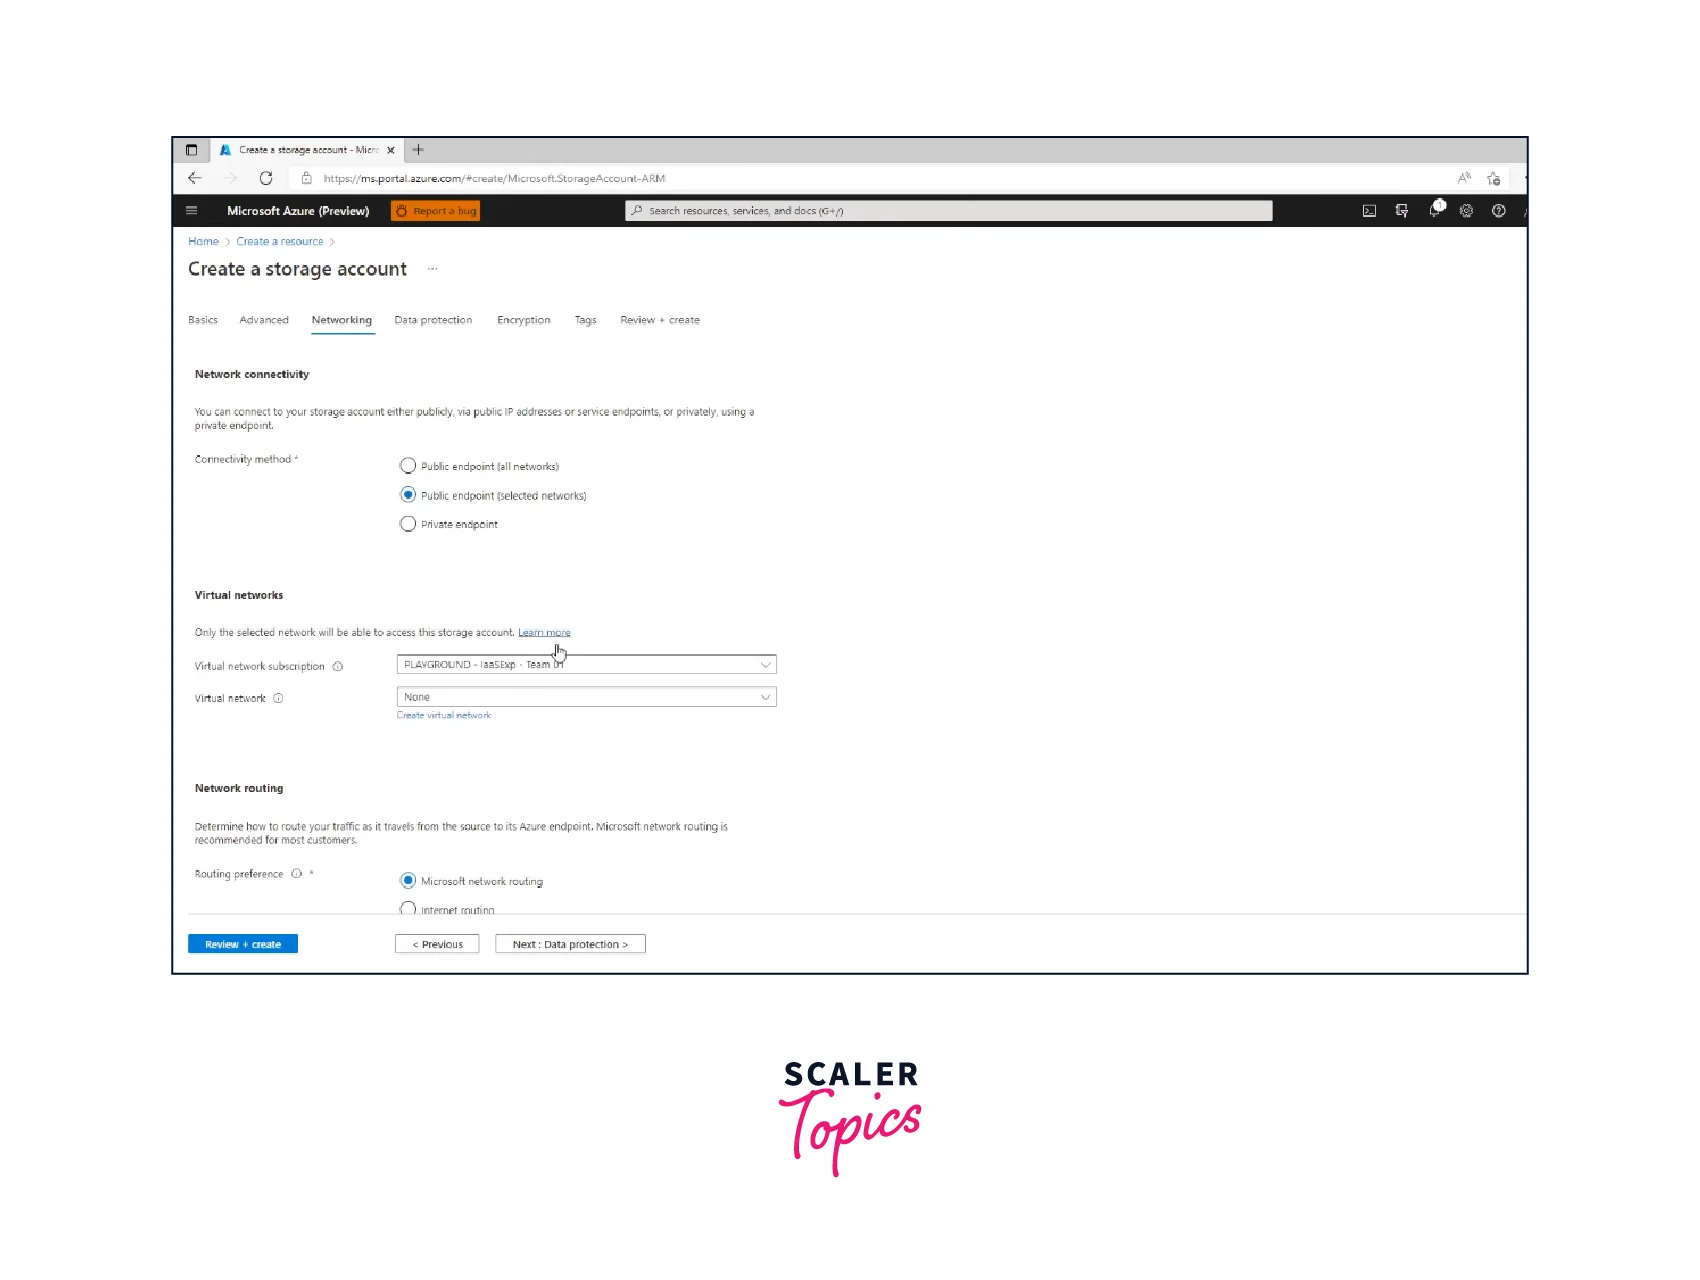
Configure the advanced options, such as access tier, virtual network, encryption, and network routing, based on your specific needs.
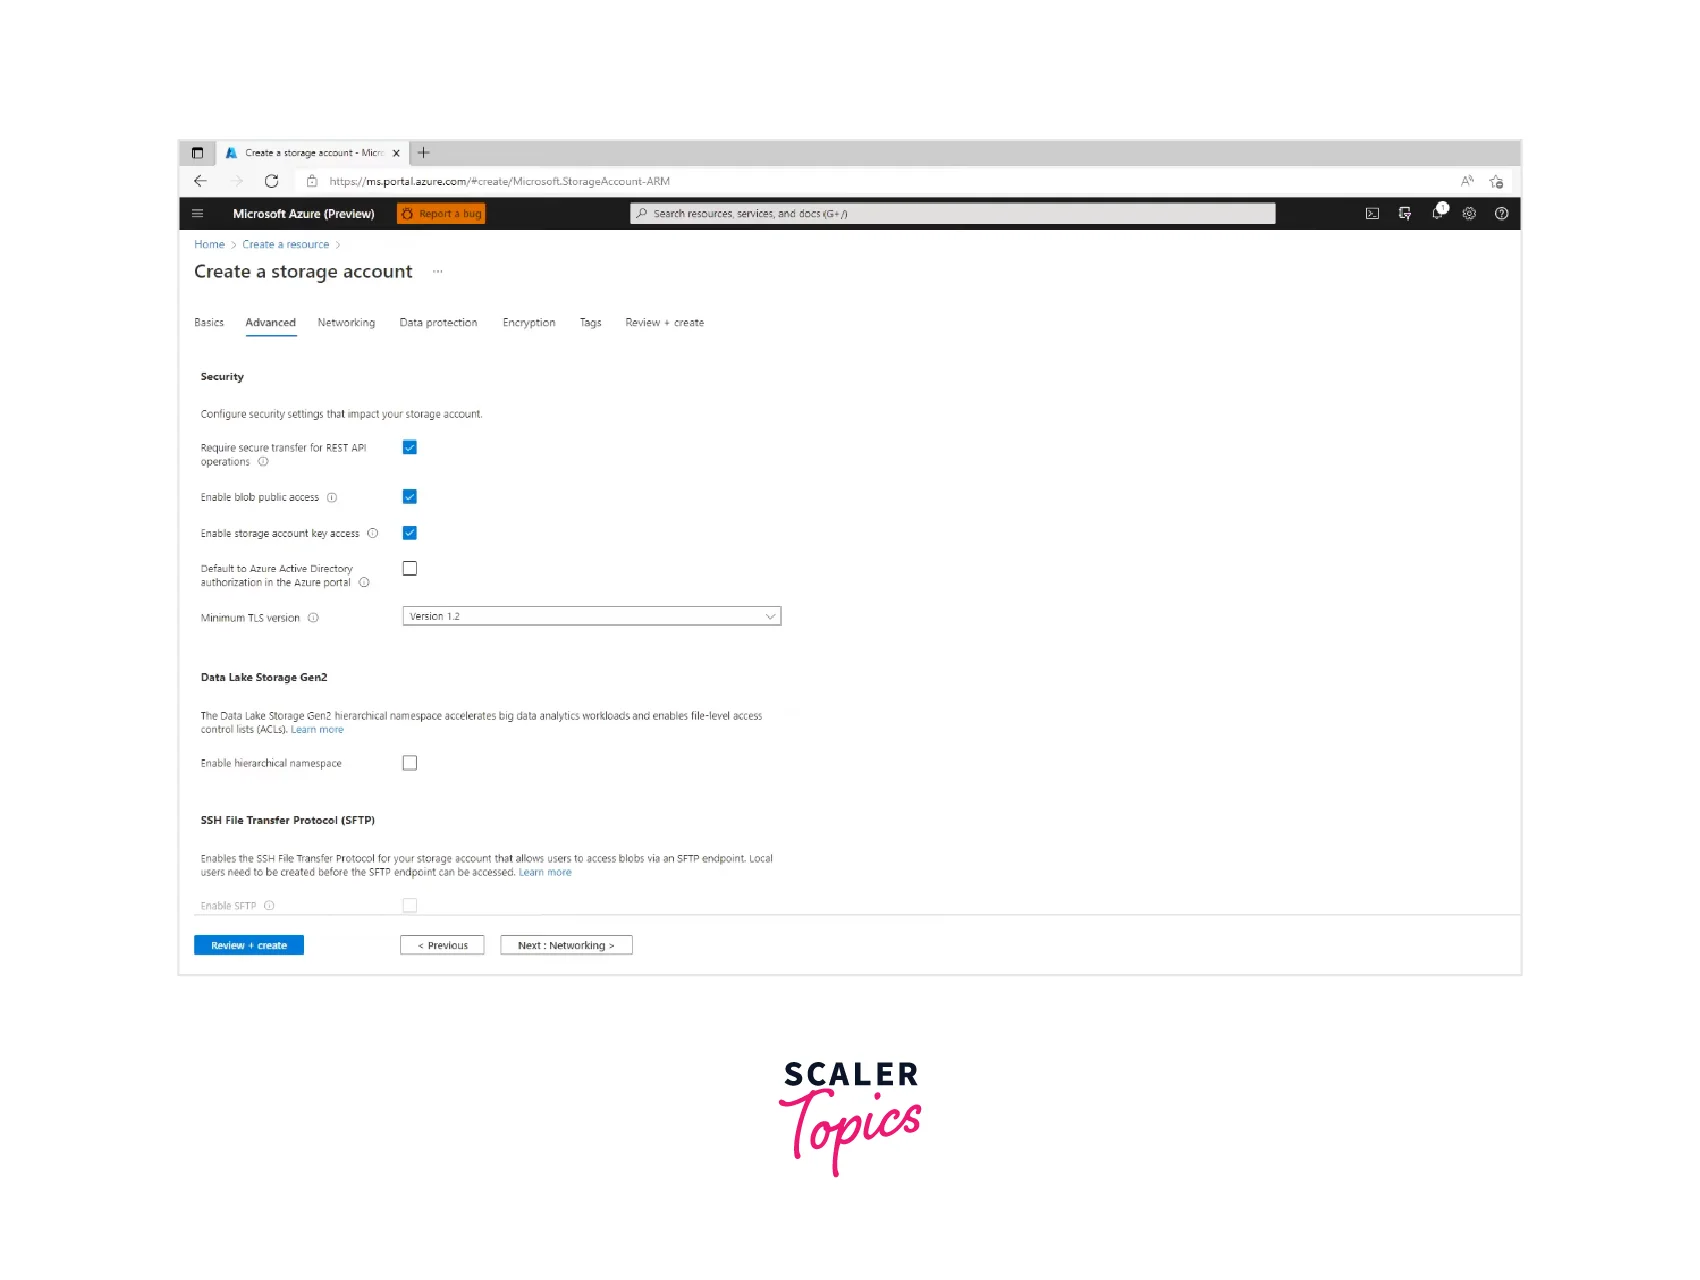
-
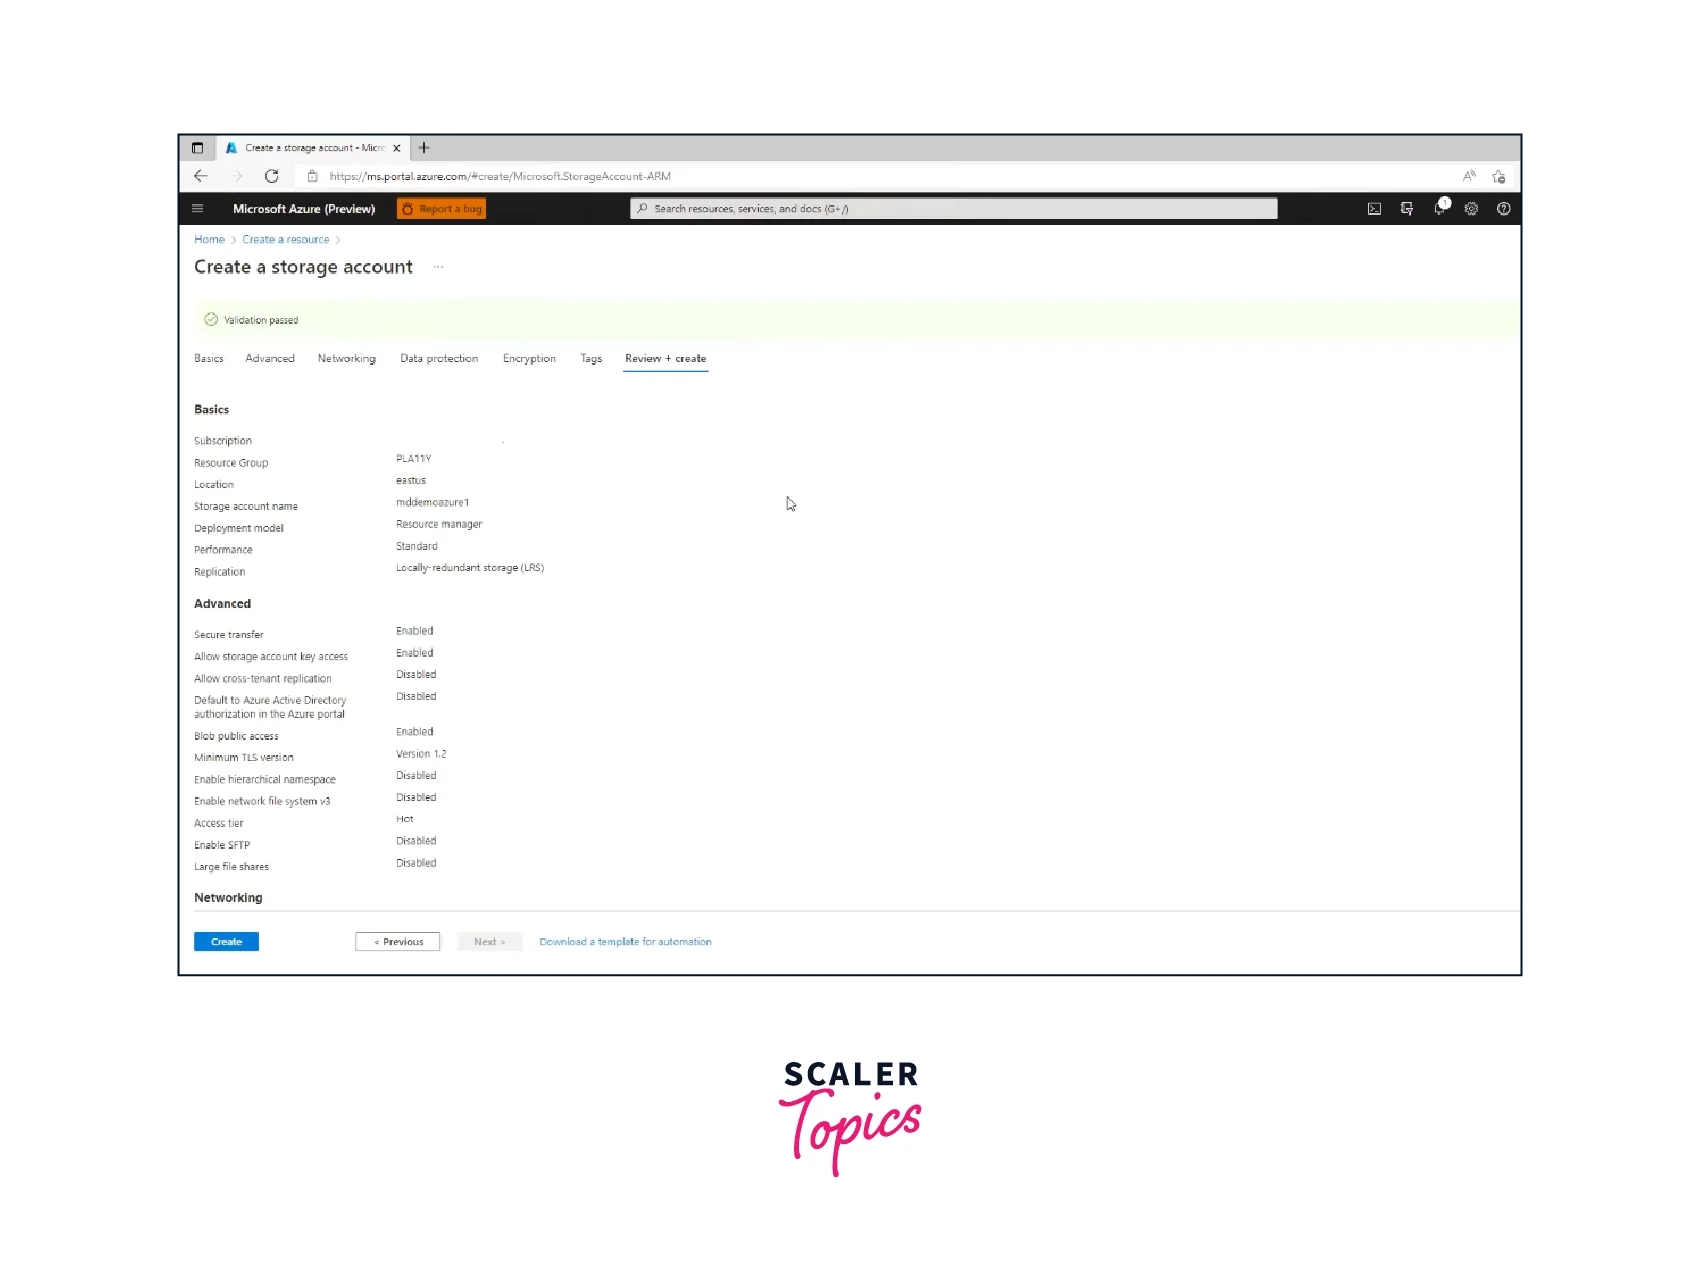
Review the configuration settings and click on the "Review + create" button.
-
After the validation is successful, click on the "Create" button to create the storage account.
-
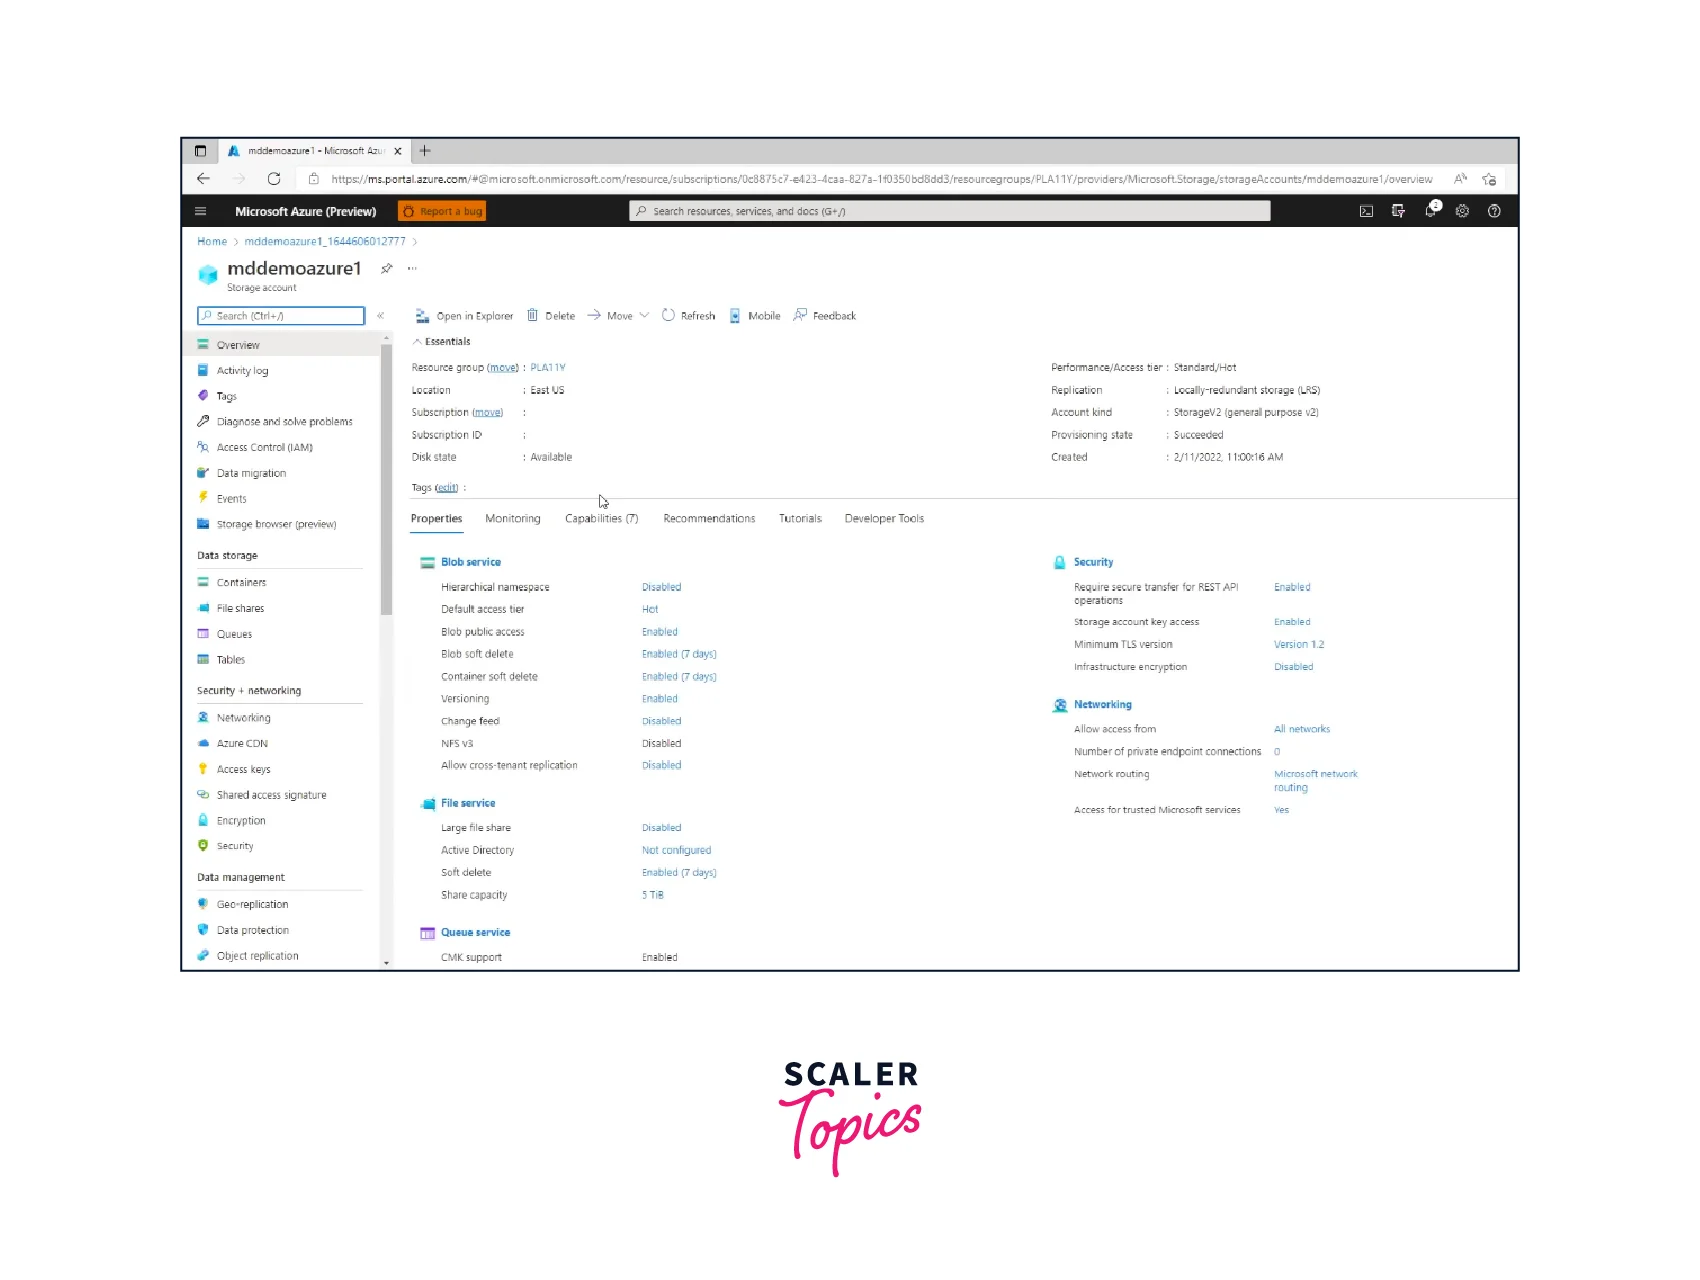
Once the storage account is created, you can access and manage it from the Azure portal or programmatically using Azure SDKs or REST APIs.
-
Configure additional settings for your storage account, such as access control, networking, and data protection, according to your requirements.
By following these steps, you can create and configure an Azure Storage account to start storing and managing your data in the cloud.
Key Configurations and Functionalities
When creating and configuring an Azure Storage account, there are several key configurations and functionalities to consider:
1. Access Control:
- Azure Active Directory (Azure AD) integration: Configure Azure AD authentication and authorization to control access to your storage account.
- Shared access signatures (SAS): Generate SAS tokens with granular permissions to provide temporary access to specific storage resources.
2. Encryption:
- Encryption at rest: Enable Azure Storage Service Encryption (SSE) to automatically encrypt data stored in your storage account.
- Client-side encryption: Encrypt data on the client-side before uploading it to Azure Storage.
3. Networking:
- Virtual Network Service Endpoints: Securely access your storage account from within your Azure Virtual Network (VNet) without public exposure.
- Firewall and Virtual Network service endpoints: Configure network rules and firewall settings to restrict access to your storage account based on IP addresses and VNet subnets.
4. Lifecycle Management:
- Storage lifecycle policies: Set rules to automatically transition data between different access tiers (hot, cool, archive) based on specific criteria such as time or usage patterns.
- Blob versioning: Enable versioning for blob storage to maintain different versions of the same object.
5. Monitoring and Logging:
- Azure Monitor: Configure diagnostics settings to collect metrics and logs for your storage account, allowing you to monitor performance and troubleshoot issues.
- Azure Storage Analytics: Enable logging and retention policies to track storage account activities and analyze them for auditing and compliance purposes.
6. Replication and Redundancy:
- Choose the appropriate replication option (LRS, GRS, etc.) to ensure data durability and availability based on your requirements.
- Configure read-access geo-redundant storage (RA-GRS) or geo-zone redundant storage (GZRS) for additional redundancy and disaster recovery capabilities.
7. Blob Storage Features:
- Blob Lifecycle Management: Automate the deletion or movement of data based on custom-defined policies.
- Blob Indexing: Enable Azure Cognitive Search integration to index and search the contents of your blobs.
These configurations and functionalities provide flexibility, security, and scalability for your Azure Storage account, enabling you to effectively manage and protect your data in the cloud.
Deleting a Storage Account
To delete an Azure Storage account, follow these steps:
-
Log in to the Azure portal here.
-
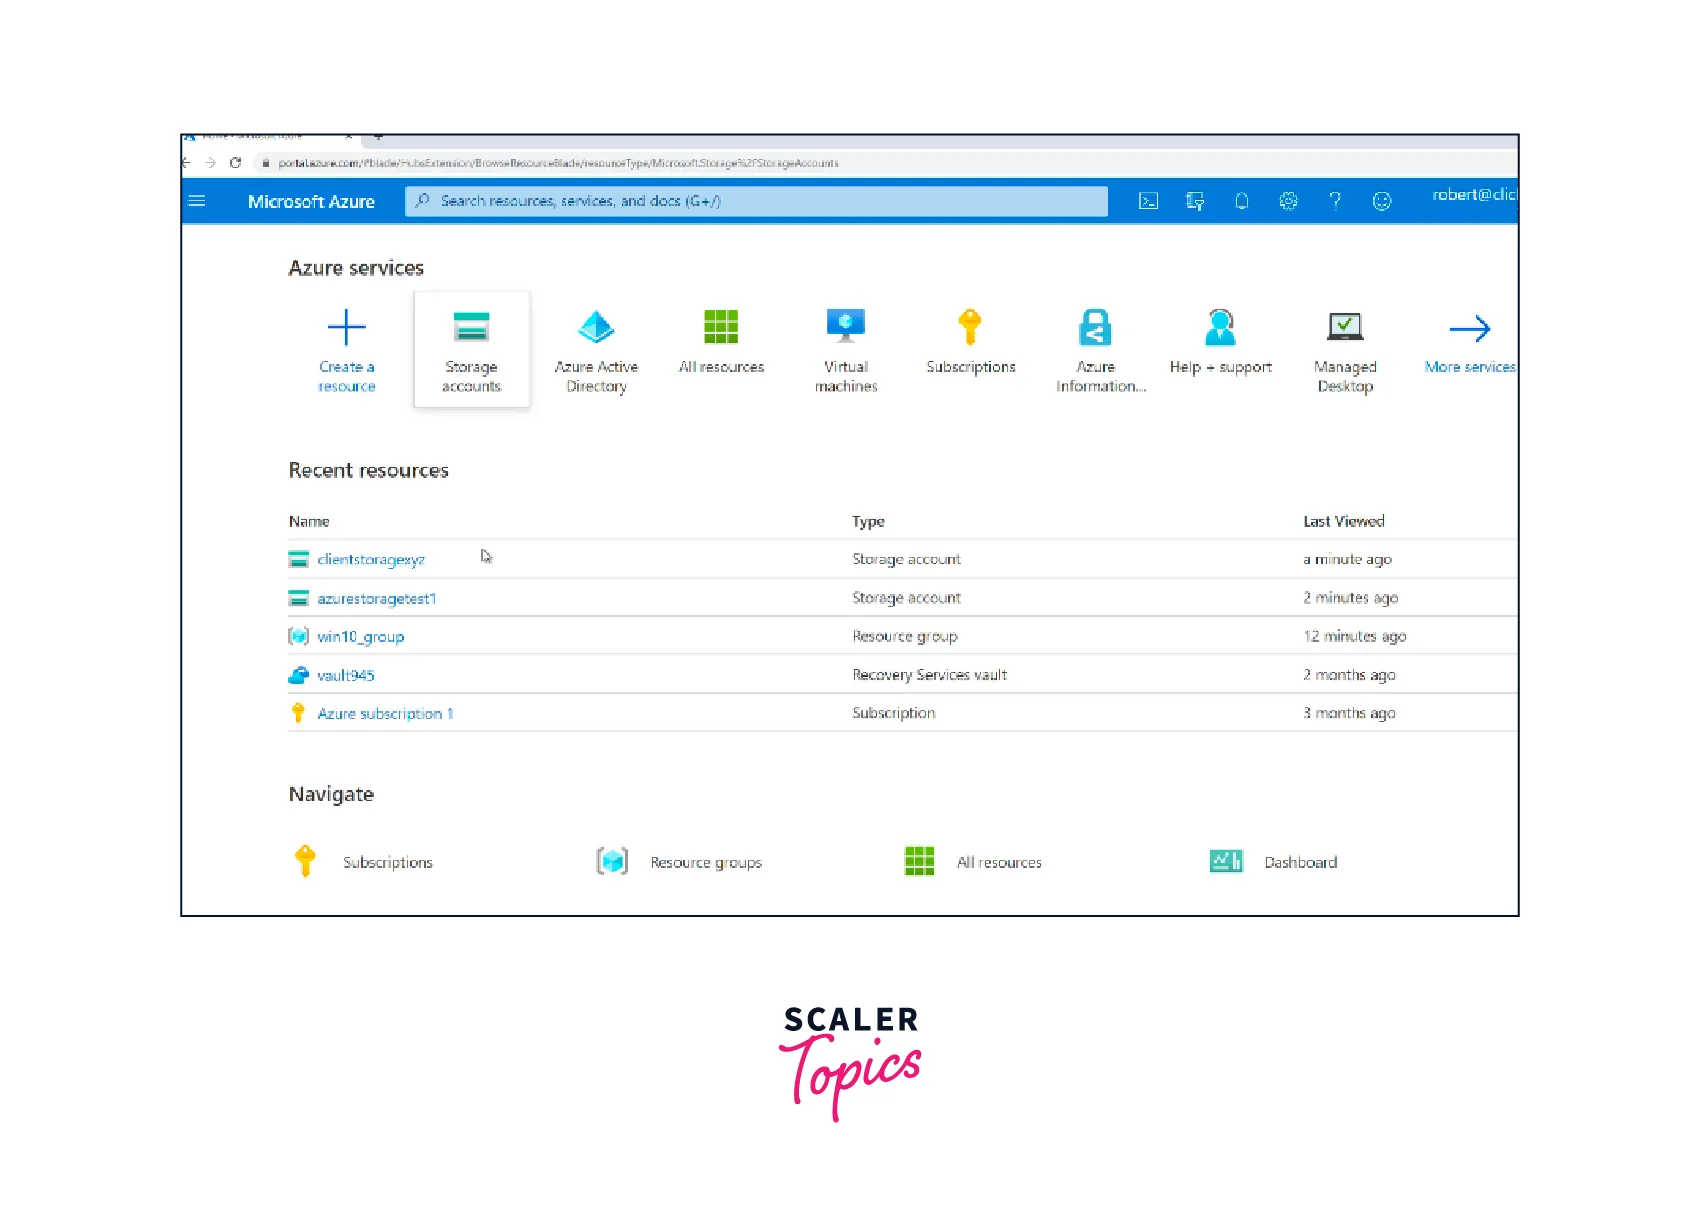
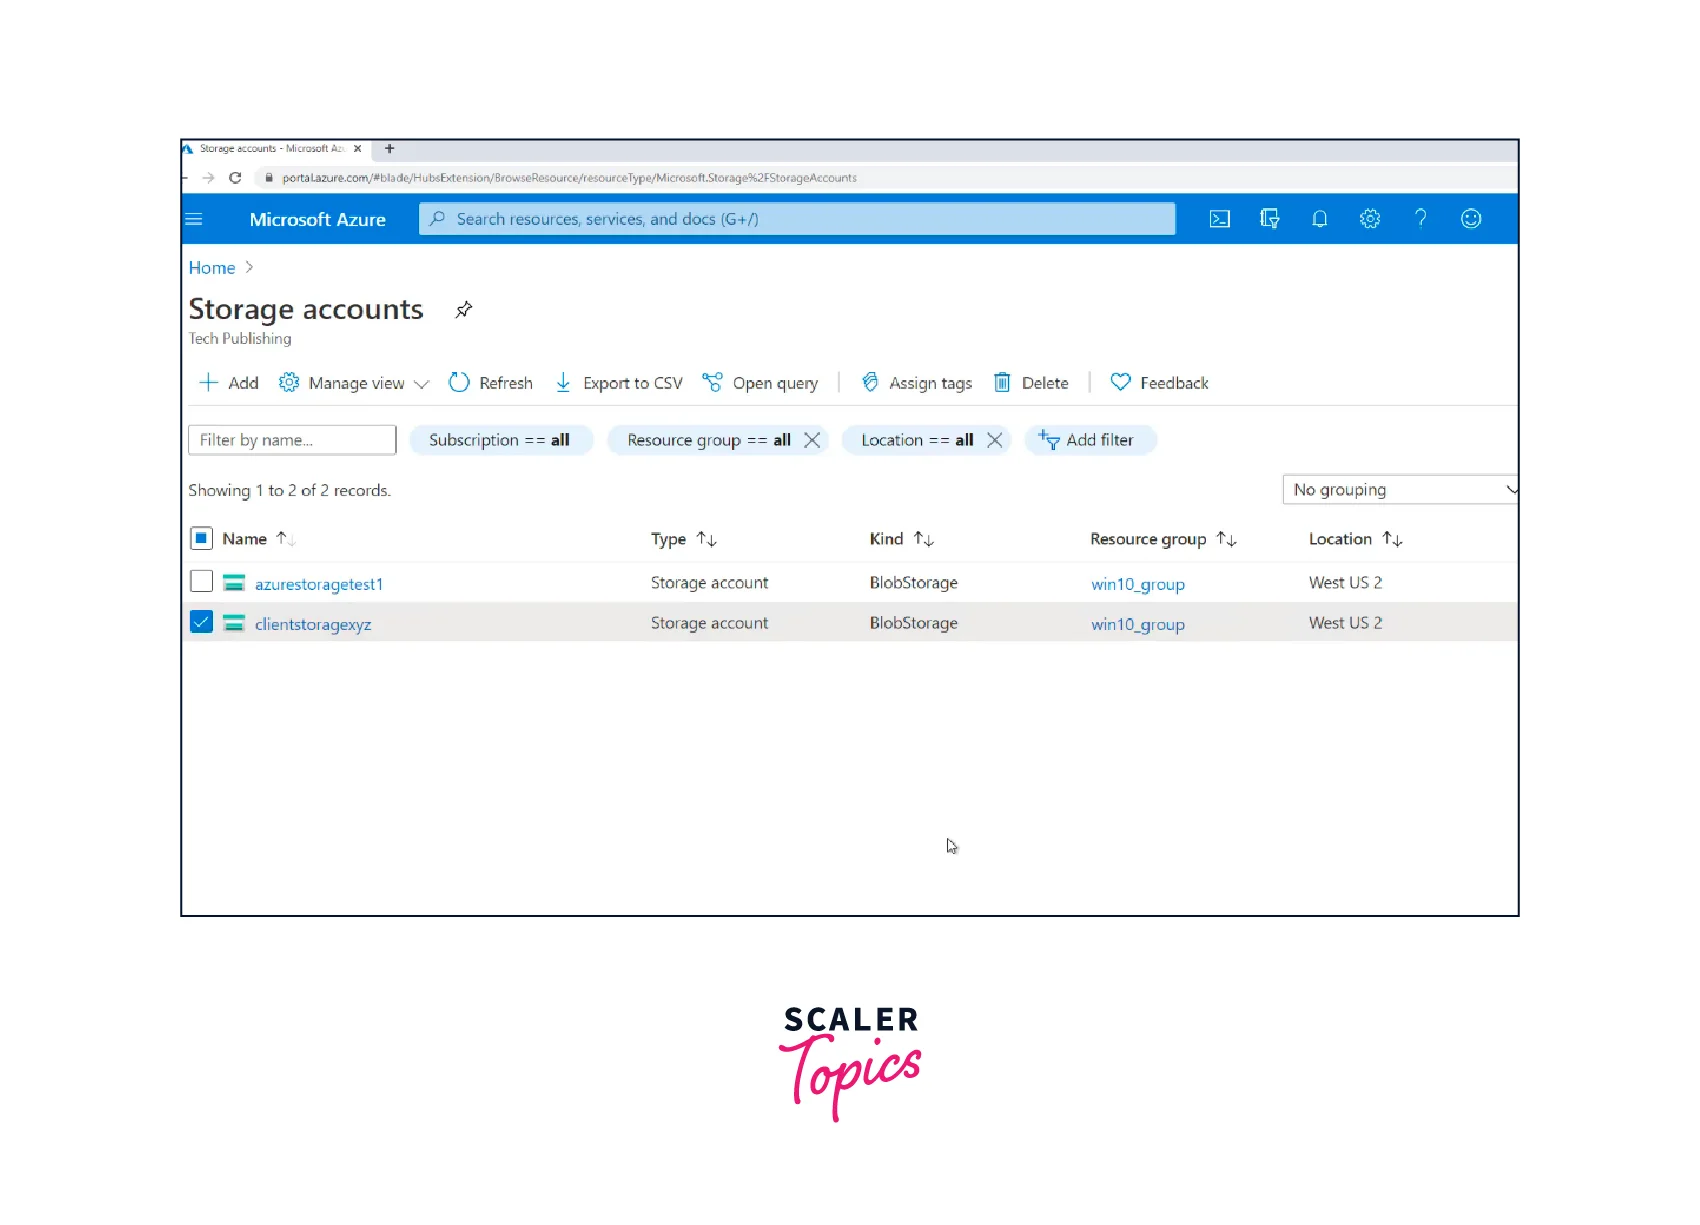
Navigate to the Storage accounts section.
-
Select the storage account you want to delete from the list.
-
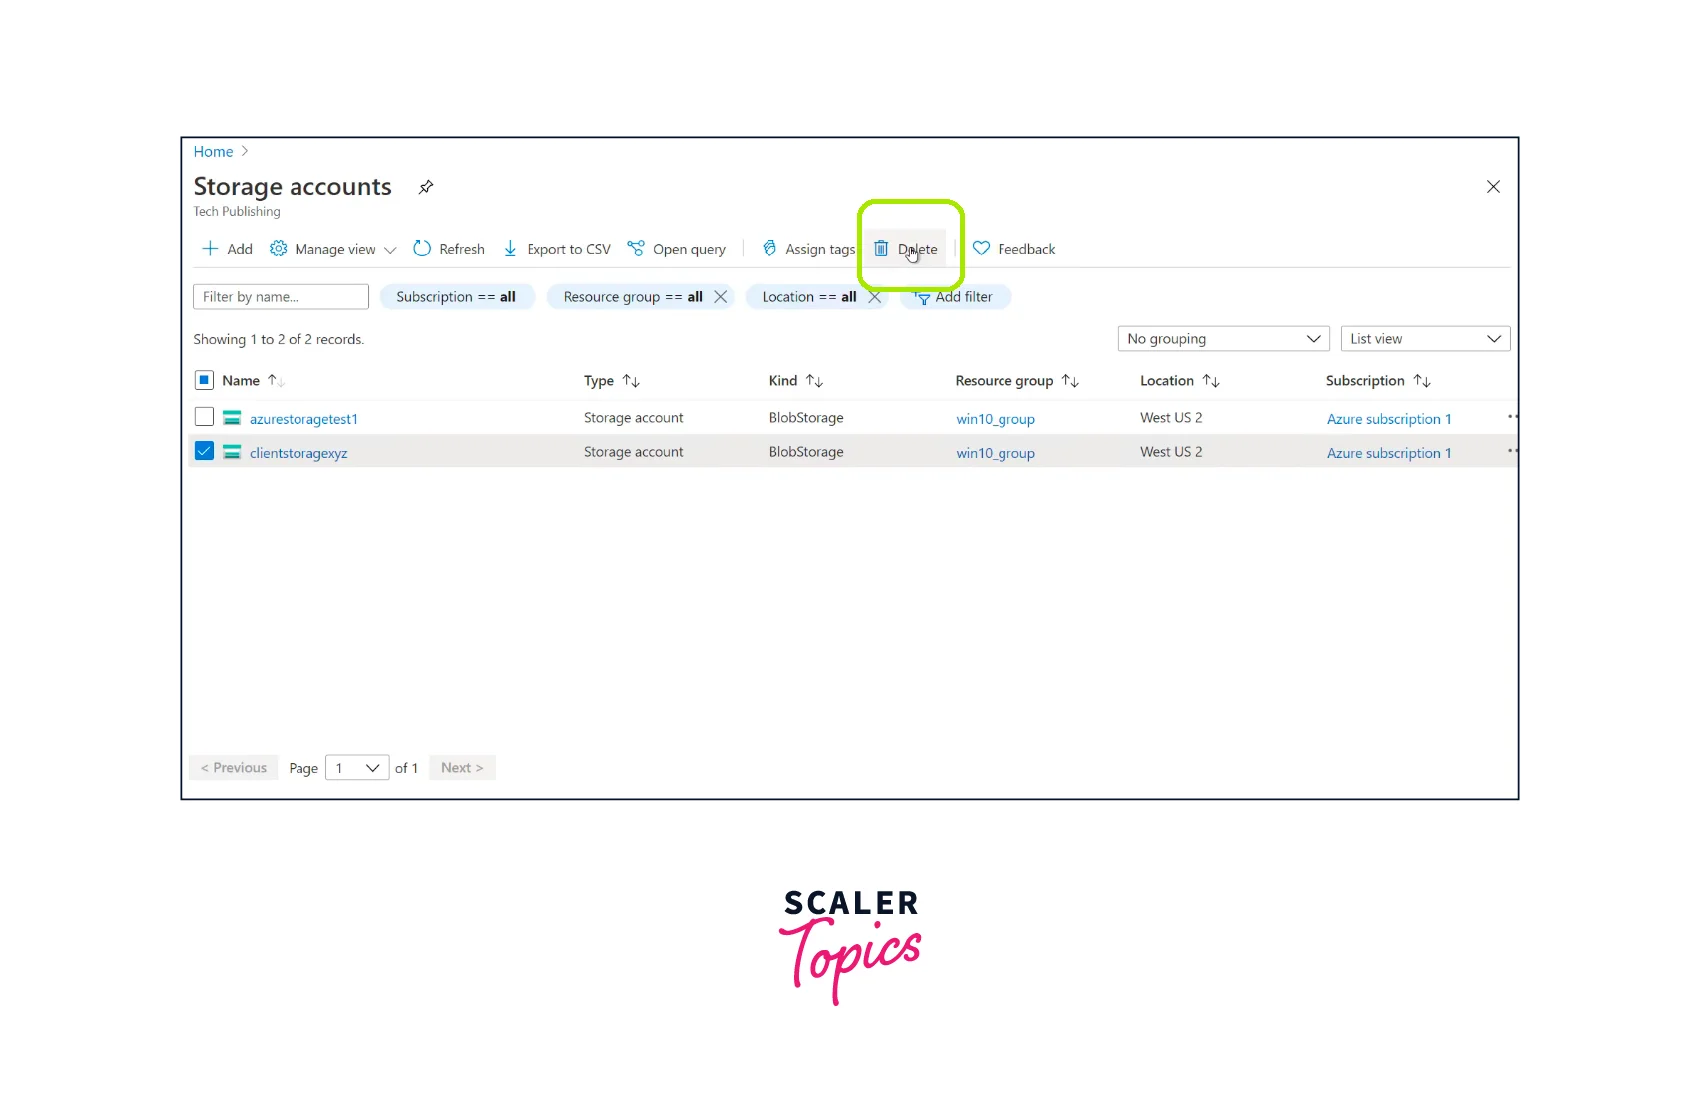
In the storage account overview page, click on the "Delete" button in the toolbar or go to the "Settings" section and select "Delete" from the options.
-
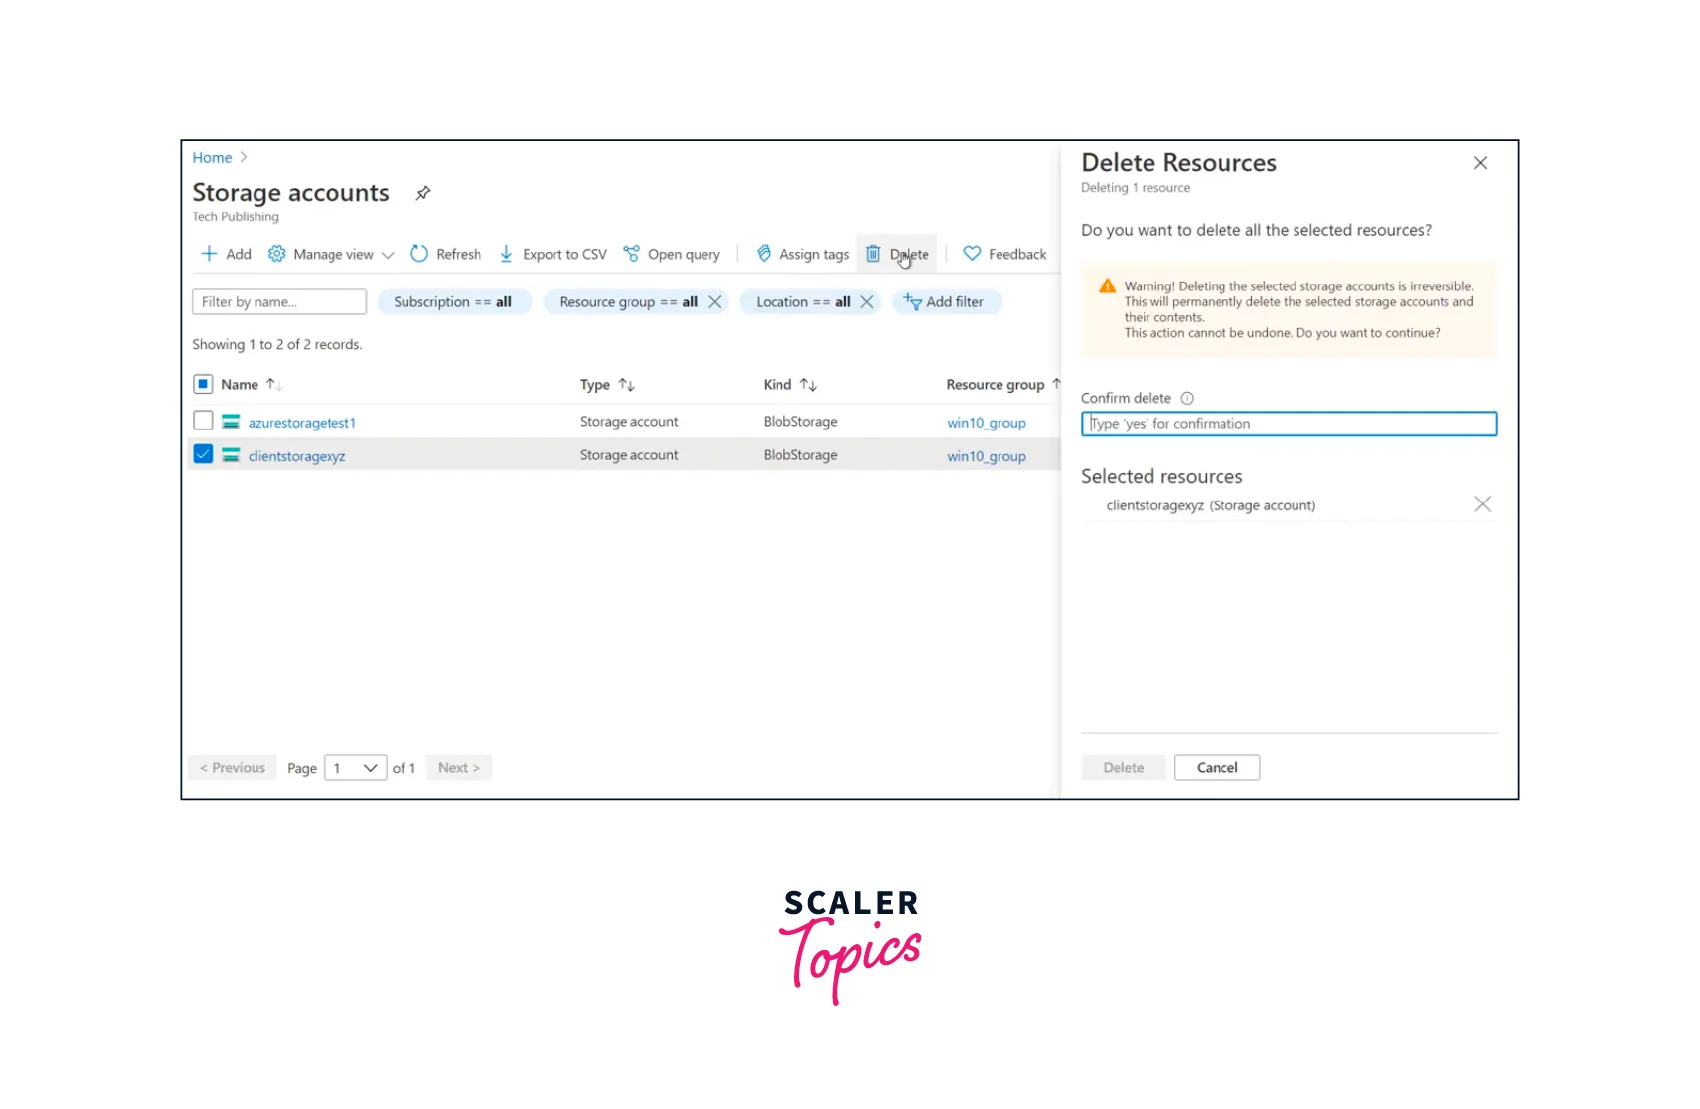
A confirmation dialog will appear, providing information about the resources that will be deleted along with the storage account. Review the information carefully.
-
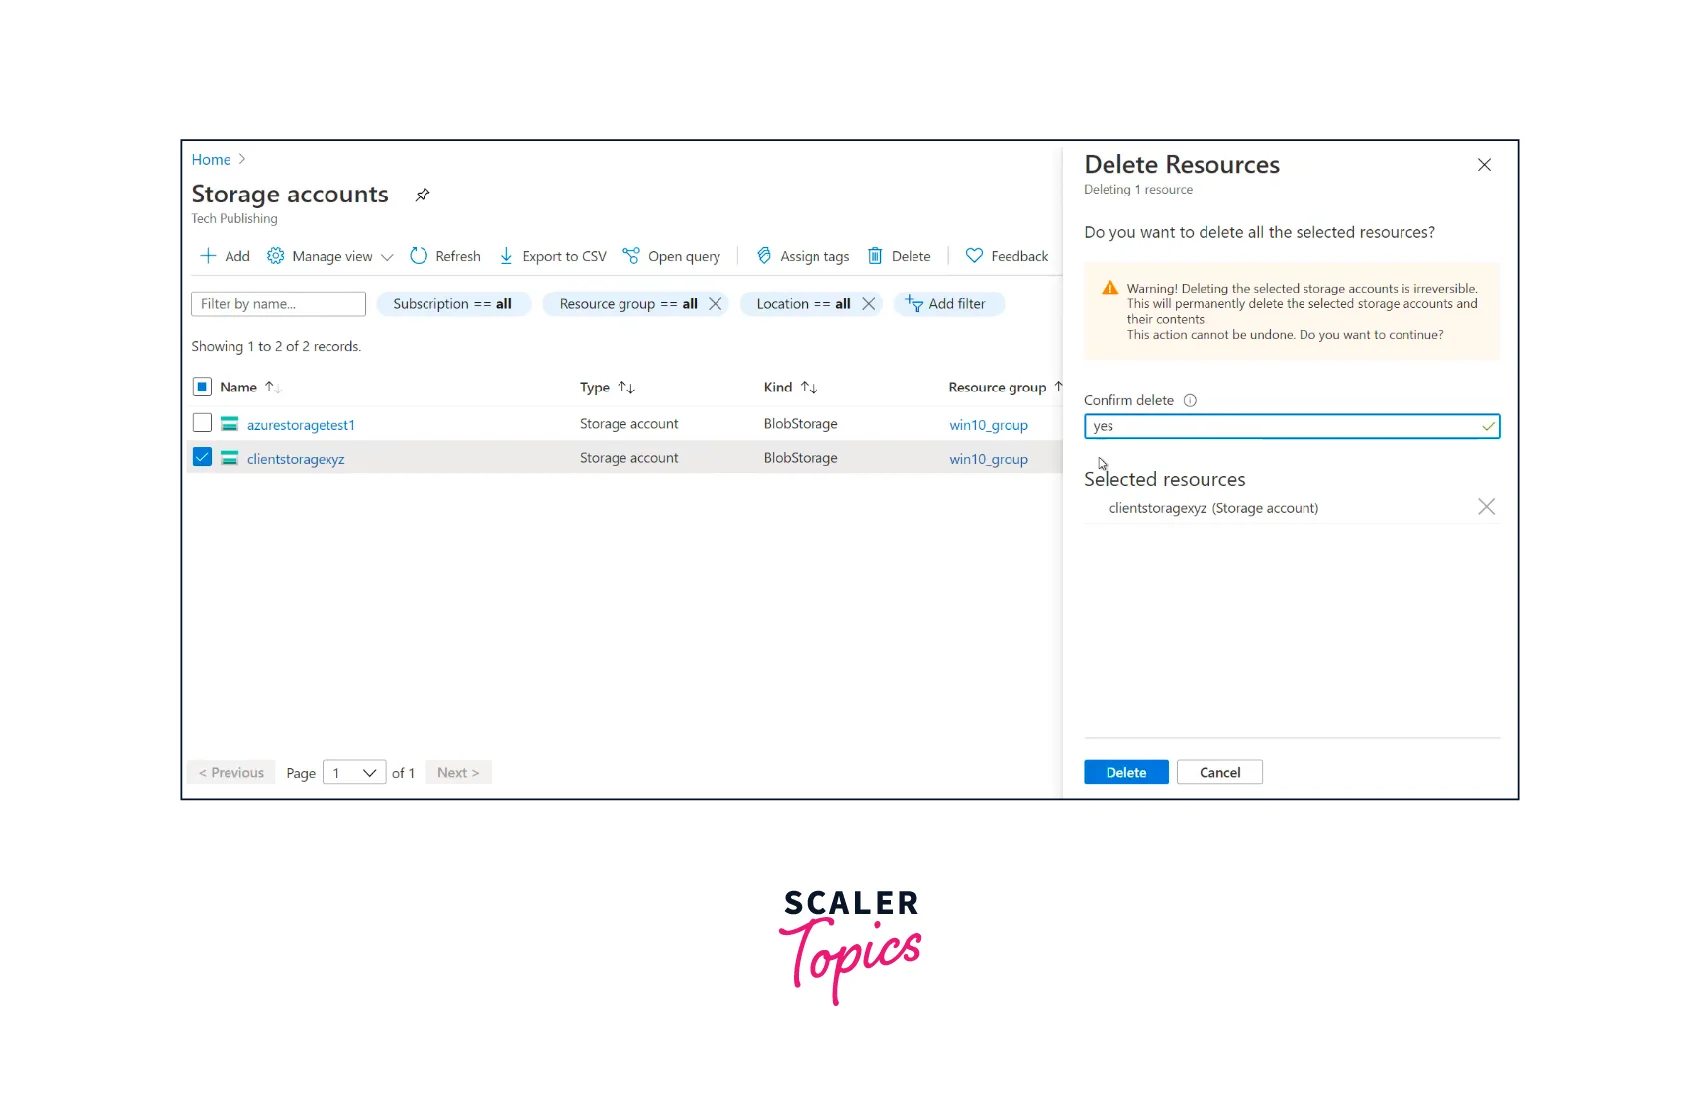
If you are ready to proceed with the deletion, type the storage account name in the confirmation box to confirm the deletion.
-
Click on the "Delete" button to initiate the deletion process.
-
The deletion process may take some time to complete. Once the process is finished, the storage account and all associated resources will be permanently deleted.
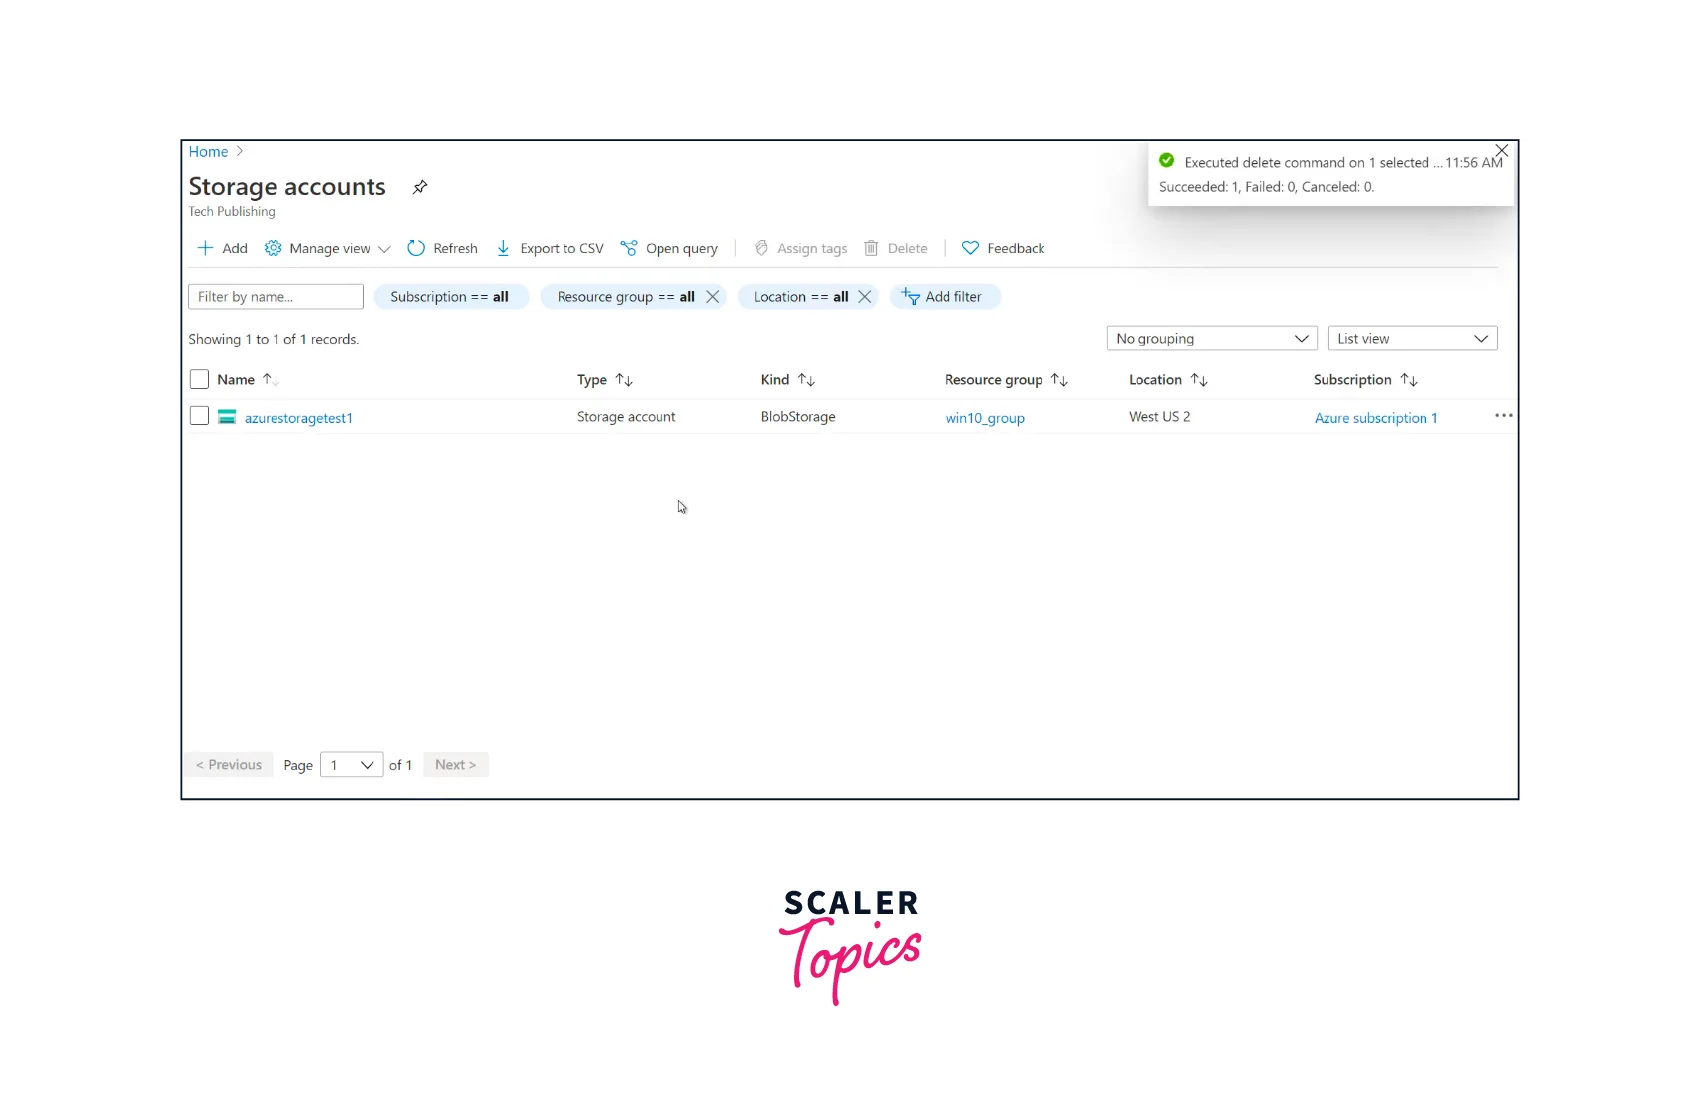 It's important to note that deleting a storage account is an irreversible action, and all data and resources associated with the storage account will be lost. Therefore, it's crucial to ensure that you have backed up any necessary data or resources before deleting the storage account.
Conclusion
- Azure Storage accounts provide a reliable and scalable solution for storing and managing data in the cloud. With various access tiers and performance options, organizations can optimize cost and performance based on their specific requirements.
- Replication options such as LRS, GRS, and ZRS ensure data durability and availability, protecting against hardware failures, datacenter outages, and regional disasters.
- Configurations like access control, encryption at rest, and networking settings enhance security and control over data access and protect data from unauthorized access.
- Lifecycle management features allow automatic data movement between different access tiers and versioning of blobs, enabling efficient data management and cost optimization.
- Monitoring and logging capabilities provide insights into storage account performance, enabling proactive monitoring, troubleshooting, and auditing.
- When deleting a storage account, it's essential to double-check and ensure that all necessary data and resources have been backed up, as the deletion process is irreversible and results in permanent loss of data and associated resources.
