Website Hosting on Azure
Overview
Website hosting on Azure offers a robust and scalable solution for businesses and individuals. Azure provides a range of services and tools to host websites, including virtual machines, Azure App Service, and Azure Static Web Apps. These services ensure high availability, secure and compliant data management, and efficient deployment. Azure's global network of data centers allows for low-latency access to websites worldwide.
Setting Up a Static Website
Here are the key steps to configure static website hosting in the Azure portal:
-
Sign in:
Log in to the Azure portal to begin the configuration process. -
Locate Storage Account:
Find your storage account in the Azure portal and select it to access the account's Overview pane.
-
Access Static Website Configuration:
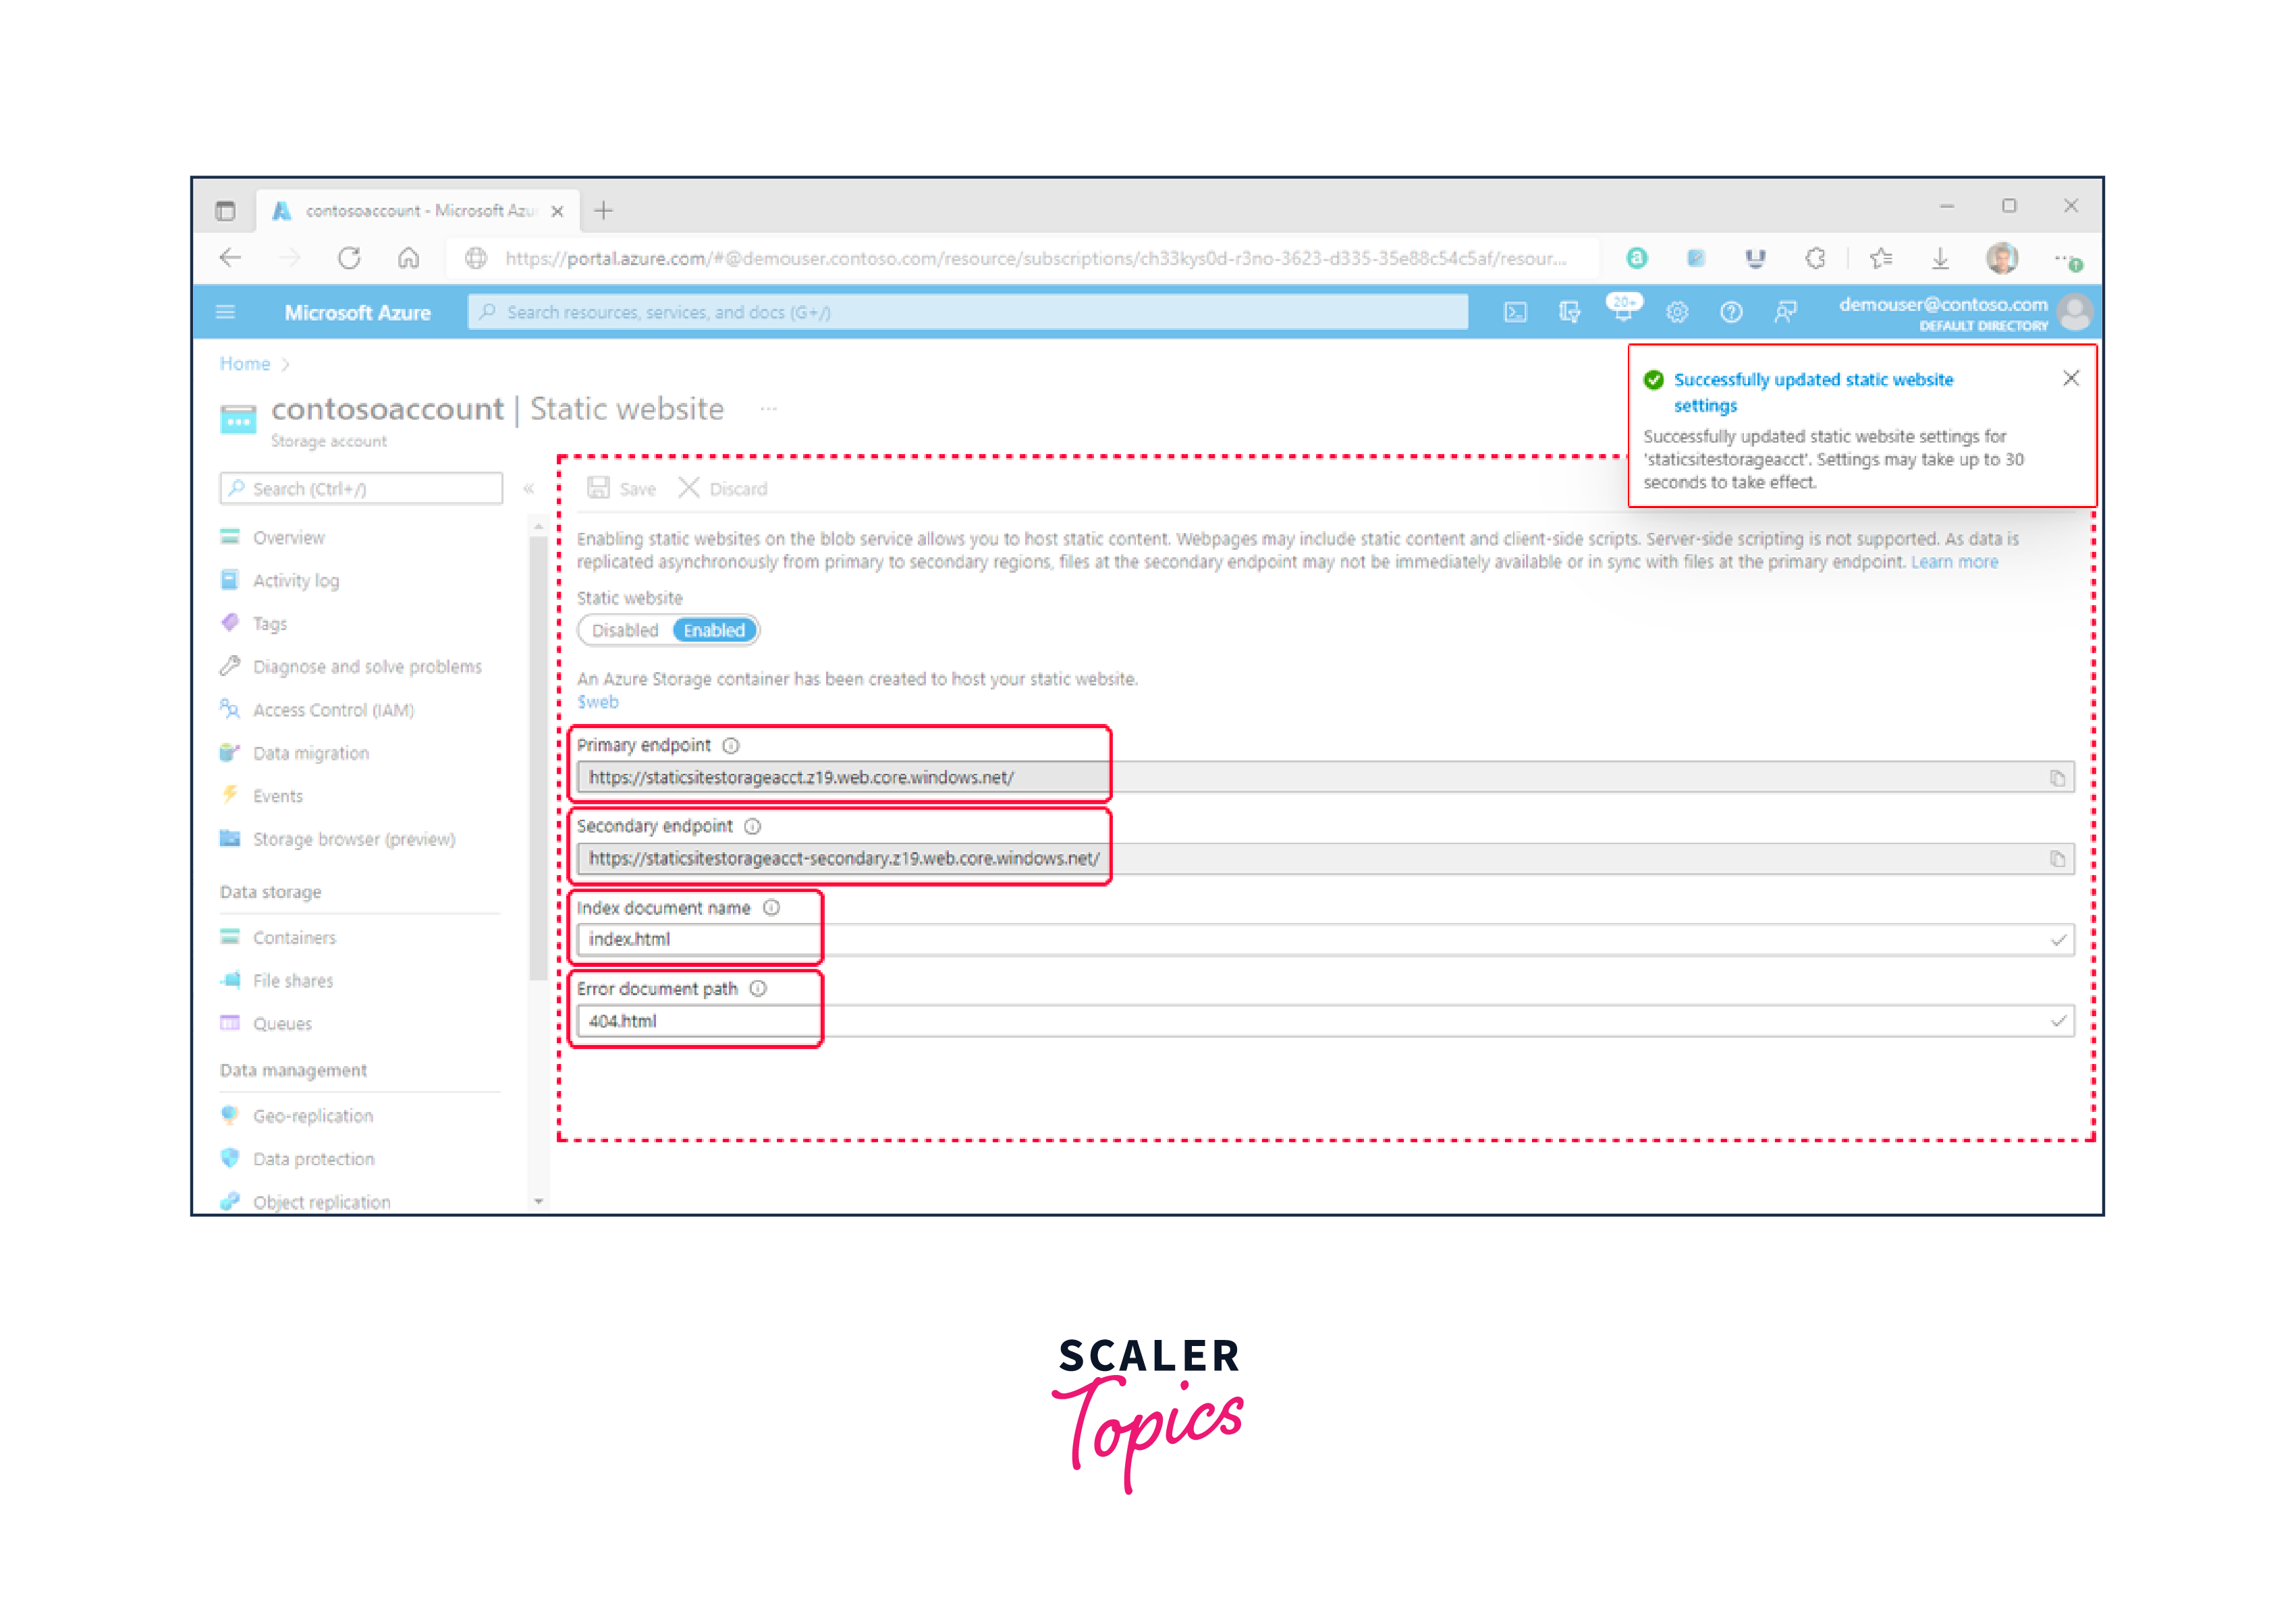
In the Overview pane of your storage account, click on the "Capabilities" tab. Then, select "Static website" to open the configuration page for static website hosting. -
Enable Static Website:
To enable static website hosting for the storage account, click the "Enabled" option. -
Set Default Index Page:
In the "Index document name" field, specify the name of the default index page. For instance, you can set it as "index.html." This page will be displayed when a user visits the root of your static website. -
Set Default Error Page:
In the "Error document path" field, define the path for the default error page. For example, you can set it as "404.html." This error page will be shown when a user tries to access a page that doesn't exist on your static website.
-
Save Configuration:
Click "Save" to finalize the static site configuration. -
Confirmation:
You'll see a confirmation message, and the Azure portal will display your static website endpoints and other configuration information within the Overview pane.
Uploading Content
Here are the key steps for uploading files to your static website storage container in the Azure portal:
-
Access Storage Account:
Go to the Azure portal and navigate to the storage account that contains your static website. -
Select Containers:
In the left navigation pane, click on "Containers" to view the list of containers associated with your storage account.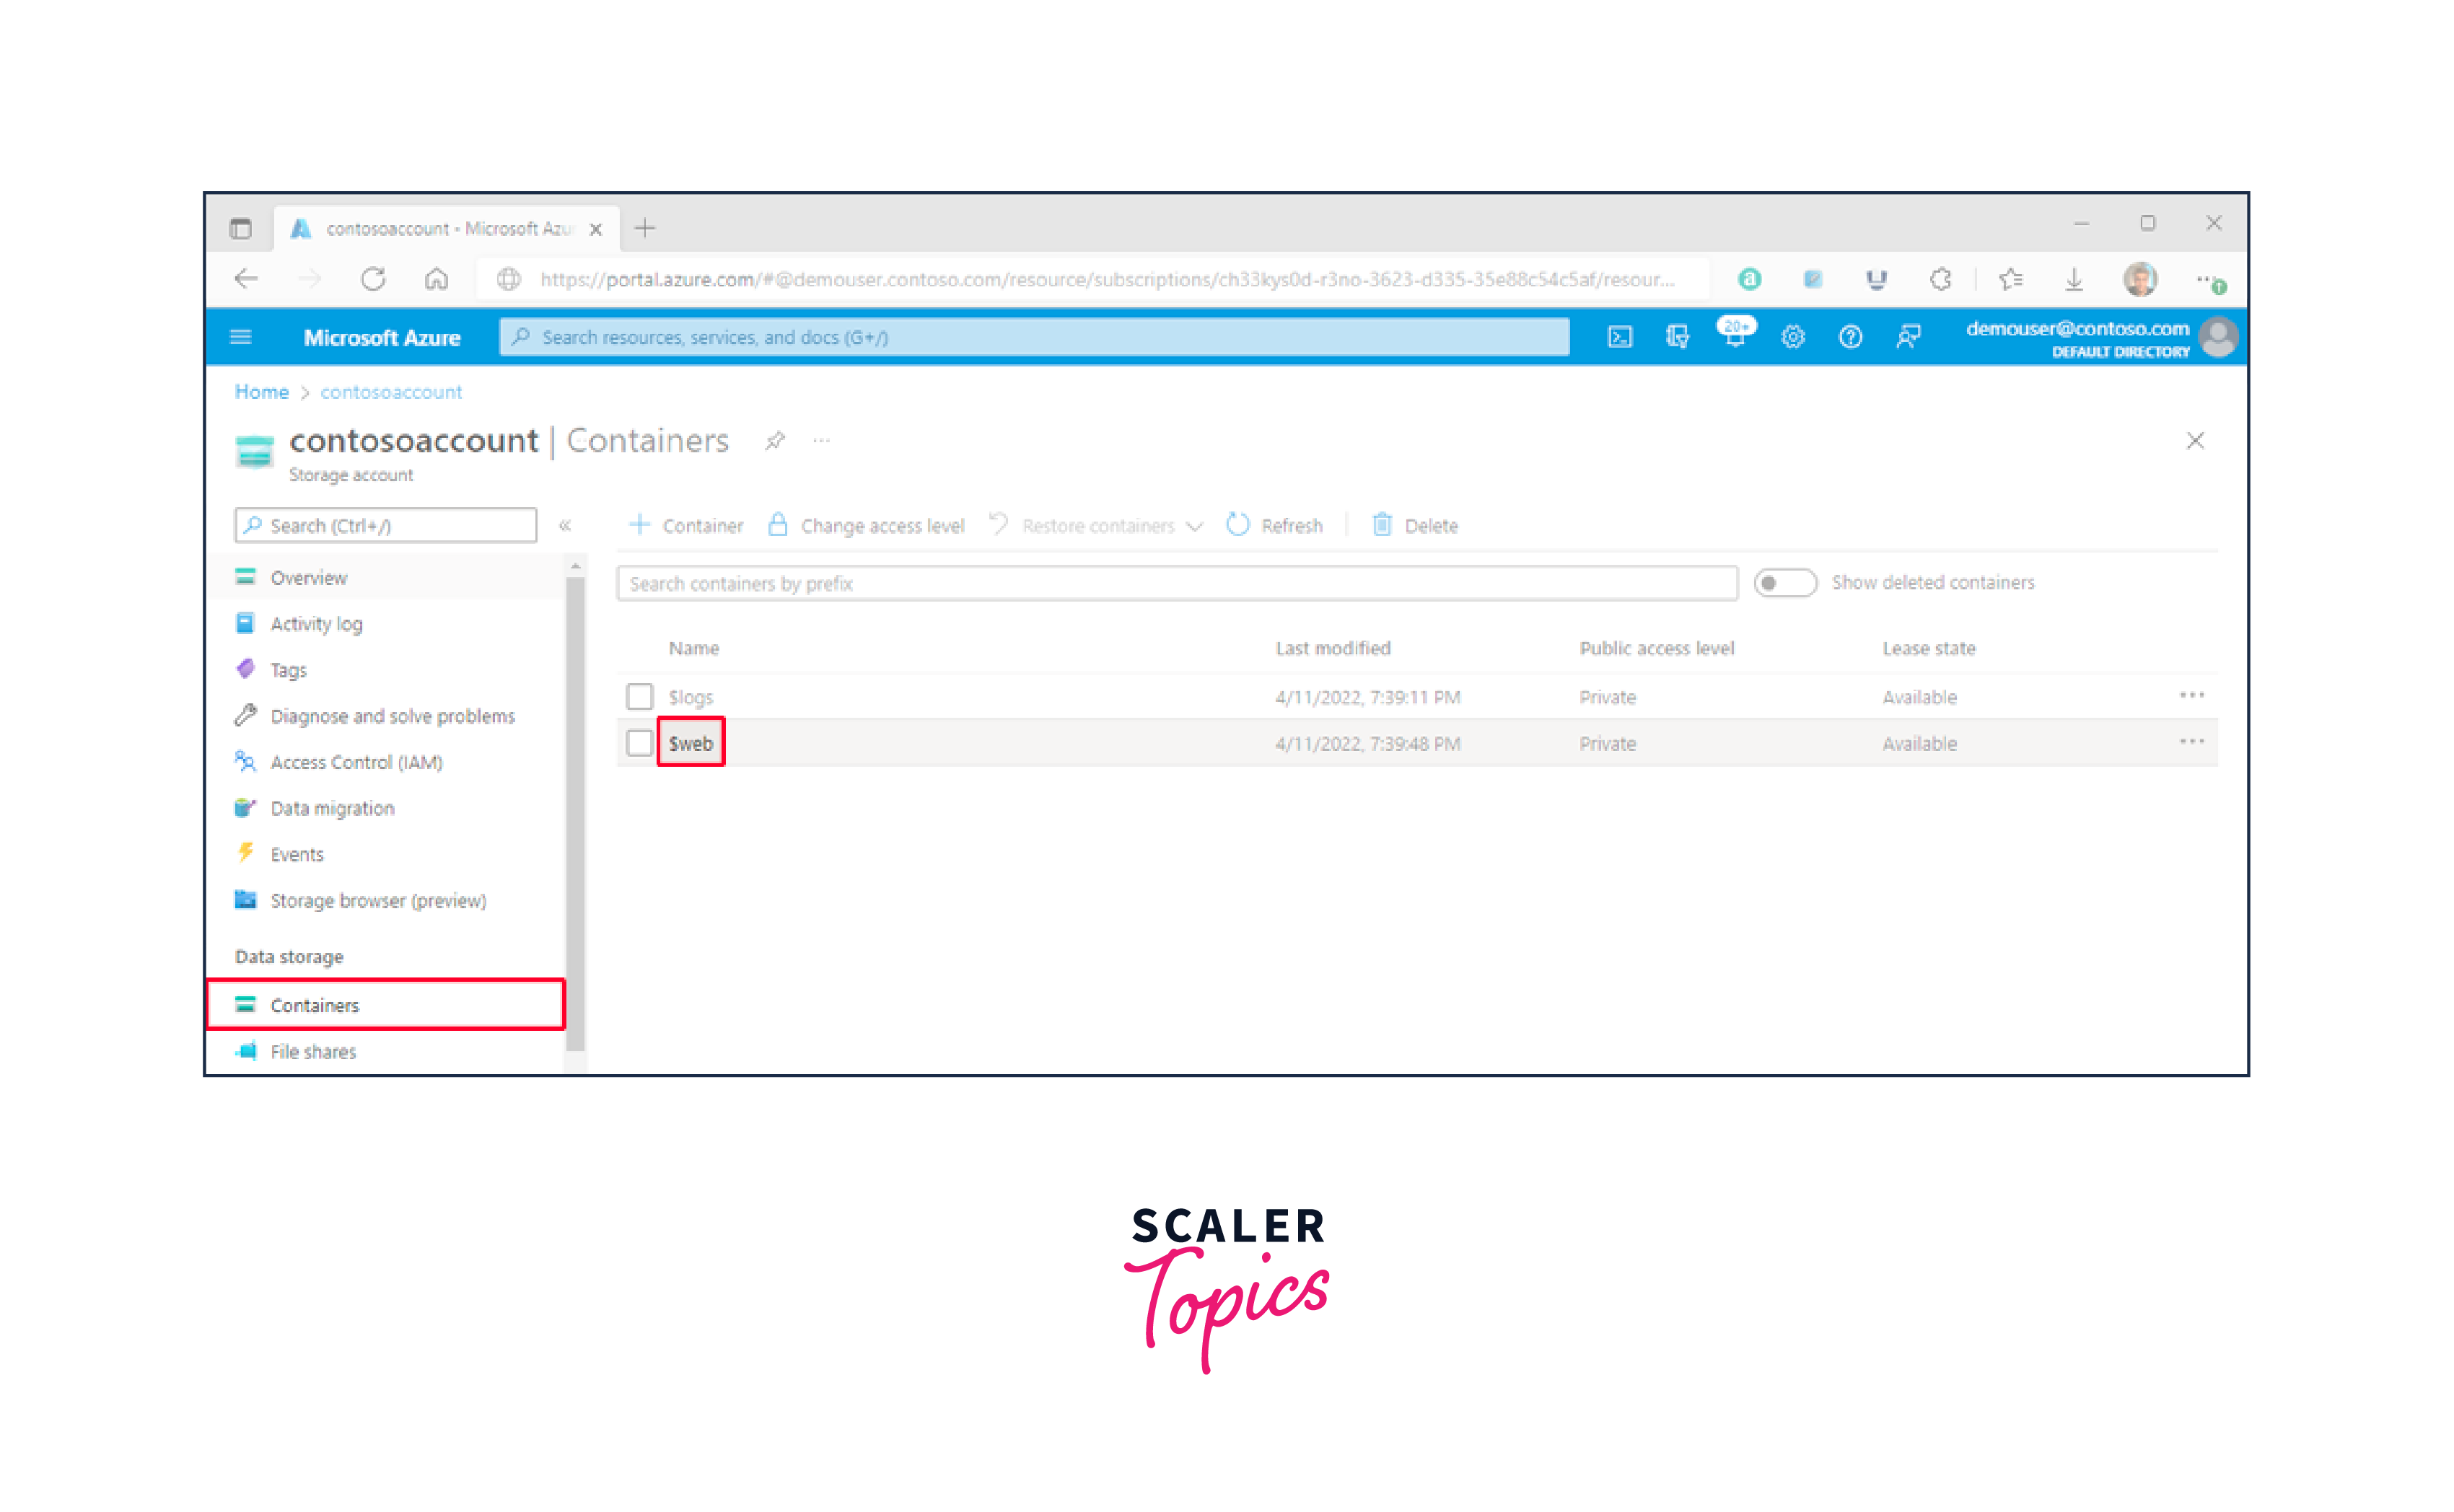
-
Choose $web Container:
From the list of containers, select the "$web" container. This action will open the container's Overview pane. -
Upload Files:
In the Overview pane of the "$web" container, locate and click on the "Upload" icon. This action will open the "Upload blob" pane.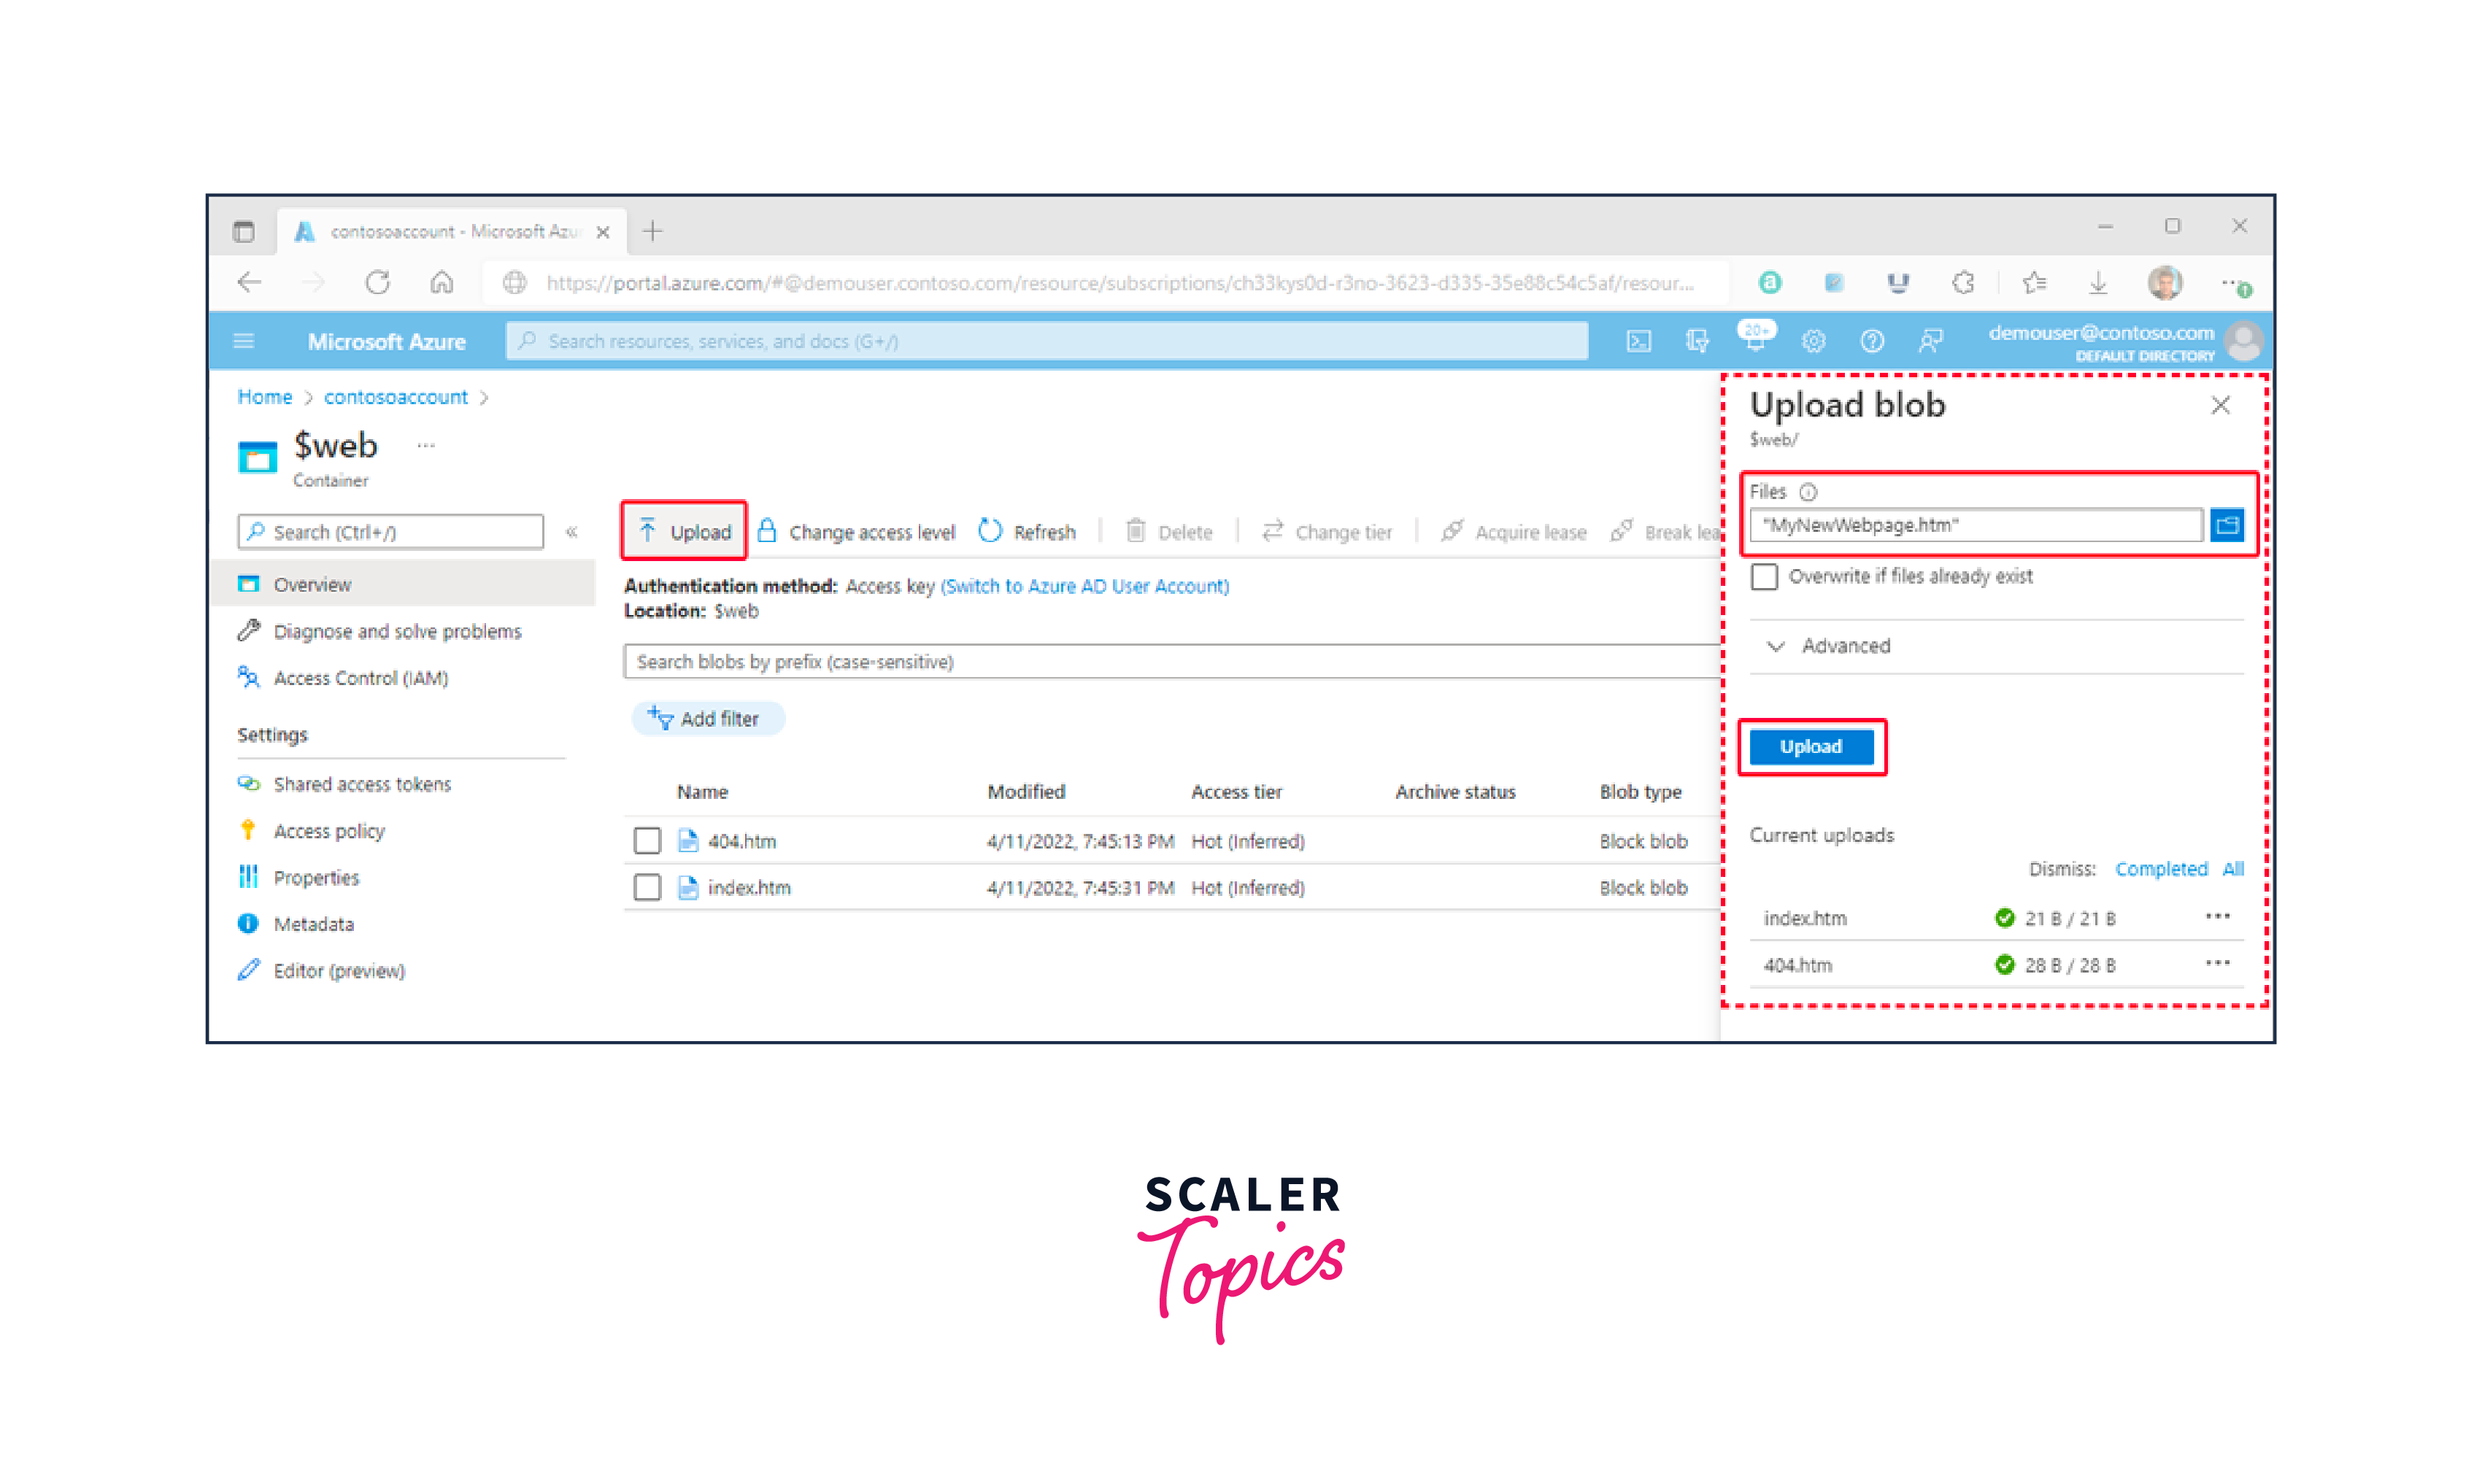
-
Select Files:
Within the "Upload blob" pane, click on the "Files" field to access the file browser. Navigate to the file on your local system that you want to upload, select it, and click "Open." Optionally, you can choose to check the "Overwrite if files already exist" checkbox.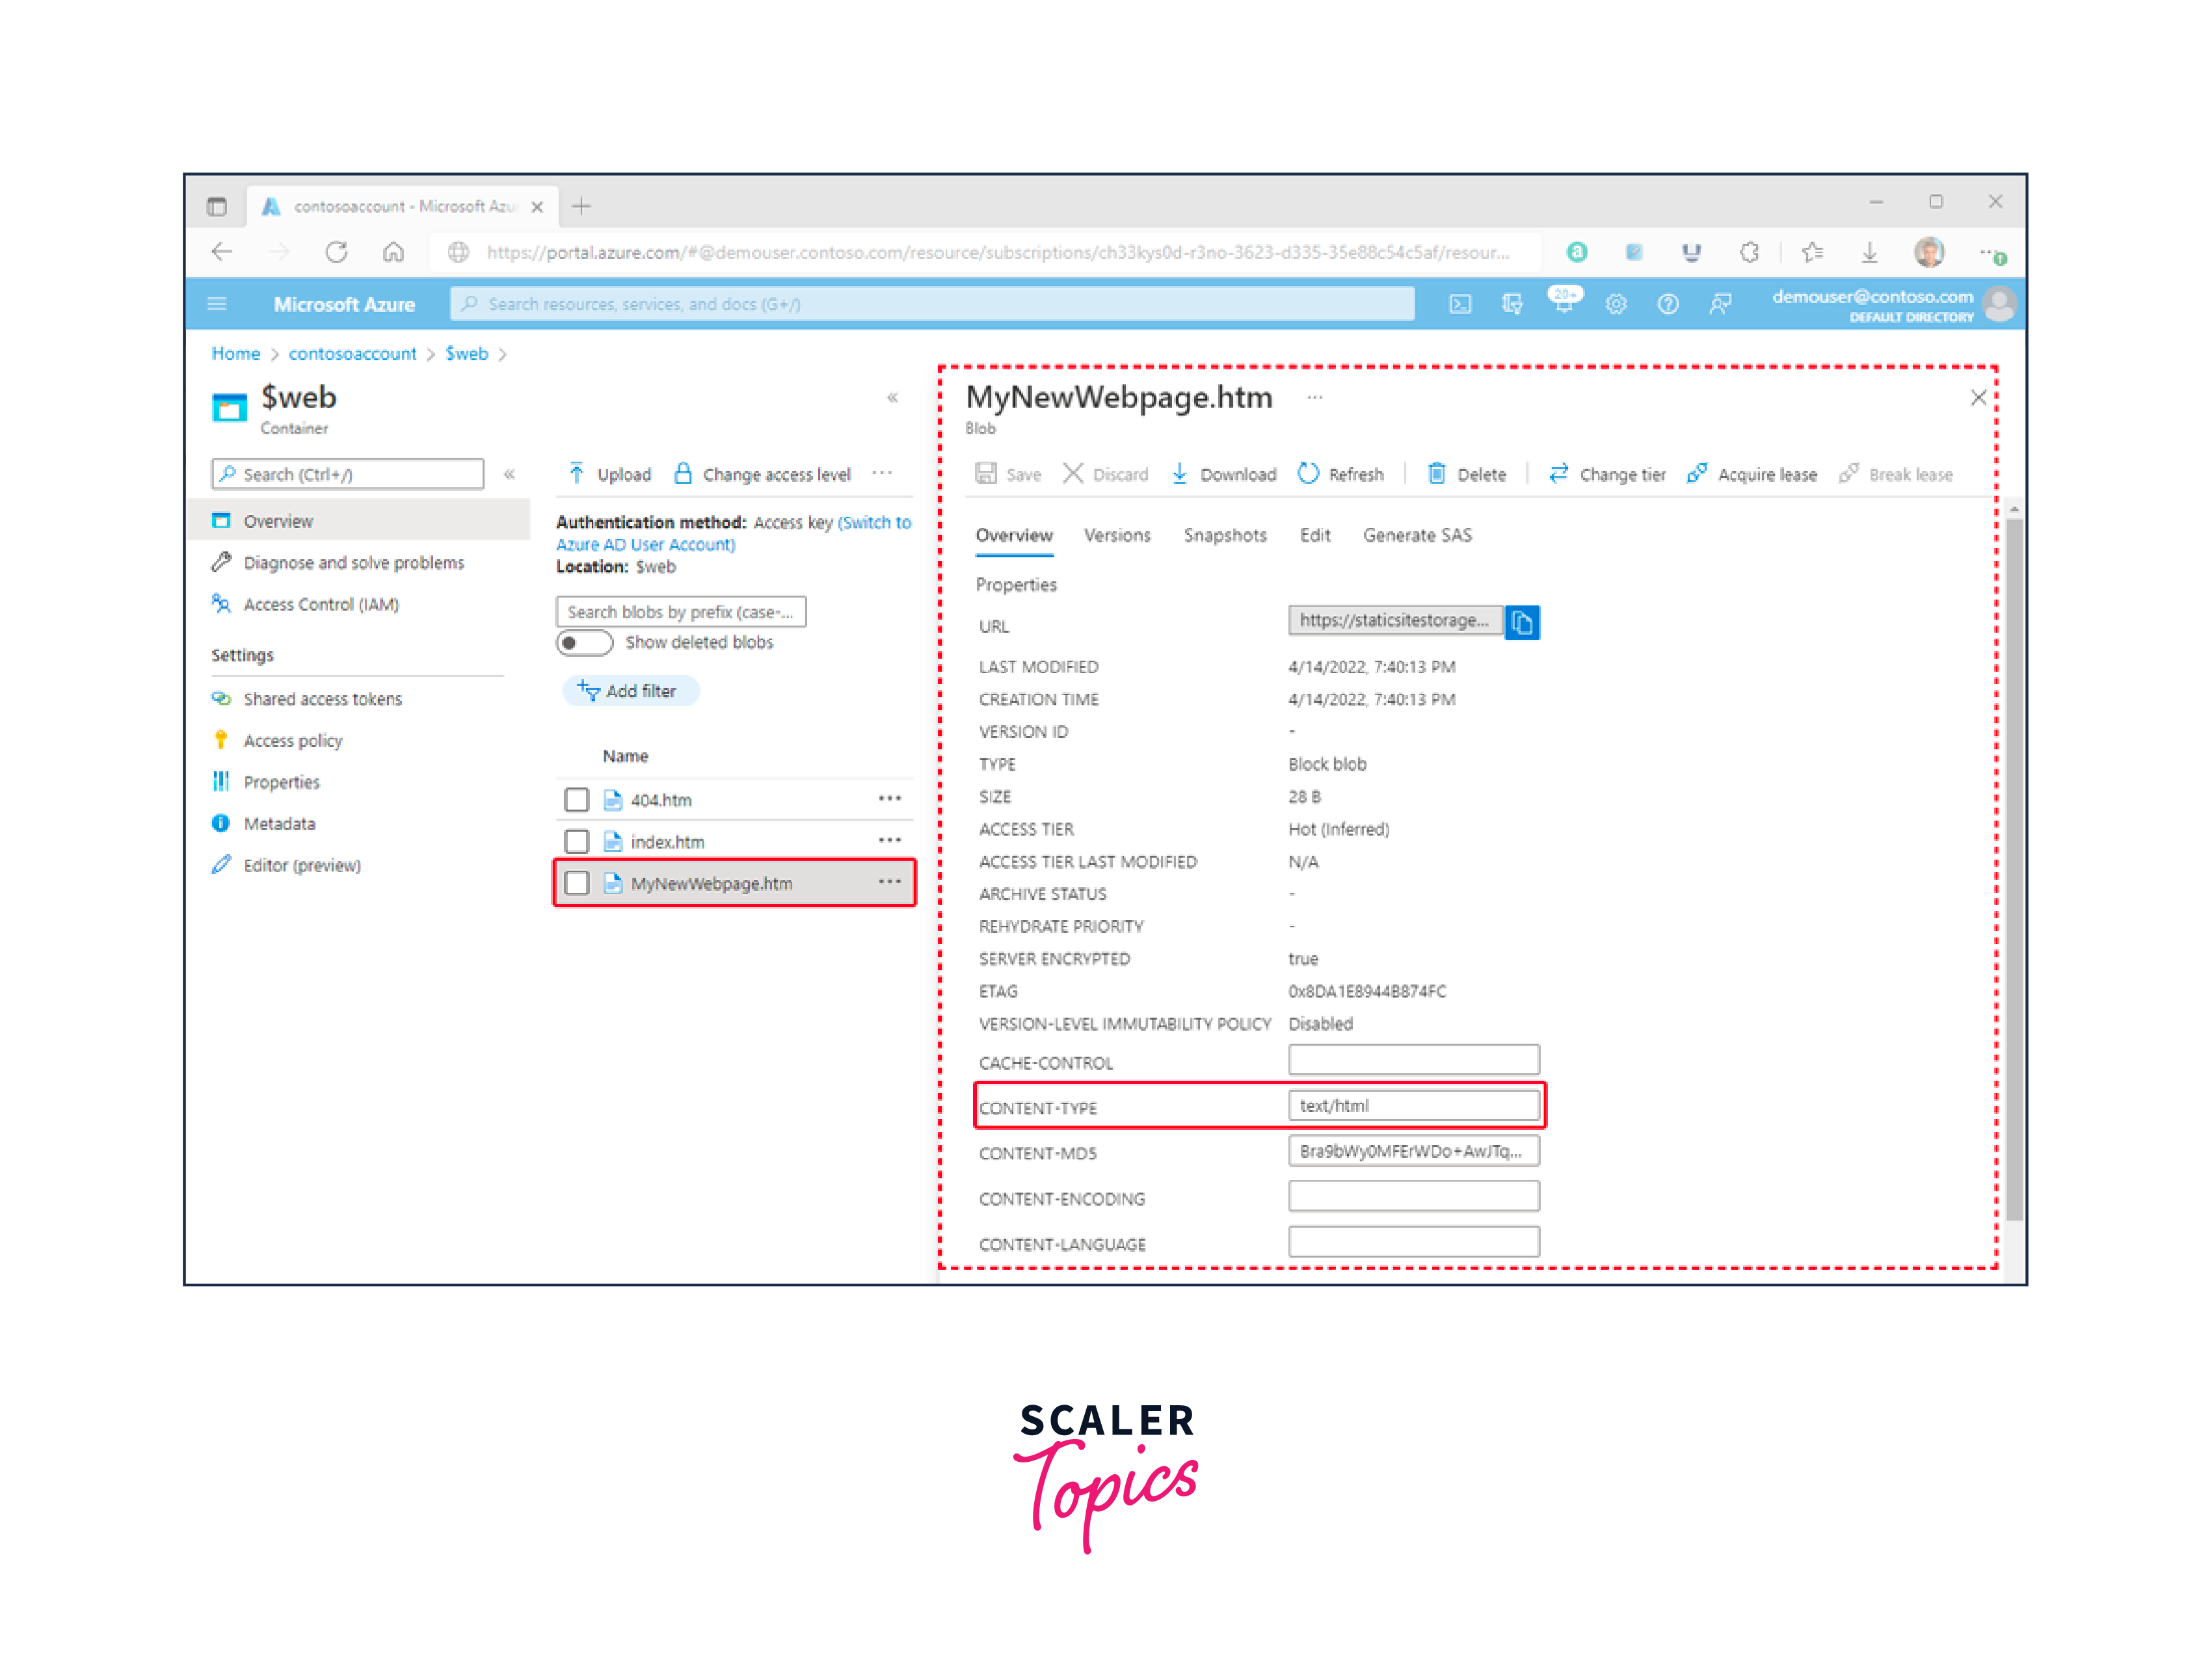
-
Set Content Type:
If you want the browser to display the contents of the file, ensure that the content type of the uploaded file is set to "text/html." To verify this, click on the name of the uploaded blob in the previous step to open its Overview pane. Check that the "CONTENT-TYPE" property field has the appropriate value set.
Viewing Content
Viewing content on a website hosted on Azure is a straightforward process. Once your website is set up and your content is uploaded, you can access it through a web browser using the provided URL. Here are the steps to view content on your Azure-hosted website:
Certainly, here are the key points from the provided information:
-
Accessing Website Content:
Users can access your website's content using the public URL of the website. You can find this URL using the Azure portal, Azure CLI, or PowerShell. -
Index Document:
When you enable static website hosting, you can specify an index document. This document is displayed to users when they open the site without specifying a specific file in the URL. For instance, if the website URL is "https://contosoblobaccount.z22.web.core.windows.net," the index document will be displayed at this URL.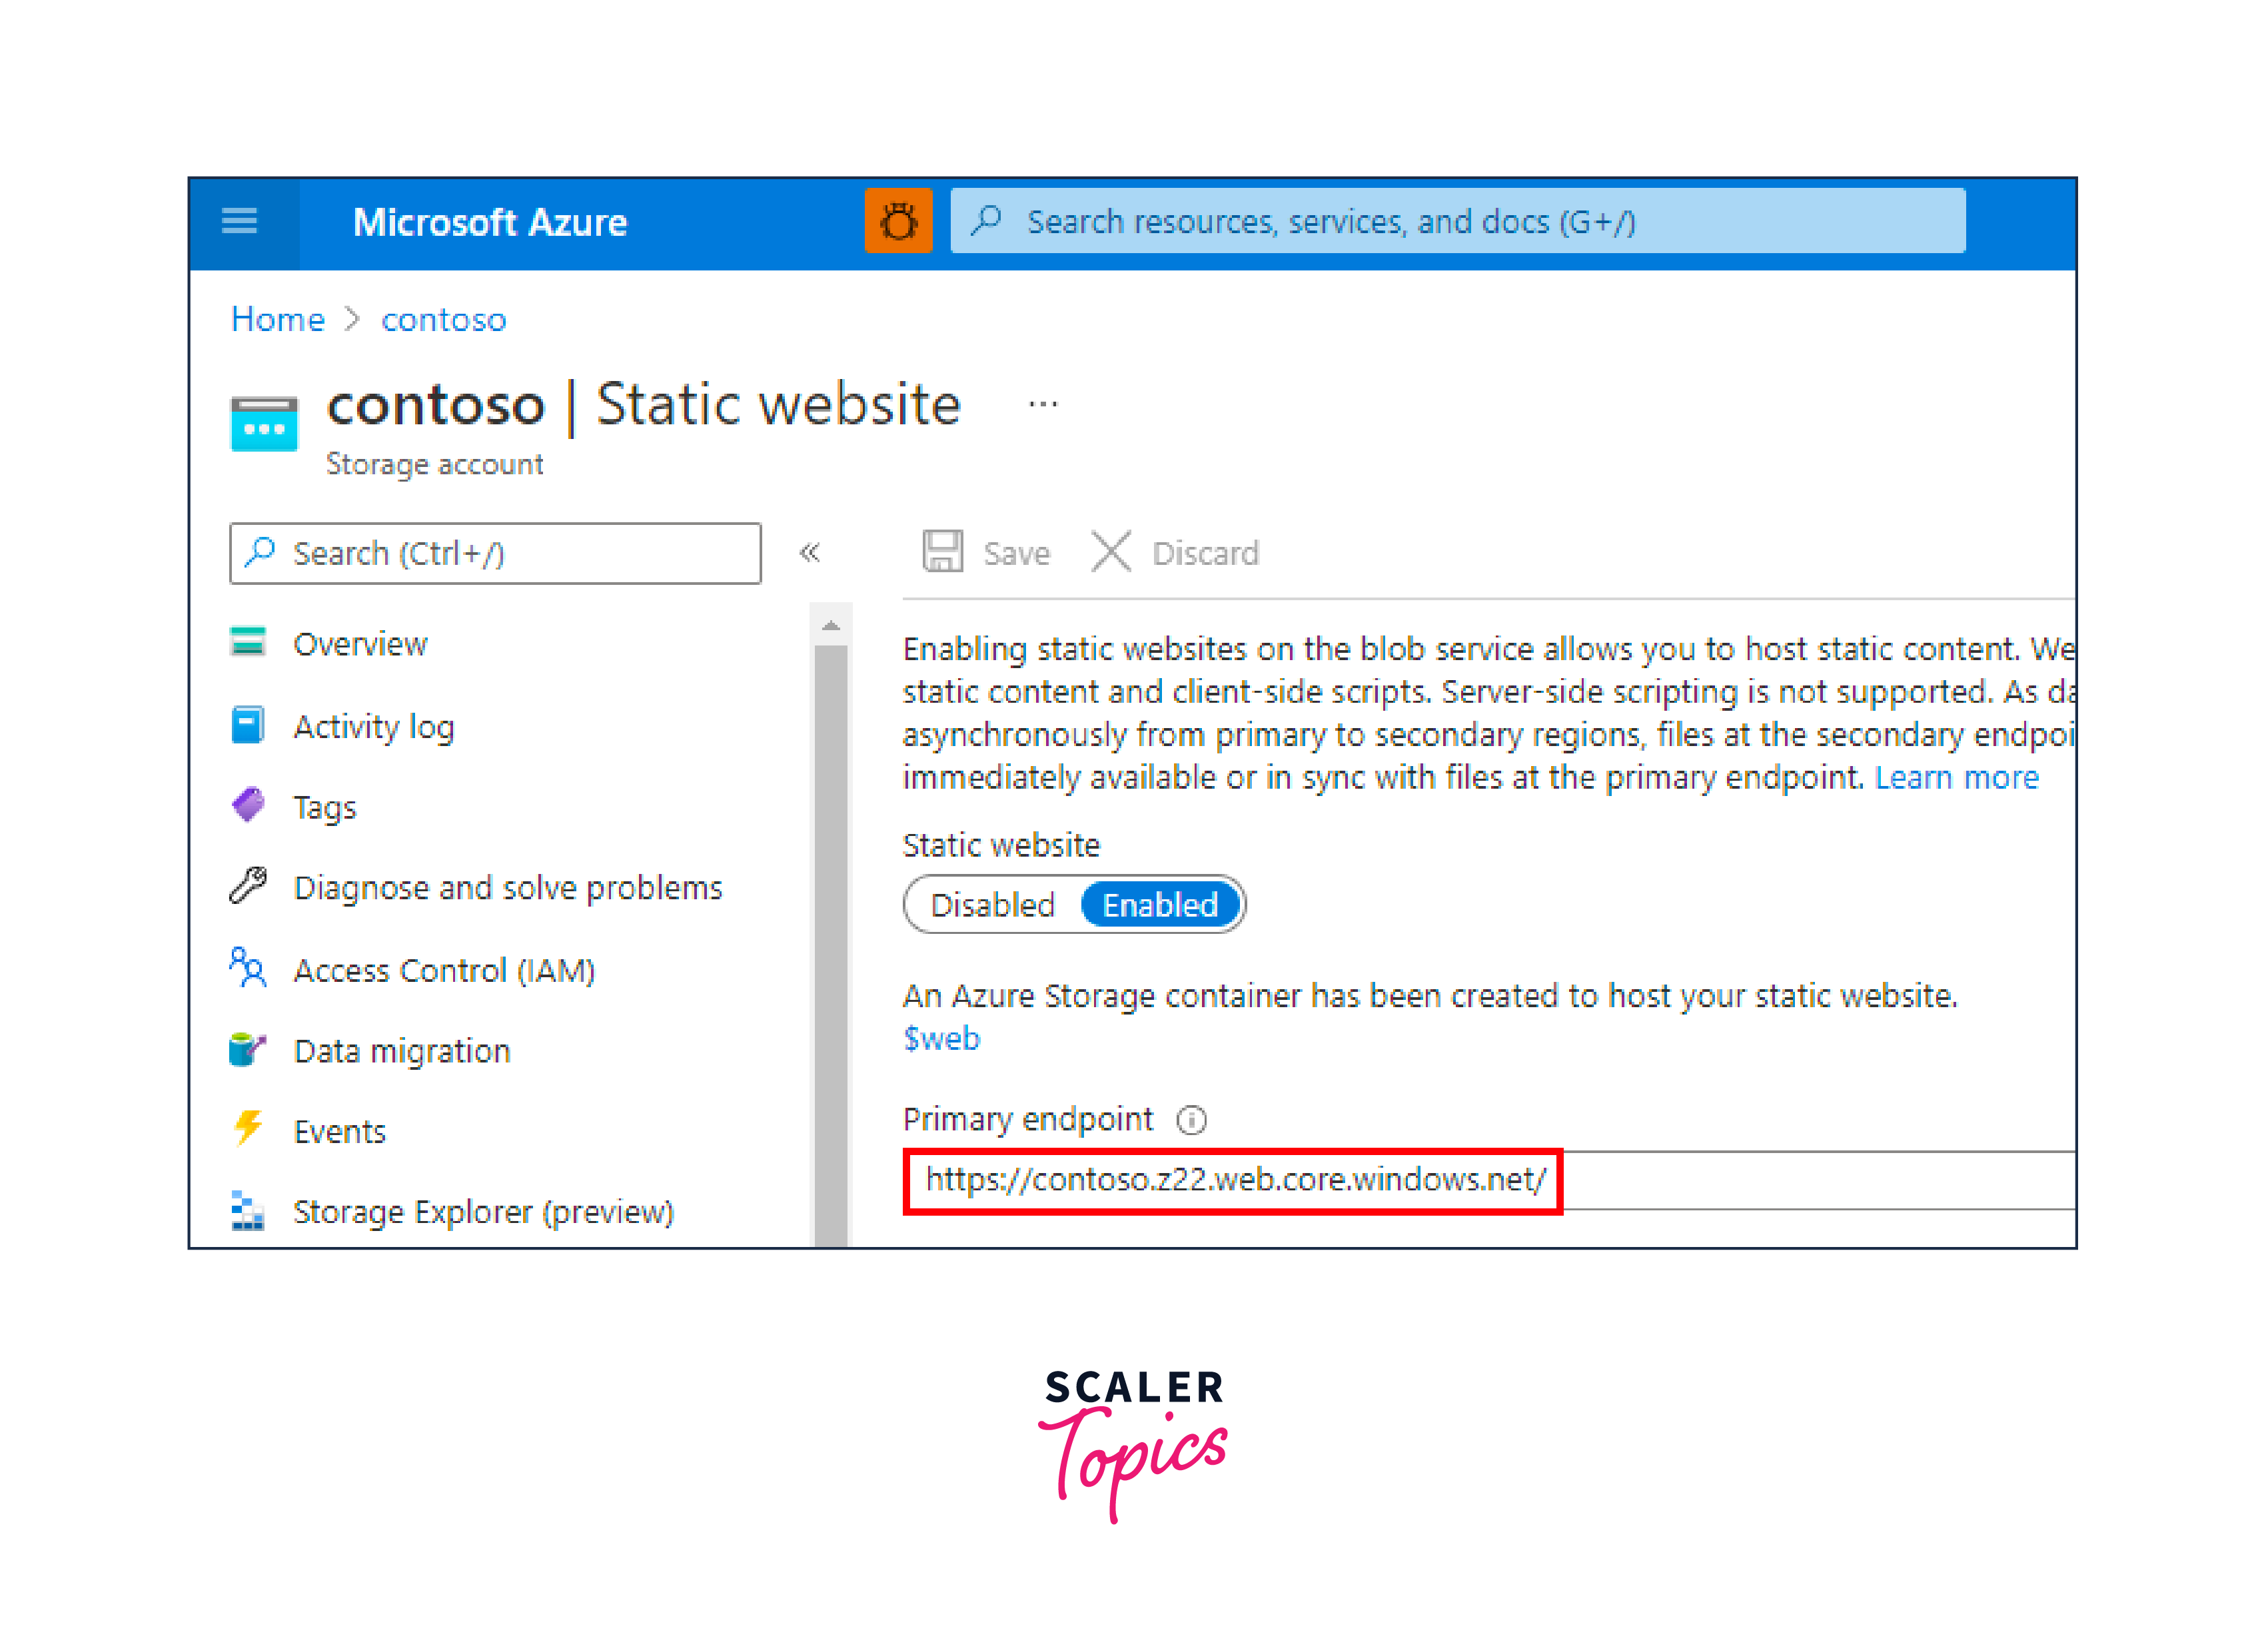
-
404 Error Handling:
If the server returns a "404 Not Found" error and you haven't defined a custom error document when enabling the website, a default 404 page will be shown to the user.
Impact of Setting the Access Level on the Web Container
Setting the access level on the web container in your Azure Storage Account has a significant impact on the security and accessibility of your website and its content. The access level determines who can view, modify, or manage the files and data within the container. Here's how different access levels impact your website:
-
Public Access (Container and Blob):
- Impact:
If you set both the container and its blobs to public access, anyone with the URL can access the content without authentication. - Use Case:
This setting is suitable for fully public, static websites where you want content to be openly accessible to the internet.
- Impact:
-
Public Access (Blob Only):
- Impact:
When the container is private but the blobs are public, only the individual files within the container are accessible without authentication. - Use Case:
This setting is useful for scenarios where you have both public and private files within the same container, such as publicly accessible images or assets in a private storage area.
- Impact:
Adding HTTP Headers
There's no way to configure headers as part of the static website feature. However, you can use Azure CDN to add headers and append (or overwrite) header values.
-
Azure Web Apps:
If you're hosting a web application on Azure, you can add custom HTTP headers by modifying the web server settings. Follow these steps:- In the Azure portal, navigate to your Web App.
- Under the "Settings" section, select "Configuration."
- Scroll down to the "HTTP headers" section, where you can add custom headers. You can configure headers like "Strict-Transport-Security," "Content-Security-Policy," and "X-Content-Type-Options."
-
Azure Application Gateway:
If you're using Azure Application Gateway to load balance and secure your web applications, you can configure HTTP headers as part of the gateway settings. This allows you to add headers for security and optimization purposes. -
Azure CDN:
Azure Content Delivery Network (CDN) allows you to add or modify HTTP headers when delivering content to users. You can set headers to control caching behavior, content security, and more.
Multi-region Website Hosting
Hosting a website across multiple regions is a strategy used to improve its availability, performance, and redundancy. Azure offers robust capabilities for multi-region website hosting, ensuring that your website remains accessible even in the face of regional outages.
Permissions
In the context of hosting your website on Azure, permissions are like the rules that decide who can do what and use your resources. Getting these rules right is super important for keeping your website safe. Here's what you need to know about permissions in Azure website hosting:
-
Azure Role-Based Access Control (RBAC):
- RBAC is a comprehensive system that allows you to manage access to Azure resources. You can assign roles to users, groups, or applications to define what actions they can perform.
-
Resource-Level Permissions:
- You can set permissions at the resource level, defining who has access to specific Azure services and components related to your website, such as Azure Web Apps, Storage Accounts, or Databases.
-
Azure Active Directory Integration:
- If your website involves user authentication, you can integrate Azure Active Directory (Azure AD) to manage user access and identity. This is useful for securing web applications and APIs.
-
Storage Account Access:
- For websites using Azure Storage for data or assets, configure permissions at the container and blob level. You can choose to make containers public or private, grant access to specific users, or create shared access signatures (SAS) for temporary access.
Pricing
| Cost Factor | Description |
|---|---|
| Azure Services Used | The cost of website hosting depends on the Azure services you utilize. Common services include Azure Web Apps, Azure Storage, Azure Functions, and Azure CDN. Each service has its pricing structure. |
| Service Tiers and Plans | Azure services often offer different service tiers and pricing plans, ranging from free tiers for basic usage to higher-tier plans with more resources and features. Choose a tier that matches your website's requirements. |
| Resource Scaling | Costs increase with the number of resources and the level of performance you allocate to your website. Scaling up resources like CPU, RAM, or storage will impact your expenses. |
| Data Transfer Costs | Data transfer out of Azure to the internet and between Azure regions may incur additional costs. It's important to estimate your data transfer needs accurately. |
| Domain and SSL Costs | Registering and managing custom domains and SSL certificates can have associated costs. Consider these expenses if you're using custom domains and HTTPS. |
| Traffic Management and CDN | Azure Traffic Manager and Azure Content Delivery Network (CDN) services have pricing based on the volume of traffic and features you use. |
| Database Costs (if applicable) | If your website relies on database services like Azure SQL Database or Azure Cosmos DB, their pricing should be factored into your overall cost. |
Conclusion
- Azure provides a versatile and robust platform for hosting websites, ranging from small blogs to large-scale applications. Azure's scalability options allow websites to grow with demand, ensuring a seamless user experience.
- Multi-region hosting in Azure enhances availability and performance, offering redundancy against regional outages. Azure's comprehensive security features and access controls protect websites and their data.
- Mapping custom domains to Azure-hosted websites is straightforward, providing a branded online presence. Configuring HTTP headers is essential for security, performance, and content delivery.
- Website hosting costs in Azure vary based on services used, resources allocated, and data transfer. Choose pricing models that match your needs. Properly configuring access permissions ensures the security of your website and its resources.
