Contours in OpenCV
Overview
Contours in OpenCV are used for object detection, shape analysis, and image segmentation. They can be detected and drawn using different methods and retrieval modes to create powerful image-processing applications.
Pre-requisites
- To work with contours in OpenCV, you should have a basic understanding of programming concepts such as loops, conditional statements, and functions.
- Additionally, you should be familiar with the basics of image processing and computer vision, including concepts such as color spaces, edge detection, and thresholding.
- A solid foundation in mathematics, especially linear algebra, is also helpful for understanding some of the more advanced image-processing techniques.
- Familiarity with the Python programming language and the OpenCV library is essential for working with contours in OpenCV.
What are contours?
Contours in OpenCV refer to the boundaries of an object or shape in an image. They are represented as a list of points that define the shape's perimeter. OpenCV provides several functions for finding and manipulating contours, including cv.findContours()** and **cv.drawContours().
OpenCV Contours can be used for various image processing tasks, such as object detection, shape analysis, and boundary extraction. They are often used in conjunction with other OpenCV functions, such as edge detection and thresholding, to perform more advanced image processing operations.
The Different Algorithms For Contour Detection:
There are several algorithms for OpenCV contours, including:
- cv.RETR_EXTERNAL: This algorithm retrieves only the external contours of an object in an image.
- cv.RETR_LIST: This algorithm retrieves all of the contours in an image but does not create any hierarchical relationships between them.
- cv.RETR_TREE: This algorithm retrieves all of the contours in an image and creates a full hierarchy of relationships between them.
- cv.RETR_CCOMP: This algorithm retrieves all of the contours in an image and creates a two-level hierarchy of relationships between them, with external opencv contours on one level and internal contours on the other.
- cv.CHAIN_APPROX_NONE: This algorithm retrieves all of the points along a contour.
- cv.CHAIN_APPROX_SIMPLE: This algorithm compresses horizontal, vertical, and diagonal segments of a contour and leaves only their endpoints.
- cv.CHAIN_APPROX_TC89_L1 and cv.CHAIN_APPROX_TC89_KCOS: These algorithms use the Tangent Chain approximation method to reduce the number of points in a contour while maintaining its shape.
Each algorithm has its strengths and weaknesses, and the choice of which one to use will depend on the specific requirements of the image-processing task at hand.
How are we Going to Build This?
Implementing contours in OpenCV and Python involves several steps. These steps include importing the necessary libraries such as OpenCV and NumPy, reading the image, converting it to grayscale, applying thresholding, finding the contours, and drawing the contours on the original image. By following these steps, you can build your implementation of contour detection in OpenCV and Python, which can be applied to various image processing tasks such as object detection and boundary extraction. This process requires Python, OpenCV, NumPy, and an image to apply the contour detection process.
Final Output
At the end of this blog, you will be able to implement opencv contours and get an output as shown below:
Requirements
To implement contours in `OpenCV and Python, you will need the following requirements:
- Python: You will need to have Python installed on your computer to run the Python code for implementing contour detection.
- OpenCV: OpenCV is an open-source computer vision library that provides numerous functions for image processing, including contour detection. You will need to install OpenCV on your computer and import it into your Python program.
- NumPy: NumPy is a Python library that provides support for multi-dimensional arrays and matrices. It is used extensively in image processing, and you will need to install it and import it into your Python program.
- An image: You will need an image to apply the contour detection process. The image can be of any format, but it should be in a format that OpenCV can read, such as PNG, JPEG, or BMP.
By fulfilling these requirements, you can implement the contour detection process using OpenCV and Python.
Implementation of Contours Using OpenCV And Python
A Brief Overview
To implement contours in OpenCV and Python, you need to follow a few basic steps. Firstly, you need to import the necessary libraries such as OpenCV and NumPy. Next, you need to read the image and convert it to grayscal. After this, you need to apply thresholding and find the contours in the image using OpenCV's findContours() function. Finally, you can draw the contours on the original image using OpenCV's drawContours() function. By following these steps, you can build your implementation of contours in OpenCV and Python and use them in various image processing tasks.
Steps for Finding and Drawing Contours using OpenCV.
We are going to follow these steps to implement contours in OpenCV and Python.
Step 1. Import the necessary libraries: To begin, you will need to import the OpenCV and NumPy libraries into your Python program. These libraries provide the necessary functions for reading and manipulating images, as well as performing contour detection.
Step 2. Read the image: Next, you will need to read the image that you want to process using OpenCV's imread() function. This function takes the path of the image as its argument and returns a NumPy array that represents the image.
Step 3. Convert the image to grayscale: Contour detection is typically performed on grayscale images. Therefore, you will need to convert the image that you read in Step 2 to grayscale using OpenCV's cvtColor() function.
Step 4. Apply thresholding: To detect contours, you will need to convert the grayscale image to a binary image using OpenCV's threshold() function.
Step 5. Find contours: Once you have the binary image, you can use OpenCV's findContours() function to find the contours in the image.
Step 6. Draw contours: Finally, you can draw the detected contours on the original image using OpenCV's drawContours() function.
Finding and drawing contours in OpenCV
Finding and drawing contours in OpenCV is a fundamental image-processing technique that involves detecting and outlining the boundaries of objects in an image. There are several ways to draw contours using OpenCV, including using CHAIN_APPROX_NONE and CHAIN_APPROX_SIMPLE.
Drawing contours in OpenCV using CHAIN_APPROX_NONE
CHAIN_APPROX_NONE is a contour retrieval mode in OpenCV that retrieves all of the contour points without any compression. In this method, all boundary points of the object are detected and returned as a list of points. This method provides accurate contour detection but may be computationally expensive.
The syntax for using CHAIN_APPROX_NONE is:
Where:
contours: A list of contours detected in the input image
hierarchy: Optional output vector containing information about the image topology. It is not used in CHAIN_APPROX_NONE mode.
image: Input image
mode: Contour retrieval mode, which should be set to cv2.RETR_EXTERNAL to retrieve only the external contours.
method: Contour approximation method, which should be set to cv2.CHAIN_APPROX_NONE to retrieve all of the contour points.
The cv2.findContours() function returns a list of contours, where each contour is represented as a list of points. The hierarchy parameter is optional and can be used to retrieve information about the topology of the image.
Overall, CHAIN_APPROX_NONE is a contour retrieval mode in OpenCV that retrieves all of the contour points without any compression and can be used to accurately detect contours in an image.
Using Single Channel: Red, Green, or Blue When using the CHAIN_APPROX_NONE method to draw contours in OpenCV, you can use a single color channel, such as red, green, or blue, to create the contour. This means that only one channel of the image is used to create the contour, while the other channels are ignored.
To use a specific color channel, you first need to split the image into its separate color channels using the cv2.split() function. This function takes an image as input and returns a list of separate color channels, with each channel represented as a separate 2D NumPy array.
Here is an example code snippet that demonstrates how to use the CHAIN_APPROX_NONE method with a single color channel, in this case, the red channel:
In this example, we first load the image in color mode using the cv2.imread() function. We then split the image into its separate color channels using cv2.split(), and select the red channel to detect the contours using the CHAIN_APPROX_NONE method. Finally, we draw the contours on the original image using the red color and display the final result using cv2.imshow().
Drawing contours in OpenCV using CHAIN_APPROX_SIMPLE
CHAIN_APPROX_SIMPLE is another contour retrieval mode in OpenCV that compresses horizontal, vertical, and diagonal segments and leaves only their endpoints. In other words, it approximates the contour shape by removing redundant points and retaining only the essential points that define the contour. This method provides a compact representation of the contour and is computationally efficient.
The syntax for using CHAIN_APPROX_SIMPLE is similar to that of CHAIN_APPROX_NONE:
Where:
contours: A list of contours detected in the input image hierarchy: Optional output vector containing information about the image topology. It is used to retrieve information about the relationship between contours. image: Input image mode: Contour retrieval mode, which should be set to cv2.RETR_EXTERNAL to retrieve only the external contours. method: Contour approximation method, which should be set to cv2.CHAIN_APPROX_SIMPLE to compress the contour and retain only the essential points.
The v2.findContours() function returns a list of contours, where each contour is represented as a list of points. The hierarchy parameter is optional and can be used to retrieve information about the topology of the image.
When using CHAIN_APPROX_SIMPLE, the resulting contour is represented as a list of end points that define the contour shape. This method provides a compact representation of the contour and is computationally efficient, making it a popular choice for many applications.
Contours in OpenCV - Hierarchies
Contour hierarchies in OpenCV refer to the relationship between contours in an image. This relationship can be represented using a parent-child hierarchy, where each contour is either a parent, a child, or both.
Parent-child relationship.
In the context of contour hierarchies in OpenCV, the parent-child relationship refers to the relationship between contours in an image. This relationship is determined based on the nesting order of contours in an image.
For example, if one contour is completely enclosed by another contour, then the inner contour is considered a child of the outer contour. Conversely, the outer contour is considered a parent of the inner contour. In this way, the parent-child relationship is defined based on the hierarchy of contours in an image.
The parent-child relationship can be represented using a 4-tuple array for each contour in OpenCV. This array contains information about the next contour, previous contour, first child contour, and parent contour. Understanding the parent-child relationship between contours is important for many image processing tasks, such as object detection, shape analysis, and tracking.
Contour Relationship Representation
Here is an example of how the hierarchy in opencv contours works:
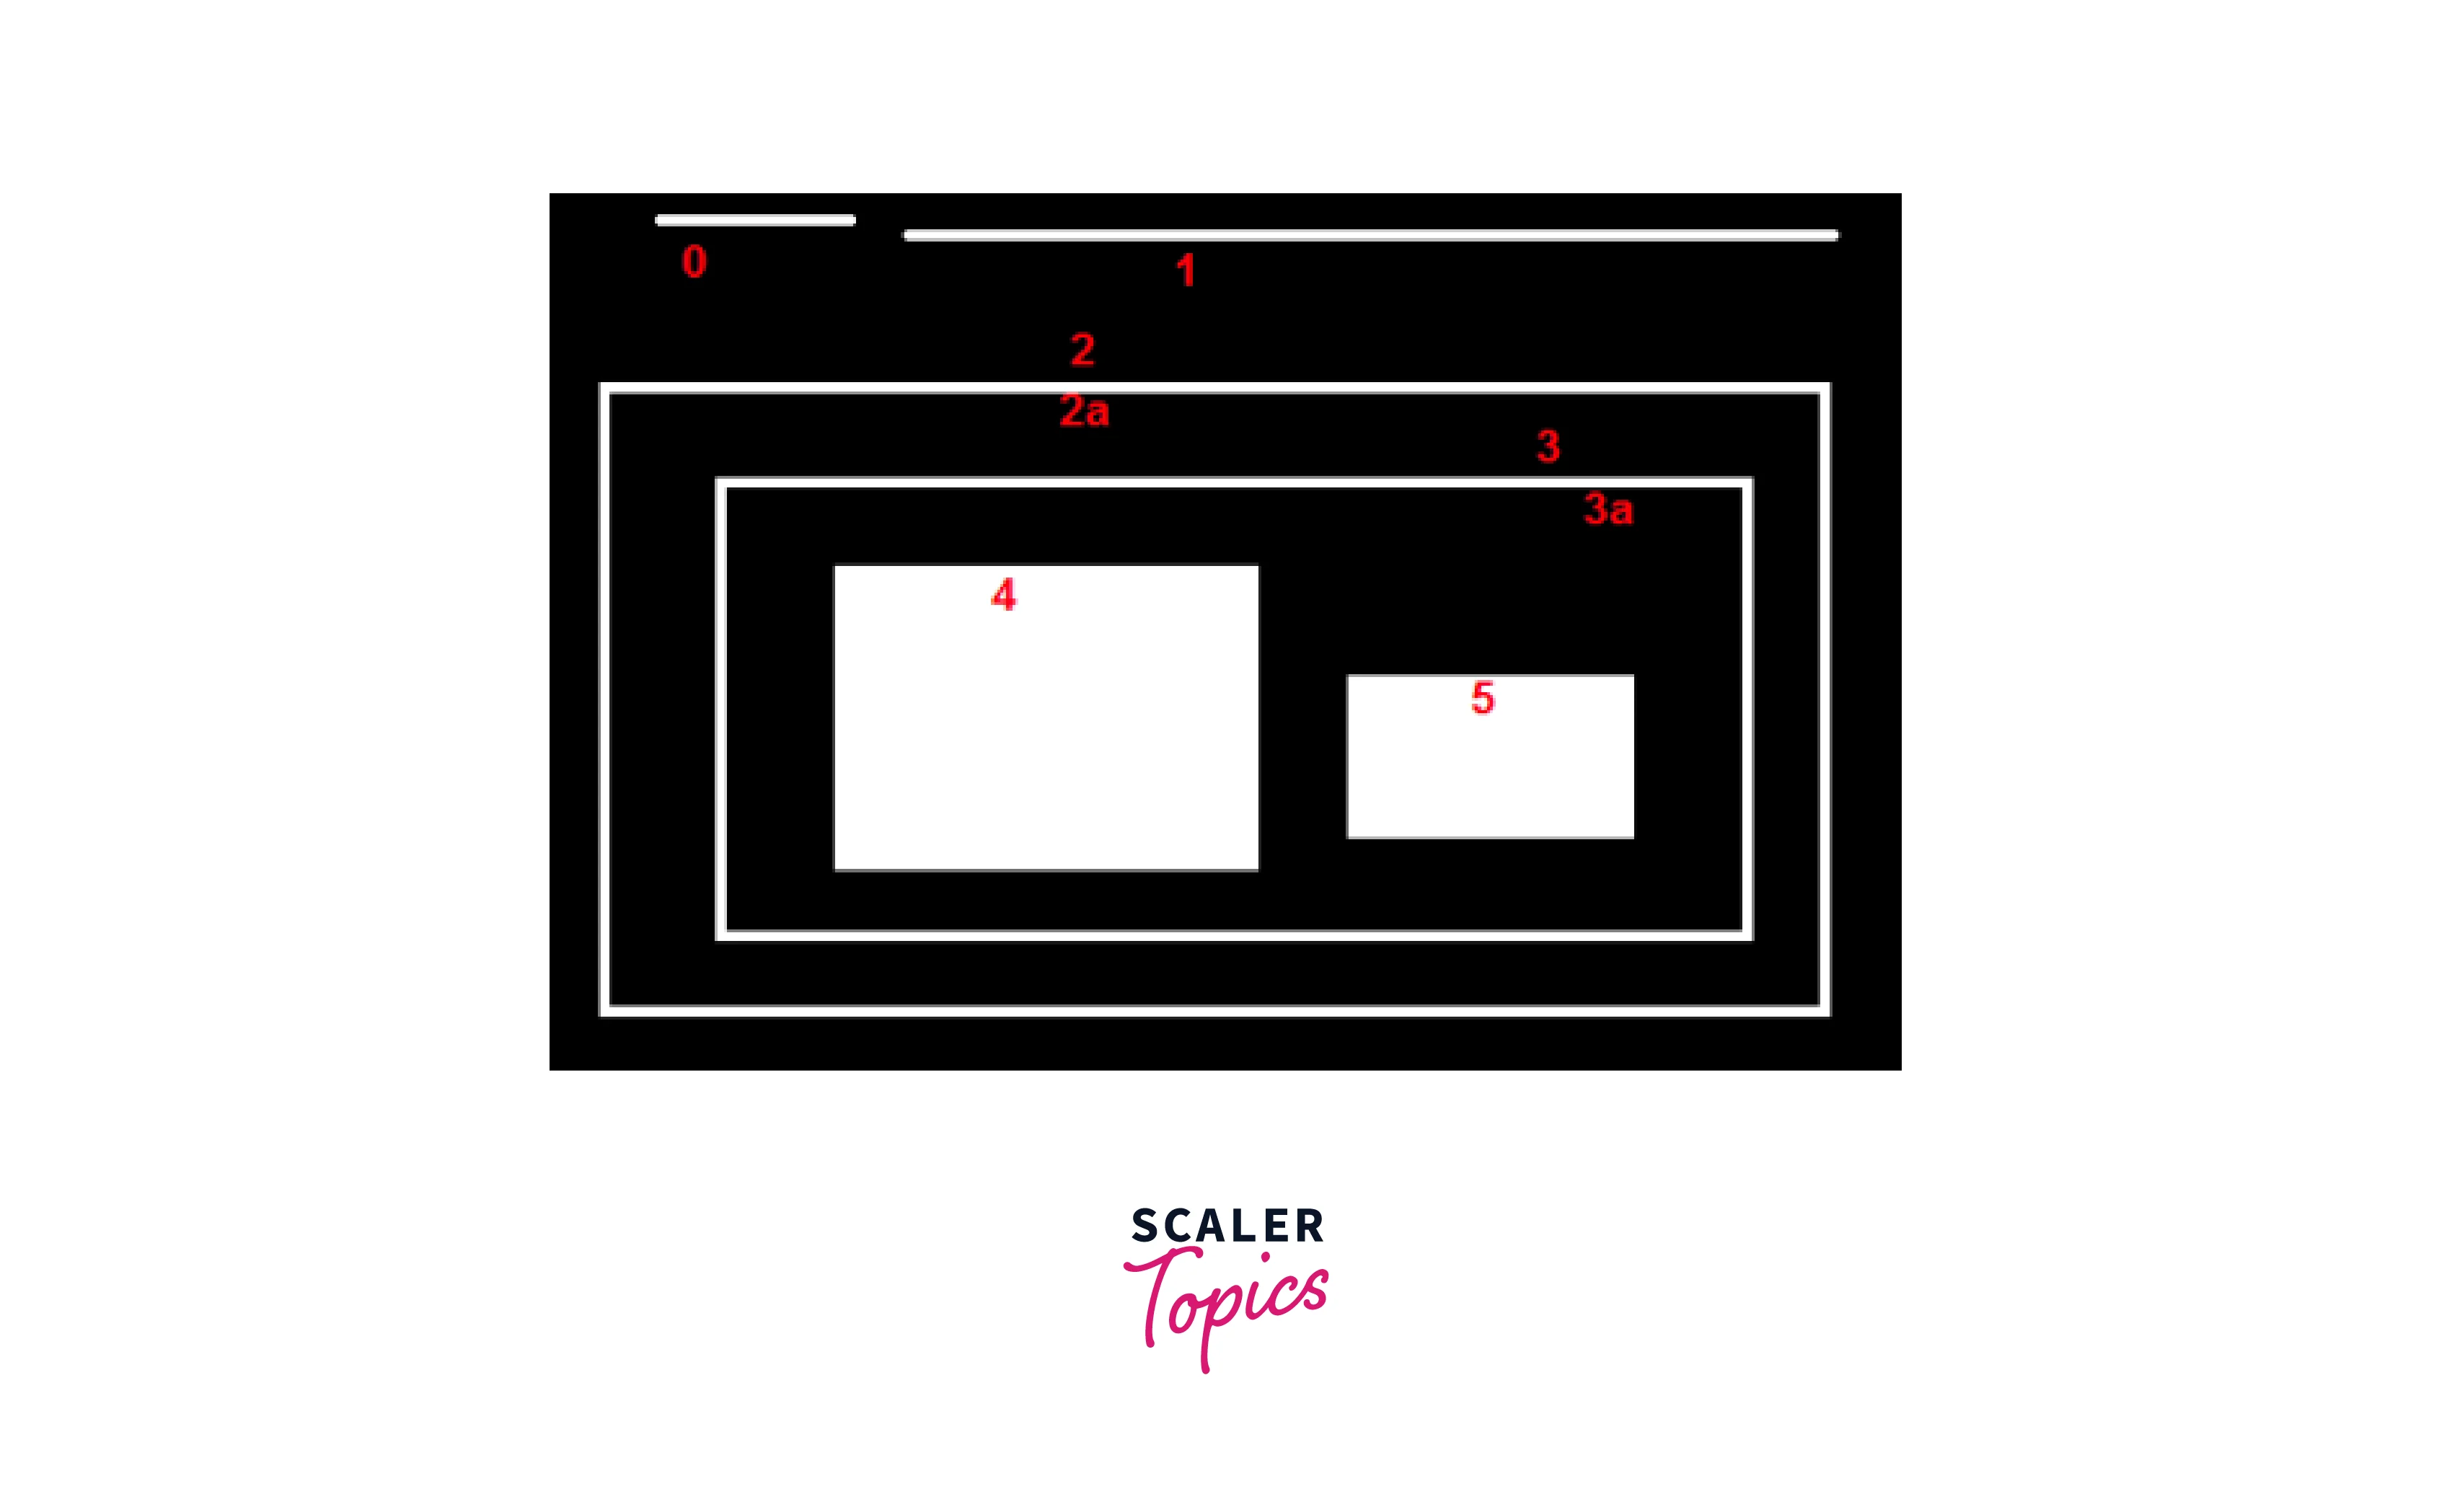
Suppose we have an image with three circles. We want to detect the contours of these circles and retrieve their hierarchy.
After running the cv2.findContours() function with the cv2.RETR_TREE flag, we get a list of contours and their hierarchy. The hierarchy is represented as a 4-tuple array for each contour.
For example, the hierarchy for the outermost contour (circle 1) may look like this:
This tells us that the outermost contour has no next or previous contour, it has one child opencv contour (circle 2), and it has no parent contour.
Similarly, the hierarchy for the innermost contour (circle 3) may look like this:
This tells us that the innermost contour has no next contour, it has a previous contour (circle 2), it has no child contour, and it has a parent contour (circle 1).
By analyzing the hierarchy of contours in the image, we can determine which contours are parent contours, which are child contours, and how they are related to each other. This information can be used for various image-processing tasks such as object detection, tracking, and segmentation.
Different Contour Retrieval Techniques
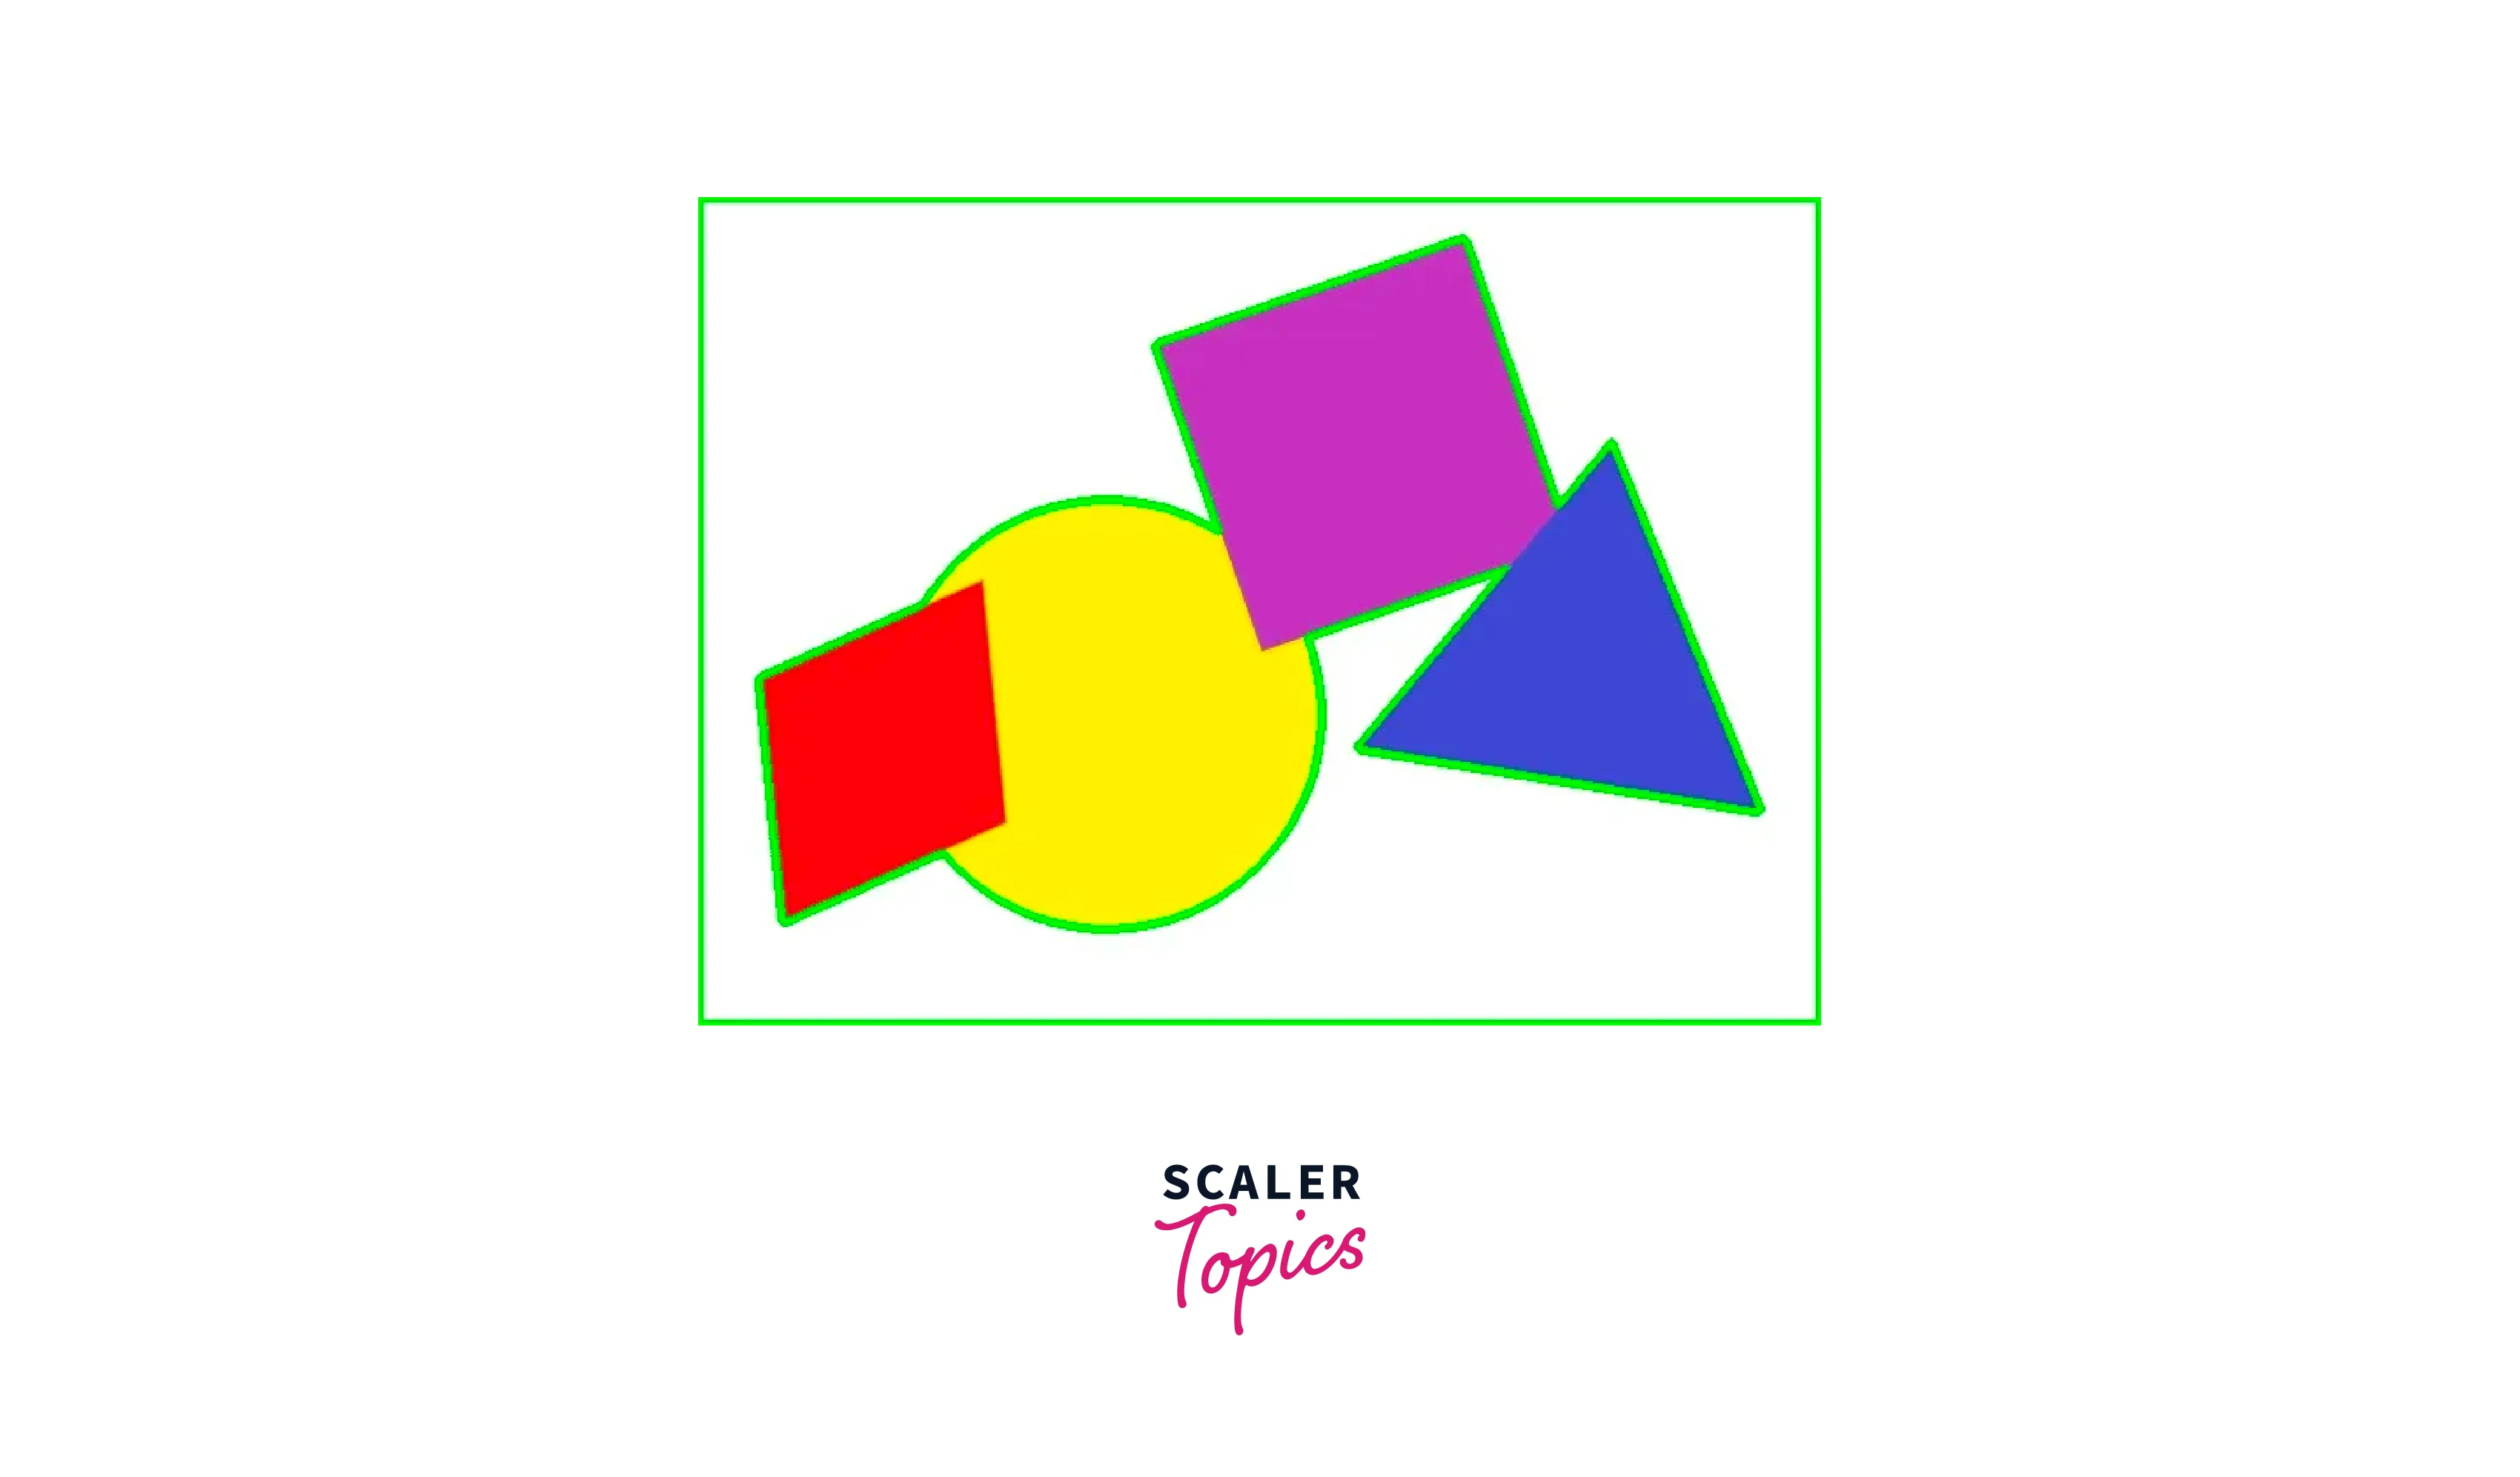
Consider the below image as an example of applying all the contour retrieval techniques and generate hierarchy for them.
Syntax
Here the 'RETR_TECHNIQUE' can be replaced by any of the four methods as required.
RETR_LIST
RETR_LIST retrieves all the OpenCV contours in the image and puts them in a flat list, without any hierarchical structure. Each contour is represented as a separate 1D array of points, and there is no parent-child relationship between the contours.
This retrieval mode is useful when we simply need to detect and analyze all the contours in an image without considering their hierarchy. It is also faster than the RETR_TREE mode, as it does not need to compute the hierarchy of contours.
RETR_EXTERNAL
RETR_EXTERNAL retrieves only the external contours in the image, i.e., the contours in OpenCV that form the boundary of the object(s) in the image. Any contours inside the object(s) are not retrieved. This retrieval mode is useful when we only need to detect the outer boundaries of objects in an image.
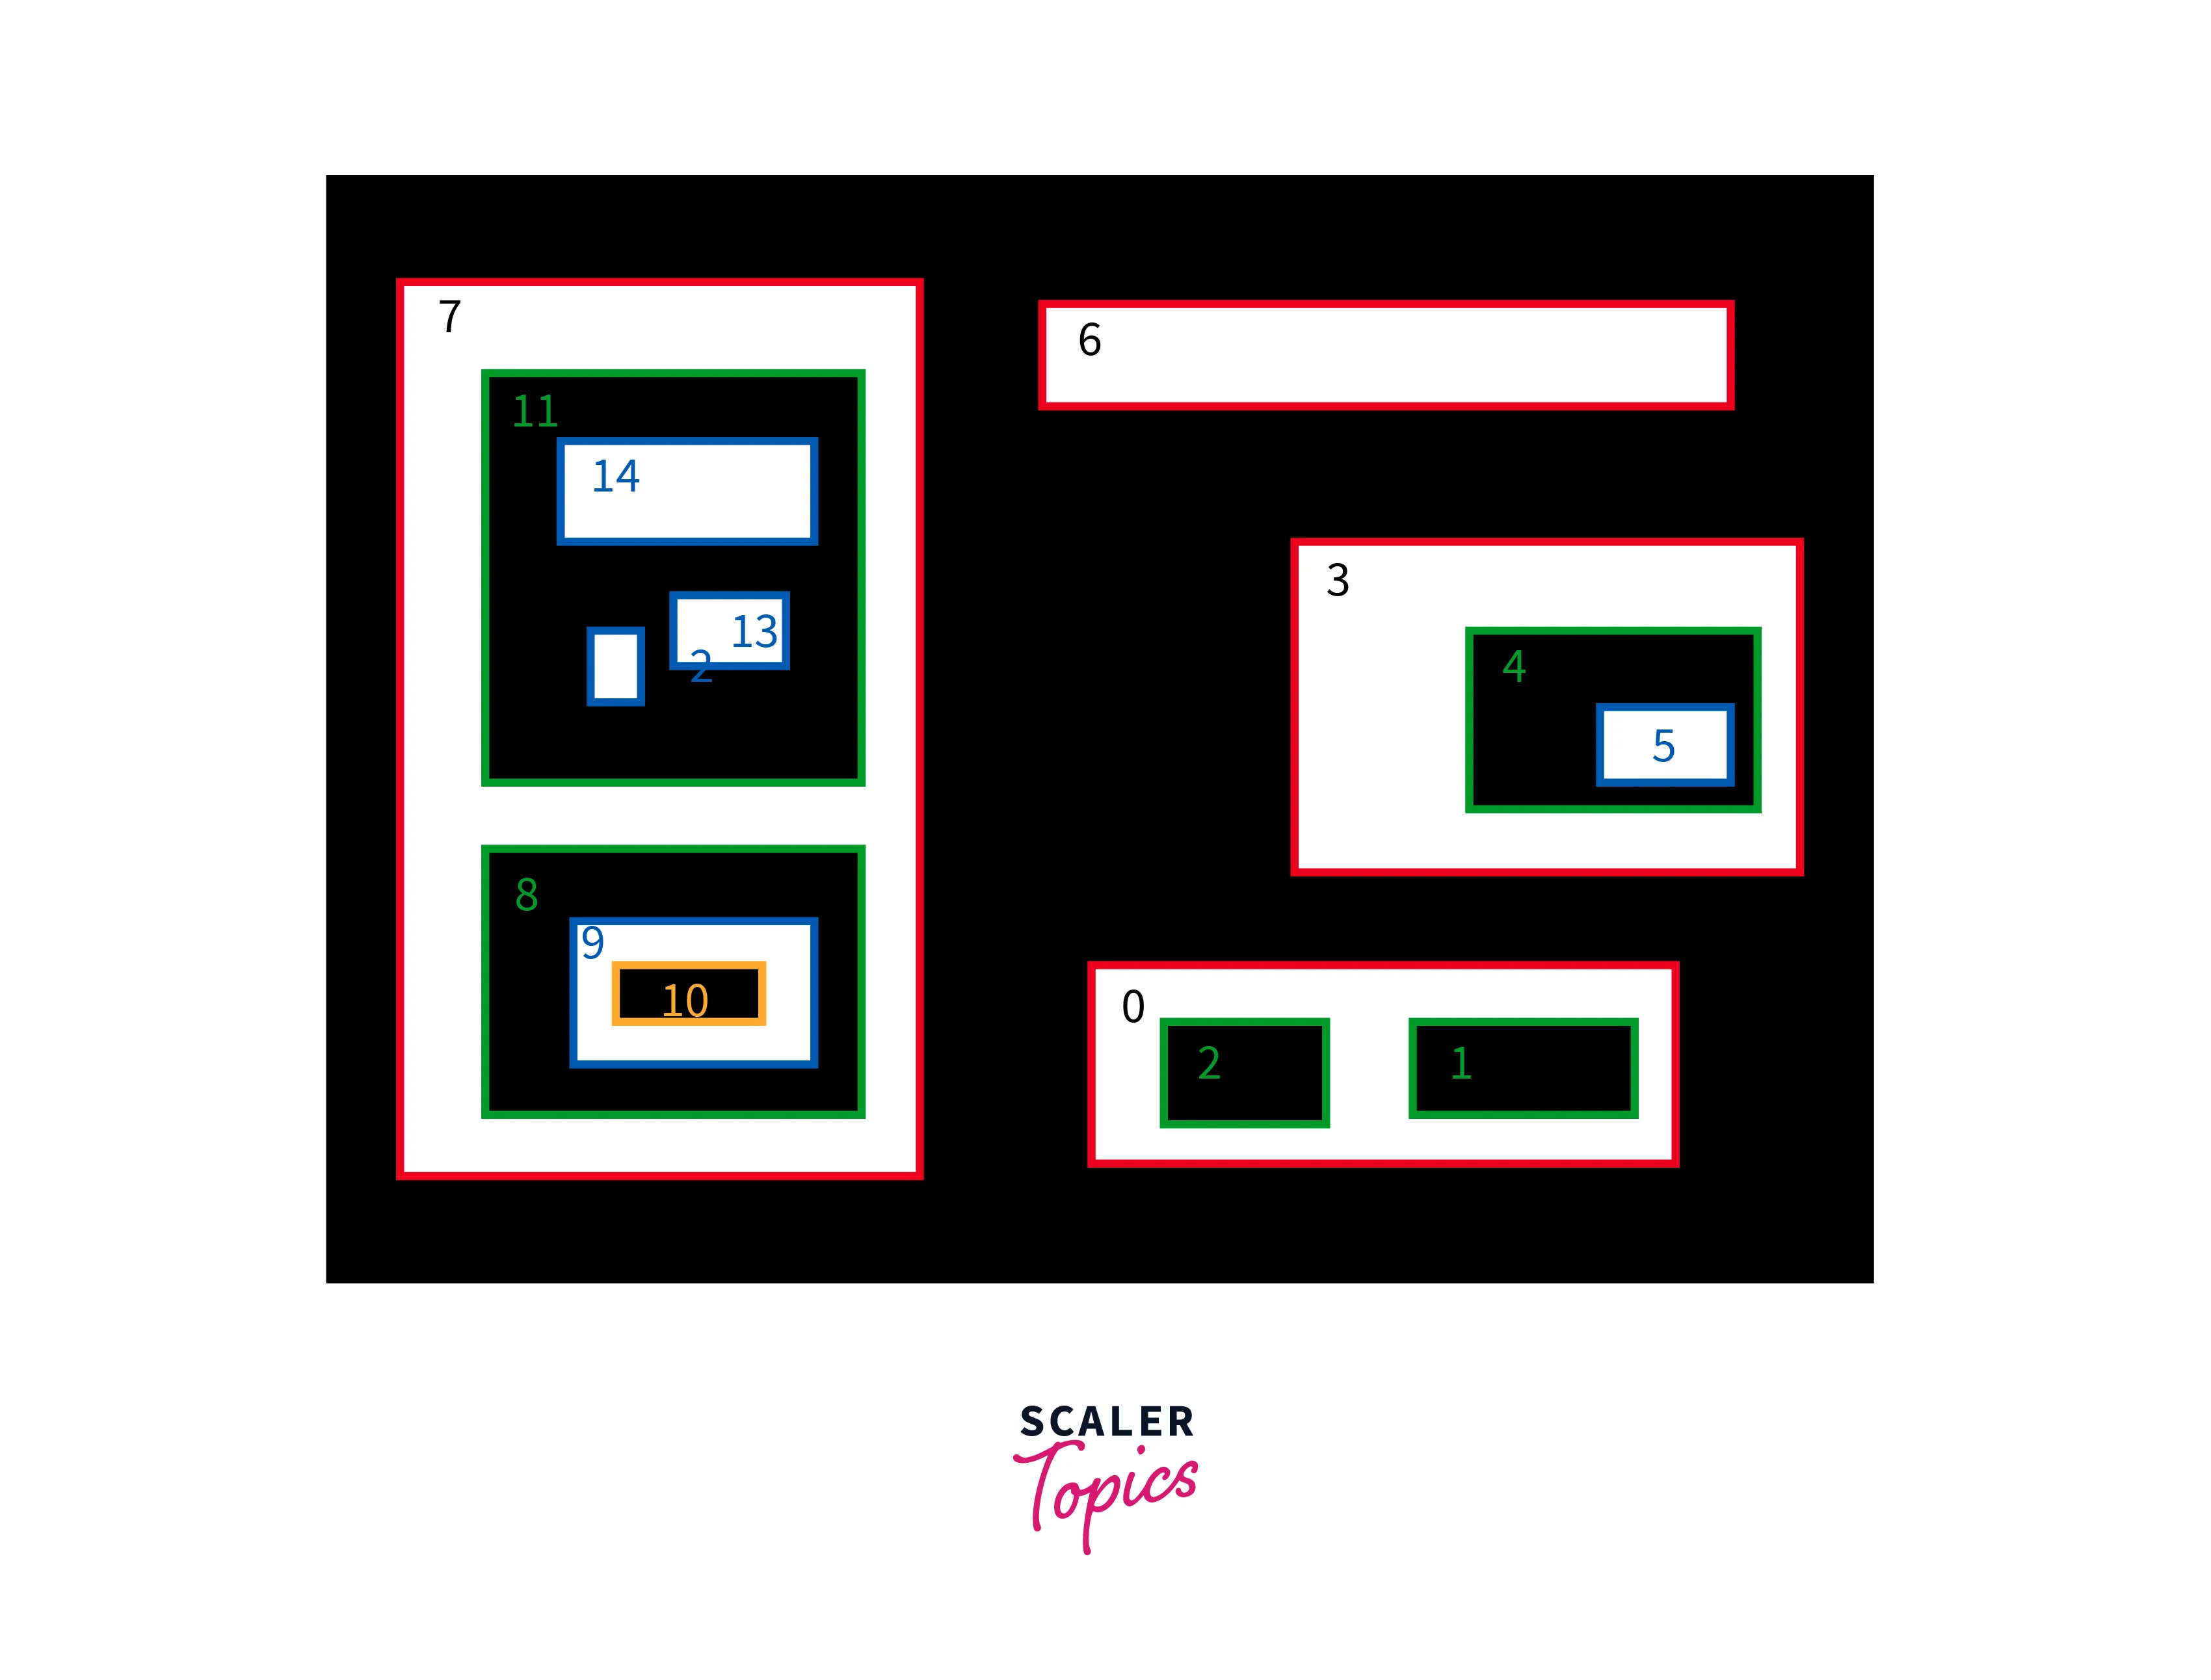
RETR_CCOMP
RETR_CCOMP retrieves all the contours in the image and arranges them into a two-level hierarchy. The first level contains the external boundaries of the components, and the second level contains the boundaries of the holes inside the components.
Below is an example image labeled with RETR_CCOMP hierarchy.

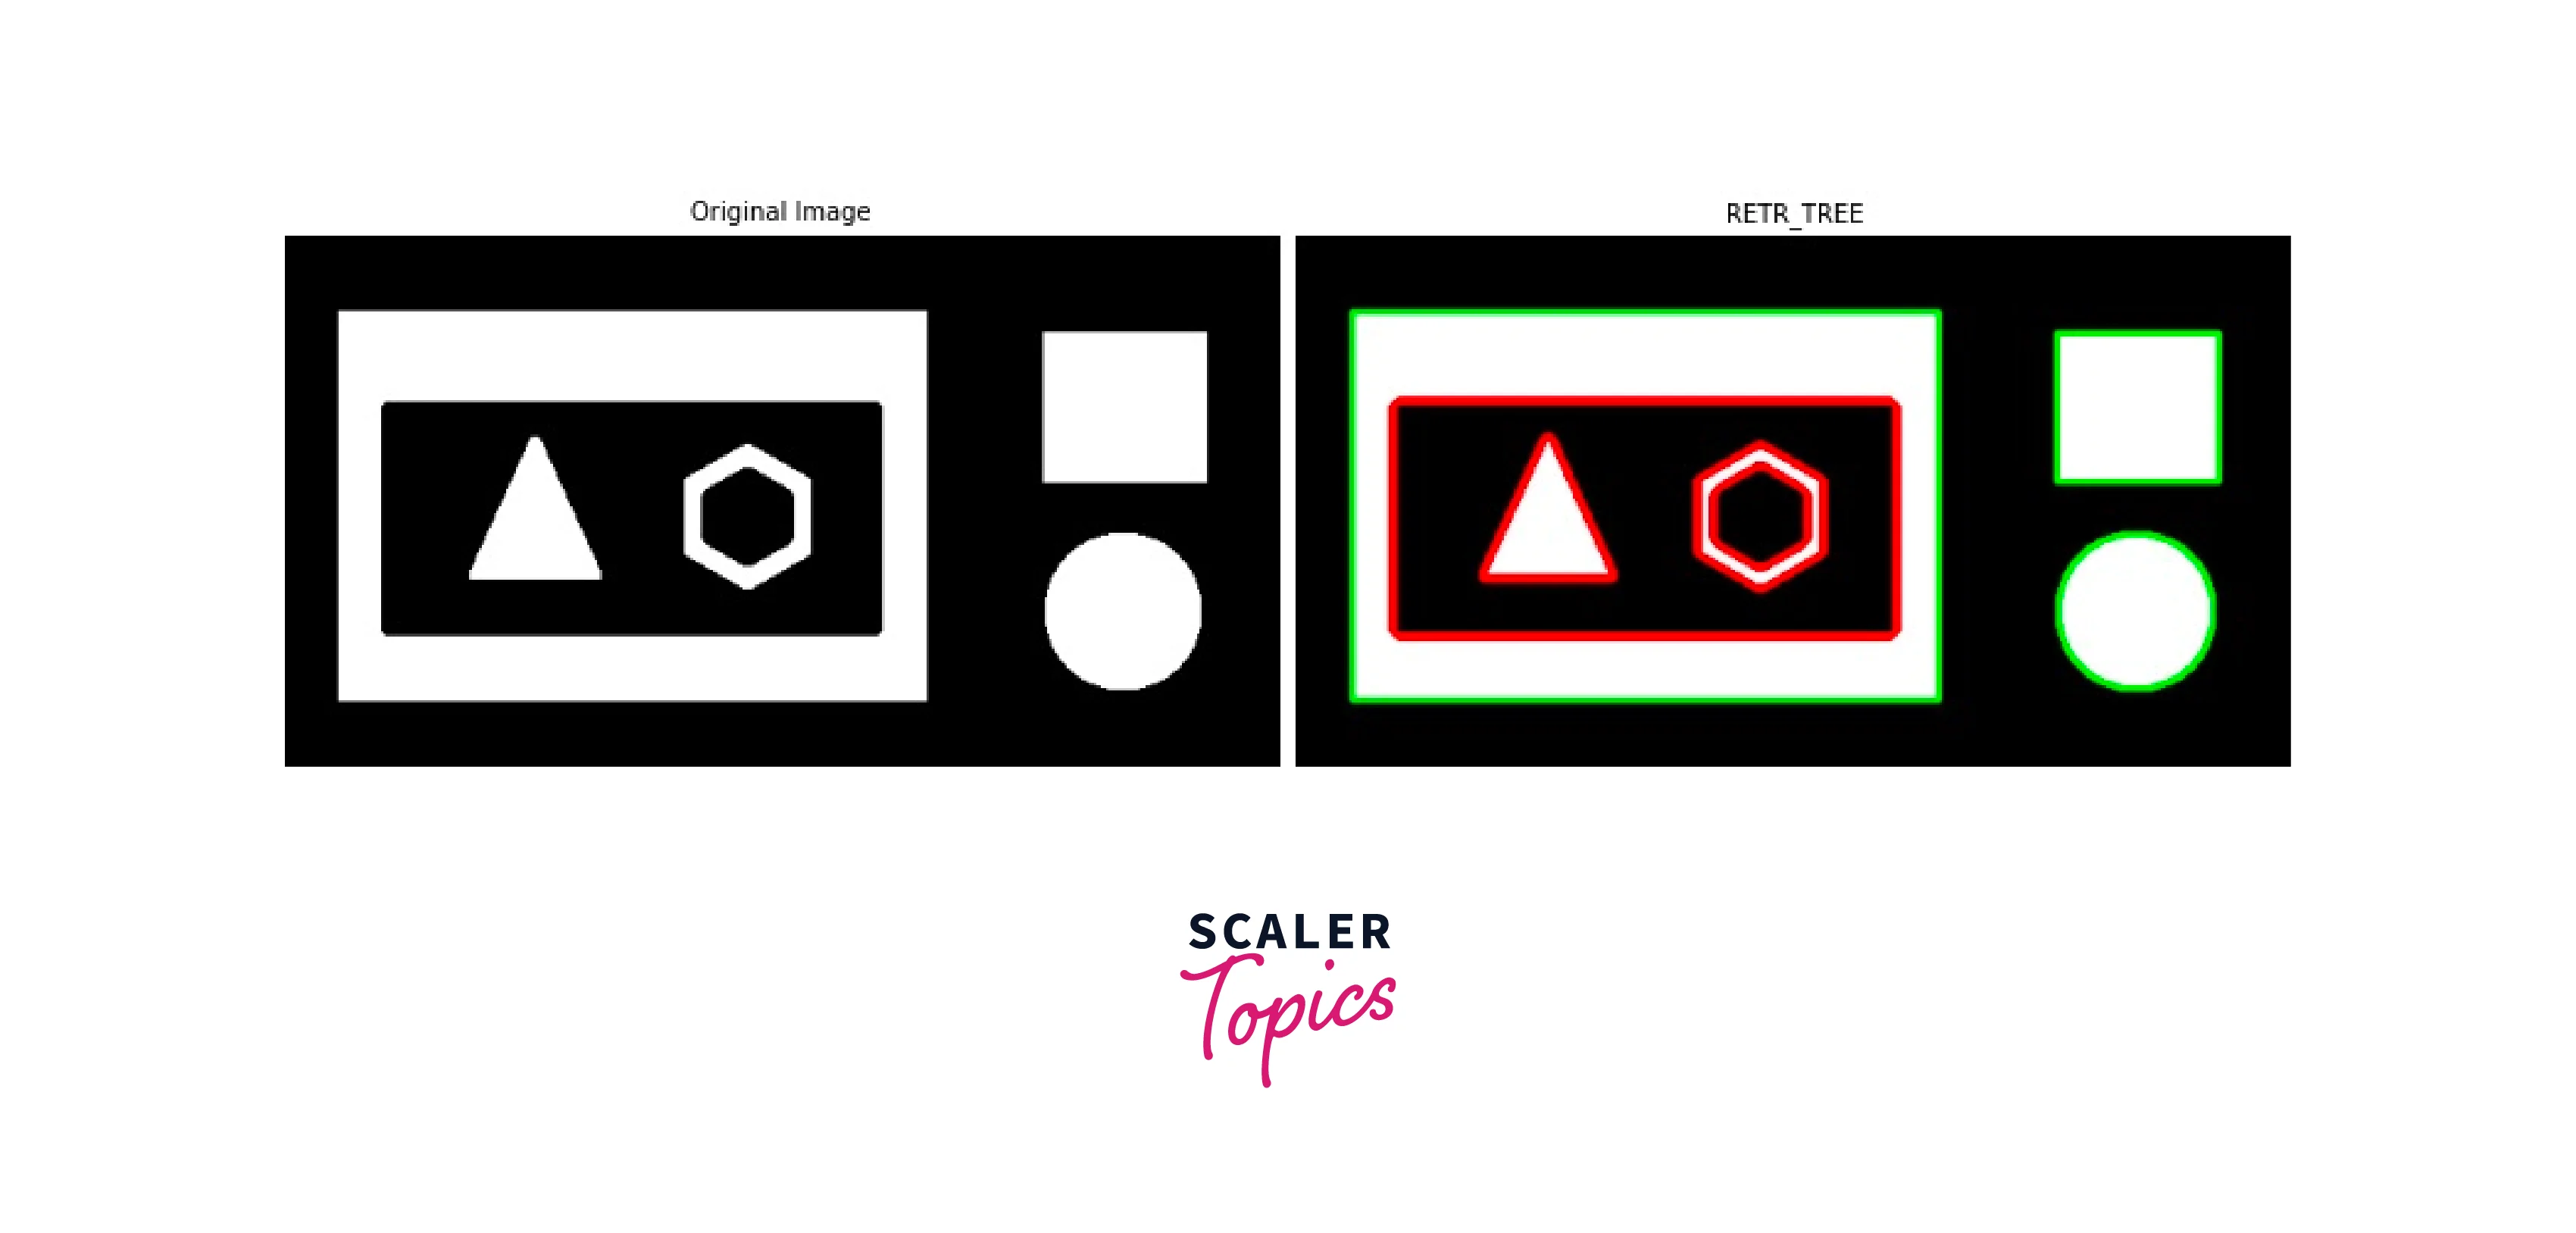
RETR_TREE
RETR_TREE retrieves all the contours in the image and creates a full hierarchy of nested contours. Each contour in the hierarchy is represented as a two-level array. The first level contains the contour itself, and the second level contains any child contours that are nested within it.
This retrieval mode is useful when we need to analyze the relationship between different contours in an image, or when we need to extract certain sub-regions of an image based on their contour hierarchy.
Below is an example image labeled with RETR_TREE hierarchy.

Step-by-step explanation with Code
Now let us follow an incremental approach to implement opencv contours.
Import the necessary libraries: The first step is to import the OpenCV and NumPy libraries in your Python program. This can be done using the following code:
Read the image: Next, you need to read the image that you want to process using OpenCV's imread() function. This function takes the path of the image as its argument and returns a NumPy array that represents the image.
Convert the image to grayscale: Contour detection is typically performed on grayscale images. Therefore, you need to convert the image that you read in step 2 to grayscale using the OpenCV's cvtColor() function. This function takes the image and the color space conversion code as its arguments and returns the grayscale version of the image.
Apply thresholding: Contours in OpenCV can be detected on binary images. Therefore, you need to apply thresholding to the grayscale image to convert it to a binary image. This can be done using OpenCV's threshold() function, which takes the grayscale image, the threshold value, and the maximum value as its arguments and returns a binary image.
Find contours: Once you have the binary image, you can use OpenCV's findContours() function to find the contours in the image. This function takes the binary image, the contour retrieval mode, and the contour approximation method as its arguments and returns the contours as a list of NumPy arrays.
Draw contours: Finally, you can draw the detected contours on the original image using OpenCV's drawContours() function. This function takes the original image, the contours, the index of the contour to draw (-1 for all contours), the color, and the thickness as its arguments and returns the image with the drawn contours.
These are the basic steps involved in implementing contours in OpenCV and Python. However, there are many parameters and options that you can tweak to achieve better results based on your specific requirements.
The complete code:
Testing
Now let us test the code with a sample image.
Input Image

Thresholded image

Output Image

Application of Contours in OpenCV
Motion Detection
Contours can be used to detect motion in video streams by comparing the contours of successive frames. Any changes in the contour indicate motion, which can be used to detect moving objects or people.
Unattended Object Detection
Contours can be used to detect unattended objects in a given area by analyzing the contours of the objects present in the scene. This technique is commonly used in security systems to detect abandoned bags, suspicious objects, or unauthorized items.
Background / Foreground Segmentation
OpenCV Contours can be used to segment the foreground objects from the background in an image or video stream. This technique is widely used in applications such as video surveillance, where it is necessary to track moving objects and people in real time.
Limitations
Although contours in computer vision are useful in many computer vision applications, they do have some limitations. Here are some of the main limitations of using contours:
-
Sensitivity to Noise: Contours can be sensitive to noise, which can result in inaccurate detection and segmentation of objects. This can be especially problematic when working with low-resolution or low-quality images.
-
Dependence on Lighting: Contours can be affected by lighting conditions, which can cause the contours of objects to vary under different lighting conditions. This can make it challenging to detect objects consistently in varying lighting conditions.
-
Limited to 2D: Contours in OpenCV are limited to 2D representations of objects, which can make it challenging to analyze and detect objects in 3D space. This limitation can be overcome by using other techniques such as depth maps or point clouds.
-
Subjectivity in Contour Extraction: The process of contour extraction can be subjective, and different algorithms and parameters can produce different contours for the same object. This can make it challenging to compare and analyze results from different contour extraction techniques.
Overall, while contours are a powerful tool for detecting and analyzing objects in computer vision, they do have some limitations that need to be considered when designing computer vision systems.
Conclusion
-
Contours in opencv are a powerful tool for analyzing and manipulating the shapes and features within an image. In OpenCV, contour detection is a common image processing technique used for various applications such as object detection, shape analysis, and image segmentation.
-
In this article, we covered the basics of contours in OpenCV, including the different contour detection algorithms, contour hierarchies, and contour retrieval modes. We also discussed how to draw contours using different methods and demonstrated how to use CHAIN_APPROX_NONE and CHAIN_APPROX_SIMPLE to draw contours.
-
Overall, understanding contours and how to work with them in OpenCV is an important skill for any computer vision or image processing developer. By mastering these techniques, you can create powerful applications that can automatically detect and analyze the shapes and features within images.