How To Crop An Image In Opencv Python?
Overview
One of the most fundamental image operations is cropping. Crop image in Opencv or Cropping is a technique for removing unwanted parts from a photograph. Cropping is the act of choosing and extracting the Region of Interest (or simply, ROI) from an image. OpenCV does not have a dedicated cropping technique; instead, NumPy array slicing is employed. Each image that is read is stored in a 2D array (for each colour channel). Simply specify the height and breadth of the cropped region (in pixels).Let's discuss in detail how to crop an image in OpenCV Python.
How to Crop an Image in OpenCV Python?
Crop image in OpenCV is the process of extracting a portion of the original image, usually with a specific width and height. OpenCV Python provides different methods to crop an image, including using array slicing.
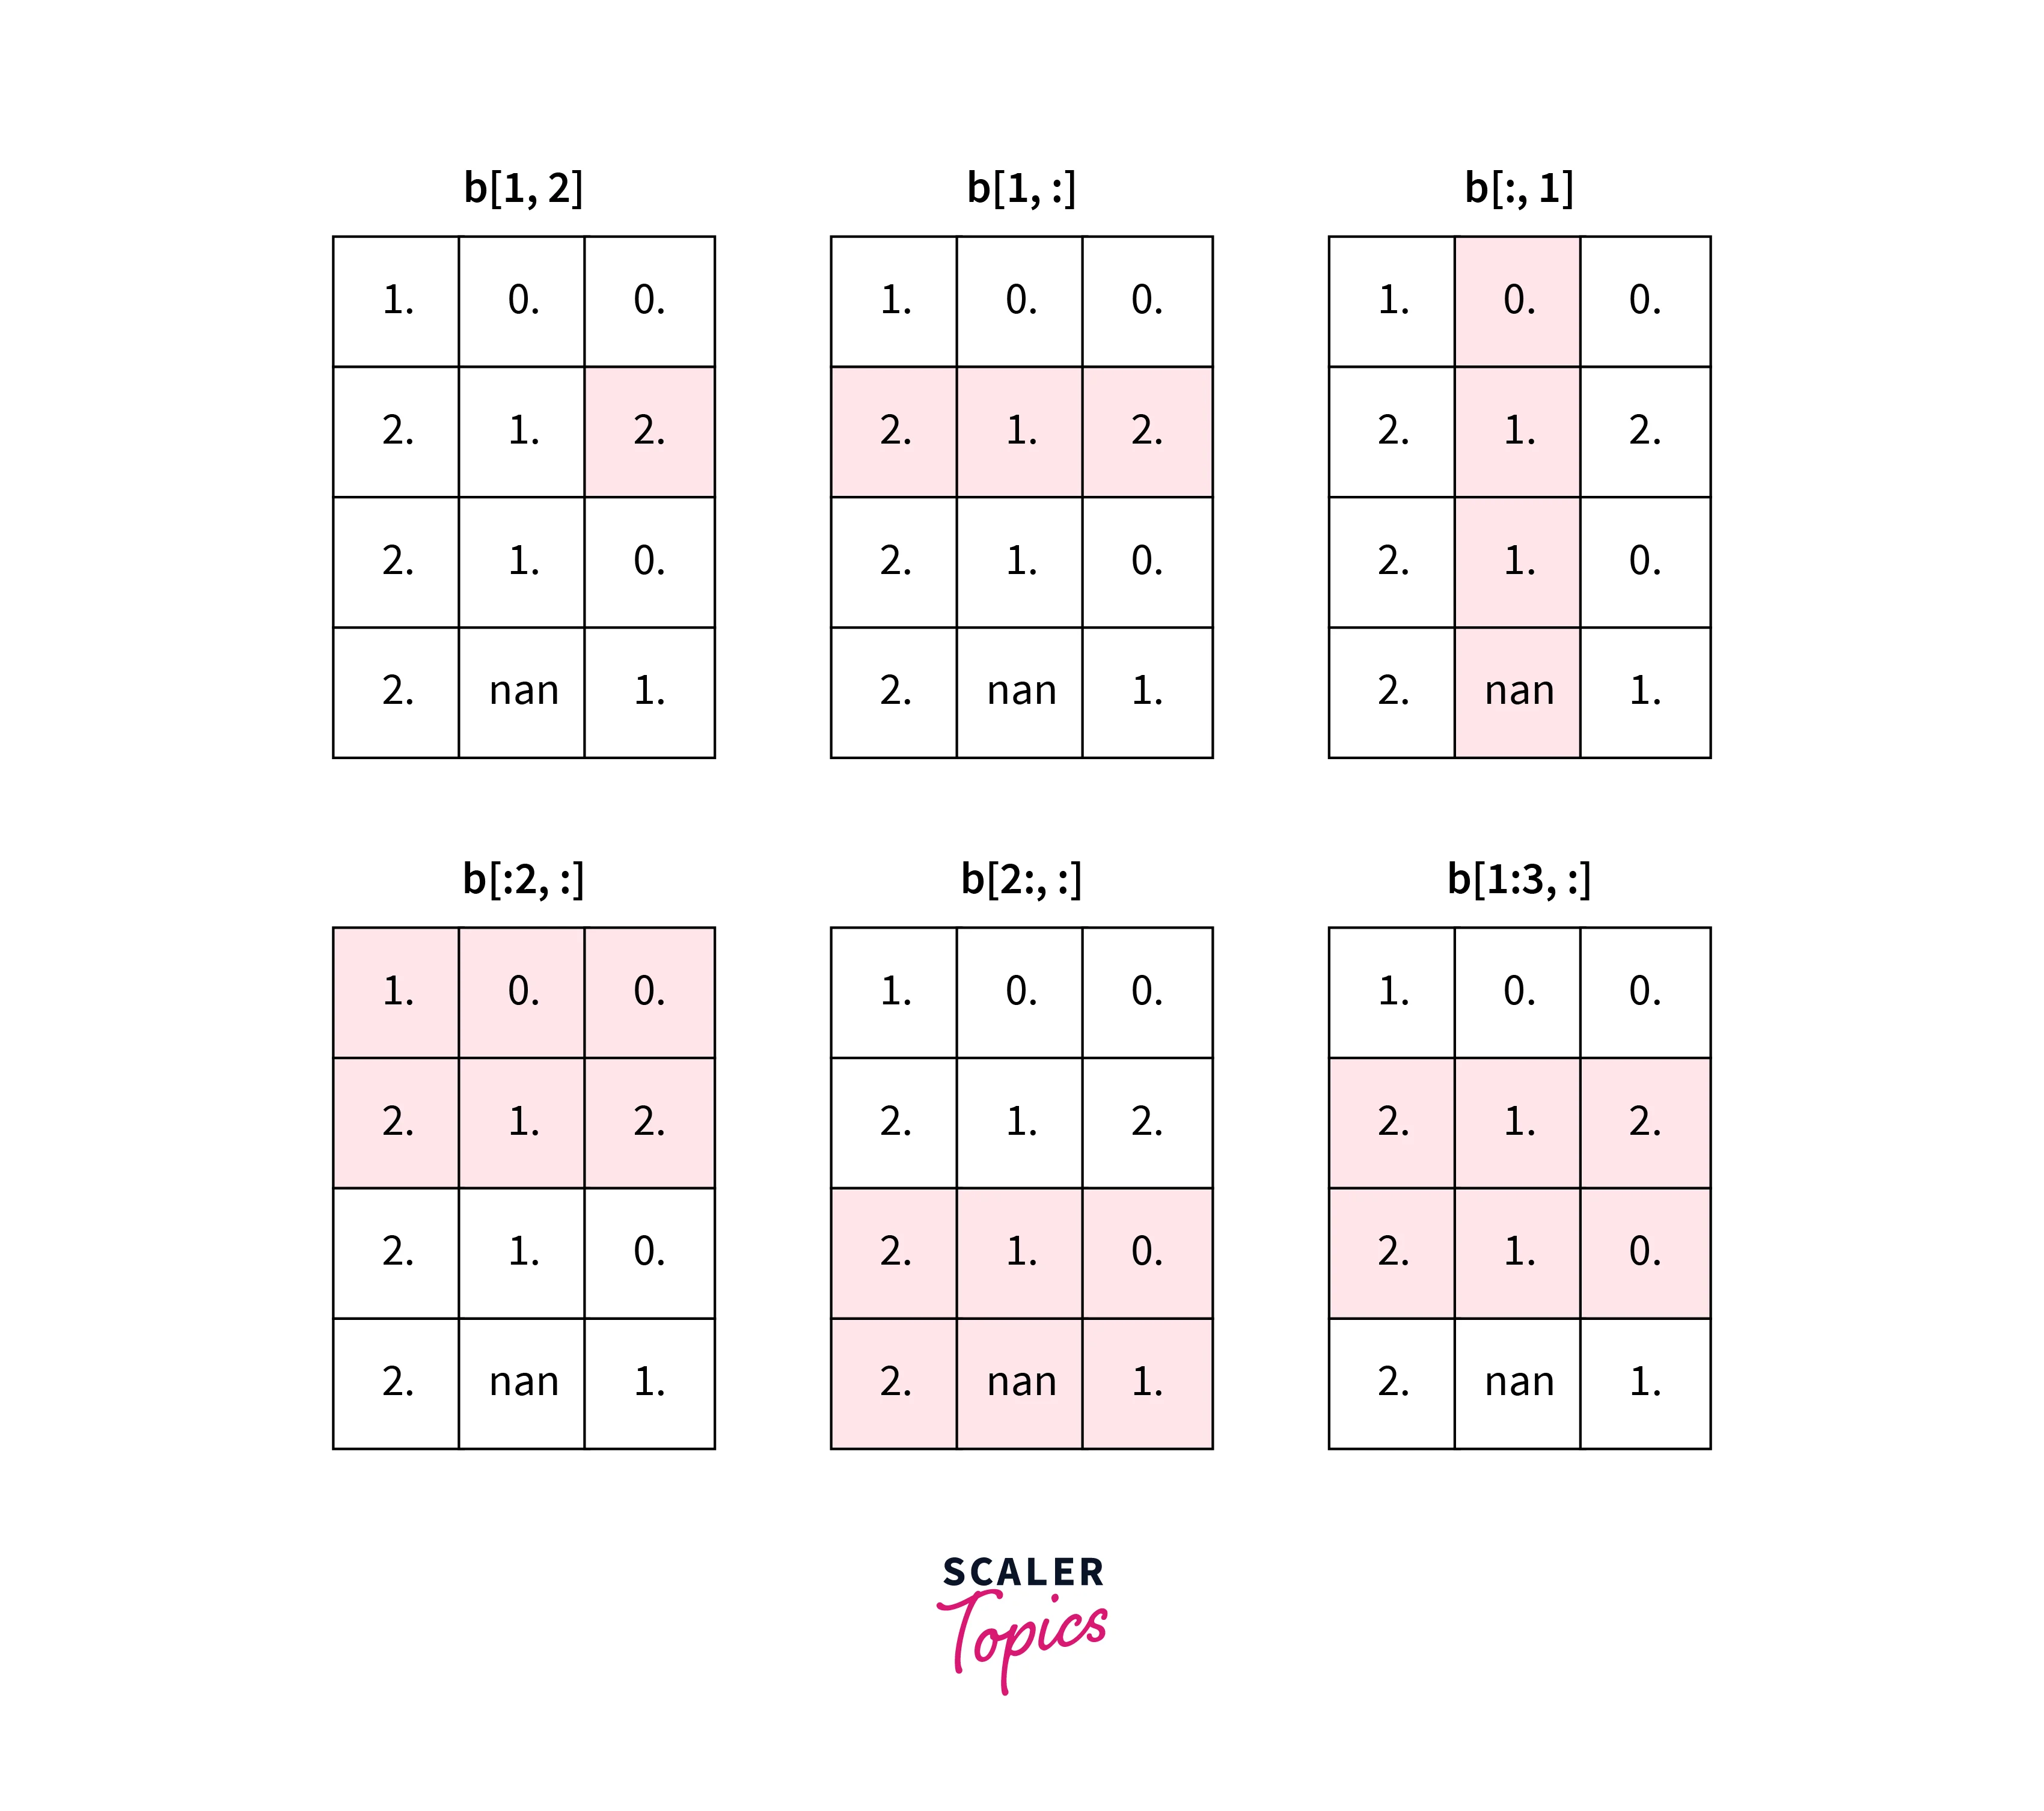
In image processing, an image can be represented as a matrix of pixel values. In OpenCV, an image is represented as a NumPy array. Array slicing is a powerful feature of NumPy that allows you to extract a sub-array from an existing array based on a given set of indices. This is the technique we can use to crop an image.
To crop an image in OpenCV Python using array slicing , we need to specify the coordinates of the region of interest (ROI) that we want to extract from the original image. These coordinates include the x and y coordinates of the top-left corner of the ROI, as well as the width and height of the ROI.
Once we have defined the coordinates of the ROI, we can use array slicing to extract the portion of the image corresponding to the ROI. Finally, we can display the cropped image using the cv2.imshow() function.
- The first dimension is always the image's height or the number of rows.
- The second dimension is the number of columns or the image's width.
- It follows the concept that the first dimension of a 2D array reflects the array's rows (where each row represents the y-coordinate of the image).
Crop Image in OpenCV and NumPy Array Slicing
1. Read the image using the cv2.imread() function and specify the path to the image file.
2. Specify the region of interest (ROI) in the image using the slicing notation. For example, you can use the image[y1
3. Display the cropped image using the cv2.imshow() function.
4. Save the cropped image using the cv2.imwrite() function and specify the path to the output file.
Stepwise Implementation to Crop an Image in OpenCV Python
The stepwise implementation to crop an image in OpenCV is useful for two main reasons:
-
It is a simple method that does not require any complex mathematical calculations or transformations. By using array slicing, we can easily extract the desired portion of an image with just a few lines of code.
-
It provides greater flexibility in defining the ROI. With array slicing, we can define the coordinates of the ROI programmatically or through user input. This allows us to easily crop different parts of an image, depending on our specific needs.
a. Read the Image
The method cv2.imread() loads an image to crop in OpenCV from the given file. This method returns an empty matrix if the image can't be read for any reason, including a missing file, improper permissions, an unsupported or invalid format, or an unsupported image size.
First, load the image that you want to crop using the cv2.imread() method. This will create a NumPy array representing the image.
INPUT IMAGE TO CROP:

b. Get the Image Dimensions
To crop an image in OpenCV, it's important to know its dimensions, i.e., its width and height. This is necessary because we need to specify the coordinates of the region of interest (ROI) relative to the image dimensions.
We can use the shape attribute of the image to get its dimensions. The shape attribute returns a tuple containing the number of rows, columns, and channels (if the image is colour).
The dimensions of the image are given by the first two elements of this tuple, i.e., shape[0] and shape[1].
Output:
In this example, we first load the image using cv2.imread(). We then use the shape attribute of the image to get its dimensions. Since we only need the width and height, we slice the first two elements of the tuple using shape[:2]. Finally, we print the dimensions of the image using a formatted string.
Once we know the dimensions of the image, we can use them to define the coordinates of the ROI and crop the image in OpenCV using array slicing
c. Slice the Image
Once we have defined the coordinates of the ROI, we can use array slicing to extract the portion of the image corresponding to the ROI.
To create our final result, we can now use array slicing.
Output:

In this example, we first load the image using cv2.imread(). We then define the coordinates of the ROI using four variables: x and y are the coordinates of the top-left corner of the ROI, and w and h are its width and height, respectively.
Next, we use array slicing to extract the portion of the image corresponding to the ROI. The syntax for array slicing is array[start
Finally, we display the cropped image using cv2.imshow().
Applications
- A zone of interest can be extracted from an image by cropping, and the rest of the image can be discarded.
- To train a patch-based neural network, you can extract patches from a picture.
- This function is preferably used in image detection jobs that involve image processing.
- The OpenCV image crop function aids in lowering the size of the Numpy array that is given as a representation of the pixels present in the image that the coder has sourced.
Conclusion
- To Crop an image in Opencv, Python is a straightforward process that involves reading the image, specifying the ROI, displaying the cropped image, and saving the output to a file.
- By cropping an image, unwanted areas can be eliminated or a particular area of interest can be isolated for further processing.
- Slicing is used to perform the cropping procedure, in which the height and breadth of the region to be cropped are specified as dimensions of the image matrix. To save the final image, either create a new matrix or update an existing one.