Getting Started with C#
Overview
C# is a flexible language from Microsoft, popular for desktop, web, and mobile apps. It works well with the .NET framework, offering a strong foundation for creating reliable software. Similar to other C-style languages, C# has a straightforward structure, making it easy for programmers to learn and build applications effectively. C# is a popular choice for making Microsoft apps because it works closely with the .NET Framework. This platform shares tools for creating apps on Windows, macOS, and Linux. So, it's simple to move C# apps between these systems. C# is also good for making apps that work on different systems. Mono, a free version of .NET Framework, helps C# apps run on macOS, Linux, and more.
Introduction to C# Programming
C# is a general-purpose, object-oriented programming language that was developed by Microsoft in 2000. It is a compiled language, which means that it is converted into machine code before it is executed. This makes C# programs faster than interpreted languages, such as Python and JavaScript. C# is a popular language for developing Microsoft applications because it is tightly integrated with the .NET Framework. The .NET Framework is a software platform that provides a common set of APIs for developing applications on Windows, macOS, and Linux. This makes it easy to port C# applications to different platforms.
Setting Up the Development Environment
Setting up a development environment for C# involves installing the necessary tools and components to write, compile, and run C# applications. Here's a step-by-step guide on how to set up a C# development environment:
-
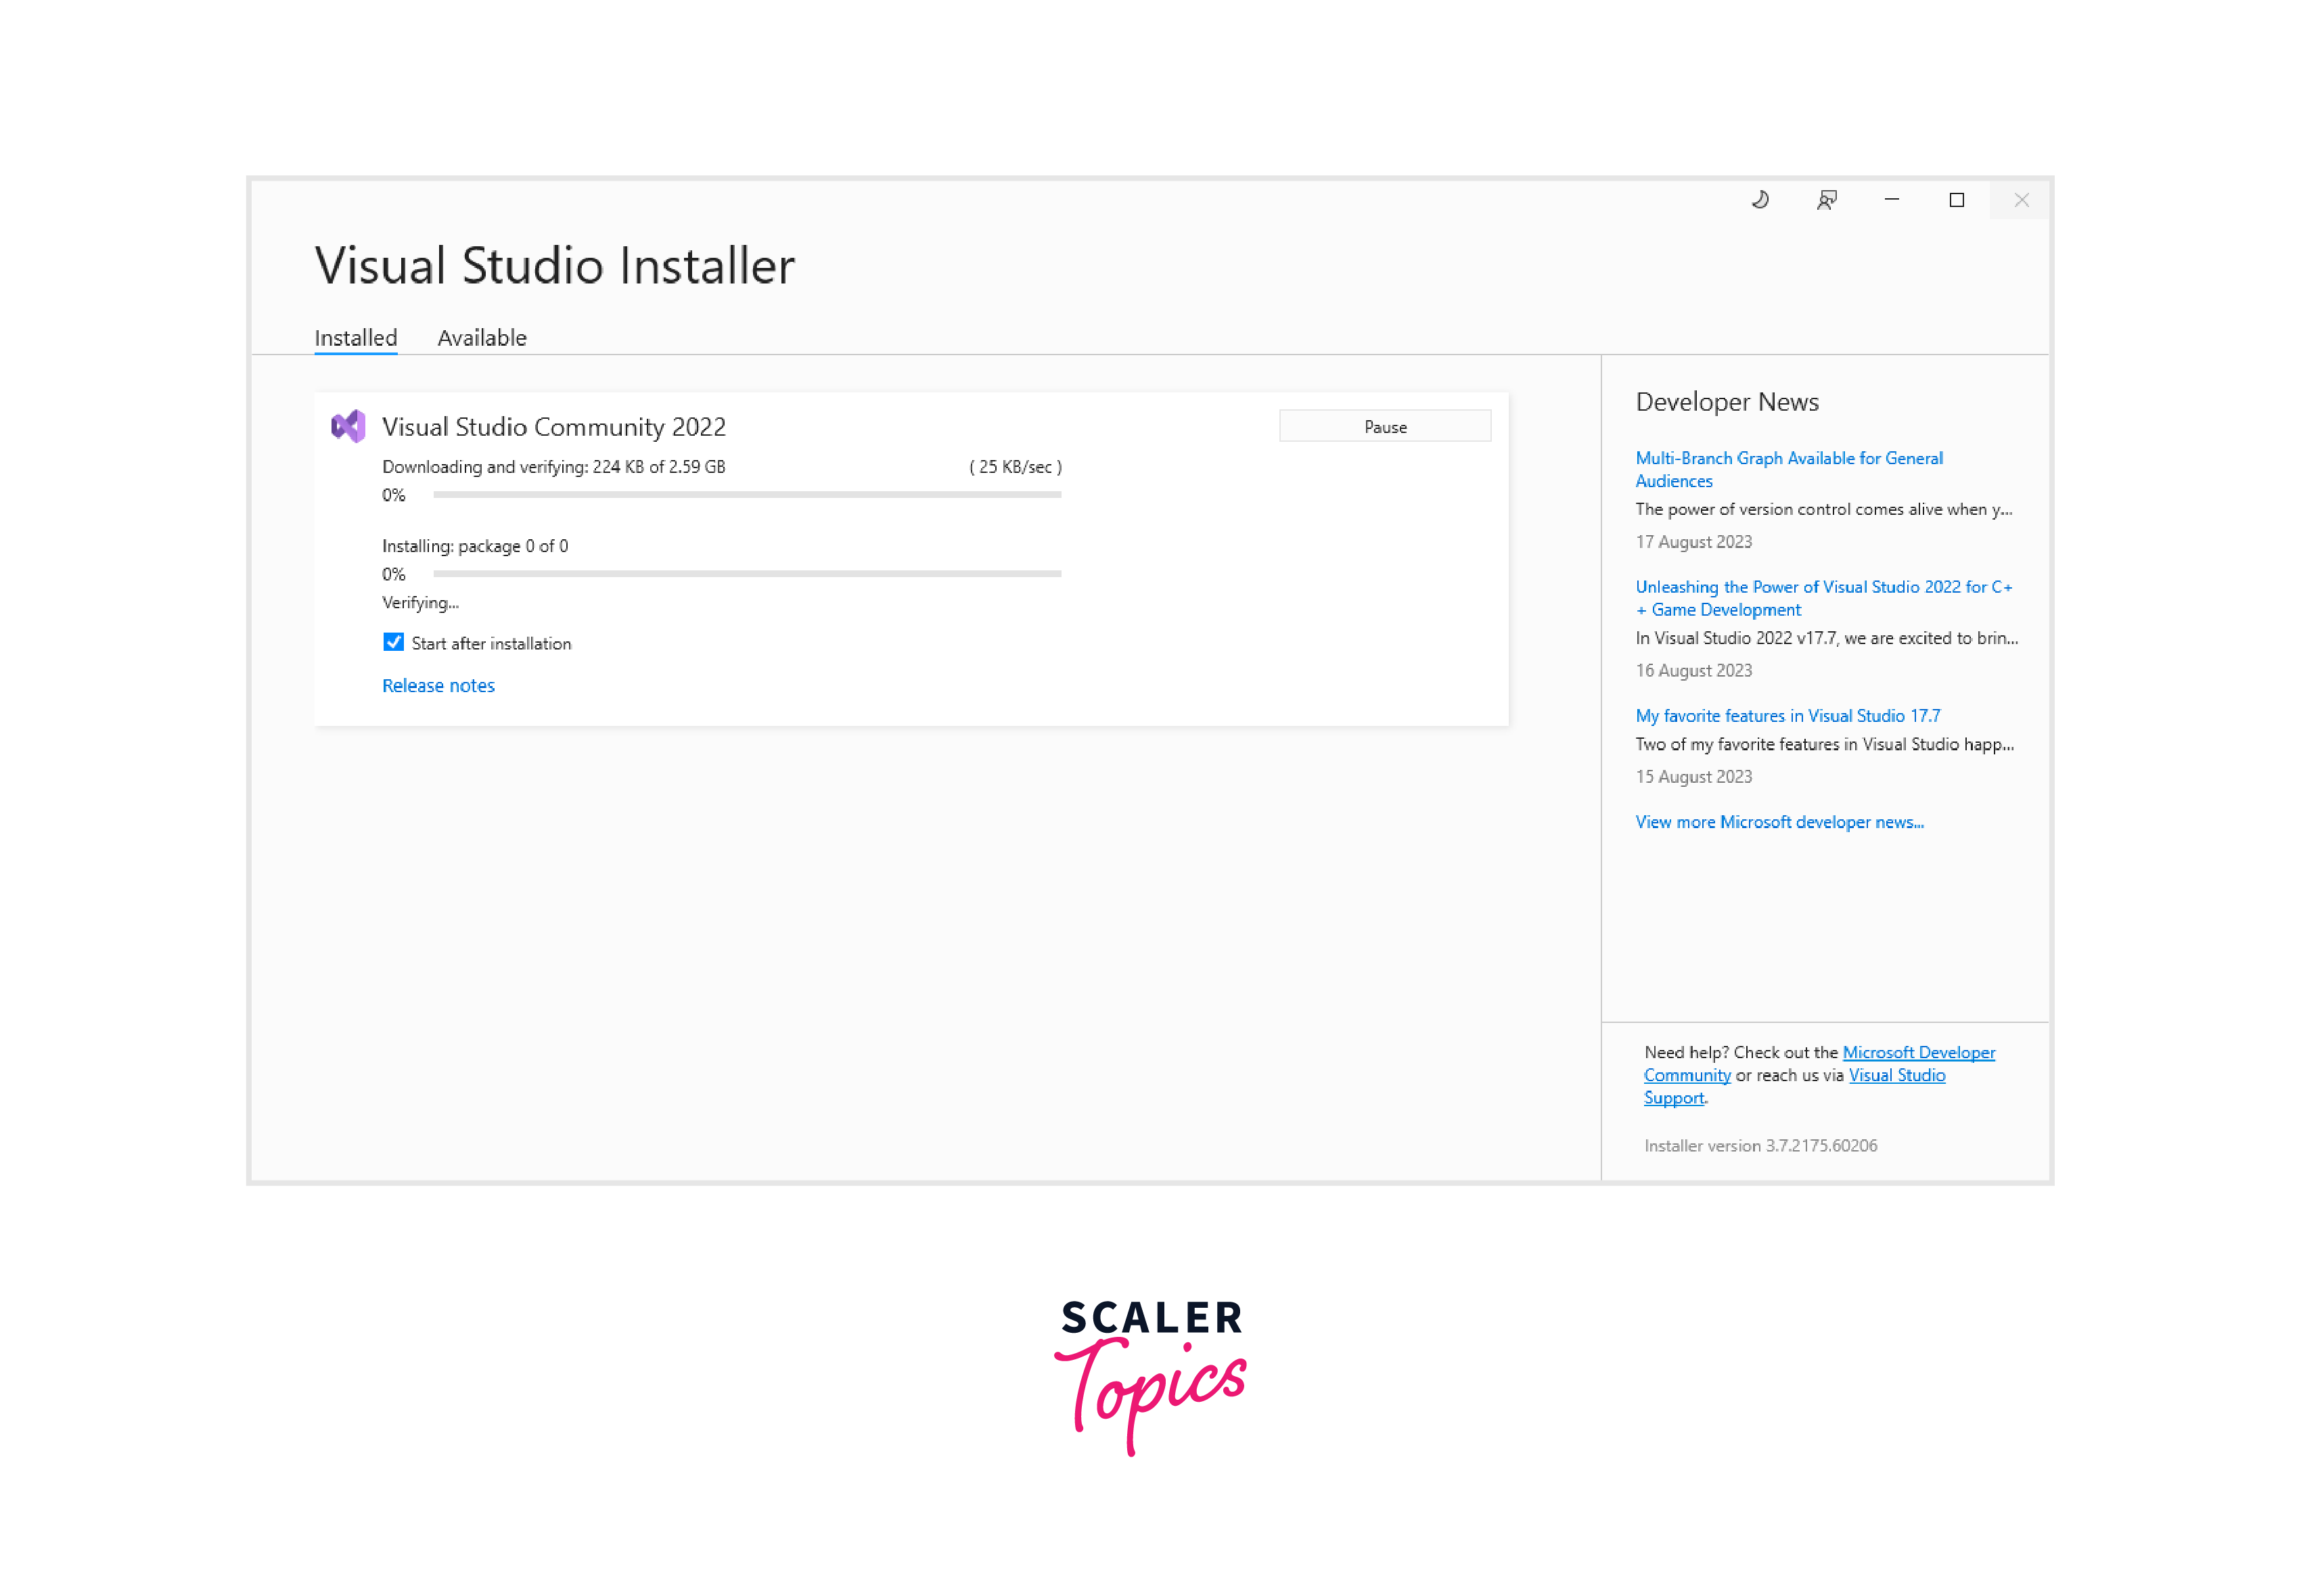
Install Visual Studio (Recommended): Visual Studio is a comprehensive integrated development environment (IDE) for C# development. It provides features like code editing, debugging, and project management.
- Go to the Visual Studio website and download the latest version of Visual Studio.
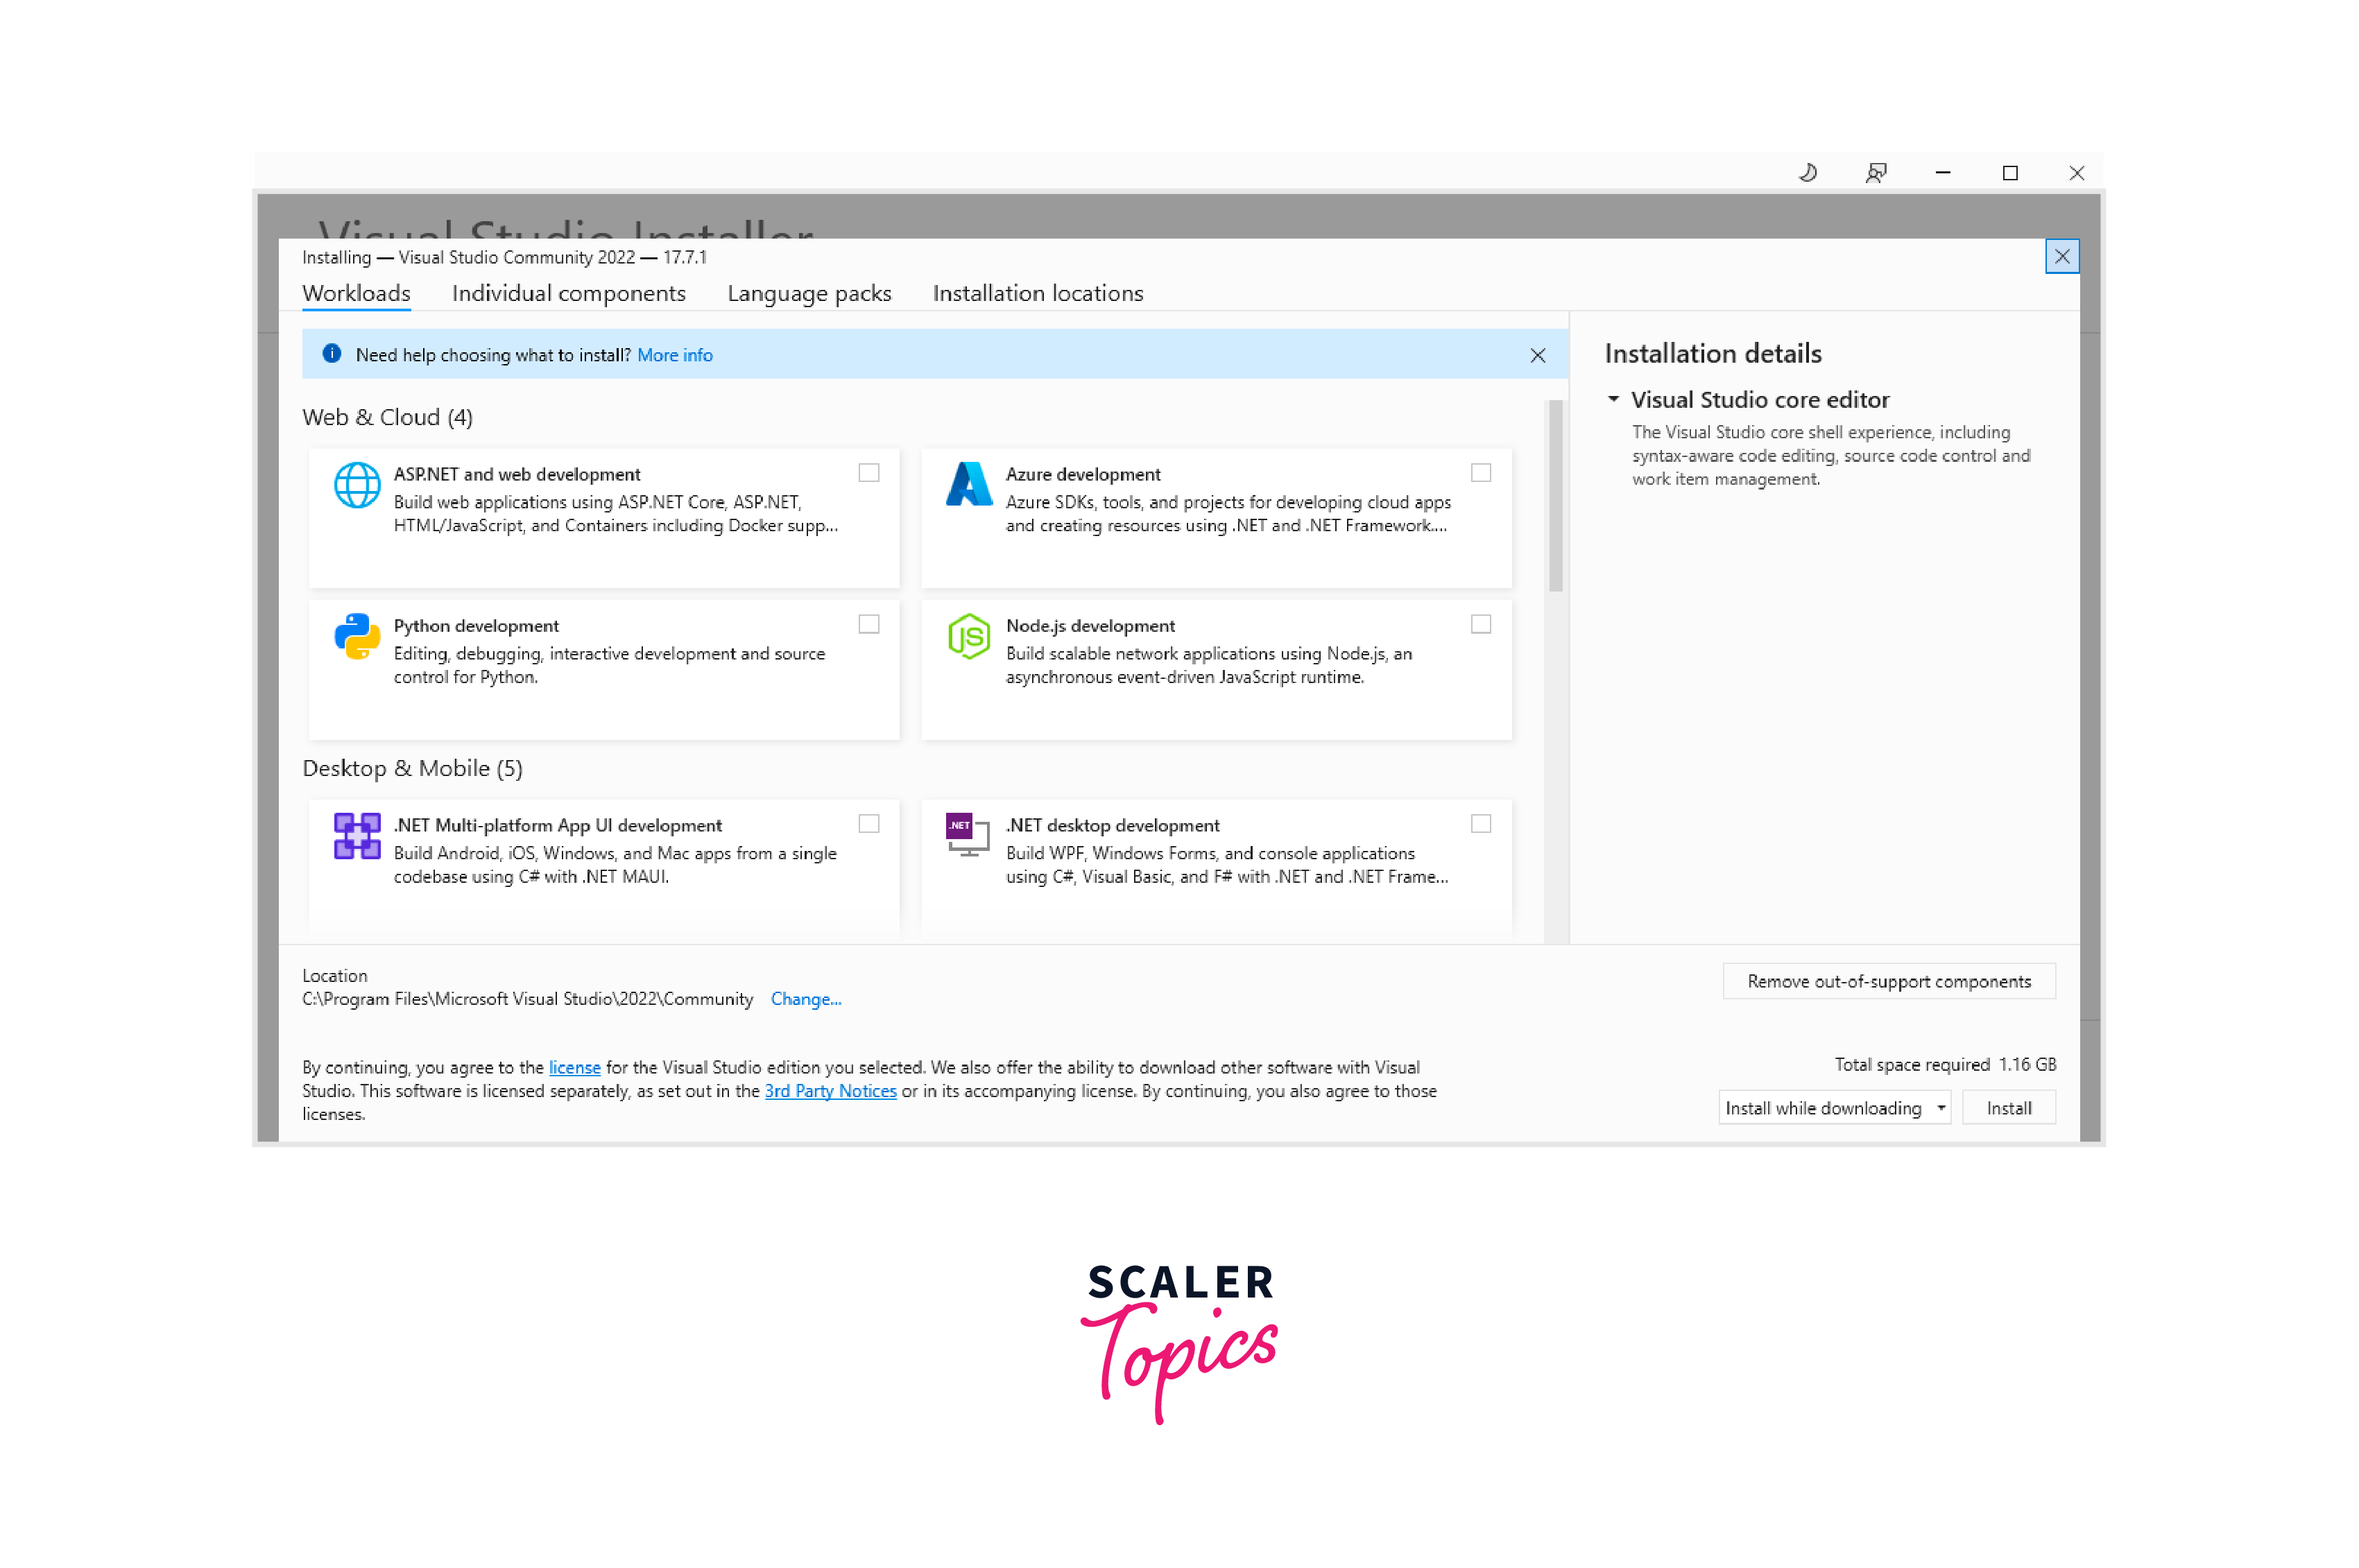
- Run the installer and choose the .NET desktop development workload, which includes the necessary tools for C# development.
- You can customize the installation by selecting additional components, but the .NET desktop development workload should cover most C# development needs.
- Follow the installation prompts.
-
Install .NET SDK: The .NET SDK includes the necessary tools for building, testing, and publishing C# applications.
- Go to the .NET website and download the latest version of the .NET SDK.
- Run the installer and follow the installation prompts.
Writing Your First C# Program
Let's create a simple "Hello, World!" console application using Visual Studio code. If you're using a different IDE or text editor, the steps might vary slightly.
-
Create a New Project: Open Visual Studio or your chosen code editor, and create a new console application project.
-
Open Program.cs: In your project, you'll find a file named Program.cs. This is the default entry point for your application.
-
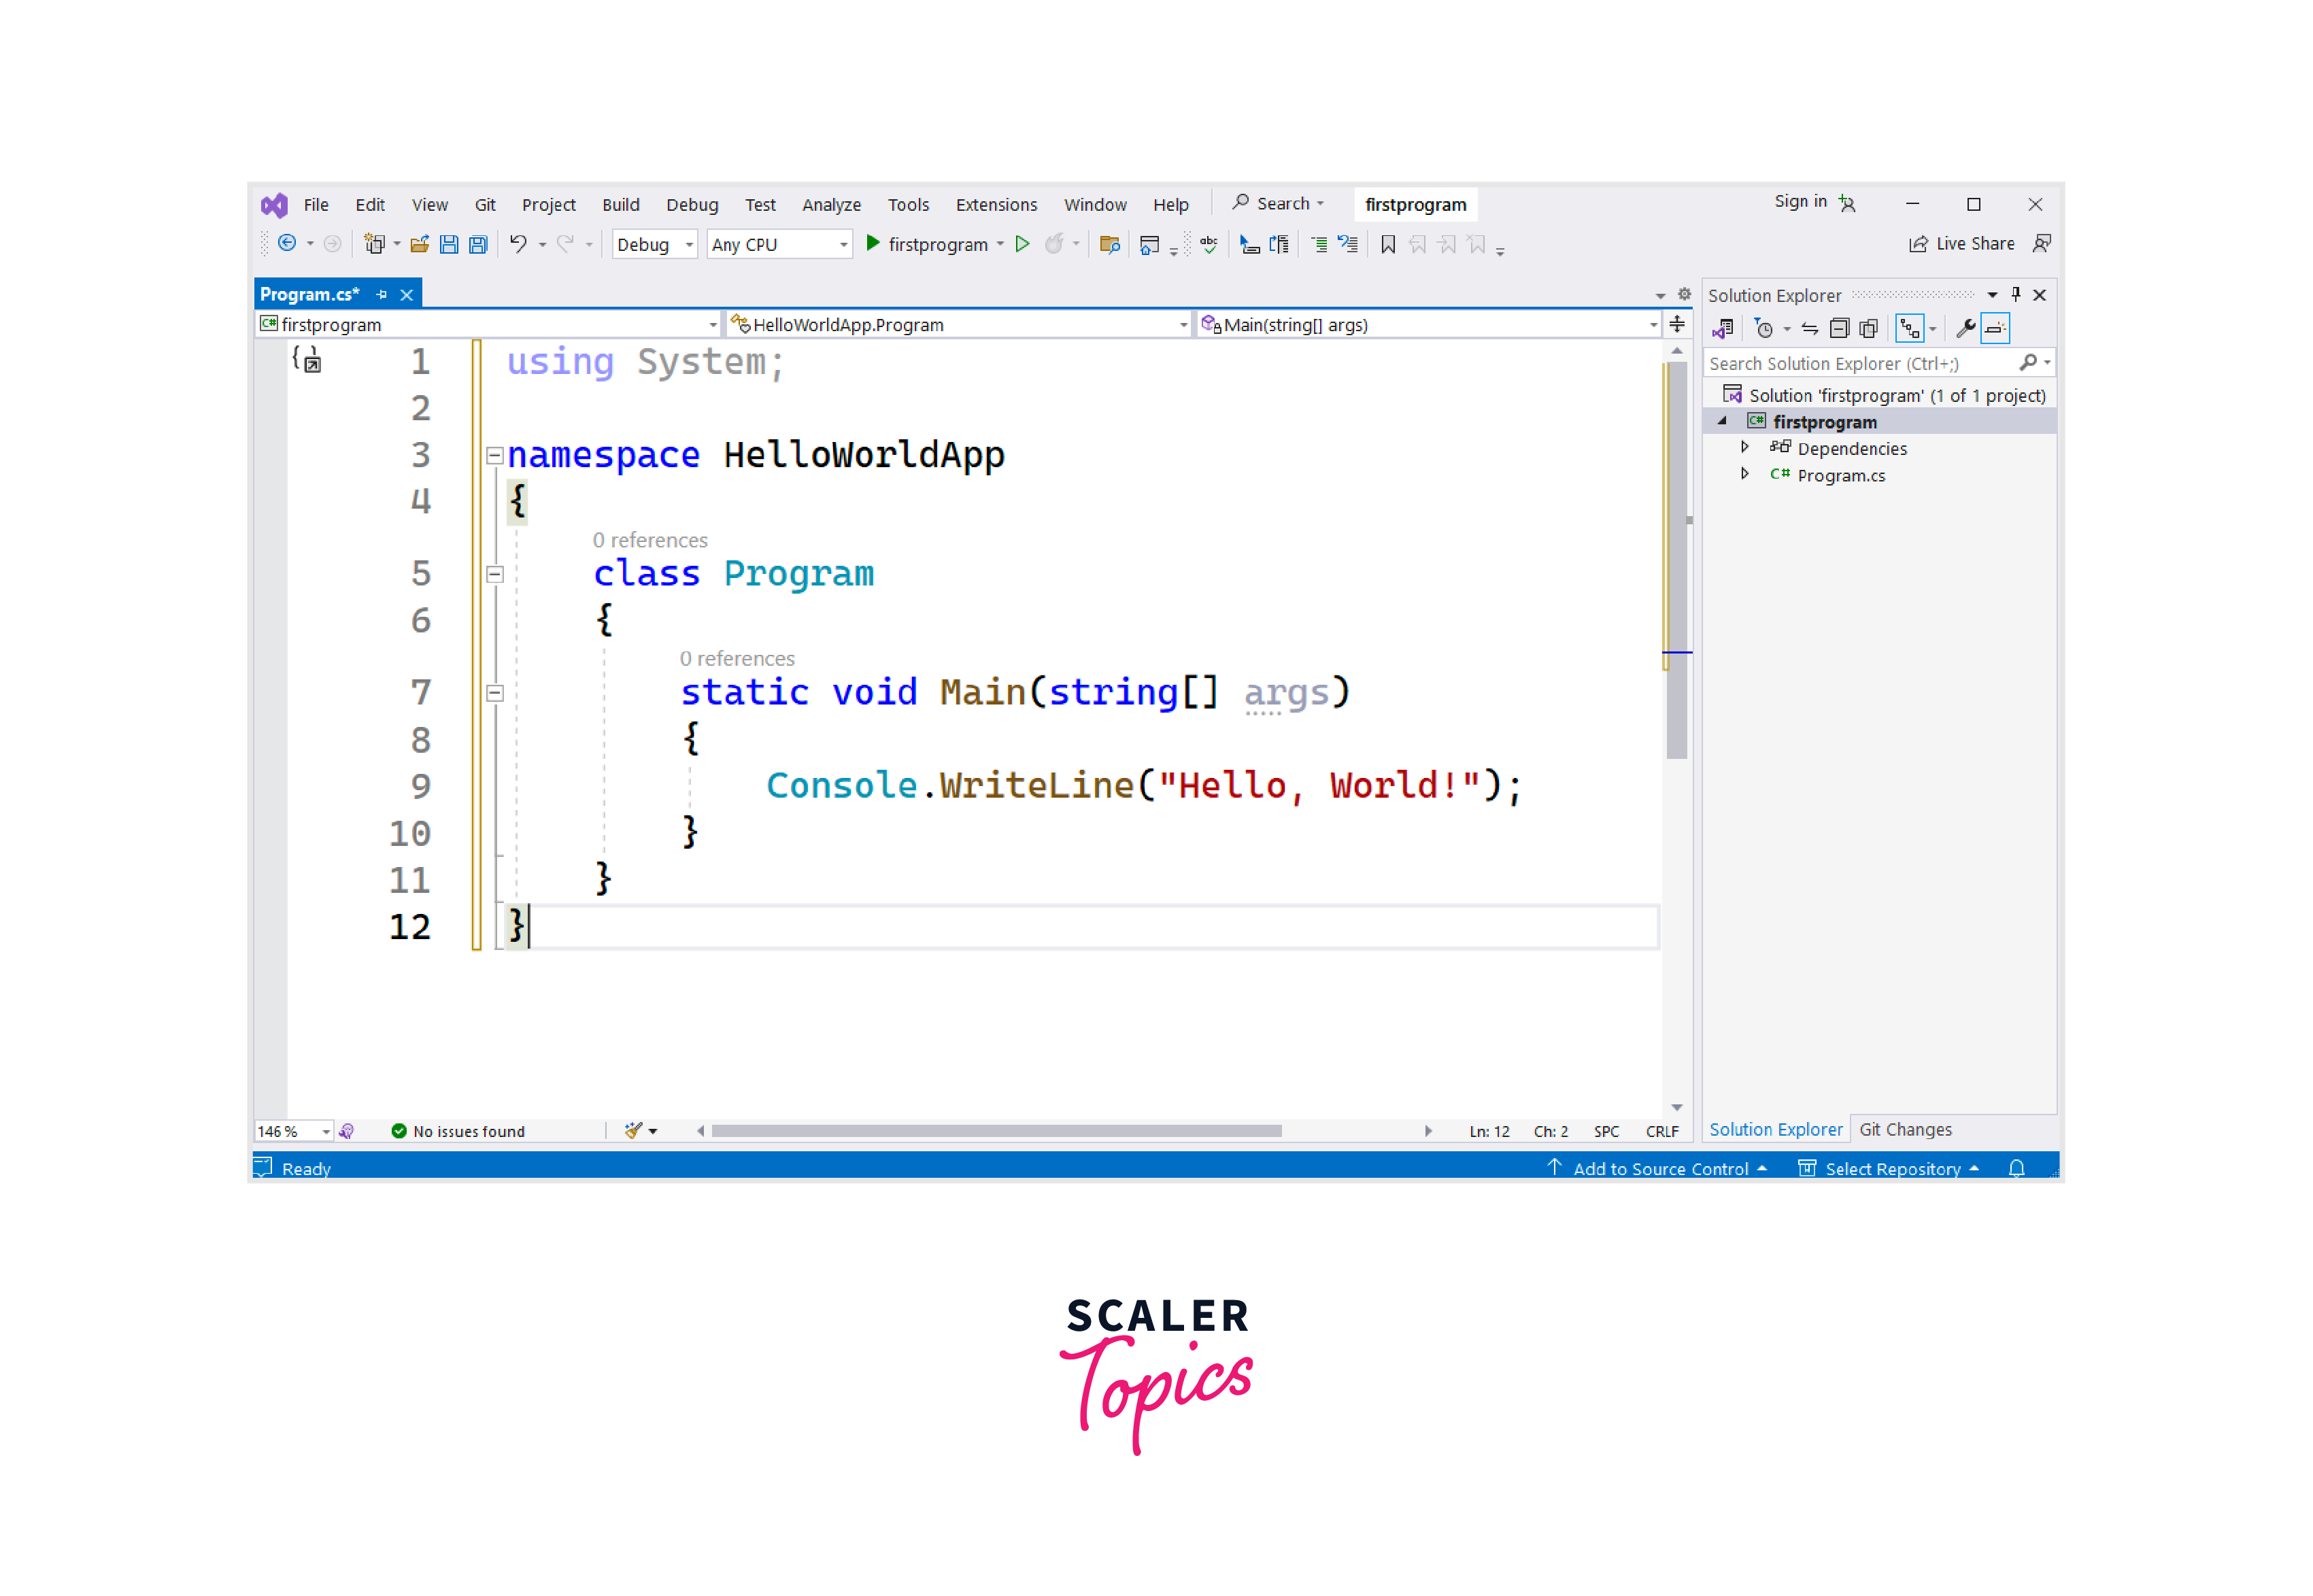
Write Your Code: Inside Program.cs, you'll see a Main method. This method is the starting point for your program. Replace the existing code with the following "Hello, World!" example:
- namespace HelloWorldApp: This defines a namespace named HelloWorldApp. A namespace is a way to organize code and avoid naming conflicts. All the code within this namespace will belong to the HelloWorldApp scope.
- class Program: This defines a class named Program within the HelloWorldApp namespace. A class is a blueprint for creating objects and defines the behavior and properties of those objects.
- static void Main(string[] args): This is the entry point of the program. It's a special method that gets executed when the program starts running. It's declared as static because it's the first method to be called before any objects are instantiated.
- Console.WriteLine("Hello, World!");: This line of code is responsible for outputting "Hello, World!" to the console. The Console class is part of the System namespace and provides methods for interacting with the command-line interface. In this case, WriteLine is used to display the text followed by a newline character, resulting in "Hello, World!" being printed to the console.
Understanding C# Basic Syntax
Understanding the basic syntax of C# is essential for writing and comprehending C# code. Let's break down some of the fundamental syntax elements in C#:
-
Namespaces: Namespaces are a way to organize and group related classes, structures, interfaces, enums, and other types in C# projects. They help avoid naming conflicts and provide a clear hierarchy for your code. Namespaces allow you to create a logical separation between different components of your application.
using System;-
using System;: This line includes the System namespace, which contains fundamental classes and types, including the Console class that we'll use for writing output.
-
namespace HelloWorldApp: Namespaces provide a way to organize and group related classes. Here, we're defining a namespace named HelloWorldApp.
-
-
Classes Classes are fundamental constructs in object-oriented programming (OOP). They serve as blueprints or templates for creating objects, which are instances of the class. A class defines both the structure (data fields) and behavior (methods) that its objects will have.
-
class Program: This line defines a class named Program within the HelloWorldApp namespace.
-
static void Main(string[] args): This is the Main method, the entry point of the program. It's where the execution of the program starts. The method is static because it belongs to the class itself (not an instance of the class). It takes an array of strings called args as its parameter, which can hold command-line arguments.
-
Console.WriteLine("Hello, World!");: This line uses the Console class to write the text "Hello, World!" to the console. The WriteLine method displays the text and adds a new line afterward.
-
Variables and Data Types in C#
C# is a strongly-typed language, which means that variables must be explicitly declared with their data types. When declaring a variable in C#, you need to specify the data type of the variable, indicating the kind of values it can store.
- Variables: A variable is a named storage location in memory that holds a value. It allows you to store data that can be used and modified throughout your program. Here's how you declare a variable in C#:
-
Data Types: Data types define the kind of value that a variable can hold. C# has a variety of built-in data types, which are categorized into two main groups: value types and reference types.
Value Types: Value types store the actual value within the variable itself. When you assign a value type to another variable, a copy of the value is made. Common value types include:
- Numeric Types: int, double, float, decimal, byte, short, long, ushort, uint, ulong
- Character Type: char
- Boolean Type: bool
- Enumerations (Enums): Custom-defined integer type with named values
Reference Types: Reference types store a reference to the memory location where the actual data is stored. When you assign a reference type to another variable, both variables refer to the same data in memory. Common reference types include:
- Strings: string
- Objects: Instances of classes
Control Flow and Decision Making
Control flow and decision making are fundamental concepts in computer programming that allow you to create programs that can make choices and perform different actions based on certain conditions. They determine the order in which statements are executed in a program
-
if Statement: The if statement is used to execute a block of code only if a specified condition is true.
-
if-else Statement: The if-else statement allows you to execute one block of code if a condition is true and another block if the condition is false.
-
if-else-if Statement: This structure allows you to check multiple conditions in sequence and execute the corresponding block of code for the first true condition.
Let's an example that uses if, if-else, and if-else if statements:
Output:
- switch Statement: The switch statement provides a way to execute different blocks of code based on the value of a variable or expression.
These control flow and decision-making structures allow you to create dynamic and responsive programs that make decisions based on input and conditions. Choose the appropriate structure based on your program's logic and requirements. Let's an example that uses a switch statement in C#:
Output
Explanation of the code:
- The program prompts the user to enter a number representing a day.
- The entered string is converted to an integer using int.Parse() and stored in the dayNumber variable.
- A switch statement is used to check the value of dayNumber and determine the corresponding day name.
- Each case represents a different value of dayNumber, and the appropriate dayName is assigned.
- The break statement is used to exit the switch statement once a match is found.
- If none of the case conditions match the value of dayNumber, the default case is executed.
- The final line uses string interpolation to display the determined dayName.
Loops and Iterations
Loops and iterations are essential constructs in programming that allow you to repeat a block of code multiple times. In C#, there are several types of loops you can use for different scenarios. Let's explore the most common ones:
-
for Loop: The for loop is used when you know in advance how many times you want to repeat a block of code.It is ideal when you have a predetermined number of iterations. The loop's structure includes initialization, a condition for continuation, and an increment or decrement step.
Let's see an example of a simple for loop in C#:
Output
-
while Loop: The while loop is used when you want to repeat a block of code while a certain condition is true. It's suited for situations where the number of iterations is not fixed in advance. The loop evaluates the condition at the beginning of each iteration before executing the code.
Let's see an example of a simple while loop in C#:
Output
-
do-while Loop: Similar to the while loop, but the condition is evaluated after the loop body executes, ensuring that the loop is executed at least once. Unlike the while loop, the condition is evaluated after the code block executes, guaranteeing at least one execution. This is useful for scenarios where you want code to run before checking the condition.
Let's see an example of a simple do-while loop in C#:
Output
-
foreach Loop: The foreach loop is used to iterate over elements in collections like arrays, lists, or other enumerable objects. It automatically iterates over each element within the collection, executing a specified code block for each element. This loop is ideal for efficient and straightforward traversal of collections.
Let's see an example of a simple foreach loop in C#:
Output
These loop types can be combined with conditional statements (if, else, switch) to create more complex control flows within your program. It's important to ensure that loop conditions can eventually become false to prevent infinite loops.
Conclusion
- C# is a versatile programming language developed by Microsoft for various applications.
- Visual Studio is a popular IDE for C# development, while Visual Studio Code is a lightweight alternative.
- The main method is where program execution begins.
- Namespaces organize code and prevent naming conflicts.
- Value types directly hold data (int, double) and reference types store references to data (string, objects).
- if,if-else, and if-else-if statements control code execution based on conditions.
- for, while, and do-while loops repeat code based on conditions.
- foreach loop iterates over collection elements.