How to use Firebase Messaging in Flutter?
This article guides readers on integrating Firebase Cloud Messaging (FCM) into a Flutter app, enabling targeted notifications for individual or group users. FCM, a robust push notification service from Firebase, ensures timely user engagement in today's competitive app environment. The tutorial elucidates FCM's advantages, illustrating its pivotal role in augmenting user interaction and app efficiency.
What is Firebase Cloud Messaging?
This is how Firebase Documentation describes Firebase Cloud Messaging:
Firebase Cloud Messaging (FCM) is a cross-platform messaging solution that lets you reliably send messages at no cost.
Firebase Messaging in Flutter provides features such as:
- Using FCM, you can notify a client app that new email or other data is available to sync.
- You can send notification messages to drive user re-engagement and retention.
- For use cases such as instant messaging, a message can transfer a payload of up to 4000 bytes to a client app.
- FCM also allows you to send a message from the client app.
Here is an official introduction video that describes what Firebase Cloud Messaging does.
While this video perfectly describes what is FCM, we should look a little further down and understand how FCM works under the hood.
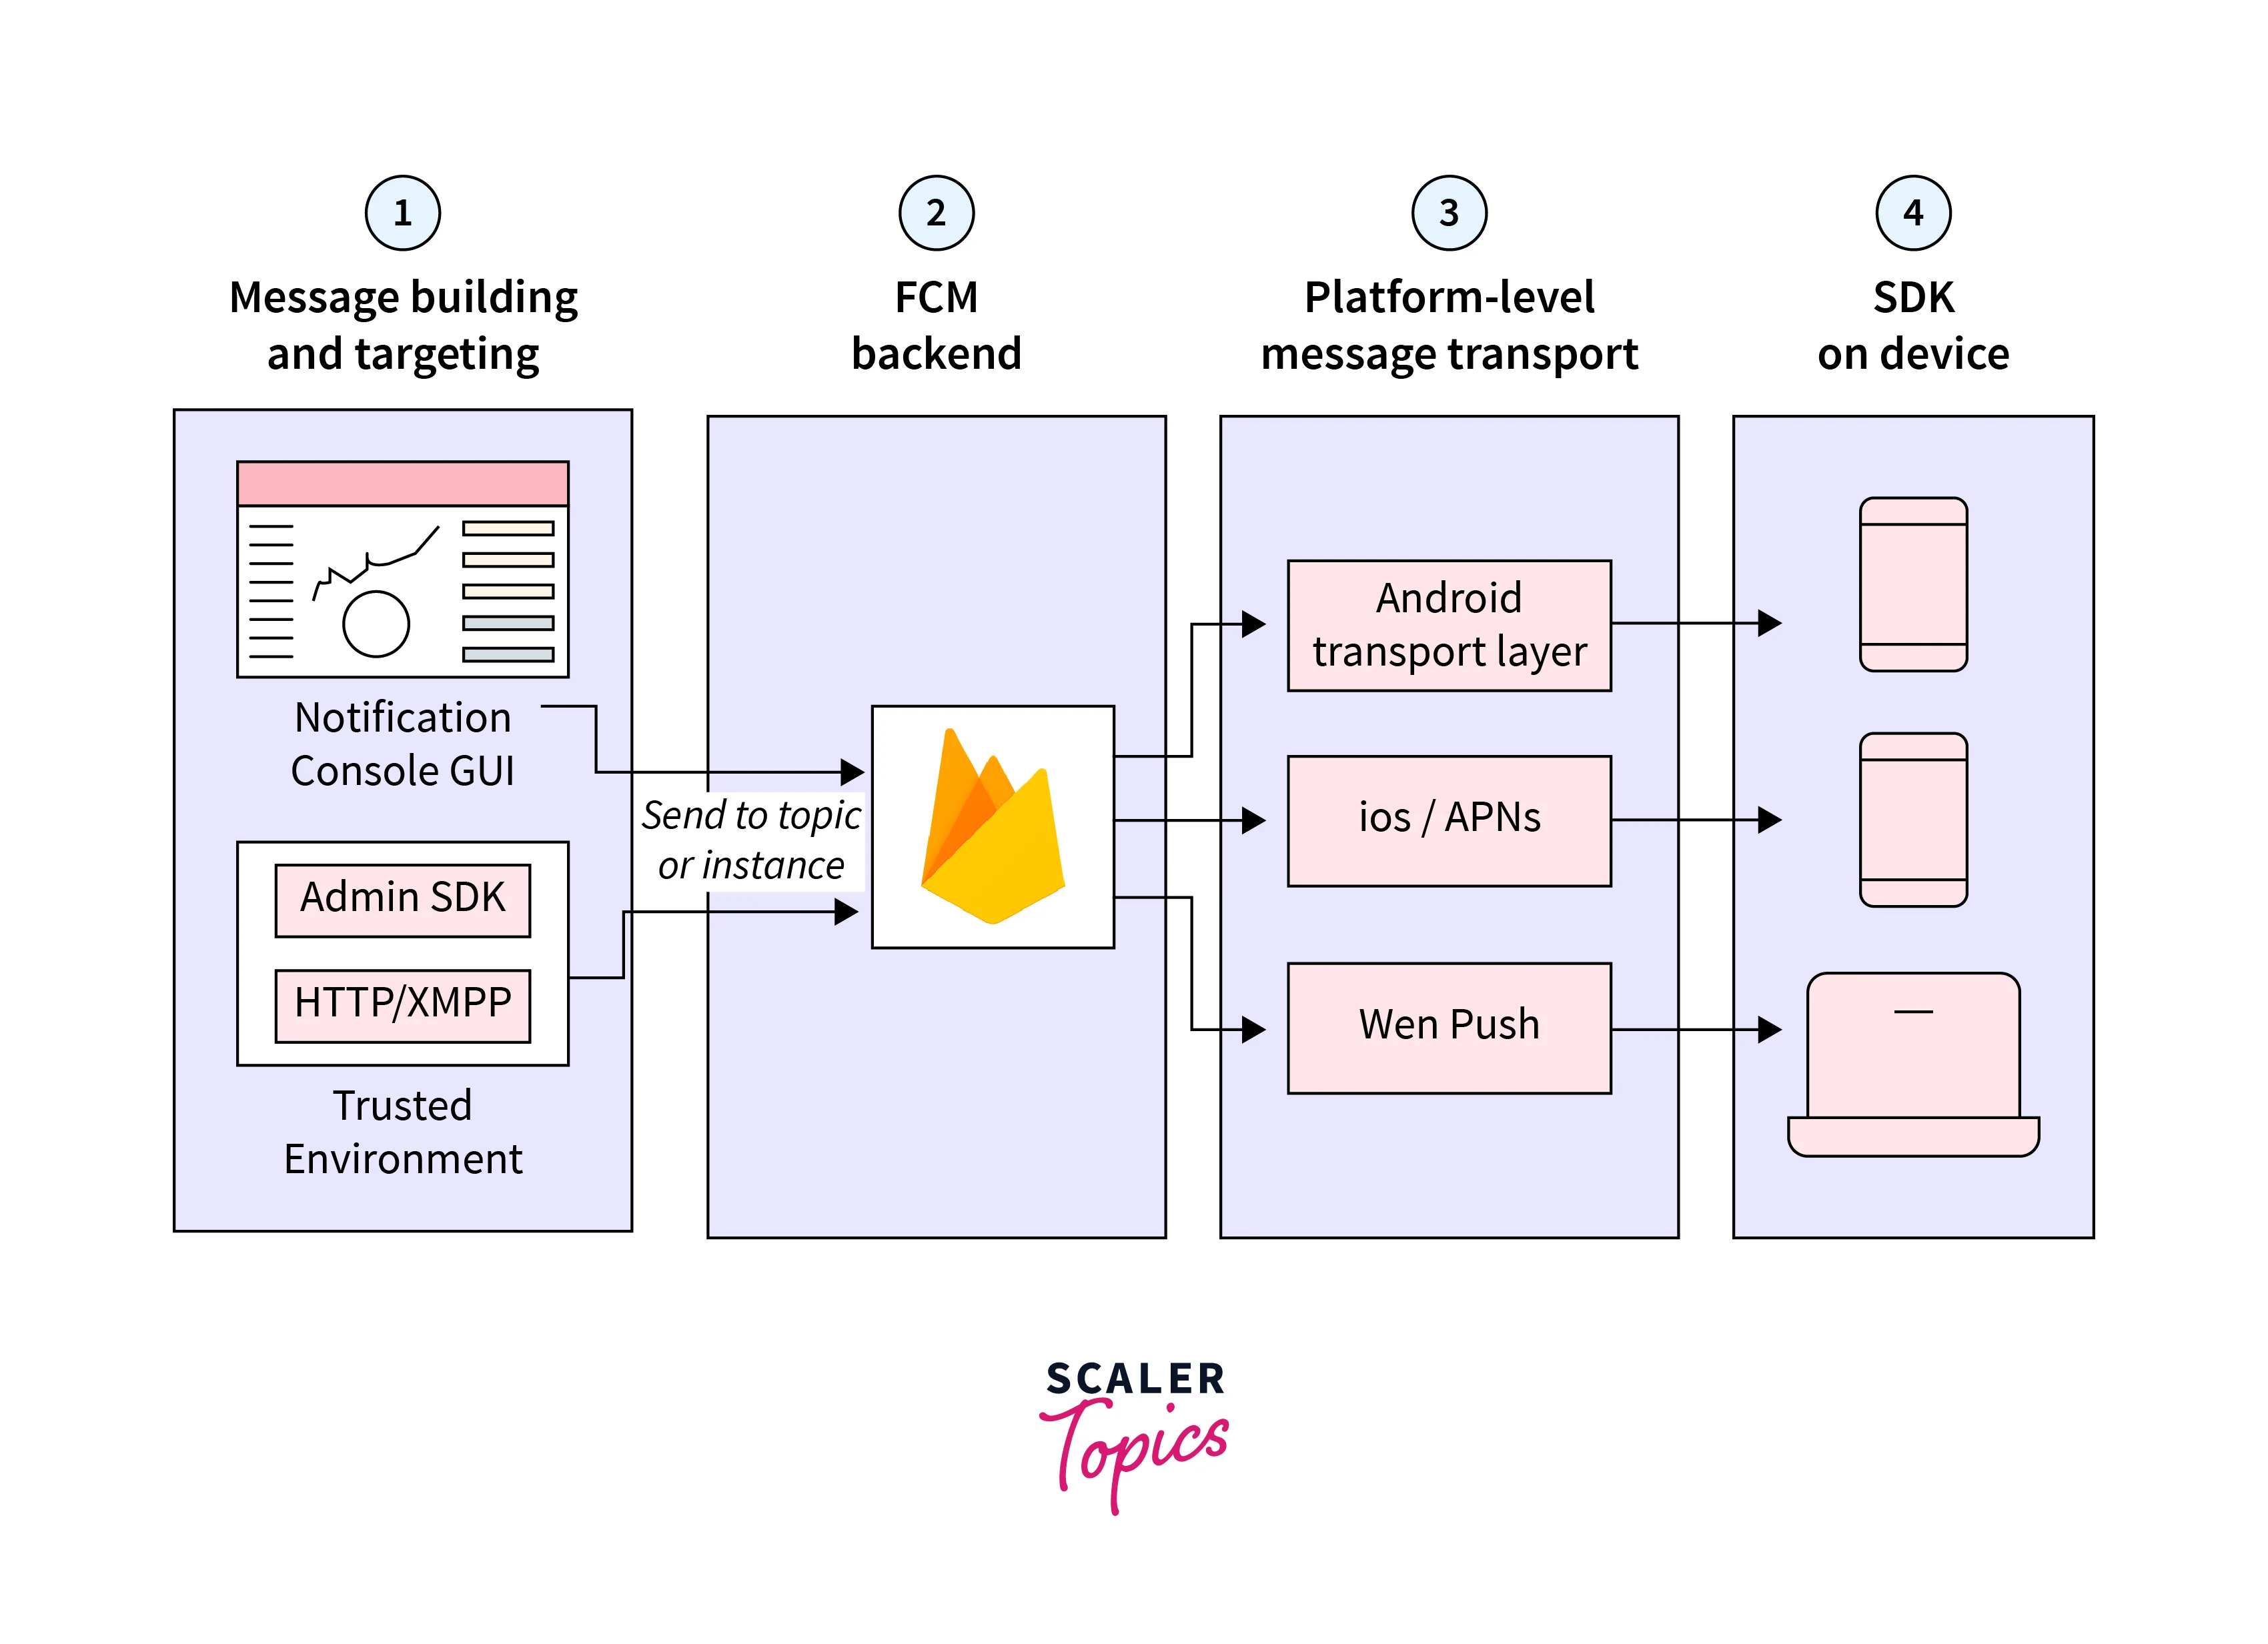
Let's start by breaking the components down:
- You start by creating a message with all the details using a Notification Composer which is a User Interface that helps in composing messages. There is also an option of creating your server which supports Firebase Admin SDK or` FCM server protocols. Using your server helps you with complete automation. But the Notification Composer provided by Firebase is enough for sending out notification messages.
- This request then goes to Firebase Backend which generates all the metadata like the message id, among others.
- This request is then routed to the targeted device, through the platform-level transport layer, which handles message delivery, and applies platform-specific configuration where appropriate. For Android devices, Android Transport Layer is used. For iOS, APN (Apple Push Notification) service is used and for web apps, Web Push Protocol is used as a transport layer.
- And at last, the device using Firebase SDK handles receiving the messages/notifications and performs an action based on application logic.
Types Of Messages
Let's start from the basic. FCM mainly offers two kinds of messages.
- Notification Messages: Notification messages are the ones that are handled by the Firebase Messaging SDK in Flutter. They are often called "Display Messages".
- Data Messages: These are the type of messages that are handled by the client app.
Let's go deeper into the details of both types of messages.
The Notification Message
Notification Messages are the ones that are displayed in the notification tray and they are used when you would want to deliver a notification to your user. They can be created using the Notification Composer provided by the Firebase Console or you can send them using your server, Postman, or terminal.
The Data Message
Data Messages are the ones that do not have a User Interface. They are used when you would want to sync emails or perform any kind of action in the client app. These messages are handled by the app and not by the Firebase FCM SDK. These messages cannot be created using Notification Composer as of today. They can be created and sent using your server or Postman.
Adding FCM To Flutter
Adding Firebase to a Flutter project has never been easier. With the new FlutterFire CLI, we can add a firebase for any platform in your project without leaving your editor.
1. Valid Flutter Installation
First, make sure you have a valid Flutter installation`. Run this command in your terminal:
If you see any issues after the command is executed, worry not, because the command also tells you how to resolve the issue. If you are still not able to solve it, feel free to comment.
2. Install Firebase CLI and Login
Second, make sure you have Firebase CLI installed, if not, here is how you can do it:
For Windows:
- Download the CLI binary for Windows.
- Open the binary, which will open a terminal where you can access the Firebase commands.
For Mac/Linux
- Run this command: curl -sL https://firebase.tools | bash
No more steps are needed for Mac/Linux Once you have Firebase CLI installed, now you can run:
firebase login
This will authenticate your terminal and give you access to the Firebase console. Once all of this is done, you can now install FlutterFire CLI.
3. Install FlutterFire CLI
In your terminal, use the command:
This will install the FlutterFire CLI and activate it. But to be able to access it from anywhere you will need to add it to your global path variable.
This is how you can do it:
Now we'll use the FlutterFire CLI for adding Firebase to our project.
4. Add Firebase Configuration File
Open your project in an editor and inside the terminal run the command:
The CLI will then ask you multiple questions in a series to register Firebase for you. Let's consider those:
- CLI will list all your Firebase projects that you have created earlier and will ask you to either select an existing project or create a new one. You can choose either of those options.
- It will ask you to choose the platform for which Firebase will be configured. Options, for now, include Android, ios, macOS, and Web.
- Once you select all the platforms, it will create a configuration file which will be added under the lib directory with the name: firebase_options.dart
If you face an error related to cocoa pods, you can refer to this link to resolve it.
When you open the newly created file, you'll see errors. That is because we haven't added the firebase_core plugin which this file uses.
Once this is done, let's initialize Firebase Messaging in Flutter.
5. Initialise Firebase in your project
Open main. dart and replace your main function like this:
And voila! All done.
Wondering if the platform-specific setup is done or not? Check your Android folder and you will see your build. gradle (app) and build. gradle (project) both have been updated. And a google_services.json file has been added under project_name > android > app > src. Similarly, all the steps are done for each platform. No need to worry.
Sending Messages Using Token
Tokens are ids that are created by Firebase Messaging in Flutter to recognize your device. Each device gets a token that can be used to send notifications from the server.
To generate the token in your client app, you need to first create an instance of FirebaseMessaging like this:
Then in initiate or any method, you can get the token using this function:
You can send this token to the server to collect tokens mapped to users and then send a notification from your server to a specific device if need be.
This token can change depending on conditions like app re-installs. More information can be found here.
You can use this function to check for new tokens provided by the Firebase Messaging SDK in Flutter after extending the FirebaseInstanceIdService.
Handling Message In the Foreground
Notification Messages:
Let's start by discussing Notification Messages. Notification messages provide a different functionality when they are sent using Firebase Console or your server (complaint with FCM rules).
After you have set up Firebase Messaging in Flutter, you can start sending notifications and the device will display those notifications.
When in the foreground (meaning your app is visible to the user), the SDK does not show any notification in the notification tray. Instead, if you do want to do something with that notification message, you need to register the onMessage function to do something with that message.
In your initState method, you can initialise the onMessage function which will receive the message if our app is in the foreground.
Remote Message is a class that represents a message sent by Firebase Cloud Messaging in Flutter.
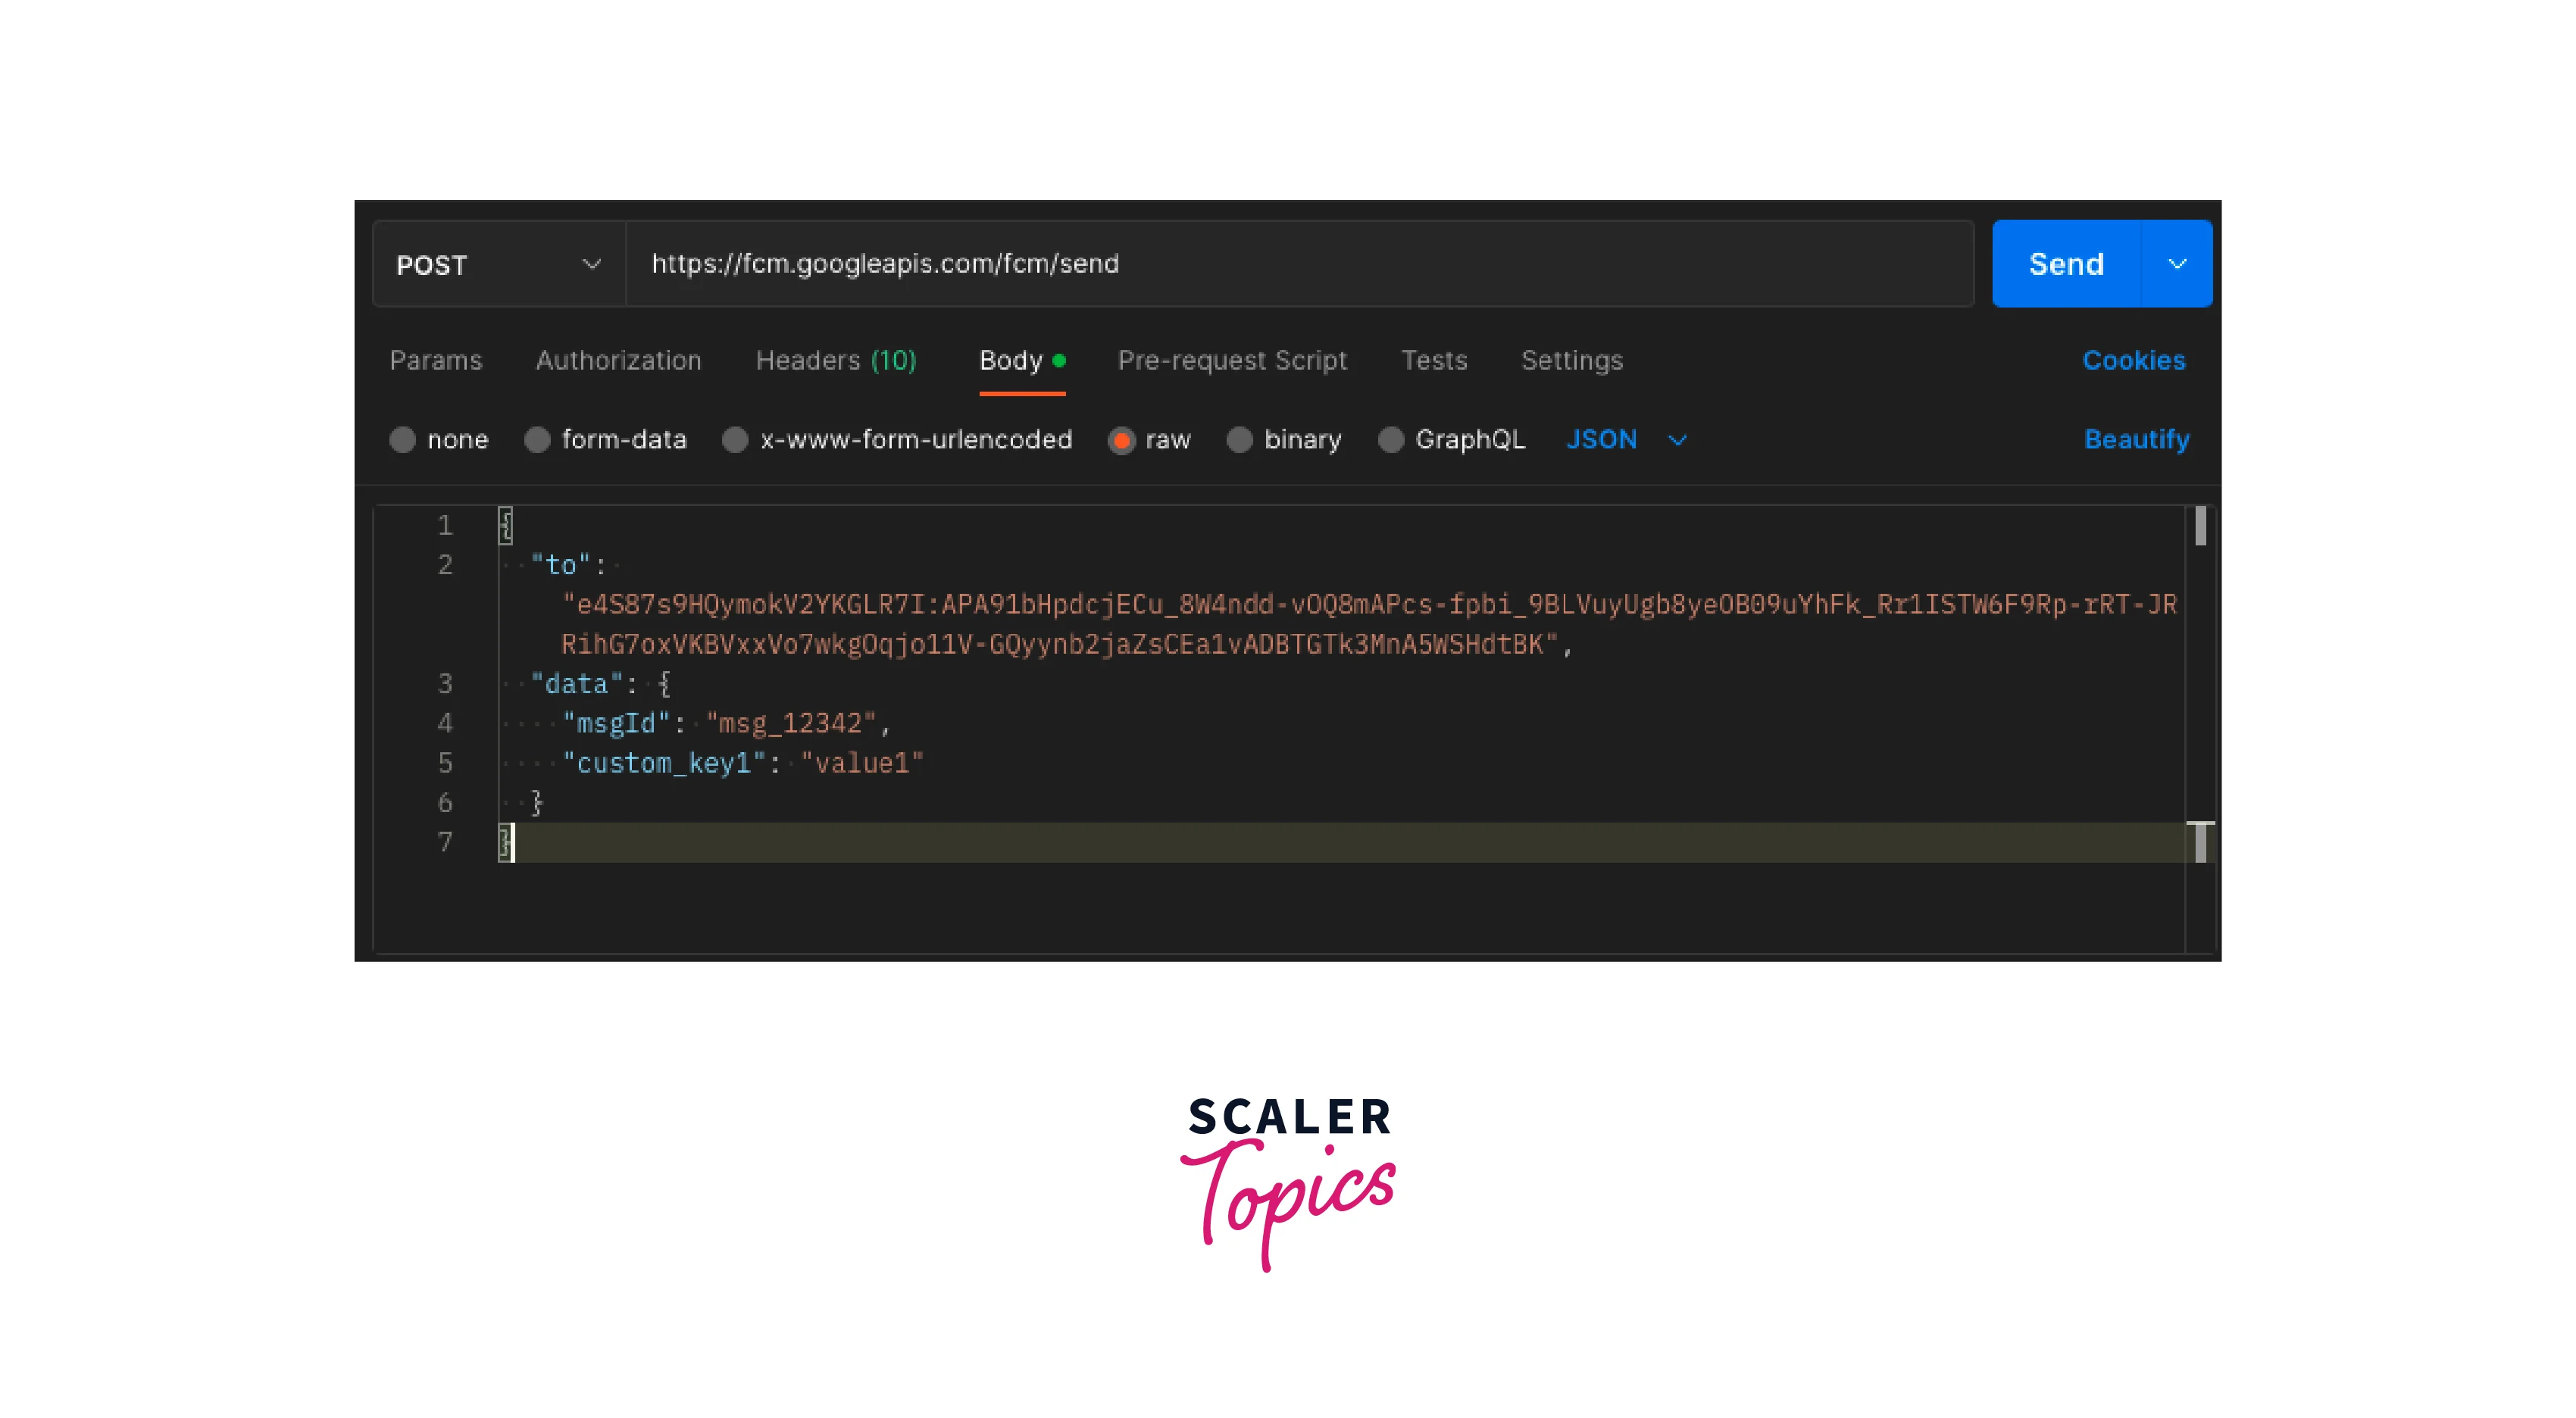
Data Messages For data messages, which only contain user-defined custom keys and values, you can send the message using Postman to try it out. You will need a server key from Firebase Console and then you can send the message like this:
And then add headers like this:
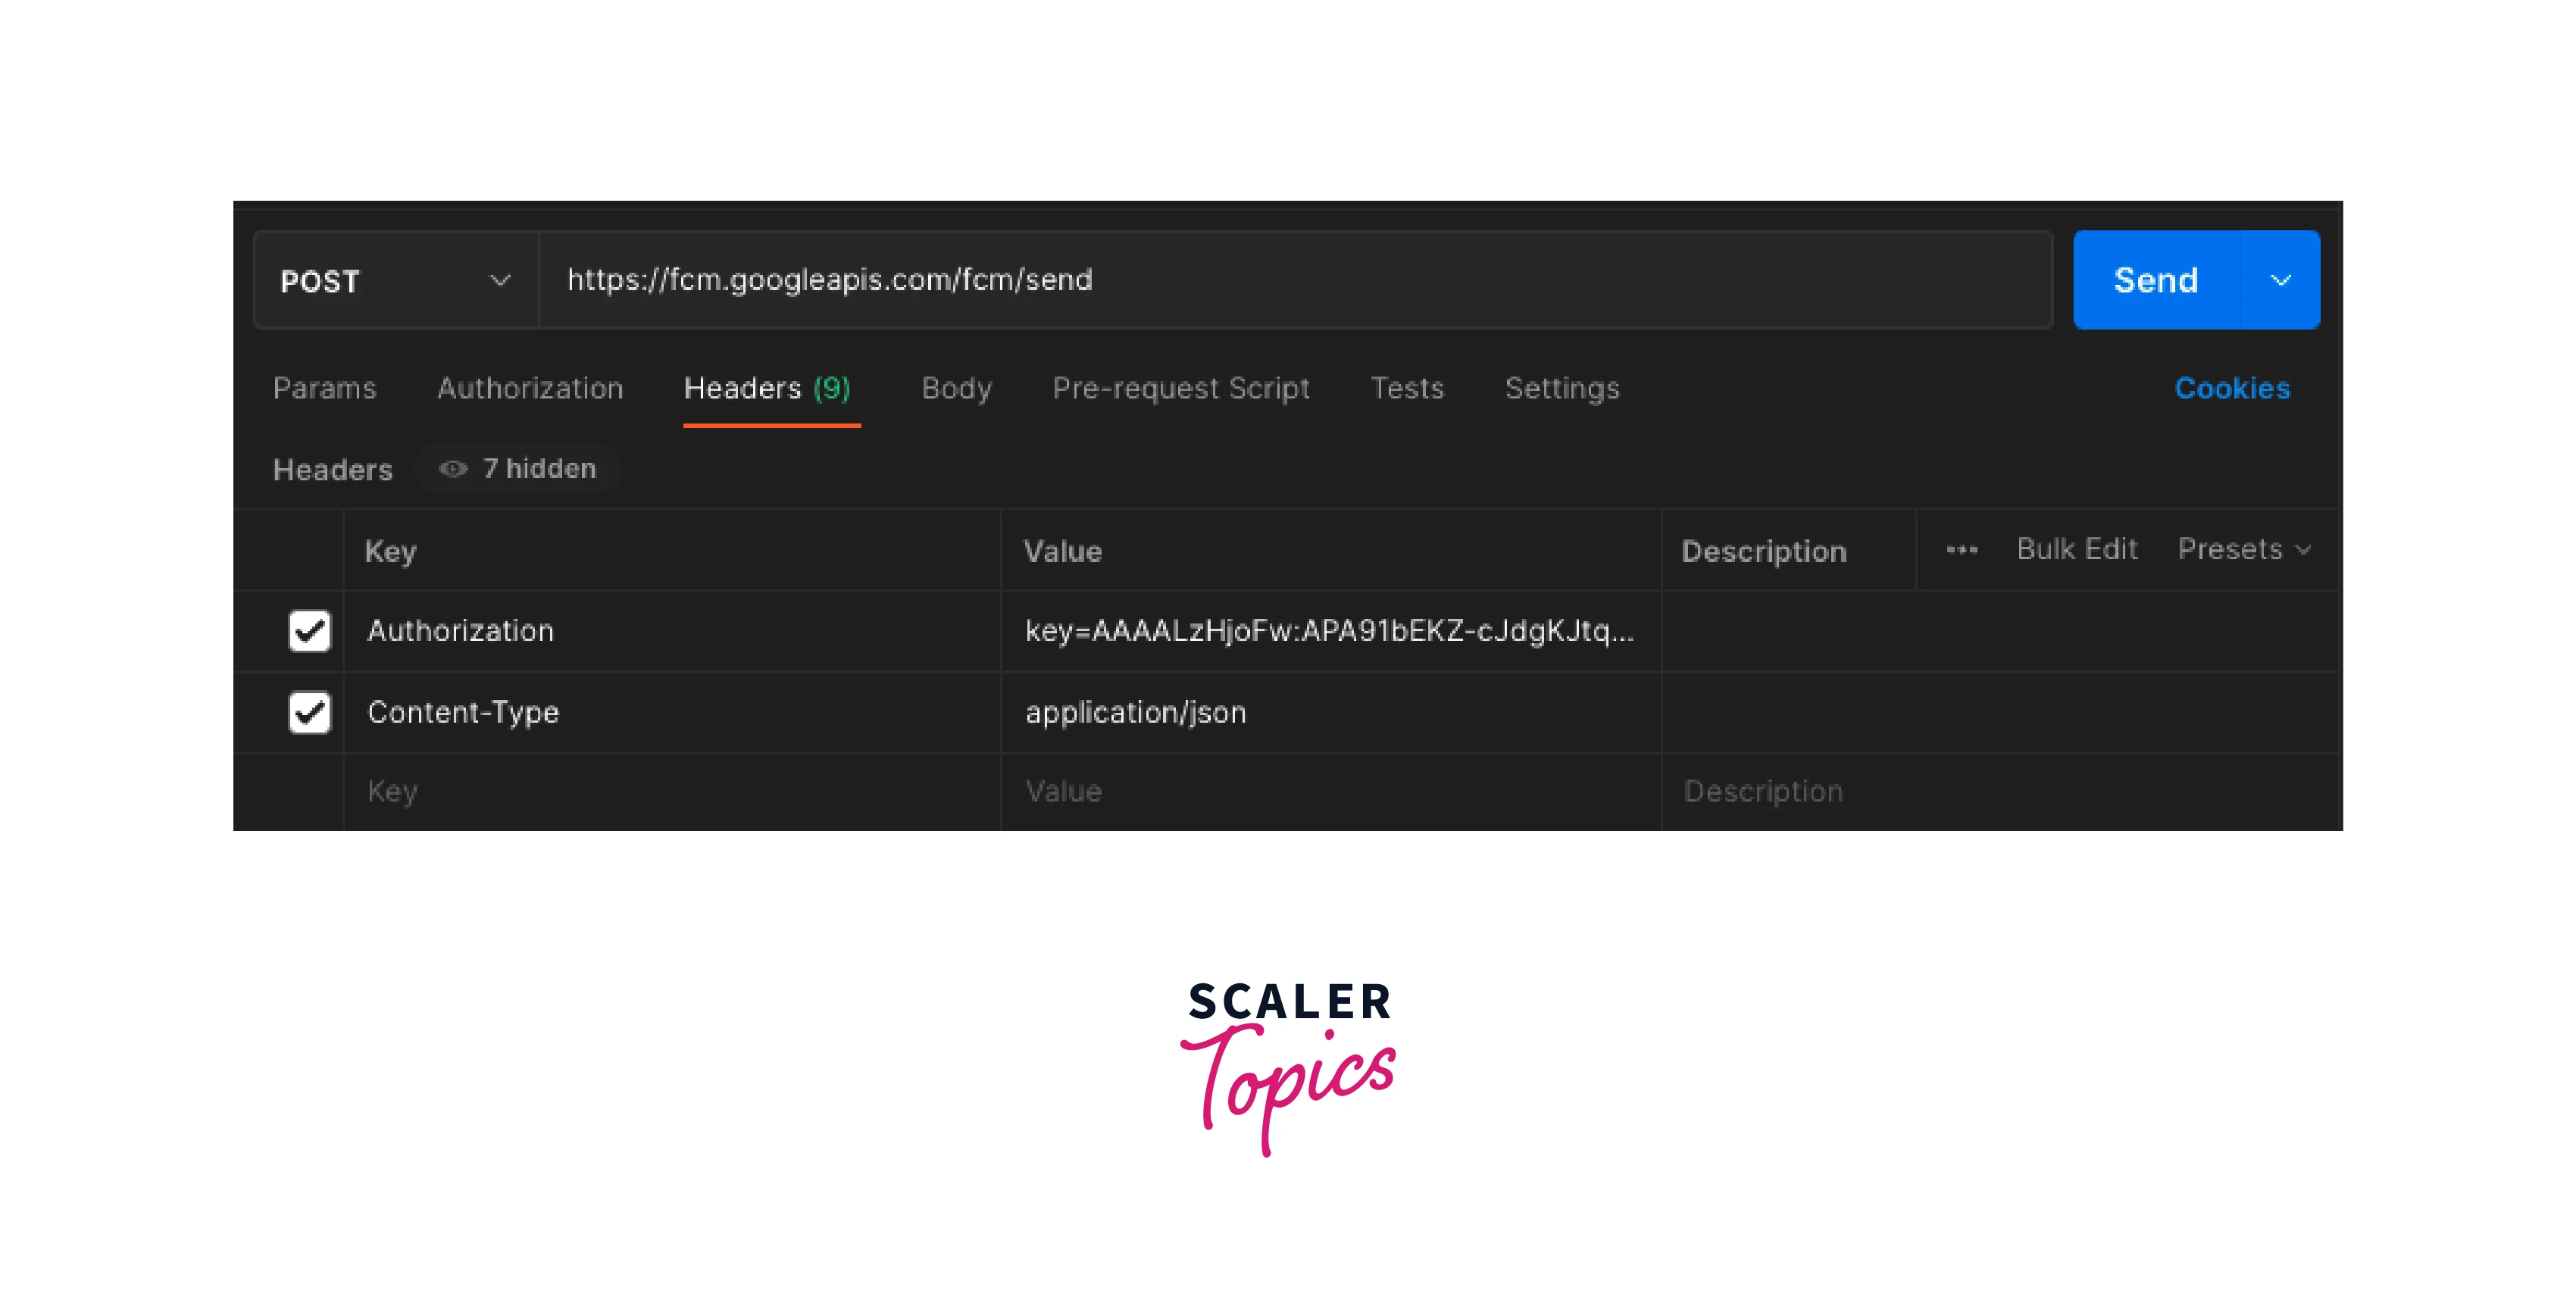
And hit send, and you will receive the notification inside the same function as discussed above but you will have to use the data value of the RemoteMessage rather than the notification value like this:
This will print like this in the console log:
And there will be no notification displayed just like a notification message.
Handling Message In Background
Notification Messages:
Notification messages, when received when the app is in the background, are displayed as notifications in the notification tray. You can register a callback using onBackgroundMessage to listen to the details of the message and do something when the user receives the notification.
You need to create a top-level static function and register it using the onBackgroundMessage callback.
If you want to do something when the notification is clicked, you can register an onMessageOpenedApp like this:
Data Messages:
For Data Messages, you will have to use the same two functions, onBackgroundMessage and onMessageOpenedApp to use them. Just make sure there is no notification value being used in Postman or your server while sending the data messages.
When the app is in a killed state, you will receive a callback inside onBackgroundMessage itself, for both, data messages and notification messages.
Sending Messages Using Topics
Topics are like channels. Certain users can subscribe to the topic, and then you can send the notifications to those users separately. Users who have subscribed to your paid services, can subscribe to topics and receive those Firebase Messages in Flutter.
To subscribe to a topic, you can do the following
Unsubscribing is also very similar:
Here, from-notification is a developer-defined topic name, it can be anything you want.
Then, once subscribed, you can send the notification from Firebase Console like this:
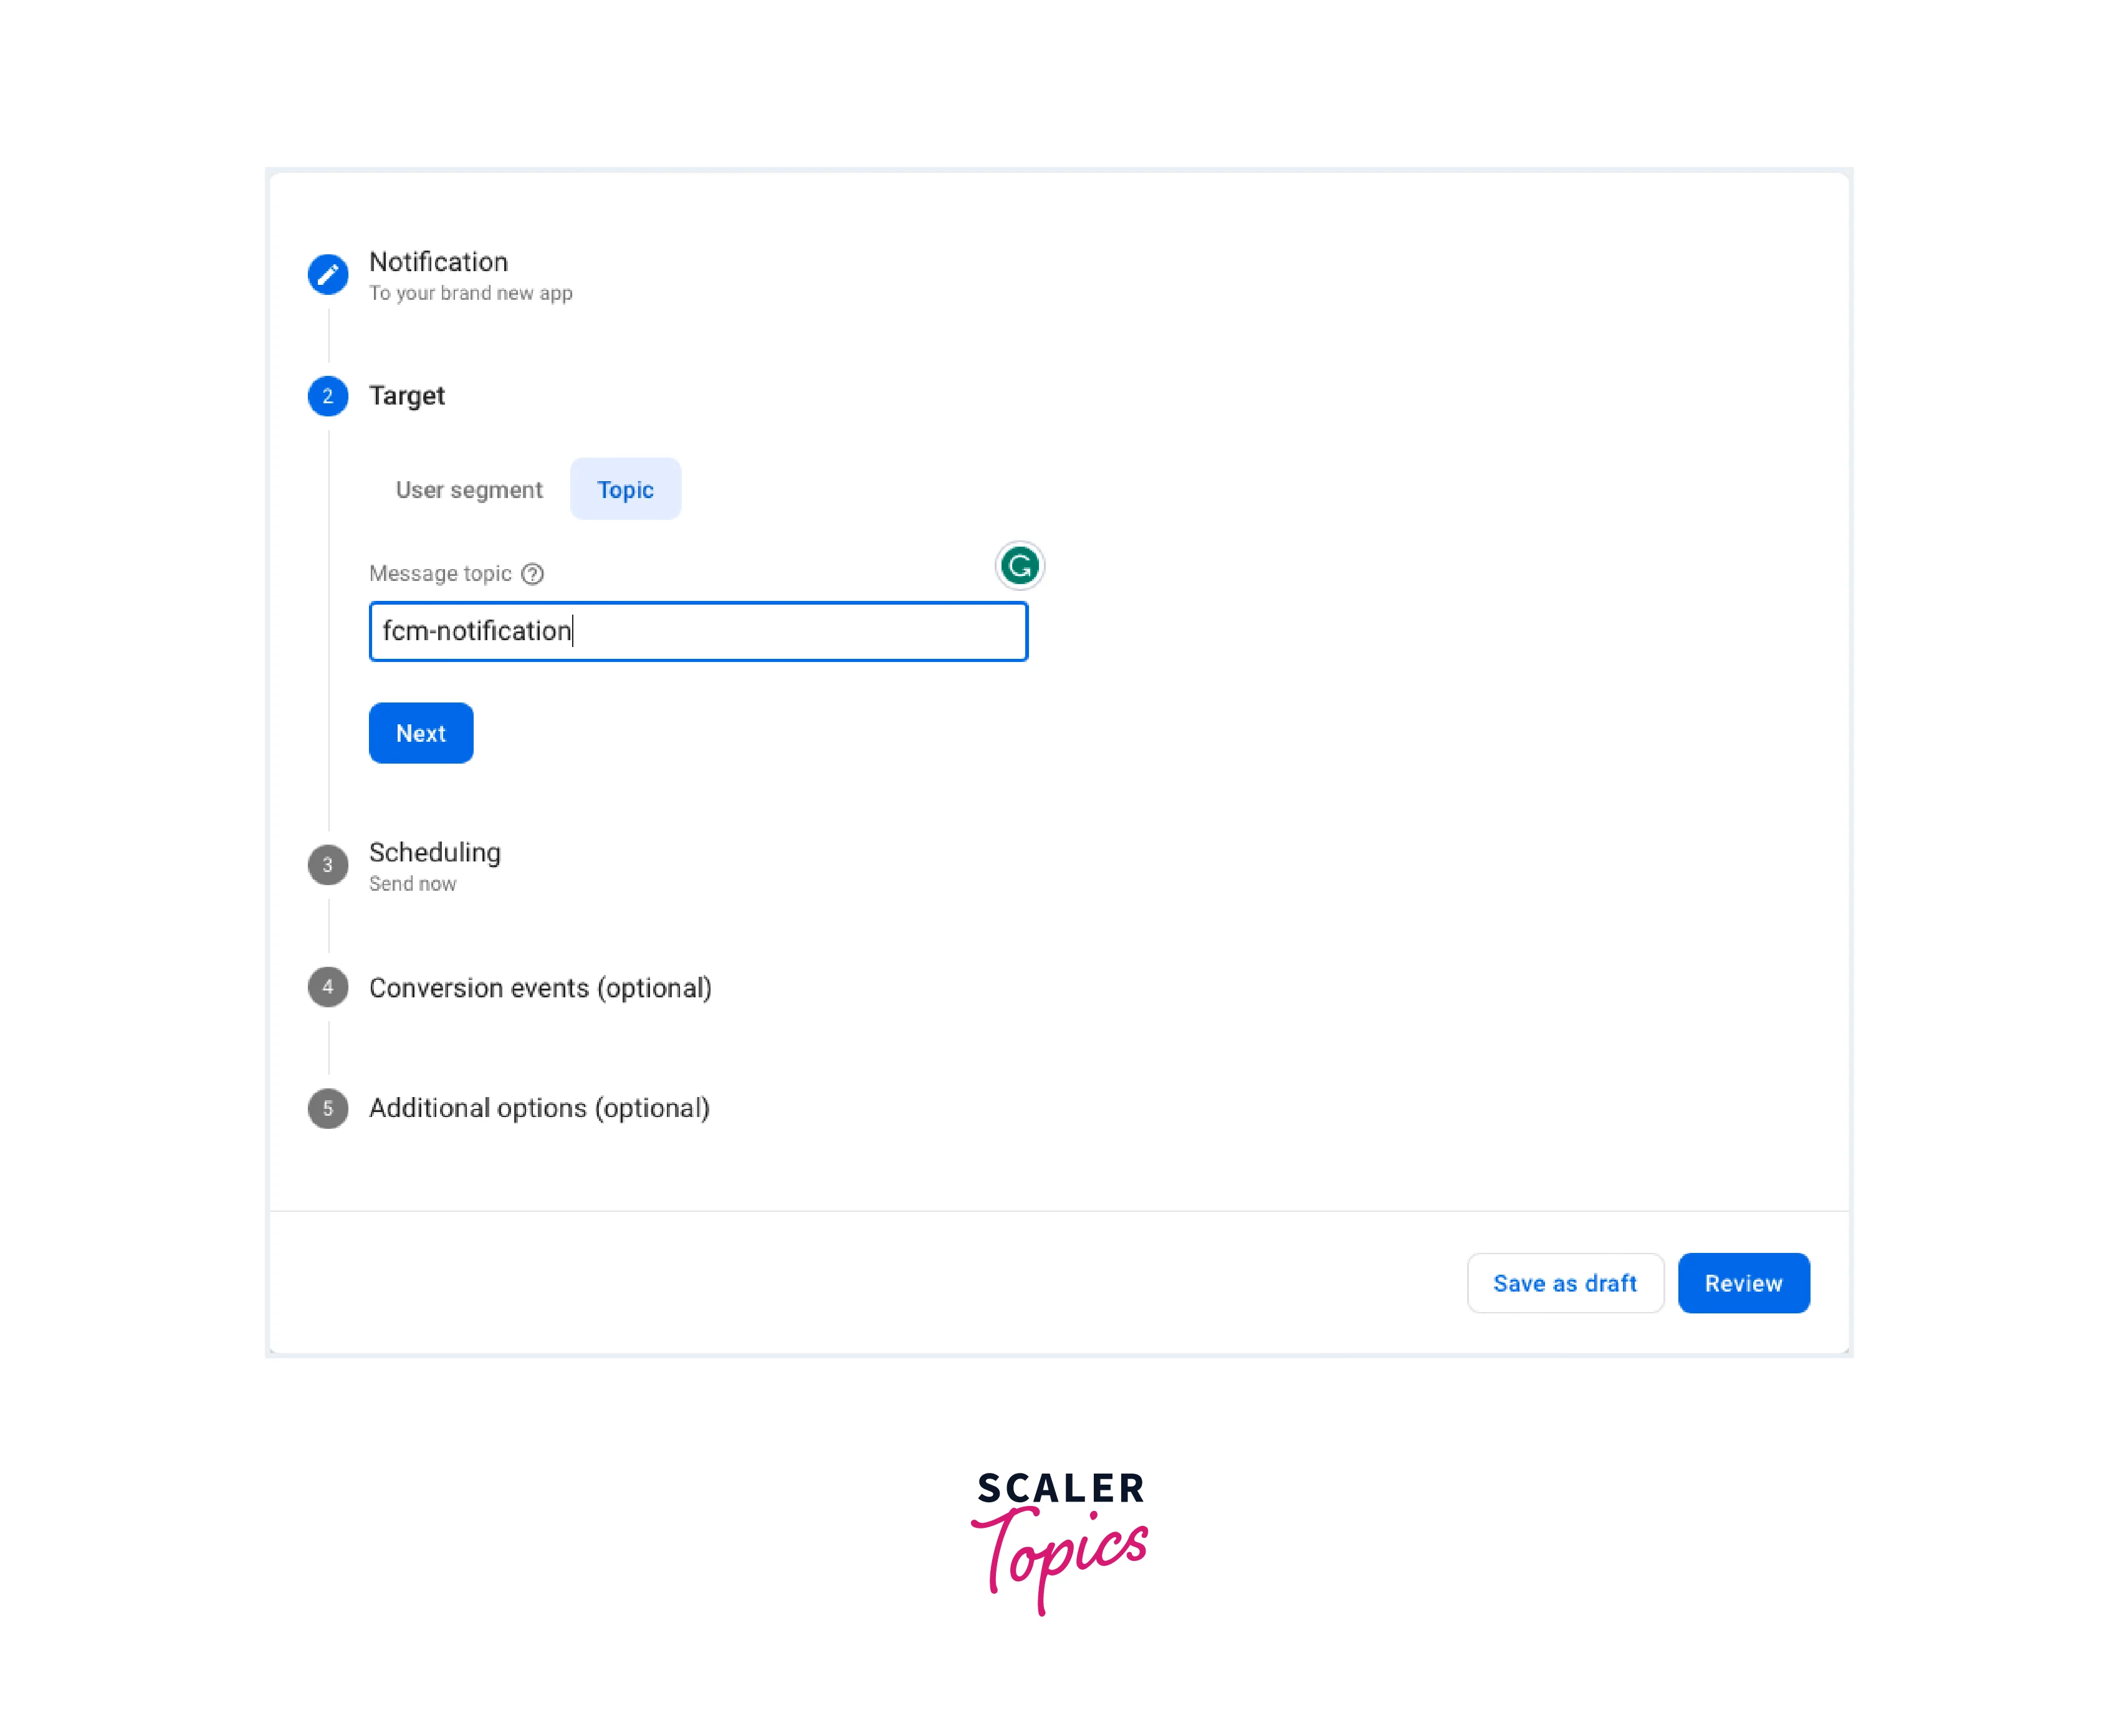
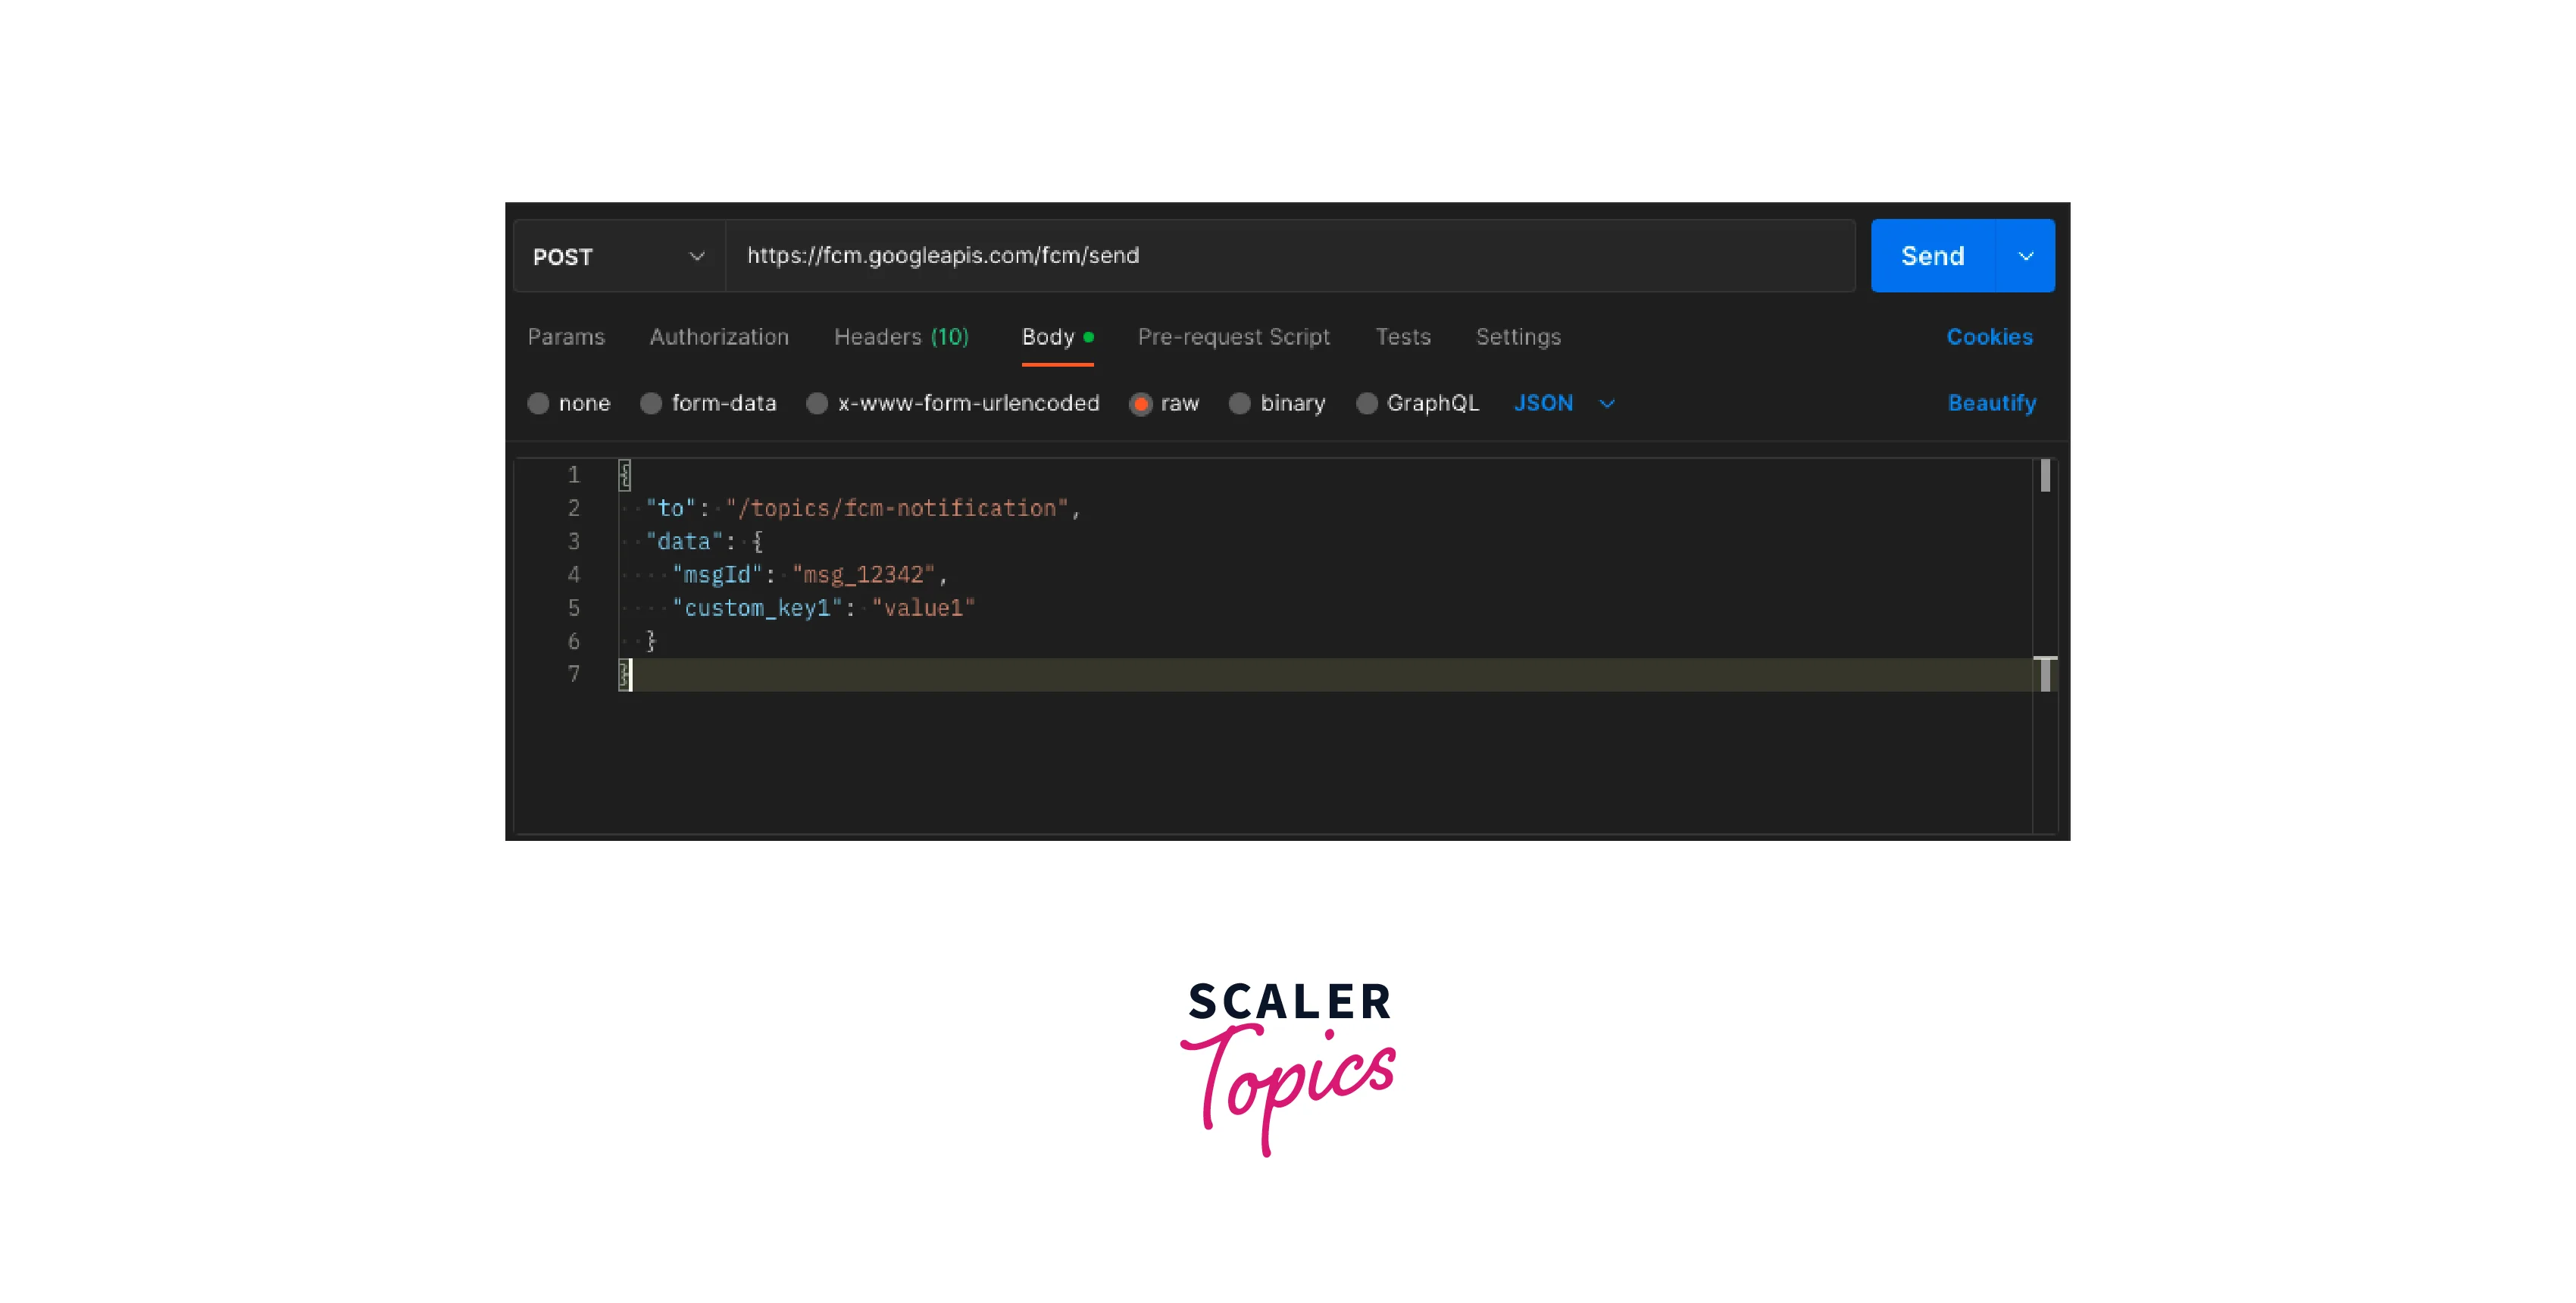
This will deliver the notification message. To deliver a data message, you can use the Postman similarly and the body like this:
Example App
To show you how the Firebase Messaging in Flutter works, let's create the main.dart's main function. Here is the Github Repository link if you want to follow along.
Let's create a MyApp widget that does the work of listening to messages.
What does this application do:
- main.dart First initialize the Firebase using a file we generated using FlutterFire CLI.
- It registers a callback for receiving the background messages using onBackgroundMessage
- Then main.dart creates the MyApp widget that listens for messages.
- We then register two callbacks namely, onMessage and onMessageOpenedApp which are called when a message is received (notification or data) when the application is in the foreground.
Conclusion
- Firebase Cloud Messaging (FCM) SDK can be used to deliver notifications and data messages to the client app when in the foreground, background, and killed state.
- To deliver notifications/data messages to the client app, one can either send to a single user, using tokens, to multiple users (using topics), or to all users.
- To receive messages when the app is in the foreground, you can use the onMessage callback to utilize the notification.
- When the messages are received in the background, you can use the onBackgroundMessage callback.
