Plugins in Flutter
Overview
Flutter plugins are crucial tools for extending app functionality across platforms. Plugins, which are packages that integrate native code and services, provide access to device capabilities, third-party APIs, and platform-specific functionality. Flutter developers may easily improve app features with a large range of officially supported and community-contributed plugins on pub.dev. This article will go deeper into Flutter plugins.
Introduction
A plugin is a package or library in Flutter that offers access to native platform capabilities or APIs. Because Flutter is a UI toolkit and framework aimed largely at mobile and web apps, it does not immediately cover all of the features and capabilities accessible on different platforms. Plugins fill this need by letting developers effortlessly add platform-specific code and services to their Flutter apps. Plugins are often written in Dart and have a native code counterpart on Android (Java/Kotlin) and iOS (Objective-C/Swift). These plugins are made available as packages on pub.dev, Flutter’s official package repository.
How Things Work in the Background?
Flutter's platform-specific API is based on message forwarding, which occurs in two parts. To begin, Flutter communicates with the host via the Platform channel, with the host being the iOS or Android component of the app. Second, the host receives messages over the Platform channel, then executes platform-specific APIs using the platform's native programming language and asynchronously returns feedback to the Flutter app.
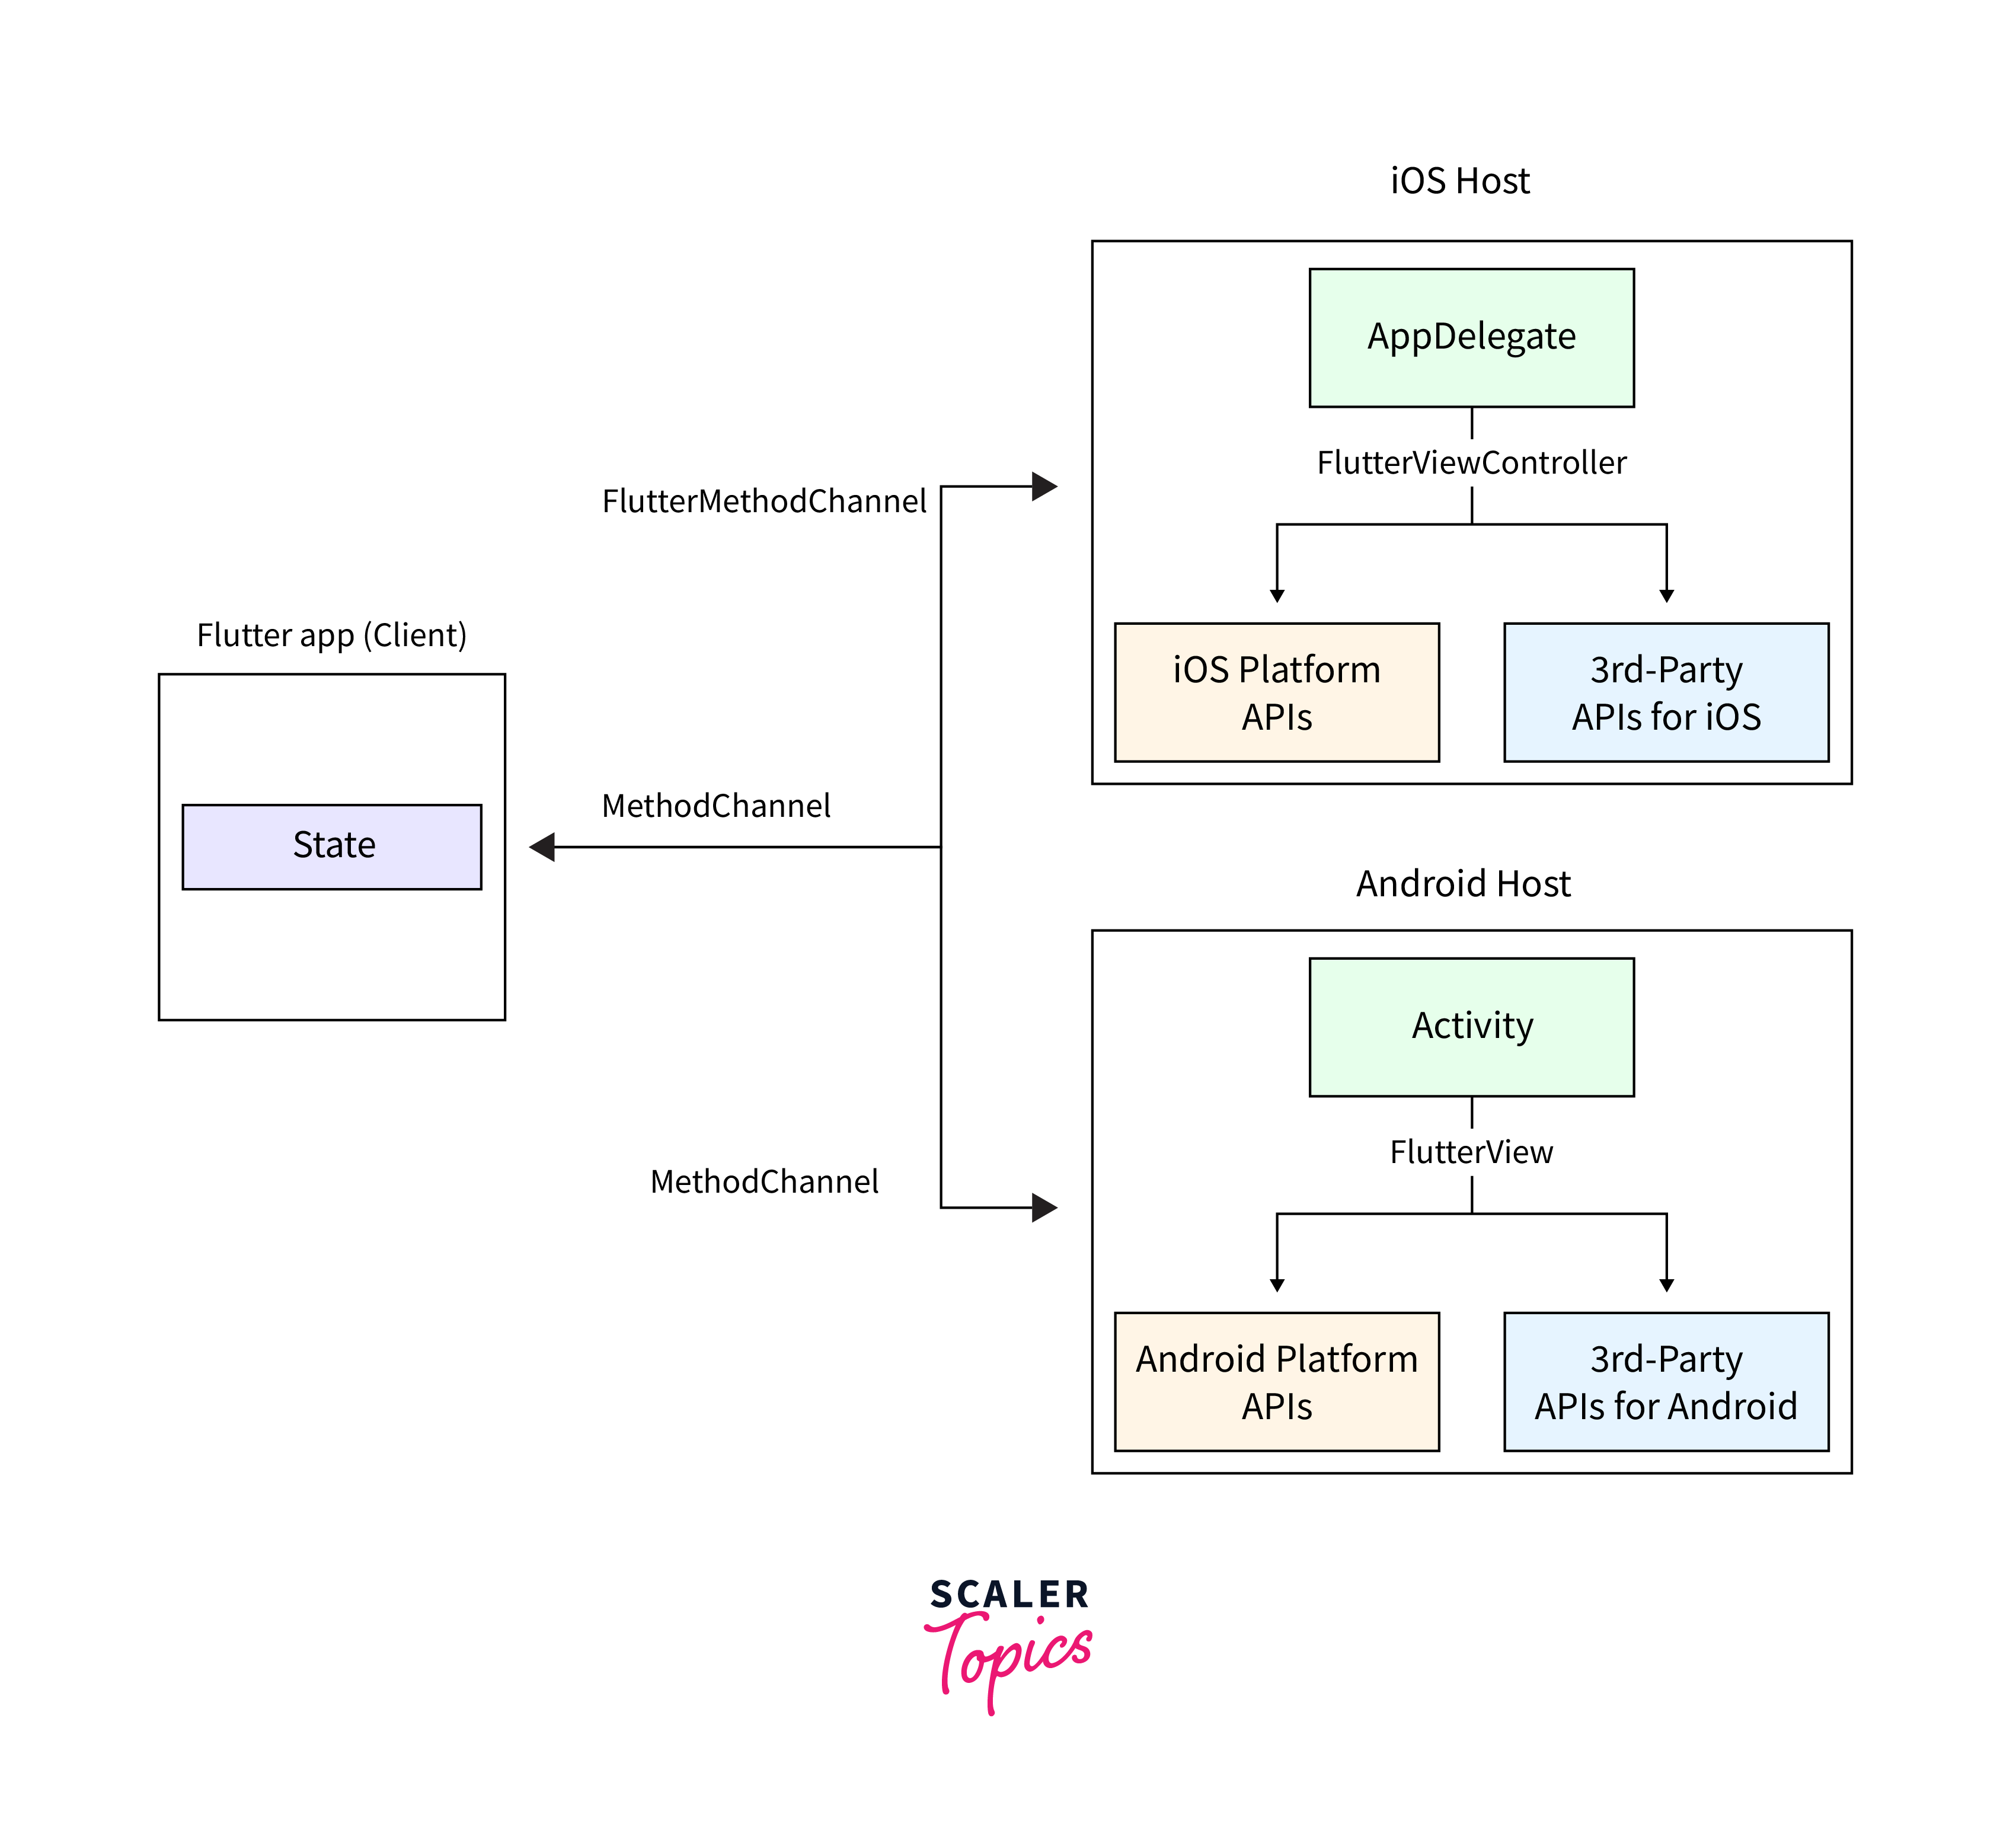
In detail, the MethodChannel is used on the client side to send messages, while the MethodChannel on Android and FlutterMethodChannel on iOS is used on the host side to receive and send messages. The goal of doing all of this is to utilize as little boilerplate code as possible.
Working with Officially Supported Plugins
Working with Flutter plugins that are officially supported is a simple procedure. Flutter has a library of plugins, known as official plugins, that are maintained by the Flutter team and span a wide range of capabilities and APIs. These plugins are well-maintained, constantly updated, and designed to operate with Flutter applications easily. The FlutterDevs team created their plugins for basic day-to-day needs such as an image plugin that pulls pictures from a storage called image_galley, a QR plugin that scans and creates QR codes, a camera plugin, and a location plugin, which we'll go over in detail below:
1. image_gallery:
A flutter plugin for displaying all of your photographs from the storage. Its usage is as follows:
2. qr_utils:
A flutter plugin for creating and scanning QR codes. This plugin can read 1D barcodes and 2D QR codes. Its usage is as follows:
3. camera_utils:
A flutter plugin that allows you to capture an image, choose an image, capture a video, pick a video, and pick a thumbnail from a movie. Its usage is as follows:
Here's how to use officially supported Flutter plugins:
-
Browse the official plugin list:
Visit the Flutter website or go directly to the pub.dev website and search for Flutter in the package search box to get a list of officially approved plugins. The official plugins tagged with the Flutter Team emblem will be displayed in the results.
-
Select a plugin:
Browse the list of plugins and choose the one that corresponds to the functionality you want in your project. Each plugin's pub.dev page will have thorough information on its features, how to use it, and code snippet examples.
-
Add the plugin to your pubspec.yaml:
Once you've decided on a plugin, include it in the dependencies section of your project's pubspec.yaml file.
-
Run command:
After you've added the plugin dependency, run flutter pub get to obtain the plugin and its dependencies, and then import and use the plugin.
Adding Third-Party Plugins
Adding third-party plugins to a Flutter app is a simple procedure. Pub, Flutter's package management, makes it simple to include external dependencies into your project. Here is a step-by-step tutorial for adding third-party plugins in your Flutter app:
-
Open your Flutter project:
In your favorite code editor, such as Android Studio, IntelliJ, or Visual Studio Code, open your Flutter project.
-
Find the pubspec.yaml file:
Locate the pubspec.yaml file in your project directory. This file is where you specify your Flutter app's dependencies.
-
Add the plugin dependency:
Add the appropriate plugin and its version to the pubspec.yaml file's dependencies section. The most recent version of the plugin may be found on the pub.dev website.
-
Run the command:
Run flutter pub get after adding the plugin dependency to acquire the plugin and its dependencies. This command will download the plugin and make it available in your project.
Your third-party plugin is now added to your project and ready to use.
Using Plugins in Flutter
Using plugins in Flutter is a simple procedure that allows you to extend the functionality of your app by adding platform-specific features and services. Here's a quick rundown on how to utilize plugins in Flutter:
-
Step 1:
Find a plugin, add it, and install the dependencies as described in the previous two sections.
-
Install the Plugin:
Import the plugin into the Dart code where you wish to utilize it. Put the following import statement at the start of your Dart file:
-
Use the Plugin:
Now that the plugin has been imported, you may utilize its APIs and features in your code. To discover how to utilize the plugin's functionality, consult its documentation or sample code.
For example, if you have the url_launcher plugin installed and want to open URLs, you may do it as follows:
-
Platform-Specific Setup (if required):
On the Android and iOS platforms, some plugins may require additional setup or configuration. Set up any needed rights, keys, or other platform-specific settings by following the plugin's documentation.
Following these instructions will allow you to efficiently utilize plugins in your Flutter app to add a variety of functions, such as accessing the device's camera, managing alerts, utilizing Google Maps, integrating Firebase services, and much more. Plugins are an important aspect of the Flutter ecosystem since they allow you to make use of native features while keeping your codebase cross-platform and efficient.
Customizing and Extending Plugins
Depending on the nature of the plugin and the level of modification required, you may customize it in a variety of ways in Flutter. Here are some typical methods for customizing plugins in Flutter:
-
Parameterized plugins:
Many plugins have parameters that allow you to customize their behavior. When you use the plugin's methods, these arguments are often supplied to them. The url_launcher plugin, for example, lets you customize the URL launch behavior by selecting whether to utilize the web view or the default browser.
-
Callbacks and Listeners in Plugins:
Some plugins have callbacks or listeners that allow you to receive updates or respond to events. The geolocator plugin, for example, allows you to listen for position updates and update the UI or execute particular actions when the user's location changes.
-
Platform-Specific Code:
Certain plugins may not offer direct modification choices for specific areas. In such circumstances, platform channels can be used to write platform-specific code. Flutter lets you call native code (Java/Kotlin on Android, Objective-C/Swift on iOS) and get results back in Dart. By integrating platform-specific logic, you may build particular behaviors for the plugin.
-
Forking or Contributing to the Plugin:
If the plugin is open-source and available on sites such as GitHub, you can fork the repository and make unique changes to meet your specific requirements. If you believe these improvements will be valuable to others, you may contribute them to the plugin's repository.
-
Wrapping the Plugin:
If a plugin does not provide the precise customization you want, you may develop a custom wrapper over the functionality of the plugin. This wrapper might give additional functionality or a more basic interface according to the needs of your project.
Remember to read the documentation for the plugin you're using to learn about the available customization options. Some plugins may be very customizable, but others may be more restricted in their settings.
In Flutter, expanding plugins now refers to improving or adding new functionality to existing plugins. In certain circumstances, you may discover that a plugin does not provide all of the capabilities you desire, or you may wish to further customize its behavior to fit specific needs. Rather than creating a new plugin from scratch, you may extend an existing one by expanding its functionality or adding new features.
Flutter plugins can be extended in numerous ways:
-
Creating a Wrapper:
Instead of altering the original plugin's code, you may wrap the plugin's functionality in a wrapper. The wrapper is a second Dart class or group of classes that uses the original plugin's methods while providing a more simple and user-friendly interface for your project.
-
Forking the Plugin:
If the plugin is open-source and published on a site such as GitHub, you can fork the repository and make changes directly to the plugin's source code. To make the plugin more customized, you may add new methods, tweak current ones, or add custom parameters.
-
Plugin Composition:
Combining capabilities from numerous plugins is another approach to extending plugins. You can develop a new plugin that utilizes current plugins internally to accomplish more sophisticated behavior or to give more functionality.
Keep in mind that extending plugins may need a thorough comprehension of the original plugin's code and may necessitate revisions if the original plugin is updated. If your extensions might be useful to the community, always test extensively and consider giving back to the original plugin's source.
Handling Plugin Compatibility and Upgrades
Handling plugin compatibility and upgrades in Flutter is critical for keeping the app stable and up to date. Here are some best practices for managing plugin compatibility and updates effectively:
-
Maintain Your Flutter SDK and Dependencies:
Keep your Flutter SDK and dependencies up to date. Check for updates regularly using the flutter pub outdated command to see if any plugins have newer versions available.
-
See the Changelog:
Before upgrading a plugin, see the changelog and release notes for the new version. Keep an eye out for any breaking changes, deprecations, or migration procedures that may be necessary to update your code.
-
Thoroughly test your app:
After updating a plugin or Flutter SDK version to ensure that all functionality and features are operating properly. Keep an eye out for any regressions or new concerns.
-
Backup or use Version Control:
Before making any big changes, consider building a backup of your project or utilizing version control systems such as Git to revert to a prior state if necessary.
-
Check for Deprecated APIs:
Look for deprecated APIs in the plugins you use. Deprecated APIs may be removed in future releases, so prepare ahead of time to update your code.
-
Breaking Changes:
If a plugin has breaking changes, thoroughly examine the modifications and modify your code accordingly. It might entail changing method names, and arguments, or implementing new patterns supplied by the plugin.
-
Check for Compatibility with Other Plugins:
Make sure the upgraded plugin version is compatible with the other plugins in your project.
-
Monitor Community comments:
Keep an eye out for community comments, conversations, and concerns with the plugins you're utilizing. This might provide you with insights into potential issues or workarounds.
-
Contribute to the Community:
If you discover problems or find answers throughout the update process, consider reporting them, sending pull requests, or offering comments to the plugin's repository.
-
Fallback strategy:
If you encounter serious problems during an update, have a strategy in place to revert to the prior version of the plugin until a solution is found.
Conclusion
- Flutter is a framework designed primarily for mobile and web apps, but it does not cover all of the features and capabilities accessible on different platforms. Plugins fill this need.
- These plugins are often written in Dart and have a native code counterpart on Android (Java/Kotlin) and iOS (Objective-C/Swift).
- Working with officially supported Flutter plugins is a simple procedure.
- Flutter has a library of plugins, known as official plugins, maintained by the Flutter team and spans a wide range of capabilities and APIs.
- The FlutterDevs team created their plugins for basic day-to-day needs, such as image_gallery, QR plugin, camera plugin, and location plugin.
- Pub, Flutter’s package management, makes it simple to include external dependencies in your project.
- Open your Flutter project in your favorite code editor, find the pubspec.yaml file in your project directory, add the plugin dependency, and run the command to acquire the plugin and its dependencies.
- In Flutter, plugins can be customized in various ways, including parameterized plugins, callbacks and listeners, platform-specific code, forking or contributing to the plugin, and wrapping the plugin.
- Extending plugins involves improving or adding new functionality to existing ones, such as creating a wrapper, forking the plugin, or combining capabilities from multiple plugins.
- It is crucial to test and give back to the original plugin's source if your extensions are useful to the community.