Configure VS Code for Golang
Overview
Golang configuration in VS code helps you write code more efficiently and bug-free. Go extension's main features are IntelliSense, code navigation, symbol search, testing, debugging, and many more that will help you with Go programming. In this article, we will see the detailed procedure to install, configure, and use.
Introduction
Before moving forward with the configuration, ensure you are already done with this.
Prerequisites:
- GO language
- Visual Studio Code
- GO Extension for Visual Studio Code
Configuration:
Step 1: Install GO extension in Visual Studio Code
- Click on extensions or use Ctrl+Shift+x.
- Enter "go" into the search box in the extension manager.

- Press the install button, then wait for the installation to finish.
- Run the Go: Install/Update Tools command after installation by pressing Ctrl+Shift+p to enter the command palette.
Select all of the tools from the list that appears, then click Install.
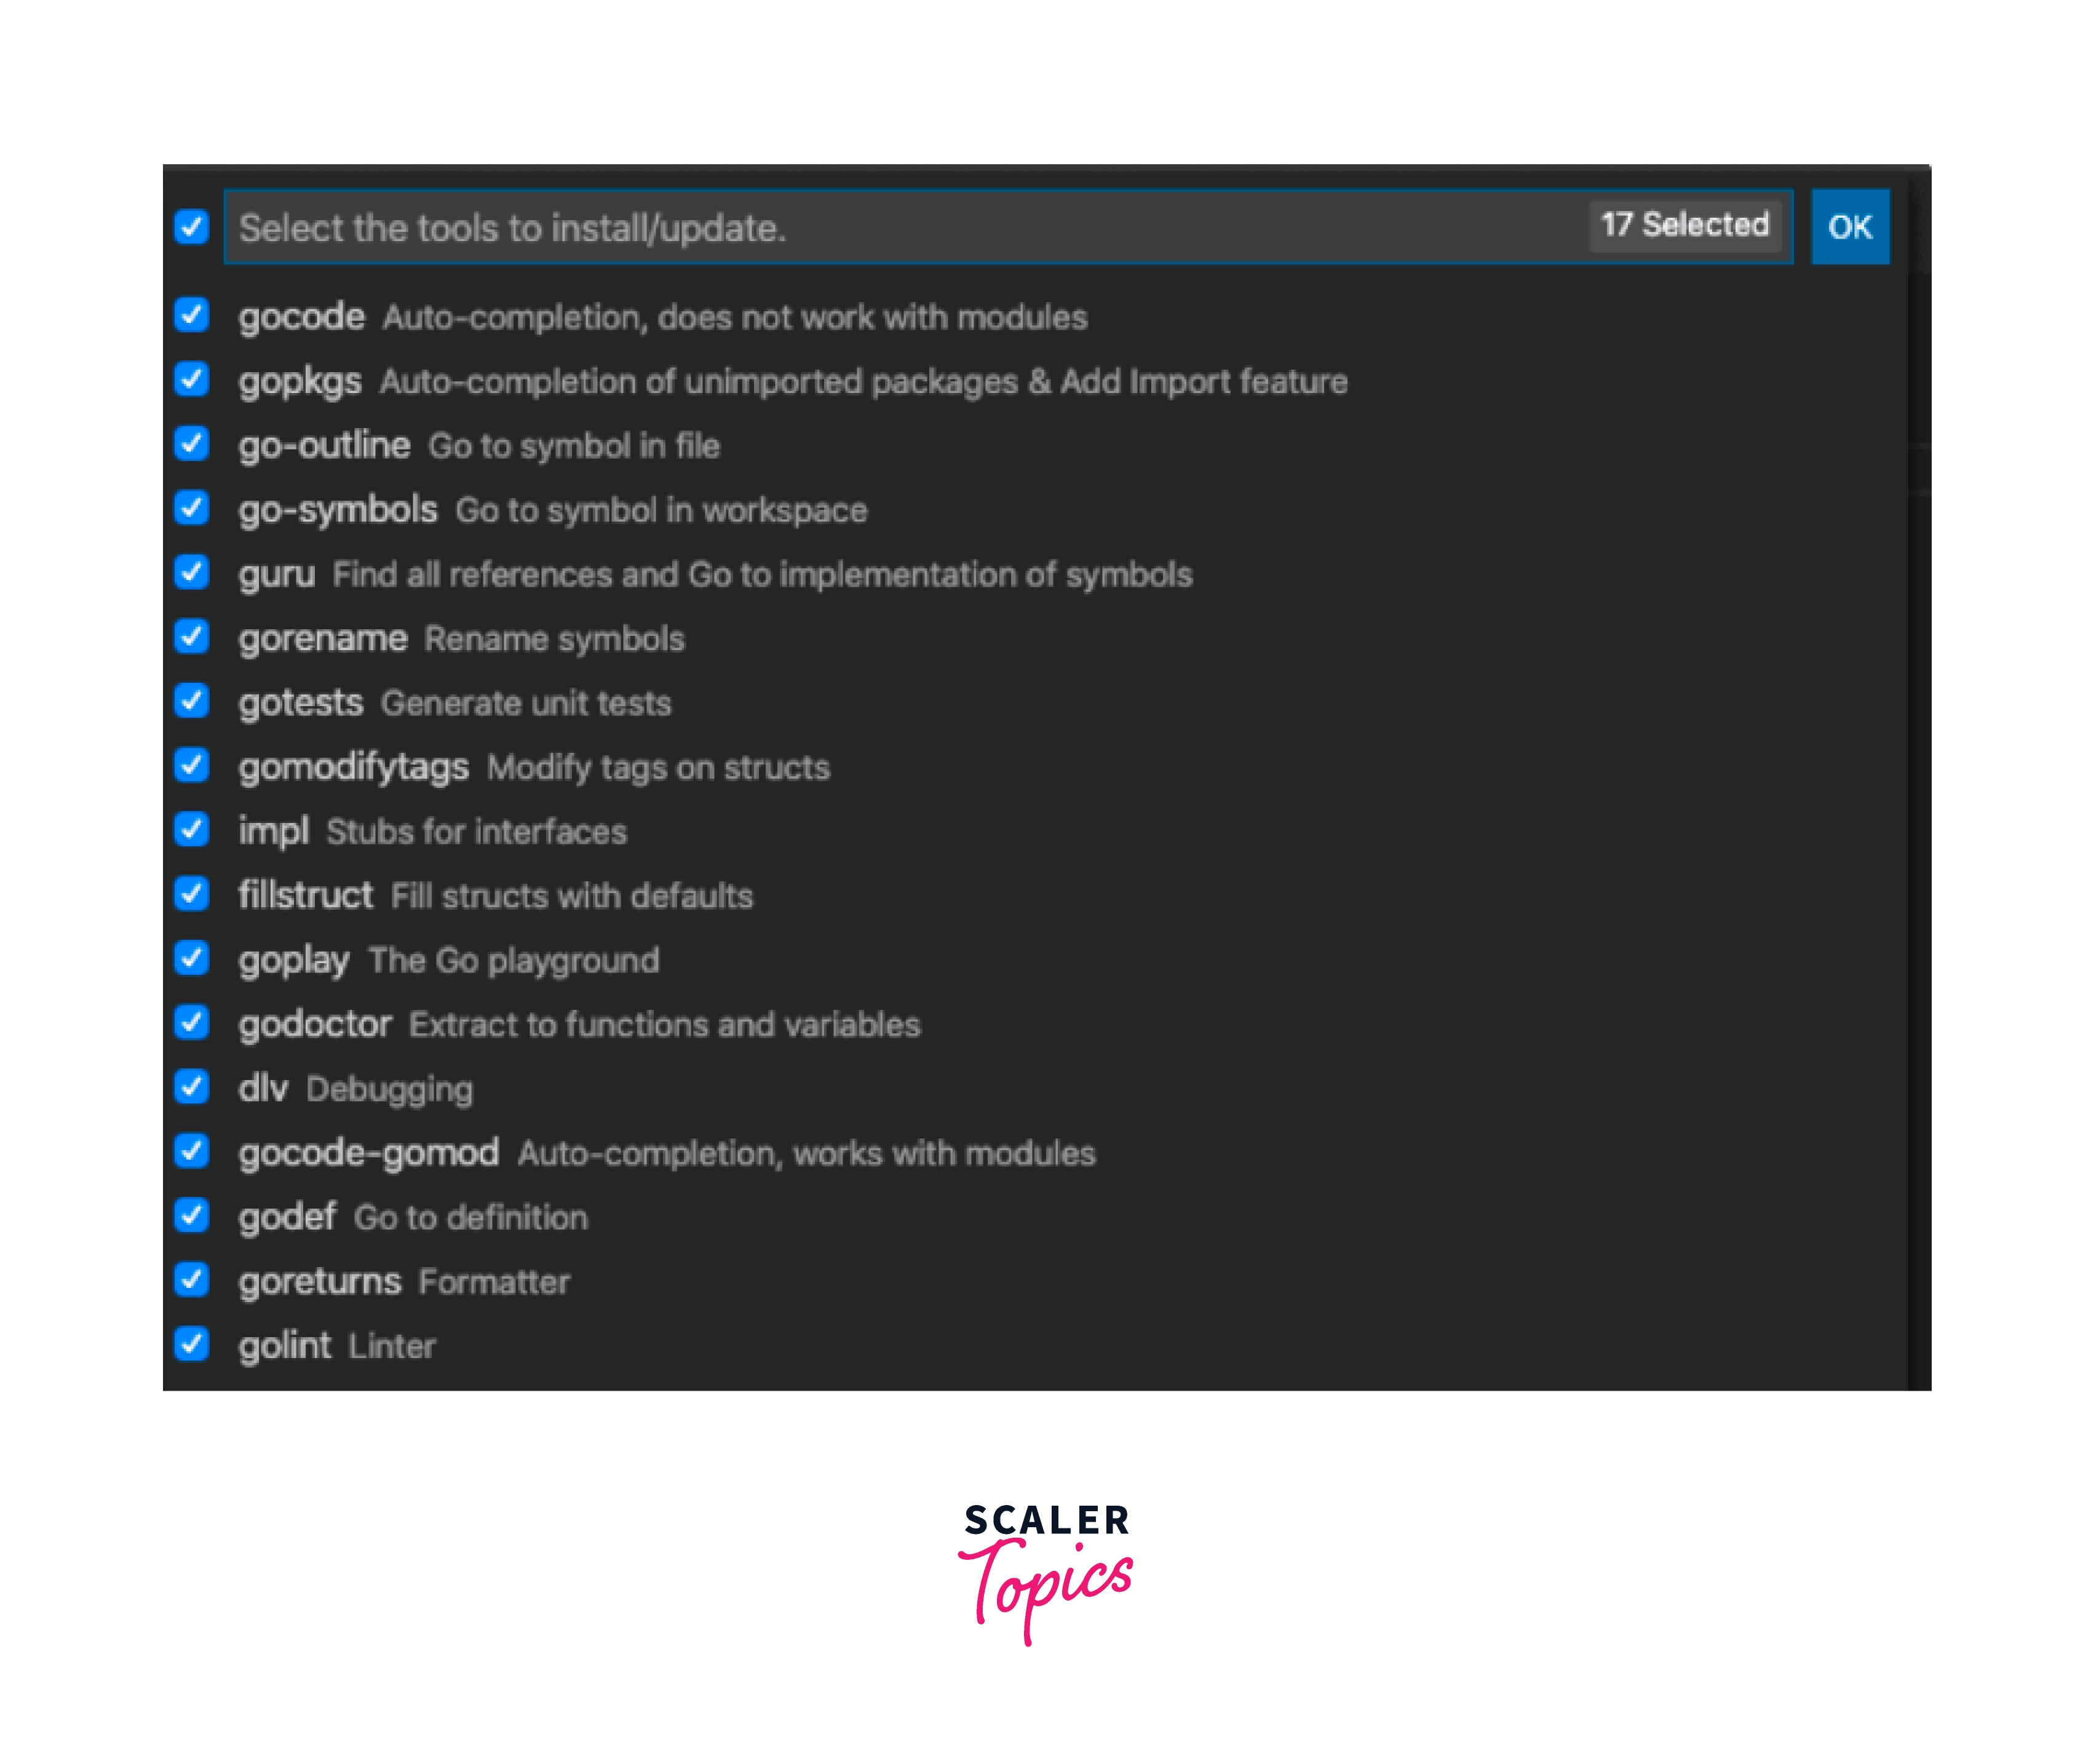
Now you can start developing in Golang.
Check by running Hello World:
main. go
And that's it.
Features of Go Extension:
- This extension works best with the latest Go version that uses Delve for its debug/test functionalities
- Set on all of Golangci's linters, and only display faults in the new code.
- Imports can be manually organized and code formatted before being saved.
- The extension organizes imports, prepares Go code, and by default deletes unnecessary imports.
- Code snippets that are already defined. When you type, these snippets will show up as completion suggestions. Additionally, users can create their unique snippets.
Linting
What is Linting?
During the development phase of any software product, you will encounter several problems and failures. There will always be a chance that you miss something, regardless of how good you are. Linting is one method for preventing such mistakes during development.
Linting is the process of checking source code for grammatical, and programming problems. When several developers are working on a project together, it also helps to adhere to acceptable coding standards. A tool known as a linter is used to perform linting.
Importance of the linting code:
- Identifying mistakes, typos, unnecessary code, and bugs.
- Linting promotes quicker development.
- Enhancing the code's general quality. For instance, limiting the length of lines, avoiding repeated print commands, etc.
- Improved and quicker code review because linting already checks static code.
Some useful linters -
- goimports: handles formatting and automatically adds the required packages. It also removes the unreferenced imports.
- errcheck : checks for unhandled errors. This helps in finding potential serious bugs that were overlooked during development.
- unused : Checks Go code for unused constants, variables, functions, and types.
The issue with having so many standalone linting tools is that you have to download and keep track of each one's versions separately. Additionally, it might be too slow to run them all at once. The best approach to set up linting in Go projects is with golangci-lint, a Go linters aggregator that runs linters concurrently, reuses the Go build cache, and caches analysis data for significantly increased performance on subsequent runs.
What is Golangci-Lint?
For simplicity and performance, the golangci-lint project was created to combine and run several different linters concurrently. You can choose the 48 linters necessary for your project out of the 48 included when installing the application. You can put it up as a part of your continuous integration strategy in addition to running it locally during development.
Golangci-lint reuses 80% of the work by just parsing programs once and invokes linters directly (no forking). This greatly accelerates golangci-lint.
Features of Golangci-lint:
- parallel linter runs; reuses create a cache and store the findings of the analysis. Yaml-based configurations feature.
- Integrations with GitHub Actions, VS Code, Sublime Text, GoLand, GNU Emacs, Vim, and Atom.
- There are numerous linters provided, so there is no need to install them.
- Fewest possible false positives as a result of good default settings.
- Nice result, complete with colored lines of source code and recognized IDs.
Installing GolangCI-Lint
Run the command below to install golangci-lint locally on any operating system. The majority of golangci-lint installations are done for CI.
GitHub Actions For CI for GitHub projects, we advise utilizing our GitHub Action to run golangci-lint. It can be significantly faster than a straightforward binary installation because it is quick and employs smart caching internally.
Additionally, the action adds GitHub annotations for any issues discovered:
- You can easily discover bugs found by golangci-lint without digging through the build log: You are encouraged to update golangci-lint regularly because the project is actively being worked on and improving.
- Check out the most recent GitHub issues for golangci-lint issues and modify them if necessary.
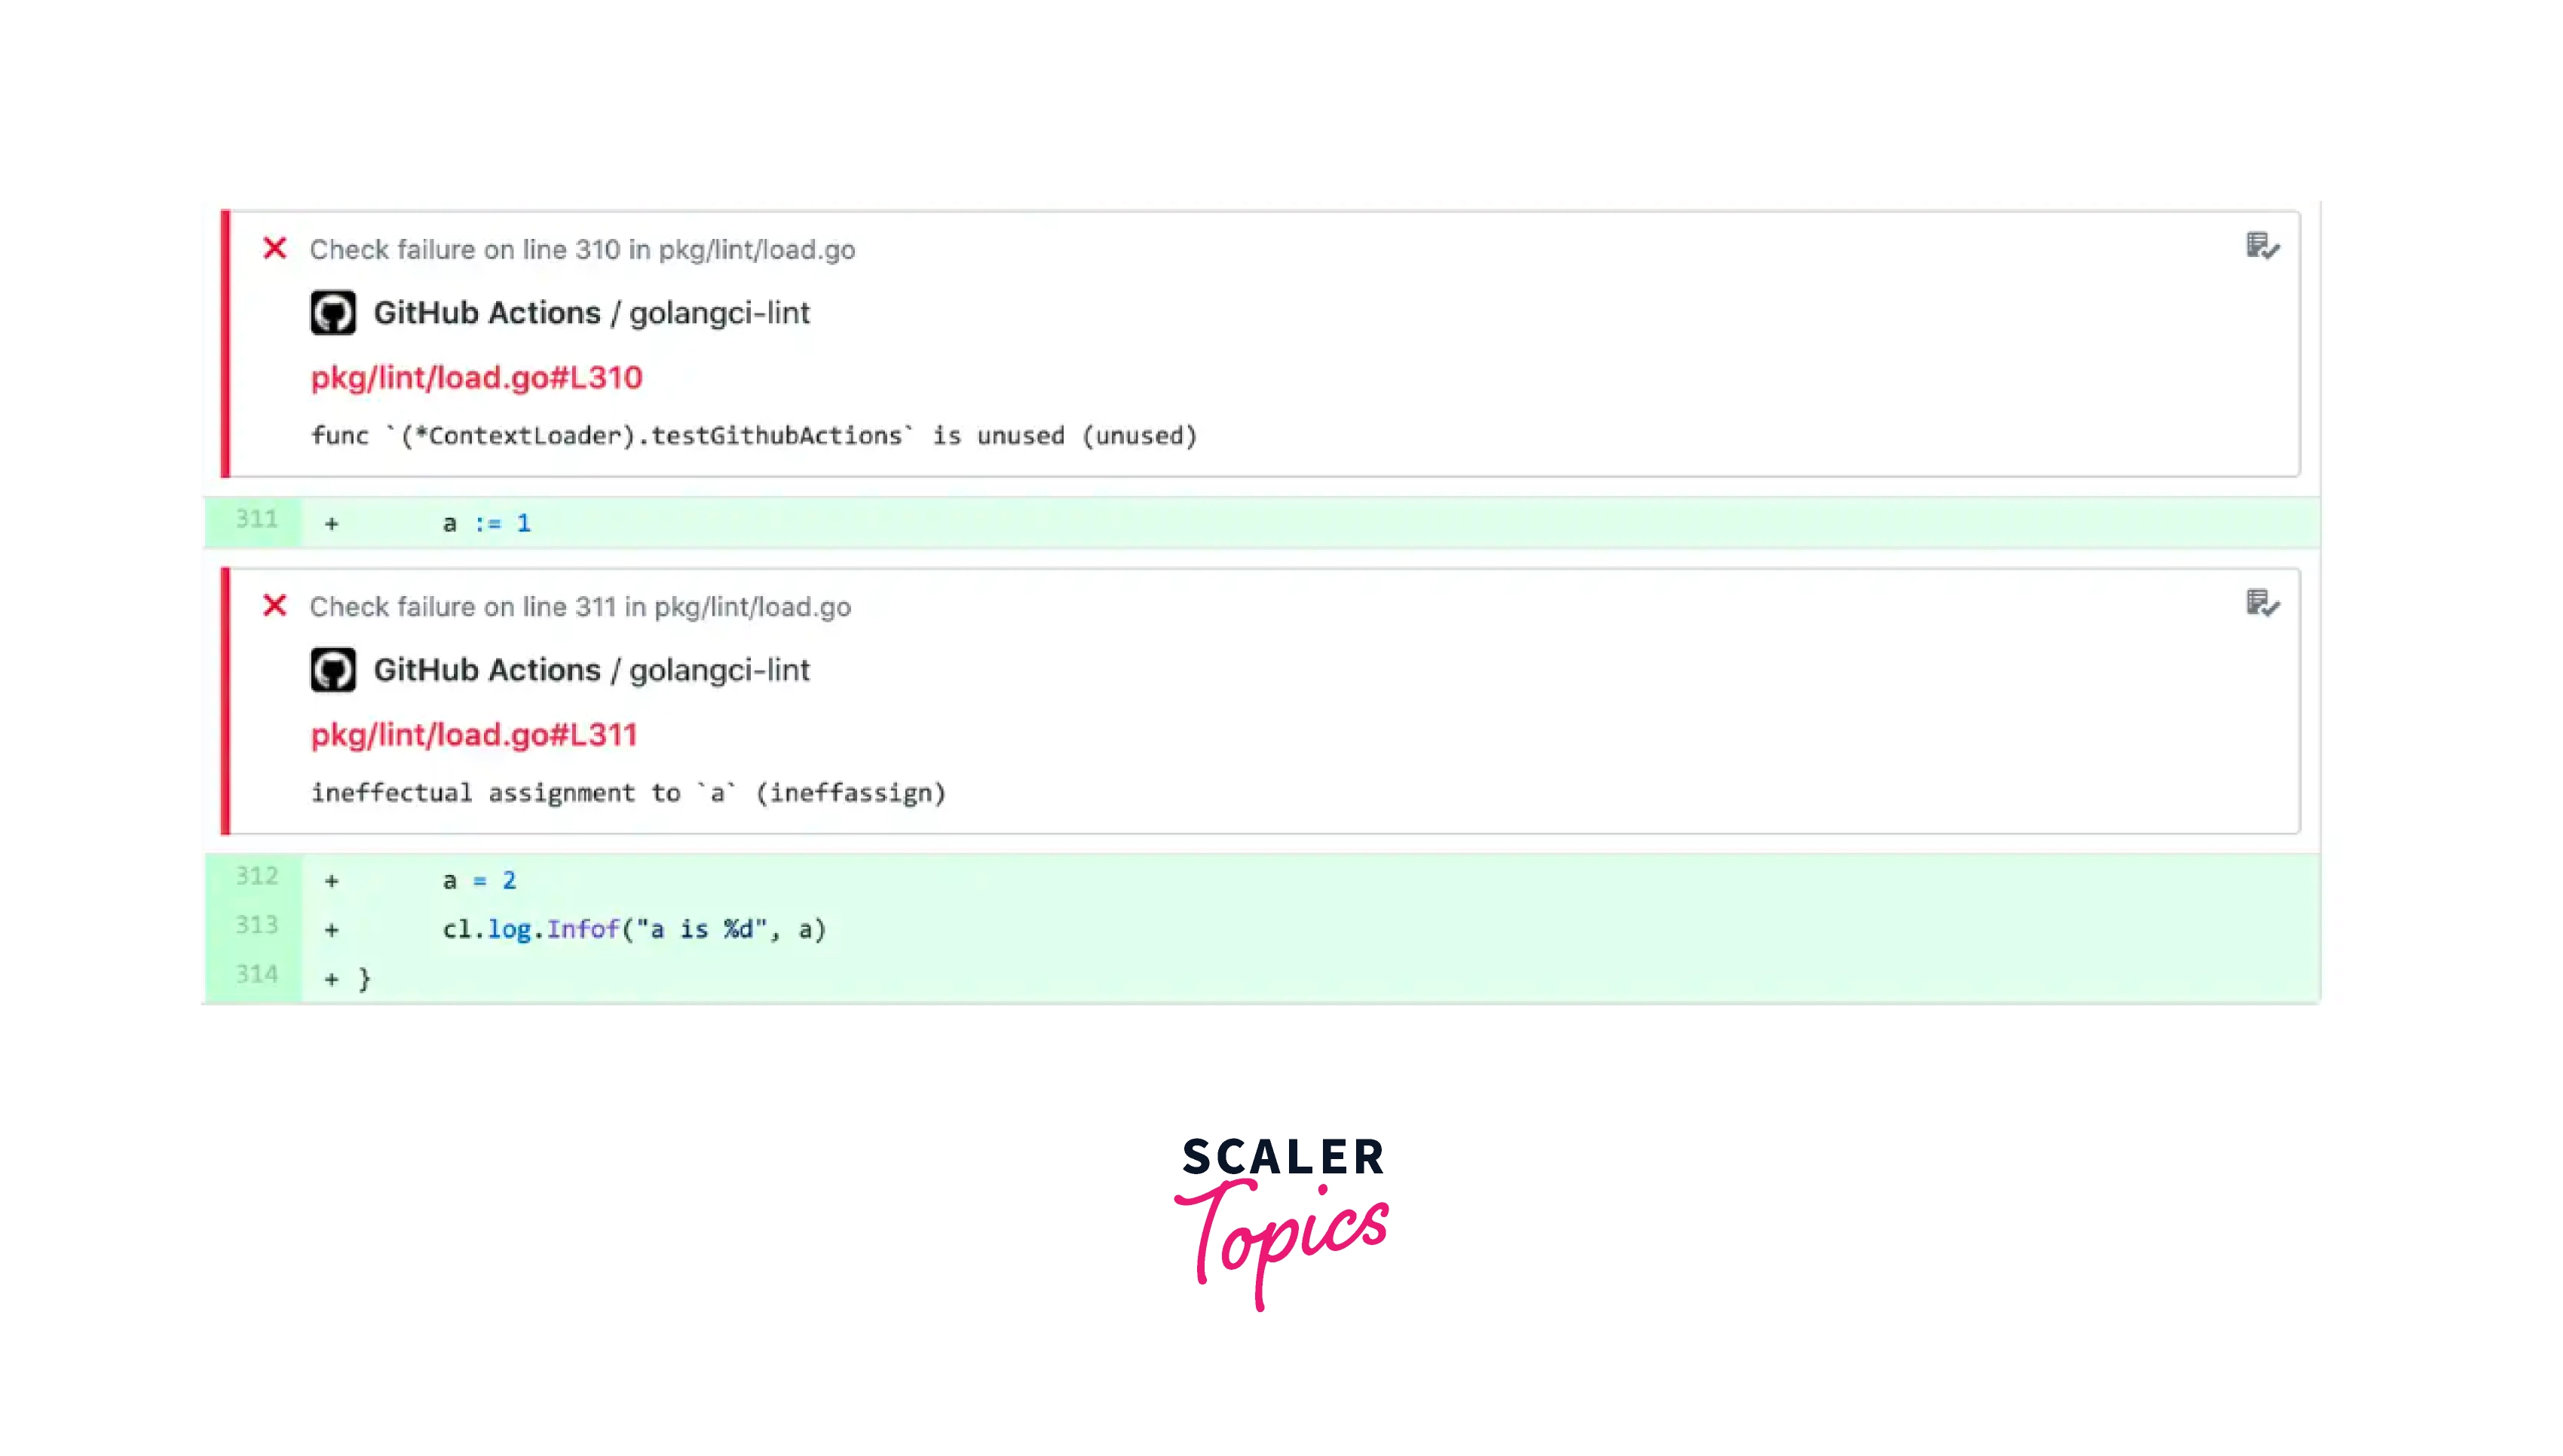
You are encouraged to update golangci-lint regularly because the project is actively being worked on and improved. Check out the most recent GitHub issues for golangci-lint issues and amend if necessary.
Local Installation
macOS You can install a binary release on macOS using brew:
Docker
Linux and Windows
You can use Git Bash on Windows to execute the above instructions.
Install from Source
Note: The success of such go install/go installations cannot be guaranteed. Applying for binary installation is advised.
After installation, you should verify the installed version:
The following command will also allow you to view every linter that is widely available:
To run golangci-lint execute:
By default, GolangCI-Lint has enabled and disabled linters, so when we start it, it only uses the enabled linters to examine the code.
Integrating Golangci-Lint in Your Editor
For immediate feedback, GolangCI-Lint provides integrations with several editors. In Visual Studio Code, all you need to do is install the Go extension, and add the following lines to your settings. json file:

Conclusion
- In this article, we learned about the installation procedure of Go in vs code and why it is important to use the GO extension, which makes finding bugs in the code easier.
- Linting your applications is an effective way to guarantee consistent coding standards among all project contributors. By implementing the tools and procedures described in this article, you will be well on your way to achieving that goal.