Golang Package Management and Module Systems
Overview
A package manager, as the name suggests is a tool used for automating the process of developing the code, updating, removing, and downloading the dependency, etc in a consistent way. In this article, we will learn all about packages and go modules.
Introduction
The package manager has been used for a while now. Use of it makes it easier to work with both third-party and first-party libraries. They help in defining and downloading the dependencies of the project so that it is updated automatically without breaking the code when the version is updated. The lock file is also supported by the package manager which guarantees the build in any environment.
Getting Started with Go Modules
Check GO111MODULE Environment Variable
Since it started from Go 1.11 the environment variable is named after it, i.e GO111MODULE. In this module, the project can reside outside of the directory. The Go 1.11 version introduced the concept of modules. A module is also known as a directory of packages with a root file named, go.mod at the root. The file go.mod defines the import path of the module as well as its dependencies. If modules are used then:
- There is no need for the go project to reside in the GOPATH
- Great improvement in package management
Creating a New Module
Following are the steps for creating a new module:
- Decide the directory for the module
- Create a directory and name it “projects”- mkdir projects
- cd projects
- Inside that directory create a new module called “mymodule” - mkdir mymodule Once the directory of the module is created, the structure will look something like this:
Once this is done, the next step is to file called go.mod in the mymodule directory for defining the go module. For this, tools of go will be used which can be accessed through the command “mod init module_name”, which in this case is mymodule and hence the command is, “mod init mymodule”. Command : go mod init mymodule Once this command is executed, the following output will be displayed:
Output
The structure of the directory will now look something like this:
Understanding the go.mod File
The file go.mod is important as it contains names and versions of its own and other modules. It also contains directives such as replace which is helpful for doing development on multiple modules simultaneously. For understanding it much better, type the command given below: nano go.mod After executing the command, the output will be shown which is something like this:
In the first line, the module keyword defines the name of the module that the compiler is looking for followed by the version of the module.
Adding Go Code to Your Module
In order to add go modules and run it, create a file named “main.go” inside the module directory. The Go file is mostly named “main.go” because of the ease. Open the file named “main.go” and add the following code snippet.
Output:
Explanation: Once the package is defined, the fmt module is imported to use the Println function and to display the output on the screen.
Installing Dependencies
For installing dependencies in the Go language for the project, use the command given below on the command line: go install After installing all the packages successfully, the output will be shown like this:
Updating Dependencies
For upgrading the dependency in the Go language project, use the command given below: go get example.com/pkg This command will update the go.mod file.
In order to upgrade all its dependencies to the latest version, use the command given below: go get -u example.com/pkg For updating all the dependencies at once, use the command given below: go get -u ./... For viewing the available dependencies upgrade, use the command given below: go list -u -m all
Minor or patch versions
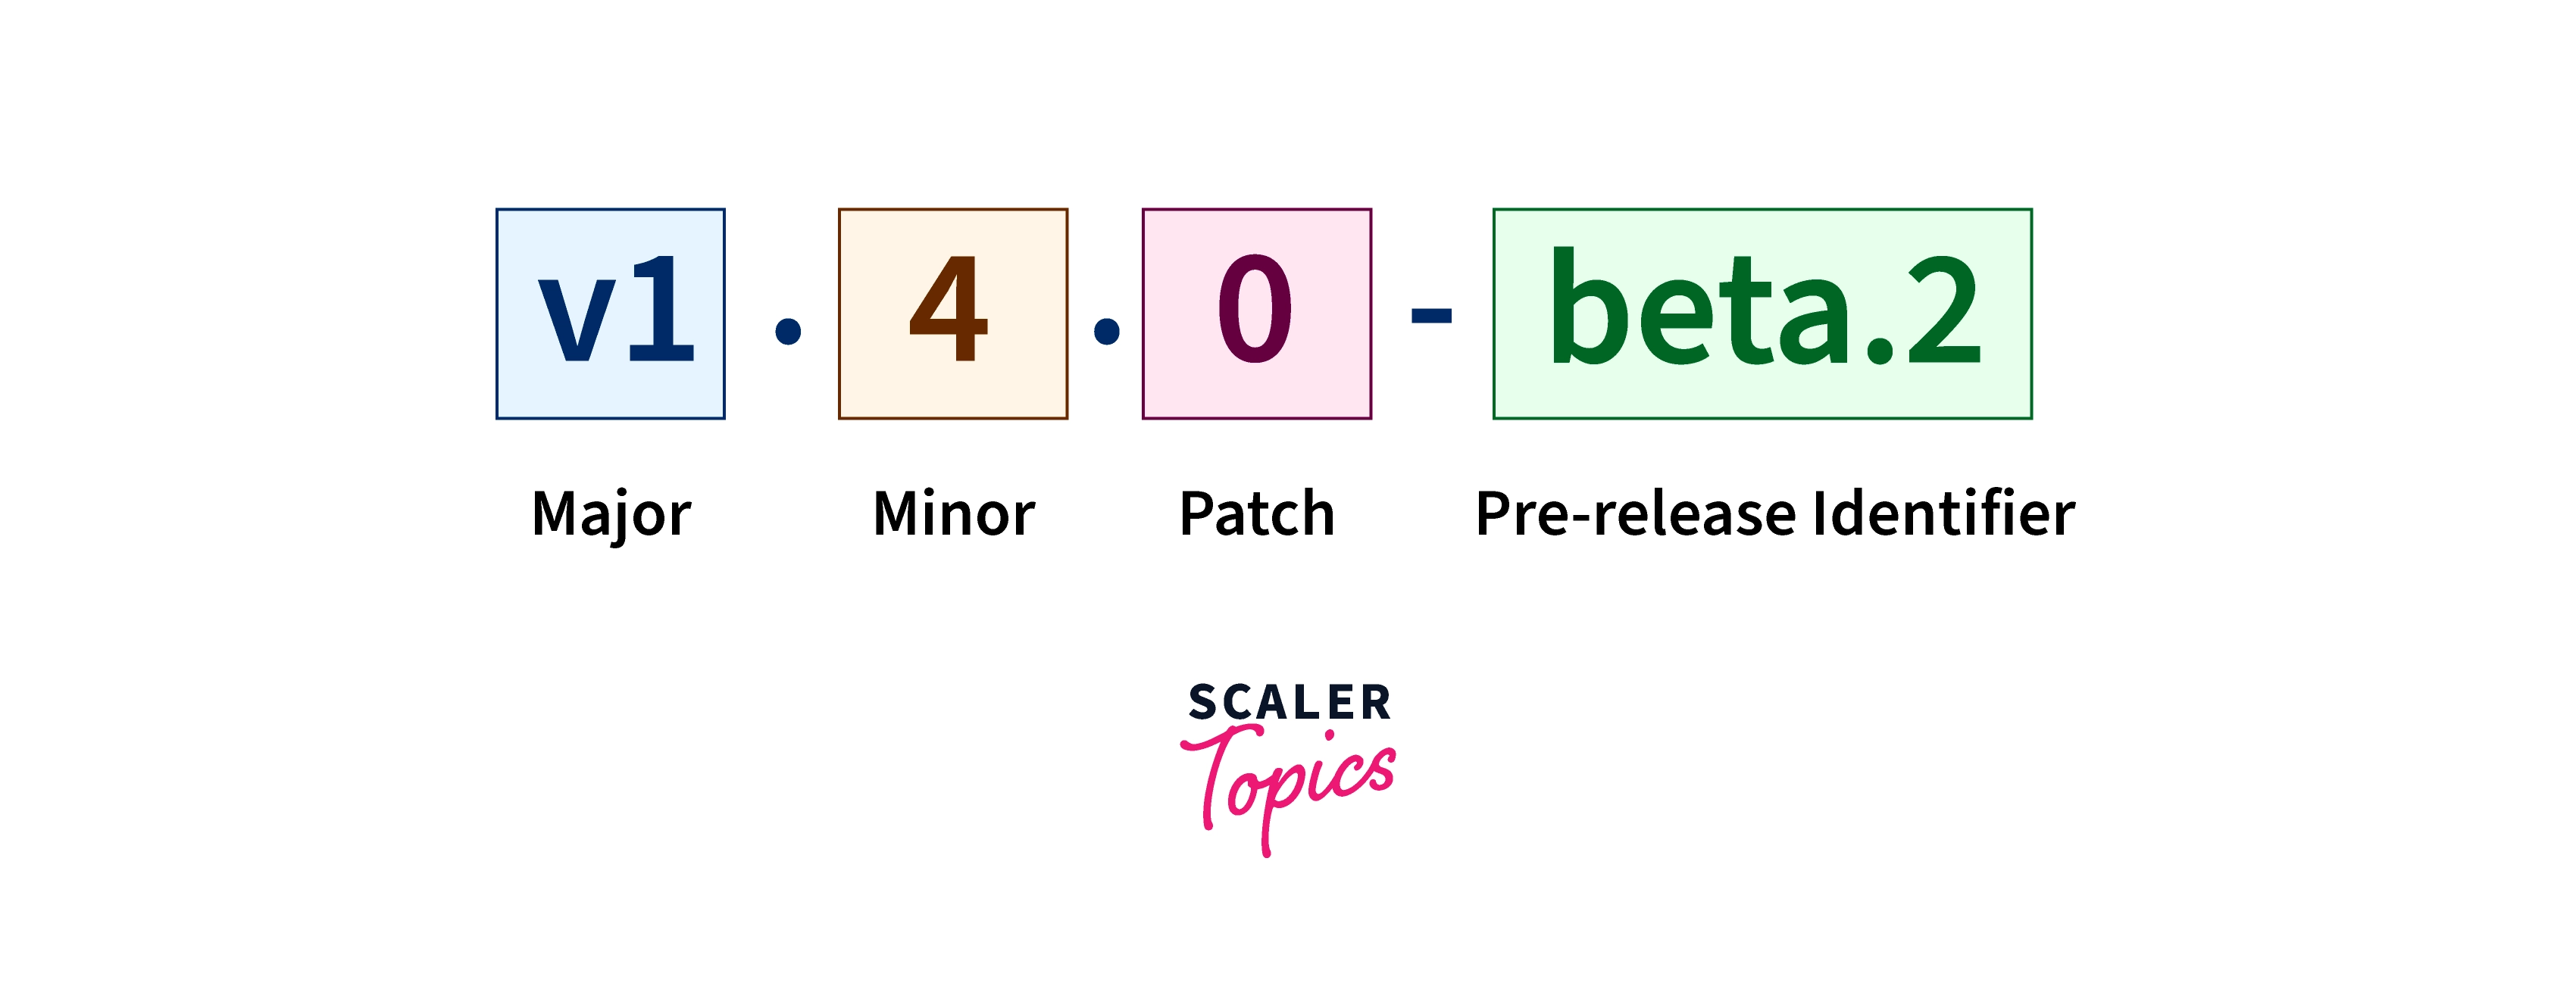
Minor version- vx.4.x- it releases backward compatibility and stability. Patch version- vx.x.1- it guarantees backward compatibility and stability.
Major versions
Example - v1.x.x This release doesn't guarantee that it will be backward compatible with the major preceding version.
What is a Package?
Packages are used to organize go source code for better reusability and reliability. Packages offer compartmentalization of code and hence it becomes easy to maintain go applications. There are two types of packages:
- Executable package: its main application which we shall execute from the command prompt.
- Utility package: it is non-executable and its role is to provide a utility function.
Adding a Package to Your Module
For this, create a sub-directory in the mymodule package using the command:
The structure of files should look something like this:
In the file, mypackage.go, copy the code given below:
In this code, since the PrintHello function is to be taken from the available package, the package needs to be imported before using it. Now open the file main.go and copy the code given below:
Now if you look at the import file section, it starts with mymodule package followed by mypackage. This is the route that is set for the go.mod file. Now run the updated module by using the command: go run main.go The output will be shown something like this:
Output
Adding a Remote Module as a Dependency
When a remote module is to be added as a dependency, a repository path is used to find the reference of the module to be used. It is done by using the command given below: go get github.com/spf13/cobra
Now when a new dependency is added, the go.mod file looks something like this:
Once the dependency is downloaded using go run command, update the main.go file with cobra code given below:
This code creates a structure called cobra.Command with a run file that contains “Hello” as a statement which will be executed using cmd.Execute() statement. Now run the update code using the command given below: go run main.go
The output of the code is shown below:
Output
Removing Dependencies
For removing the dependencies from the project, just remove all the references from the package of the project and run the go mod tidy on the command line for cleaning up the go.mod file.
Vendoring Dependencies
Vendoring dependency is done by making a copy of all the third-party packages that the project uses and placing those packages under the vendor directory. This is done to ensure the stability of the project for production builds without having to rely on external services.
Conclusion
- A package manager, as the name suggests is a tool used for automating the process of developing the code, updating, removing, and downloading the dependency, etc.
- They help in defining and downloading the dependencies of the project so that it is updated automatically without breaking the code when the version is updated.
- Installing dependencies- go install
- Updating dependencies- go get example.com/pkg