How to Create a Formula in Excel?
Overview
Excel is a powerful tool that can help you organize and analyze data in a variety of ways. One of its most powerful features is its ability to perform calculations using basic formulas and how to add in excel formula. With basic formulas, you can perform simple arithmetic operations such as addition, subtraction, multiplication, and division, as well as more complex calculations such as averages, percentages, and more. To create a basic formula in Excel, you simply select the cell where you want the result to appear, type the equals sign (=), followed by the formula you want to use. For example, to add two numbers, you would type =, where A1 and B1 are the cells that contain the numbers you want to add. Once you've created a basic formula, you can copy it to other cells to perform the same calculation with different data. Overall, Excel's basic formula creation feature is a powerful tool that can help you perform calculations quickly and efficiently, saving you time and effort.
Introduction
Excel is a powerful tool for data analysis, and one of its most essential features is its ability to perform calculations and create formulas. With Excel, you can perform simple or complex calculations on large sets of data with ease.
Creating formulas in Excel involves using mathematical operators such as addition, subtraction, multiplication, and division to perform calculations on data and how to add in excel formula Formulas in Excel can be used for a variety of purposes, including calculating totals, averages, percentages, and much more.
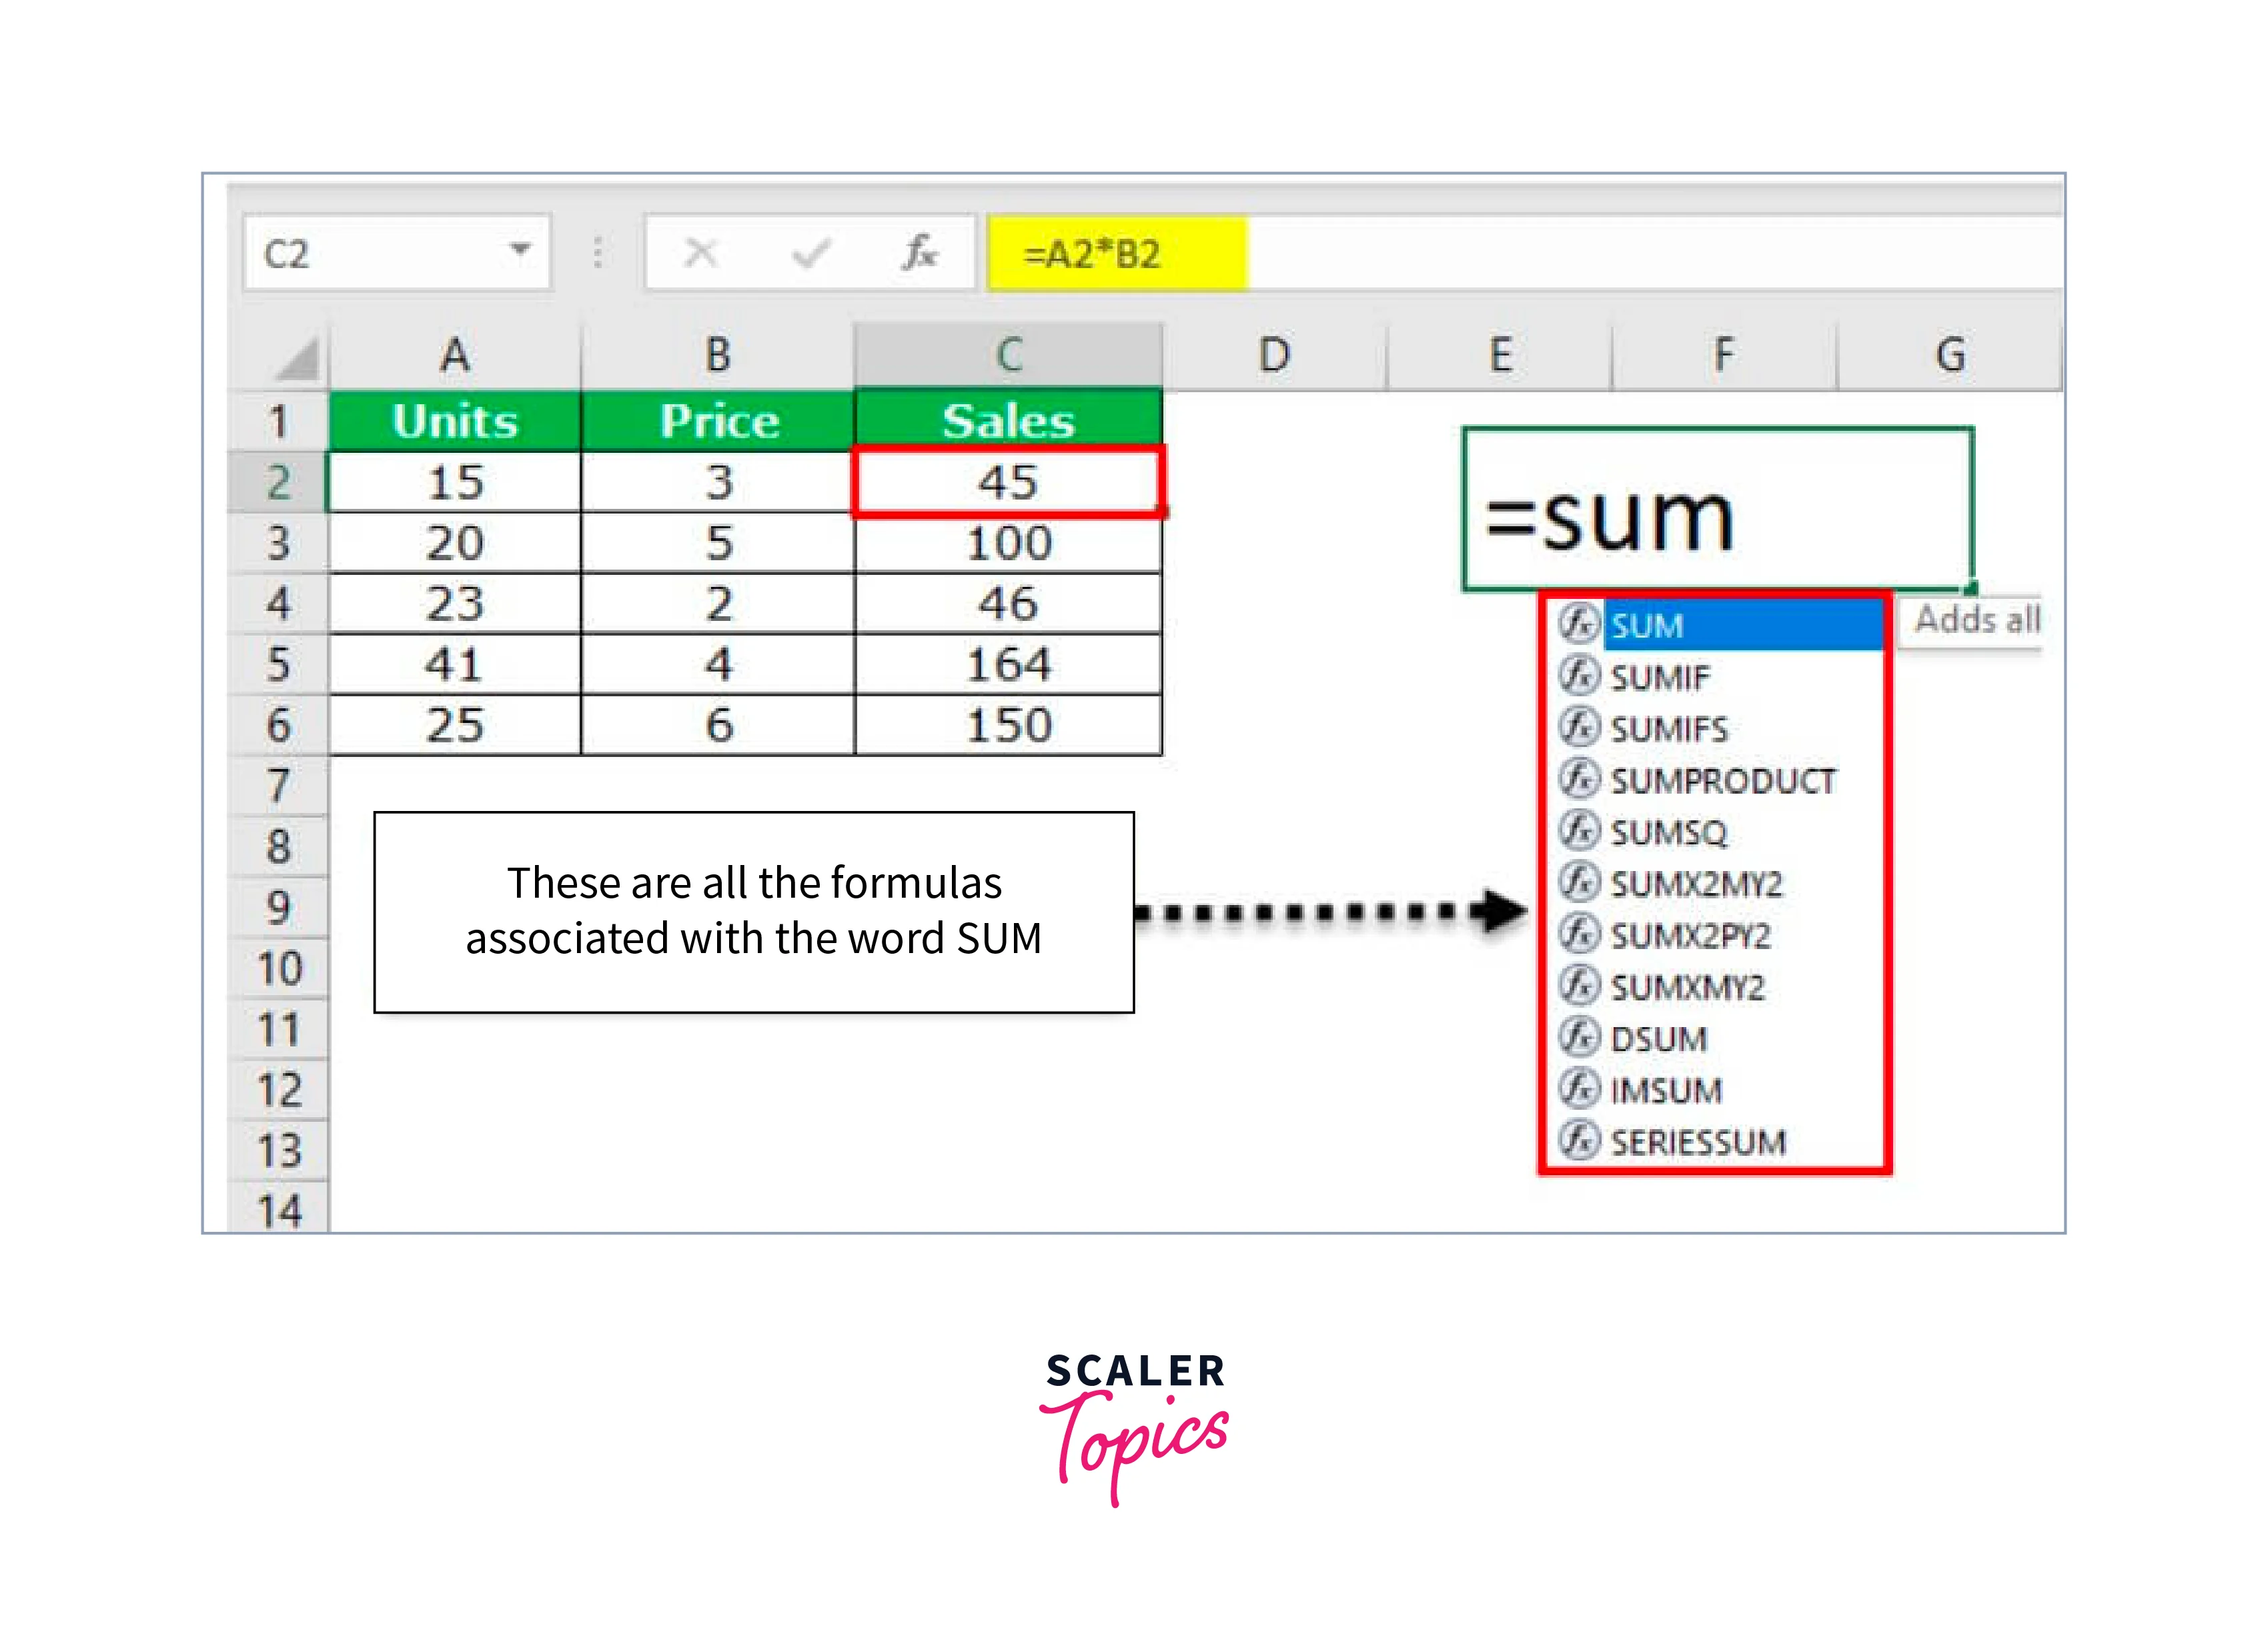
One of the most basic formulas in Excel is the SUM formula, which is used to add up a range of numbers. Another important formula is the AVERAGE formula, which is used to calculate the average of a range of numbers. Other commonly used formulas in Excel include the MAX formula, which is used to find the largest value in a range of cells, and the MIN formula, which is used to find the smallest value in a range of cells.
Excel also provides more advanced formulas, such as the IF formula, which allows you to perform different calculations based on a specific condition, and the VLOOKUP formula, which allows you to search for specific data in a table and return a corresponding value.
Overall, understanding how to create and use formulas in Excel is essential for anyone who works with data. By mastering Excel's formula creation capabilities, you can make sense of large data sets and gain valuable insights into your data.
Steps to Create a Simple Formula in Excel
Creating a simple formula in Excel can help automate calculations and save time. Here are the steps to create a simple formula in Excel:
- Open a new or existing Excel file and select the cell where you want to create the formula.
- Type an equal sign (=) in the cell to indicate that you are entering a formula.
- Enter the formula using cell references, mathematical operators, and functions. For example, to add the values in cells A1 and B1, enter "=A1+B1" in the cell.
- Use cell references instead of typing in numbers for each calculation. This will allow the formula to update automatically when the values in the referenced cells change.
- Use mathematical operators to perform calculations, such as addition (+), subtraction (-), multiplication (*), and division (/).
- Use functions to perform more complex calculations, such as calculating the average or sum of a range of cells. To use a function, type the function name followed by the range of cells in parentheses. For example, to calculate the average of cells A1 to A5, enter "=AVERAGE(A1:A5)".
- Press Enter to complete the formula. The result of the calculation will appear in the cell.
- Copy the formula to other cells by selecting the cell with the formula and dragging the fill handle (a small square in the bottom-right corner of the cell) to the desired range of cells.
- Check that the formula is working correctly by verifying that the results are consistent with the expected values.
- By following these simple steps, you can create formulas in Excel to automate calculations and streamline your work. With practice, you can create more complex formulas using a variety of functions and mathematical operations to solve a wide range of problems.
How to Write Formulas in Excel Using Cell References
When creating formulas in Excel, it is best to use cell references rather than typing in numbers for each calculation. Using cell references makes it easier to update and to add in excel formulas and ensures that the calculation is always accurate. Here are the steps to write formulas in Excel using cell references:
- Open a new or existing Excel file and select the cell where you want to create the formula.
- Type an equal sign (=) in the cell to indicate that you are entering a formula.
- Enter the formula using cell references. Cell references are the names of the cells you want to include in the calculation, and they are identified by their column letter and row number. For example, cell A1 is in column A and row 1.
- Use mathematical operators to perform calculations between the cell references. For example, to add the values in cells A1 and B1, enter "=A1+B1" in the cell.
- Use parentheses to group calculations and ensure that the formula is calculated correctly. For example, to calculate the sum of cells A1 to A5 and then multiply the result by cell B1, enter "=SUM(A1:A5)*B1" in the cell.
- Use absolute cell references to ensure that the formula always refers to a specific cell, even if the formula is copied to other cells. To create an absolute cell reference, add a dollar sign ($) before the column letter and row number of the cell reference. For example, to create an absolute reference to cell A1, enter "1" in the formula.
- Copy the formula to other cells by selecting the cell with the formula and dragging the fill handle (a small square in the bottom-right corner of the cell) to the desired range of cells. Excel will automatically adjust the cell references in the formula to match the new cell locations.
- Check that the formula is working correctly by verifying that the results are consistent with the expected values.
- By using cell references in your formulas, you can create powerful calculations that update automatically as you enter new data or make changes to existing data. This can save time and ensure that your calculations are always accurate. With practice, you can create more complex formulas using a variety of functions and mathematical operations to solve a wide range of problems.
Using cell references in Excel formulas and how to add in excel formulais a powerful way to perform complex calculations and analysis on large amounts of data. By understanding how to use cell references, you can create dynamic and scalable formulas that can be easily updated and modified as your data changes. This can save you time and effort, and enable you to make data-driven decisions with confidence.
Create a Formula Using the Point-And-Click Method
In addition to typing a formula manually, Excel also offers a point-and-click method to create formulas. This method allows you to select the cells and functions you want to use in your formula by pointing and clicking on them, rather than typing them out.
Here are the steps to create a formula using the point-and-click method:
- Open a new or existing Excel file and select the cell where you want to create the formula.
- Click on the "Formulas" tab in the ribbon at the top of the screen.
- Click on the "Insert Function" button in the toolbar to open the "Insert Function" dialog box.
- Select the function you want to use from the list of functions in the dialog box. You can also use the search bar to find a specific function.
- Click on the "OK" button to open the "Function Arguments" dialog box.
- Select the range of cells you want to use in the formula by clicking and dragging the cursor over the cells in the worksheet. The selected range will appear in the "Function Arguments" dialog box.
- Click on the "OK" button to insert the function and the selected range into the cell.
- Repeat steps 4 to 7 to add additional functions and cell ranges to the formula.
- Verify that the formula is working correctly by checking the result in the cell.
- The point-and-click method is a quick and easy way to create formulas in Excel, especially for more complex calculations. It allows you to select the necessary functions and cell ranges without having to type them out manually, saving you time and reducing the likelihood of errors. With practice, you can use this method to create a wide range of formulas to automate calculations and streamline your work.
Whether you use the point-and-click method or other methods such as typing directly into the formula bar or using keyboard shortcuts, creating formulas in Excel can help you automate calculations and analyze data more efficiently. With practice and a solid understanding of Excel functions and operators, you can create complex formulas to handle even the most challenging data analysis tasks.
Create an Excel Formula by Using Defined Names
Excel allows users to create formulas using named ranges, which can make it easier to reference data and make formulas more understandable. Here are the steps to create an Excel formula using defined names:
- Select the range of cells that you want to name. This could be a column, row, or group of cells.
- Click on the "Formulas" tab in the Excel ribbon.
- Click on "Define Name" in the "Defined Names" group.
- In the "New Name" dialog box, enter a name for the range. The name should be descriptive and easy to remember, such as "Sales" or "Expenses".
- Verify that the range is correct in the "Refers to" box. This should be the range of cells that you selected in step 1.
- Click "OK" to save the defined name.
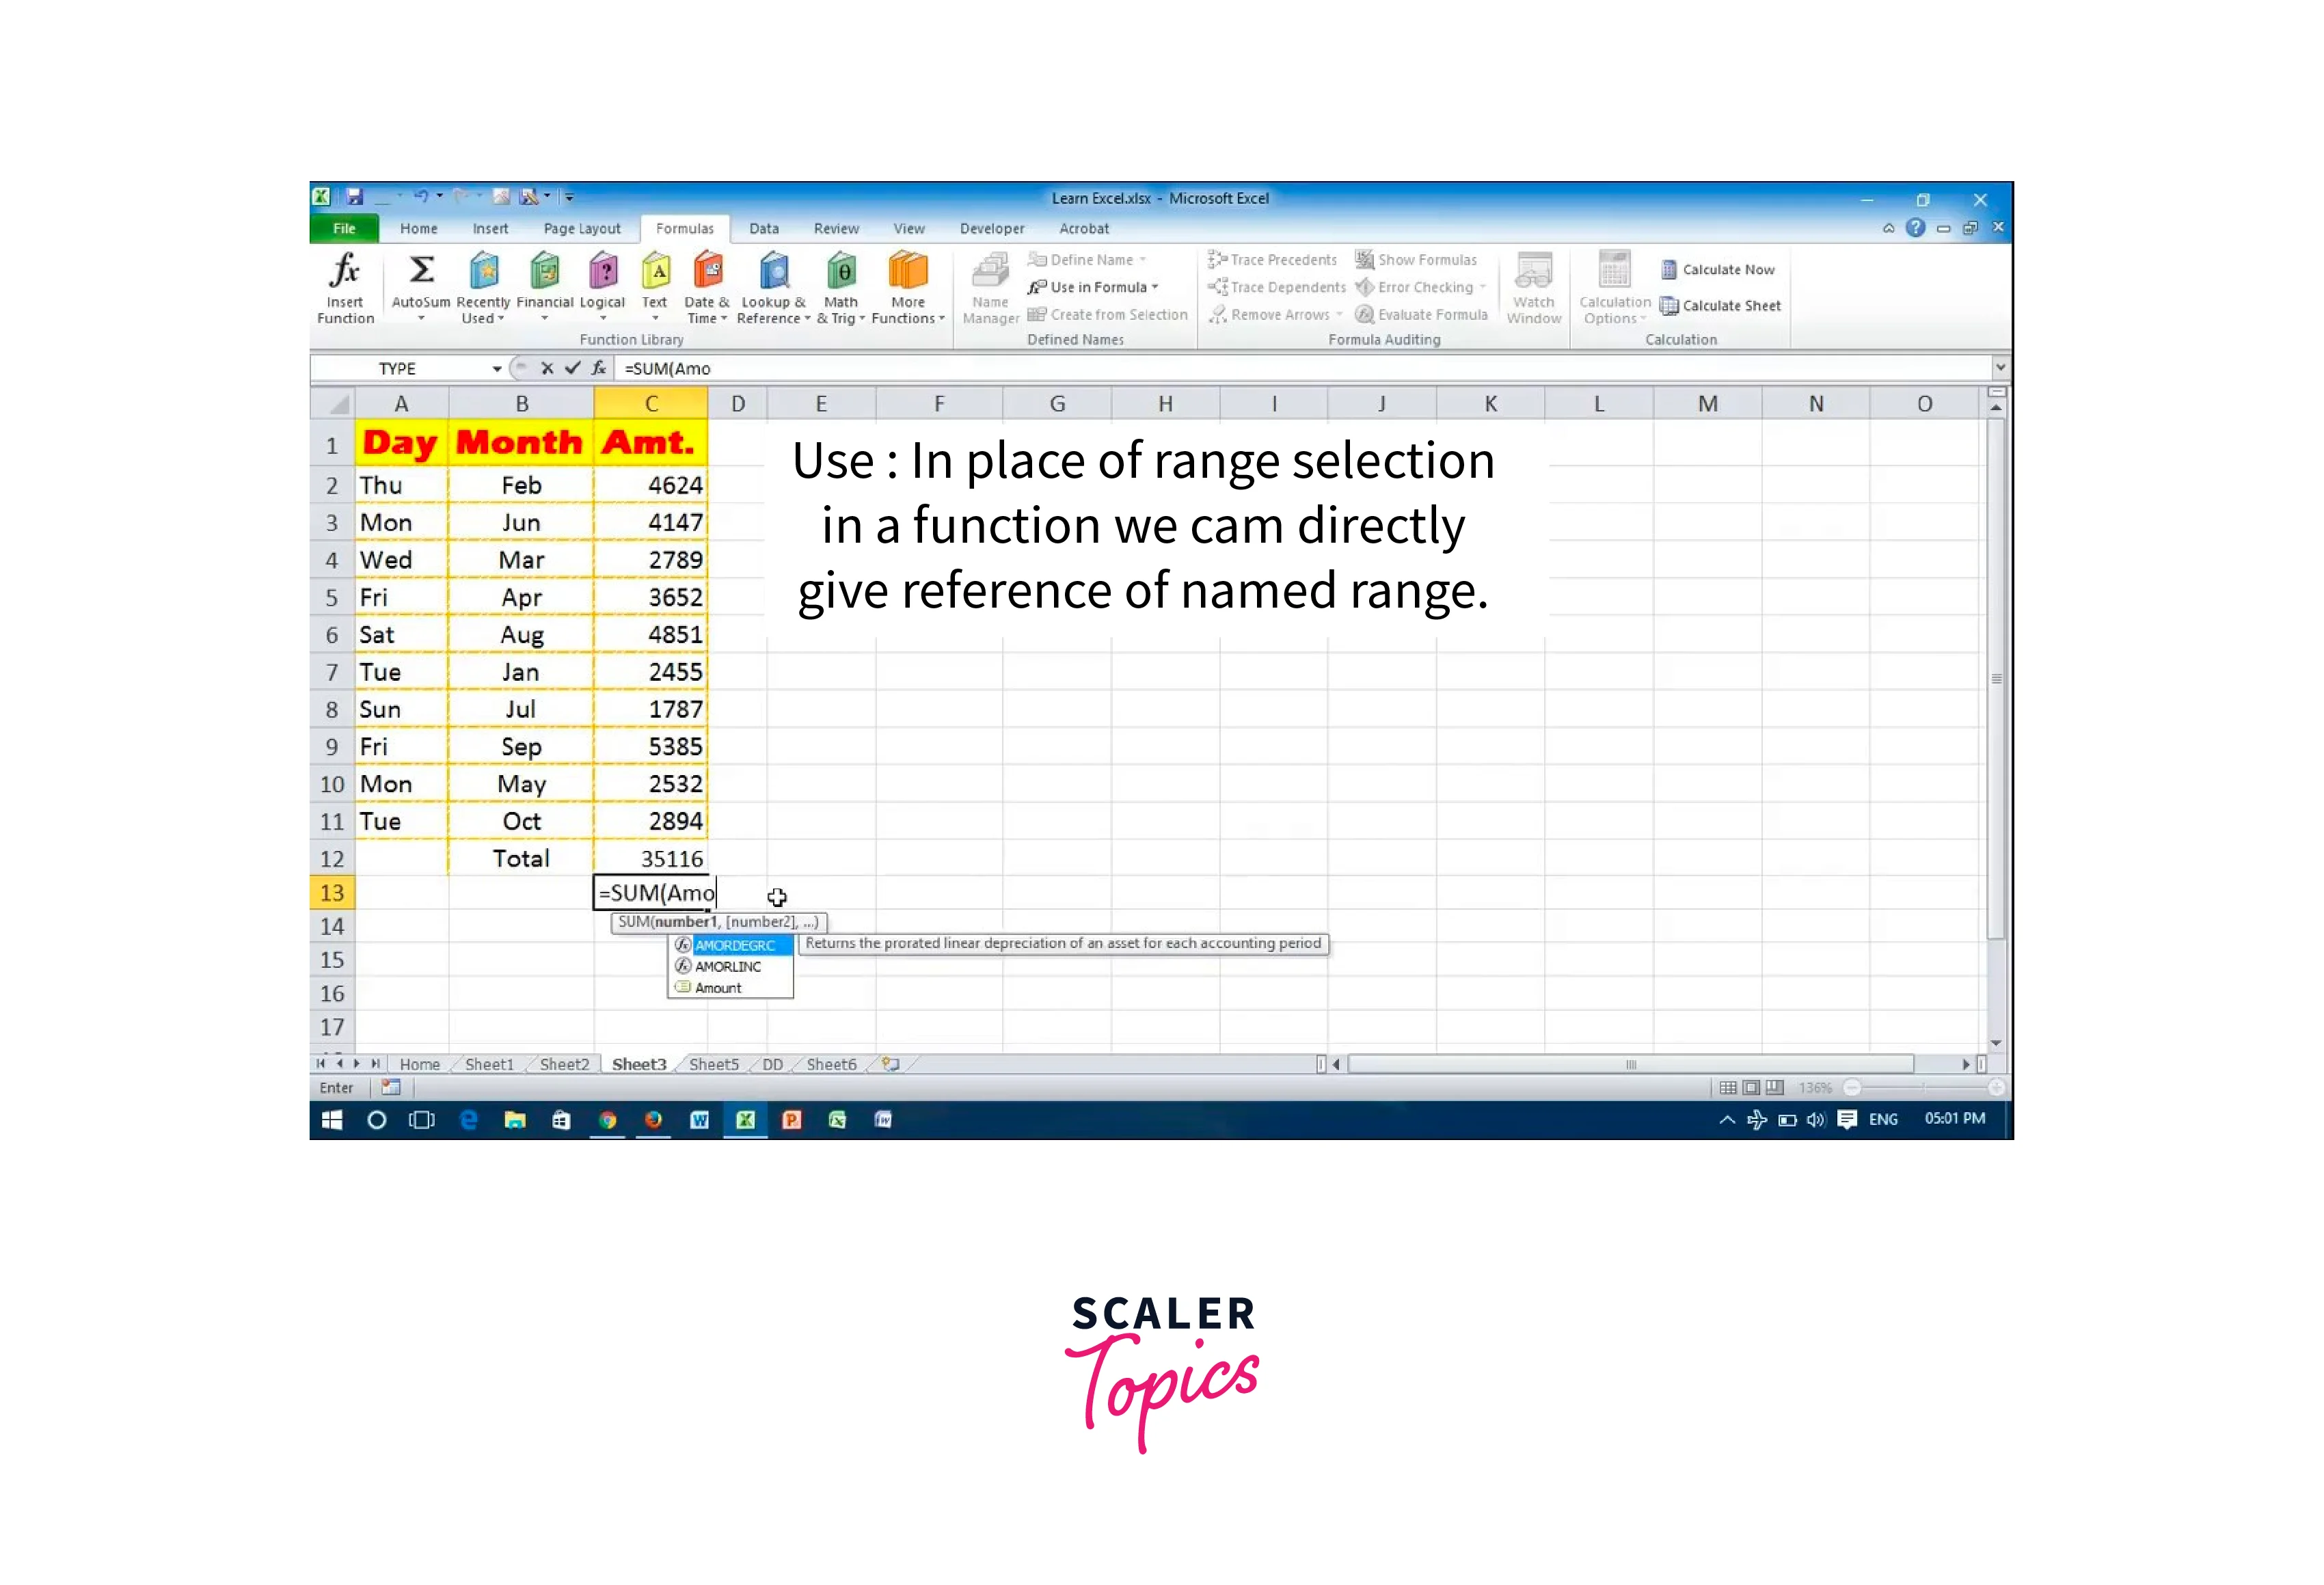
- To use the defined name in a formula, type the name followed by the desired mathematical operator and the cell or value you want to use in the calculation. For example, if you named a range of cells "Sales" and wanted to add the values in that range to the value in cell B1, you would enter "=SUM(Sales)+B1" in a cell.
- Using defined names in Excel formulas can make your calculations more readable and easier to understand. It also allows you to reference the same range of cells in multiple formulas without having to enter the cell references manually each time. By naming ranges of cells and referencing them in formulas, you can save time and reduce the risk of errors in your calculations.
Using defined names in Excel formulas can make them easier to read, write, and understand. It can also help to avoid errors and improve the efficiency of your work. By defining names for ranges of cells, tables, or individual cells, you can reference them in your formulas by name rather than by cell address. This makes your formulas more flexible and easier to maintain, especially when working with large datasets.
Make Excel Formulas by Using Functions
Excel functions are pre-built formulas that can perform complex calculations and analysis on your data. Using functions can save you time and reduce errors in your Excel spreadsheets. In this section, we will discuss how to make Excel formulas by using functions.
Step 1: Select the cell where you want to create the formula:
Before you can start creating a formula, you need to select the cell where you want the result to appear.
Step 2: Start the formula with an equal sign (=)
All Excel formulas start with an equal sign (=). This tells Excel that you are entering a formula.
Step 3: Choose a function
- To use a function, you need to choose the appropriate function for the task you want to perform. Excel has a wide range of functions, including mathematical functions, statistical functions, and text functions, among others.
- To see a list of available functions, click the fx button next to the formula bar. This will open the Insert Function dialog box, where you can search for functions by name or category.
Step 4: Enter the arguments for the function
- Once you have selected a function, you need to enter the arguments for the function. Arguments are the values or references that the function uses to perform its calculation.
- The number and type of arguments required by a function vary depending on the function. You can find information about the required arguments for each function in Excel's help documentation.
Step 5: Enter additional arguments (optional)
Some functions have additional optional arguments that you can use to customize the function's behavior. These arguments are usually enclosed in square brackets [].
Step 6: Close the formula with a closing bracket
Once you have entered all the necessary arguments for the function, you need to close the formula with a closing bracket ).
Step 7: Press Enter to complete the formula
- Press Enter to complete the formula. The result of the calculation will appear in the selected cell.
- For example, to use the SUM function to add up a range of numbers in cells A1 to A5, you would enter the formula =SUM(A1:A5) in the cell where you want the result to appear. Excel would then add up the values in cells A1 to A5 and display the result in the selected cell.
Excel formulas are an essential tool for data analysis and management. By using functions, users can create complex and sophisticated formulas to perform calculations, manipulate data, and automate tasks. Some of the most commonly used functions in Excel include SUM, AVERAGE, MAX, MIN, IF, and VLOOKUP. By mastering these functions and their various parameters, users can greatly increase their productivity and efficiency in Excel. Overall, learning how to create Excel formulas using functions is a valuable skill for anyone working with data in Excel.
Formula Directly in A Cell or Formula Bar
In Microsoft Excel, formulas can be entered directly into a cell or the formula bar. Both methods have their advantages, and which method you choose will depend on your personal preferences and the complexity of the formula you are entering.
Entering a Formula Directly in a Cell:
To enter a formula directly into a cell, simply click on the cell where you want the result to appear, and then type an equal sign (=) to tell Excel that you are entering a formula. You can then enter the formula using cell references, mathematical operators, and functions.
One advantage of entering a formula directly into a cell is that you can see the result immediately, without having to switch to the formula bar. This can be useful when working with simple formulas that require only a few cells.
Entering a Formula in the Formula Bar:
To enter a formula in the formula bar, simply click on the cell where you want the result to appear, and then click on the formula bar at the top of the screen. You can then enter the formula using the same cell references, mathematical operators, and functions as when entering a formula directly in a cell. One advantage of entering a formula in the formula bar is that you can see the entire formula, which can make it easier to make changes and troubleshoot errors. Additionally, the formula bar allows you to use keyboard shortcuts to quickly enter cell references and functions, which can save time when working with longer formulas.
The ability to write formulas directly in a cell or formula bar is a powerful feature of spreadsheet applications like Microsoft Excel and Google Sheets. This feature enables users to perform complex calculations, manipulate data, and automate tasks with ease. By using formulas, users can save time, reduce errors, and improve the accuracy of their work. Therefore, mastering the art of writing formulas directly in a cell or formula bar can greatly enhance one's productivity and efficiency in data analysis and management.
Use AutoSum
AutoSum is a useful tool in Microsoft Excel that allows users to quickly and easily create basic formulas and how to add in excel formula for calculating totals, averages, and other simple functions. Here's how to use AutoSum to create basic formulas:
- Select the cell where you want to display the result of your formula.
- Click on the AutoSum button in the "Editing" section of the "Home" tab.
- Excel will automatically select a range of cells that it thinks you want to include in your formula. If this range is correct, press the Enter key to accept the formula. If not, use your mouse to adjust the range of cells that Excel has selected.
The result of your formula will now be displayed in the selected cell.
- AutoSum can be used for a variety of basic calculations, such as summing a range of values, finding the average of a set of numbers, or calculating the maximum or minimum value in a range. Here are some examples of how to use AutoSum for these calculations:
- To sum a range of values, select the cell where you want to display the total, then click on the AutoSum button. Excel will automatically select the range of cells above the selected cell and display the total in the selected cell.
- To find the average of a set of numbers, select the cell where you want to display the result, then click on the AutoSum button. Excel will automatically select the range of cells above the selected cell and display the average in the selected cell.
- To find the maximum or minimum value in a range of cells, select the cell where you want to display the result, then click on the AutoSum button. From the drop-down menu, select "Max" or "Min" to display the maximum or minimum value in the selected cell.
- AutoSum is a simple but powerful tool for creating basic formulas in Excel. By following the steps above, you can easily calculate totals, averages, and other simple functions in your spreadsheets.
AutoSum in Excel is a powerful tool that simplifies the process of calculating sums and averages of numerical data in a worksheet. By selecting a range of cells and clicking on the AutoSum button, users can quickly generate accurate totals and averages without the need for manual calculations. This feature not only saves time but also reduces the risk of errors in calculations, making it an essential tool for anyone who works with large amounts of numerical data in Excel.
Conclusion
- Formulas in Excel allow users to perform calculations and manipulate data quickly and easily.
- Basic formulas in Excel include addition, subtraction, multiplication, and division, which can be created using arithmetic operators (+, -, *, /) and cell references (e.g., A1, B2, etc.).
- Excel also offers a variety of built-in functions, such as SUM, AVERAGE, and MAX, which allow users to perform more complex calculations and analysis.
- When creating formulas in Excel, it's important to ensure that cell references are accurate and that the order of operations is correct.
- Excel also allows users to create nested formulas, which involve using one formula inside of another to perform more complex calculations.
- By mastering basic formulas in Excel, users can save time and increase efficiency in their work, whether they are managing finances, analyzing data, or creating reports.
- When working with more complex formulas, users can use parentheses to control the order of operations, or use named ranges to make the formula easier to read and understand.
- Excel also provides a range of tools for debugging and troubleshooting formulas, including the Trace Precedents and Trace Dependents features.
- Finally, it is important to ensure that formulas are accurate and up-to-date by regularly checking for errors and updating inputs as needed.