intl Library
Overview
The International Library in Flutter is a powerful and versatile package that provides developers with a comprehensive set of localization and internationalization tools for their Flutter applications. With intl library in flutter, developers can easily implement multi-language support, date and time formatting, number formatting, and currency formatting in their apps. It offers a user-friendly interface for managing translations, allowing developers to organize and maintain their localized resources efficiently. The International Library in Flutter is a valuable asset for developers looking to create globally accessible applications with localized content tailored to diverse audiences.
Installation and Setup
Till now we have learned the significance of intl library in flutter. Let us now understand how to install the intl library in flutter so that we can use it for different purposes.
To install the Intl library in Flutter, you can follow these steps:
-
Open your Flutter project in your preferred code editor.
-
Open the pubspec.yaml file, which is located at the root of your Flutter project.
-
In the dependencies section of the pubspec.yaml file, add the following line:
This will add the intl package as a dependency to your project.
-
Save the pubspec.yaml file.
-
In your terminal or command prompt, navigate to the root directory of your Flutter project.
-
Run the following command to download and install the dependencies:
This command will fetch the intl package and its dependencies and make them available for use in your project.
-
Once the command finishes executing, the Intl library is successfully installed in your Flutter project.
You can now import and use the Intl library in your Flutter application by adding the following import statement at the top of your Dart files:
You're now ready to leverage the powerful internationalization and localization capabilities provided by the Intl library in your Flutter application.
-
In order to use flutter_localizations, you have to add the package as a dependency to your pubspec.yaml file. You also need to add it to the intl package.
-
This will lead to the following result in your pubspec.yaml file.
-
Now, you have to import the flutter_localizations library and specify localizationsDelegate and supportedLocales for the MaterialApp or CupertinoApp.
-
After adding the flutter_localizations package and adding the code above, the Material and Cupertino packages will get localized in one of the 78 locales suported by it.
Widgest should also be adapted to the localized messages, along with correct lwft-to-right and right-to-left layout.
-
You can try to change the target platform's locale to spanish. Thereafter notice the localized message.
Applications based on WidgetApp are identical except for the fact that you do not need GlobalMaterialLocalizations.delegate. You should prefer the Locale.fromSubtags constructor as the scriptCode is supported by it. As far as the Locale Constructor is concerned, it is still fully valid.
The various elements of the localizationsDelegates list contain localized values. GlobalMaterialLocalizations.delegate gives localized strings and other values for the Material Components Library. The default text direction which can be left to right or right to left for the widget library is decided by GlobalWidgetsLocalizations.delegate.
Internationalizing Text
After you have added the flutter_localizations package, you need to use the following instructions to add localized texts to the application. The various steps are as follows:
-
You have to add the intl package as a dependency. The version used needs to be the one pinned by the flutter_localizations with any:
-
Next, in the pubspec.yaml file, activate the generate option. This is included in the Flutter-specific section of the pubspec and is typically placed towards the end of the file. # The following section is specific to Flutter.
-
Create a fresh yaml file named l10n.yaml in the main directory of your Flutter project and populate it with the following information:
-
In this case, the configuration file sets up the localization tool for the Flutter project. The input files, located in ${FLUTTER_PROJECT}/lib/l10n, are specified as the source. The app_en.arb file serves as the template, while the resulting localizations are stored in the app_localizations.dart file.
-
Place the app_en.arb template file in the ${FLUTTER_PROJECT}/lib/l10n directory. For instance, you can add it as follows:
-
Subsequently, include an app_es.arb file in the identical directory, containing a Spanish translation of the corresponding message. Here's an example of how you can add it:
-
Proceed to execute the command "flutter gen-l10n" to trigger the code generation process. As a result, you will observe the generated files in the ${FLUTTER_PROJECT}/.dart_tool/flutter_gen/gen_l10n directory. Alternatively, you can run "flutter gen-l10n" independently to generate these files without launching the app.
-
Include the import statement for app_localizations.dart and AppLocalizations.delegate in the constructor call for MaterialApp.
The auto-generated AppLocalizations class also offers pre-built lists of localizationsDelegates and supportedLocales. Instead of manually providing them, you can utilize these generated lists.
This code snippet produces a Text widget that exhibits "Hello World!" when the device's locale is set to English, and "¡Hola Mundo!" when the device's locale is set to Spanish. The method name of each getter corresponds to the key of the respective entry in the arb files, while the localized message is stored as the value of that entry. Hence, Intl flutter helps developers to dispaly text in their preferred language as per requirement.
Formatting Dates and Times
With the help on intl library in flutter we can format date and time. Date strings are formatted in various ways depending on both the locale and the requirements of the application.
When it comes to placeholder values of type DateTime, they are formatted using the DateFormat class from the intl package. There are 41 different format variations available, distinguished by the names of their DateFormat factory constructors. In the given example, the DateTime value within the helloWorldOn message is formatted using the DateFormat.yMd constructor.
In an application set to the US English locale, the following expression would result in "7/10/1996". However, in a Russian locale, it would yield "10.07.1996".
Hence, in the above example you have seen how with the help of intl flutter we can format date.
Formatting Numbers
The way numbers are displayed varies significantly across different regions, including currency values. Intl flutter helps us to achieve the formatting of numbers in a desired manner. To handle this, the localization generation tool in flutter_localizations utilizes the NumberFormat class from the intl package. This class ensures that numbers are appropriately formatted according to the specific locale and desired format.
The constructors of the NumberFormat class can be applied to int, double, and number types.
To illustrate, if you want to specify the optional decimalDigits parameter for compactCurrency, you need to modify the lib/l10n/app_en.arg file as follows.
Example Application
Let us now understand how with the help of intl flutter we can create an application. Now we will make an application dealing with Internationalization of Text, Formatting Numbers and Formatting Date and Time.
After you finsih setting up the intl library in flutter, your project structure will look something like this:
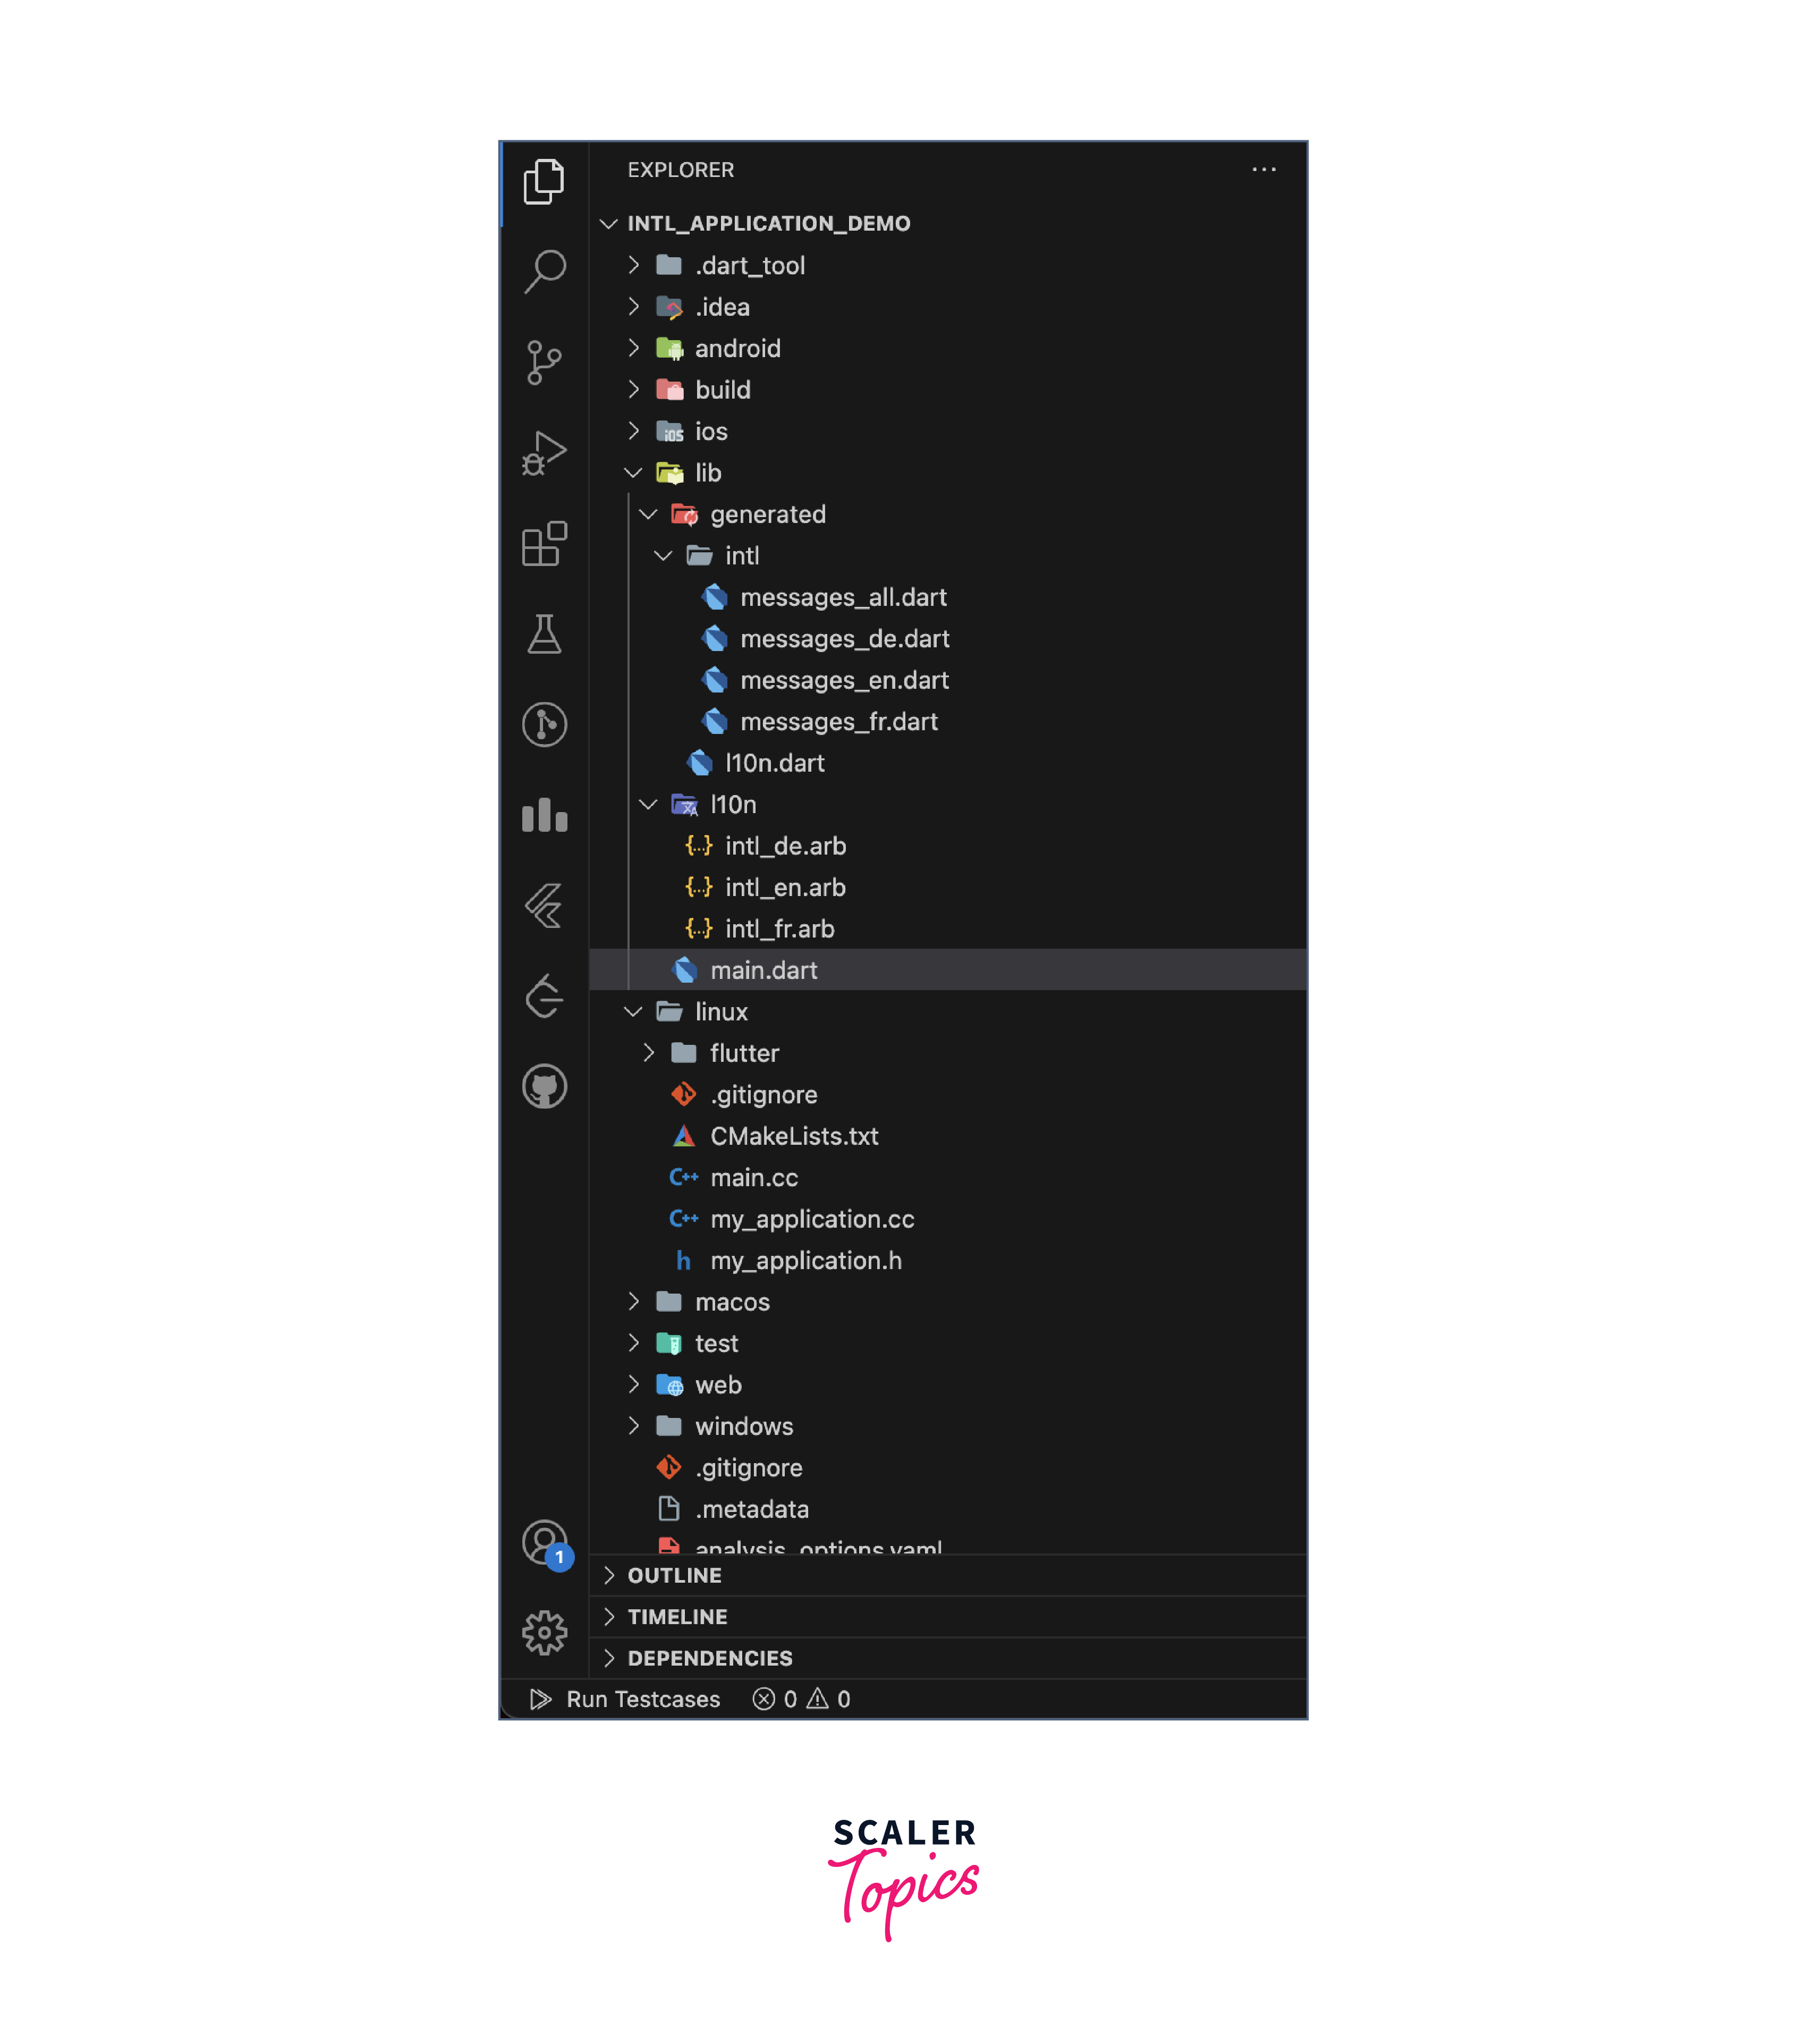
Now follow the steps as mentioned below to build an application demonstrating the implementation of intl in flutter.
Step 1:
In lib/I10n directory of your application add necessary strings to .arb files of added locales like in our case we will be making changes only in intl_en.arb and intl_fr.arb
This is how intl_en.arb file will look:
This is how intl_fr.arb file will look so that we can use intl in flutter:
As we can see we have added required placeholders to take data from user. We will be using these placeholders to display data in incorporation to the translated data.
This will auto-generate changes in I10n.dart file in lib/generated/intl directory of the app.
After the changes, this is how I10n.dart will look like:
Step 2:
Now we will make UI to display the changes made till now of intl flutter. This is the code we will put in main.dart:
The application made in intl flutter would look something like this:
Below is the link for the github repository of the same application:
Advanced intl Features
Advanced Features of the Intl Library in Flutter are as follows. We will be learning more about them in the sections given below:
Handling Right-to-Left (RTL) Languages
The Intl library provides support for handling RTL languages, which are languages that are written from right to left. You can use the intl package along with the intl_translation package to add RTL language support to your Flutter app. By defining appropriate RTL locales and using the Directionality widget, you can ensure that your app's UI adapts correctly for RTL languages, including the alignment of text, navigation elements, and layout.
-
Localization Setup:
Make sure you have set up localization in your Flutter project using the intl library. This involves defining your app's localized messages and loading them using the Intl class.
-
Locale Configuration:
Define the RTL locales in your app by specifying the correct textDirection for each RTL language. Flutter's TextDirection enum provides two values: TextDirection.ltr for Left-to-Right languages and TextDirection.rtl for Right-to-Left languages.
-
Support for RTL Layout:
To support RTL layout, you need to mirror the direction of widgets and adjust the alignment of text and other elements. Flutter provides the Directionality widget, which takes the textDirection as a parameter and automatically handles the layout direction for you. Wrap your app's root widget with Directionality and pass the appropriate textDirection based on the user's selected locale.
Pluralization and Gender Agreement
The Intl library supports pluralization and gender agreement, which are essential for correctly adapting content based on numeric values and gender-specific language rules. With the Intl.plural and Intl.gender methods, you can define different translations for singular and plural forms, as well as handle gender-specific phrases. This enables your app to display accurate and contextually appropriate messages in different languages.
Pluralization and gender agreement are important aspects of localization in Flutter apps. The intl library provides powerful features to handle these requirements. Let's explore them briefly:
Pluralization:
Pluralization is the process of selecting the appropriate translation based on the count of items. Different languages have different plural forms, and the intl library helps you handle this complexity by providing the Intl.plural() method. It allows you to define messages for different plural forms, such as zero, one, few, many, and other, and select the appropriate message based on the count.
Gender Agreement:
Gender agreement is the process of ensuring that translations align with the gender of the subject. While the intl library doesn't provide explicit support for gender agreement, you can achieve gender-specific translations by using placeholders in your messages. You can dynamically replace these placeholders with the appropriate gender-based values at runtime.
By utilizing the intl library in Flutter, you can create robust and flexible localization solutions that handle pluralization and gender agreement in a convenient and scalable manner.
Localizing Images and Assets
The Intl library can be utilized to localize images and assets in your Flutter app. You can create separate asset directories for different locales, and then dynamically load the appropriate assets based on the current locale using the Intl.defaultLocale. This allows you to provide localized images, icons, fonts, and other visual resources, enhancing the overall user experience and ensuring consistency with the localized content. To localize images and assets in Flutter using the intl library without writing any code, you can follow these high-level steps:
-
Organize your assets:
Start by organizing your assets based on the languages you want to support. Create separate folders for each language and place the corresponding localized assets inside them.
-
Define asset paths in localization files:
In your localization files, define the paths to the localized assets. Use unique keys for each asset and specify the path based on the current locale.
-
Configure asset entries in pubspec.yaml:
In your project's pubspec.yaml file, configure the asset entries to include all the localized asset folders.
-
Load and display localized assets:
In your Flutter code, load and display the localized assets based on the current locale using the Intl.message() function or any other localization approach of your choice.
By following these steps, you can localize your images and assets in Flutter using the intl library. Remember that while this explanation doesn't provide the exact code implementation, it gives you a high-level understanding of the localization process for images and assets.
Custom Localization Strategies
The Intl library offers flexibility in implementing custom localization strategies to suit your specific requirements. You can extend the LocalizationsDelegate class to define your own localization logic, allowing you to fetch translations from remote servers, integrate with third-party localization services, or use different file formats for storing translations. This enables you to customize the localization process and seamlessly integrate the Intl library with your preferred localization workflows.
Message Extraction and Translation Workflow
The intl library in Flutter, along with the intl_translation package, provides tools and a workflow to handle message extraction and translation. Here's an overview of the message extraction and translation workflow using the intl library:
-
Extracting Messages:
The first step is to extract the translatable messages from your Flutter source code. You can use the intl_translation package's tools to scan your codebase and identify messages that need to be translated. These messages are typically wrapped in the Intl.message() function or other relevant functions provided by the library.
-
Generating Translation Files:
Once the messages are extracted, you can generate translation files in a format that translators can work with. The intl_translation package provides utilities to generate translation files in formats like ARB (Application Resource Bundle), XLIFF (XML Localization Interchange File Format), or CSV (Comma-Separated Values).
-
Translating Messages:
The translation files are then handed off to translators who can provide translations for the extracted messages. Translators work with the translation files and provide the localized versions of the messages for each supported language.
-
Updating Translations:
As your app evolves and new messages are added or existing messages change, you need to update the translations. By running the message extraction process again, you can identify the new or modified messages and generate updated translation files. Translators can then work on updating the translations for those specific messages.
-
Integration in the App:
Once the translations are available, you can integrate them back into your Flutter app. By including the translated messages in the respective localization files, your app can load the appropriate translations based on the user's selected locale.
The message extraction and translation workflow ensures a systematic and efficient process for localizing your app's messages. It enables collaboration between developers and translators, facilitates the generation and management of translation files, and simplifies the integration of localized content back into the app. This workflow, combined with the capabilities of the intl library, helps streamline the localization process and ensures a smooth multilingual experience for your app users.
By leveraging these advanced features of the Intl library in Flutter, you can create highly localized and user-friendly applications that cater to a diverse range of languages, cultures, and regions. These features empower you to handle complex language rules, adapt visual elements, and provide a seamless experience for users around the world.
Conclusion
- The Intl library in Flutter is a powerful and versatile package that provides developers with a comprehensive set of localization and internationalization tools for their Flutter applications.
- With this library, developers can easily implement multi-language support, date and time formatting, number formatting, currency formatting, handling RTL languages, pluralization, gender agreement, and localizing images and assets.
- It offers a user-friendly interface for managing translations and provides advanced features for customization and flexibility.
- The Intl library enables developers to create globally accessible applications with localized content tailored to diverse audiences, ensuring a seamless and personalized user experience.
- With its extensive capabilities, the Intl library is a valuable asset for developers looking to internationalize and localize their Flutter applications.