What are the Mouse Events in JavaScript?

An event is something that happened due to a specific action. Hence a mouse event is something that happens due to the specific action of the mouse such as click, double click, mouseover, mousedown, mouseup, etc.
Before moving ahead let us discuss why events, specifically mouse events, are provided in JavaScript. The answer is - "The mouse events are provided in JavaScript to make it easier for the user to achieve some result by performing a simple action using the mouse".
As a developer, there can be a scenario when you want to show some alert when the user clicks something on the website or you want to show the hidden element when the user double clicks a button or anything like that, you must have got the idea. So without further ado, let us get started.
Types of Mouse Events in JavaScript
There are seven popular mouse events in JavaScript. All these events occur when you do some kind of action with the help of your mouse such as clicking something or moving the mouse out of the area of some element. Remember that these mouse events only occur on the elements that they are attached with, and not with any random element. Let us see the basic definitions of these mouse events in JavaScript.
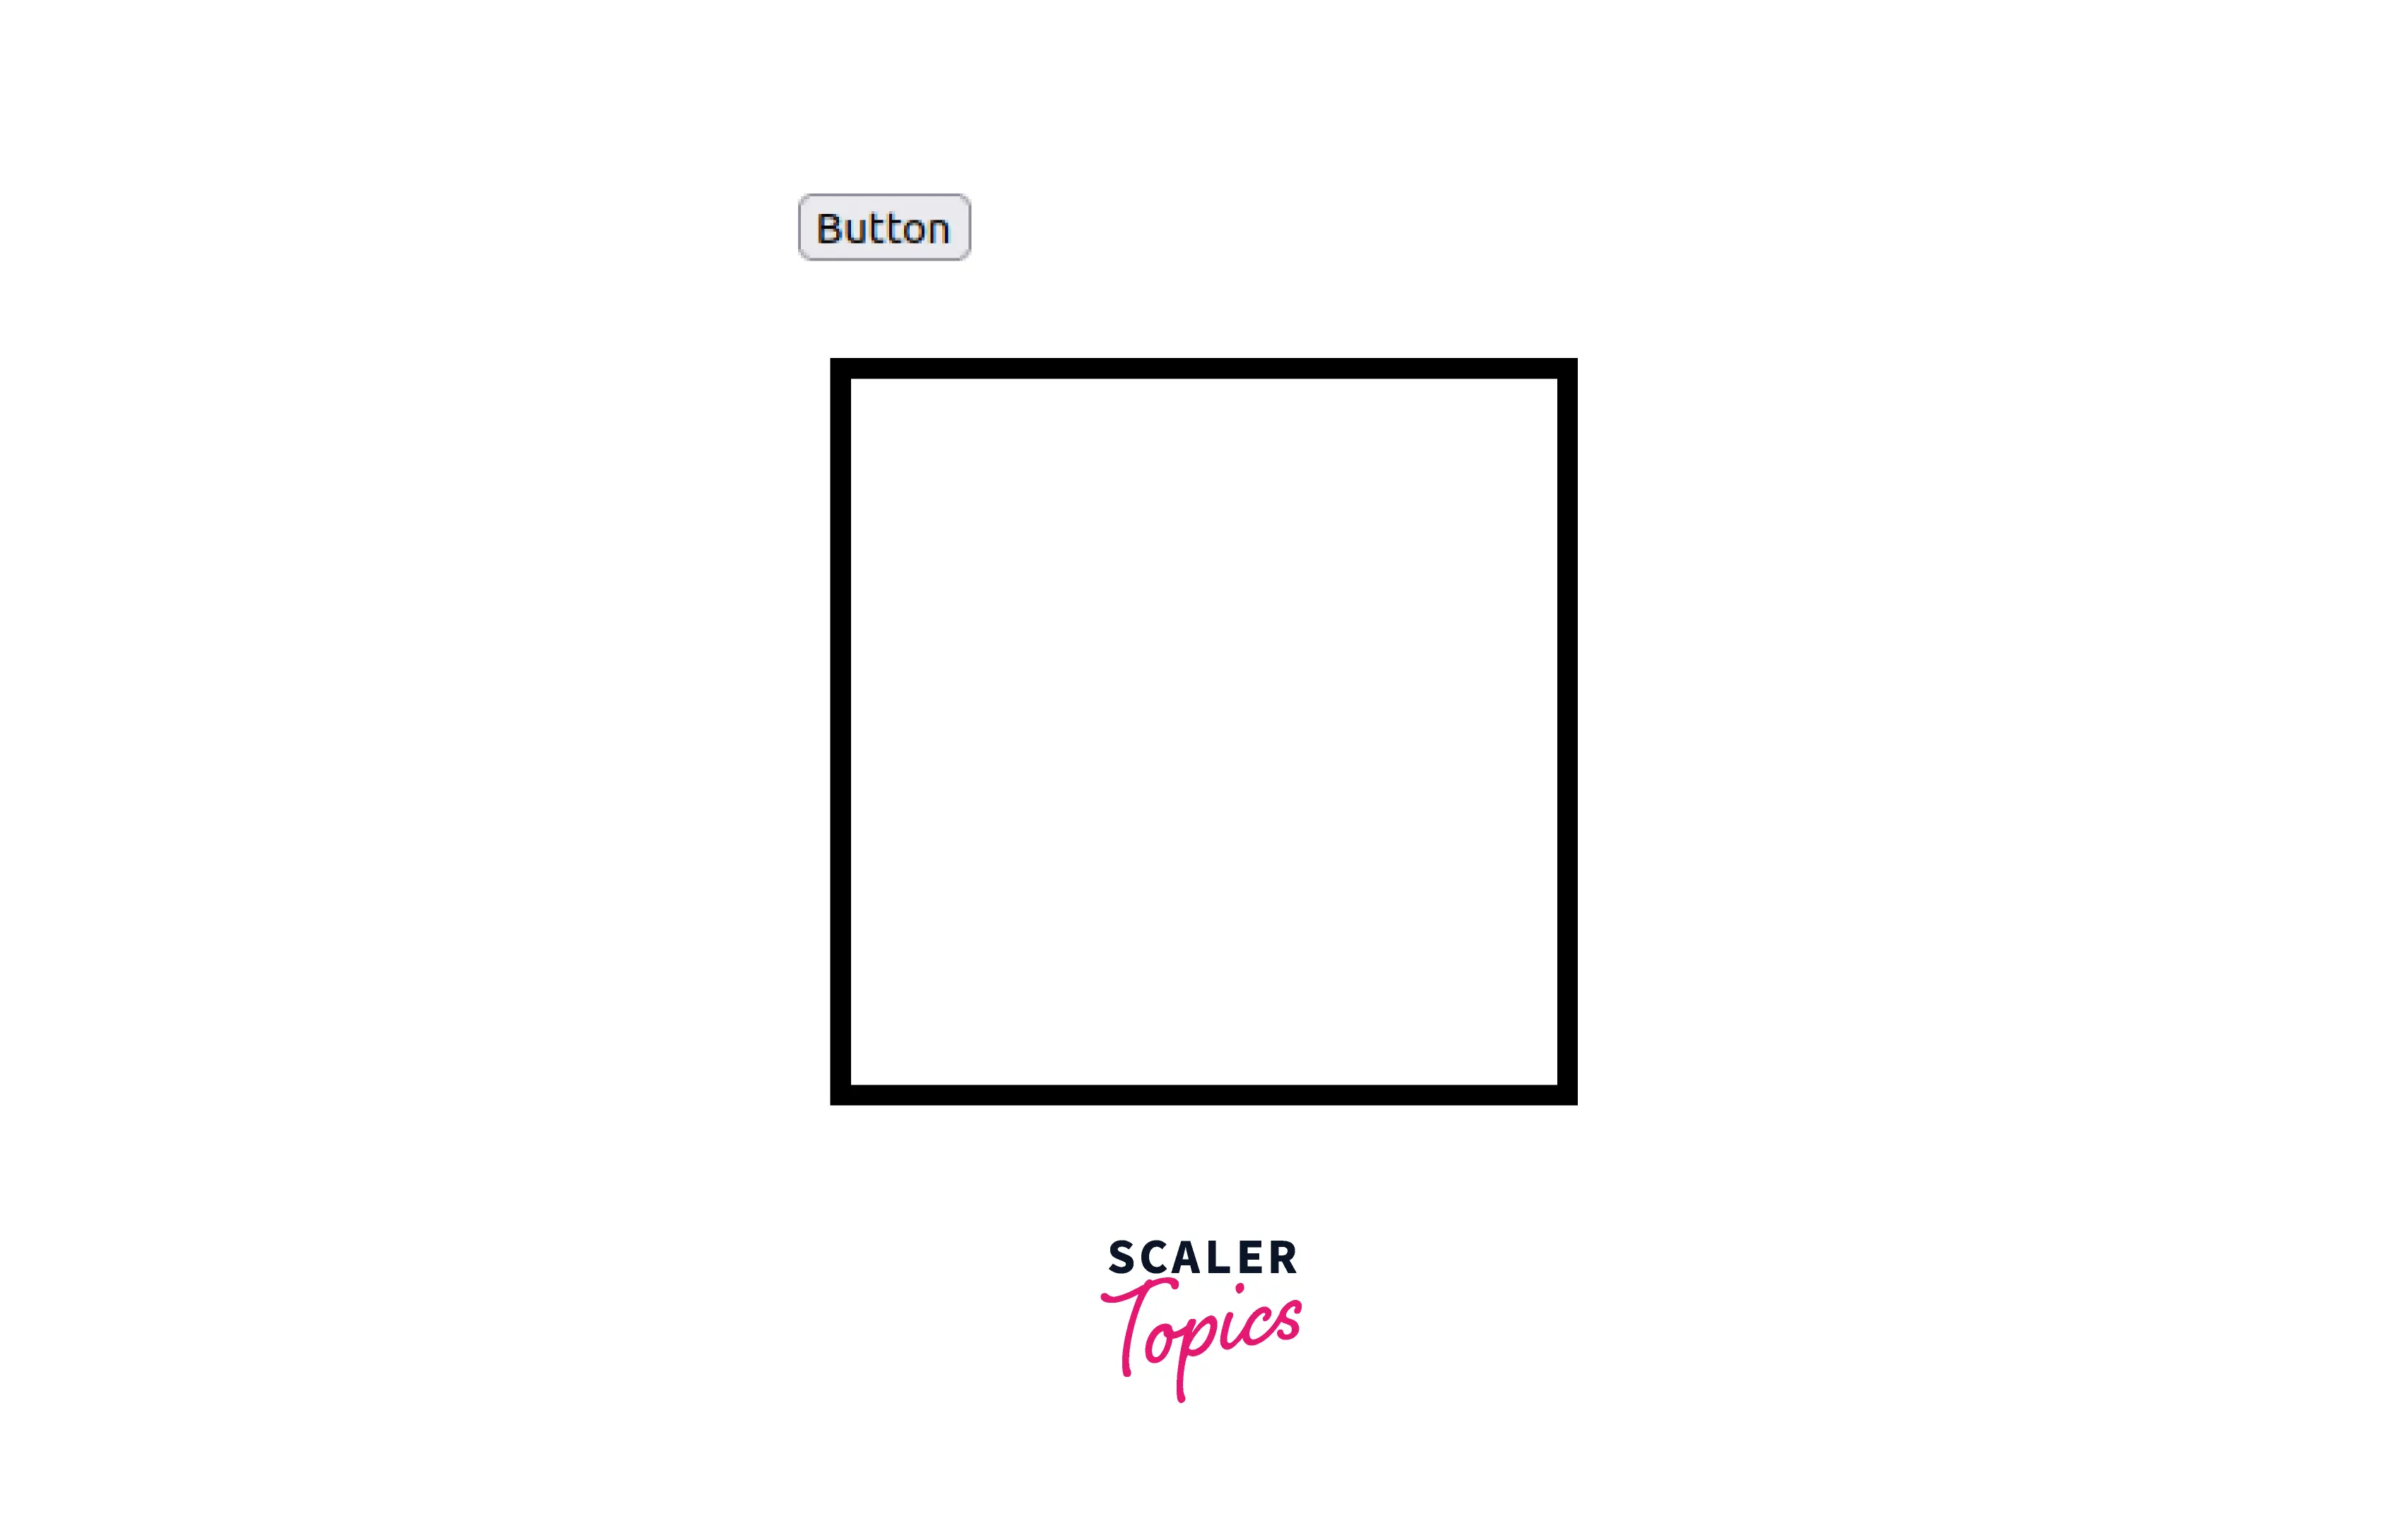
1. click event
The click event as the name suggests is the event that gets fired on clicking the specific element on the web page. One-click is defined as the combination of mousedown and mouseup events. Here's an image for your reference.
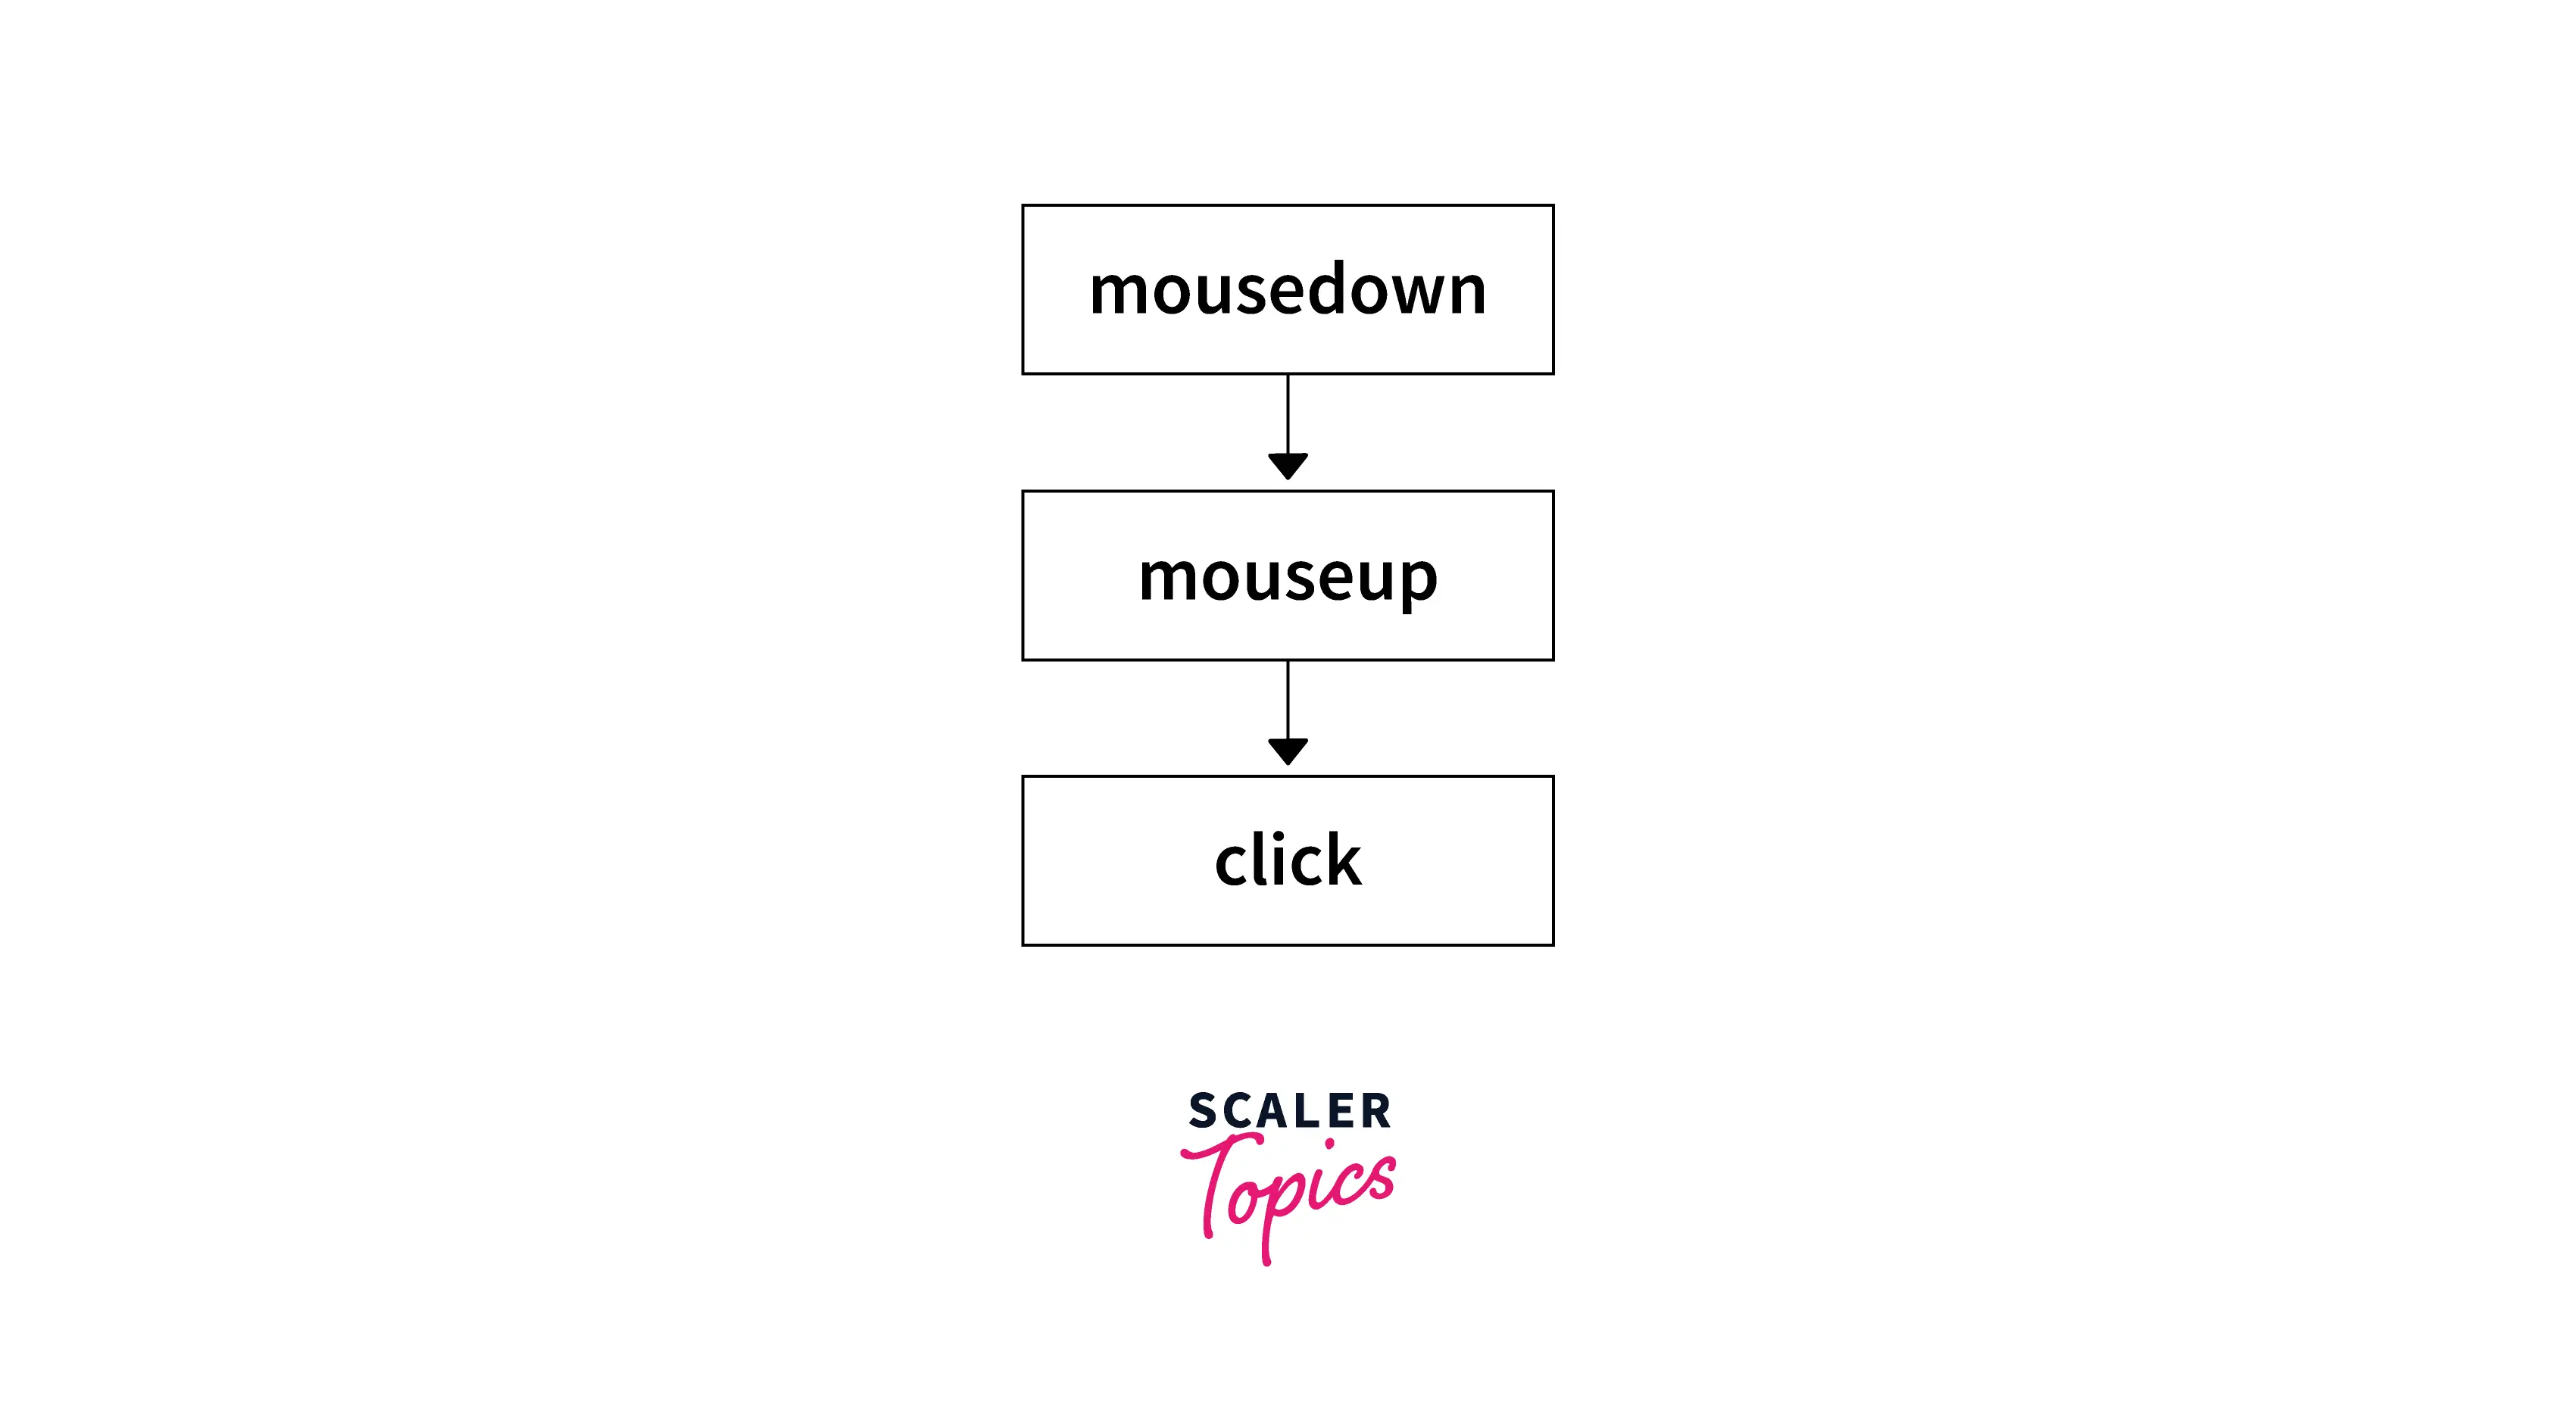
As you can see in the above-given image when both mousedown and mouseup event occurs successfully, we say it as a click event. This event is one of the most used mouse events in JavaScript.
2. dblclick Event
The dblclick event is the event that gets fired on double-clicking the specific element on the web page. When two click events are fired in a very short time, one double-click event gets fired.
3. mousedown Event and Mouseup Event
Whenever we press the left mouse button, in that state, the mousedown event gets fired. I said pressed not released. There's a difference between the two. One click involves two events that are mousedown and mouseup. When we press the mouse button, the mousedown event gets fired and when we release it, the mouseup event gets fired. Simple as that.
4. mousemove Event
The mousemove event gets fired when the cursor moves over the specific element in the web page. As this event gets fired every time the cursor moves over the element hence it affects the performance of the web page.
5. mouseover Event and mousemove Event
The mouseover event gets fired when the cursor gets over the specific element in the web page. The main difference between mousemove and mouseover is that the mousemove event needs the cursor movement over the element to get fired but the mouseover event just needs the cursor over the element to get fired. If the cursor is over the element and we don't move the cursor, the mouseover event still gets fired but the mousemove event does not.
As this event gets fired every time the cursor is over the element hence it also affects the performance of the web page.
Ways of Adding Event Listener in JavaScript
Now we know the definition of mouse events in JavaScript but the definition is not sufficient, we need to know how to apply this in our program. We can apply these events in our program using two popular ways addEventListner() and inline. Let us discuss both of these in detail.
Using addEventListener() Way
We can use addEventListener() method to register or add an event to an element. Before doing so, we have to select that element using a selector like queryselector, getElementById(), etc. After selecting the element, we can easily use the addEventListener() method on it. Let us see an example of the same.
Syntax:
There are three parameters of addEventListener() method. The first two parameters are mandatory while the third one that is useCapture is optional.
- event - Here the event name is to be passed, like click, dblclick, mousedown, etc.
- function - Here function name is to be passed, like clickFunc(), dblclickFunc(), or any function of your choice. This function acts as an event listener. In simple words, this function gets called when the event is fired.
- useCapture (optional) - Here a boolean value is passed that is either true or false. By default, it is set to false (for Event Bubbling), but you can set it to true also (for Event Capturing).
Using inline Way
The inline is way the simplest way of registering events in JavaScript. Here you just need to add the event name with the prefix 'on' such as onclick, ondblclick, onmousedown, etc. as the attribute of an HTML tag.
Syntax:
Example:
Which one is Preferred?
Even though both of these ways of registering events in JavaScript do the work but addEventListener() method is the most preferred way among the two. Why?
Because the addEventListener() method does the same work as onclick(inline way) and even more but using the inline way as the attributes in HTML tag mixes up HTML and JavaScript which is considered a bad practice.
Hence one should prefer the addEventListener() method over the inline method of event handling/listening.
Examples of JavaScript Mouse Events
Now as we have gone through all the prerequisites of mouse events in JavaScript let us dive into the examples of mouse events in JavaScript.
1. click Event
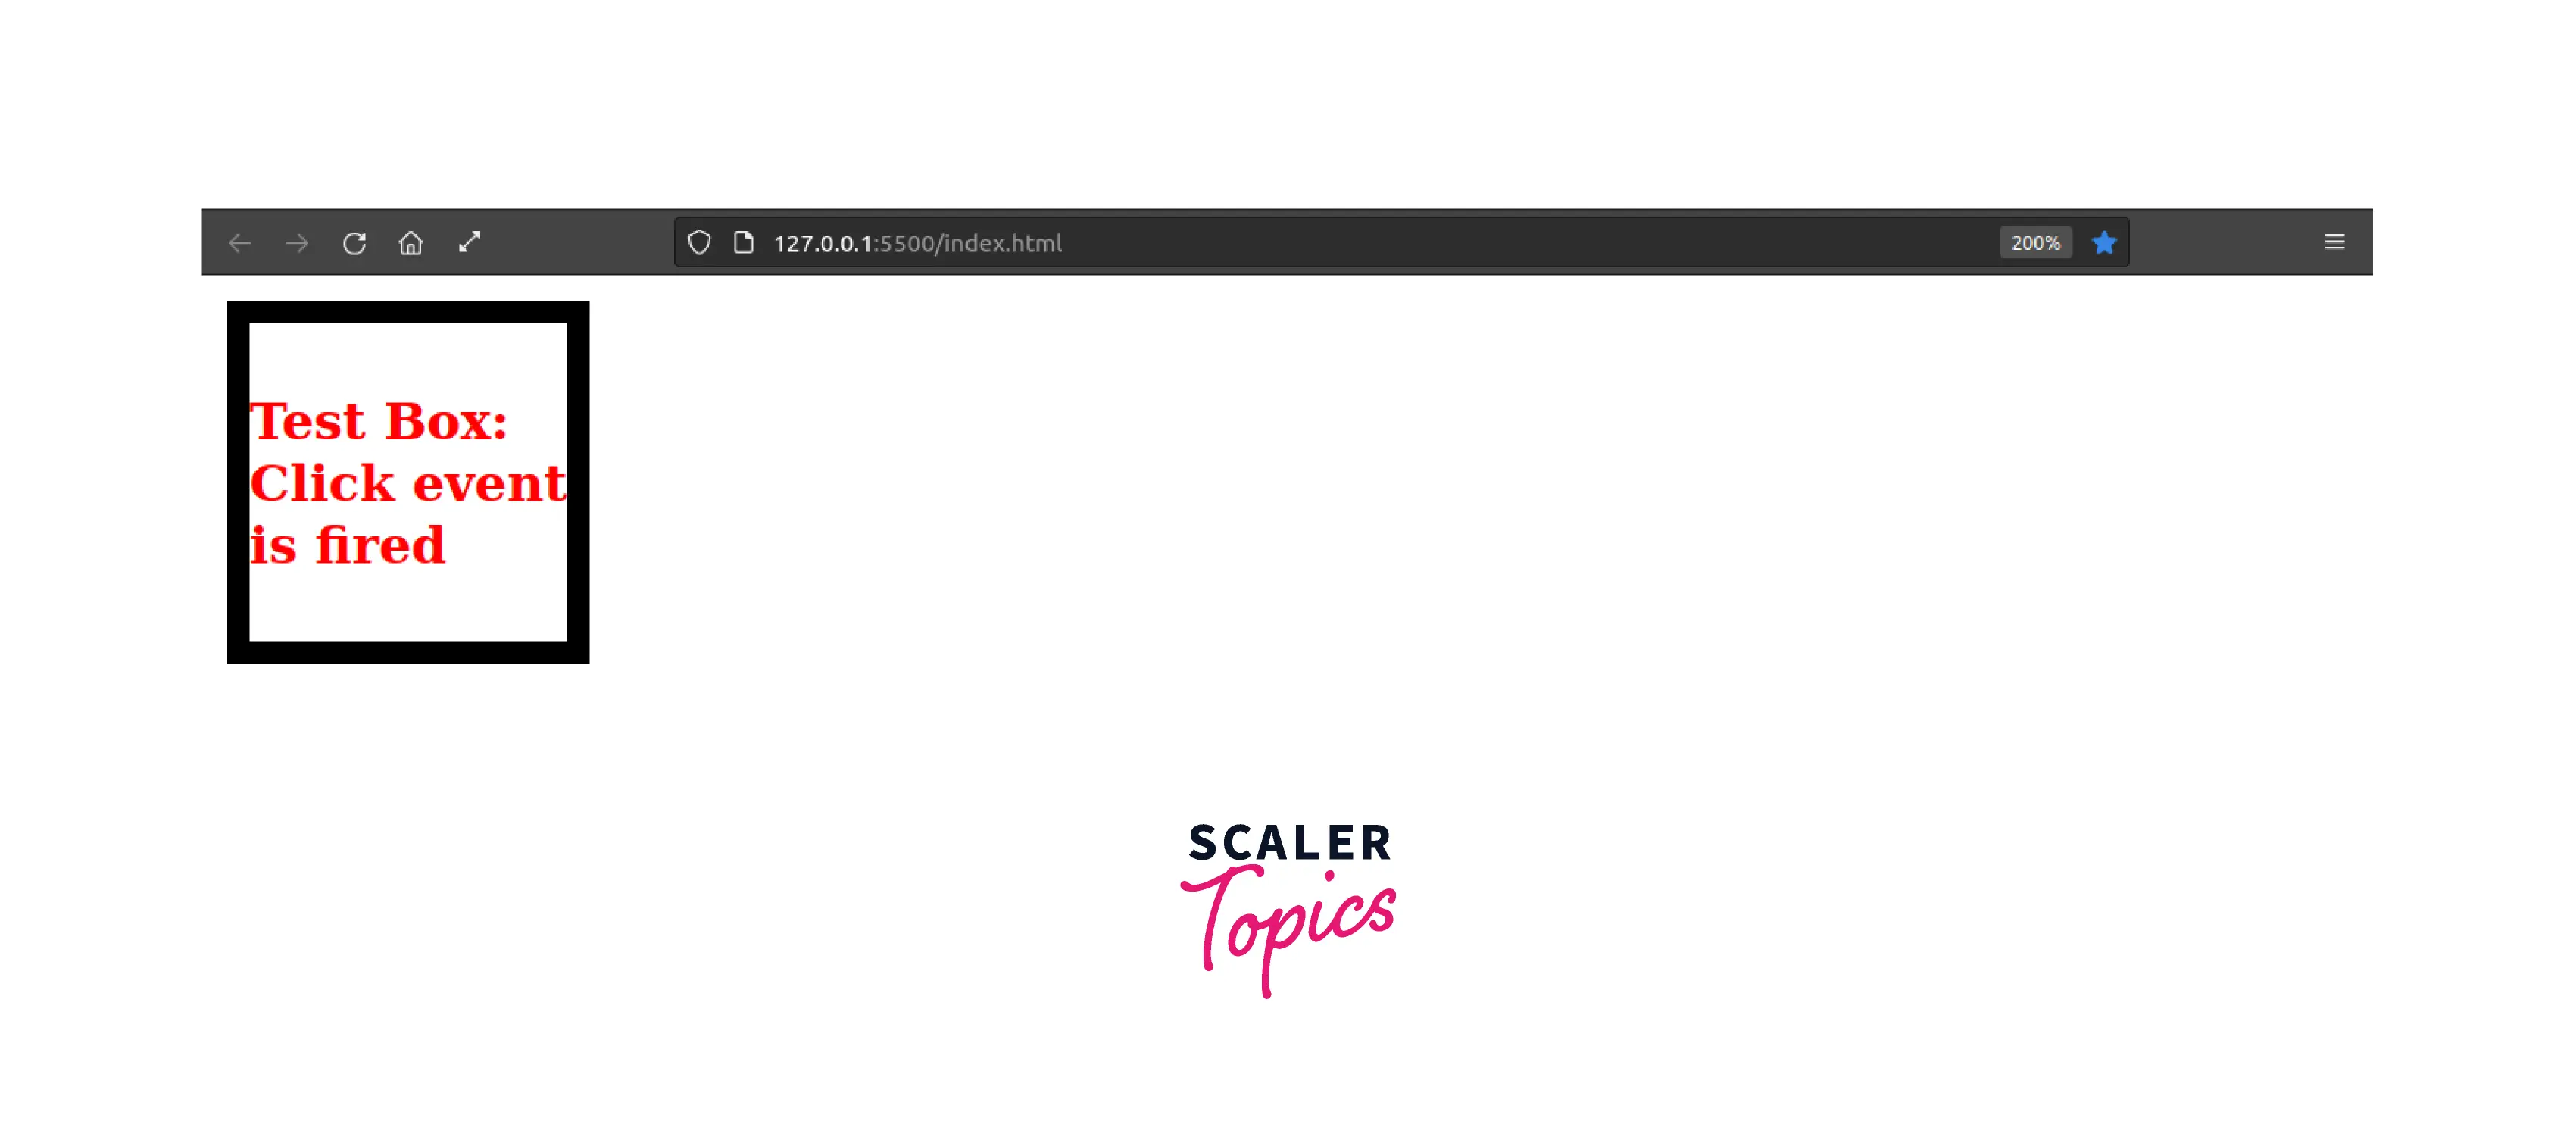
In this example, we have used the inline way just to showcase to you how it works. Here we have a program that adds a message into the "test box" whenever the user clicks on the "test box".
Code:
Code Flow:
In the above-given code, we have a <div> tag with the id as "testbox" and we have applied some CSS on it. We have used the click event to get a message in the test box. For this, we used a function called myFunc() that is attached with the click event. Hence, myFunc() gets triggered when the testbox is clicked. We have used document.getElementById to select the <div> tag having id as "testbox". Then we added a message in that selected element using elem.innerText and set the color as 'red' using the elem.style.color.
Output:

Explanation:
In the above-given example, we have used the 'click' event in JavaScript to achieve a functionality on clicking the <div> tag with the id as 'testbox'. When that element got clicked, a new message appeared in that element saying "Test Box: Click event is fired" with the color 'red'. This is achieved dynamically using the 'click' mouse event in JavaScript.
2. dblclick Event
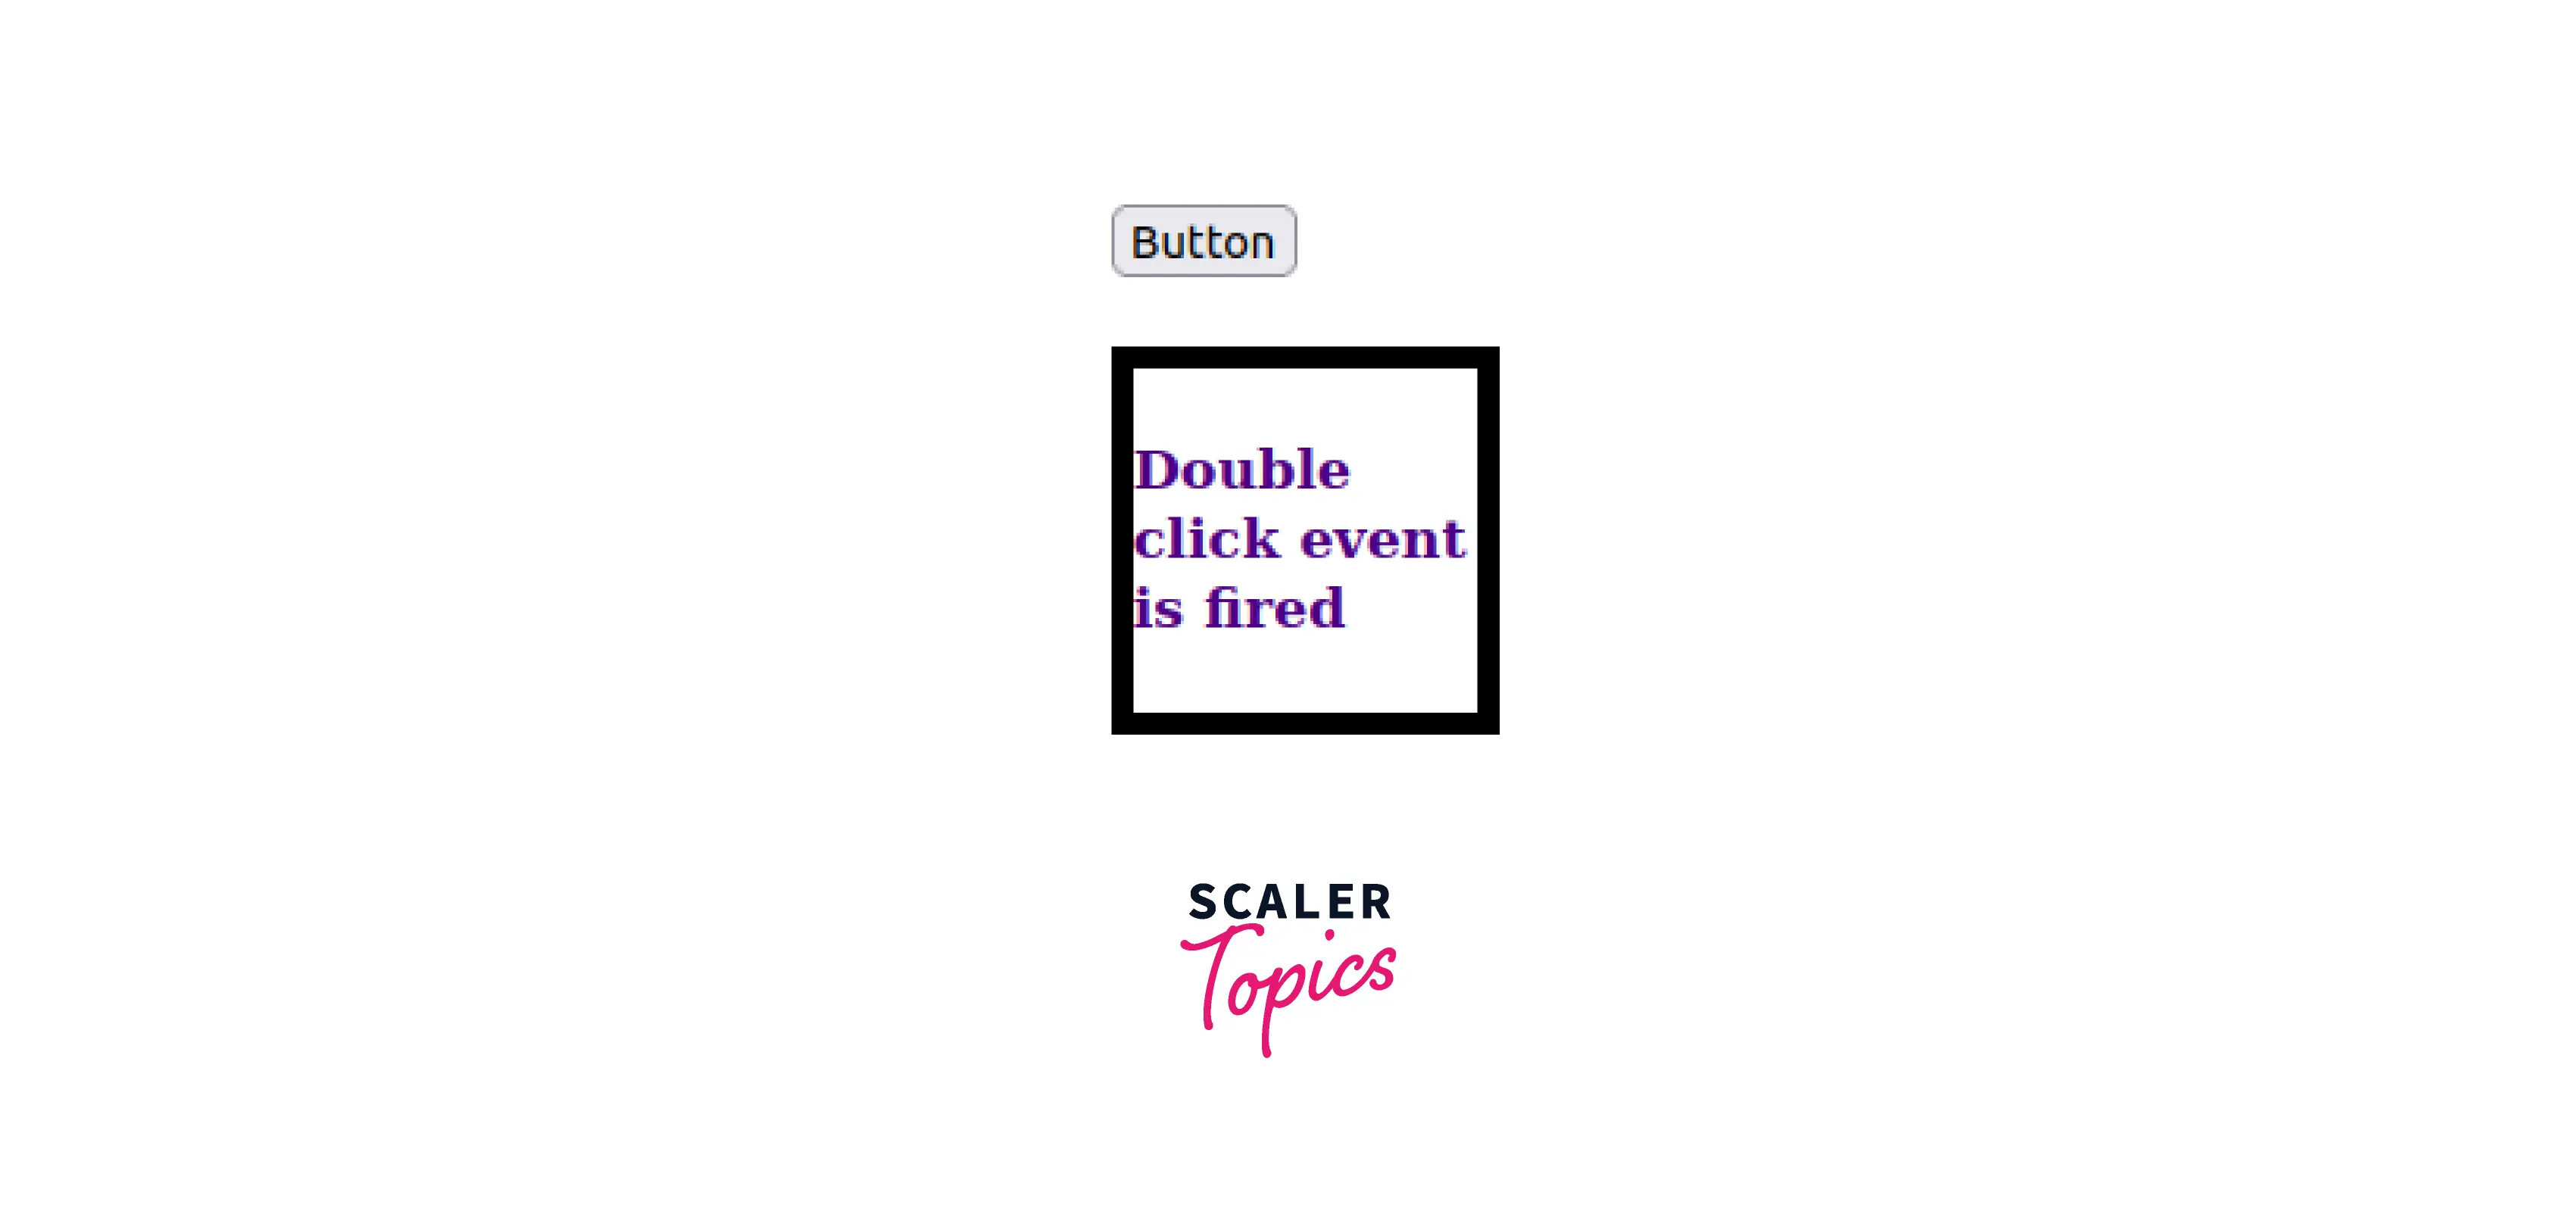
In this example, we have used the addEventListener() method to handle the dblclick event. Here we have a program that adds a message into the <div> tag whenever the user double clicks on the given button.
Code:
Code Flow:
In the above-given code, we have a <div> tag with the id as "add" and we have applied some CSS on it. We have used the double click event to get a message in the test box. For this, first we selected the button with the id as 'btn' using the document.getElementById then we attached an event listener on that button with the event as 'dblclick'. We also used an arrow function in the addEventListener() method. In that arrow function, We have used document.getElementById to select the <div> tag having id as "add". Then we added a message in that selected element using elem.innerText.
Output:
Explanation:
In the above-given example, When the button got double-clicked, a new message appeared in the div tag saying "Double click event is fired". This is achieved dynamically using the 'dblclick' mouse event in JavaScript.
3. mousedown Event
In this example, we have used the addEventListener() method to listen to the mousedown event. Here we have a program that adds a message into the <div> tag whenever the user press the given button.
Code:
Code Flow:
In the above-given code, we have a <div> tag with the id as "add" and we have applied some CSS on it. We have used the mousedown event to get a message in the div tag. For this, first we selected the button with the id as 'btn' using the document.getElementById then we attached an event listener on that button with the event as 'mousedown'. We also used an arrow function in the addEventListener() method. In that arrow function, We have used document.getElementById to select the <div> tag having id as "add". Then we added a message in that selected element using elem.innerText.
Output:

Explanation:
In the above-given example, When we pressed the button, a new message appeared in the div tag saying "Mousedown event is fired" with the color 'blue'. This is achieved dynamically using the 'mousedown' mouse event in JavaScript.
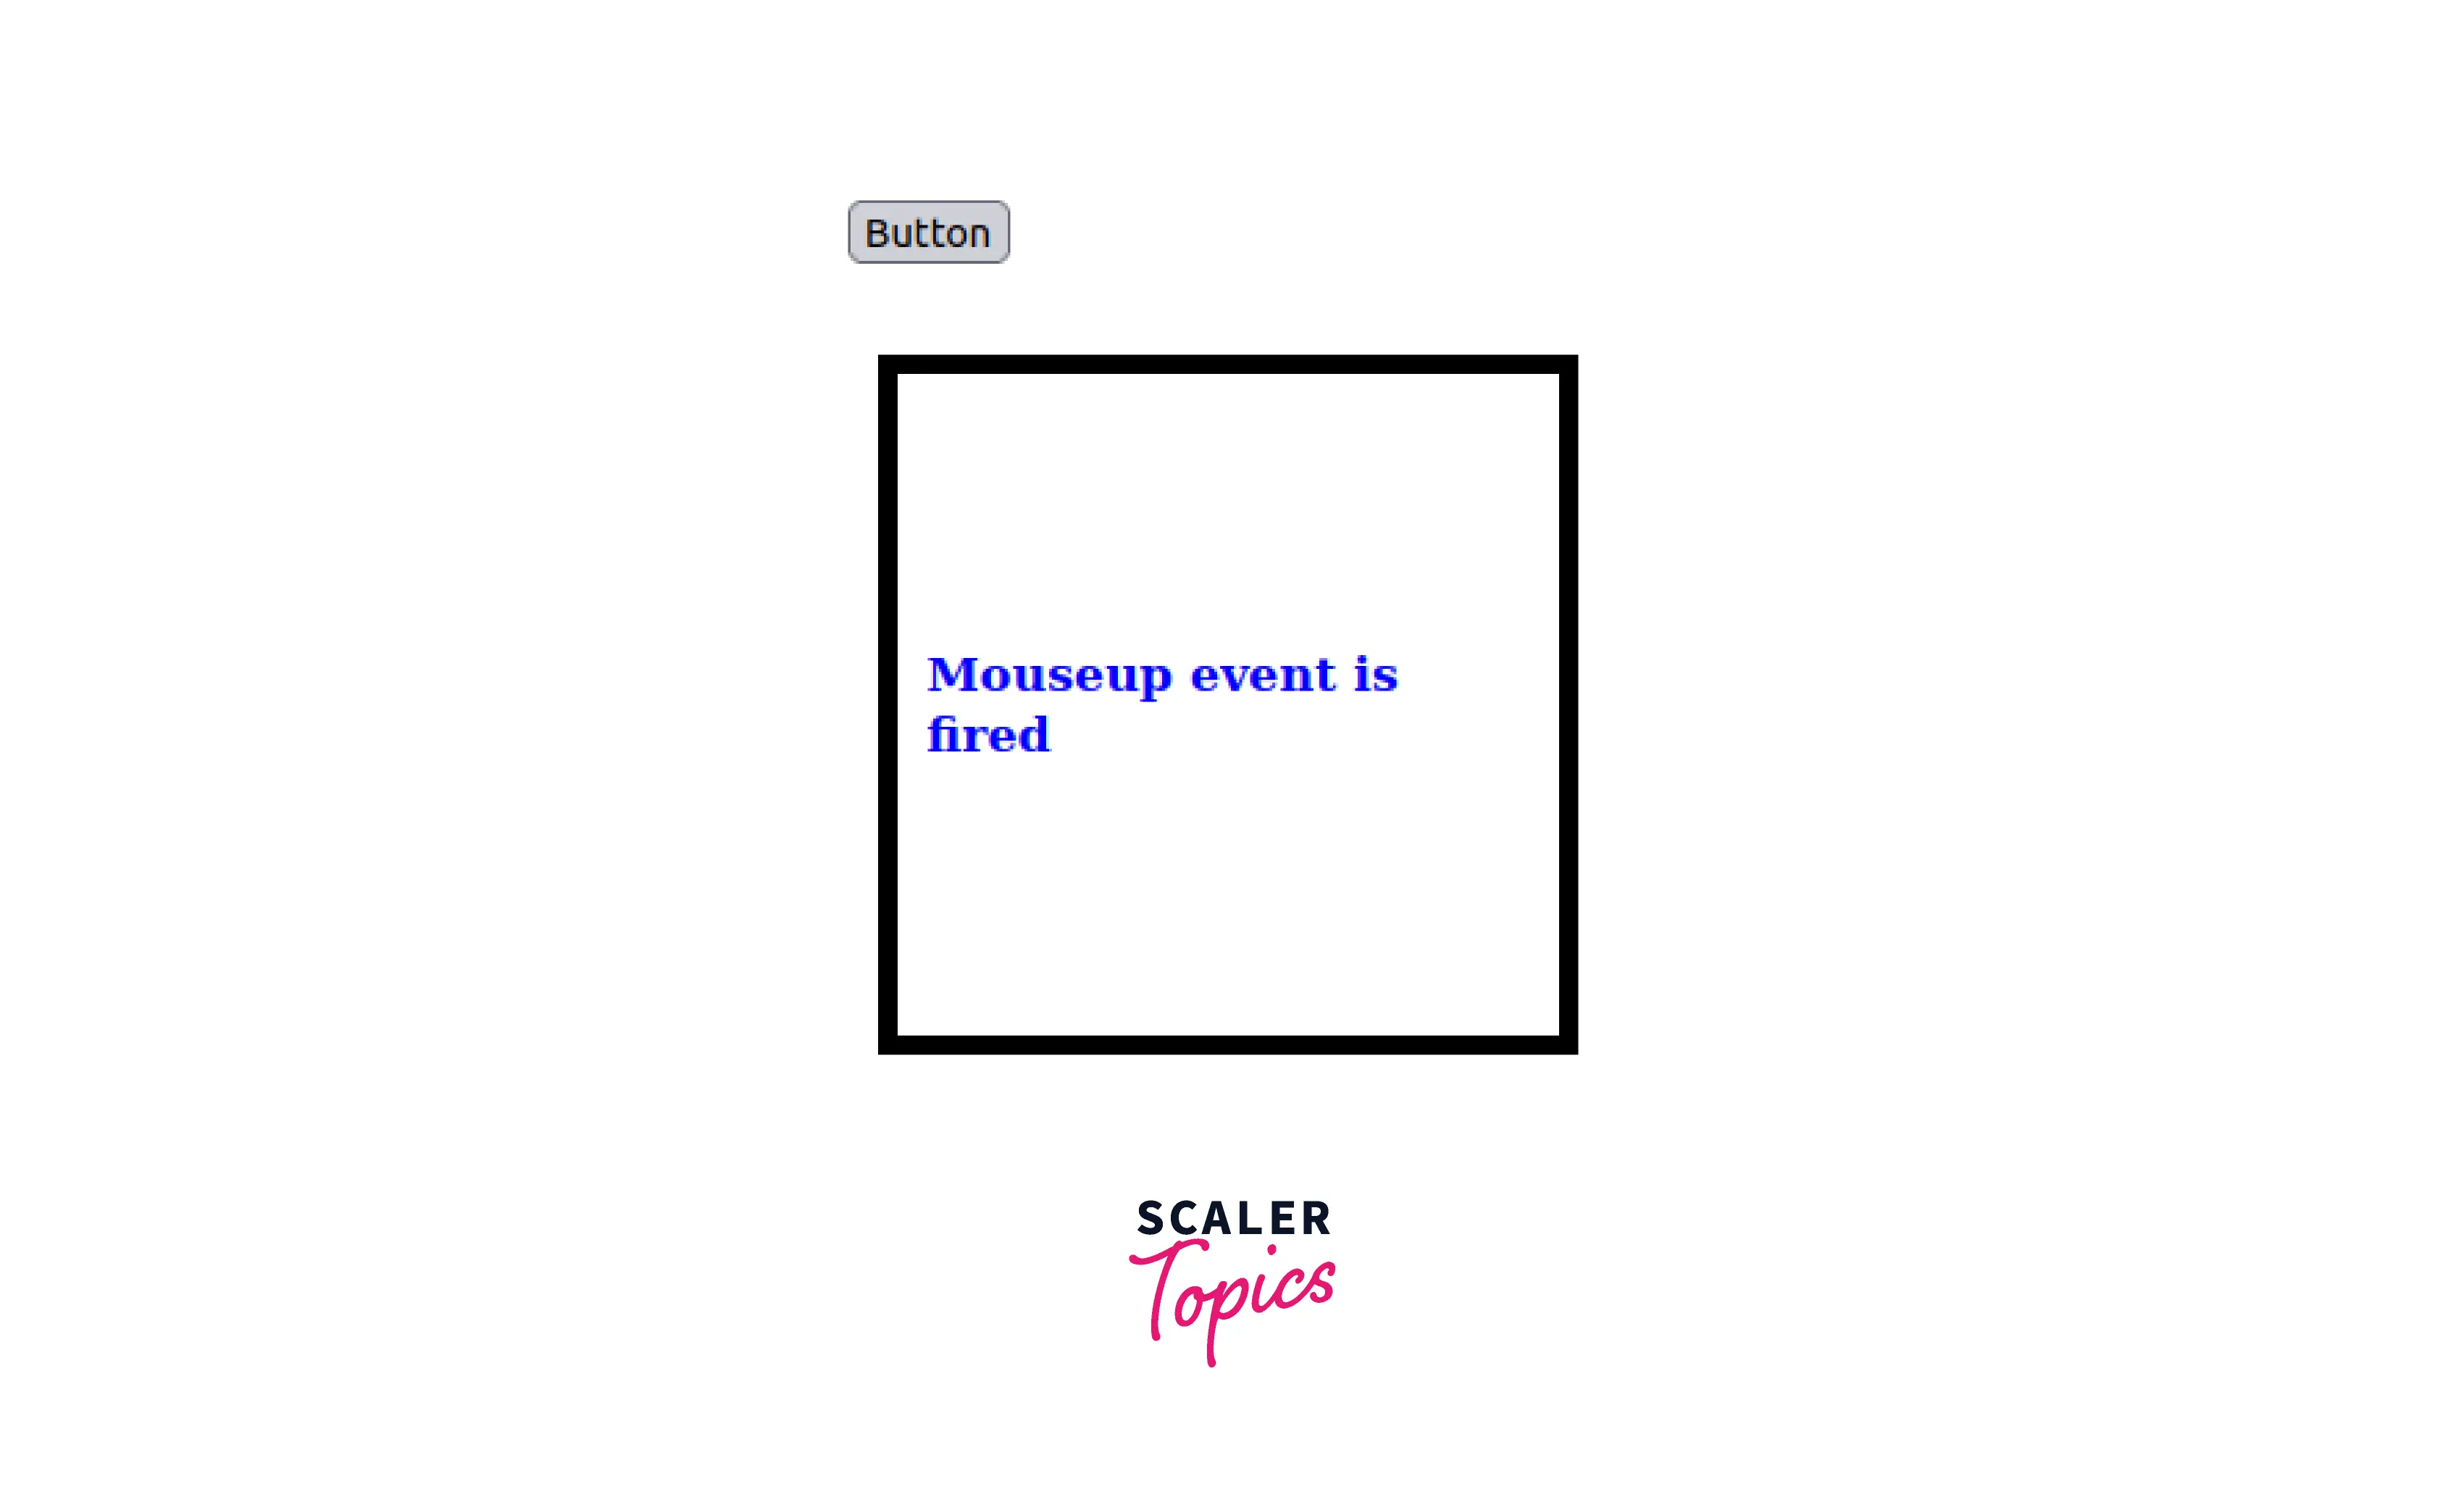
4. mouseup Event
In this example, we have used the addEventListener() method to listen to the mouseup event. Here we have a program that adds a message into the <div> tag whenever the user press the given button.
Code:
Code Flow:
In the above-given code, we have a <div> tag with the id as "add" and we have applied some CSS on it. We have used the mouseup event to get a message in the div tag. For this, first we selected the button with the id as 'btn' using the document.getElementById then we attached an event listener on that button with the event as 'mouseup'. We also used an arrow function in the addEventListener() method. In that arrow function, We have used document.getElementById to select the <div> tag having id as "add". Then we added a message in that selected element using elem.innerText.
Output:
Explanation:
In the above-given example, When we released the button after pressing it, a new message appeared in the div tag saying "Mouseup event is fired" with the color 'blue'. This is achieved dynamically using the 'mouseup' mouse event in JavaScript.
5. Mousemove Event
In this example, we have used the addEventListener() method to listen to the mousemove event. Here we have a program that adds a message into the <div> tag whenever the user moves the cursor over the div tag.
Code:
Code Flow:
In the above-given code, we have a <div> tag with the id as "add" and we have applied some CSS on it. We have used the mousemove event to get a message in the div tag. For this, first we selected the div tag with the id as 'add' using the document.getElementById then we attached an event listener on it with the event as 'mousemove'. We also used an arrow function in the addEventListener() method. In that arrow function, we have used div.innerText to add the message inside the <div> tag.
Output:
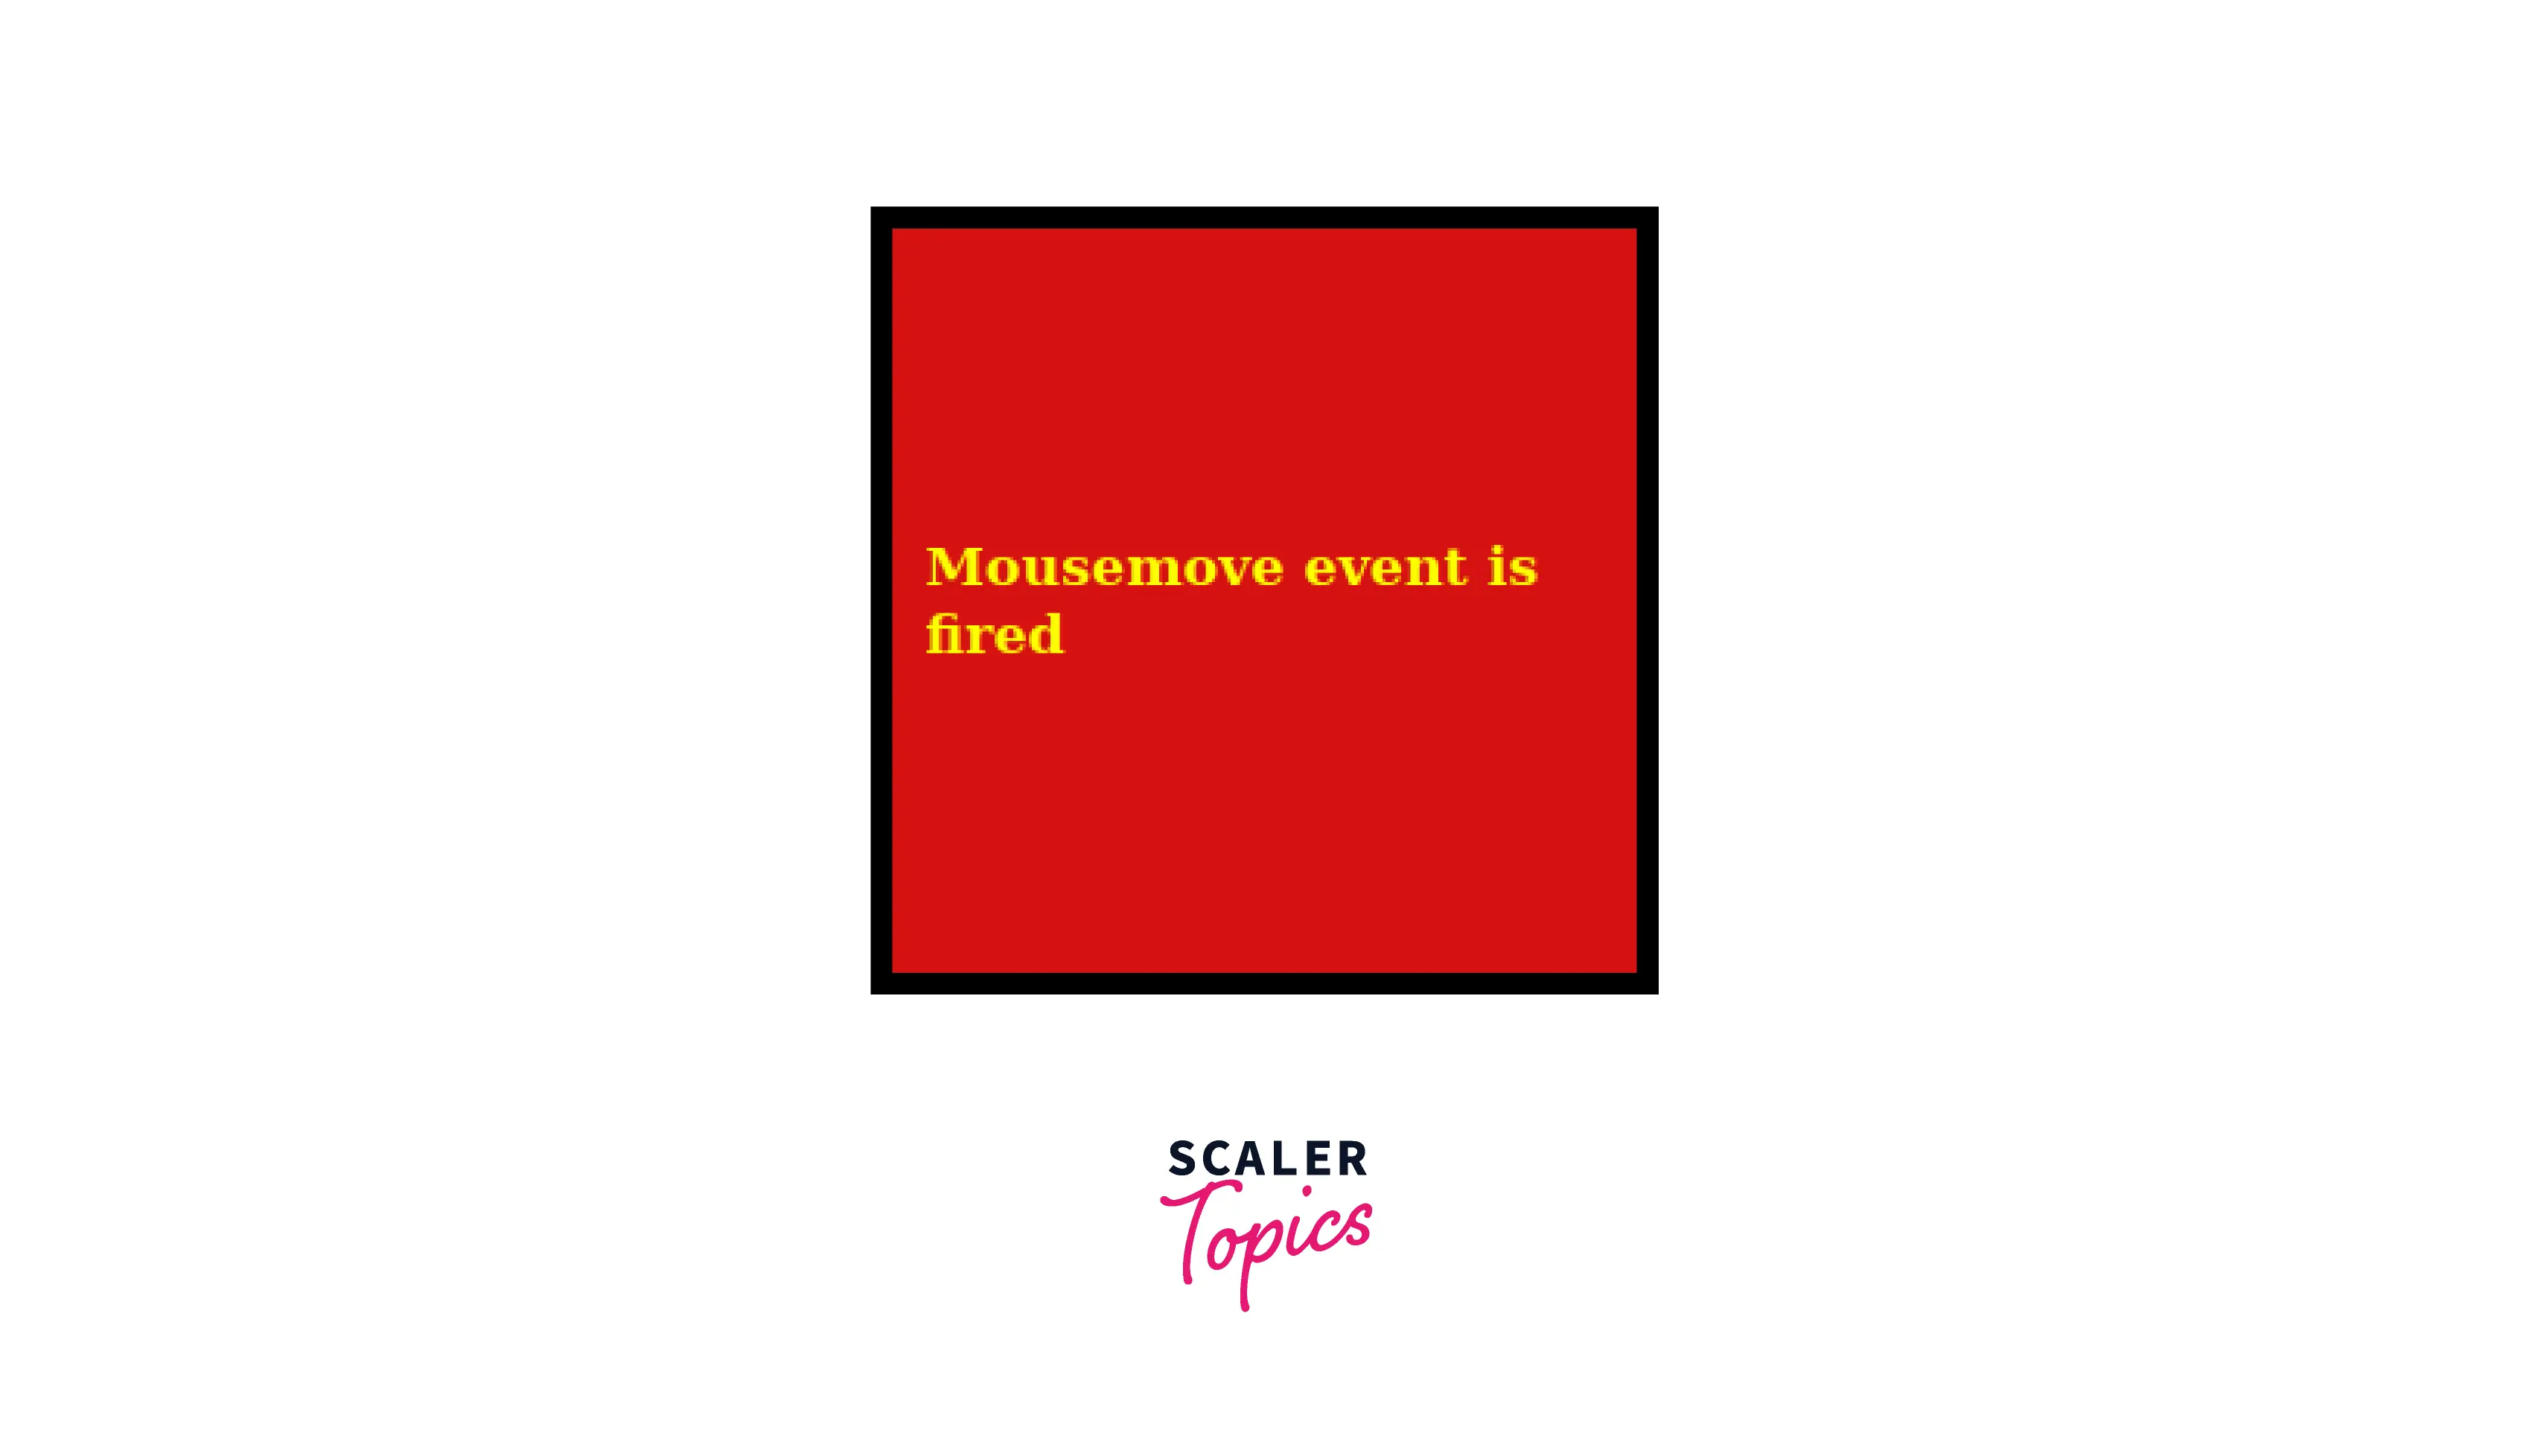
Explanation:
In the above-given example, When we moved the cursor over the element, a new message appeared in the div tag saying "Mousemove event is fired" with the color 'yellow'.
6. Mouseover Event
In this example, we have used the addEventListener() method to handle the mouseover event. Here we have a program that adds a message into the <div> tag whenever the cursor is over the given element.
Code:
Code Flow:
In the above-given code, we have a <div> tag with the id as "add" and we have applied some CSS on it. We have used the mouseover event to get a message in the div tag. For this, first we selected the div tag with the id as 'add' using the document.getElementById then we attached an event listener on it with the event as 'mouseover'. We also used an arrow function in the addEventListener() method. In that arrow function, we have used div.innerText to add the message inside the <div> tag.
Output:

Explanation:
In the above-given example, When we moved the cursor over the element, a new message appeared in the div tag saying "Mouseover event is fired" with the color 'yellow'.
7. mouseout event
In this example, we have used the addEventListener() method to handle the mouseout event. Here we have a program that adds a message into the <div> tag whenever the cursor gets out of the boundary of the given element.
Code:
Code Flow:
In the above-given code, we have a <div> tag with the id as "add" and we have applied some CSS on it. We have used the mouseout event to get a message in the div tag. For this, first we selected the div tag with the id as 'add' using the document.getElementById then we attached an event listener on it with the event as 'mouseout'. We also used an arrow function in the addEventListener() method. In that arrow function, we have used div.innerText to add the message inside the <div> tag.
Output:

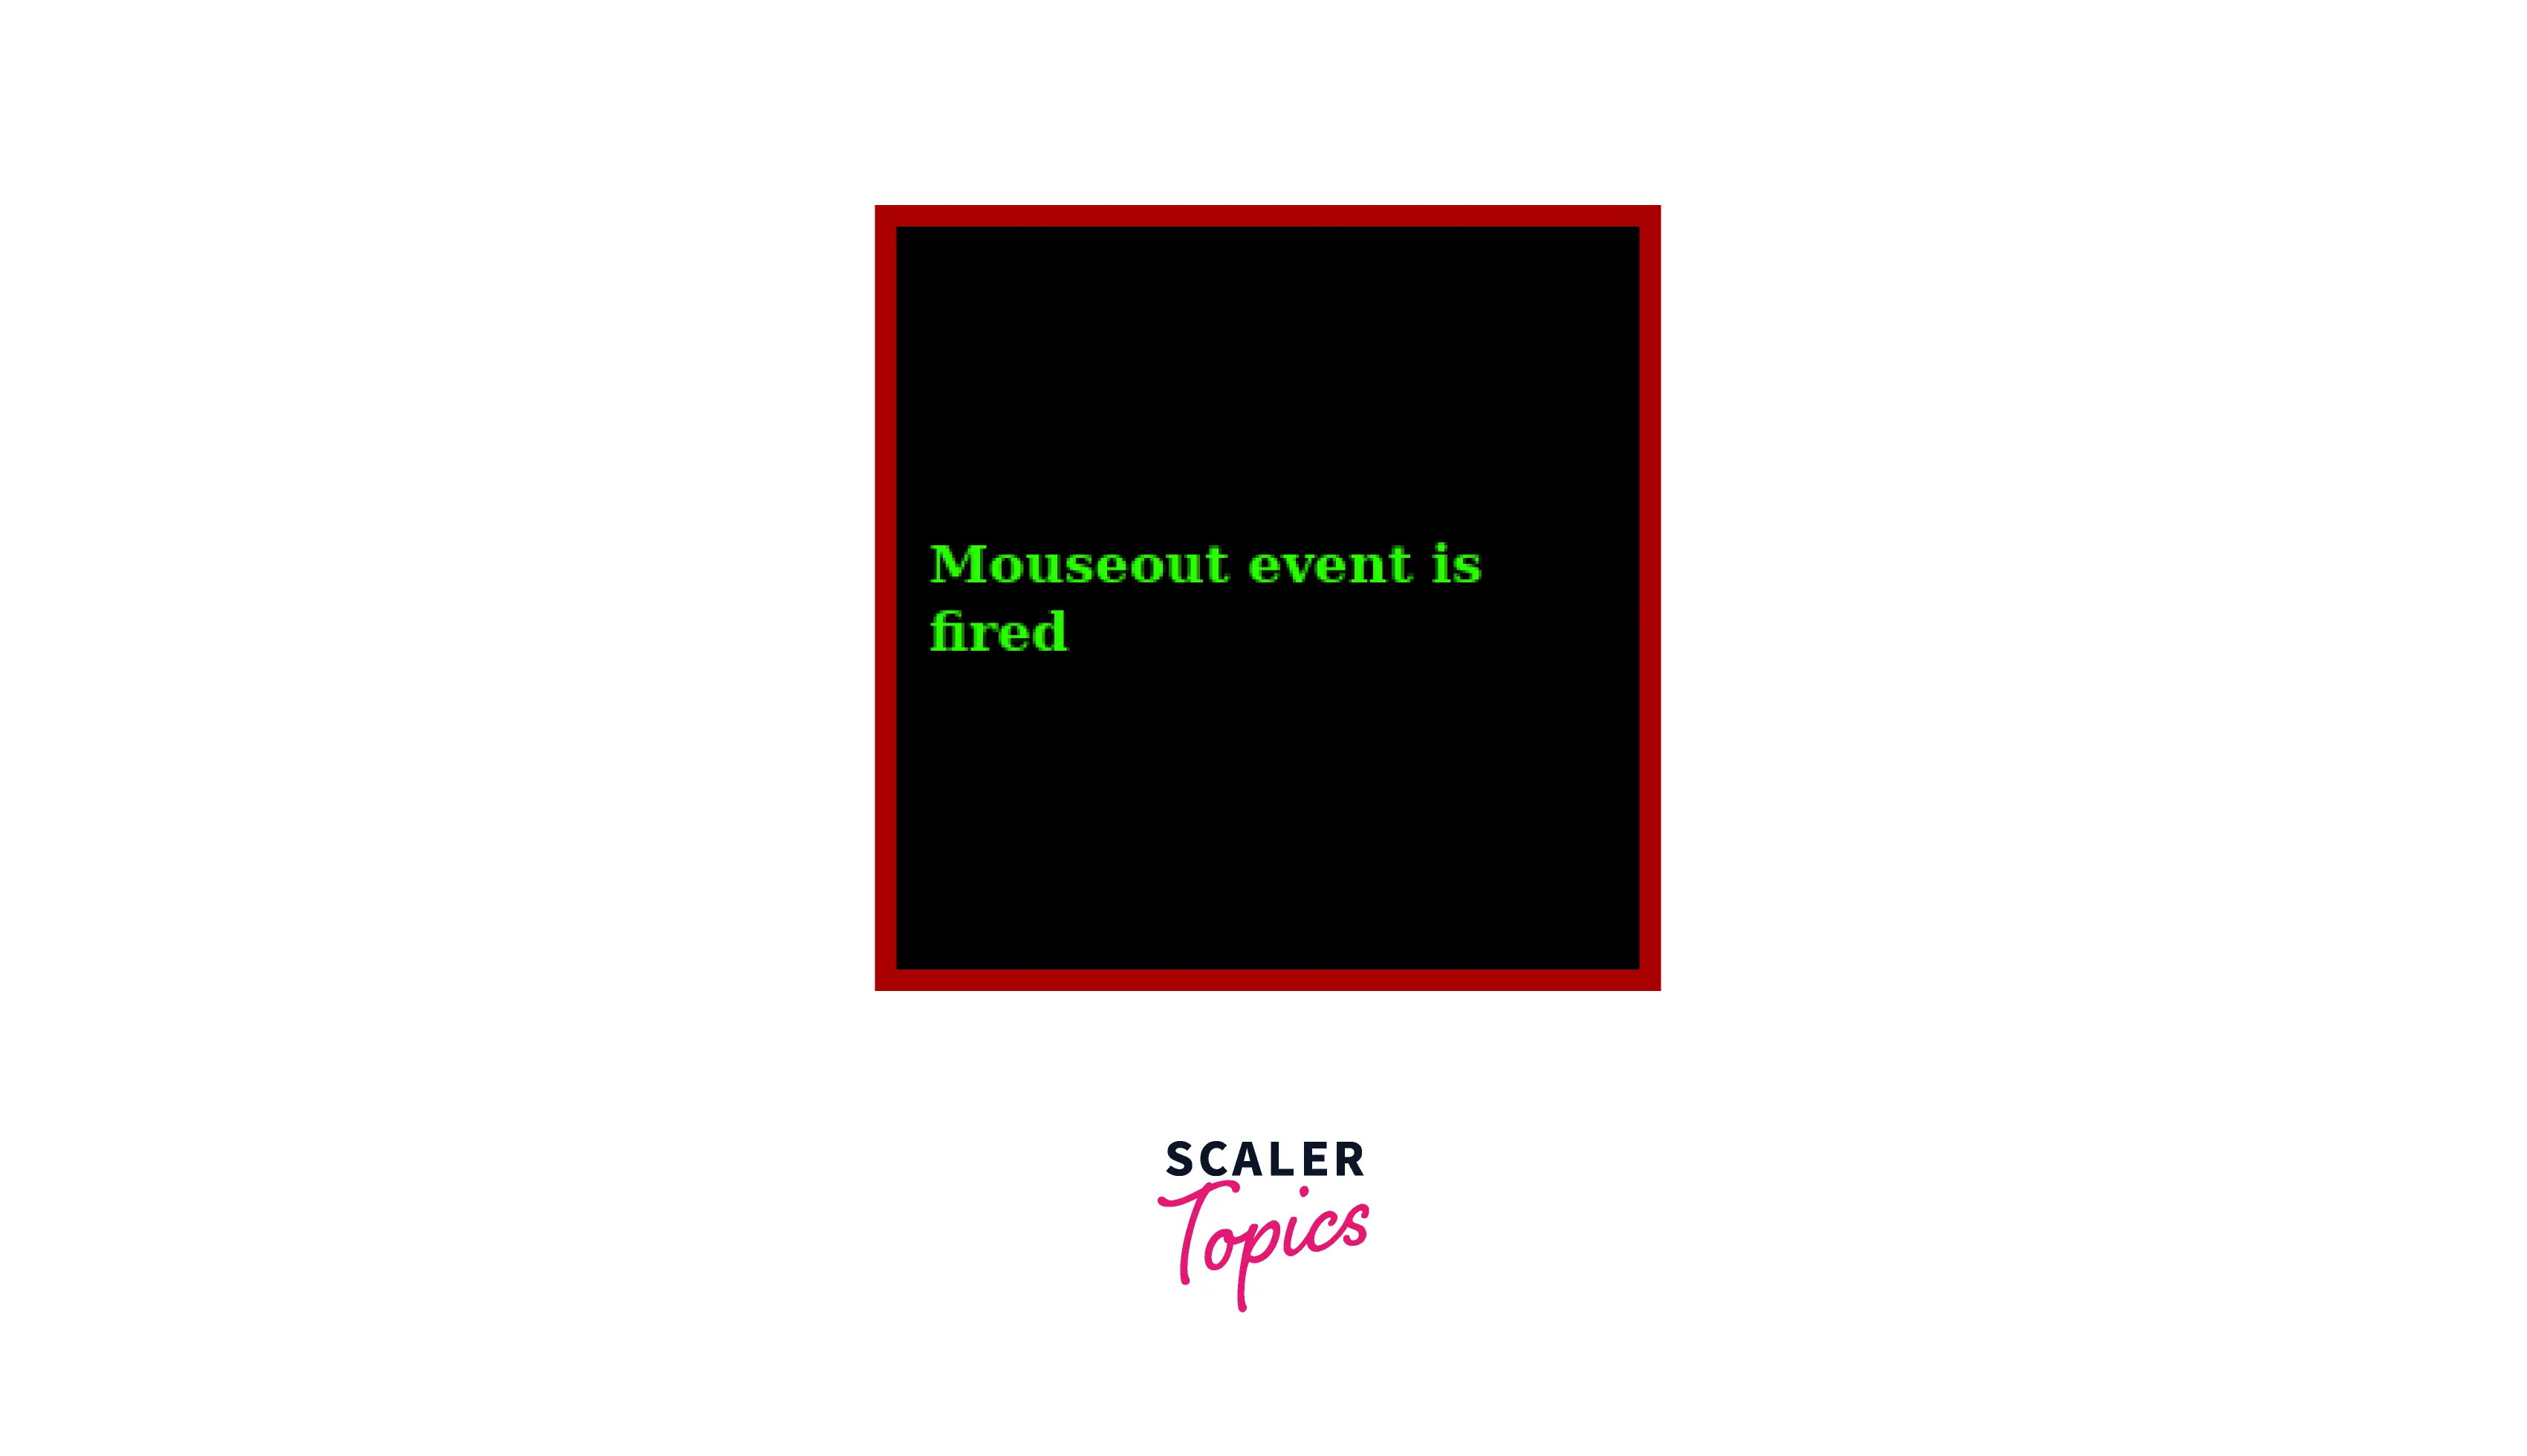
Explanation:
In the above-given example, When we moved the cursor out of the boundary of the element, a new message appeared in the div tag saying "Mouseout event is fired" with the color 'green'.
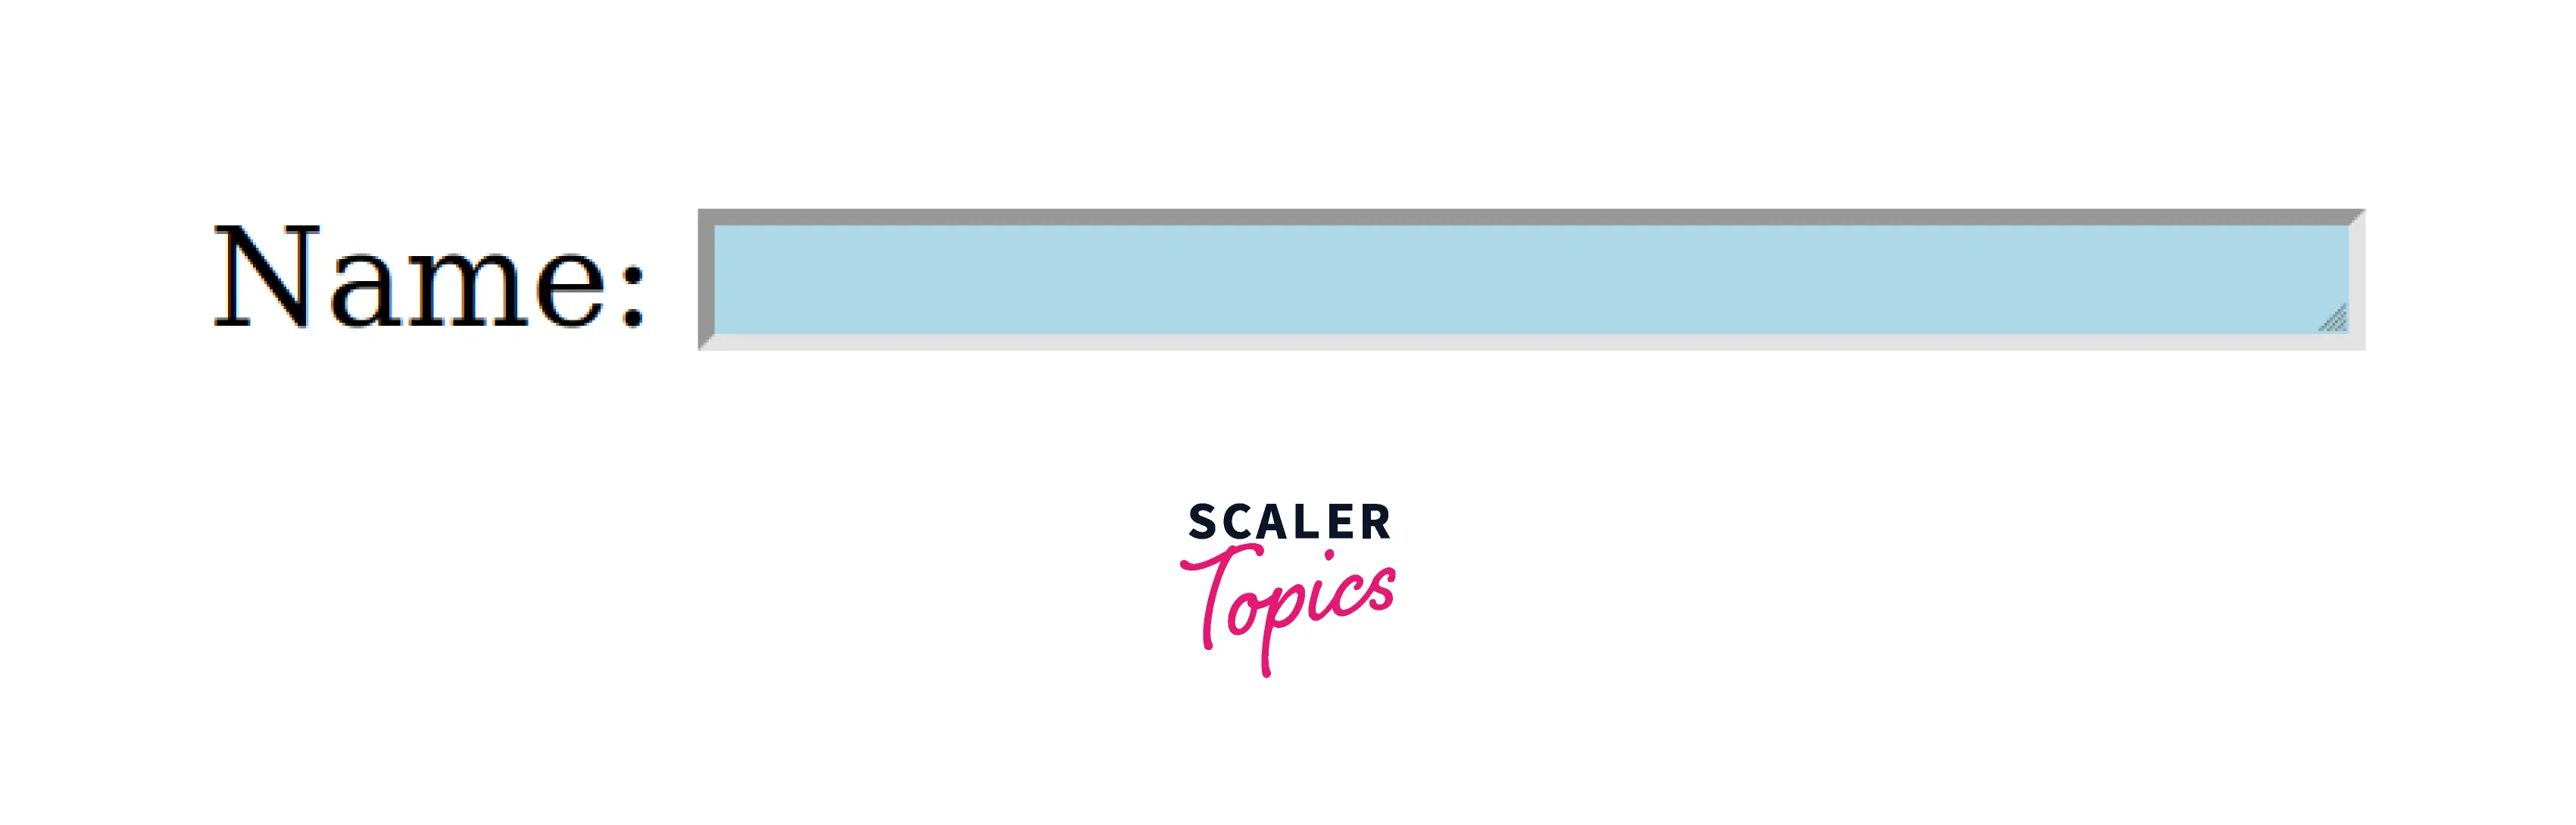
Mouseover and Mouseout Events Simultaneously
You might have noticed that in some forms when we hover over some field such as name or number then it gets highlighted with some specified color. The interesting this is that we can achieve that functionality using the two mouse events that we discussed above. One is a Mouseover event and the other is a Mouseout event. Let us now see the program of the same.
Code:
Code Flow:
In the above-given code, we have a <form> tag having a name field inside it. First we selected that name field using document.getElementById() method then we attached both event listeners mouseover and mouseout on it. Here, We have also used the event.target property which returns the element that triggered the event. First we applied mouseover event to that element to add the 'lightblue' background color whenever it gets triggered. Then we applied the mouseout event to remove the background color whenever it gets triggered.
Output:
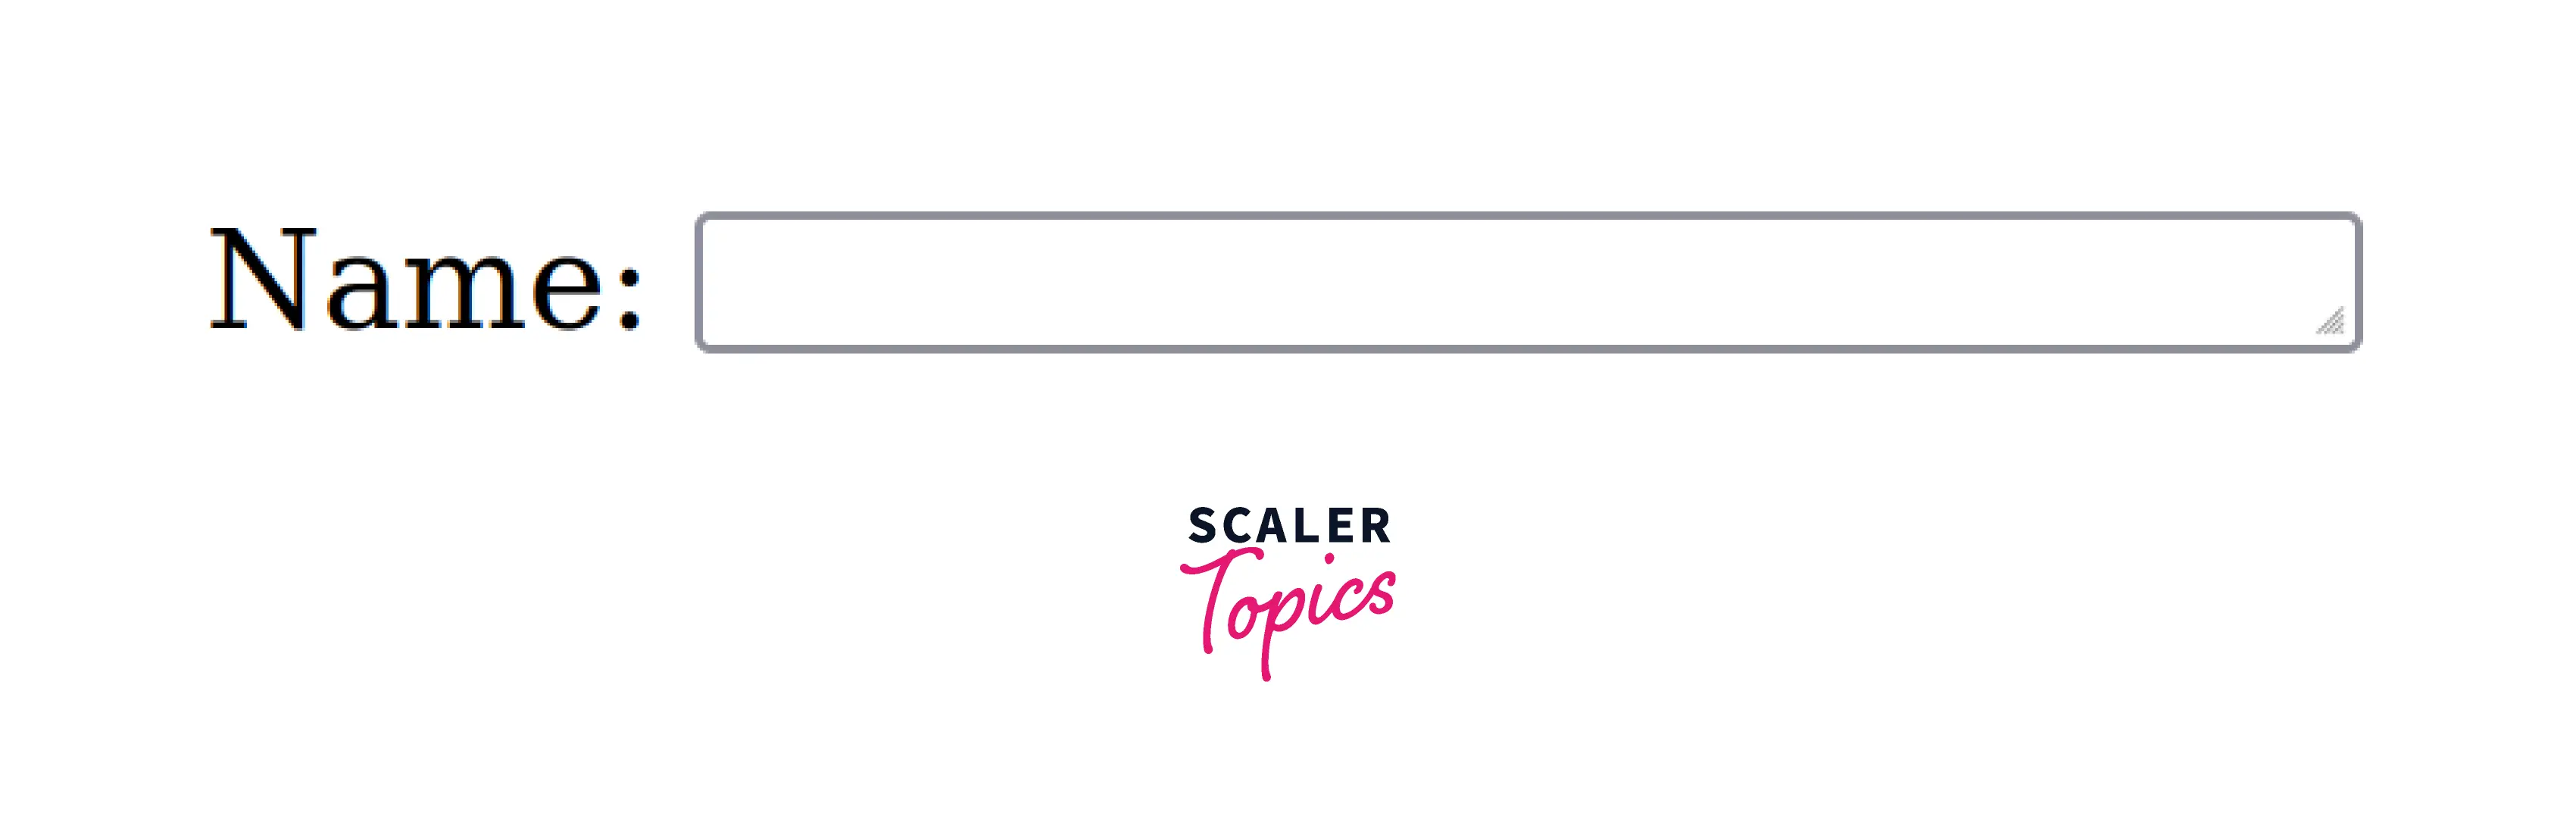
Explanation:
In the above-given example, we have used the mouseout and mouseover events simultaneously over an element called <textarea>. It is a simple program that adds a background color over the element whenever the cursor gets over the name field and removes the color whenever the cursor moves out of the name field.
Conclusion
- A mouse event is something that happens due to the specific action of the mouse such as click, double click, mouseover, mousedown, mouseup, etc.
- There are seven popular mouse events in JavaScript.
- We can apply these events in our program using two popular ways addEventListner() and inline way.
- There are three parameters of addEventListener() method event, function and useCapture.
- One should prefer the addEventListener() method over the inline method of event handling(or listening).
- We can use mulitple mouse events on the same element simultaneously.
- The target property of the event returns the element which triggered the event.