Jenkins Declarative Pipeline
Overview
In Jenkins, can you guess how can we add a powerful combination of automation tools that can provide support to a vast number of use cases ranging from creating a basic CI (Continuous Integration) pipeline to a complex CD (Continuous Delivery) pipeline?
Yes, you are right! They are known as Pipelines. But in this article, we will mainly inclined towards the Jenkins declarative pipeline.
Previously, Jenkins UI was used to create the Jenkins jobs known as FreeStyle jobs. But recently, Jenkins 2.0 came up with an alternative way of creating Jenkins jobs using the pipeline as code technique.
In this technique, a script file is created which consists of all the steps that need to be executed by the Jenkins Job. Each step is a command used to perform a single task. These scripted files in Jenkins are known as Jenkinsfile.
What is Jenkinsfile?
- Jenkinsfile allows us to combine the steps including build, test, and deliver to the application itself.
- It's just a text file stored at the same place in the Git repository where the project's source code is present.
- All project's source code has its own Jenkinsfile, ideally.
Jenkinsfile along with other tools is shown below diagram :
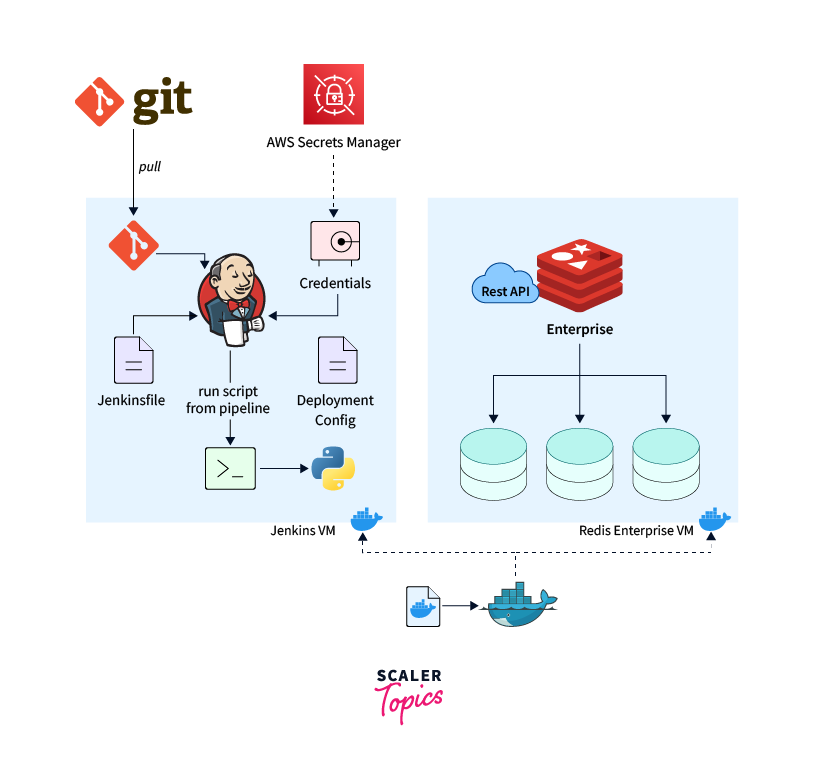
In the above diagram, Jenkinsfile contains the scripts i.e. all the actions which we want to perform on our source code pulled from git step-by-step in the form of commands and Jenkins helps to run these scripts on the application code, we will discuss more about these commands in Jenkinsfile in Jenkins declarative pipeline section below.
There are 2 ways to write the Jenkinsfile:
Scripted pipeline syntax & Declarative pipeline syntax.
Jenkins Scripted Pipeline
These are traditional Jenkins pipelines. Jenkins webUI is used to store these scripted pipelines, as a Jenkins file.
To create the Jenkins scripted pipelines, the following points are important to keep in mind :
- Good knowledge of Groovy programming (domain-specific language).
- These pipelines are the first version of the “pipeline-as-code” technique.
- Consists of only 2 basic blocks: node and stage, with fewer restrictions on its structure.
- Sample Scripted Jenkins Pipeline is shown below :
Let us now deep dive into the other Jenkins pipeline known as the Jenkins Declarative Pipeline.
Jenkins Declarative Pipeline
Note: Pipeline automatically takes the source from the Git repository where the Jenkinsfile is stored. It then executes it on an agent and then groups them into stages further, which consist of steps, containing sequential actions (commands).
Jenkins Declarative Pipeline :
- Provides a more simplified and user-friendly syntax to create a Jenkins pipeline and this is the latest addition to the Jenkins pipeline.
- It doesn't require previous knowledge of Groovy to write the scripts means it replaced the loops, structures, and handling of exceptions in Groovy with a simple model to provide us more efficient and easy way to create consistent pipelines.
- A more simplified and opinionated syntax.
An Example of the declarative Jenkins pipeline script is shown below :
Declarative Pipeline Syntax
-
Each valid Directive pipeline in Jenkins must begin with the pipeline block as shown :
-
It must contain 4 blocks (directives) for it to be correct syntactically. These are :
-
agent
-
stages
-
stage
-
steps.
An example is shown below :
The entire Declarative Jenkins Pipeline structure looks a little bit complex but has only a couple of basic operations to write. The above structure can be easily understood by the below :
- pipeline – main wrapper block that contains all declarations of the entire pipeline.
- agent – an executor to run this Jenkins pipeline.
- stages – stages like build, test, deliver, etc.
- steps – block containing a sequence of commands for each action.
As explained above, Declarative pipelines are valid when beginning with the “pipeline” sentence and must have these required sections:
- agent
- stages
- stage
- steps
Just like above, sections in Declarative Pipelines in Jenkins can have below directives (optional) as well which we will discuss in detail below :
- Environment
- Input
- options
- parallel
- conditions
- parameters
- post
- script
- tools
- triggers
- matrix
- When
Before going in-depth to discuss each of these commands above, let's understand the important keyword that we will use more frequently in the entire explanation below :
-
Directives:
A block, that contains some additional logic, can be used to include the tools into the pipeline, also used for enabling the triggers, and parameters, asking the CI/CD users for inputs like passwords, usernames, etc. Directives are responsible for making the Declarative pipelines of Jenkins more powerful.
Now, let's deep dive into each of these directives in detail with examples below.
Required Jenkins Declarative Pipeline Sections
Agent
Jenkins Controller-Agent Architecture allows us to perform distributed builds by distributing the jobs to the agent nodes. As a consequence of this, with only one Jenkins server you can run multiple jobs simultaneously in different configurations (environments) as well.
If we want to perform a job by only restricted potential agents then we must be able to label or uniquely identify them, by their versions, or by their platforms like Linux, Windows, etc., or locations and others.
The agent section allows us to choose the specific agents and we can run our pipeline only using them. For example: specifying the "agent any" means we want our pipeline to run on any available Jenkins agents/nodes.
An example of a pipeline containing agent sections is shown below :
Parameters:
-
any
It executes the pipeline on any available nodes/agents.
-
none
If we define the agent none at the top level of our pipeline block, that means we want to run our stages on different agents/environments so in that case, we must specify the agent within each stage directive.
-
label
It executes the pipeline on the Jenkins agents which have the same label as provided. For example : "agent { label 'my-defined-label' }"
-
node
It behaves the same as the above label but enables us for more options like "custom workspace".
-
docker
Executes the pipeline on the given container. "arg" here refers to the parameters passed to the docker run invocation directly.
An example of a stage-level agent section is given :
We are gradually completing the entire basic Jenkins declarative pipeline architecture with the required sections.
So far, we came to know that first we have the pipeline directive and then inside it, we insert the agent directive as discussed above.
Stages
Each Jenkins pipeline consists of multiple stages as we know the first stage can be build, then test and deploy, etc. To define each phase(stage) we use the single stages directive inside our pipeline. It contains the ordered stages with their names.
It is highly recommended that for each separate part of your Continuous delivery process (pipeline), there must exist at least one single-stage directive.
Bulk of the entire work that happens in the pipeline is usually described under the stages directive.
Parameters
No parameter is required, unlike the agent section which has parameters like any.
Allowed
Only its single occurrence is allowed inside the pipeline directive.
Syntax
Some examples are given below for your understanding:
Stage
- Stage section must exist inside the stages directive at least once.
- It contains the part of tasks that the Jenkins pipeline will execute.
- Since Jenkins renders these stage names on its interface it is suggested that all the stage directives must be named properly.
As can be seen, the time duration of each stage is displayed by the Jenkins followed by their status as well.
For the above Jenkins pipeline, the declarative Jenkins pipeline script is written below :
Steps
- There must be at least one step section inside the stage directive.
- It is the last required section as well.
- sh is supported in both Linux and MacOS.
An example is given below :
An example of a bat or PowerShell for Windows is given below :
Non-Required Jenkins Declarative Pipeline Sections
Environment
- In the environment directive, we write the key-value pairs, which are nothing but the environment variables either for all the steps in the pipeline or for a particular stage, depending upon the place where you have written this environment directive.
- It can be inserted inside the stage directive as well as the pipeline directive.
- Wherever you define it's the section, the scope of its definitions is decided accordingly.
- If you define it just inside the pipeline level then the definitions written in it will be used for all the steps in the pipeline declaration.
- Else if you define it at the stage level, its definitions will be valid only for that particular stage scope.
Note that:
This directive provides us with an important method called credentials(). Jenkins has some pre-defined credentials stored in it each having their identifiers. With the help of this credentials() method we can access those pre-defined credentials using their identifiers. Credentials can be any type for example if they are of Secret Text type, then the credentials() method helps us to get those contents of secret text stored in our environment variables inside this directive. For Credentials of the "Standard username and password" type, the environment variable will become like username: password. Also, two variables namely, MYVARNAME_USR and MYVARNAME_PSW will be defined automatically as environment variables.
For example, as shown below :
An example of using environment directive in a Declarative Jenkins pipeline is shown for the pipeline level :
Example of using the environment section at the state level :
Post
The post directive can be used in the top-level pipeline block and each stage block as well.
-
The post directive is used which contains all the actions which will run only at the end of the execution of the pipeline.
-
The actions inside it can be :
- always
- changed
- failure
- success
- unstable
-
Depending on what is the status of the pipeline at the end, the steps/commands to the corresponding action will be executed automatically.
Parameters
No parameter is required, unlike the agent section which has parameters like any.
Conditions
-
always: Irrespective of any status of the pipeline this will be executed.
-
changed: this will be executed only when there is a difference in the results between the current pipeline execution and the previous pipeline.
-
failure: It is generally shown as the red indication in the Jenkins web UI and runs only when the pipeline has the failed status at the end.
-
success: If the status is "success" then it is also shown using the blue/green color in the Jenkins UI.
-
unstable: Indicated using the yellow indications. Pipeline status gets unstable due to reasons including code violations, failures of tests, etc.
An example of the post section in the Declarative Jenkins pipeline is given below :
Options
In the Pipeline itself, we can configure the Pipeline-specific options using the Options directive. Options like buildDiscarder and others are provided by the pipeline. Other options can be accessed via plugins including timestamps etc.
Parameters
No parameters are required unlike agents for example: any.
Allowed
You can use the direction of the option only a single time within your entire pipeline scripts.
Available options
-
buildDiscarder
For the specific number of recent Pipeline runs, it persists artifacts and console output.
For example: options { buildDiscarder(logRotator(numToKeepStr: '1')) }.
-
disableConcurrentBuilds
It is helpful to avoid accessing the shared resources simultaneously. It doesn't allow concurrent executions of the Pipeline.
For example options { disableConcurrentBuilds() }.
-
skipDefaultCheckout
By default in the agent directive, it skips checking out code from source control. An example includes options { skipDefaultCheckout() }.
-
timeout
Set a fixed time duration for the execution of the pipeline, after which the pipeline gets aborted. For example: options { timeout(time: 1, unit: 'HOURS') }.
-
retry
Specifies the total number of retries we can use in case of failure of the pipeline. For example options { retry(3) }.
-
timestamps
It performs the console output created by the Pipeline run along with the time duration at which the line was emitted. For example options { timestamps() }.
An example of options in the Declarative Jenkins pipeline is given below :
Parameters
During the execution of the Jenkins pipeline, we require some parameters from the user itself, hence there comes the role of the parameters directive. Enables us to specify the list of parameters that the user can give while triggering the pipeline. using the params object, these values are made available to the pipeline steps.
Parameters
No parameter is required, unlike the agent section which has parameters like any.
Allowed
In the pipeline directive, only once.
Available options
-
string
Consider an example of a string-type parameter. For example: parameters { string(name: 'DEPLOY_ENV', defaultValue: 'staging', description: '') }
-
booleanParam
Consider an example of a boolean-type parameter. For example: parameters { booleanParam(name: 'DEBUG_BUILD', defaultValue: true, description: '') }
An example of the parameters directive is shown below :
triggers
We can re-trigger the Jenkins pipeline using the triggers directive using automated ways. cron and poll SCM are currently the two available triggers. Although webhooks-based integrations are present more likely when the pipelines are integrated into the source such as GitHub or Bitbucket, and in that case, triggers are not required as much.
Parameters
No parameter is required, unlike the agent section which has parameters like any.
Allowed
Single usage inside the pipeline block
Available options
-
cron
For example: triggers { cron('H 4/* 0 0 1-5') }
Accepts a cron-style string to define a regular interval at which the Pipeline should be re-triggered,
-
poll SCM
Available only in Jenkins 2.22 or later. For example: triggers { poll SCM('H 4/* 0 0 1-5') } Accepts a cron-style string to define a regular interval at which Jenkins should check for new source changes. If new changes exist, the Pipeline will be re-triggered.
An example of the triggers in the Declarative Jenkins pipeline is shown below :
Tools
The tools section is used to mention the tools (from available) to get installed automatically while running the pipeline and putting them on the path specified. Now, if you define agent none then, this directive gets ignored.
Parameters
No parameter is required, unlike the agent section which has parameters like any.
Allowed
Either you can define it at the pipeline level or the stage level just like the agent section.
All supported Tools
- maven
- JDK
- gradle
Note: The tool name you will write in this section needs to be configured first under Manage Jenkins → Global Tool Configuration.
An example showing the Tools section in the Declarative Jenkins pipeline is shown below :
when
Sometimes we want to execute a particular stage(s) when some particular condition(s) gets triggered or satisfied. This functionality is provided by the when the section in Jenkins. It enables us to execute a pipeline after a certain condition has been satisfied.
Built-in Conditions
-
branch
Whenever the branch being built matches the specified branch name, the stage gets executed.
For example : when { branch 'default' }
-
environment
When the specified environment variable is set to the given value, the stage section gets executed.
For example : when { environment name: 'DEPLOY_TO', value: 'production' }
-
expression
In this, we write some groovy expressions that return us a boolean value either true or false. Depending upon the results, if the true stage directive gets executed else not.
For example : when { expression { return params.DEBUG_BUILD } }
An example showing the condition section in the Declarative Jenkins pipeline is shown below :
Can't we just run all the stages at the same time? The answer is Yes and No. Let's discuss it next section.
Parallel Stages
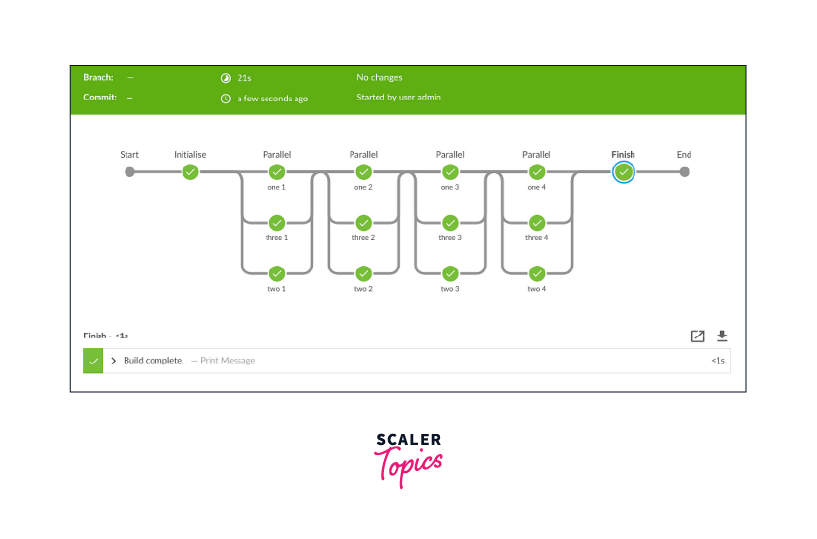
If stages are not dependent on each other means the execution of one stage does not affect the execution of another stage, then those stages can be run in parallel. This is used to achieve the maximum efficiency of your Pipeline. A good example can be multiple independent tests that can be run simultaneously, as shown below :
The parallel running stages are shown below in the Jenkins Web UI :
Running Your First Declarative Pipeline
I hope we are now well-acquainted with the Jenkins pipeline and the Declarative Jenkins pipeline syntax as well. Now it's the right time to run our first declarative pipeline. Let's begin step by step.
Step 1:
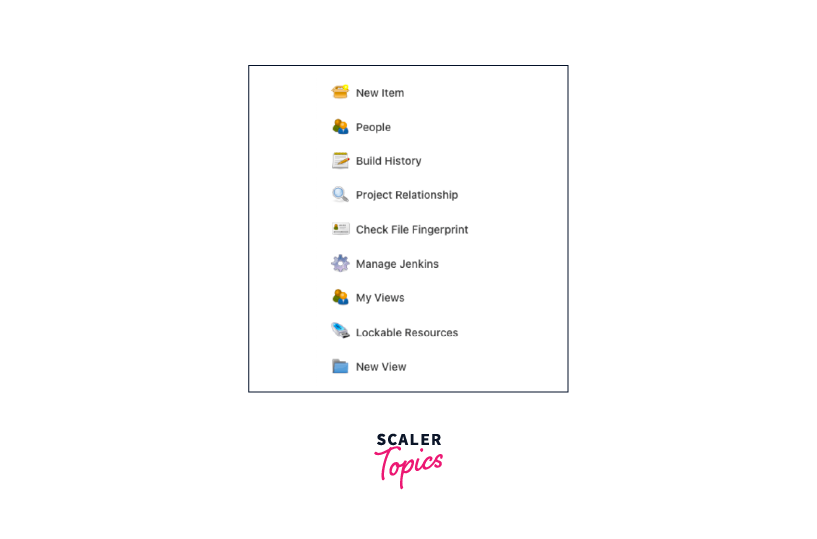
Open your local host or Jenkins home page (http://localhost:8080 in local) and in the left menu click on the New Item.
Step 2:
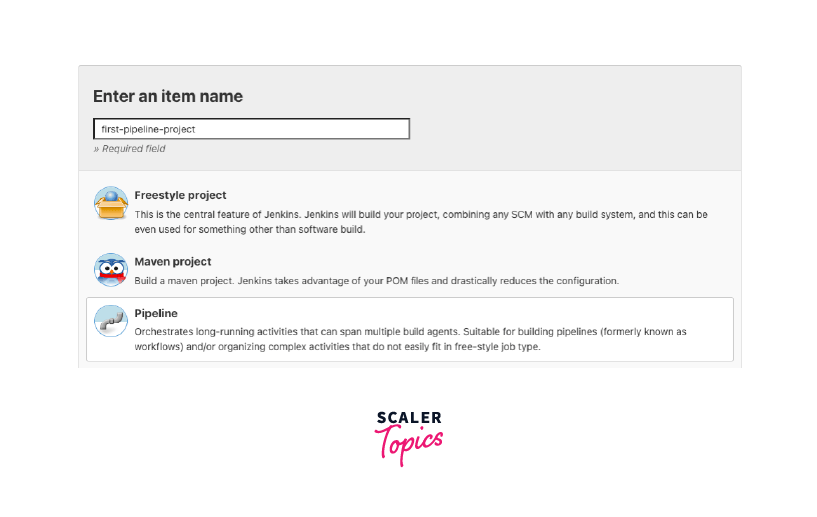
Let's name our Jenkins job as "first-pipeline-project". Choose pipeline as the style from the given options and proceed with OK.
Step 3:
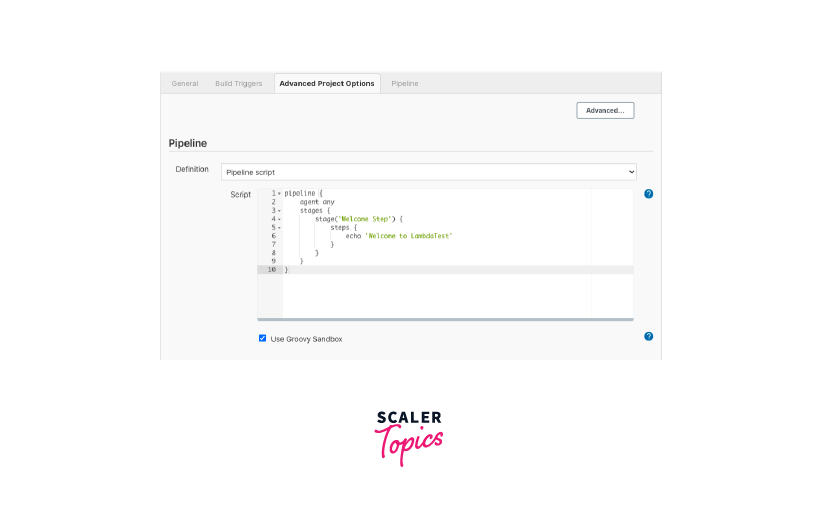
Go to the Pipeline section at the bottom and write the first Declarative style Pipeline code to the given script textbox.
Step 4:
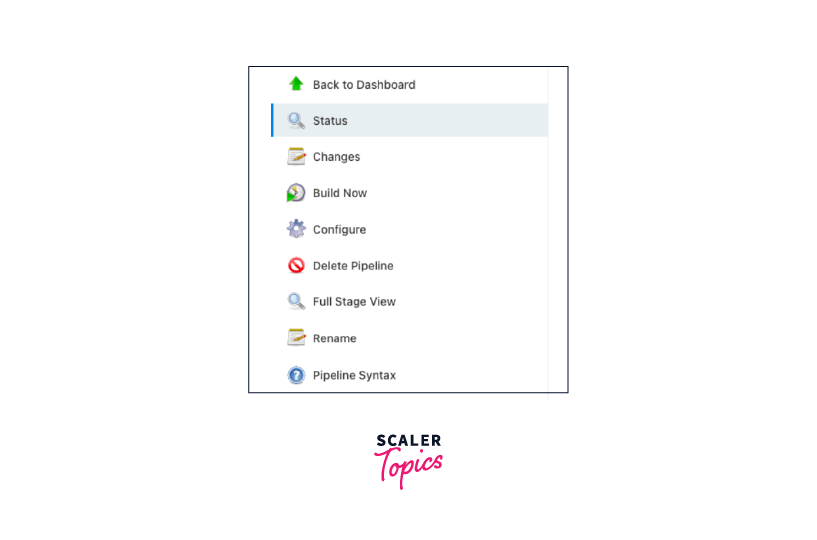
Press on the Save button and Click on Build Now present in the left align menu.
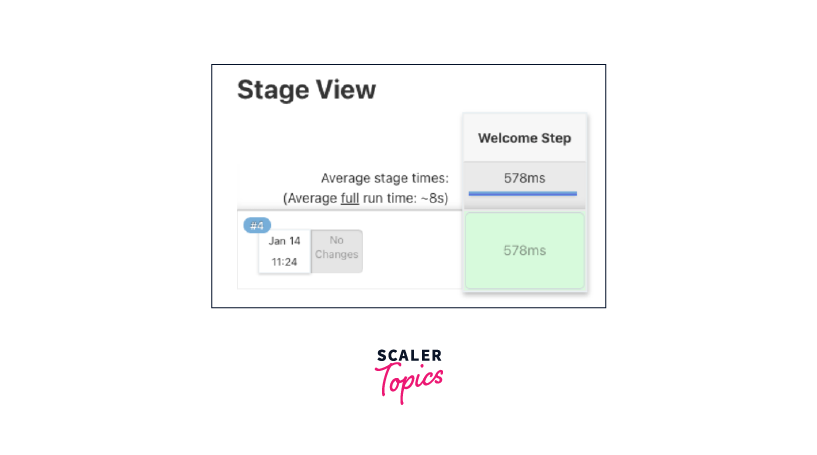
In the stage view, you can see the build running stage by stage.
Step 5:
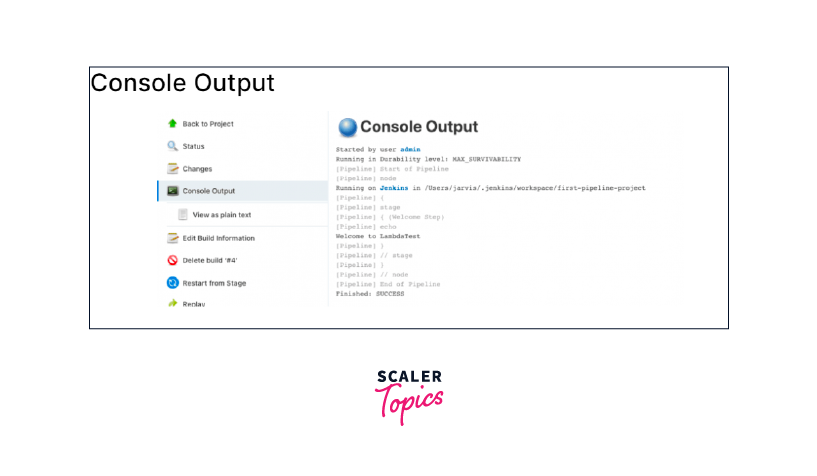
To see the check logs in the Build job, click on any stage and then press the check logs button. An alternative option to see the check logs is to use the Console output present in the left-side menu.
Congratulations! We have built our first Jenkins Declarative Pipeline.
Conclusion
- Pipeline as code technique involves two ways of creating a Jenkins pipeline: Scripted which is a traditional one, requires knowledge of Groovy programming.
- Declarative in comparison is more beginner-oriented and doesn't require any prerequisites like groovy etc. and is the latest addition. Jenkinsfile is used to attach the entire pipeline (or steps) to the application itself where the source code is stored.
- Directives are nothing but blocks or sections which makes the declarative system more powerful.
- Required declarative pipeline sections are agent, stages, stage, steps, etc.
- Some non-required sections are environment, post, conditions, options, parameters, triggers, tools, when, parallel, etc.
