How to Integrate Jenkins with Selenium?
Overview
In today's fast-paced software development environment, automation is key to ensuring the efficiency and reliability of your applications. Selenium, a popular open-source testing tool, has become the go-to choice for automating web application testing. However, managing and executing Selenium tests manually can be time-consuming and error-prone. This is where Jenkins, an open-source automation server, comes to the rescue. In this article, we will explore the integration of Jenkins with Selenium to create a seamless and automated testing pipeline.
What is Jenkins in Selenium?
Jenkins is an open-source automation server that plays a crucial role in the Selenium ecosystem. It is a popular continuous integration and continuous delivery (CI/CD) tool used by developers to automate various stages of the software development lifecycle.
In the context of Selenium, Jenkins acts as a powerful orchestrator, seamlessly integrating with the Selenium testing framework. It allows teams to automate the execution of Selenium test suites and manage the testing process efficiently.
The integration between Jenkins and Selenium enables developers to schedule, trigger, and run Selenium tests automatically in response to code changes, commits, or on a predefined schedule. This automated testing process helps identify bugs and issues early in the development cycle, ensuring faster feedback and quicker resolutions.
With Jenkins in Selenium, developers can establish a robust and continuous testing pipeline, which contributes to the overall software quality, increases development efficiency, and supports agile development practices.
Integrating Jenkins with Selenium
Integrating Jenkins with Selenium can be achieved through different methods, including using the Jenkins Dashboard and utilising Maven. Let's explore each approach:
1. Integrating Jenkins with Selenium using the Jenkins Dashboard:
- Install Jenkins: First, you need to install Jenkins on your server or machine and set it up with necessary configurations.
- Install Plugins: Jenkins provides various plugins, including the Selenium plugin. Install the Selenium plugin from the Jenkins Dashboard to enable Selenium integration.
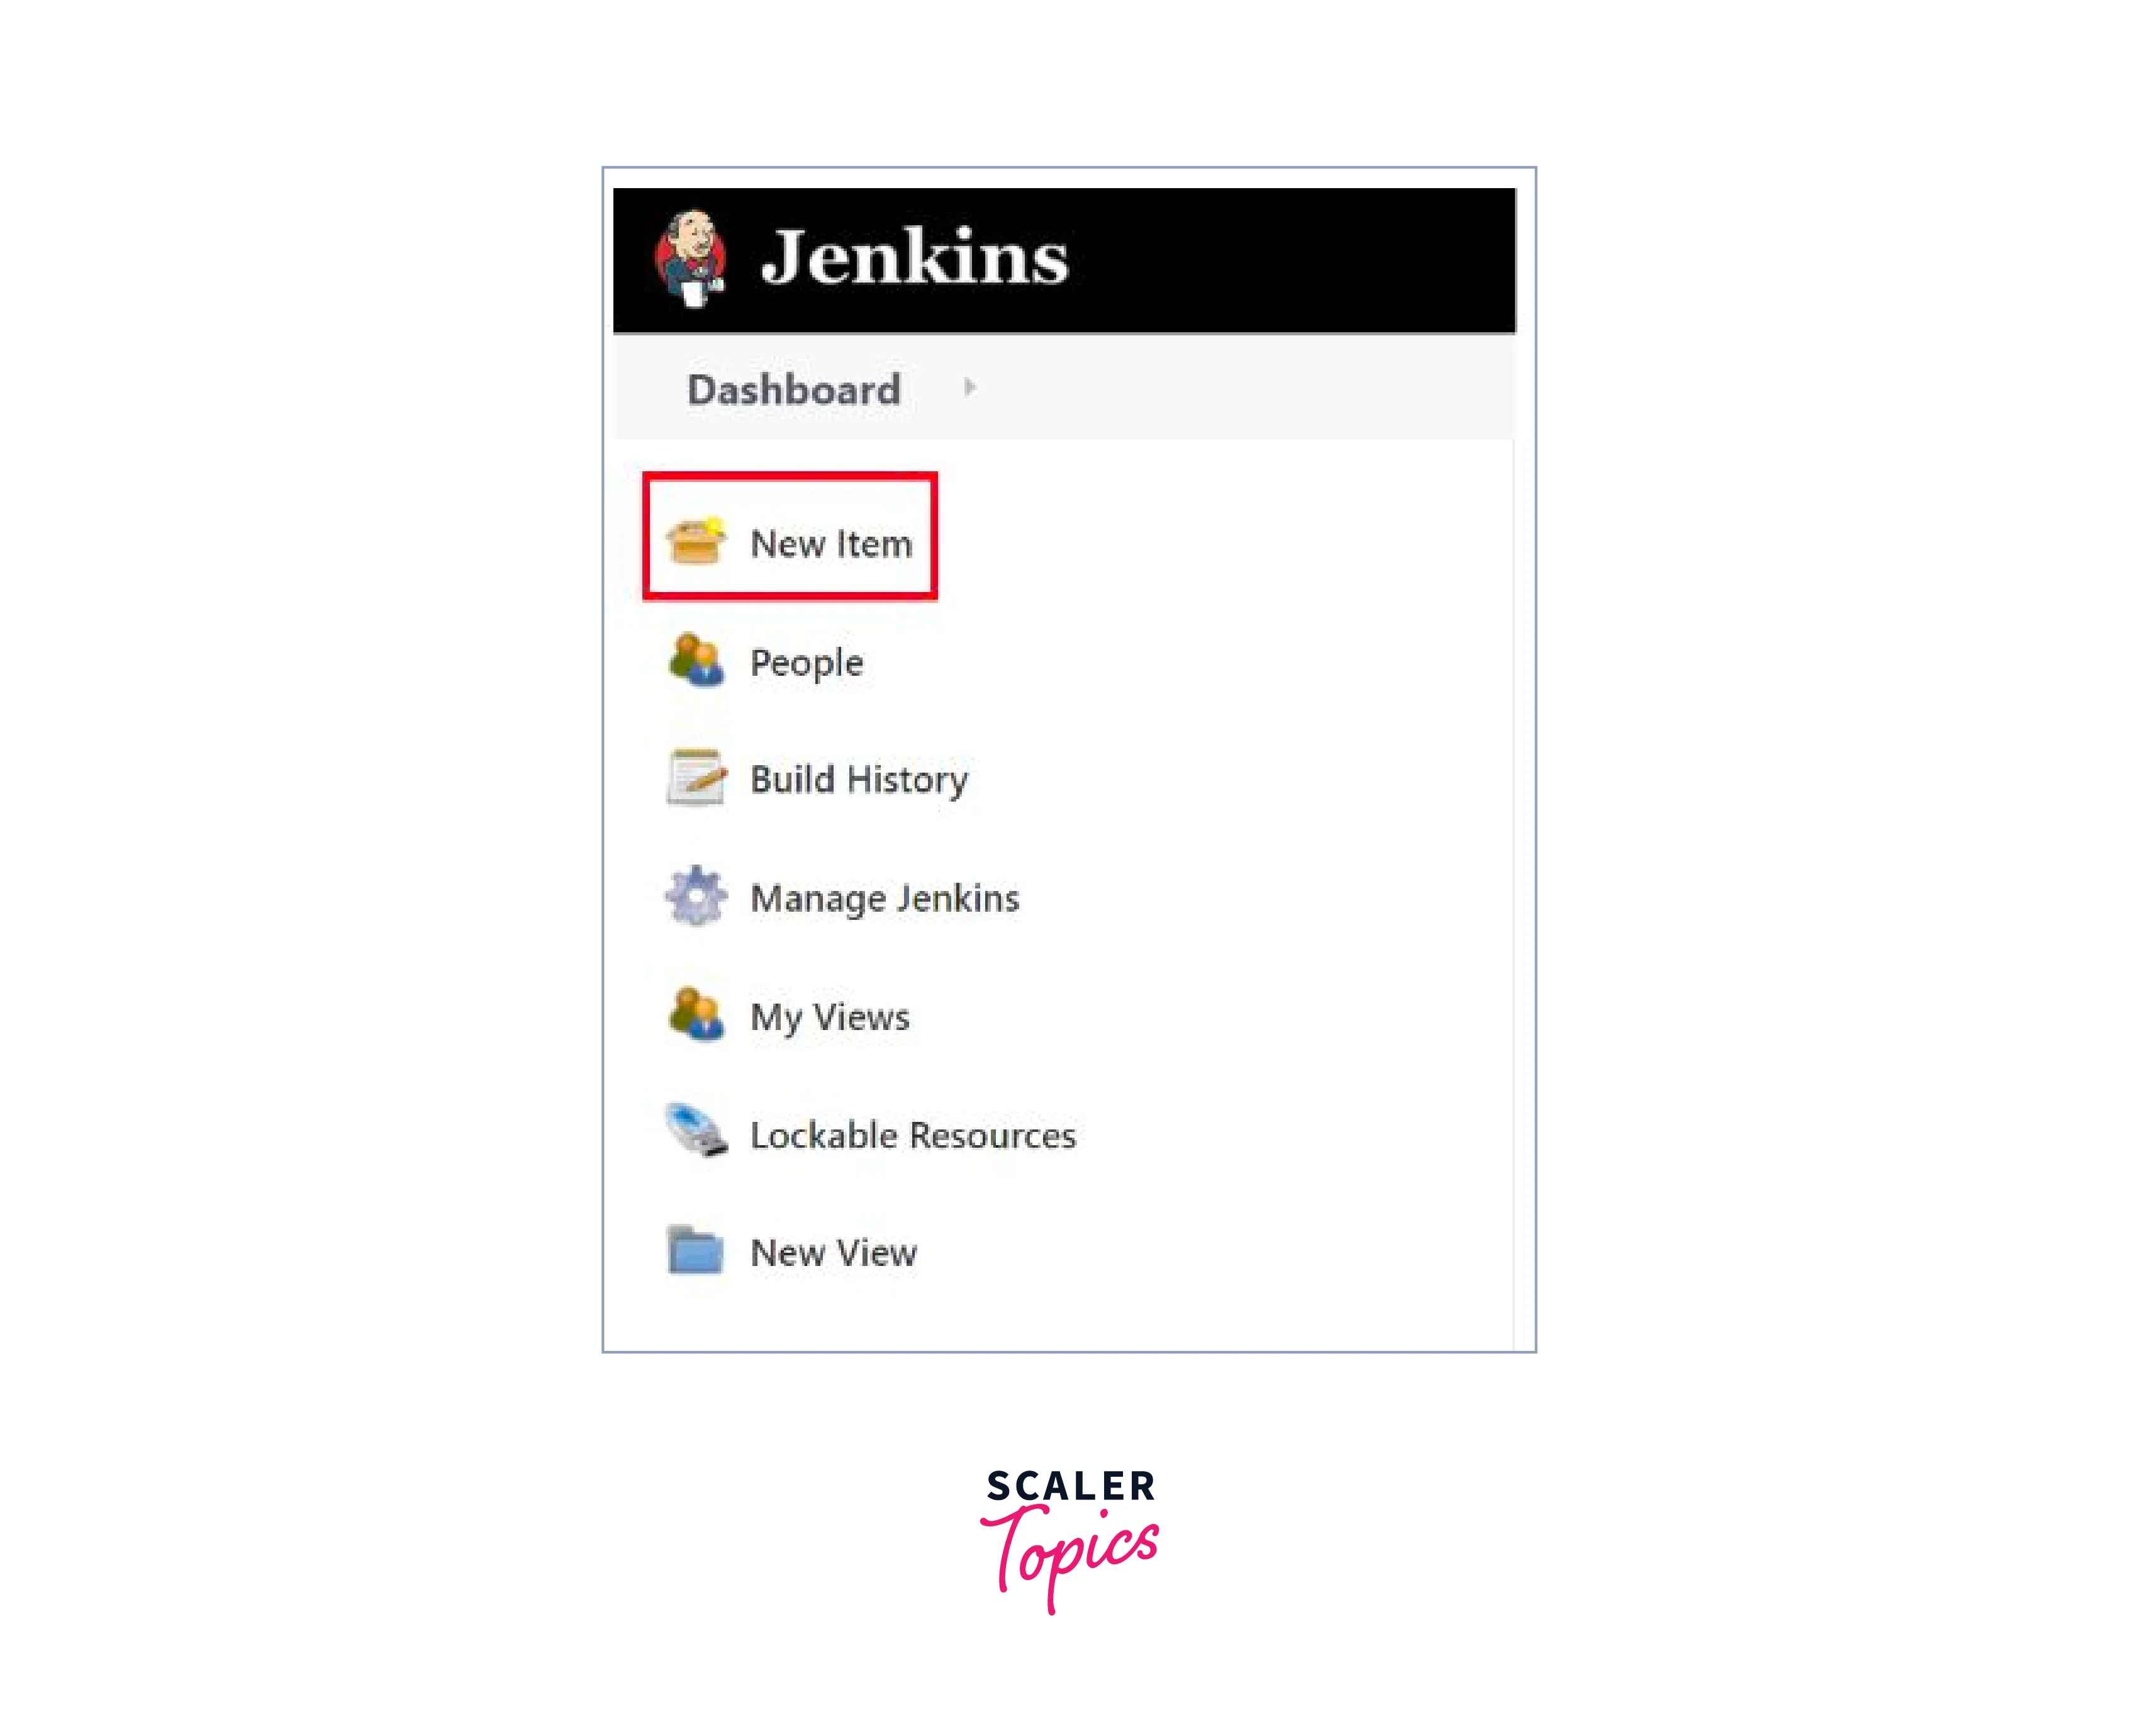
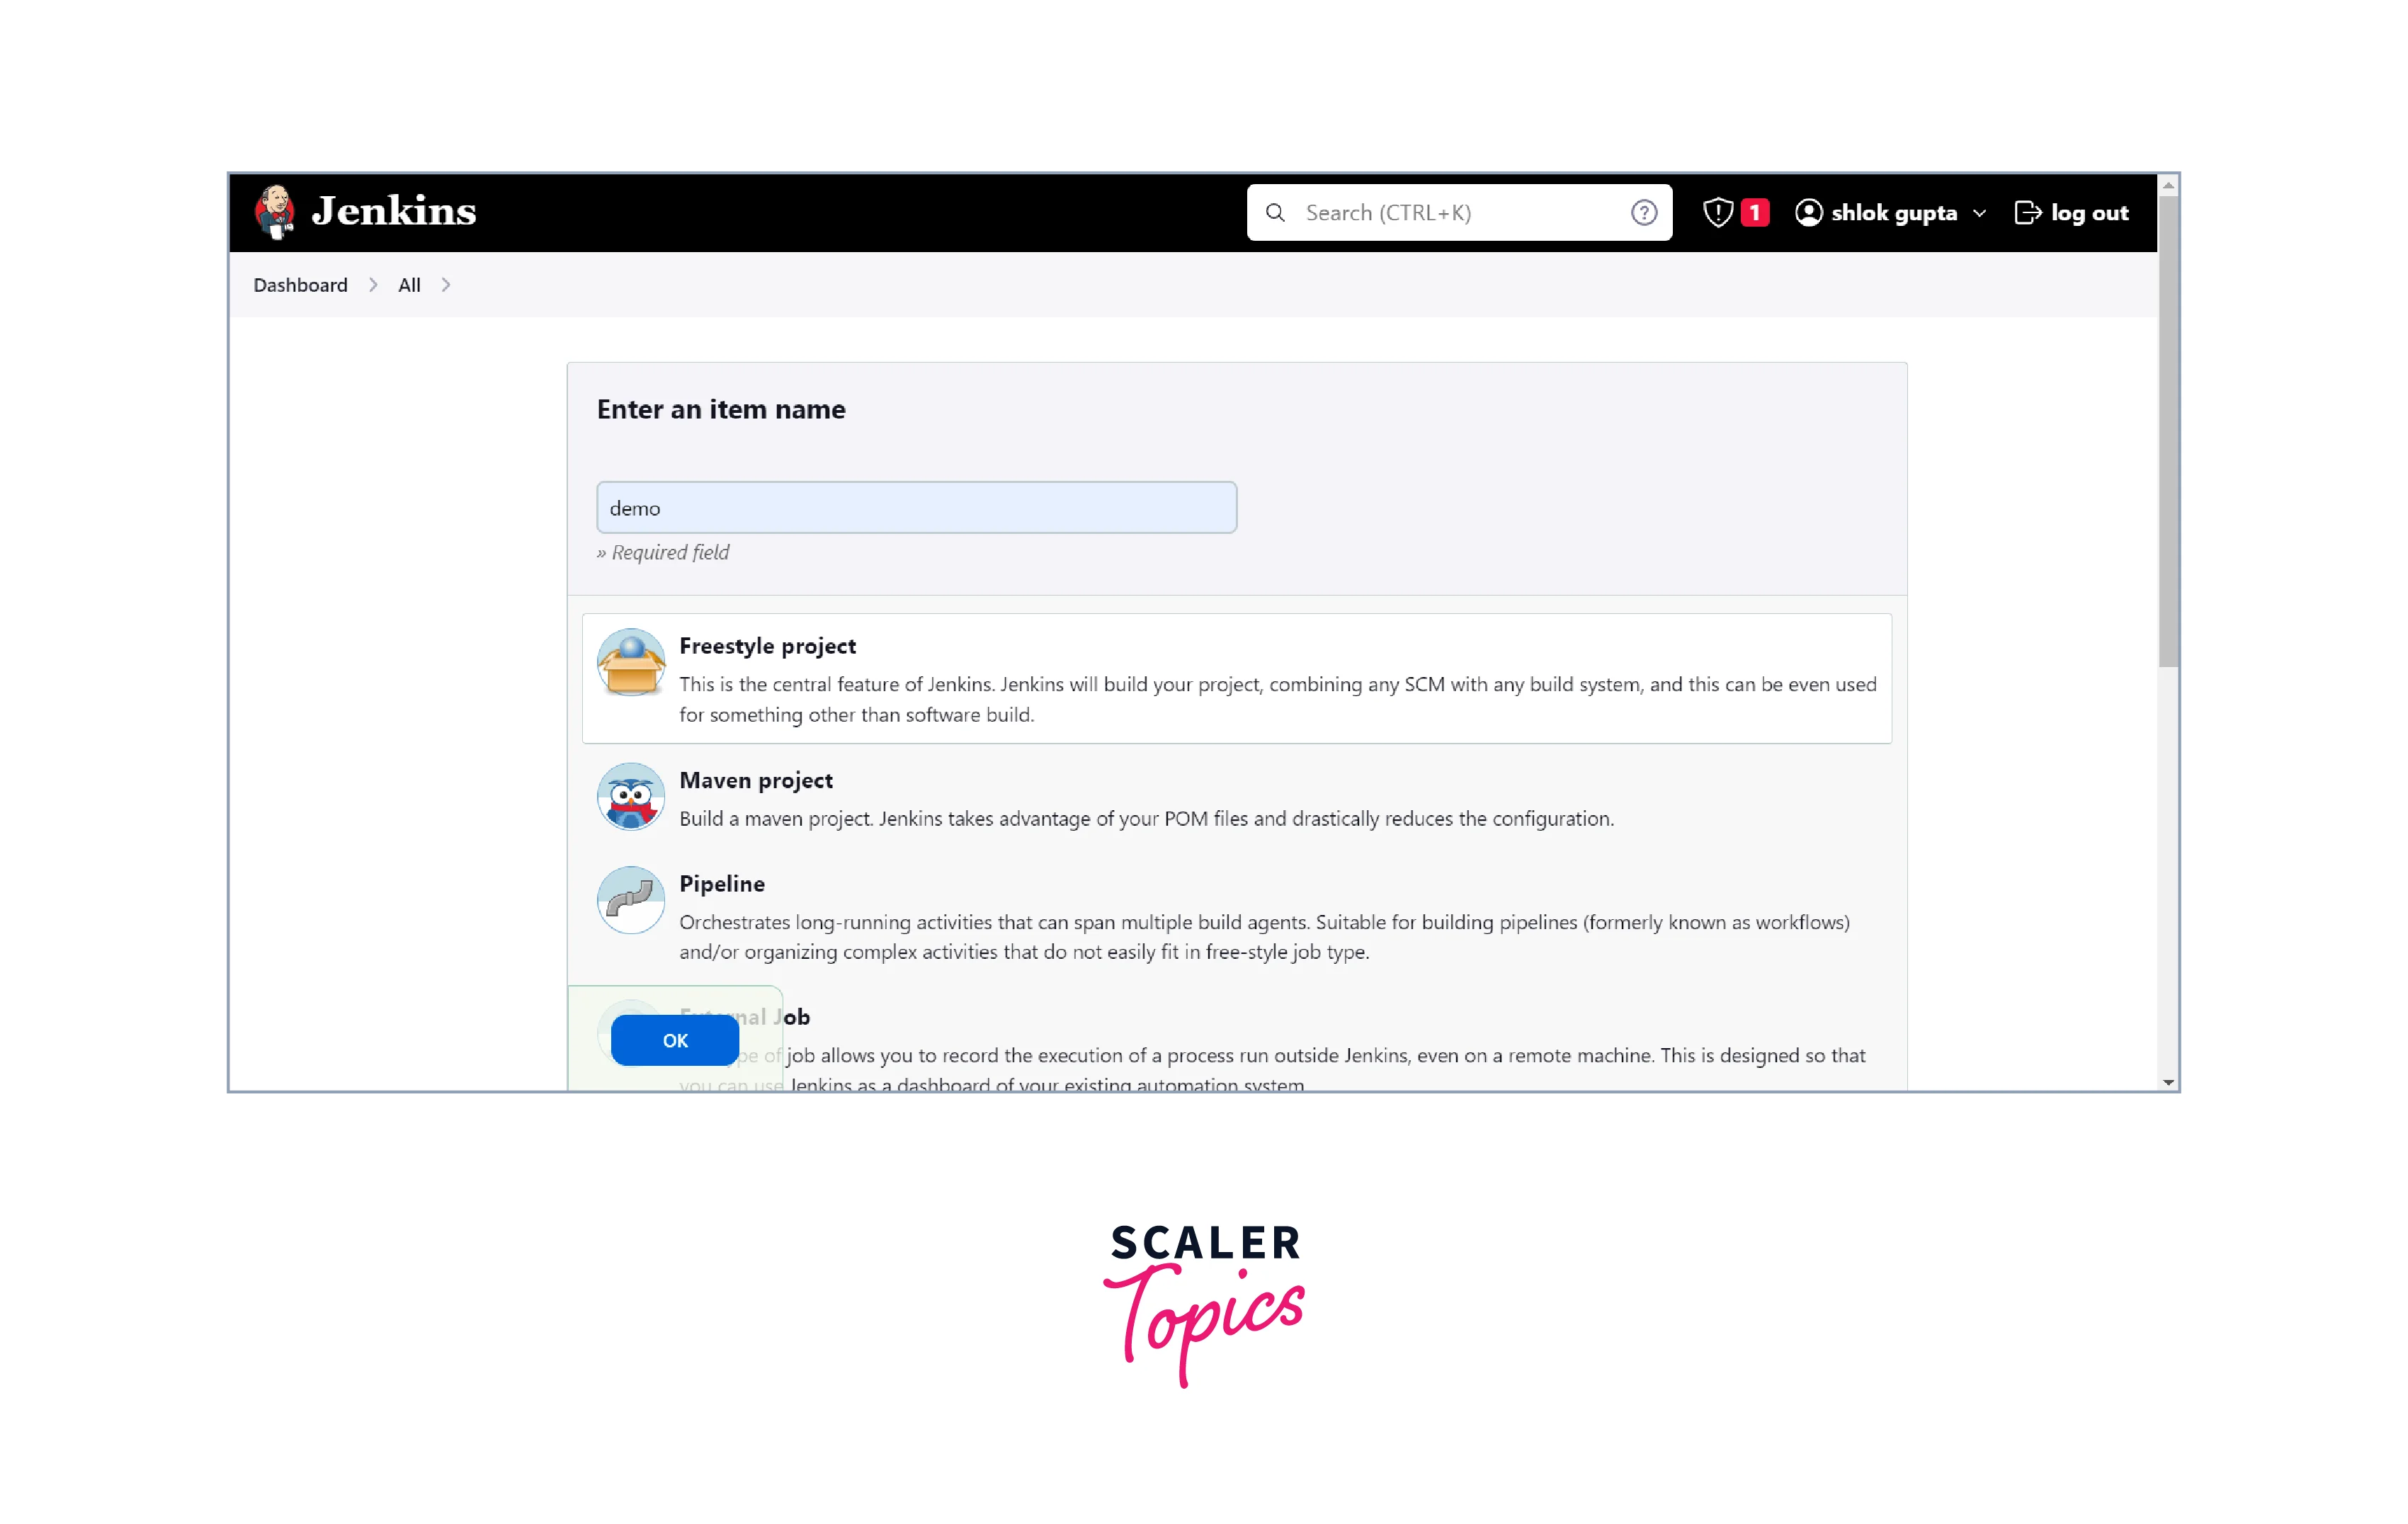
- Create a New Jenkins Job: Create a new Jenkins job for your Selenium tests by selecting the "New Item" option and choosing "Freestyle project" or "Pipeline."
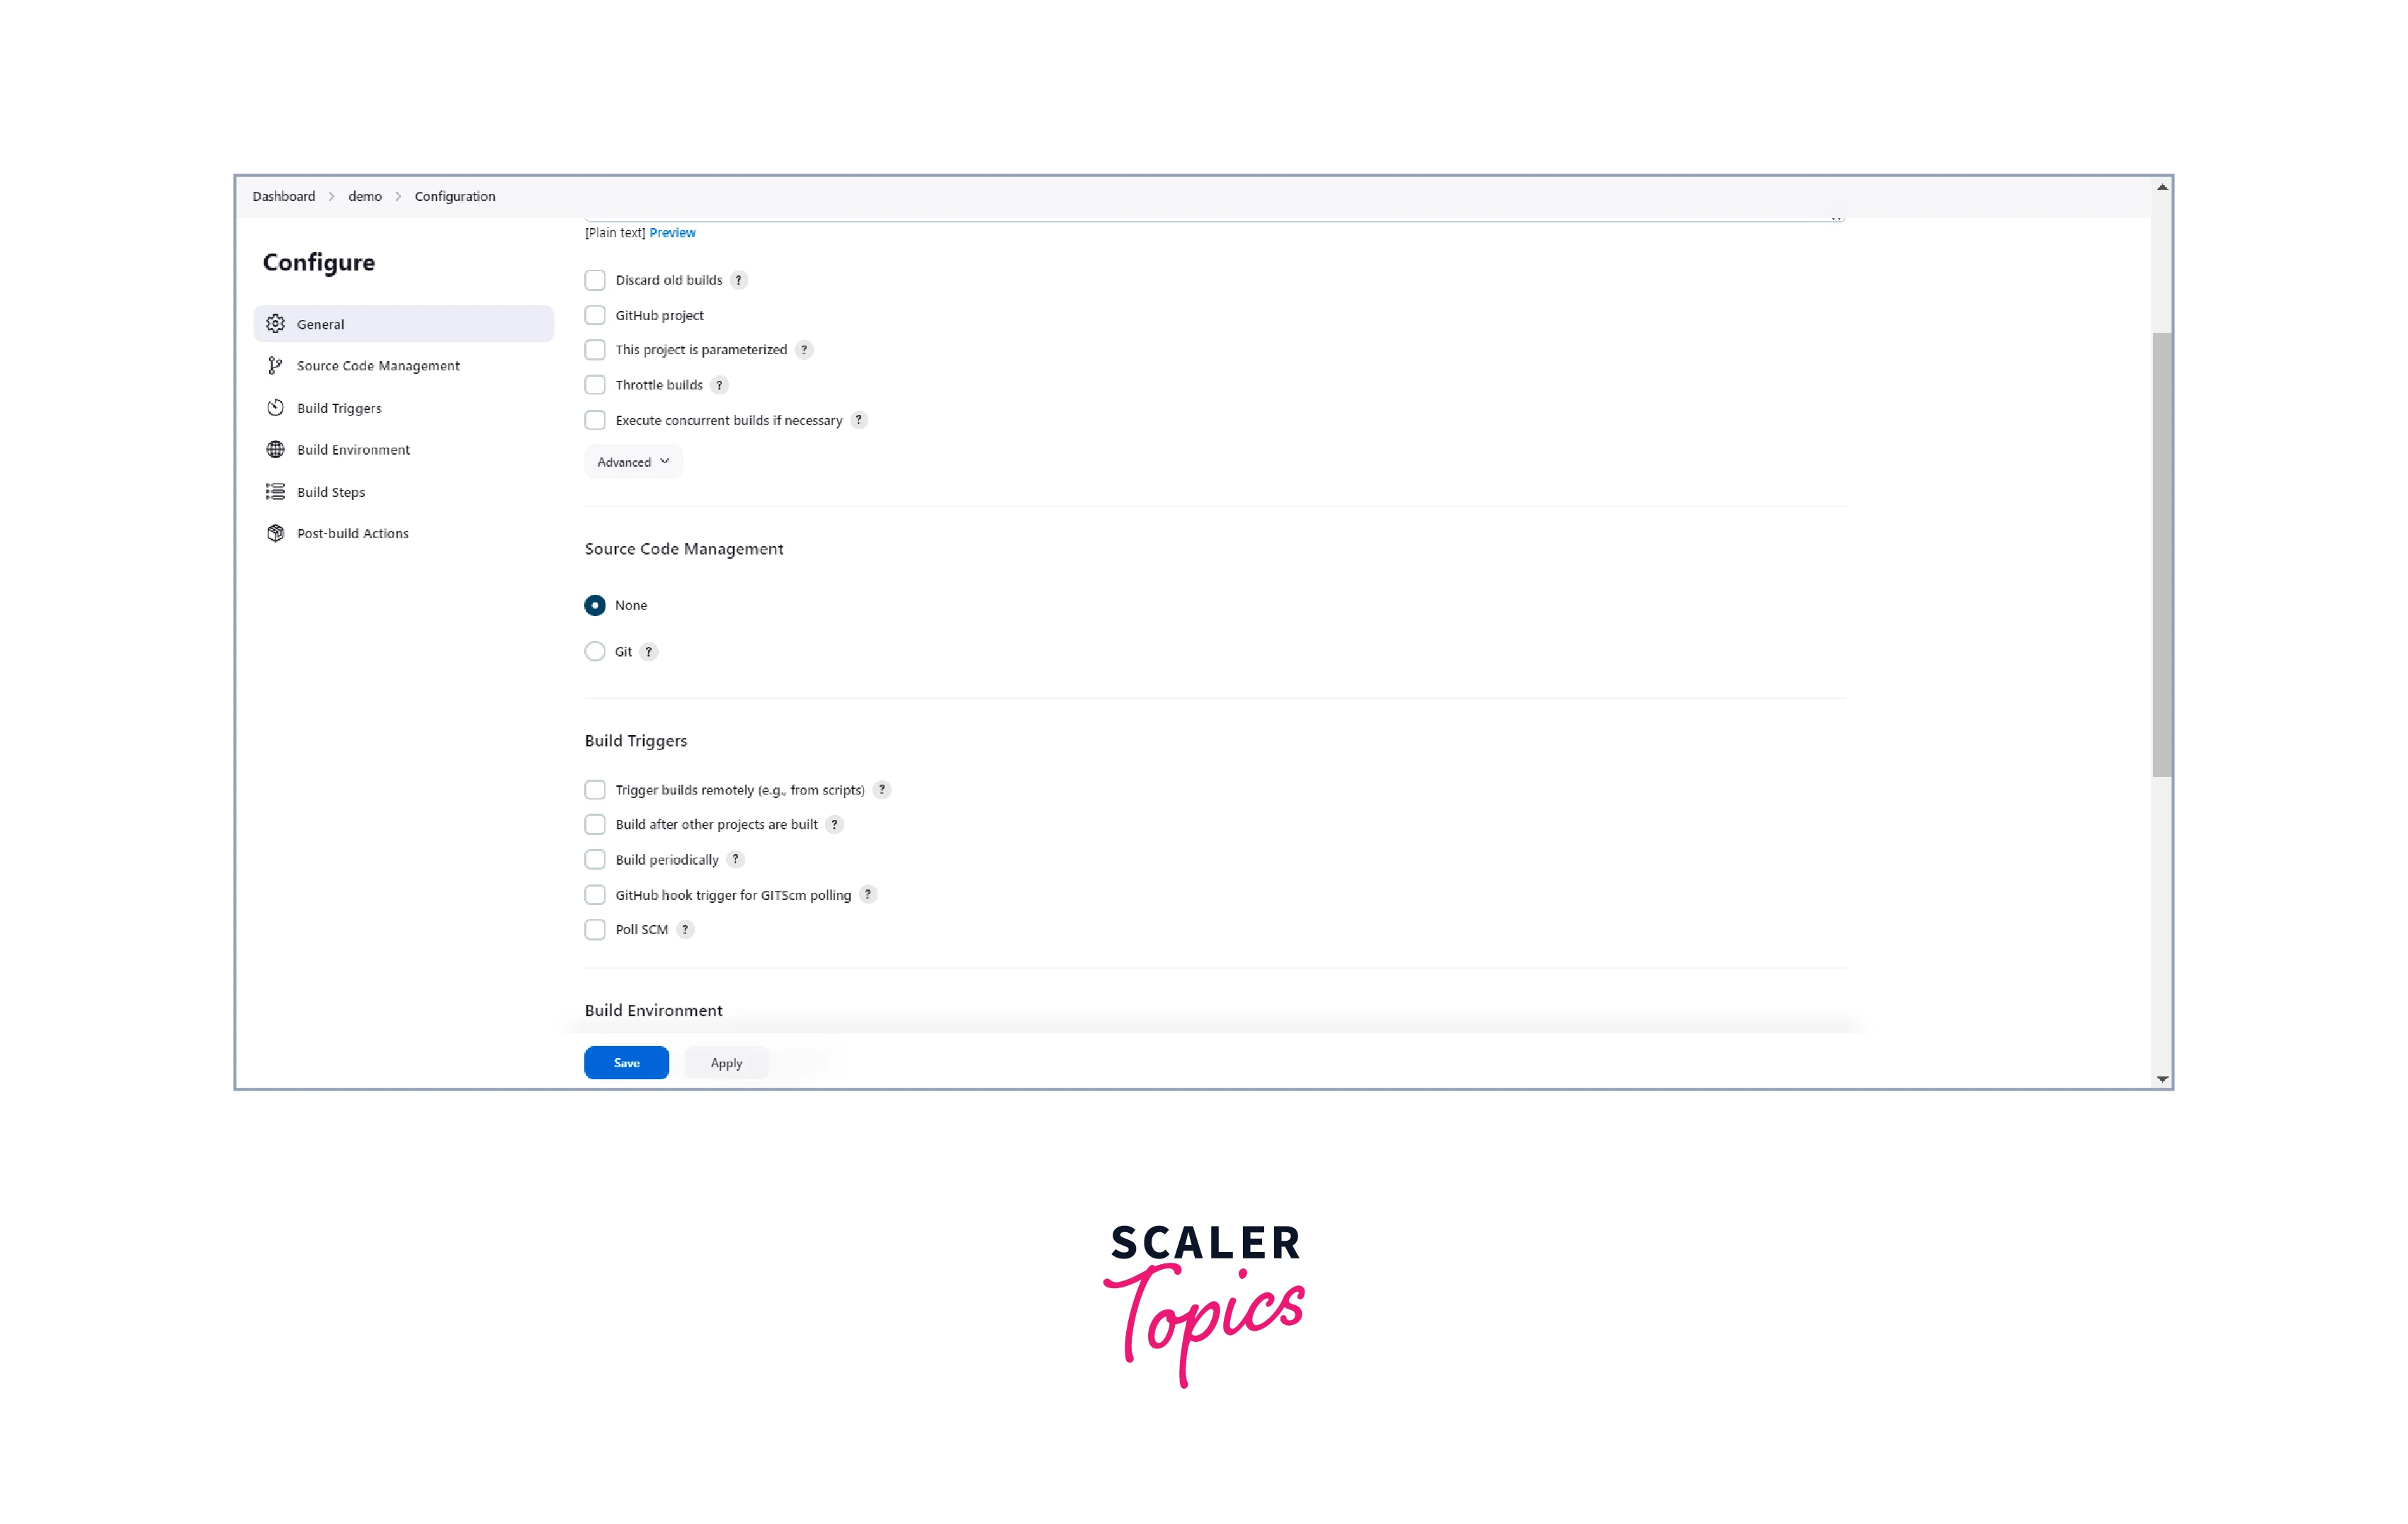
- Configure Job Settings: Set up your job's configuration, specifying the source code repository, build triggers, and other details.
- Add Selenium Test Execution: Add build steps or stages to execute your Selenium tests. You can use shell commands or batch files to run the tests through Selenium WebDriver scripts.
- Save and Trigger: Save the job configuration, and Jenkins will automatically trigger the job based on your specified triggers then Jenkins Selenium would be ready to use.
2. Integrating Jenkins with Selenium using Maven:
- Set up Maven Project: Create a Maven project for your Selenium tests, managing dependencies and configurations using the pom.xml file.
- Configure Jenkins: Similar to the previous method, install Jenkins and set it up with required plugins.
- Create Jenkins Job: Create a new Jenkins job, choosing "Maven project" as the job type.
- Specify Project Details: In the Jenkins job configuration, specify the source code repository, branch to build, and the location of your Maven pom.xml file.
- Define Build Steps: Add build steps to execute the Maven project. For Selenium tests, you can use Maven commands like "clean test" or specific plugins to run the tests.
- Save and Trigger: Save the job configuration, and Jenkins will automatically trigger the Maven build process, which, in turn, will execute your Selenium tests then Jenkins Selenium would be ready to use.
Quick Installation – Jenkins plugins for Selenium integration
To quickly install the necessary Jenkins plugins for Selenium integration, follow these steps:
- Install Jenkins: Download and install Jenkins on your server or machine. You can find the installation instructions on the Jenkins website.
- Access Jenkins Dashboard: Once installed, access Jenkins by navigating to http://localhost:8080 (or the URL you set during installation) in your web browser.
- Install Selenium Plugin: On the Jenkins Dashboard, click on "Manage Jenkins" on the left-hand side.
- Then, select "Manage Plugins" from the dropdown menu.

- Available Plugins: In the "Manage Plugins" section, go to the "Available" tab.
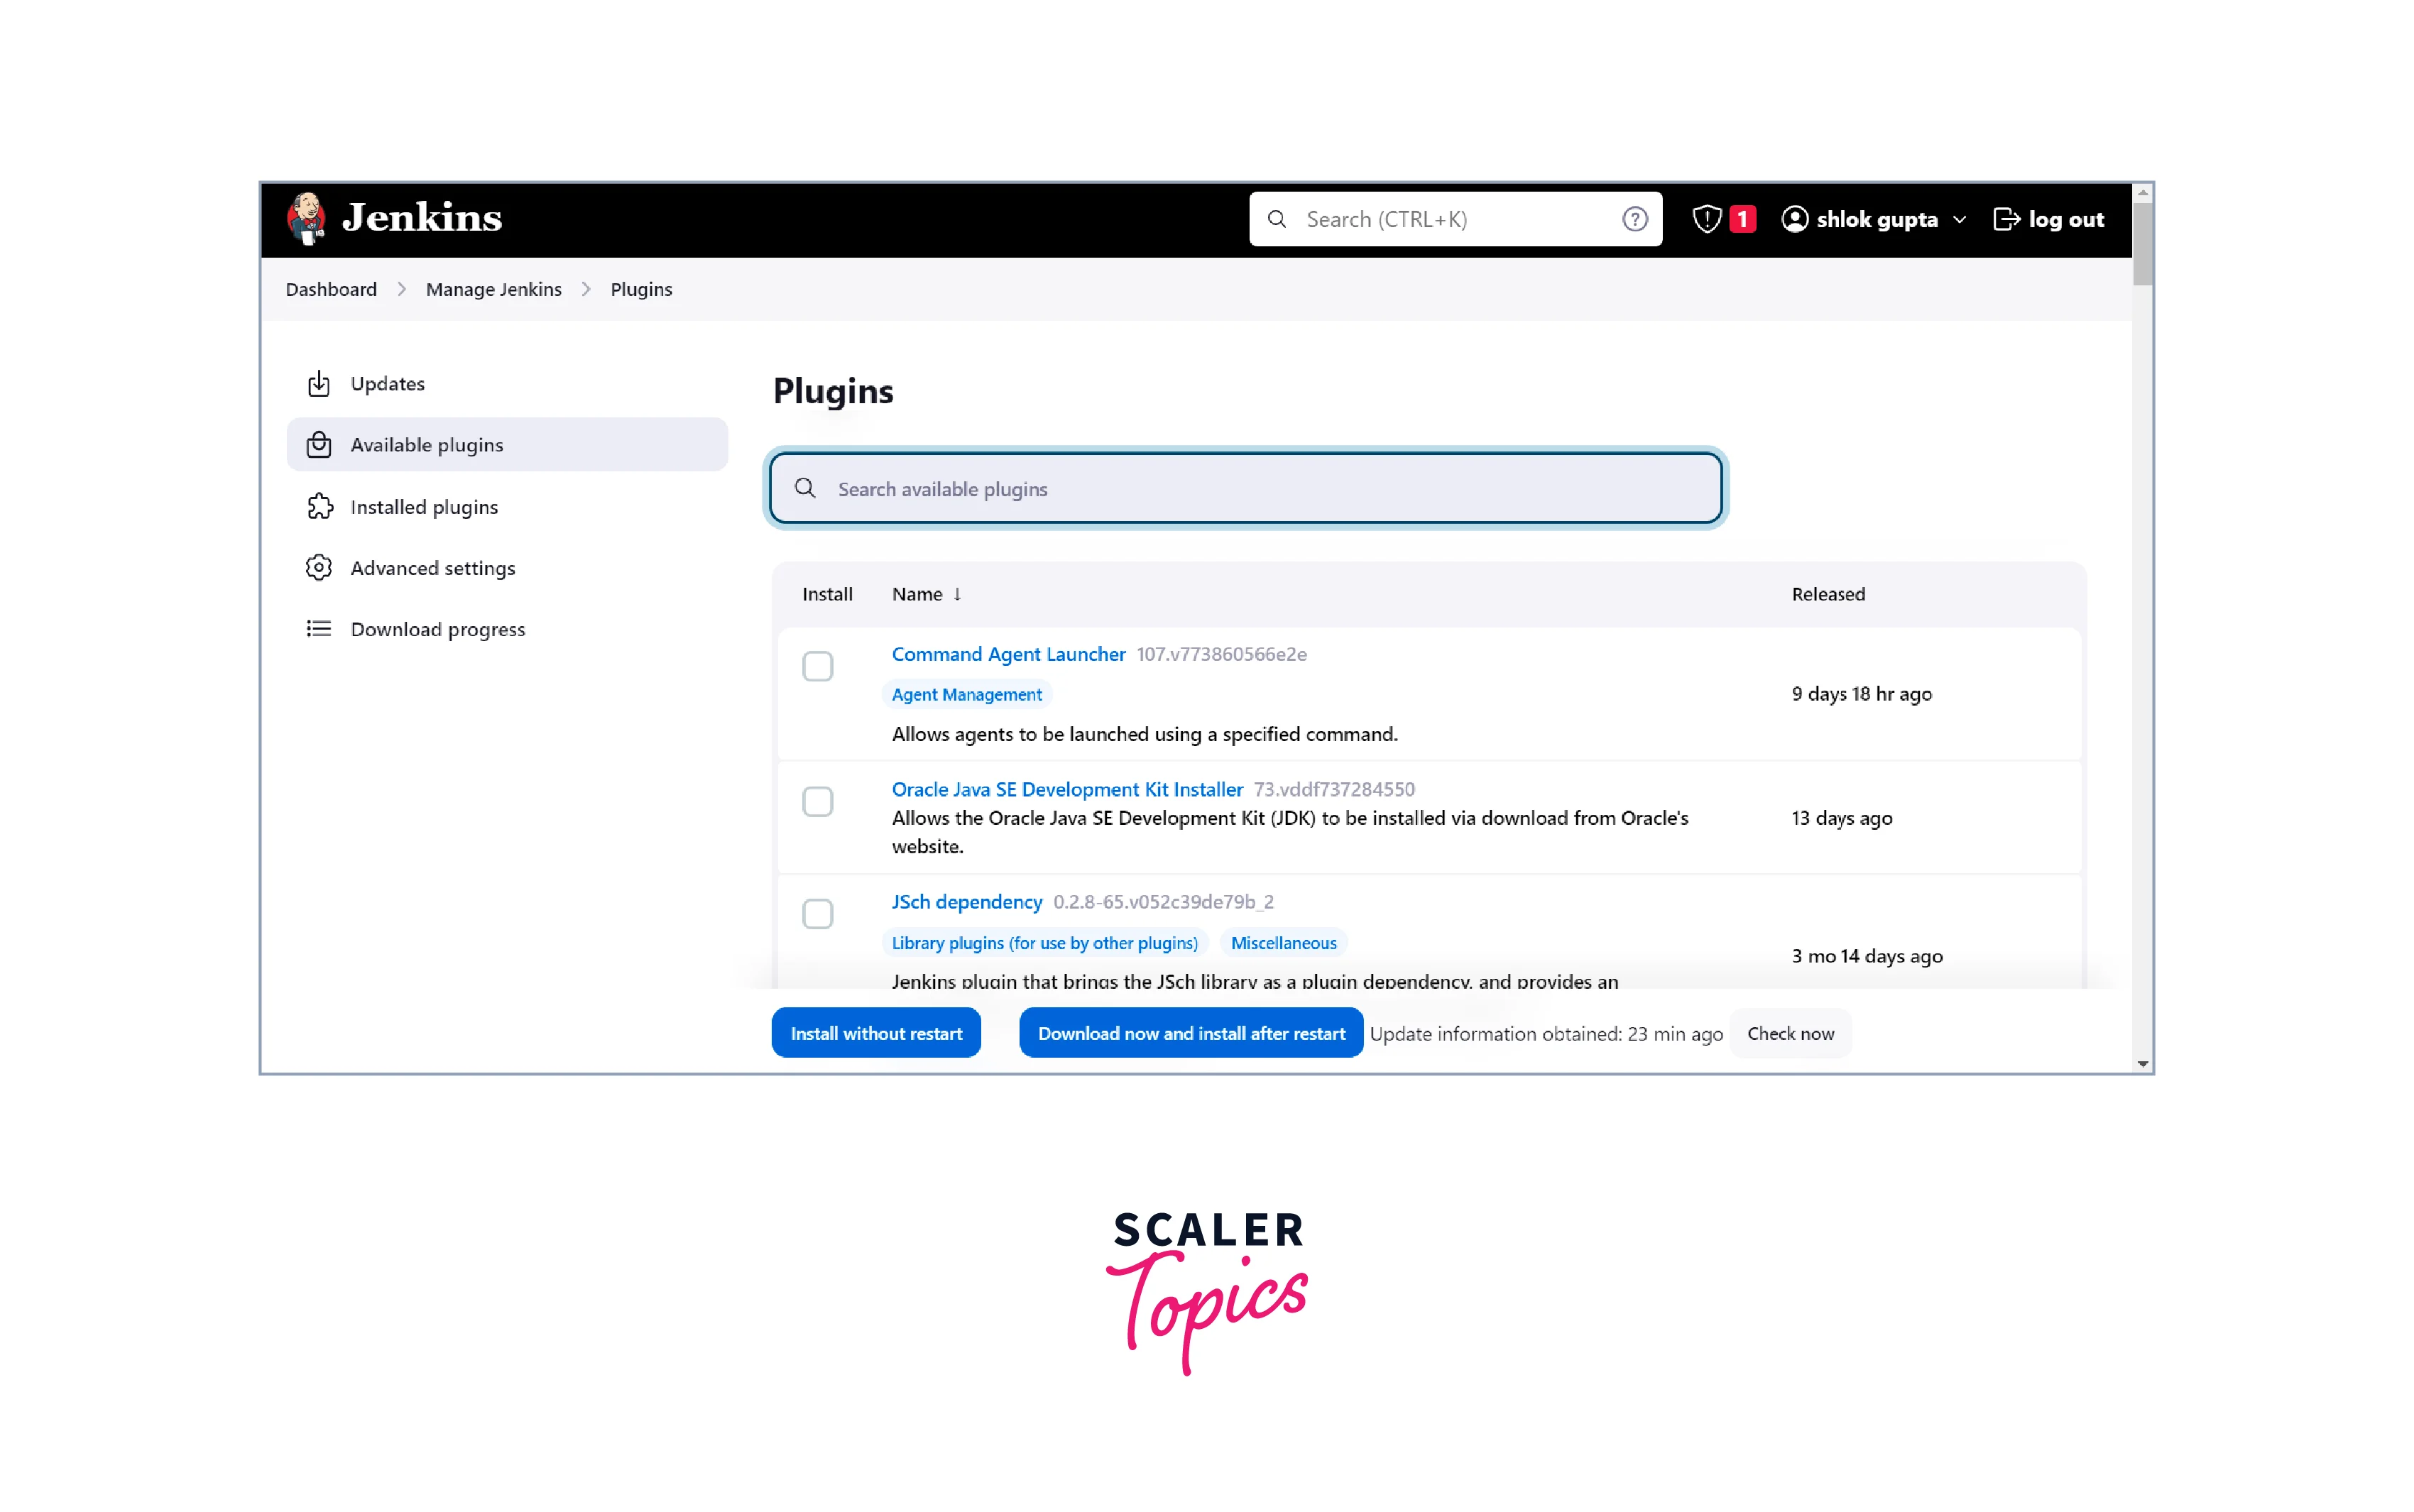
- Search for Selenium Plugin: In the search box, type "Selenium" and press Enter.
- Select Plugin: Locate the "Selenium Plugin" in the search results.
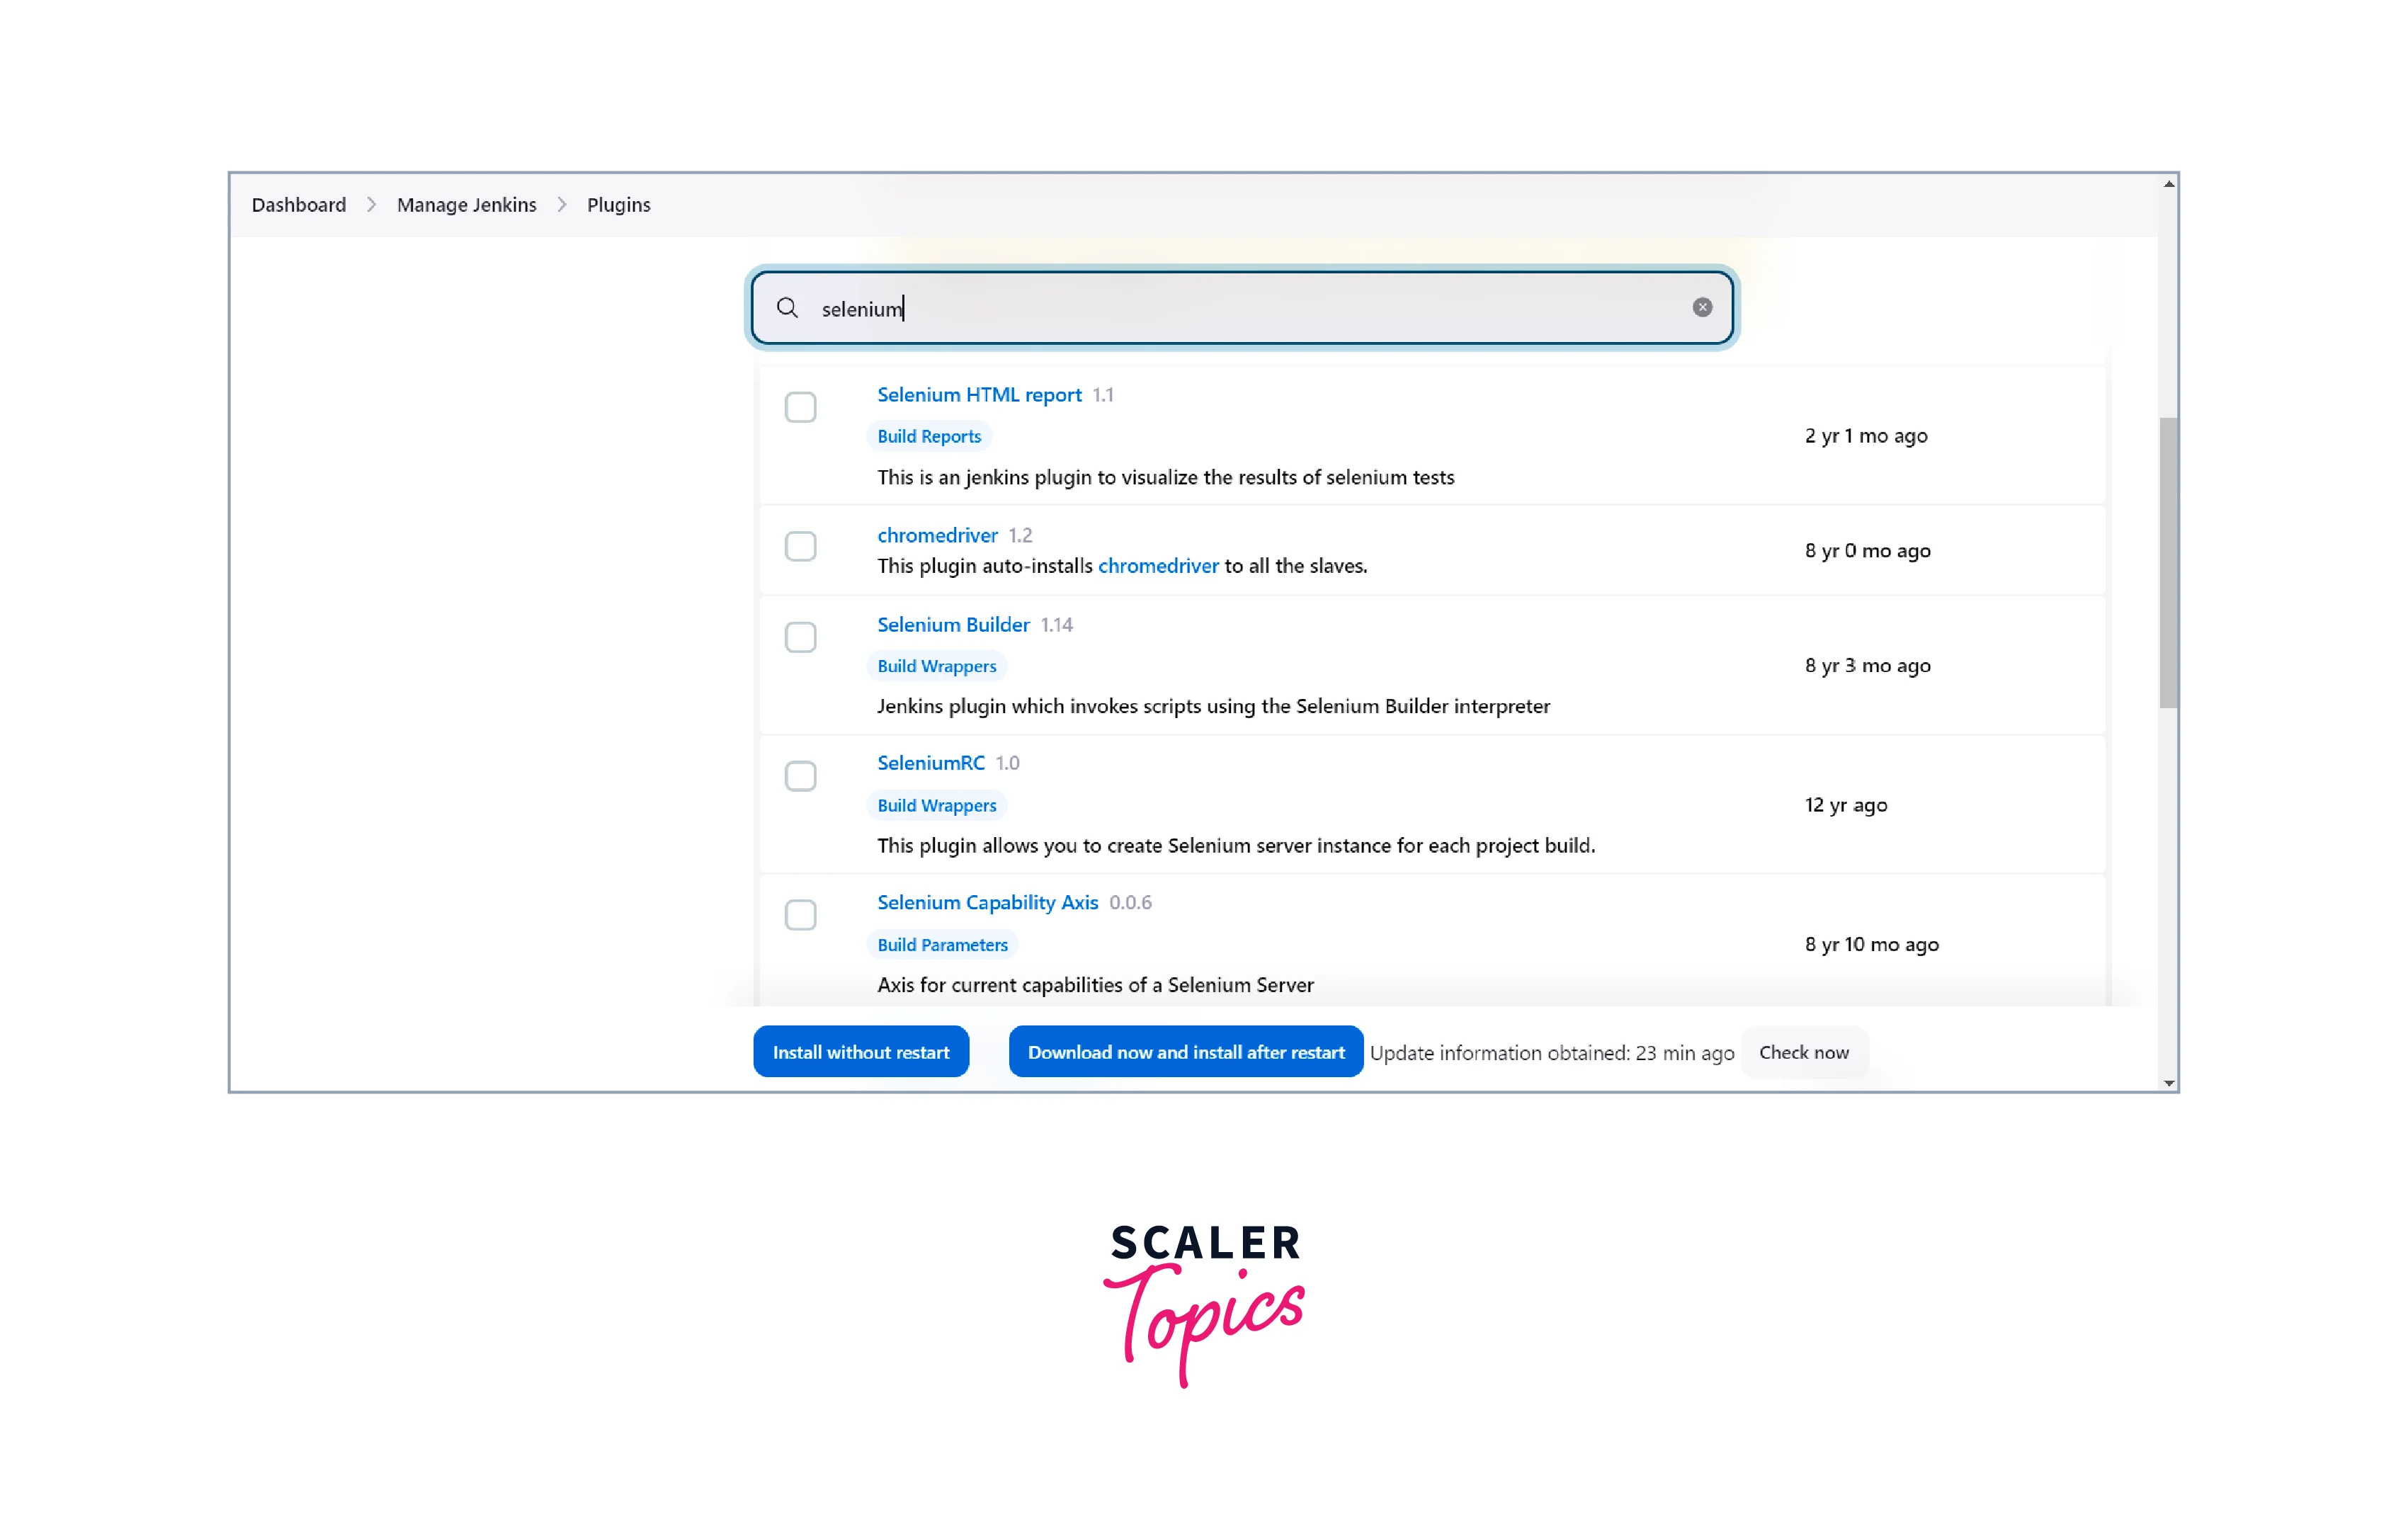
- Check the checkbox next to the "Selenium Plugin" to select it for installation.
- Install Plugin: Click the "Install without restart" button at the bottom of the page.
- Restart Jenkins (Optional): After installation, Jenkins may prompt you to restart. If so, click the "Restart Jenkins when no jobs are running" checkbox and wait for the restart to complete.
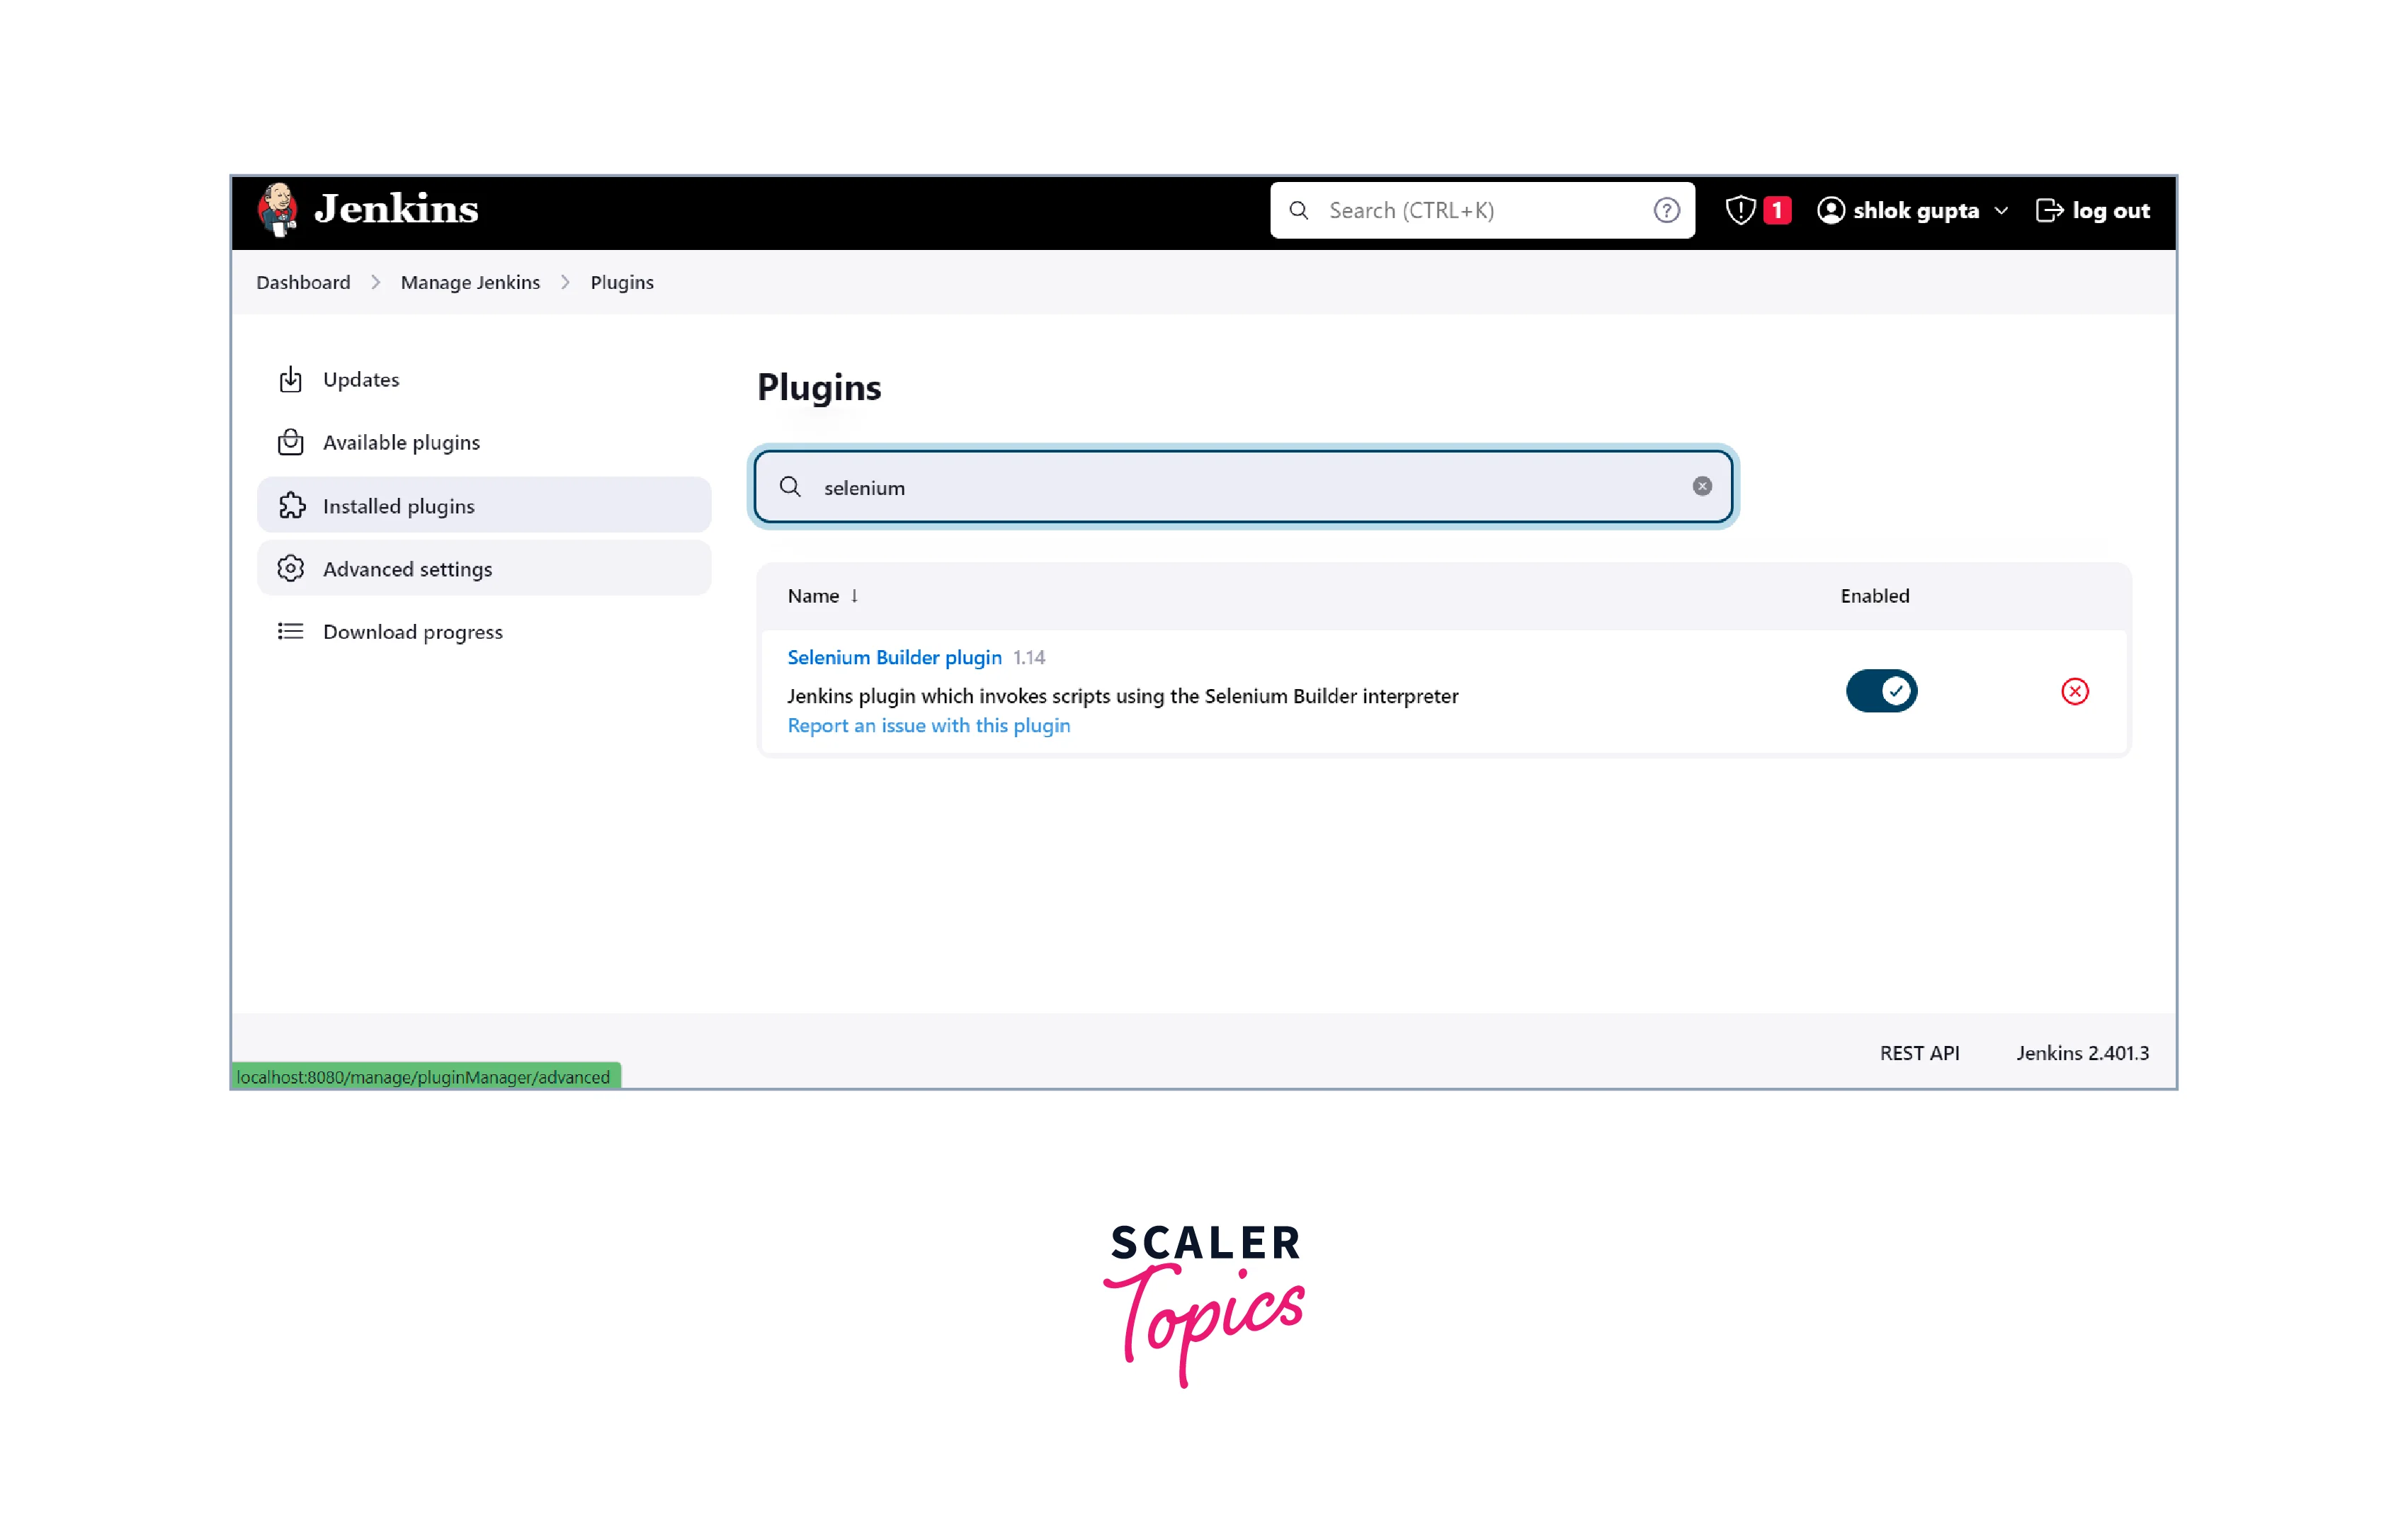
Once the Selenium plugin is installed, you can start integrating Jenkins with Selenium and set up automated test execution for your web applications. This plugin enables seamless communication between Jenkins and Selenium, allowing you to execute your Selenium test scripts as part of your Jenkins build process and take advantage of continuous integration for your software projects and Jenkins Selenium would be ready to use.
Configuring Jenkins to run Selenium tests
To configure Jenkins to run Selenium tests, follow these steps:
- Install Jenkins: If you haven't already installed Jenkins, follow the installation steps for your operating system.
- Install Selenium Plugin: Go to the Jenkins Dashboard, click on "Manage Jenkins," and then select "Manage Plugins." In the "Available" tab, search for "Selenium Plugin" and install it.
- Create a New Jenkins Job: On the Jenkins Dashboard, click on "New Item" to create a new job. Enter a name for the job, and select "Freestyle project" or "Pipeline" as the job type.
- Configure Job Settings: In the job configuration page, specify the source code repository where your Selenium test scripts are stored.Choose the branch or main that should trigger the test execution. Define any build triggers, such as "Poll SCM" or "Build periodically," to control when the tests will run.
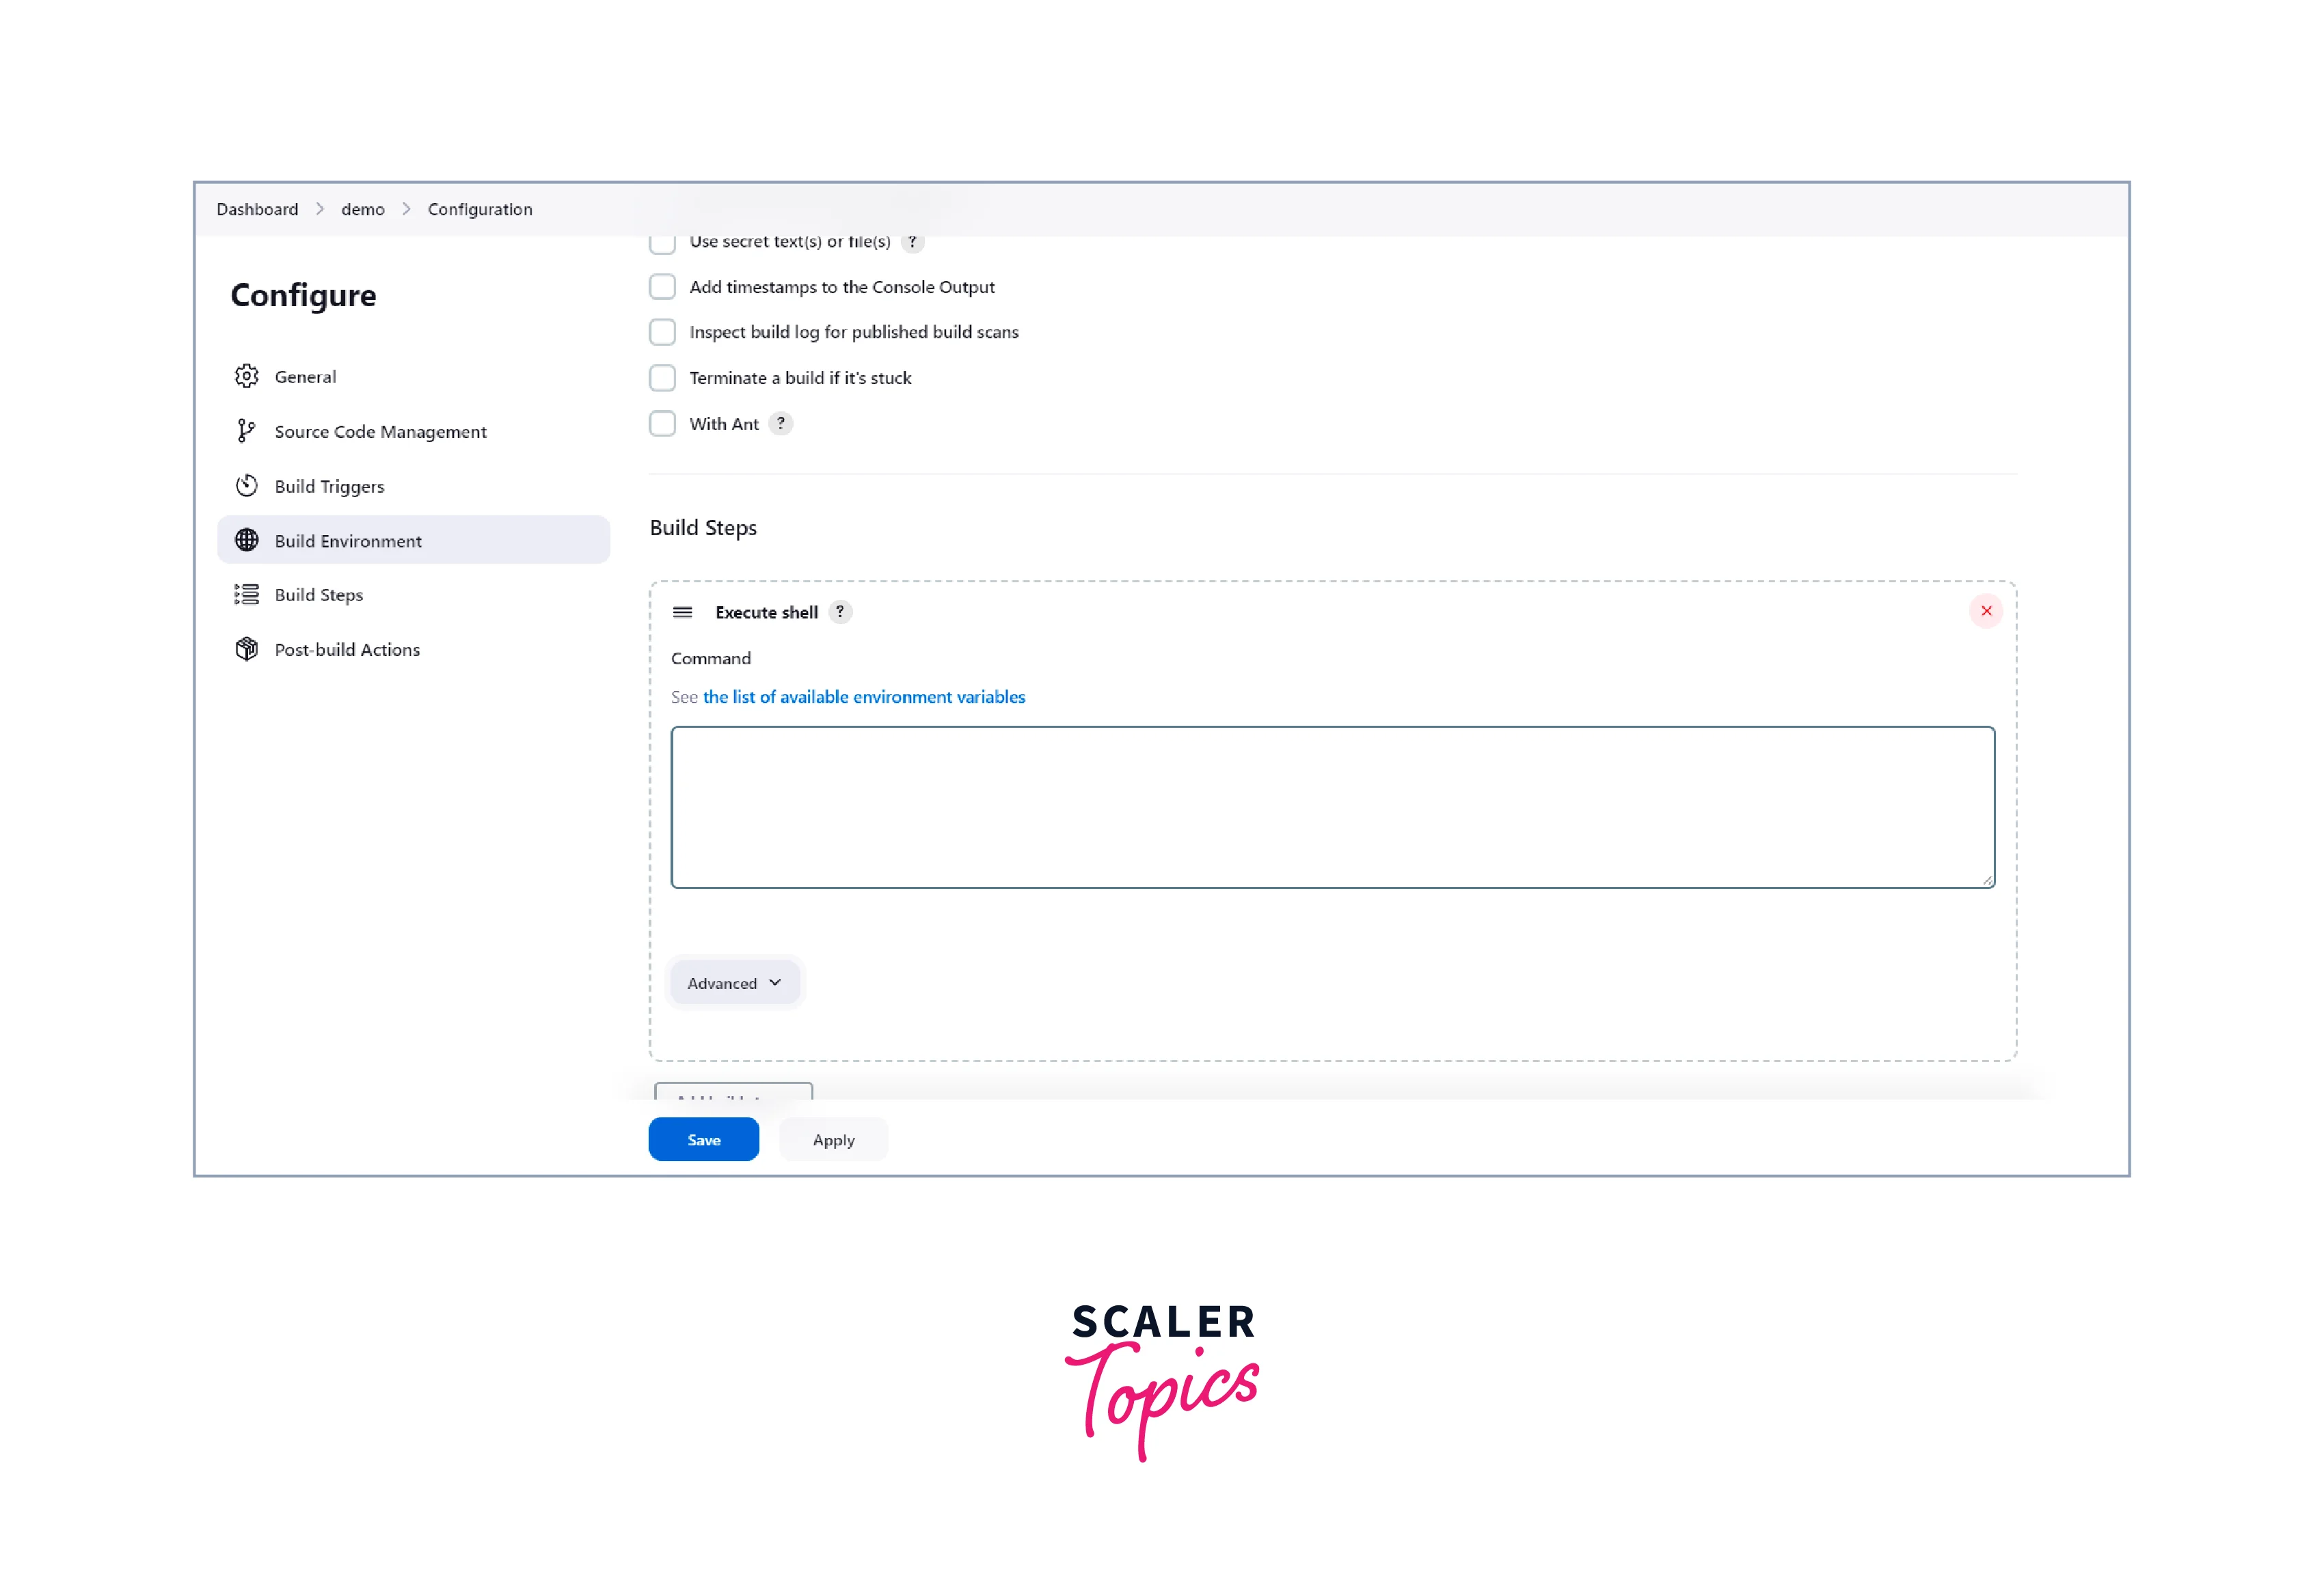
- Add Build Step (Freestyle project) or Stage (Pipeline): For "Freestyle project," under the "Build" section, click on "Add build step" and choose "Execute shell" (for Unix-like systems) or "Execute Windows batch command" (for Windows). In the shell or batch command, you will specify how to run your Selenium tests, such as invoking a testing framework like JUnit or TestNG.For "Pipeline," within the Jenkinsfile, use the "script" block to define the commands to run your Selenium tests.
- Save Configuration: Click "Save" to save the job configuration.
- Trigger Test Execution: Depending on the build triggers you set in step 4, Jenkins will automatically trigger the job and execute your Selenium tests based on the specified schedule or code changes.
- View Test Results: After the job execution, Jenkins will display the test results in the build console output.You can also integrate with reporting plugins like "JUnit" or "TestNG" to get more detailed and organised test reports.
- Optional: Parallel Execution (Pipeline Only): If using a Pipeline, you can take advantage of parallel execution to speed up your Selenium tests by running them on multiple agents simultaneously. This is useful for large test suites.
Creating a Jenkins job for Selenium testing
Creating a Jenkins job for Selenium testing involves setting up a new job in Jenkins, configuring it to run your Selenium tests, and defining the necessary build steps. Here's a step-by-step guide:
- Install Jenkins: If you haven't installed Jenkins yet, download and set it up on your server or machine.
- Install Selenium Plugin: Go to the Jenkins Dashboard, click on "Manage Jenkins," then select "Manage Plugins." In the "Available" tab, search for "Selenium Plugin" and install it.
- Create a New Jenkins Job: On the Jenkins Dashboard, click on "New Item" to create a new job. Enter a name for the job (e.g., "Selenium Test Job") and choose "Freestyle project" as the job type.
- Configure Job Settings: In the job configuration page, you can provide a description for the job (optional). Under the "General" tab, specify the source code repository where your Selenium test scripts are located.
- Build Triggers (Optional): Under the "Build Triggers" section, choose when you want the job to be triggered. For example, you can use "Poll SCM" to trigger the job periodically or use "GitHub hook trigger for GITScm" to trigger it on code commits.
- Add Build Step: Under the "Build" section, click on "Add build step" and choose the appropriate build step for your Selenium tests. Common choices include: "Execute shell" for Unix-like systems. "Execute Windows batch command" for Windows. "Invoke top-level Maven targets" if your tests are managed by Maven.
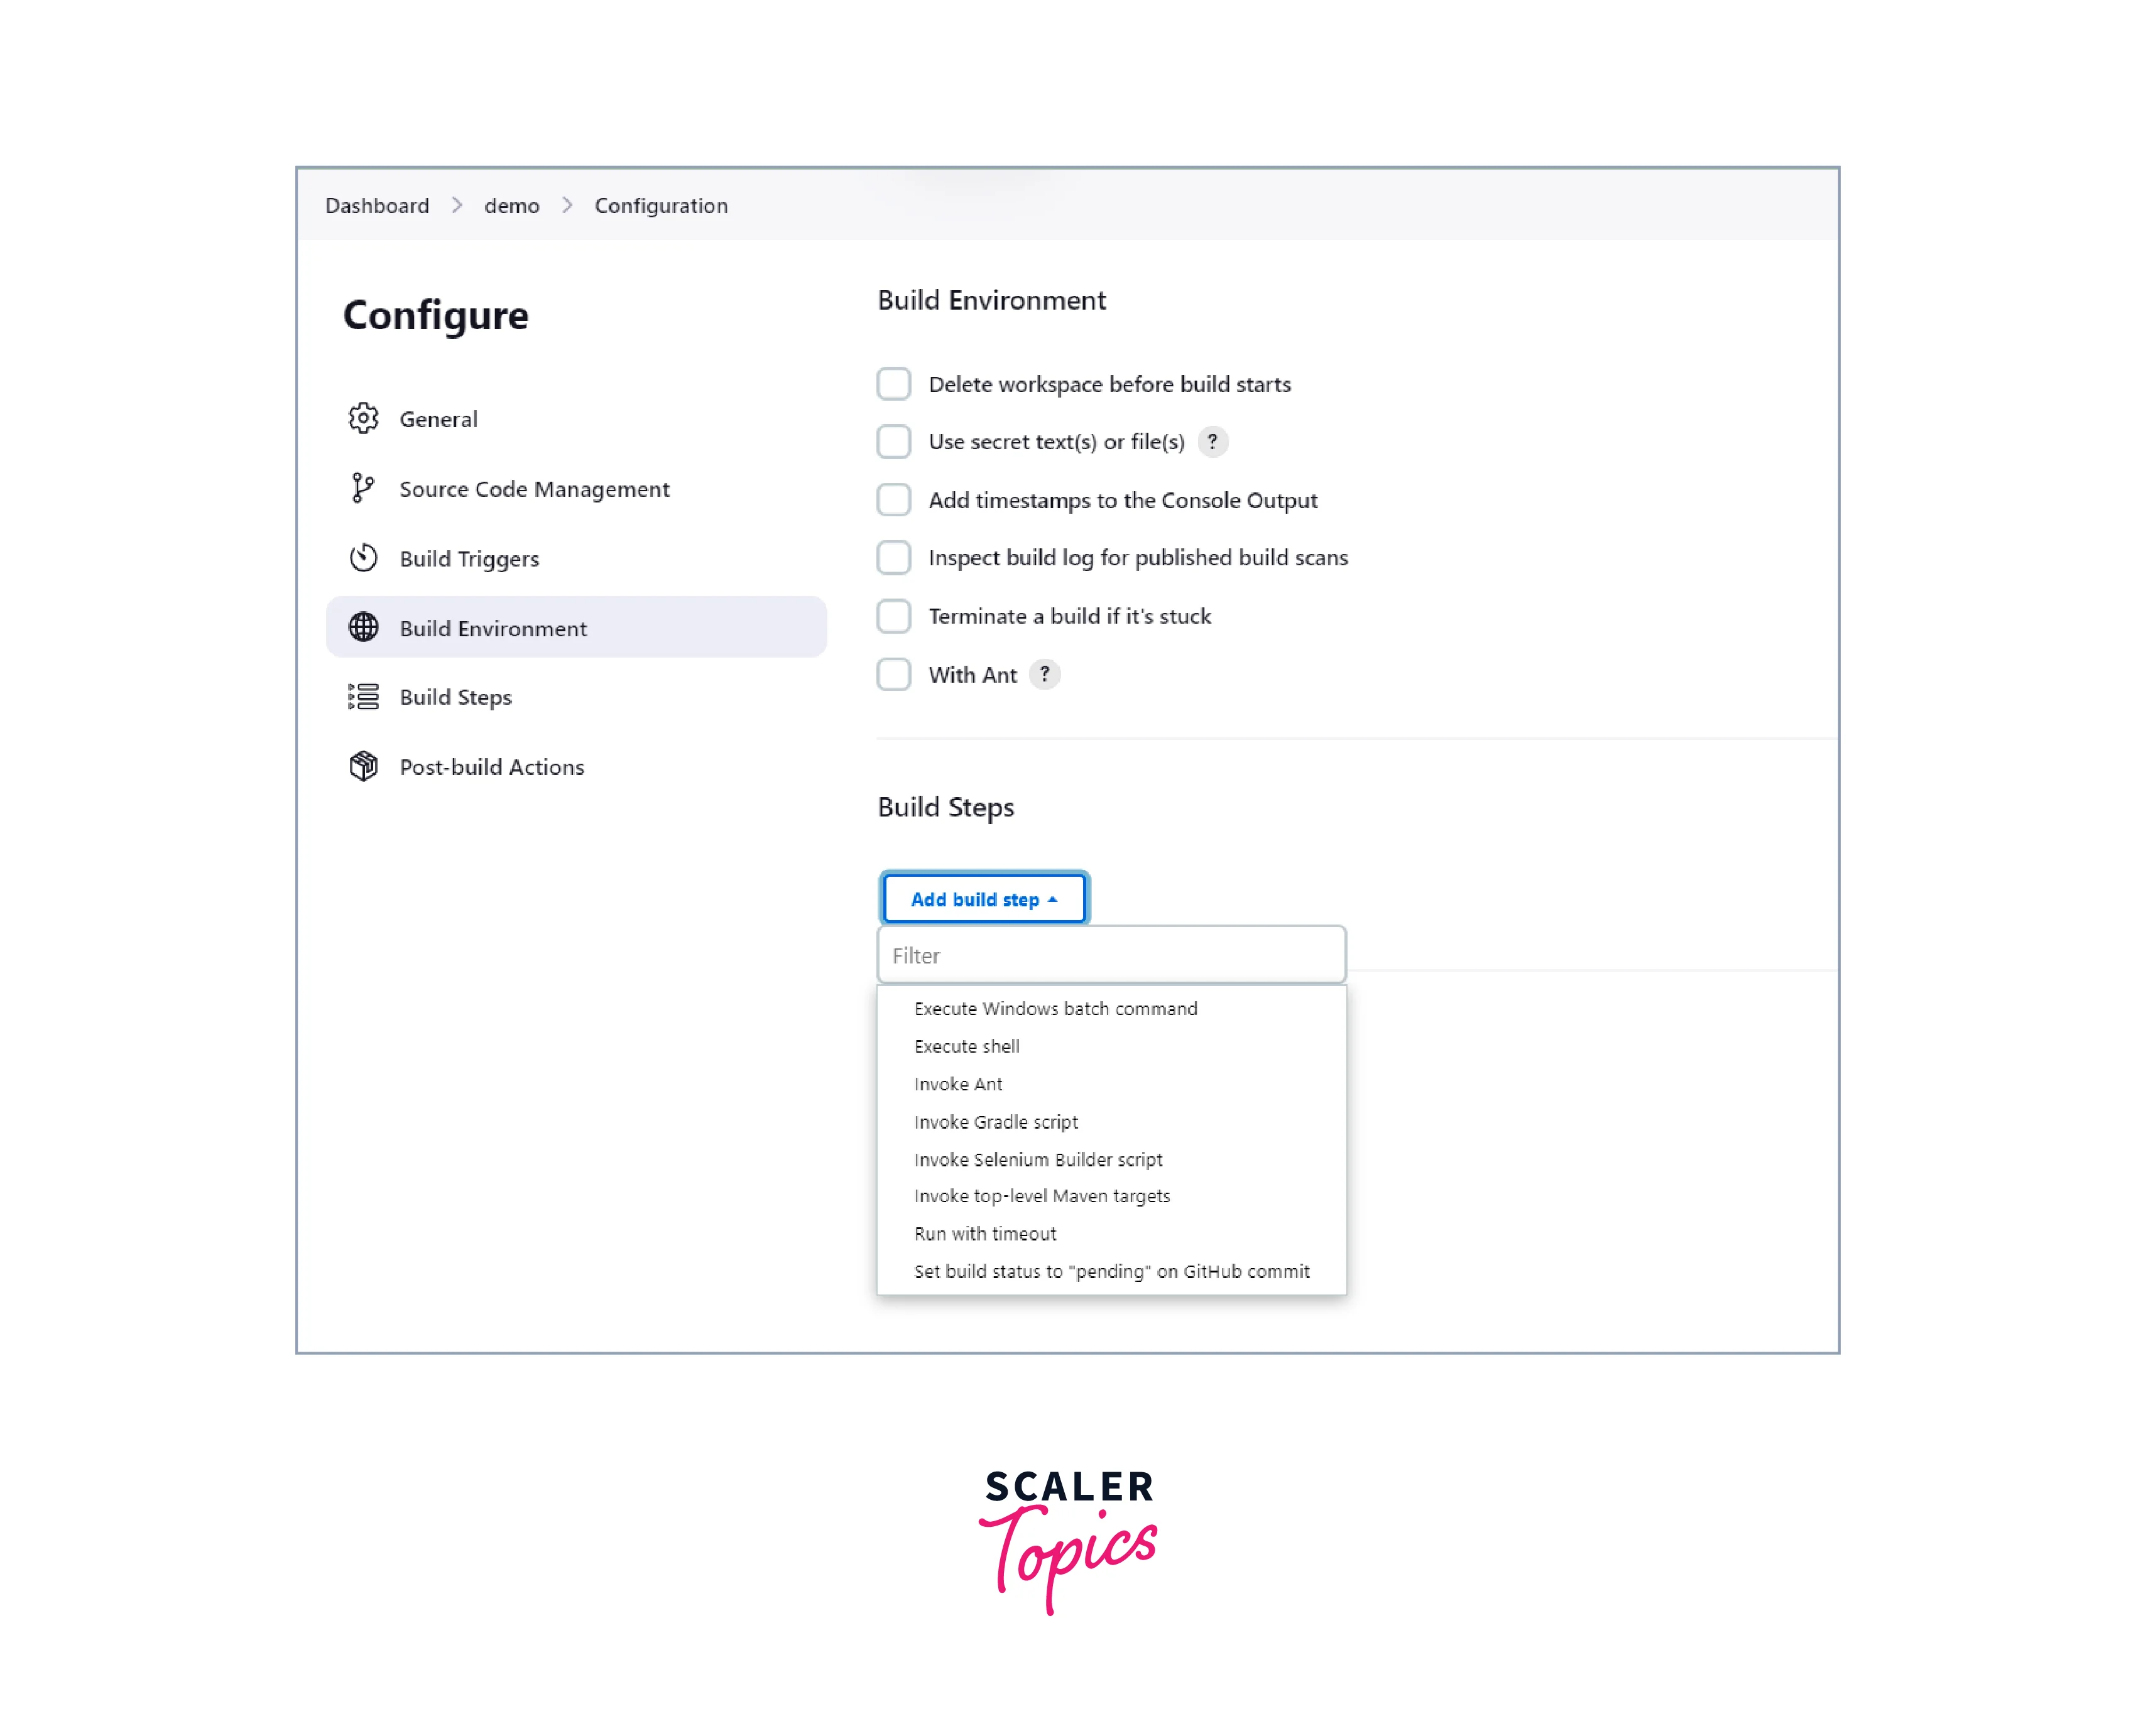
- Specify Selenium Test Execution: In the build step, write the necessary commands to execute your Selenium tests. This could involve invoking a specific testing framework like JUnit or TestNG, launching a browser with WebDriver, and running your test scripts.
- Post-build Actions (Optional): You can add post-build actions to handle test reports or notifications after the test execution is complete. For example: "Publish JUnit test result report" to display test results in Jenkins. "Email notification" to send notifications about the test results to specific recipients.
- Save Configuration: Click "Save" to create the Jenkins job.
- Trigger Test Execution: Depending on the build triggers you set earlier, Jenkins will automatically trigger the job and run your Selenium tests based on the defined schedule or code changes.
Running Selenium Tests with Jenkins
To run Jenkins Selenium tests, follow these steps:
Configure Jenkins Job:
Create a new Jenkins job (as explained in the previous section) and configure it to execute your Selenium tests.
- Install Dependencies: Ensure that the machine where Jenkins is running has all the necessary dependencies installed. This includes Java Development Kit (JDK), web browsers (e.g., Chrome, Firefox), Selenium WebDriver, and any testing frameworks (e.g., JUnit, TestNG) you are using for your tests.
- Add Selenium Test Execution Command: In the build step of your Jenkins job, add the command or script to execute your Selenium tests. For example: If you're using JUnit or TestNG, the command may be to run the test classes through the testing framework.If you're using a build tool like Maven, the command may be "mvn test" to execute the tests defined in your pom.xml file.
- Set Browser Configuration (Optional): If your Selenium tests require specific browser configurations, such as running tests on different browsers or headless browsers, ensure that the WebDriver is configured accordingly in your test scripts or test framework.
- Save Job Configuration: Save the job configuration in Jenkins after making any changes.
- Trigger Test Execution: Depending on the build triggers you set during job configuration, Jenkins will automatically trigger the job and initiate the execution of your Jenkins Selenium tests based on schedule or code changes.
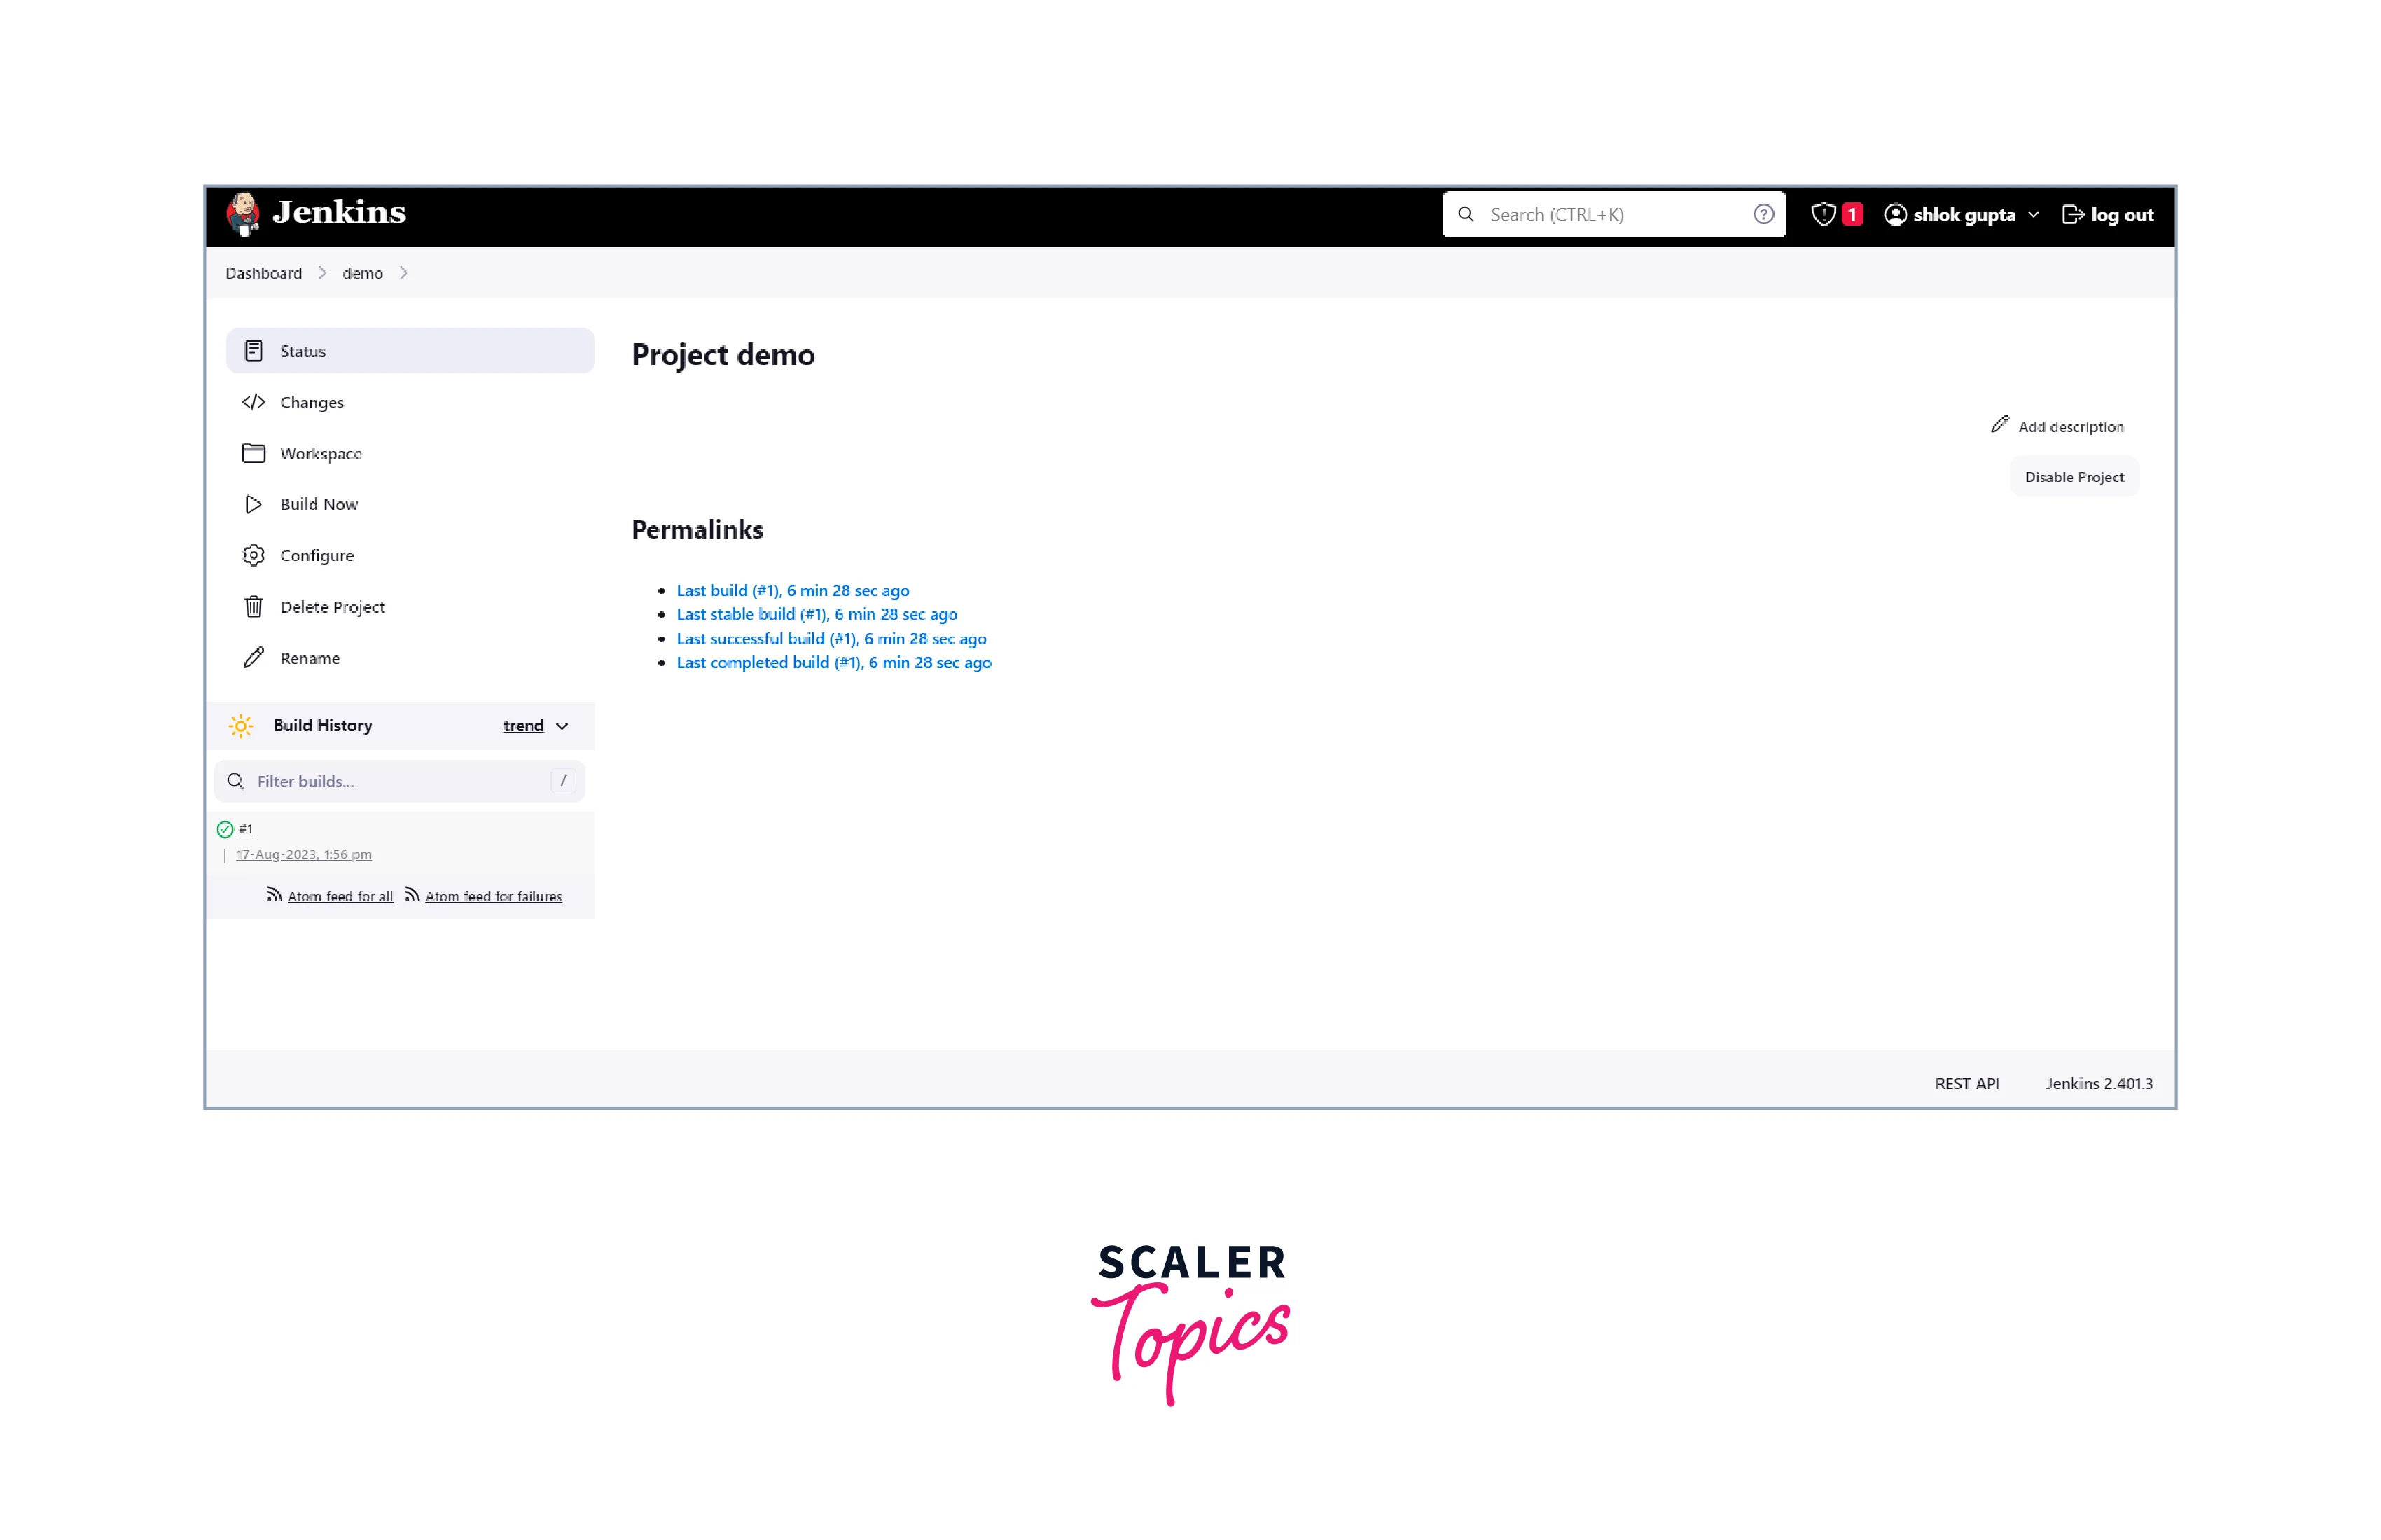
- View Test Results: After the test execution is complete, Jenkins will provide the test results in the build console output. You can view the console log or integrate with reporting plugins to get more detailed and organised test reports.
- Email Notifications (Optional): If you want to receive notifications about test results, you can configure Jenkins to send email notifications to specific recipients.
- Manage Test Reports (Optional): Jenkins provides various plugins to manage and visualise test reports better. You can use plugins like "HTML Publisher" to publish HTML-based test reports or integrate with "Allure" or "ExtentReports" for more sophisticated reporting capabilities.
Conclusion
- Jenkins is an open-source automation server used for continuous integration and continuous delivery (CI/CD) in software development.
- Selenium is a popular testing framework for web applications, enabling automated testing.
- Integrating Jenkins with Selenium streamlines the testing process, providing rapid feedback on code changes and improving software quality.
- By installing the Selenium plugin in Jenkins, teams can trigger and execute Selenium test suites automatically.
- Configuring a Jenkins Selenium testing involves setting up the job, specifying the source code repository, and defining build steps to run Selenium tests.
- Running Jenkins Selenium tests enhances development efficiency, detects bugs early, and supports continuous software delivery.
- Jenkins' integration with Selenium enables seamless automation, faster development cycles, and enhanced team collaboration.
- Developers can leverage Jenkins Selenium to establish a robust and continuous testing pipeline, ensuring high-quality software delivery.