Jenkins Testing Automation
Overview
Testing is a crucial aspect of this process, helping to catch bugs and issues early on, thereby improving the reliability and stability of your software. Manual testing, however, can be laborious and prone to mistakes. This is where automation enters the picture, and Jenkins, an open-source automation server, stands out as a potent tool for automating testing procedures. This blog post will look into Jenkins testing automation and how it can revolutionize your software development practices.
Setting Up Jenkins for Testing Automation
Navigate to Jenkins Download Page and click on the OS you want to install your Jenkins on or you could use Dockerimage for starting a new container.
Step 1: Pull Jenkins Docker Image
Step 2: Start docker container using jenkins image
Step 3:
To unblock Jenkins we will be needing the initialAdminPassword which is downloaded when we installed Jenkins and is kept in a file. To access the initialAdminPassword in Docker we will have to get inside the container.
This will print the Admin password copy and paste it and move forward.
If you are new and starting up you will have to create an Admin user login password.

Once done you will be prompted to change the Jenkins URL if needed you can change it. We will not be changing it in this use case.
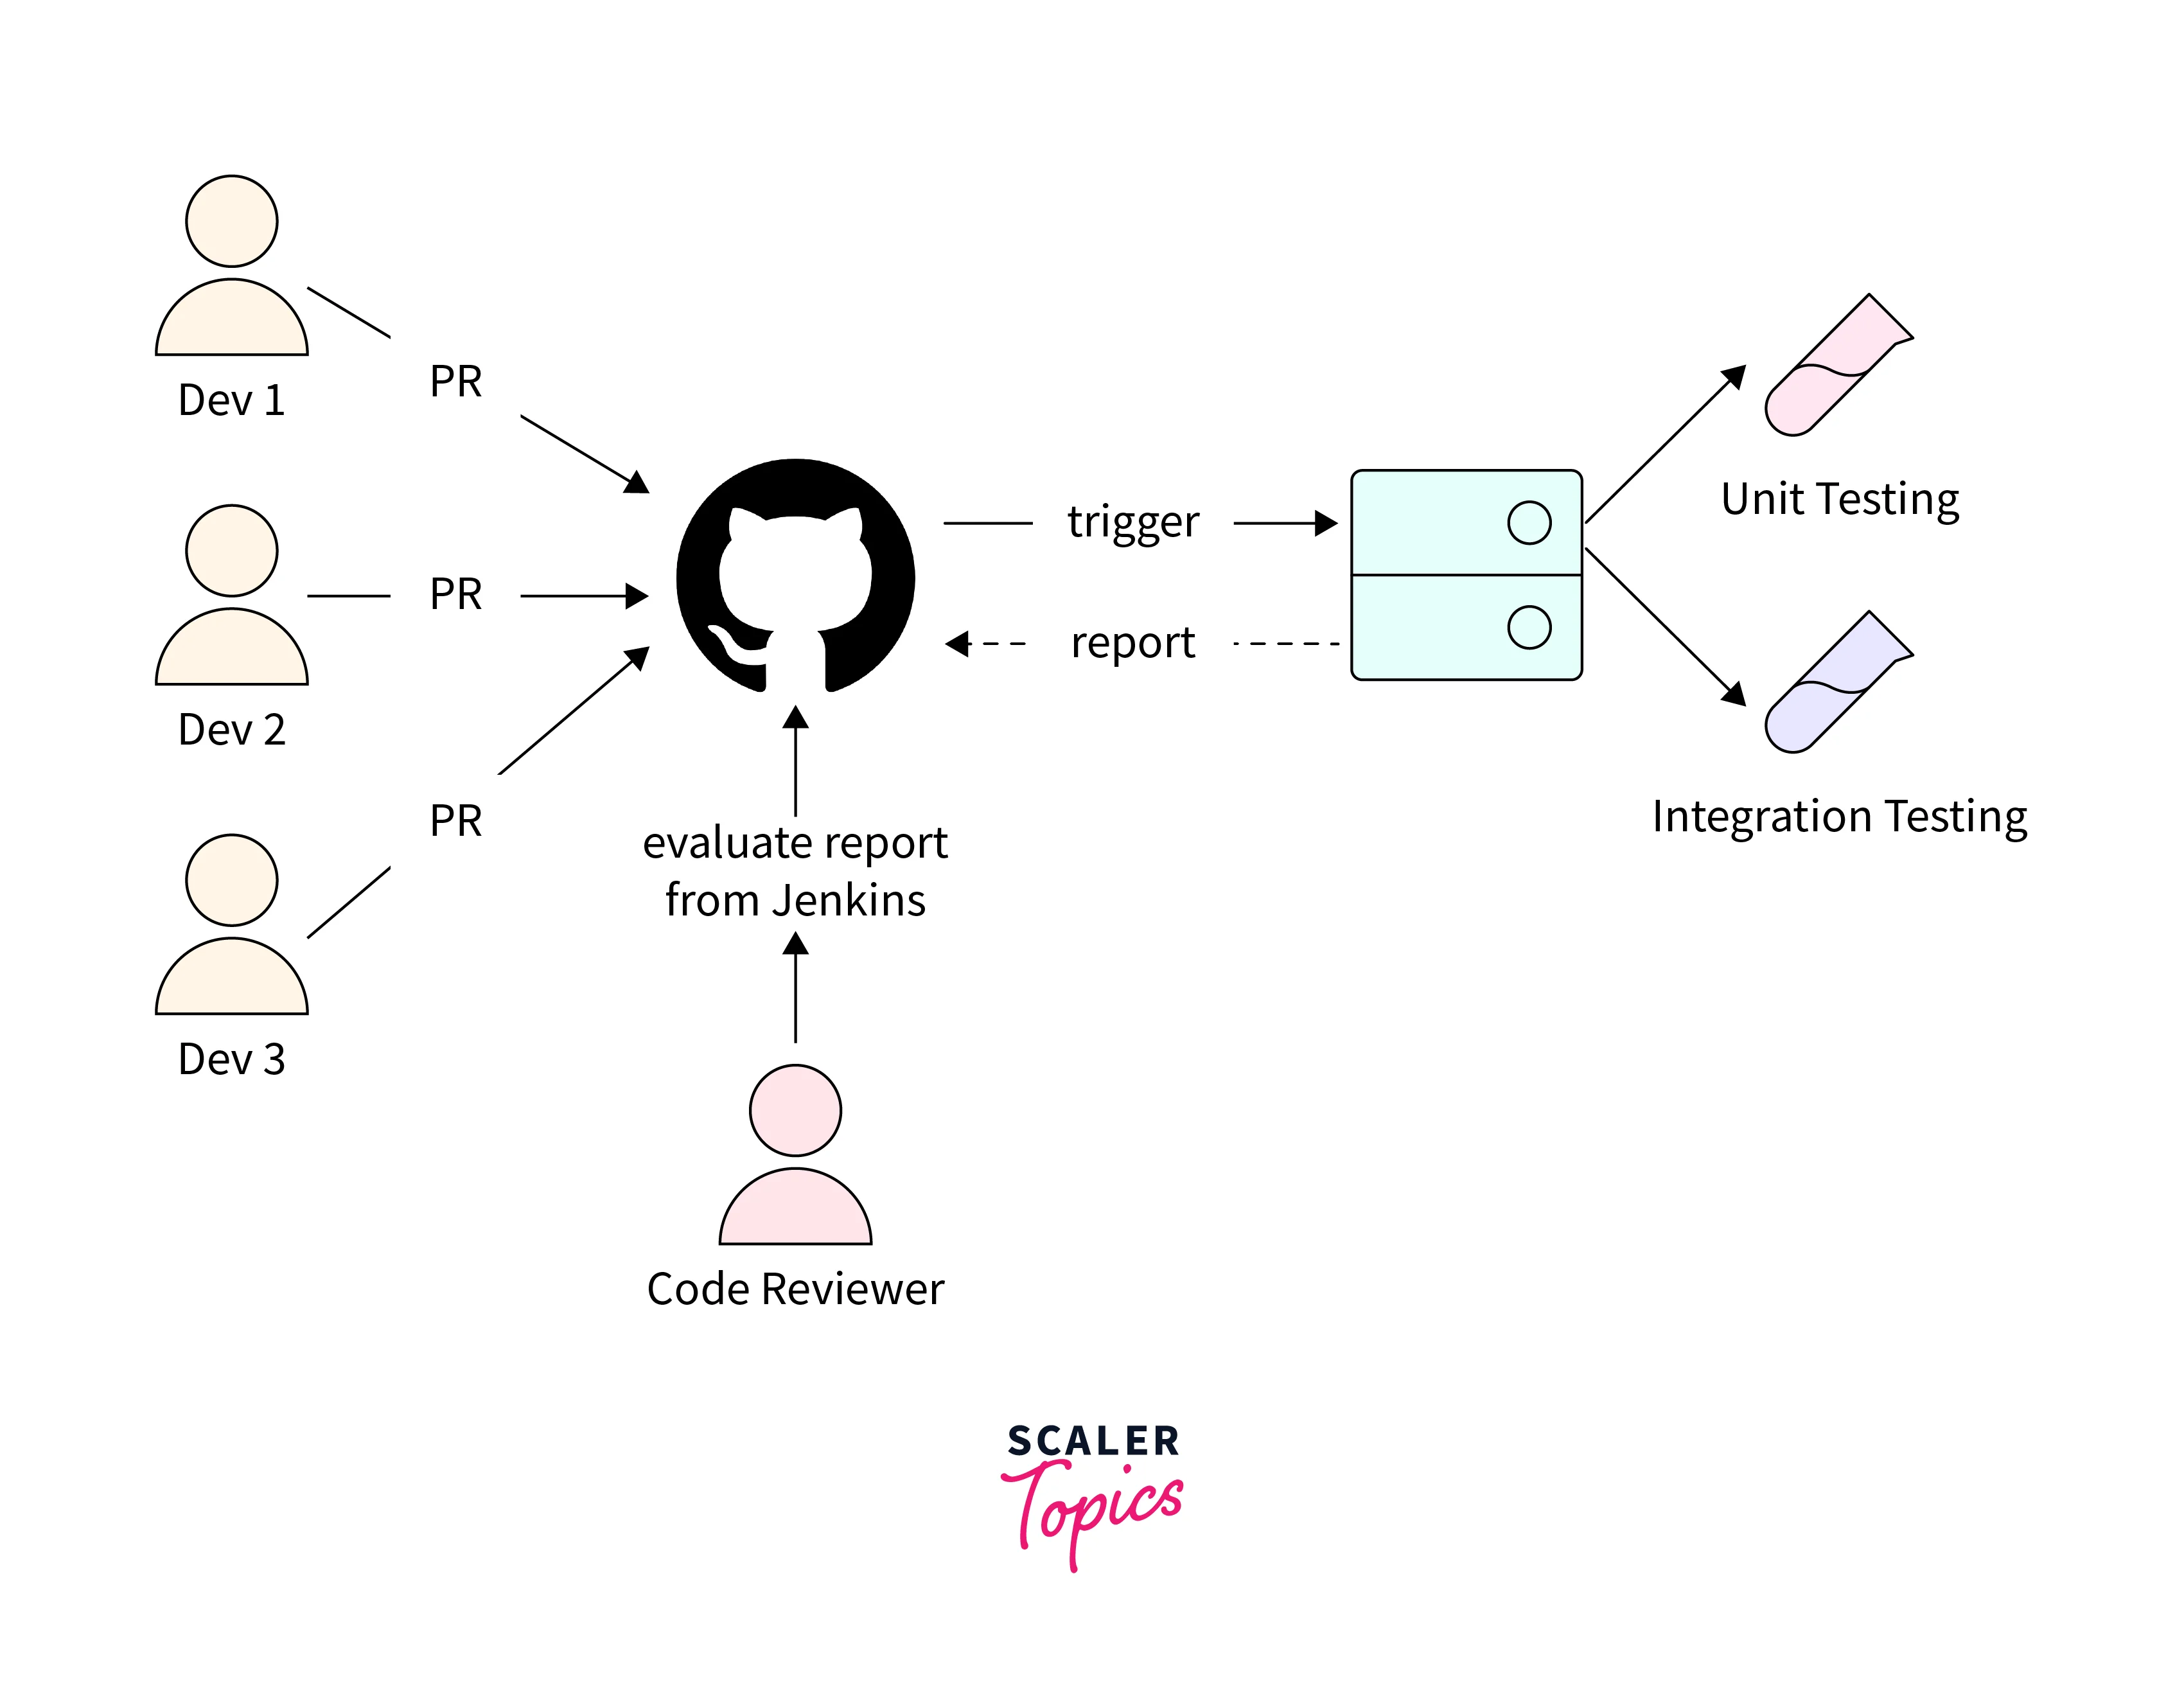
Integrating Testing Frameworks with Jenkins
When it comes to Jenkins Testing Automation, the choice of framework often depends on the programming language and the specific requirements of your project. Whether you're a fan of JUnit, TestNG, NUnit, or other Jenkins testing Automation frameworks, Jenkins can seamlessly bind these tools to your automated testing pipeline. Jenkins adaptability is its strength. It plays well with a diverse range of testing frameworks, ensuring that your preferred tool doesn't hinder your automation efforts. Jenkins provides a lot of functionality and plugins to speed up and make your Jenkins testing Automation easier. Some of the few scopes are mentioned below:
- Selecting Your Framework:
Begin by identifying the testing framework that aligns with your project's technology stack and Jenkins testing Automation needs. Whether you're inclined towards JUnit for Java, TestNG for more comprehensive testing, or NUnit for .NET projects, Jenkins accommodates them all. - Jenkins Configuration:
With your framework in mind, configure Jenkins to sync seamlessly. Jenkins allows you to create a dedicated build job that corresponds to your project. This job will be responsible for managing the Jenkins testing Automation process. - Plugin Power:
Leverage Jenkins plugins to streamline the integration. Jenkins' extensive plugin ecosystem includes plugins tailored to various Jenkins testing Automation frameworks. These plugins provide the necessary hooks and functionality to integrate your chosen framework. - Build Triggers:
Jenkins' magic lies in automation. Configure your Jenkins job to trigger the test suite execution whenever there's a code change. This means that as soon as new code is pushed to the repository, your tests automatically kick off, ensuring rapid feedback on code quality. - Test Reporting:
Integrate test reporting tools to extract meaningful insights from your automated tests. Jenkins facilitates the collection of test results and their presentation in a clear and concise format, aiding in swift issue identification.
Automated Unit Testing with Jenkins
Before we dive into automation, let's reiterate the importance of unit testing. Unit tests focus on isolated units of code, usually individual functions or methods. These tests verify that each unit functions as intended and produces expected outcomes for various input scenarios. By catching bugs early in the development cycle, unit tests pave the way for a robust and maintainable codebase. Jenkins steps in to automate the execution of unit tests, transforming the testing landscape. Here's how it works:
- Setting Up the Environment:
Begin by configuring your Jenkins environment. This includes installing necessary plugins and setting up your code repository. - Defining a Jenkins Job:
Create a Jenkins job dedicated to unit testing. This job will house the instructions for running your unit tests whenever triggered. - Integration with Version Control:
Jenkins can be set to monitor your version control repository (e.g., Git). Whenever a new code is pushed or a pull request is made, the Jenkins job is triggered automatically. - Running Unit Tests:
Within the Jenkins job, specify the commands to execute your unit tests. These commands might involve running testing scripts or invoking testing frameworks. - Test Reporting:
Jenkins collects the test results and generates clear reports. This provides developers with insights into test successes, failures, and coverage metrics.
Jenkins testing Automation with unit tests offers several advantages that contribute to the overall quality of your codebase:
-
Faster Feedback Loop:
Jenkins testing automation ensures that your unit tests are run consistently and swiftly, providing rapid feedback on code changes. This accelerates the development cycle. -
Continuous Integration:
Automated unit testing is an integral part of the continuous integration process. It ensures that every code change is tested, aligning with the principles of CI/CD.
Automated Integration Testing with Jenkins
Integration testing examines the connections and collaborations between different modules, verifying that they function as a unified whole. By simulating real-world interactions, integration tests uncover compatibility issues, data flow discrepancies, and other integration-related challenges. This practice is essential for maintaining the reliability and performance of your software, particularly as its complexity evolves. Jenkins' versatility extends to automating integration tests, offering a systematic approach to ensure components work seamlessly together:
- Pipeline Definition:
Begin by defining a Jenkins pipeline dedicated to integration testing. This pipeline will outline the sequence of steps necessary for running your integration tests. eg.
- Version Control Integration:
Integrate your pipeline with your version control system (e.g., Git). Whenever new code is pushed or changes are made, the integration testing pipeline is automatically triggered. - Environment Setup:
Before running integration tests, ensure that the required test environment is set up. Jenkins allows you to manage these environments dynamically, guaranteeing consistency in testing. - Running Integration Tests:
Within the pipeline, specify the commands or scripts to execute your integration tests. Jenkins ensures that these tests are run in the specified environment.
Jenkins' seamless integration with version control and its ability to manage dynamic testing environments make it a powerful tool altogether.
Automated End-to-End Testing with Jenkins
To ensure your software truly shines in the hands of users, end-to-end (E2E) testing becomes crucial. E2E testing replicates real-world user interactions, uncovering usability glitches and ensuring smooth functionality across the entire application. This is where Jenkins steps in, offering automation that not only saves time but also elevates the user experience. Jenkins extends its capabilities to automate E2E testing, simplifying complex user scenarios:
- Pipeline Definition:
Begin by creating a Jenkins pipeline dedicated to E2E testing. This pipeline will outline the steps required to execute your end-to-end tests. - Integration with Version Control:
Integrate your E2E testing pipeline with your version control system. Whenever new code is pushed or changes are made, Jenkins automatically triggers the E2E tests. - Environment Setup:
Before initiating E2E tests, ensure that the required environment is set up. Jenkins enables you to manage these environments dynamically, ensuring consistency in testing. - Running E2E Tests:
Within the pipeline, specify the commands or scripts to execute your E2E tests. Jenkins orchestrates the tests in the designated environment, simulating user interactions. - Test Reporting:
Jenkins collects the E2E test results and generates comprehensive reports. These reports help your team identify any user experience issues and regressions.
Automated E2E testing with Jenkins offers numerous advantages, all of which contribute to enhancing the user experience:
- Early Bug Identification:
E2E tests simulate real user interactions, which can uncover usability issues that might go unnoticed in other testing stages. Early detection prevents user frustration and boosts satisfaction. - Preventing Regressions:
As your software evolves, new features and changes can inadvertently introduce regressions. Automated E2E testing ensures that the complete user journey remains smooth. - User-Centric Development:
By regularly subjecting your application to E2E tests, you're prioritizing the user experience. This practice aligns with user-centric development principles.
By automating the simulation of real-world scenarios, you're identifying issues that matter to users and enhancing overall usability. Jenkins' integration capabilities, coupled with its ability to manage dynamic testing environments, make it powerful.
Managing Test Environments in Jenkins
Test environments are controlled setups that replicate the conditions in which software applications are tested. These environments provide the necessary infrastructure, configurations, and resources for conducting various types of software testing, such as unit testing, integration testing, end-to-end testing, performance testing, and more. Jenkins introduces a dynamic approach to test environment management, ensuring that the environment matches the needs of your tests:
- Containerization and Virtualization:
Jenkins integrates with containerization tools like Docker and virtualization platforms like VirtualBox. These technologies encapsulate your test environment, making it portable and repeatable across various systems. - Infrastructure as Code (IaC):
Leveraging Jenkins along with IaC tools like Terraform and Ansible, you can define your test environment as code. This approach enables you to create and configure environments consistently, eliminating manual setup errors. - Environment Versioning:
Jenkins allows you to version your test environments. This means you can recreate specific environment states to replicate past test results or debug issues. - Dynamic Provisioning:
With Jenkins, you can automatically provision test environments based on predefined specifications. This agility accelerates the testing process and ensures a consistent setup for every test run.
Jenkins transforms test environment management from a potential headache into an asset. By automating provisioning, versioning, and infrastructure management, you ensure that your tests are conducted in a consistent, controlled, and reproducible environment.
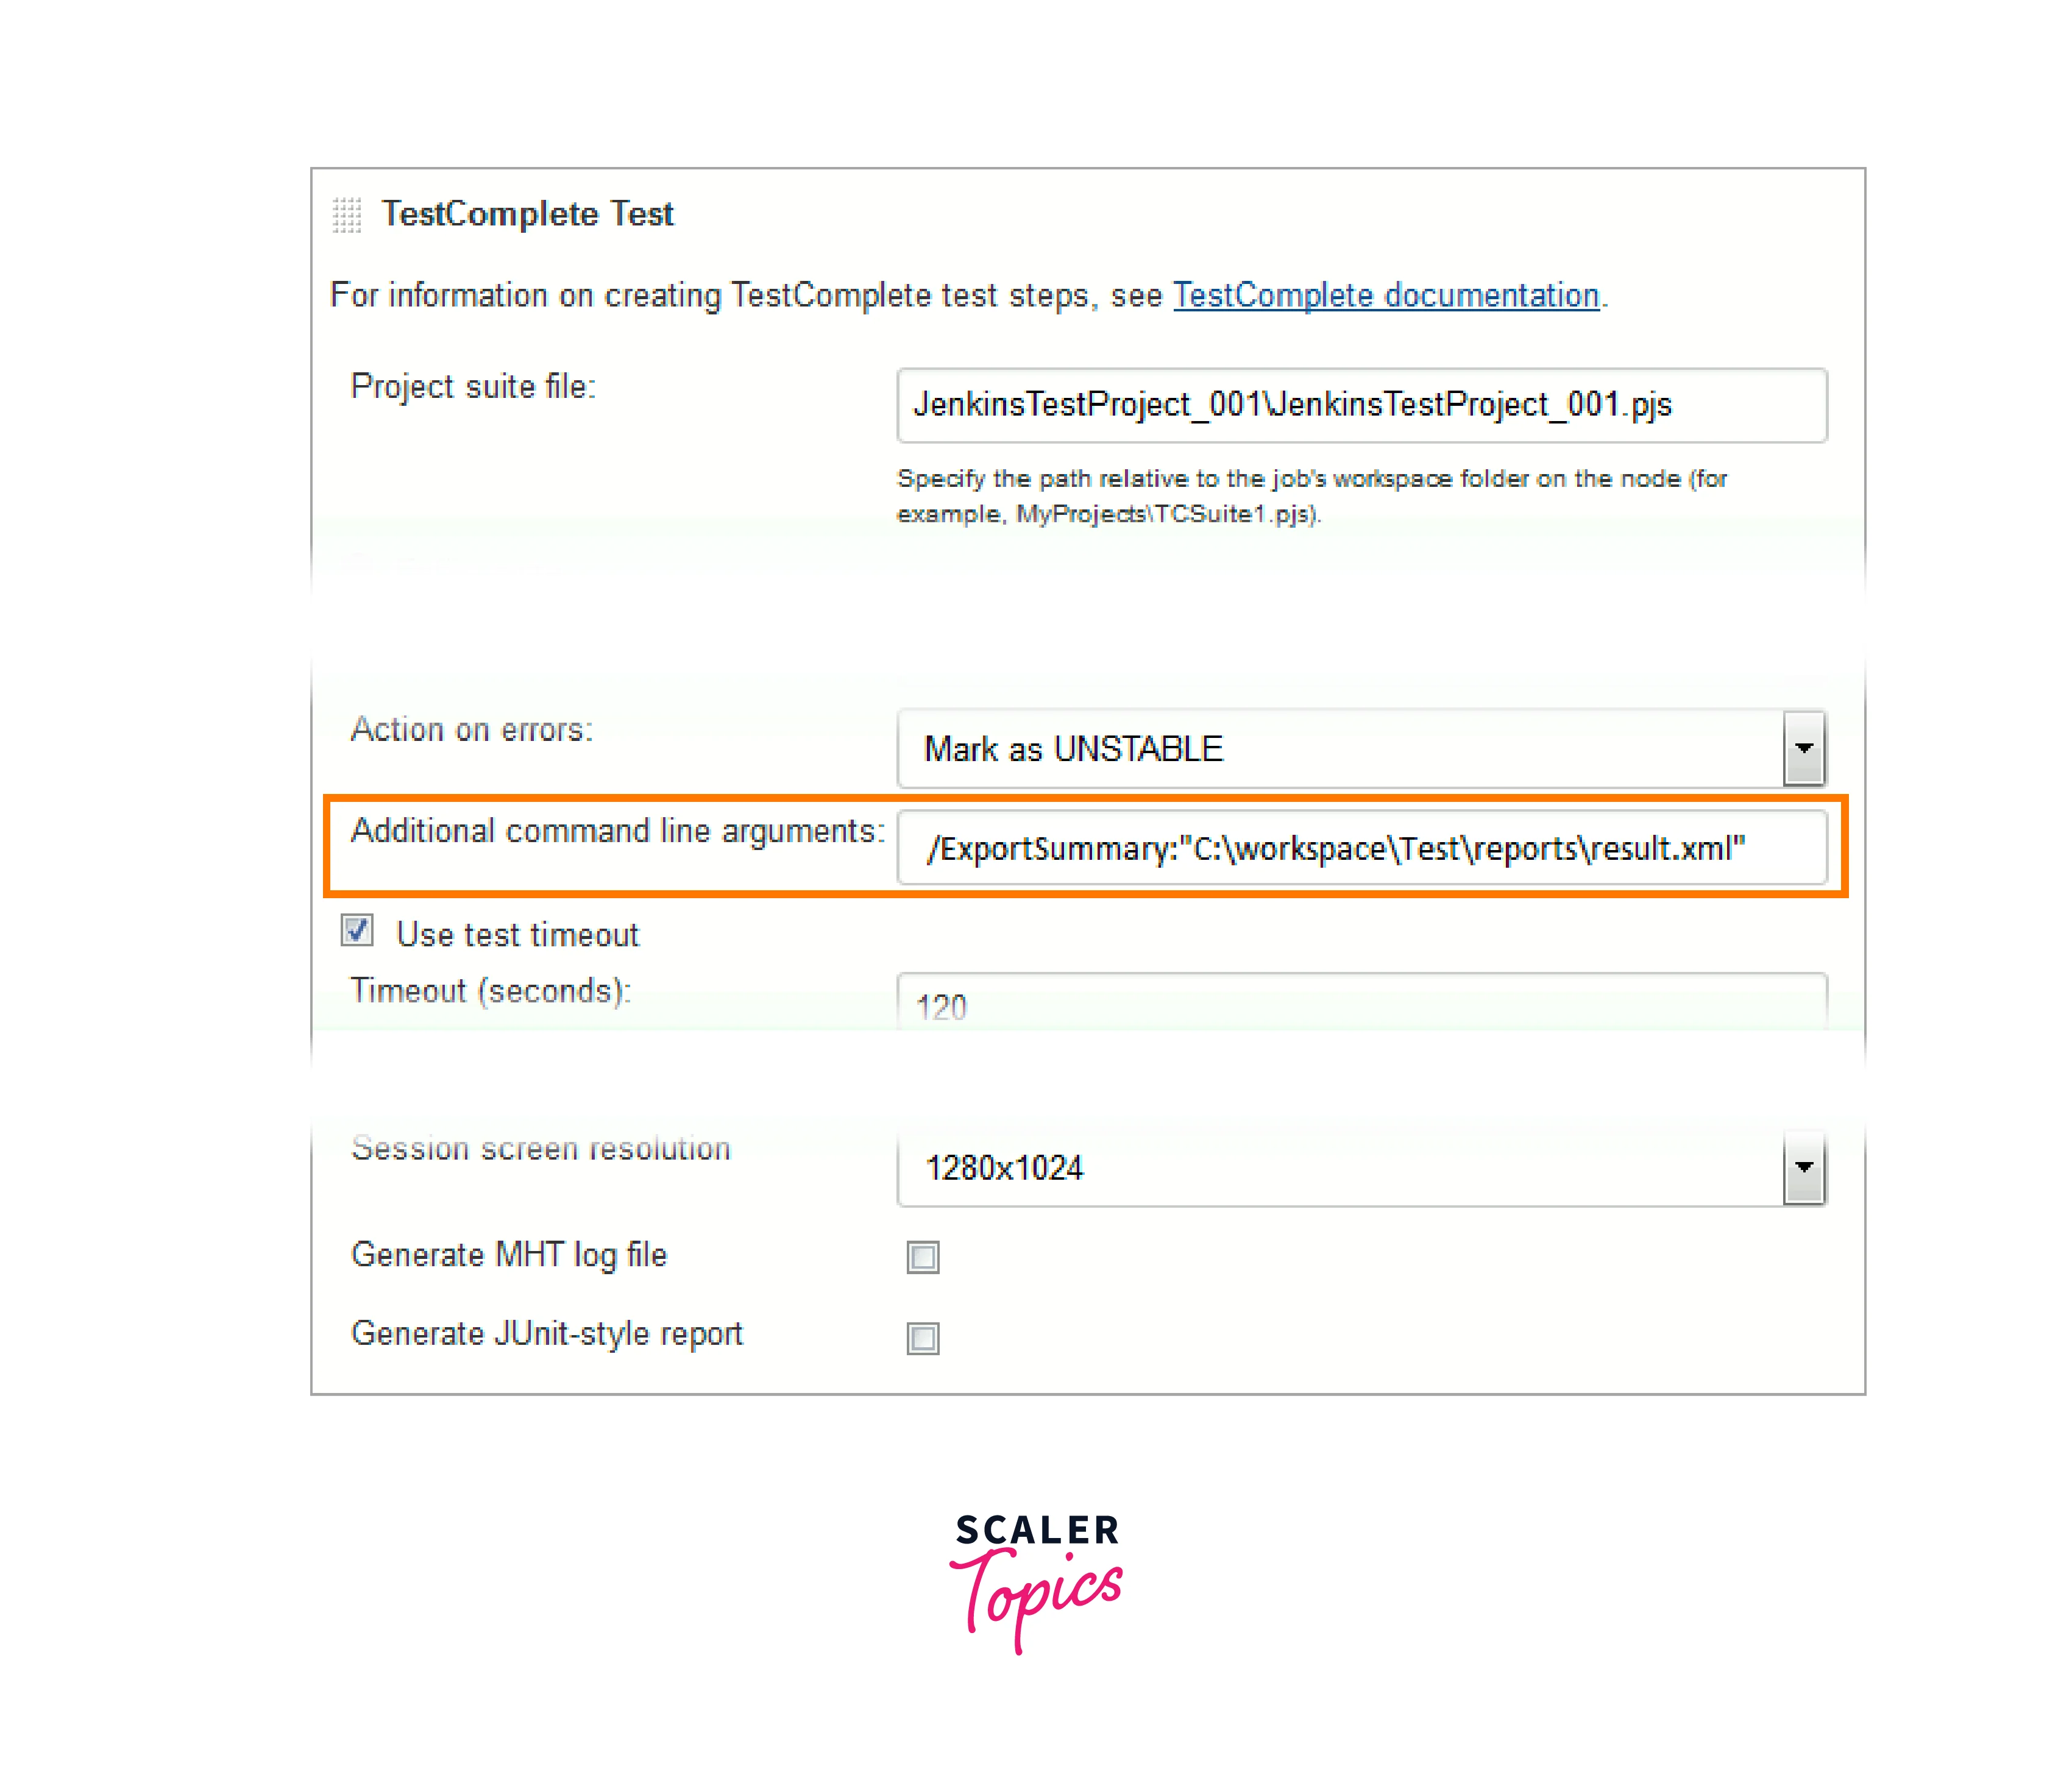
Reporting and Test Result Visualization
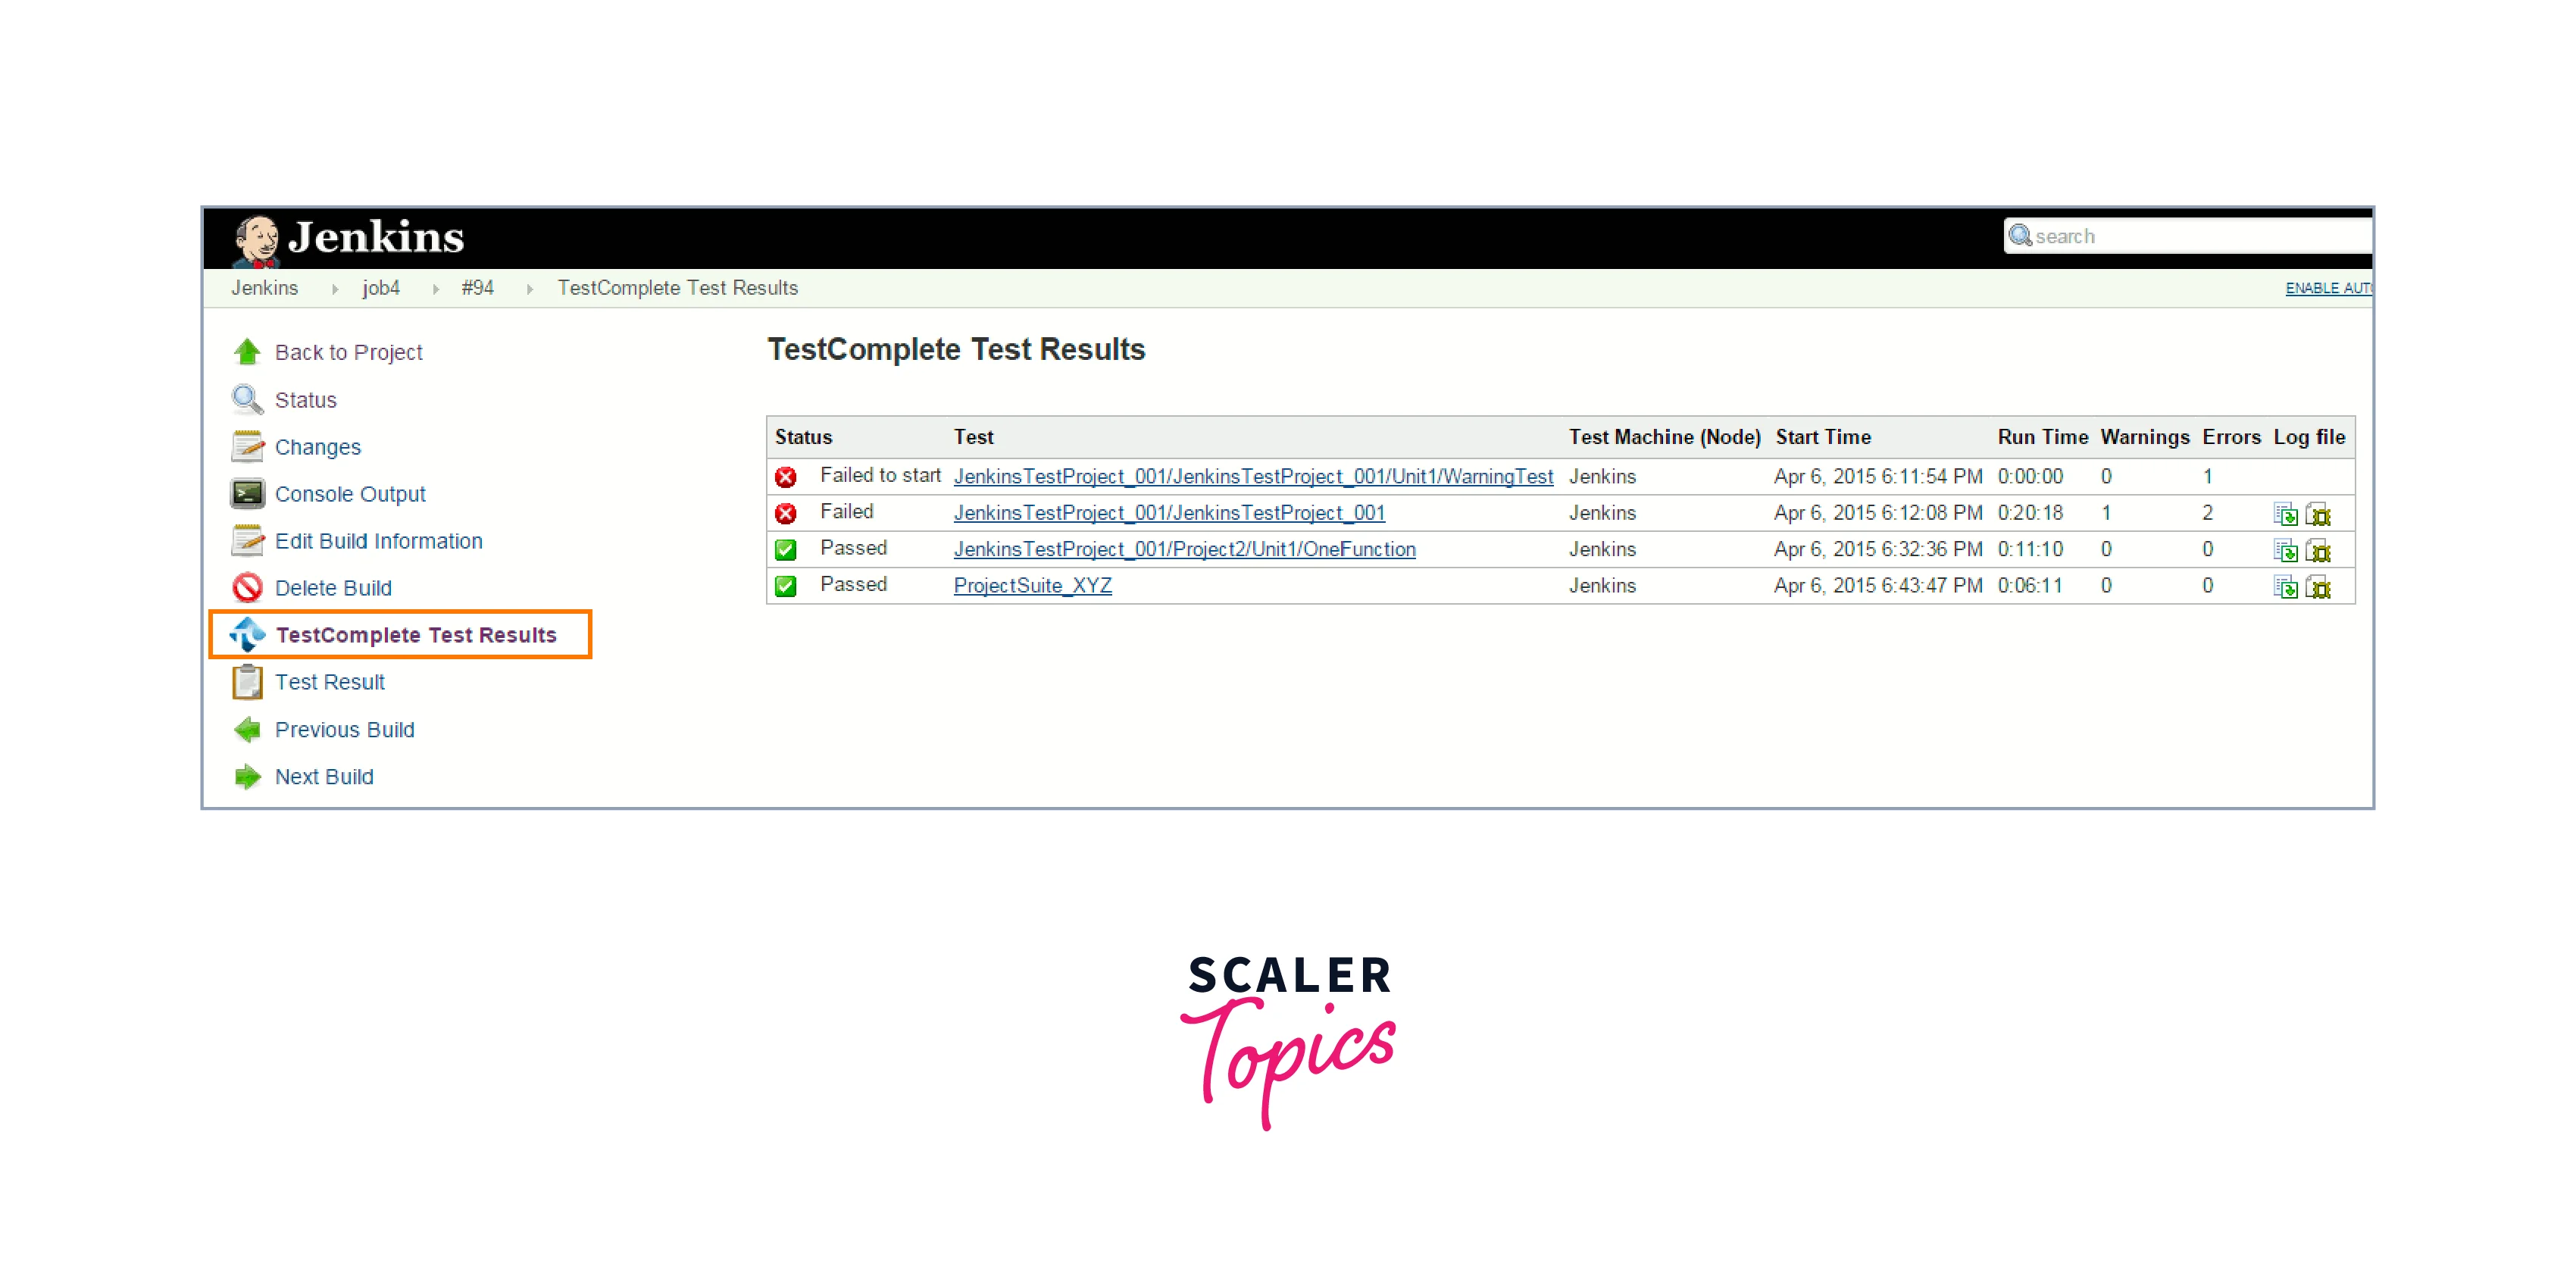
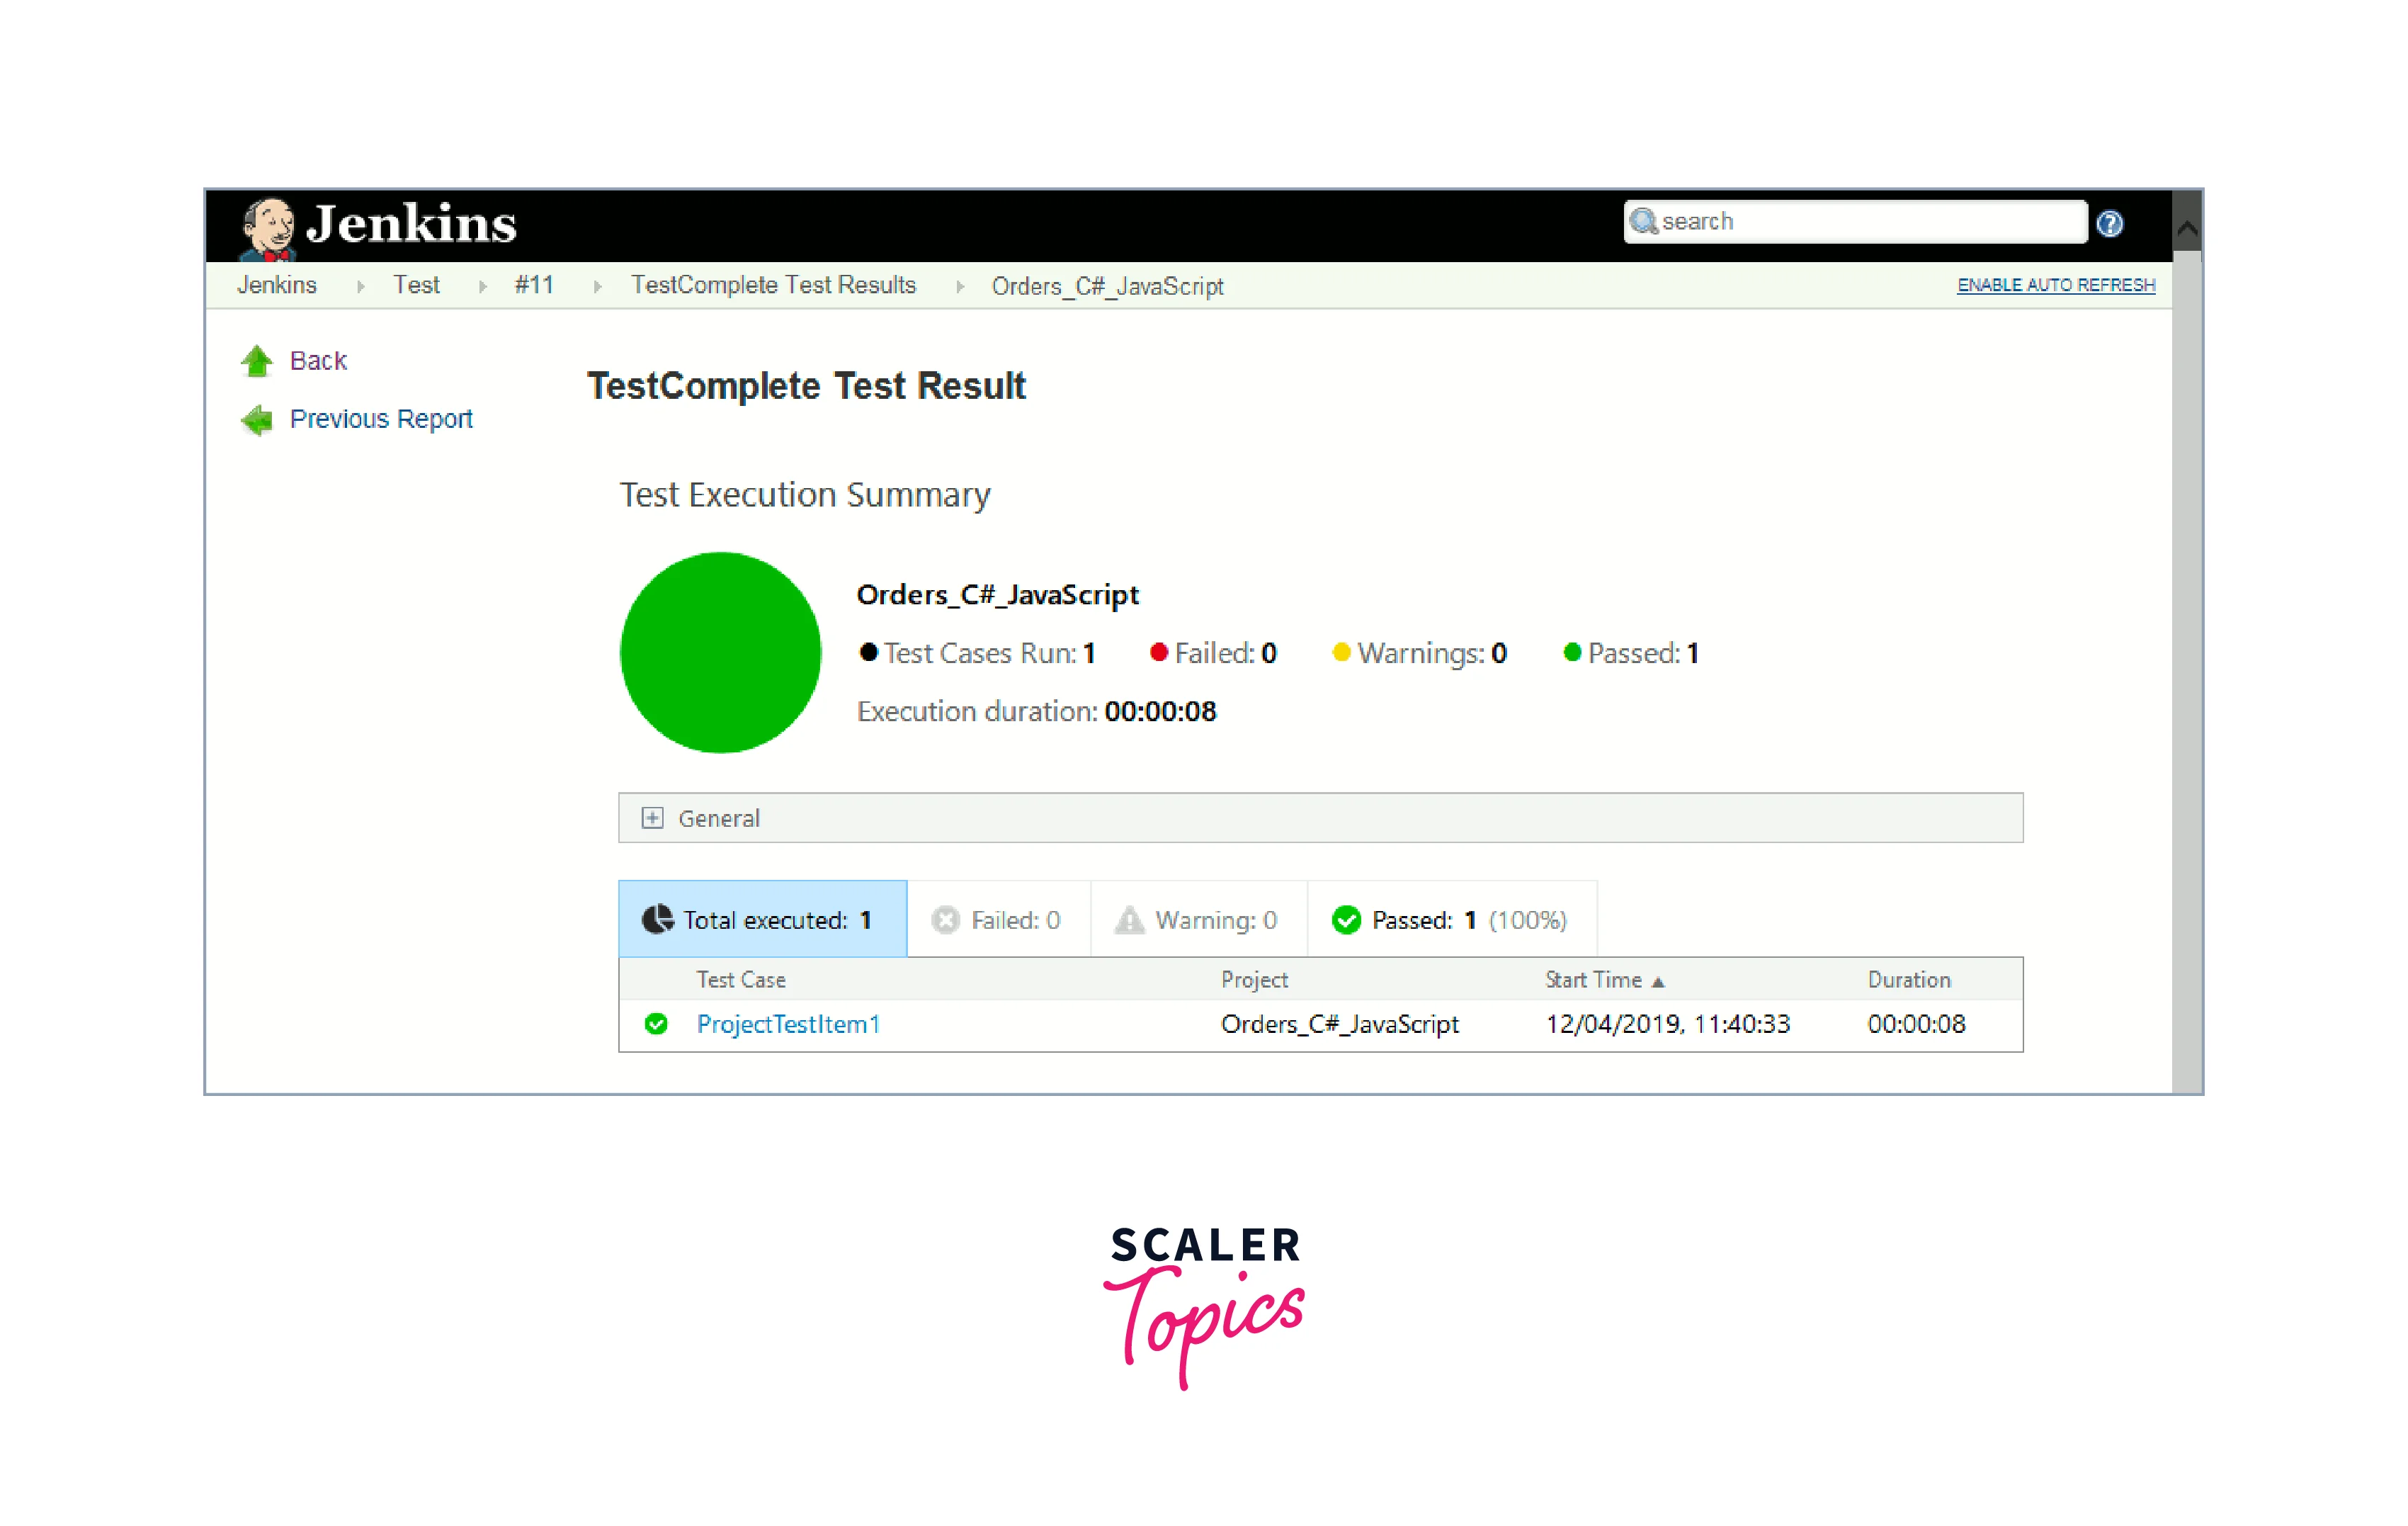
Test reports serve as a testament to the software's quality, capturing details of test runs, successes, failures, and coverage metrics. These reports provide a snapshot of the current state of the codebase and help identify areas that need attention. For reporting and Visual Results, we are going to use the TestComplete Support plugin which can be installed on Manage Plugins. Once Installed, in your TestComplete Test build step, specify the /ExportSummary command line argument in the Additional command-line arguments text box and specify the path to the folder where you want to save the generated test results. and hit build:
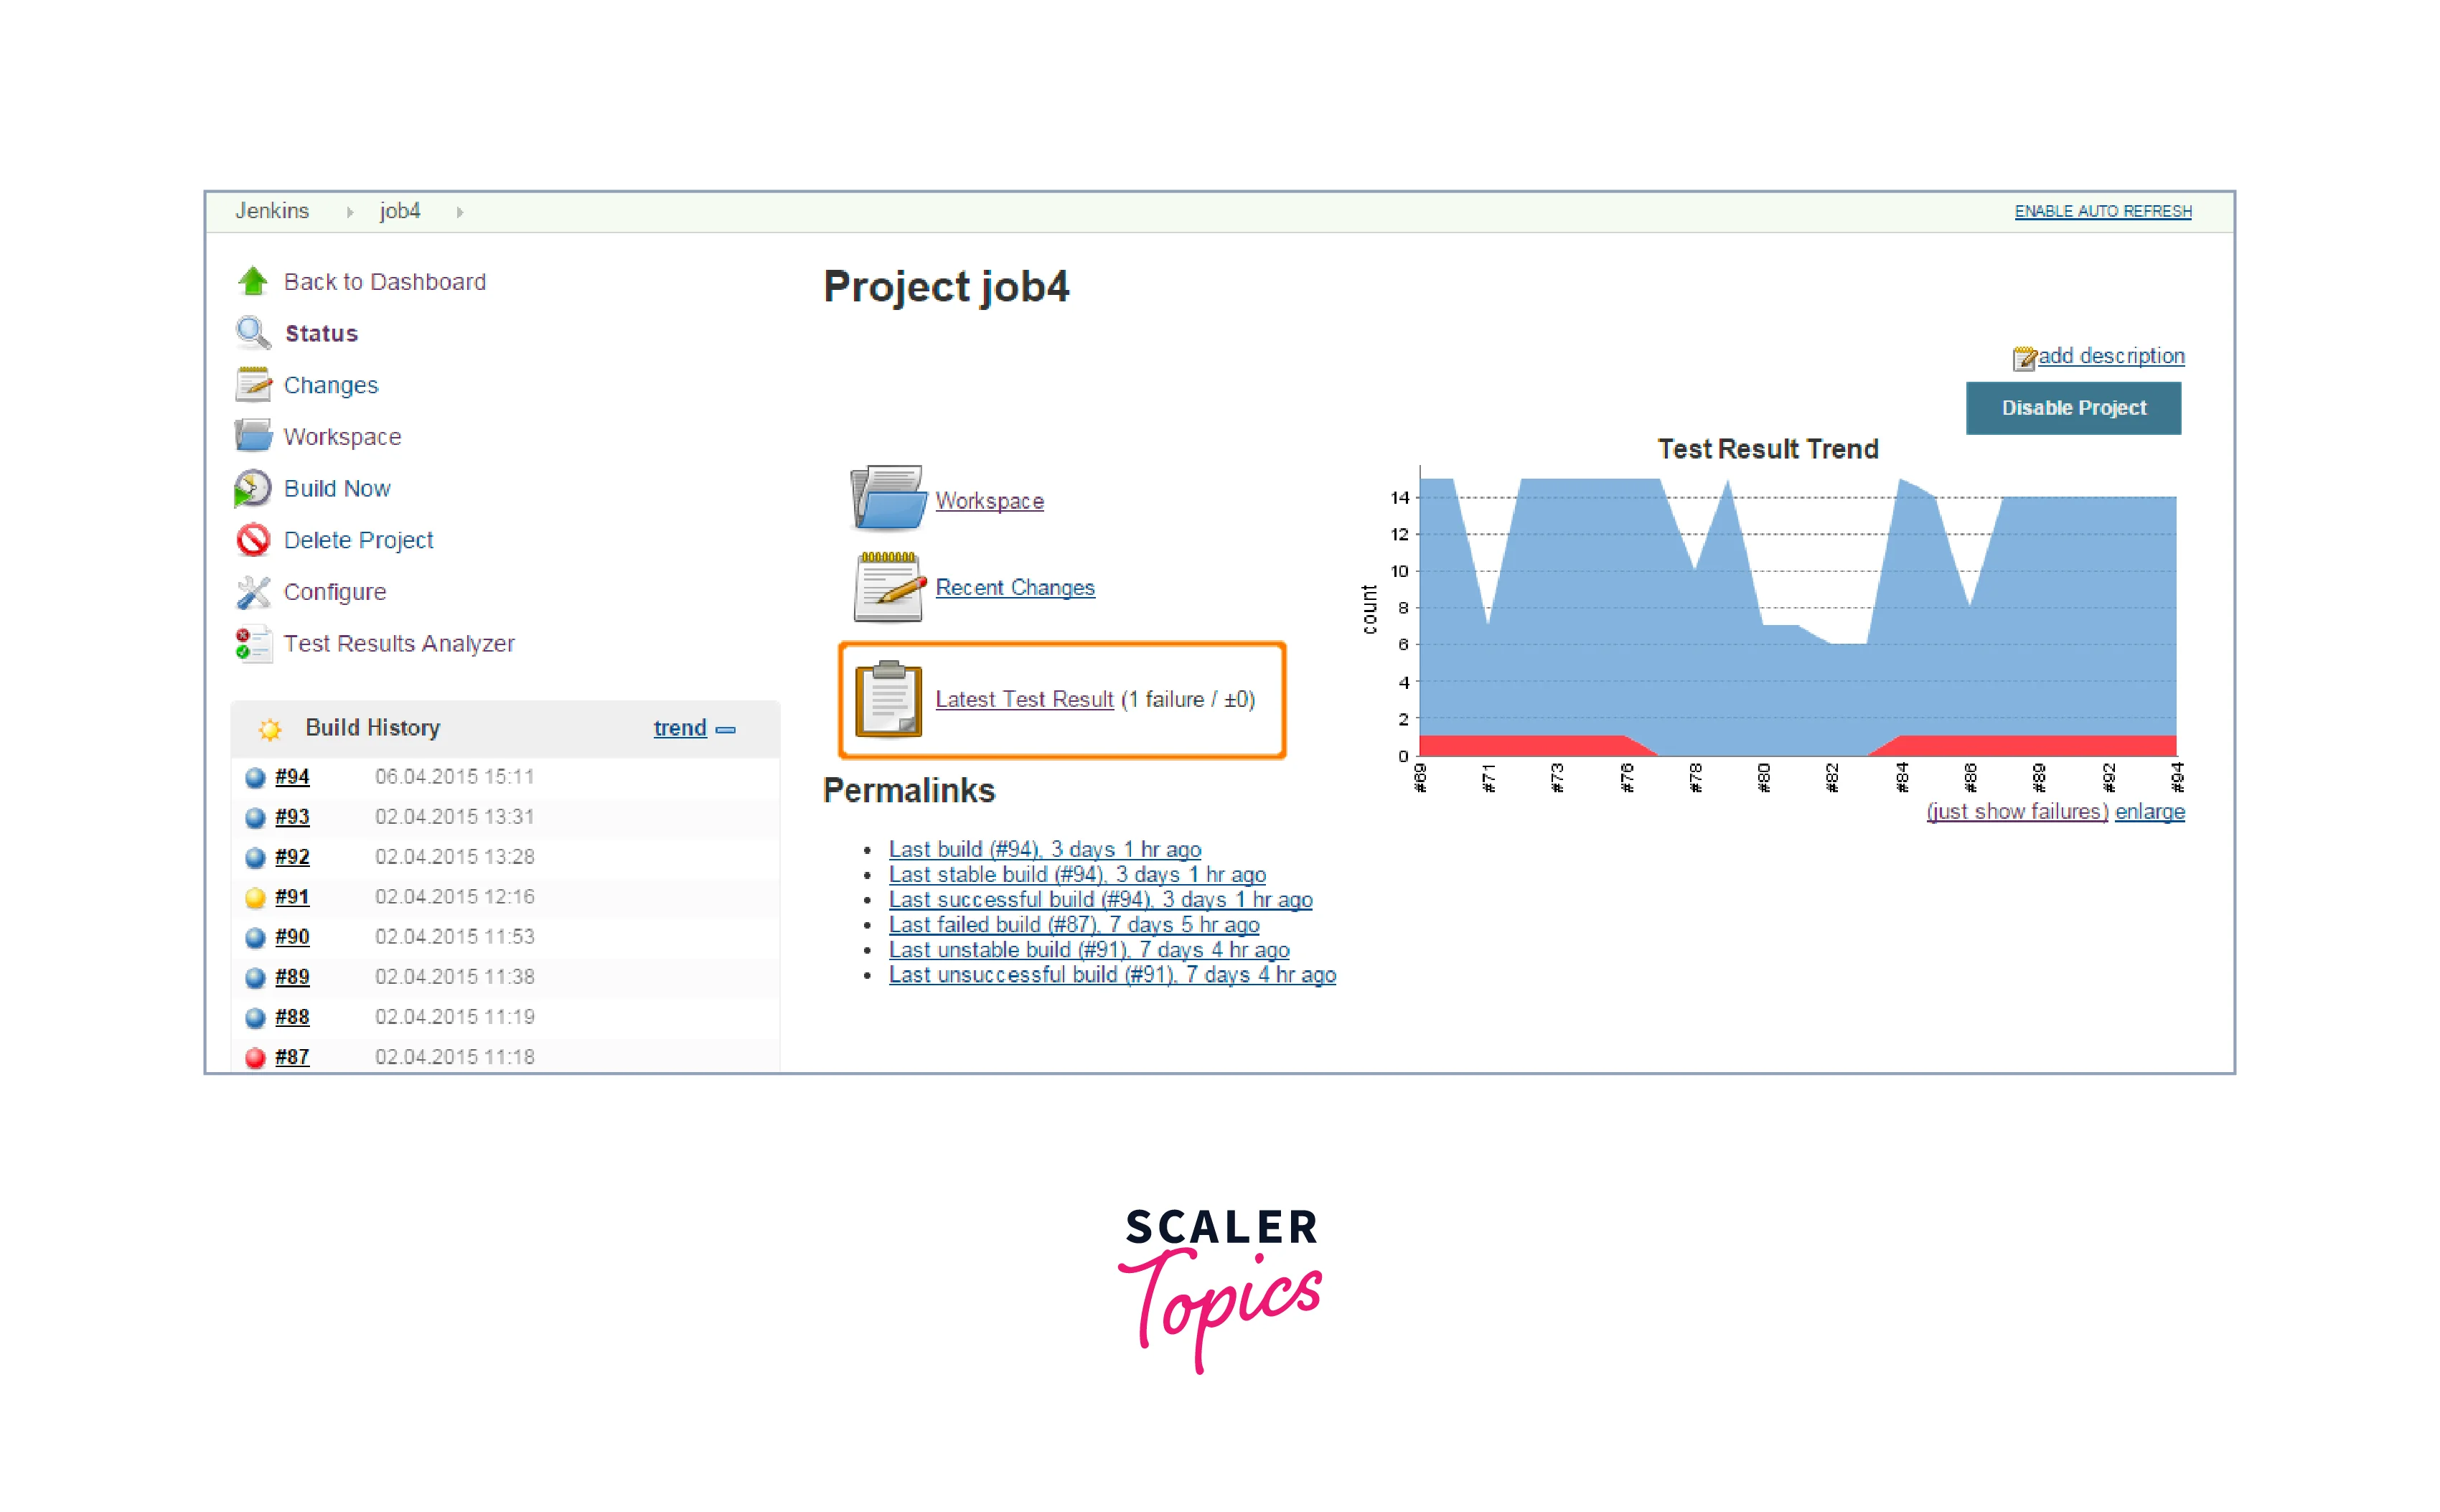
Jenkins's Reporting Test Results
To check the results you can go to the test workflow and click Latest test results to view the results:
Jenkins transforms test reporting and visualization from a mere documentation exercise into an insightful process:
- Customizable Reporting:
Jenkins allows you to tailor your test reports to suit your team's needs. You can define what information is included, such as test summaries, code coverage percentages, and more. - Integration with Testing Frameworks:
Many testing frameworks integrate seamlessly with Jenkins, providing standardized reports that highlight test outcomes and coverage metrics. - Historical Tracking:
Jenkins retains historical test reports, enabling you to track changes in test results over time. This historical data aids in identifying trends and performance improvements.
Visualizing Test Results:
Test result visualization enhances the interpretability of test reports, making complex data more accessible to different stakeholders:
- Graphs and Charts:
Jenkins generates graphical representations of test results and coverage metrics. These graphs allow you to quickly assess the overall health of your codebase. - Trend Analysis:
Visualizing trends in test results over time helps identify patterns and deviations. This trend analysis aids in understanding how your software's quality evolves. - Heatmaps:
Heatmaps provide an at-a-glance view of code coverage, highlighting areas that have been tested more rigorously than others.
By generating detailed reports and graphical representations of test results, Jenkins empowers your team to identify issues, track improvements, and make informed decisions
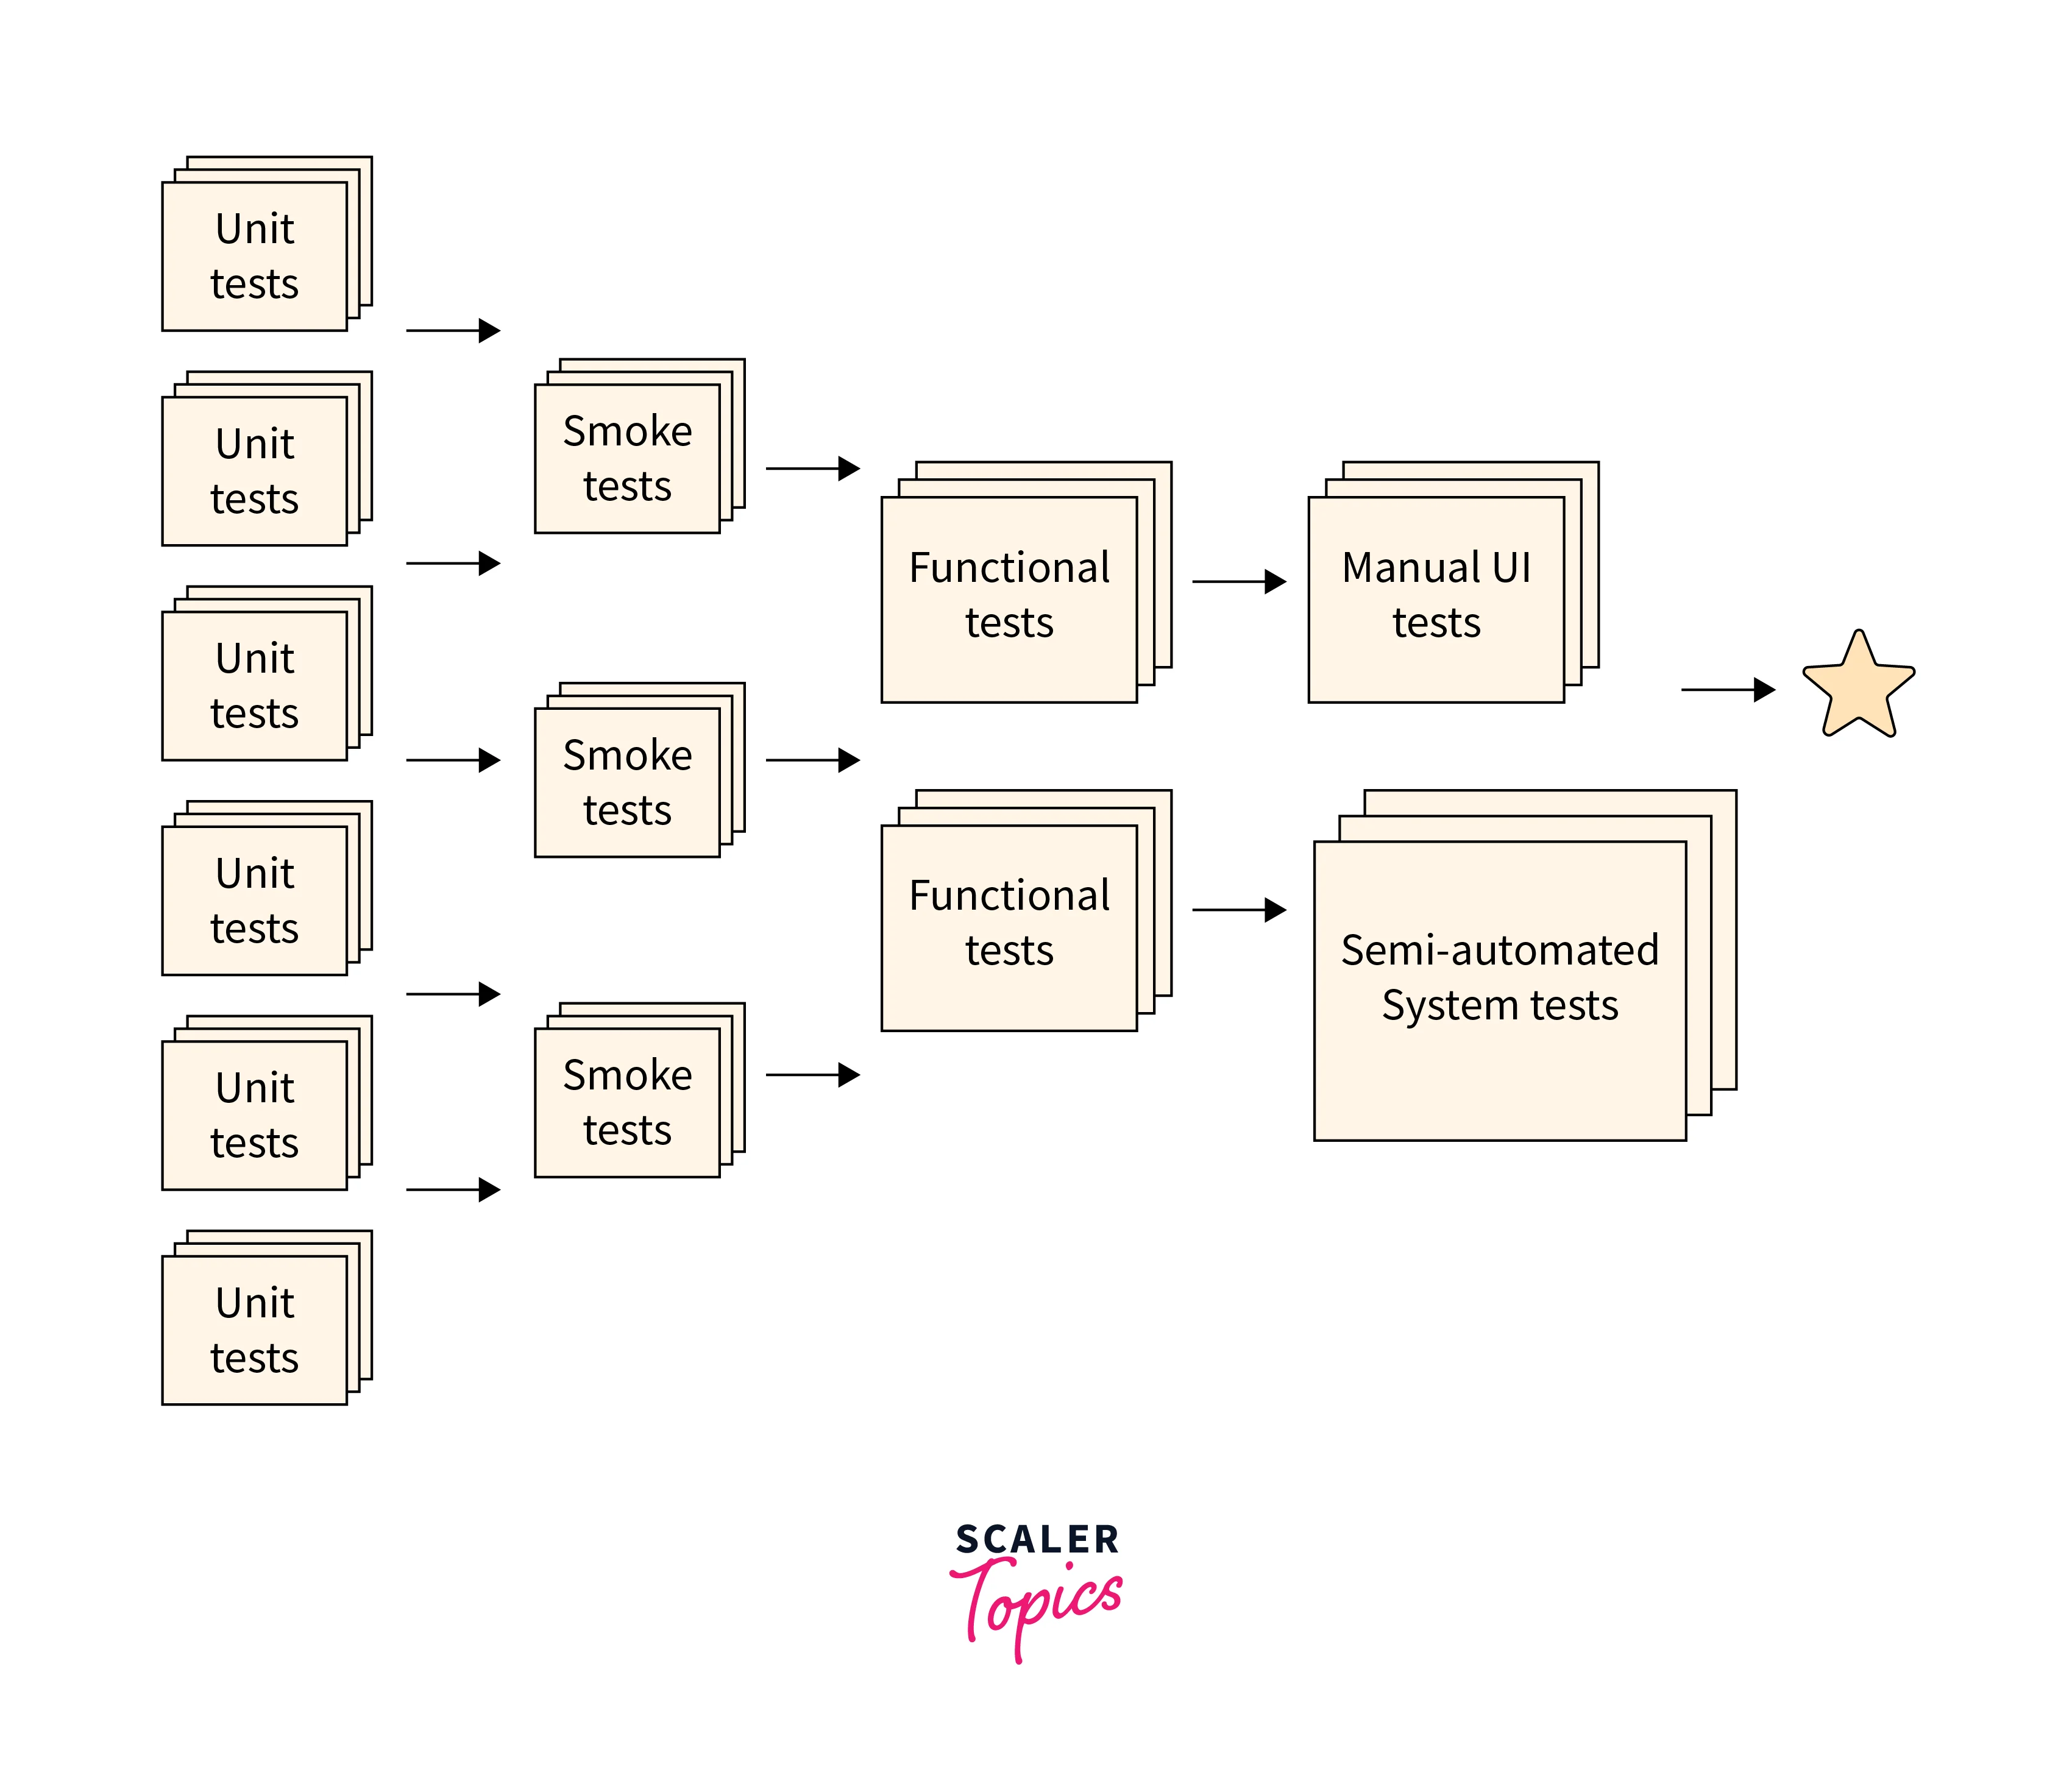
Test Automation Best Practices
Successful test automation isn't just about implementing tools, plugins etc; it's about adhering to proven best practices that ensure quality, maintainability, and efficient Jenksin Automation testing processes. Here we are going to look into some essential test automation best practices:
- Start Early:
Integrate jenkins testing automation from the project's inception. Early testing helps catch defects at their root, reducing the cost and effort of addressing issues later. - Choose the Right Tests:
Not everything needs to be automated. Prioritize tests that are repetitive, time-consuming, critical, and provide value to users. - Clear Objectives:
Define clear objectives for your test automation efforts. Know what you're trying to achieve, whether it's improving code quality, catching regressions, or enhancing user experience. - Continuous Integration:
Integrate test automation into your CI/CD pipeline. This ensures that tests are run consistently with each code change, catching issues early. - Maintainable Code:
Treat your test automation code with the same care as your production code. Follow coding standards, use meaningful names, and keep your codebase clean and organized. - Data Management:
Separate test data from test scripts. Use data-driven testing techniques to parameterize your tests and increase coverage. - Version Control:
Store your test automation code in a version control system. This enables collaboration, history tracking, and easy rollbacks. - Parallel Execution:
Run tests in parallel to expedite testing and obtain results faster. Parallel execution helps scale your testing efforts as your application grows. - Continuous Feedback:
Test automation is a collaborative effort. Maintain open communication between developers, testers, and other stakeholders to improve the process continuously. - Documentation:
Document your test automation processes, frameworks, and scripts. This documentation aids new team members and future maintenance.
Embracing these test automation best practices isn't just a matter of procedure; it's a commitment to delivering quality software that meets user expectations. By following these guidelines, you're setting the foundation for a streamlined, efficient, and reliable Jenkins testing automation process.
Continuous Integration and Test Automation
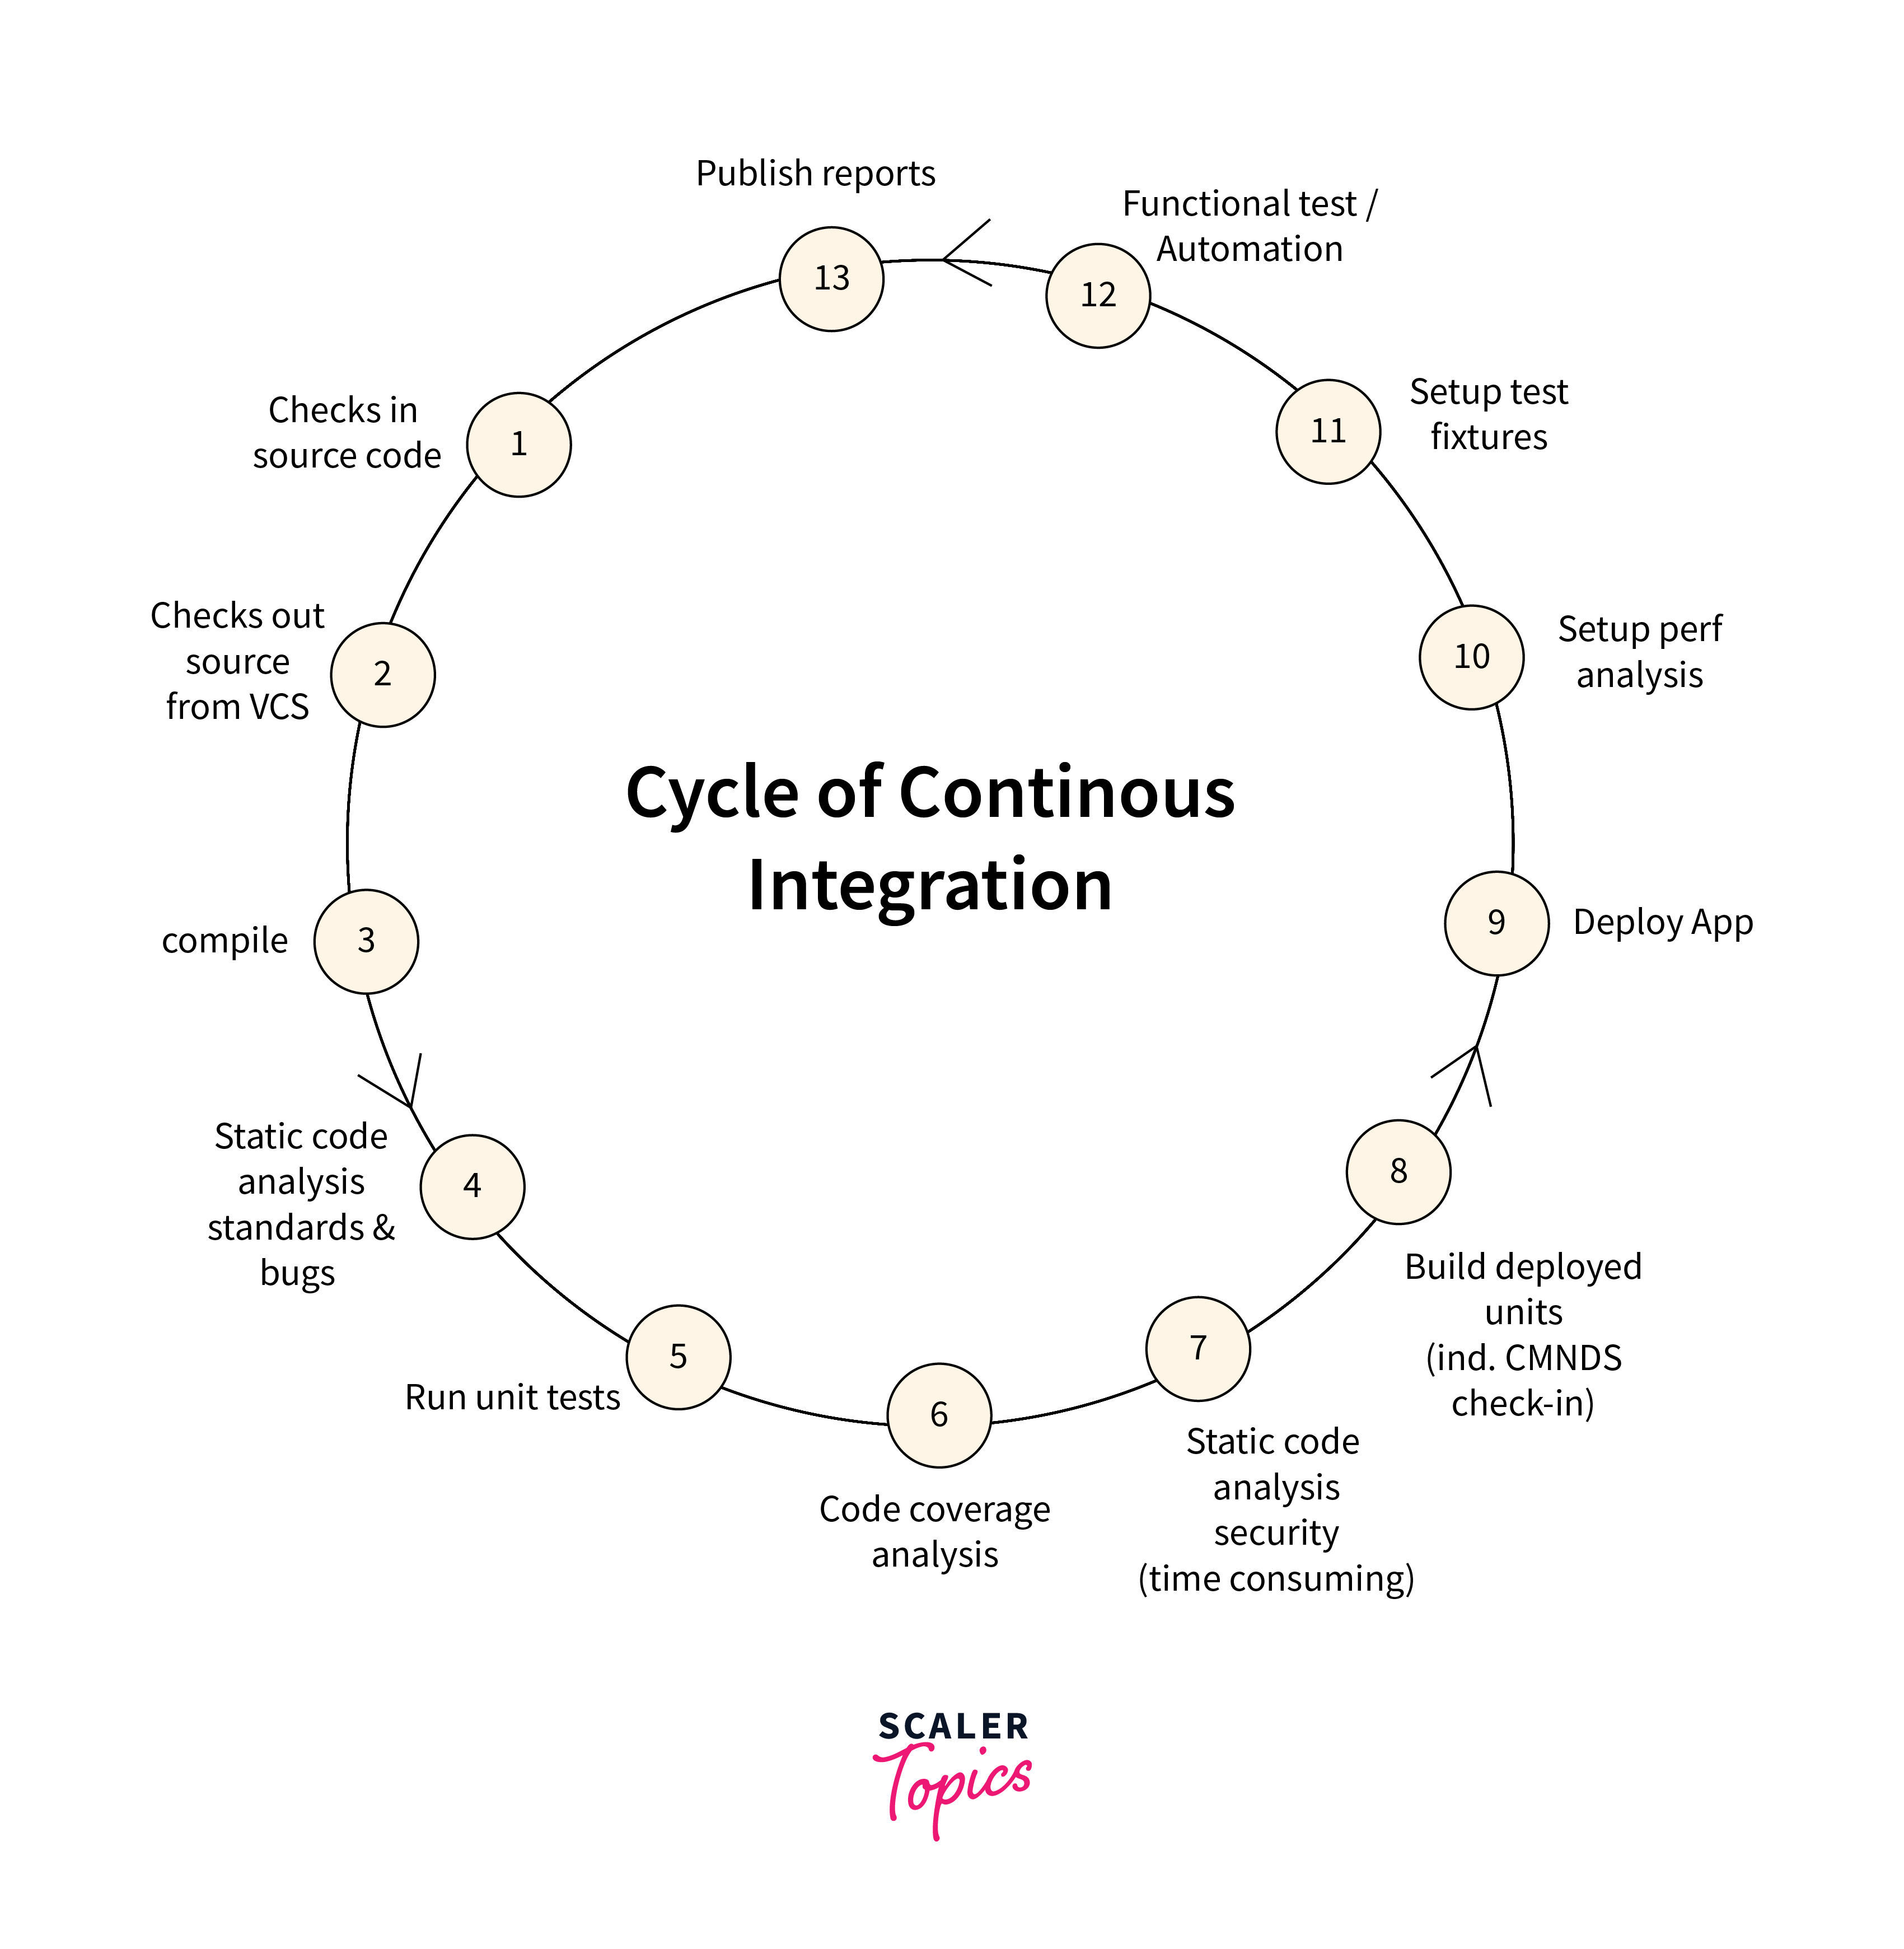
Continuous Integration is a development practice where code changes are frequently integrated into a shared repository. With each integration, automated builds and tests are executed to catch bugs and issues early in the development process. CI promotes collaboration, reduces integration problems, and ensures that the software remains in a consistently testable state. Continuous Integration (CI) and test automation emerge as dynamic allies, transforming the way software is developed, tested, and deployed.
Test automation serves as the driving force behind CI. It's the mechanism that automates the execution of tests whenever code changes are integrated. Test automation guarantees that code quality is maintained by quickly identifying regressions and ensuring that new changes don't break existing functionality. With Continuous Integration and Test Automation we can expect
- Rapid Feedback Loop:
CI, fueled by test automation, provides rapid feedback on code changes. Developers receive immediate alerts if a change causes tests to fail, enabling them to address issues promptly. - Reduced Integration Issues:
Regular integration and Jenkins testing automation prevent integration problems from accumulating. This avoids the "integration hell" scenario that can arise when code changes are delayed. - Reliable Software:
Test automation validates the software's functionality continuously, leading to a more reliable product that users can trust. - Streamlined Collaboration:
CI and test automation facilitate collaboration between developers, testers, and other stakeholders. Everyone is working on the same codebase, reducing miscommunications and enhancing transparency. - Less Error Deployment:
With automated tests verifying code changes, deployments become less risky. Confidence in the code's stability increases, leading to smoother and safer releases.
Test Automation and Pipelines
From the above we have a good idea about what is Test automation works. In this segment, we'll explore how test automation and pipelines work in harmony. The code to reach into production needs to go from a series of tests and checks which we can say it went through a pipeline. Pipelines helps in building, testing, and deploying code in a structured manner, reducing the risk of errors and enhancing consistency.
Test automation serves as the backbone of pipelines, ensuring that code changes are rigorously tested before they proceed through various stages:
- Build Stage:
Test automation kicks off in the build stage, executing unit tests to validate individual components. These tests ensure that code changes haven't broken existing functionality. - Integration Stage:
In the integration stage, integration tests are automated. These tests assess how different parts of the application interact and whether they harmonize as expected. - End-to-End Stage:
Test automation extends to the end-to-end stage, simulating real user scenarios. This ensures that the entire application works cohesively and delivers a seamless user experience.
The Benefits of Automated Pipelines
- Consistency:
Automated pipelines ensure consistent and repeatable testing processes. Every code change goes through the same stages, reducing variability and increasing reliability. - Early Issue Detection:
Automated tests catch bugs and issues early, preventing them from propagating to later stages or reaching production. - Accelerated Feedback:
Rapid execution of automated tests provides immediate feedback to developers. This accelerates the development cycle and reduces debugging time. - Reduced Manual Effort:
Automated pipelines eliminate the need for manual intervention in testing. This frees up resources for more creative and critical tasks. - Transparent Progress:
Pipelines offer visibility into the progress of code changes. Developers and stakeholders can monitor each stage, making the development process transparent.
Performance Testing with Jenkins
Performance testing assesses your application's responsiveness, speed, stability, and scalability under varying conditions. It helps you identify performance bottlenecks, determine system limits, and ensure your software can handle the load it's expected to encounter.
Jenkins becomes a powerful ally when it comes to orchestrating performance tests:
- Select the Right Tools:
Choose performance testing tools that align with your application's technology stack and testing objectives. Popular tools include JMeter, Gatling, Locust, and more. - Version Control Integration:
Integrate your performance testing pipeline with your version control system. This ensures that tests are triggered automatically whenever code changes are pushed. - Test Environment Setup:
Before running performance tests, ensure the test environment is appropriately configured to mimic real-world conditions. Jenkins allows you to manage dynamic test environments seamlessly. - Test Execution:
Within the pipeline, specify the performance test scenarios and parameters. Jenkins executes these tests, simulating various user interactions and load levels. - Metrics and Reporting:
Performance testing generates a wealth of metrics related to response times, throughput, error rates, and more. Jenkins collates and presents this data in a way that aids analysis.
Security Testing Automation
Security testing assesses your software's resilience against potential attacks, ensuring the confidentiality, integrity, and availability of sensitive information. It helps identify vulnerabilities, misconfigurations, and weaknesses that malicious actors could exploit.
Automated security testing with Jenkins delivers several advantages that fortify your software against threats:
- Early Vulnerability Detection:
Automated security testing catches vulnerabilities early in the development cycle, preventing them from reaching production. - Proactive Risk Mitigation:
By identifying security weaknesses before they're exploited, you're proactively mitigating risks and reducing the potential impact of attacks. - Regulatory Compliance:
Many industries have stringent security regulations. Automated security testing helps ensure compliance by detecting and addressing potential violations. - User Trust:
A secure application enhances user trust. Regular security testing demonstrates your commitment to safeguarding user data and sensitive information.
Conclusion
- Jenkins testing automation emerges as a transformative force, redefining how we build and test software.
- From seamless integration of testing frameworks to orchestrating end-to-end tests, Jenkins empowers developers to deliver robust, user-centric applications.
- By setting up Jenkins for testing automation, we've laid the groundwork for a streamlined process that catches bugs early.
- Integrating testing frameworks ensures that your preferred tool aligns harmoniously with Jenkins automation prowess.
- The automation of unit, integration, and end-to-end tests elevates code quality, strengthens interactions, and delivers user-friendly experiences.
- Managing test environments becomes effortless with Jenkins, allowing for consistent and reproducible setups. Reports and visualization provide actionable insights, while performance and security testing ensure resilience and protection against threats.
- Aligning with test automation best practices and integrating with continuous integration, Jenkins paves the way for collaborative and reliable development.