Setting up a multi-node Kafka cluster
Overview
In this article, we shall be throwing light on how to configure and execute the Kafka multi-node cluster setup. We start with the prerequisite that one must follow before jumping into executing the Kafka multi-node cluster setup. It is also recommended to have a deep understanding of Kafka, its various crucial components, as well as its architecture, as it would help you understand the steps to execute the Kafka multi-node cluster setup easily.
Prerequisites
Some prerequisites that must be kept in mind before in Kafka multi-node cluster setup are given below:
-
Java Development Kit (JDK): Before installing Kafka on your system, it's recommended to have Java as the most needed prerequisite. It can directly be installed via the official Oracle website or from the link JDK. Make sure to install 32-bit or 64-bit as per your system configuration. Once it's downloaded, run the installer, and you should be easily able to configure the file path as well as the Java_Home environment variables. Lastly, run the java-version command to test the JDK installation in your terminal.
-
7-Zip or WinRAR: For unzipping or extracting the downloaded Kafa files, it is good to have the 7-Zip already installed. You can install it via the link 7-Zip or WinRAR.
-
The leadership for the Kafka Controller is maintained via the Zookeeper.
-
SSH connection is correctly installed, and configured Kafka multi-node cluster setup.
-
Its a mandatory to install and correctly configure Zookeeper across all the nodes over the cluster and validate if it is successfully running with a leader and follower mode. Zookeeper holds the main responsibility to keep the information over the topic, broker, and partition for every Kafka node.

Installing and Configuring Kafka
In this section of the article, we shall be learning how one can Installing and Configuring in Kafka multi-node cluster setup:
- Start by downloadeding Apache Kafka of version 2.3.1 from Apache link Apache Kafka Download mirror and extracted the tarball as shown below.

- Then, you can extract the files from the zip folder downloaded.
- The entire directory "kafka_2.11–2.3.1" shall be moved to /usr/local/kafka. You could also wget https://downloads.apache.org/kafka/2.5.0/kafka-2.5.0-src.tgz. You must make sure you have the "root" privilege.
- Once the steps mentioned above are executed for one node, repeat them for the remaining nodes in the Kafka cluster.
- Users can also scp the entire directory extracted "kafka_2.11–2.3.1″ or move ahead with the downloaded kafka_2.11–2.3.1.tgz.
- As part of the configuration step, find the config directory that you might find inside /usr/local/kafka
Installing Zookeeper
If you have not yet, downloaded and installed ZooKeeper, you can follow the below-given steps:
- Navigate to the Zookeeper. You shall see the page like shown below:

- Select the mirror site for successfully downloading the ZooKeeper package via the mirror zookeeper. As seen below, you shall get a html tar.gz file.

- Then, on the CLI, execute the command - wget https://downloads.apache.org/zookeeper/zookeeper-3.4.14/zookeeper-3.4.14.tar.gz
- You shall see that in the zookeeper.connect configuration, the user can easily set the necessary Zookeeper address. When the Zookeeper is successfully up and running in a Kafka cluster, then you can provide the address as shown below, that is, a comma-separated list, localhost:2181,localhost:2182.
Creating a Multi-Node Cluster
In this section of the article, we shall be learning how one can Create a Multi-Node Cluster in Kafka multi-node cluster setup:
Step 1: From the Kafka folder, where you shall find the downloaded Kafka files, navigate to the config folder.
Step 2: Open the server.properties for manipulating or updating the key-value pair.
Step 3: Validate for broker_id, as it must be different than the other configuration files.
Step 4: The broker_id key must get assigned with a distinct integer number which denotes the unique id of the broker in the Kafka cluster. As in the Kafka multi-node cluster setup, we are looking for many nodes, then as per your number of nodes, set values as 1,2 and 3... so on for each broker. Also, go ahead and delete # from listeners=PLAINTEXT://:9094
Step 5: Now, create a log folder where you can easily modify the path as per in log.dirs.
Step 6: The log.dirs key shall have the value as the location directory where the Kafka logs will get stored. For every node, the log directory is created, and the location/path is updated.
Step 7: The num.partitions parameter shows the concurrency mechanism that is achieved by partitions in Kafka. Here, the topic is divided into more than one or simply one partition in Kafka.
Step 8: The calculation for getting the optimized number of partitions is shown below: Partitions = Desired Throughput / Partition Speed
Step 9: If your scenario requires you to change the number of partitions, then from the option ( shown below ), one can easily increase or decrease the number of partitions for a defined topic in the configured and running Kafka cluster.
Step 10: The command for running inside the bin directory of Kafka.
bin/kafka-topics.sh –alter –zookeeper <IP address of each zookeeper node separated by a comma with port no> –topic <Topic Name> –partitions <Number of partition>
Step 11: For the zookeeper.connect option, you can specify the list of zookeeper servers. Here you can mention the IP address and port as the value of zookeeper.connect key separated by a comma (,).
Step 12: User can set the delete.topic.enable=true. Although this key-value pair is not available by default under the server.properties section, users can still explicitly add it to delete the desired created topic.
Step 13: Repeat the above steps for all the nodes residing in your Kafka cluster.
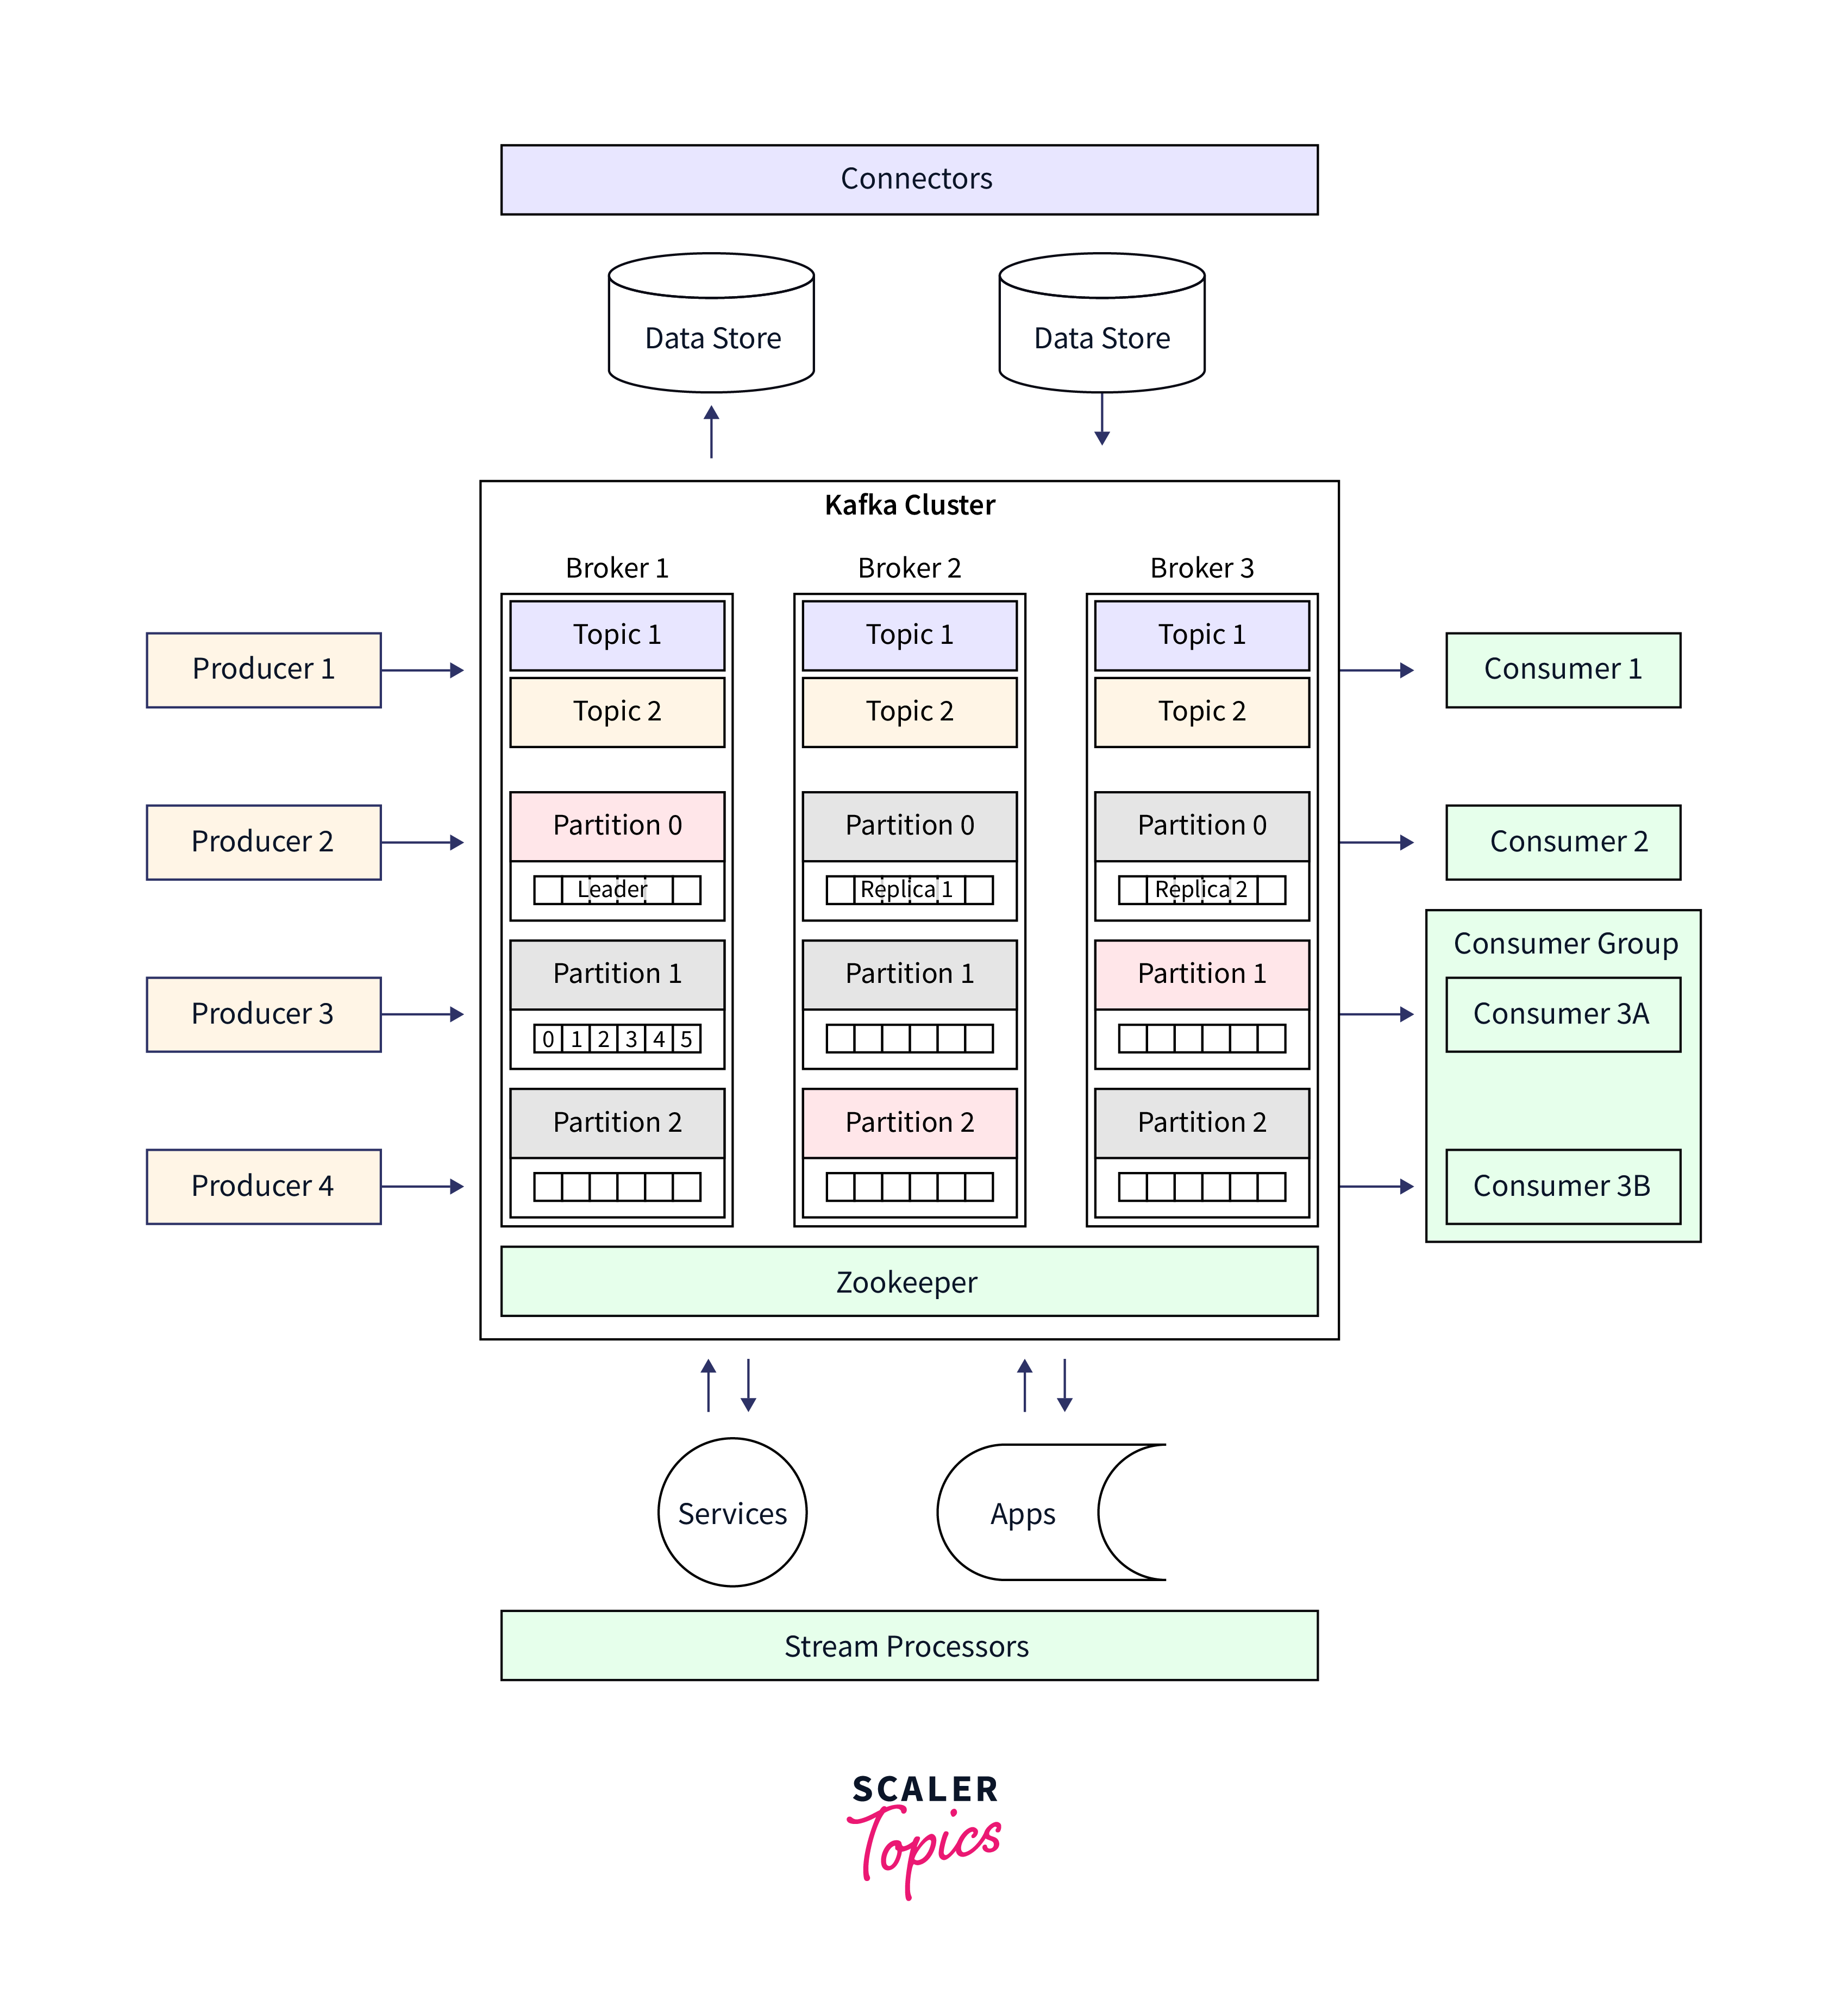
Below is the detailed illustration of Kafka cluster:
Creating Topics and Configuring Replication
In this section of the article, we shall be learning how one can create topics and configure replication in a kafka multi-node cluster setup:
Step 1: Now, for a topic user need to create on every node in the Kafka cluster for which the user can utilize the below-given command. This command needs to be executed inside the bin directory available found in the home directory of Kafka.
bin$ ./kafka-topic.sh –create –zookeeper <list of zookeeper server IP address with port separated by comma > –replication-factor 3 –partition 5 –topic <topic name>.
Step 2: For the replication factor, the user can specify the number of copies it wants to create for the data records or messages for the various brokers in a Kafka cluster. Take care that the value of the replication factor must always be more than 1 (somewhere between 2 and 3).
For executing all the nodes in Kafka Cluster
- To execute Node 1, use the following command: ./bin/kafka-server-start.sh config/server.properties &
- To execute Node 2, use the following command: ./bin/kafka-server-start.sh config/server1.properties &
- To execute Node 3, use the following command: ./bin/kafka-server-start.sh config/server2.properties &
- To execute Node 14 and so on, use the following command: ./bin/kafka-server-start.sh config/{server_for _the_node}.properties &
Testing the Kafka Cluster
In this section of the article, we shall be learning how one can test the Kafka Cluster in Kafka multi-node cluster setup:
Step 1: Once your Kafka server is successfully installed and configured for every node in the cluster before you try to start, we must always ensure that the zookeeper server for every node is successfully up and running.
Step 2: When the Zookeeper is perfectly up and running for every node in the Kafka cluster, the user can efficiently navigate to the bin directory available inside the home directory of Kafka for every node and run the below-given command: bin$ ./kafka-server-start.sh ../config/server.properties
Step 3: The log file can be validated to detect any potential error after starting every Kafka server in the cluster for each node.
Step 4: With the help of the scripts kafka-console-producer.sh and kafka-console-consumer.sh, which are available inside the bin directory, the user can easily validate the entire Kafka cluster without combating the hassle of developing and running an explicit producer, consumer program. This helps to quickly execute console producer and consumer script that could be by sending as well as consuming some dummy messages subsequently.
Step 5: With the below command user can test sending messages to various brokers at a time /kafka/bin$ ./kafka-console-producer.sh –broker-list <<IP Addresses and port separated by comma (,) >> –topic <<Topic Name>>
Step 6: Similarly, for consuming the sent messages, one can send the messages from a specific broker's topic with the help of the below command: /kafka/bin$ ./kafka-console-consumer.sh \–bootstrap-server <<IP Address and port of a node/broker>> \– topic <<Topic Name>> \–from-beginning
Summarizing the test command,
- For producing the data records ./bin/kafka-console-producer.sh --broker-list localhost:9092 --topic test
- For creating the Kafka topic ./bin/kafka-topics.sh --describe --zookeeper localhost:2181 --topic test
- For validating and checking the broker list ./bin/kafka-console-producer.sh --broker-list localhost:9094 --topic test
- For validating and checking logs ./bin/kafka-console-consumer.sh --zookeeper localhost:2181 --from-beginning --topic test
- For consuming the data records that are beginning from node 1 ./bin/kafka-console-consumer.sh --bootstrap-server localhost:9092 --topic test --from-beginning
- For consuming all the data records beginning from node 2 ./bin/kafka-console-consumer.sh --bootstrap-server localhost:9093 --topic test --from-beginning
- To consume all the data records beginning from node 4 ./bin/kafka-console-consumer.sh --bootstrap-server localhost:9094 --topic test --from-beginning