Building Custom Layers in Keras
Overview
Layers are the basic building block of any Deep Neural Network mode because they extract and learn the underlying features from the dataset associated with the specific label and try to predict the unseen data. Keras allows us to create layers from a pre-defined class by importing the specific class. Furthermore, Keras also can create the Custom Layer, i.e., our layer, by extending the base class known as layers and overriding its functions. This article will discuss creating Custom Layers in-depth and implementing them with a simple Deep Neural Network.
Why is Building Custom Layers Important?
Keras API provides an abstract way of creating the layers and the option to inherit the base class and override the class and method per our problem statement. If we use Keras pre-defined layer class, we have a limited scope of implementation, i.e., we can use pre-defined functions and logic already existing. On the other hand, if we create a Custom Layer by inheriting the Layer class, then we can do a wide range of implementations concerning the internal mathematical calculation of the Layer as well as the flow of the data in the layer we will have full control over the layers functionality.
Keras Class and Methods for Creating Dense Layers
This section will discuss the Keras Layer Class and the Functions associated with the class.
Keras Layer Class
The Keras Layer class is responsible for creating any custom or pre-defined layer. We can inherit the base class and override the method per our problem statement to create the Custom Layer in Keras. It is one of the central abstractions in Keras API.
Keras Layer Class Functions
The Custom layer in Keras is created by creating a class that inherits and overrides the existing function. Below I have discussed the function most widely used to create custom layers in Keras.
build
The function named build is responsible for building the layer with proper initialization of the weights and biases according to the specified shape in custom layers in the Keras class.
get_config
The function named get_config displays the number of neurons present in the layer by serializing the layers.
register_keras_serializable
This function is named register_keras_serializable and is used to serialize the custom layers we built by inheriting the Keras Layer class. If we try to export the deployment model, it may start showing errors. Even if we save the model, it will show errors during deployment.
When writing a custom Keras layer, Keras loss, or Keras model, we define a code. But when we are exporting the model, you have to make a flat file out of it. So we must tell Keras how to pass in all the constructor arguments etc. So you define a getConfig() method with all the constructor arguments.
call
The function named call is responsible for any calculation the layer performs with its states, i.e., weights and bias. Any mathematical calculation performed within the layer is done inside this call function only for custom layers in the Keras class.
compute_output_shape
The function named compute_output_shape is called automatically when we call the function model.summary basically, it shows the output shape of the layer in custom layers in the Keras class.
Implementing Dense Layer from scratch
In this section, we will create a Keras Dense layer from scratch. As discussed above, we will inherit the Keras Layer class and override the methods. There are three steps we need to follow to create Custom Layer in Keras, which are mentioned below:
Step 1: Importing Libraries
The code snippets below import the libraries to create our custom layers in Keras.
Step 2: Creation of Custom Dense Layer
The below code snippets are for creating the custom layer in Keras. We have created a class named CustomDense and inherited Layer from the pre-defined class in Keras. As discussed above, we have created a init function which will accept arguments, i.e., the number of neurons to be created in the layer unit, activation function name activation, and layers are trainable or not trainable. Inside init function, we call the class constructor in which our class is inherited and initialize the class variable.
The build function accepts the dataset's shape and initializes the states of the layer. States are basically weights and biases on the layers. I have chosen tensorflow random initializer you can choose any initializer as per your convenience, assign the trainable parameter for the tensorflow variable, and assign the tensorflow variable to w_init and b_init.
The call function accepts the number of neurons and performs the mathematical computation; for the sake of simplicity, I have done a dot product of several neurons and added that with bias. If the activation is specified, I have returned the value after applying the specified activation function; else, the dot product value is returned. Finally compute_output_shape function accepted the input share and returned the output shape of the layer, and get_config function returns the number of neurons in the layer.
Step 3 Custom Dense Layer Class
The below initiates the Custom Layer class by invoking its object. I have also implemented the class by calling the individual function, i.e., call(),variables() for weight and bias value respectively get_config(), and compute_output_shape() shown in code snippets below:
Output
Training a Model Using Cutosm Layers in Keras
In this section, we will train Simple MNIST-Fashion Deep Neural Network (DNN)Classifier Model with the layer we have created in the above section.
Step 1: Importing Libraries
We have imported the necessary libraries, which we will be using to implement to train the MNIST-Fashing Classifier model.
Step 2: Loading and Preprocessing Dataset
In this step, we will load the MNIST-Fashion dataset, which comprises 60,000 train images and 10,000 test images of the Fashion MNIST dataset. First, I have loaded the dataset, which is already separated into train and test shapes. The dataset is in the shape of images, i.e., 28*28, but the model which I am going to create will flatten input, i.e., 1D input, so I am reshaping the test as well as train dataset 60,000*784, and 10,000*784 array for train and test set respectively. After that, we need to scale the value of our dataset because we will use relu as an activation function with a range between 0 and 1 inclusively. That is why I have used the Sklearn MinMaxScaler Transformation of the dataset. The Min-Max scaler is a method of displaying numerical numbers between 0 and 1. Finally, I am printing the class labels and the number of samples in the training and test set.
The code for pre-processing is shown below:
Step 3 Visualization of the Dataset
Data visualization is one of the most important parts of any Machine Learning (ML) / Deep Learning (DL) project. So, here I have visualized the dataset using the matplot library.
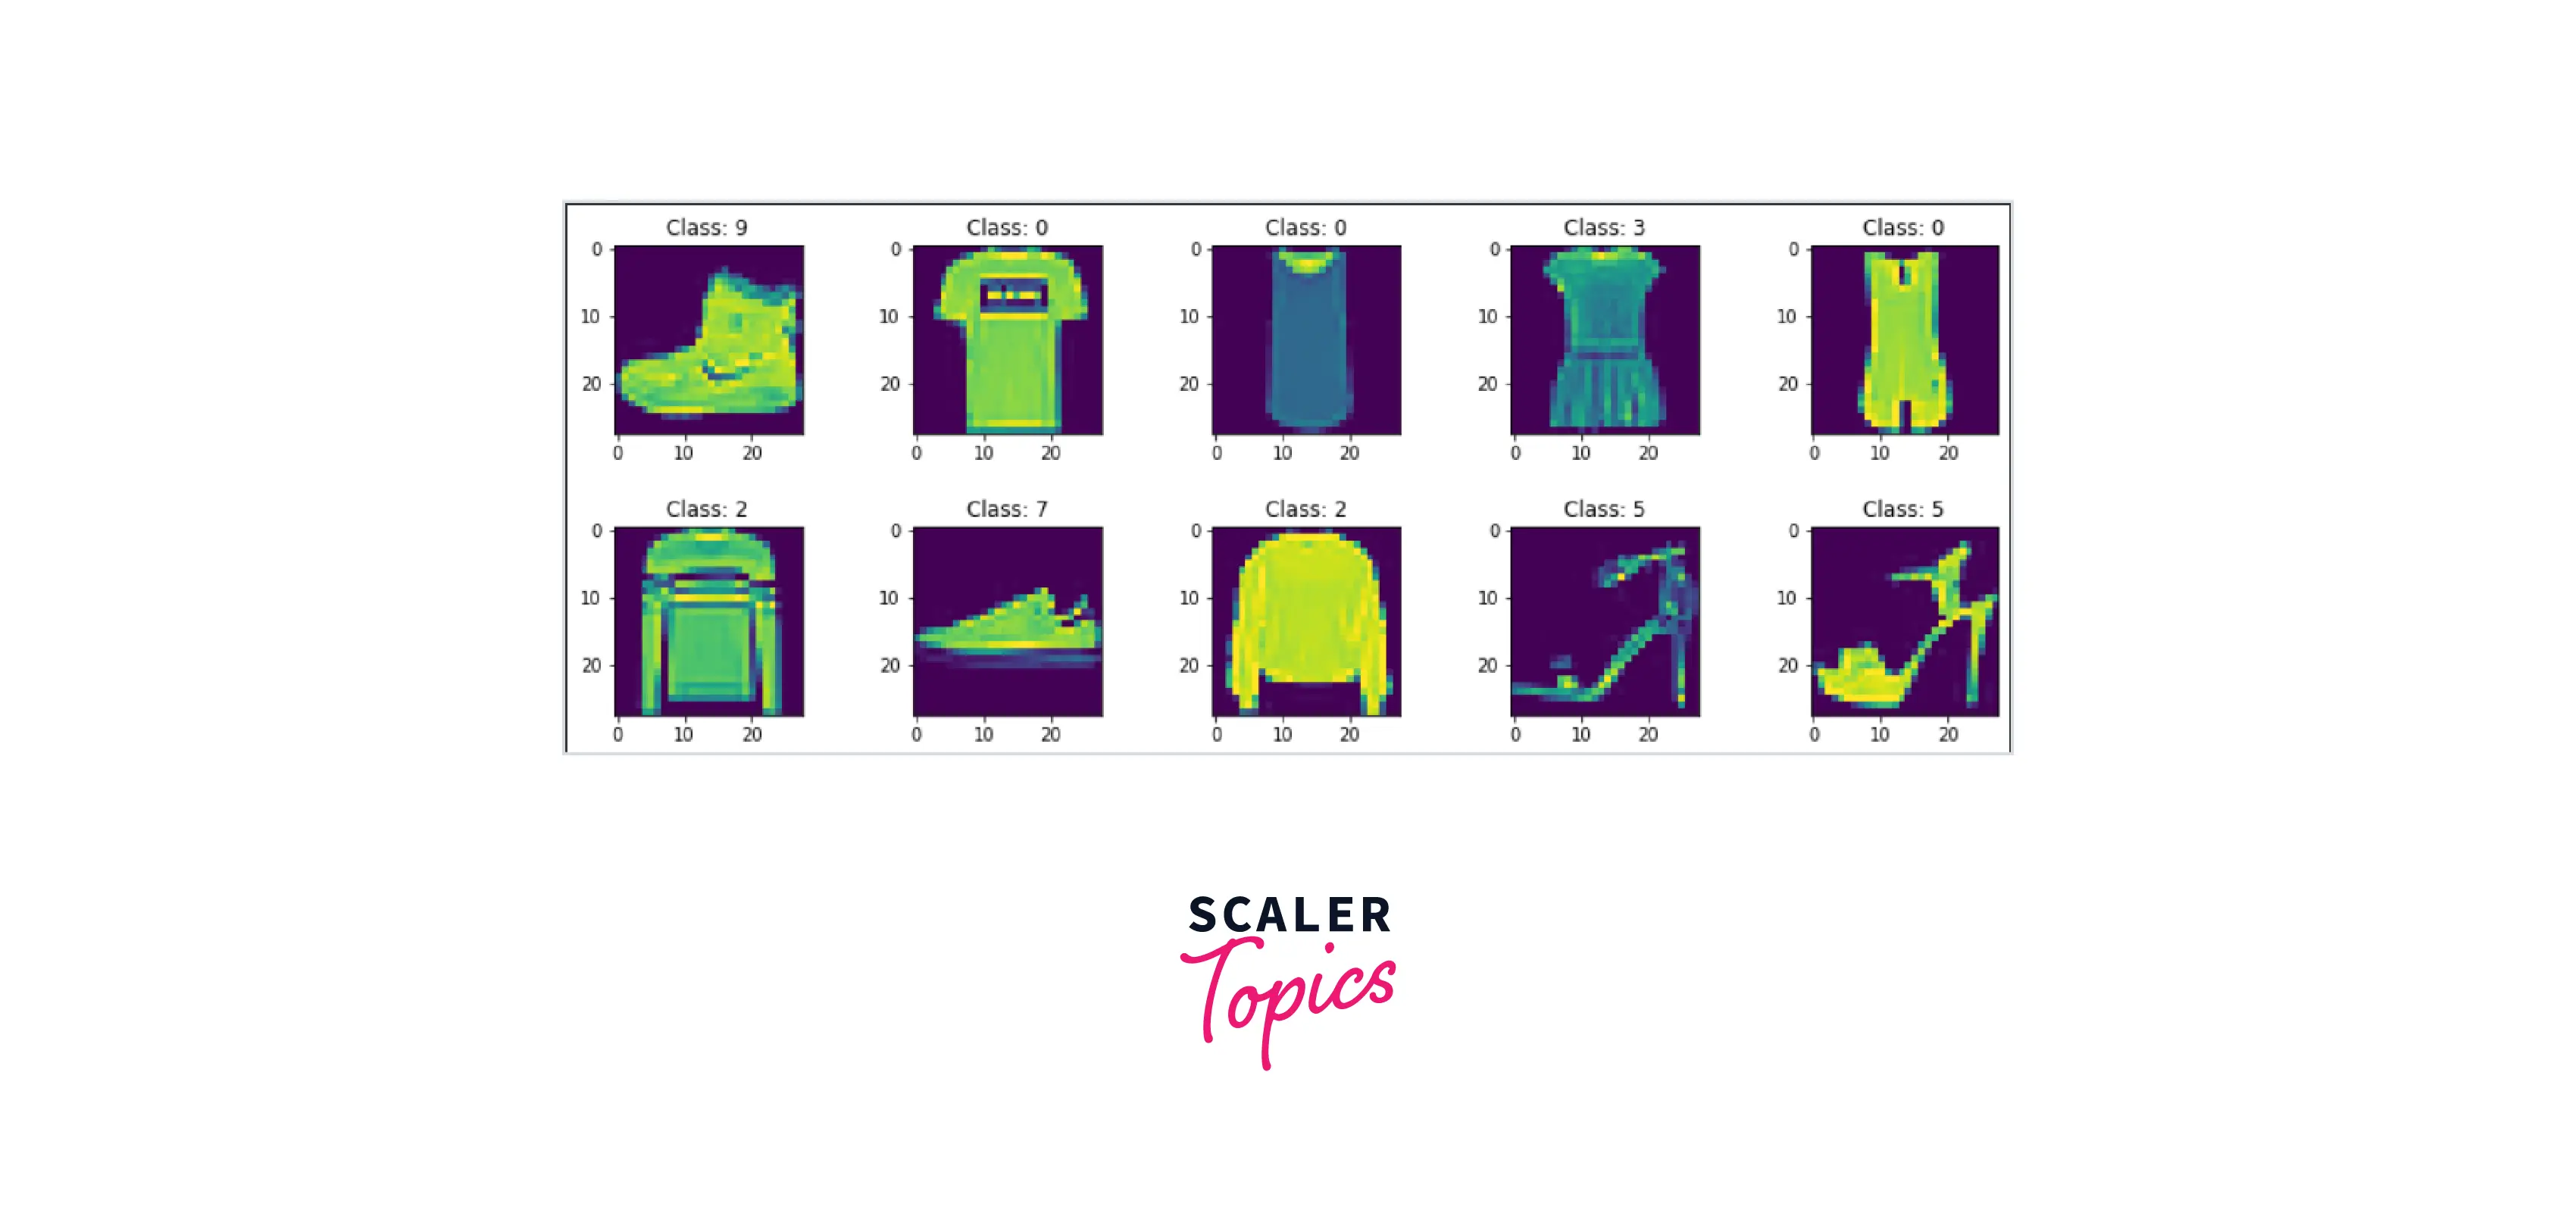
I will plot 10 data samples from the training dataset, creating a subplot with 2 columns and 5 rows. I am extracting 10 samples from the training dataset in the below code, reshaping it into 28*28 metric, and displaying it along with its associated labels using the matplot library. The code snippets are shown below for the training and testing set.
Step 4 : Custom Dense Layer Creation
In this step, we will create our Custom Dense Layer. The below code snippets are for creating the custom layer in Keras. We have created a class named CustomDense and inherited the Layer class from a pre-defined class in Keras. As discussed above, we have created a init function which will accept arguments, i.e., the number of neurons to be created in the layer unit, activation function name activation, and whether layers are trainable or not trainable. Inside the init function, we are calling the constructor of the class which our class is inherited from and initializing the class variable.
The build function accepts the dataset's shape and initializes the layer's states. States are basically weights and biases on the layers. I have chosen tensorflow random initializer . You can choose any initializer as per your convenience, assign the trainable parameter for the tensorflow variable, and assign the tensorflow variable to w_init and b_init.
The call function accepts the number of neurons and performs mathematical computation. For the sake of simplicity, I have done a dot product of the number of neurons and added that with bias. If the activation is specified, I have returned the value after applying the specified activation function; else, the dot product value is returned. Finally, the compute_output_shape function accepts the input share and returns the output shape of the layer, and get_config function returns the number of neurons in the layer.
The Custom layer class has optional arguments of activation. This argument will accept the activation function which we want to implement. The call function will pass the calculated value of weights and the input to the activation function and return the value. In our model, we will implement Softmax and Relu activation functions. The below depicts the code for a custom dense layer.
Step 5: Create a Model using our Custom Dense Layer class
We will create the tensorflow Keras Sequential Model using our custom layer in this step. I have created the tf Keras Sequential object and added a custom layer to the model. As you can see, the first and second layer has 784 and 500 neurons along with the Relu activation. After that, I added a dropout layer with a probability of 0.2; this will deactivate 20 percent of the neuron's layer at any point in the training phase. Finally, we have 10 neutrons with Softmax activation function. Softmax gives the probability of the input dataset in association with its respective class; it has a range of 0-1 exclusively.
Step 6 : Model Compiling and Training
In this section, we are going to compile our model. We need to specify the loss function, optimizer, and metrics to compile the model. I have used sparse_categorical_crossentropy as our loss function because our dataset is multilabel and not one hot encoded. Adam was selected as the optimizer to propagate the error backward. Adam is an extension of the Stochastic Gradient Descent and a combination of the Root Mean Square Propagation (RMSProp) and Adaptive Gradient Algorithm (AdaGrad). Finally, we have used accuracy for simplicity; you can use any metric based on your problem statement. The below snippets depict the code for model compilation.
After successfully compiling the model, our final step is to train the model. The dataset is already split into two sets i.e training and testing sets. The argument validation_data accepts one tuple of numpy array, i.e., input data along with their label; after training the model for one epoch, the model will validate its performance on the unseen data - testing data for 25 epochs with a batch size of 128—the code for model training.
The below code is for fitting the dataset in the model. I have declared variable batch_size of 128 and epoch of 25.
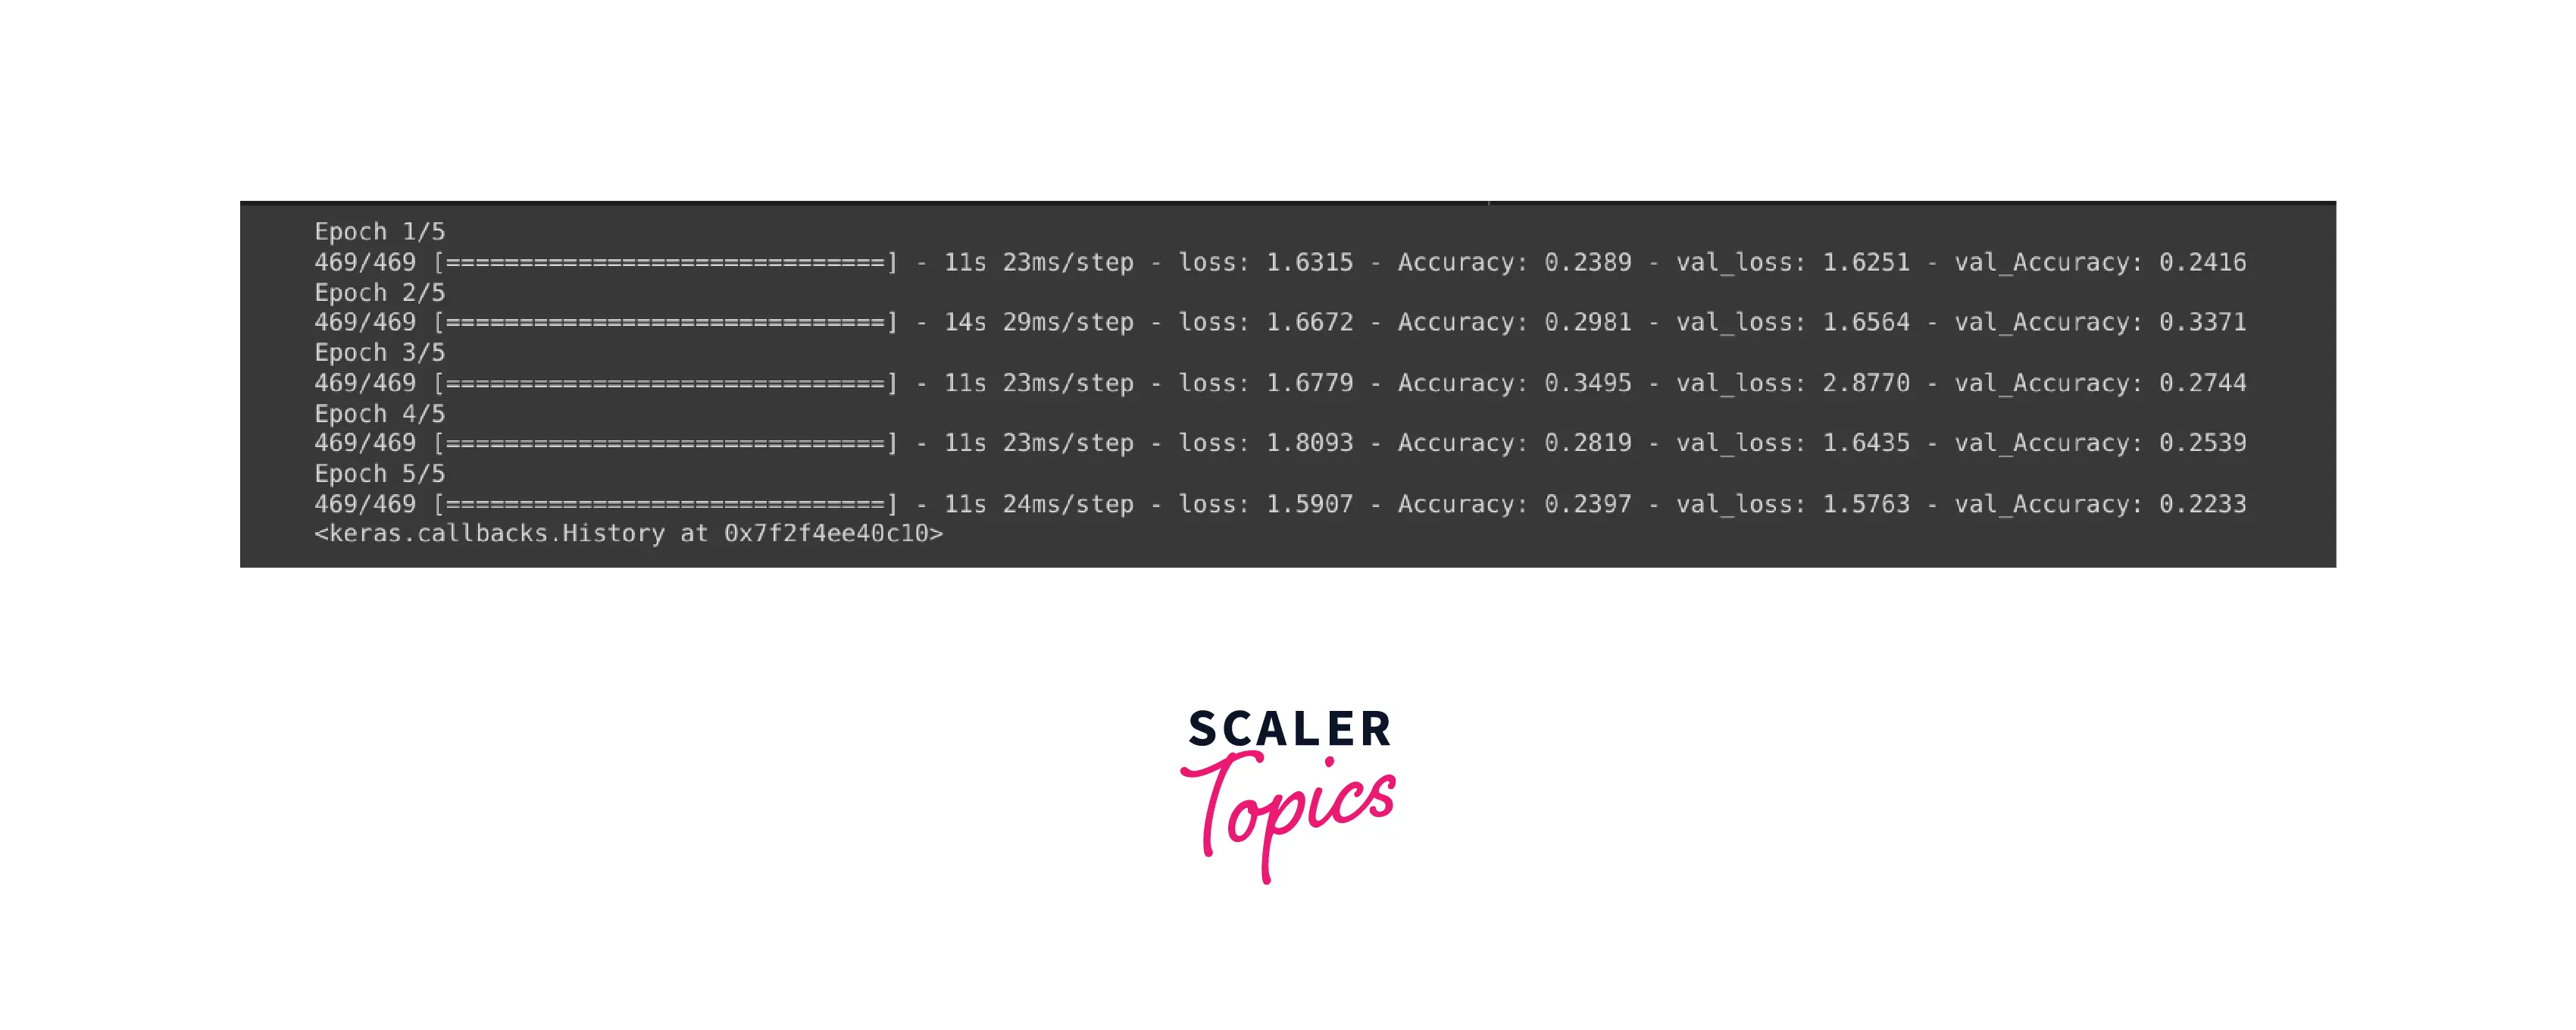
The image below depicts our model's training process with a custom dense layer for 5 epochs.
Step 7: Model Evaluation
In the above steps, we have created and trained our custom model composed of our custom dense layer network. In this step, we will evaluate our model. For evaluation, we will be using our test set. Keras has a pre-defined function known as .evaluate which accepts input data and their respective labels and outputs the statistical value of the metric which was specified while training the model with a custom Dense Layer.
The below snippets are used to predict the model metric on the test dataset. After training, the MNIST-Fashion classifier model over 5 epochs model has test accuracy of 0.2232999950647354 and test loss of 1.57628333568573.
Output
Lastly, we will see the summary of the model. The model summary consists of parameters trainable and non-trainable, layer name, and output shape of the respective layer. The summary of the created model is shown below:
Output
Plotting the Model
In the above section, I have explained how we can create a model of a Custom Dense Layer. Using the Custom Dense Layer, we create a Simple Classifier Neural Network with different activation functions and a different number of neurons. Every aspect of the Custom Neural Network Layers is functioning as required. Pre-defined Layers in Keras have an inbuilt function allowing the user to plot the model layers using the .plot function.
Syntax
Arguments
-
model: Object Model which we want to plot
-
Type: Keras Model Object
-
to_file: Path of the file where the image of the plotted model will be saved.
-
Type: String
-
show_shapes: Whether to show the input and output shape of the layer
-
Type: Boolean
-
show_layer_names
to show the name of the layer -
Type
-
rankdir: To specify the PyDot which layout we want, Horizontal or Vertical
-
Type: LR (Horizontal) and TB (Vertical)
-
expand_nested: Whether to expand nested model into cluster or not
-
Type: Boolean
-
dpi: Dots per Inch
-
Type: Integer
-
layer_range: To specify which layer layers we want to plot in the image
-
Type: List
-
show_layer_activations: To specify the PyDot which layout we want, Horizontal or Vertical
-
Type: Boolean
The code snippets depict the code snippets we will run to plot the model.
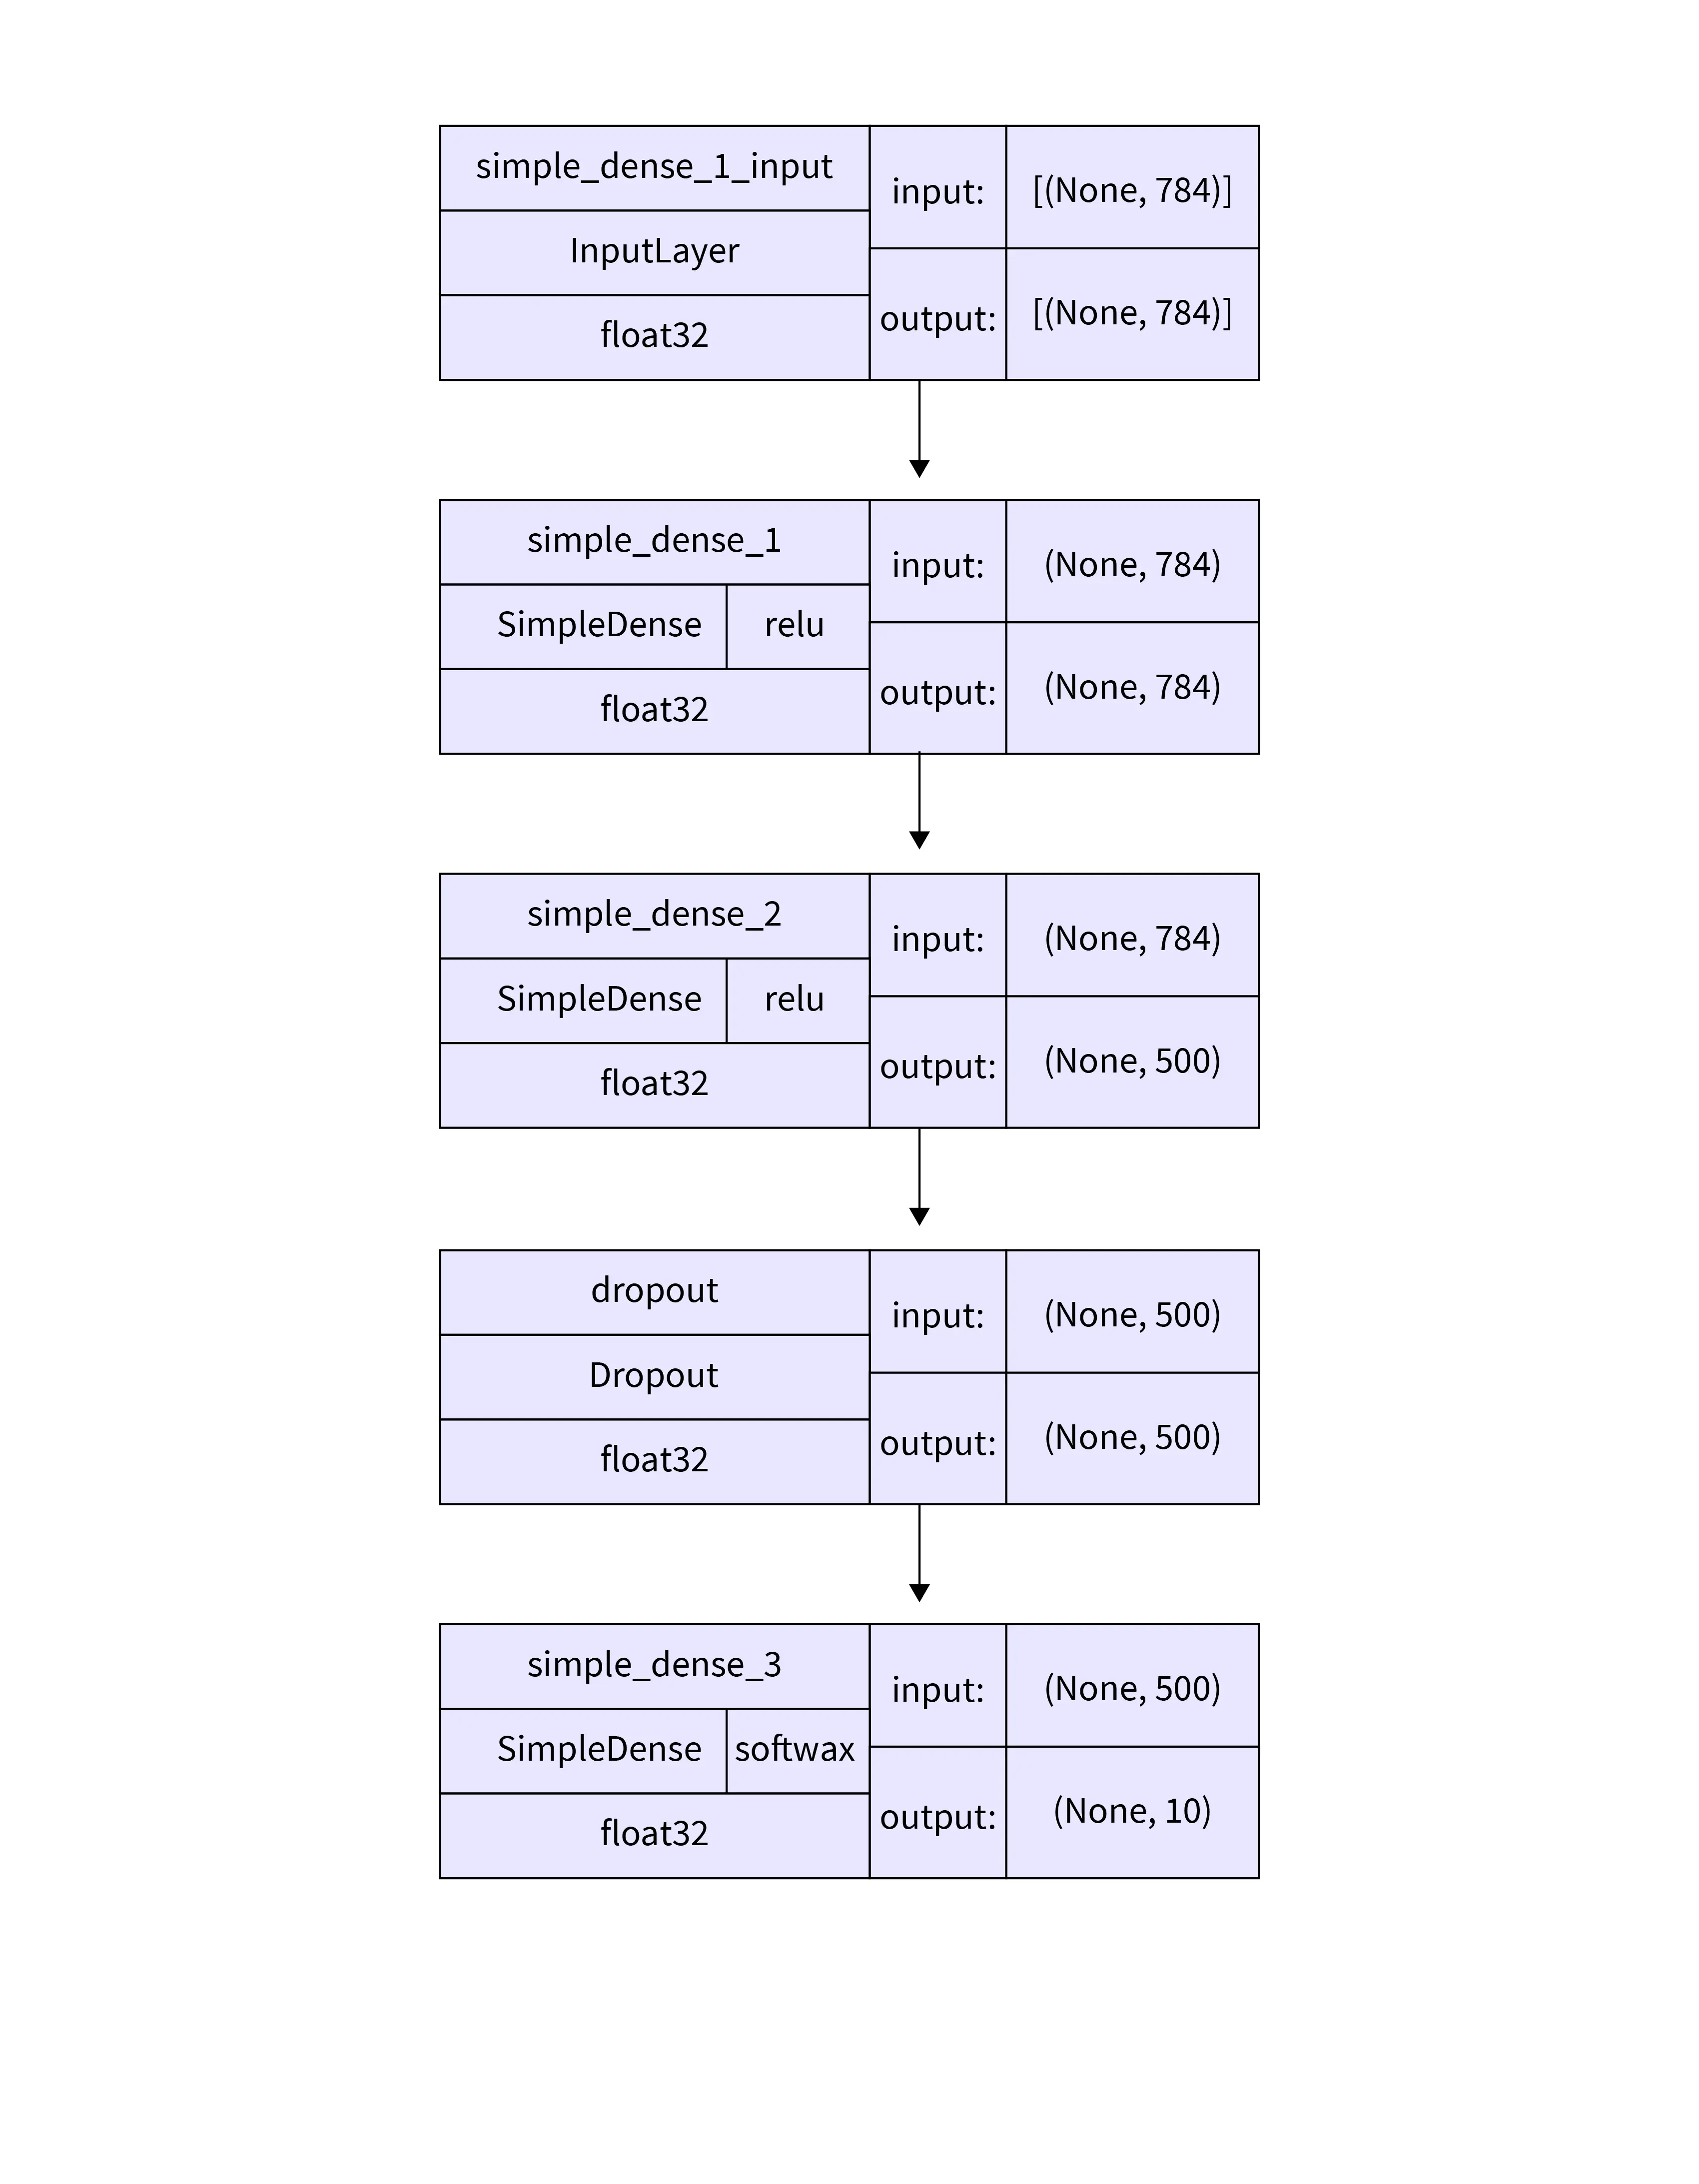
If you will run the above code snippets with the show_shapes - displays the input and output shapes of the layers of the model, show_dtypes - displays the data type of the layers, and show_layer_activations - displays the activations which are used by the layer, in our scenario it is relu and softmax. The below image shows an image of the model layers with layer and their information.
Conclusion
In this article, I have discussed the Custom layers in Keras. The key takeaways from this article are as follows:
- Custom allows us to integrate our weight initializer logic and calculation within the layer.
- Functions in pre-defined layer class, i.e., build, get_config, call,compute_output_shape and register_keras_serializable are the backbone for creating our custom layer since it overrides the function of the parent/base class.
- Class named Layer is Keras has pre-defined two main functions such as build, which is used to create the architecture of the layer with an initializer, and call, which is used to perform the mathematical calculation.
- Class named as Layer is Keras has pre-defined other functions such as get_config and get_output_shape, which is responsible for displaying the internal layer information such as shape, number of neurons, etc.
- The Custom Layer can be trained similarly to any pre-defined layer in Keras.