Deploy App to Kubernetes
Overview
To Deploy application to Kubernetes involves orchestrating and managing containerized workloads efficiently across a cluster of machines. Kubernetes provides a robust platform for automating the deployment, scaling, and management of applications, making it an ideal choice for modern software development and operations. Further in this blog we will see how can we Deploy Application to Kubernetes.
Preparing Your Application for Kubernetes
Kubernetes has emerged as a game-changer in the constantly changing world of software deployment, promising simplified orchestration and scalability. However, it's crucial to make sure to deploy application to kubernetes the application is ready before you plunge into the Kubernetes environment. We'll go over the crucial processes in this preparation procedure, such as assessing application compatibility, utilizing Docker to create containers, and producing a Docker image for your application.
Assessing application compatibility with containerization and Kubernetes deployment.
Before starting on any migration or deployment journey, understanding your application's compatibility with the chosen platform is necessary. When it comes to deploy application to Kubernetes, several aspects demand your attention:
1. Architecture Evaluation:
Examine whether your application's architecture aligns with Kubernetes principles. Microservices architectures tend to integrate seamlessly with Kubernetes, enabling independent scaling and deployment of components.
2. Statelessness vs. Statefulness:
Kubernetes is engineered for stateless applications that don't retain critical data internally. While stateful applications can be accommodated using StatefulSets, it's essential to evaluate whether your app's stateful nature aligns with Kubernetes' paradigms.
3. Dependency Analysis:
List down your application's dependencies, including libraries, external services, and databases. Ensure these dependencies are compatible with containerization or have containerized alternatives available.
4. Configuration Management:
Kubernetes manages configuration through ConfigMaps and Secrets. Assess whether your application's configuration can be externalized and fetched from these Kubernetes resources.
Containerizing the application using Docker or other containerization tools.
Containerization is the foundation of Kubernetes deployment. Docker, a widely used containerization tool, enables you to encapsulate your application and its dependencies into isolated, portable containers. Here's how to get started:
1. Dockerfile Definition:
Craft a Dockerfile that outlines the steps to create the container image. This includes specifying the base image, adding dependencies, copying application code, and setting up runtime configurations. 2. Dependency Management:
Ensure your Dockerfile accurately reflects your application's dependencies. This guarantees consistent behavior between development and production environments.
3. Isolation and Portability:
Containerization isolates your application from its host environment, enhancing security and portability. Applications run within their own runtime environment, reducing conflicts and ensuring consistency.
Creating a Docker image for the application and pushing it to a container registry.
With your Dockerfile in hand, you're ready to create a Docker image and make it accessible to your Kubernetes cluster:
1. Image Building:
Use the docker build command to build your Docker image. This process involves following the instructions in your Dockerfile, resulting in an image that encapsulates your application.
2. Tagging and Naming:
Assign a meaningful tag and name to your Docker image to identify its version and purpose.
3. Container Registry:
A container registry, such as Docker Hub, Google Container Registry, or others, is where you'll store your Docker image. Use the docker push command to upload your image to the registry.
Setting Up a Kubernetes Cluster
Creating a local Kubernetes cluster allows you to experiment, develop, and test applications in an environment that closely simulates a production Kubernetes setup. For this we are going to use kubectl and Minikube make sure to have it installed on our OS.
Step 1: Start Minikube Cluster
Open your terminal and execute the following command to start a Minikube cluster:
This command initializes a local Kubernetes cluster using VirtualBox as the driver. You can replace virtualbox with your preferred driver if using a different virtualization software.
Step 2: Verify Cluster Status
Once the cluster is up and running, verify its status by running:
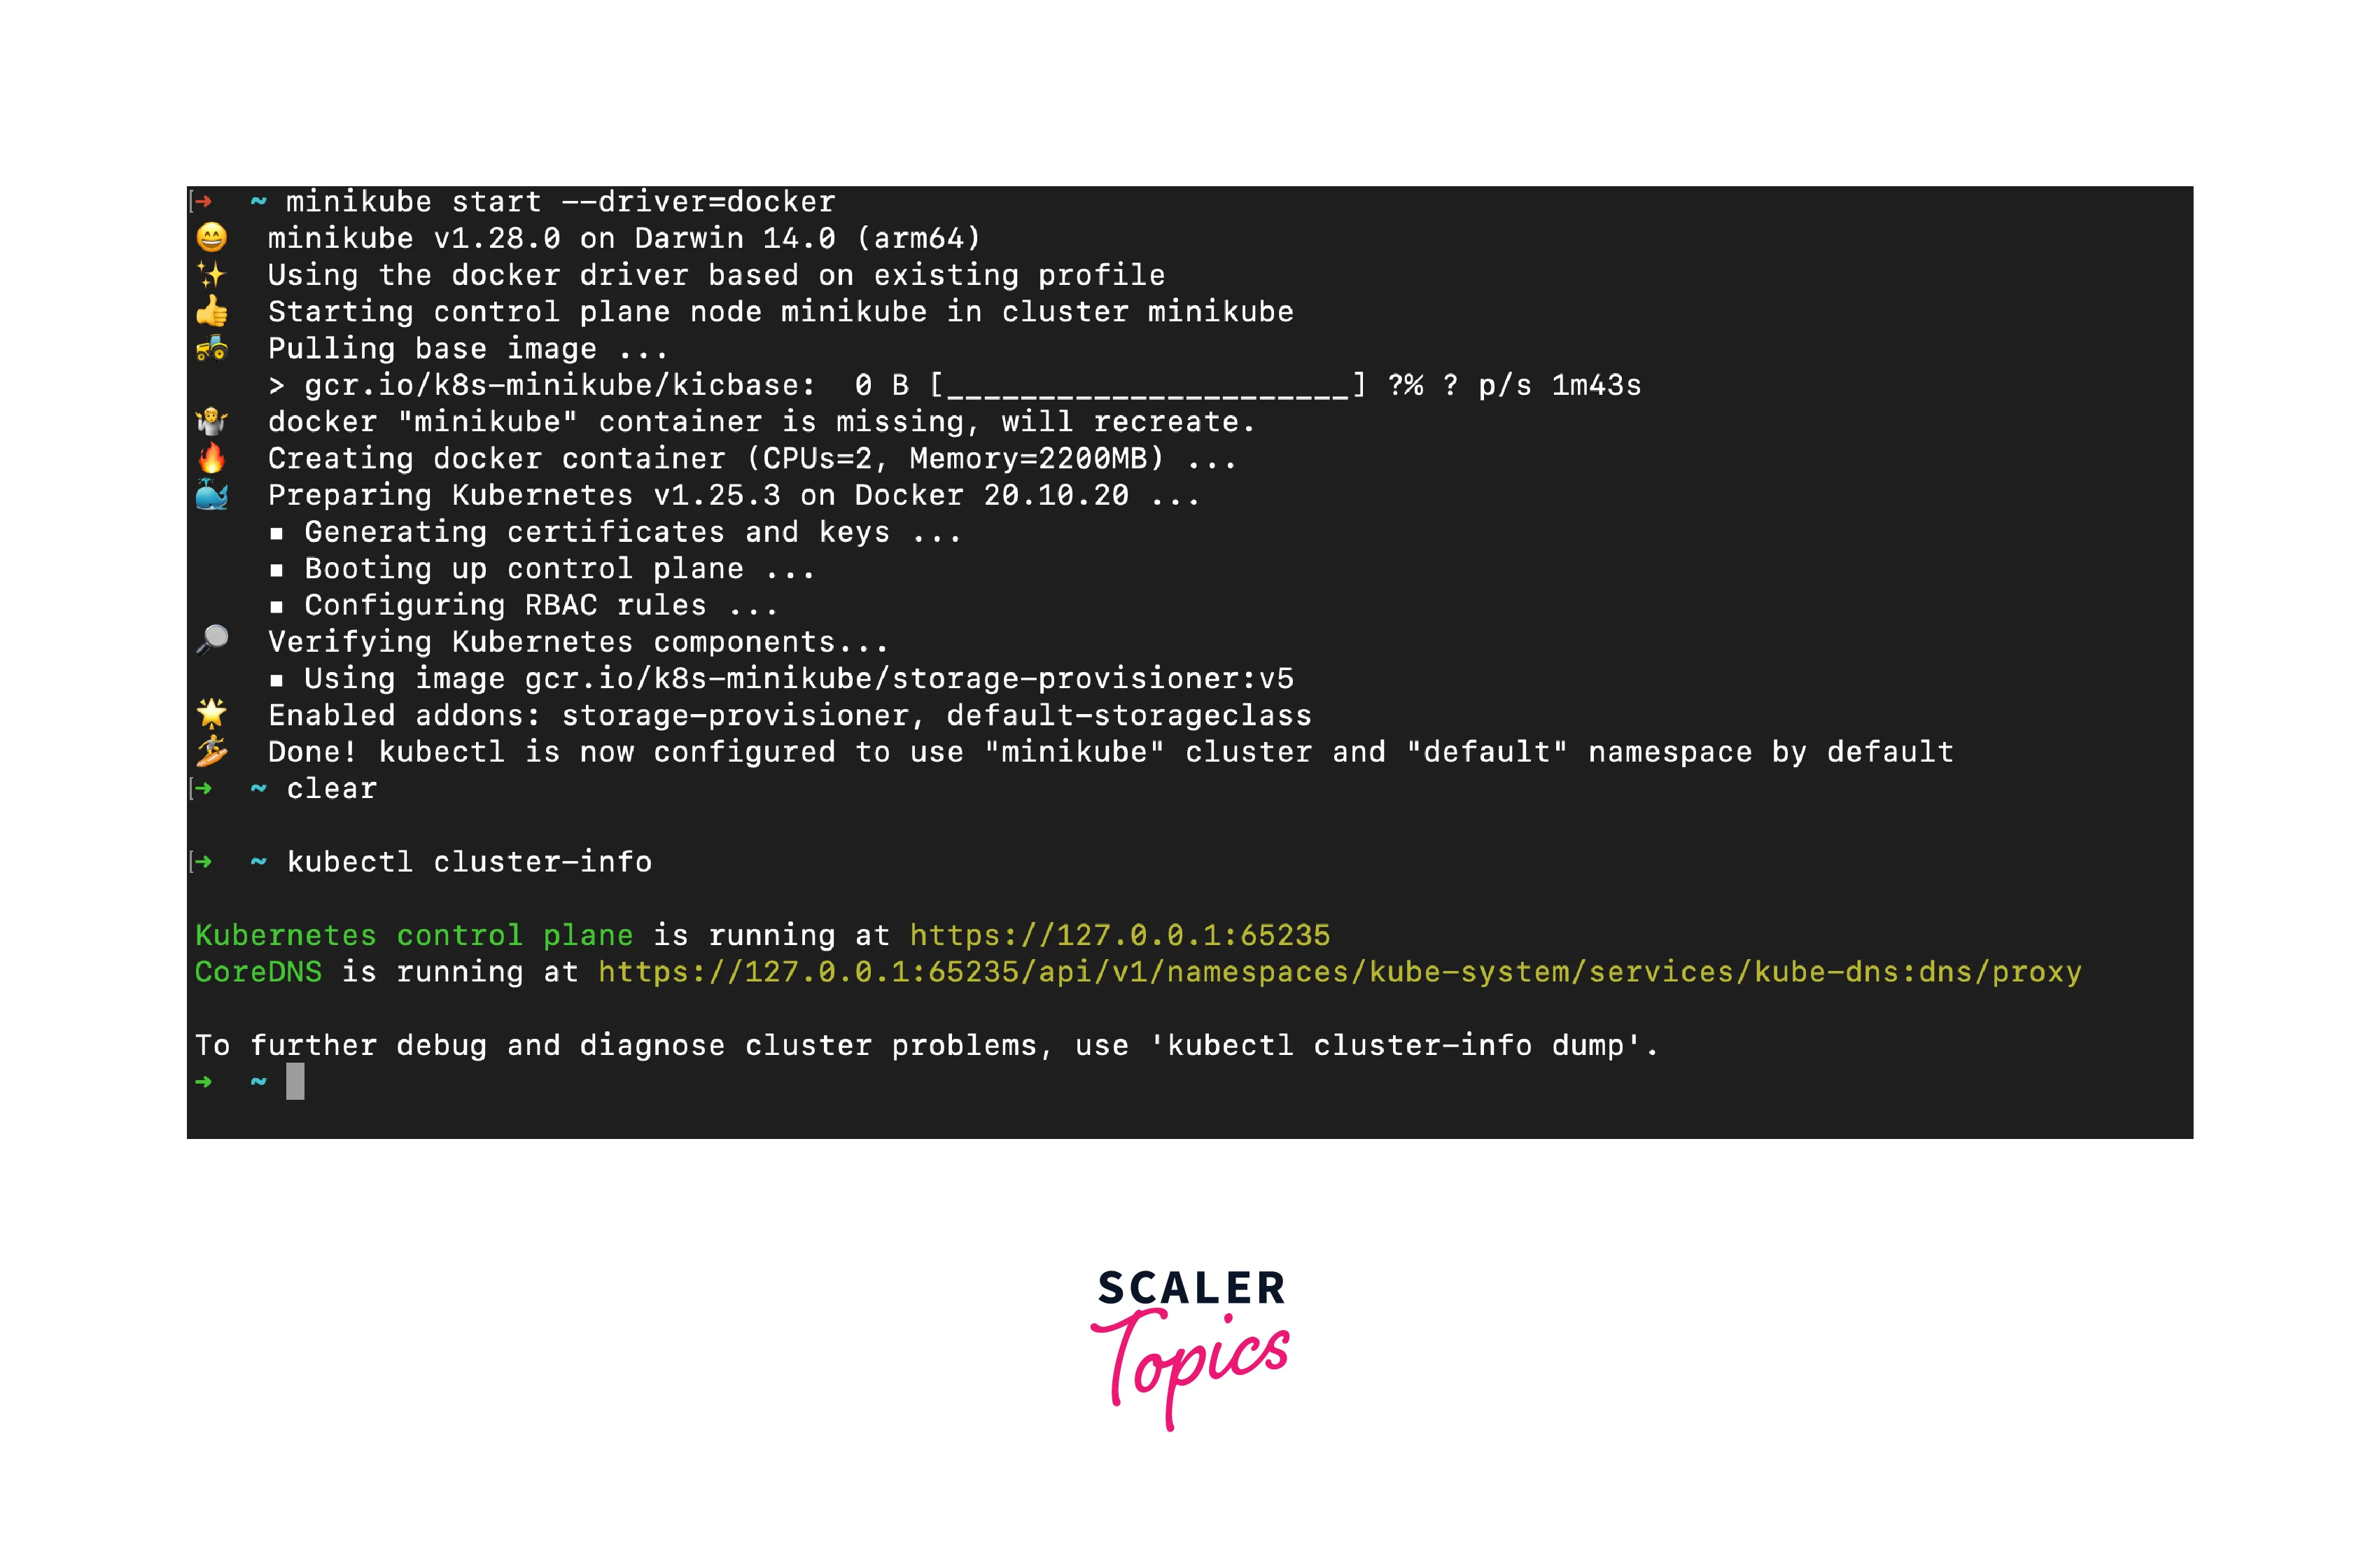
You should see output confirming the cluster's existence and endpoints.
Defining Kubernetes Manifests
Kubernetes manifests are essential blueprints that define the desired state of your applications and resources within a Kubernetes cluster. By encapsulating configurations in YAML files, these manifests enable automated deployment, scaling, and management of containerized workloads. In this guide, we'll delve into the world of Kubernetes manifests, unraveling their components and their role in orchestrating your applications.
Anatomy of a Kubernetes Manifest: A Kubernetes manifest is typically written in YAML and consists of several key components:
- API Version: Indicates which Kubernetes API version the manifest is compatible with. Kind: Specifies the type of resource you're defining (e.g., Deployment, Service, Pod).
- Metadata: Contains metadata about the resource, including its name, labels, and annotations.
- Spec: Defines the desired state of the resource. This section includes configuration settings and parameters unique to the resource type.
In this manifest:
- apiVersion: We're using the apps/v1 API version for Deployments.
- kind: The resource type is a Deployment.
- metadata: Name your Deployment as my-app-deployment.
- spec: We define the desired state of the Deployment.
- replicas: Specifies that we want three replicas of our application running.
- selector: Labels used to identify which pods belong to this Deployment.
- template: Defines the Pod template for the Deployment.
- metadata: Labels for pods created from this template.
- spec: Describes the pod's specification.
- containers: An array of containers in this pod.
- name: Container name.
- image: The Docker image to use.
- ports: Container ports to expose.
Manifest files can be changed and more configuration can be added as required.
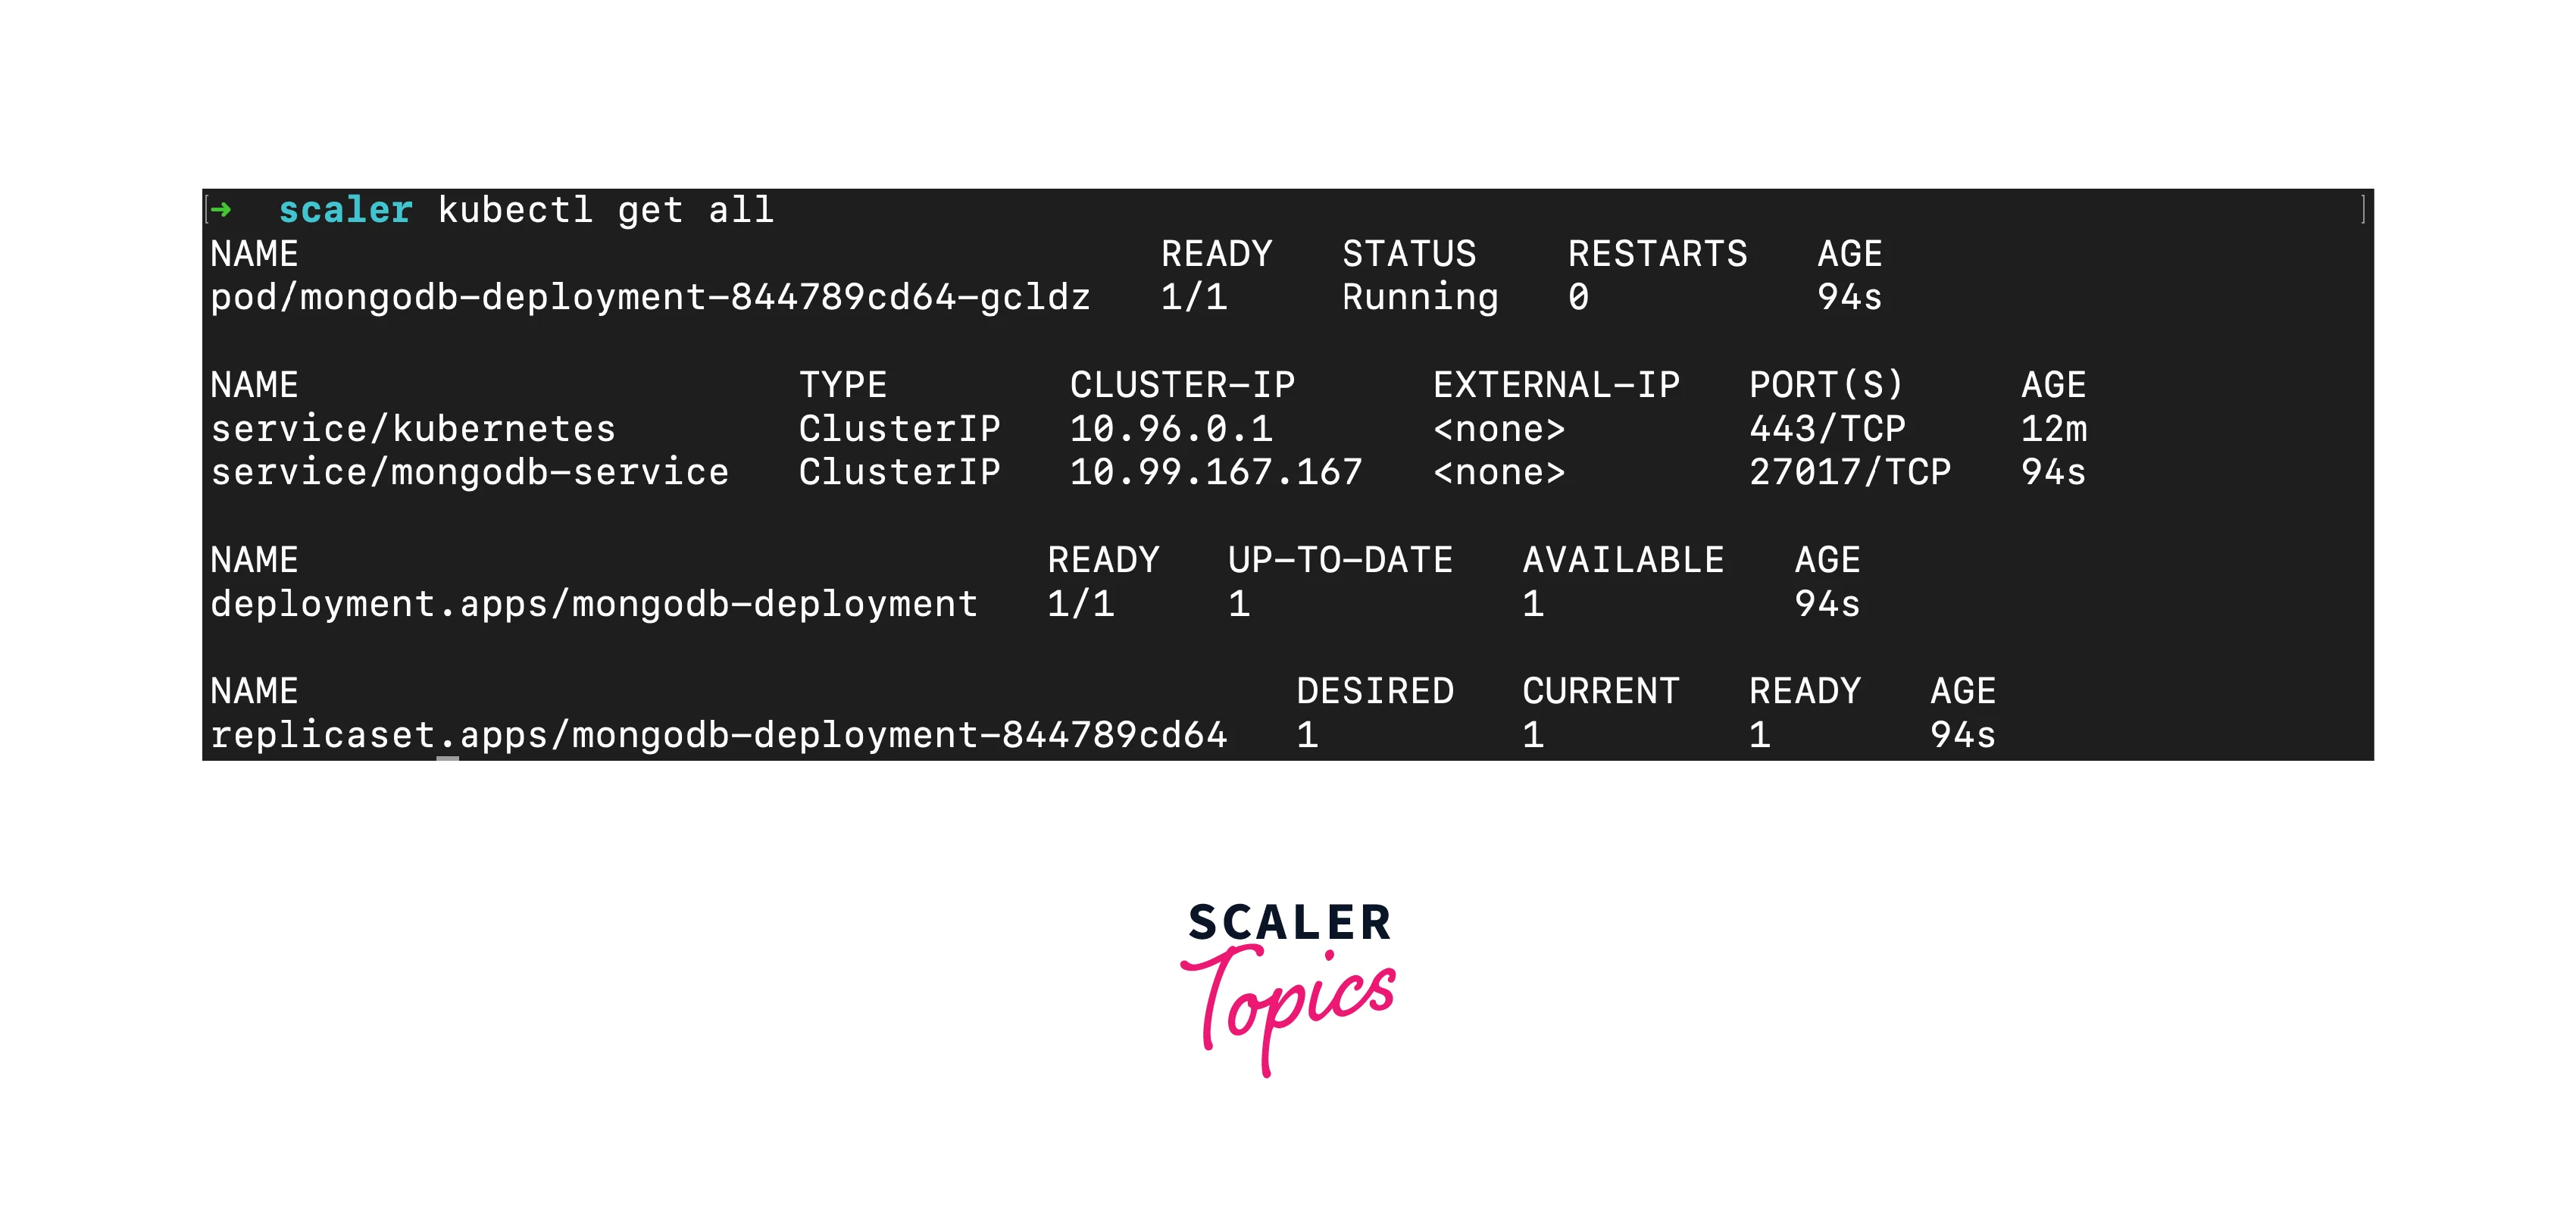
Deploying Pods and Services
Deploying pods and services are fundamental tasks in Kubernetes that enable you to manage and expose your containerized applications.
Pods:
A pod is the smallest deployable unit in Kubernetes, representing a single instance of a running process. It can house one or more containers, sharing the same network namespace and storage. While it's common to deploy a single container in a pod, there are scenarios where multiple containers in a single pod can work together. For instance, a main application container might need a sidecar container for logging or monitoring. Here's how to define a basic pod manifest:
In this manifest:
- apiVersion: We're using the v1 API version for Pods.
- kind: The resource type is a Pod.
- metadata: Name your Pod as my-pod.
- spec: Describes the pod's specification.
- containers: An array of containers in this pod.
- name: Container name.
- image: The Docker image to use.
- ports: Container ports to expose.
- containers: An array of containers in this pod.
Services: Exposing Your Application
Pods in Kubernetes are ephemeral, which means their IP addresses can change due to scaling, rescheduling, or failures. Services provide a stable network endpoint for accessing your application, allowing seamless communication regardless of pod IP changes.
Here's how to define a basic service manifest:
In this manifest:
- apiVersion: We're using the v1 API version for Services.
- kind: The resource type is a Service.
- metadata: Name your Service as my-service.
- spec: Describes the service's specification.
- selector: Labels used to identify which pods belong to this Service.
- ports: Port configuration for the Service.
- protocol: Protocol for the port (TCP in this case).
- port: Port exposed by the Service.
- targetPort: The port to forward to on the pods.
Applying Pods and Services:
To deploy the pod and service defined in the manifests, use the kubectl apply command:
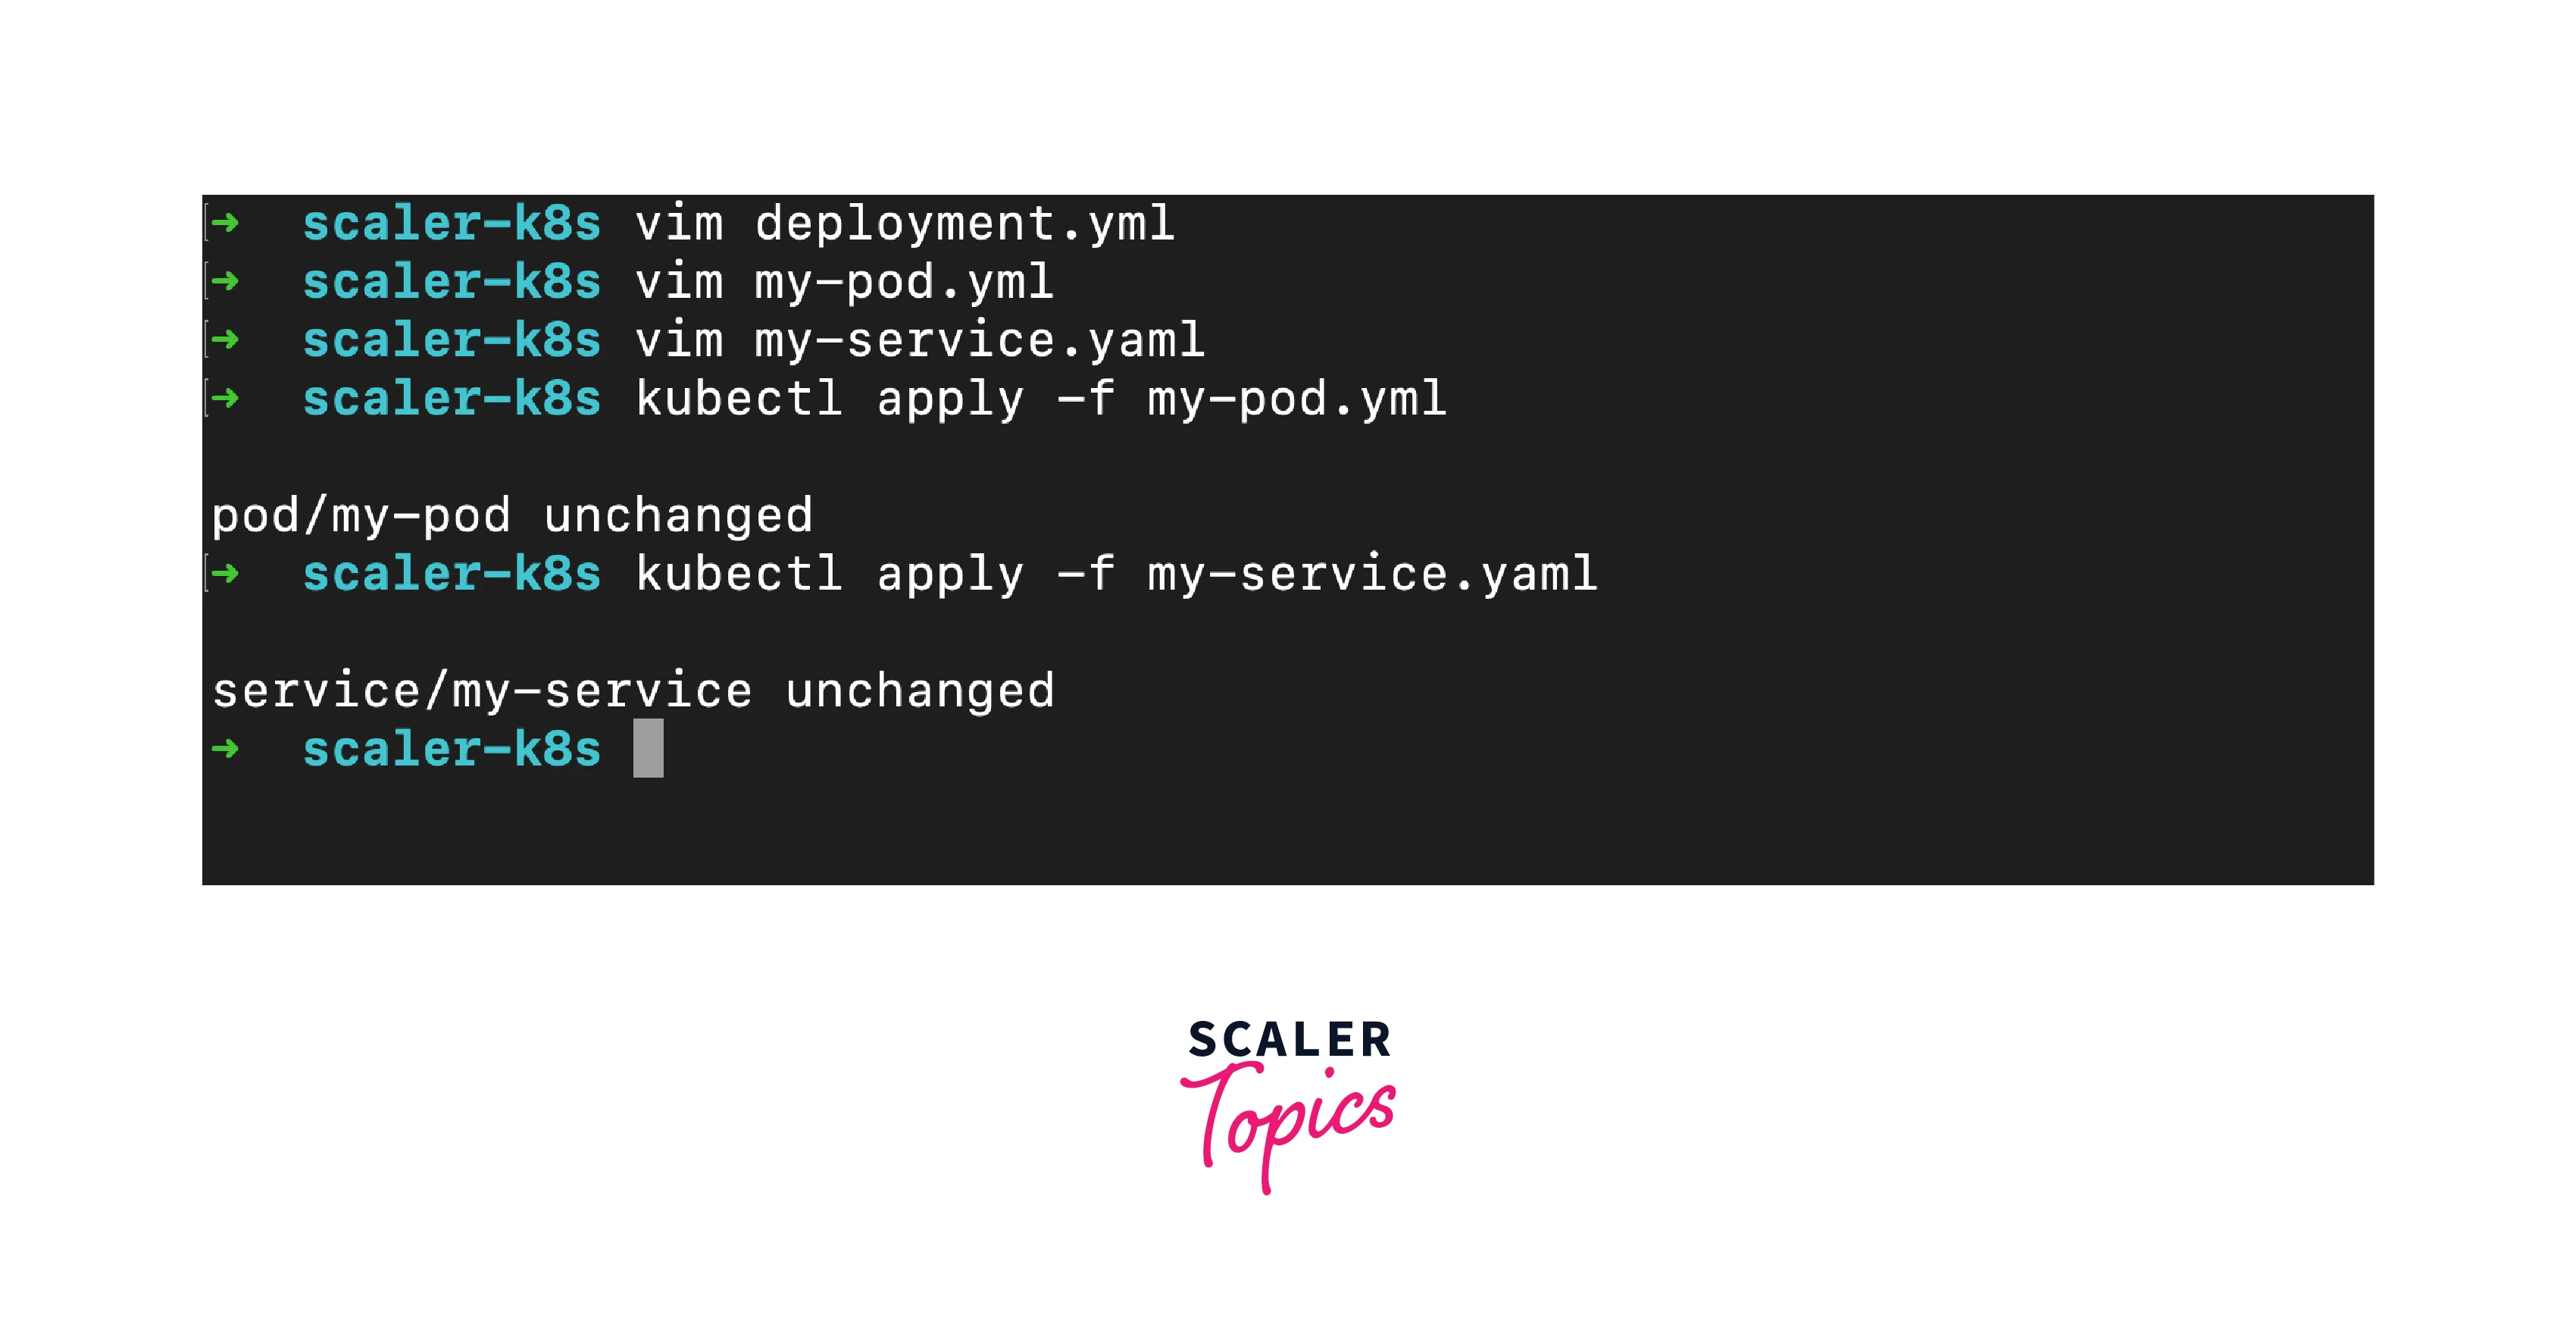
The pod will be created, and the service will expose the pod's containers.
Configuring Environment-Specific Variables
Applications often require different configurations based on their deployment environment. Kubernetes provides two key mechanisms, ConfigMaps and Secrets, to manage environment-specific variables and sensitive information. In this guide, we'll explore how to leverage these resources to configure your applications effectively within the Kubernetes ecosystem.
ConfigMaps:
ConfigMaps allow you to decouple configuration details from your application code. They store key-value pairs or entire configuration files as Kubernetes resources. This separation of concerns simplifies application deployment and maintenance, especially when you need to adjust settings across various environments. Here's how to create a basic ConfigMap:
In this example:
- apiVersion: We're using the v1 API version for ConfigMaps.
- kind: The resource type is a ConfigMap.
- metadata: Name your ConfigMap as my-config.
- data: Define key-value pairs representing your configuration.
To inject ConfigMap values into your application, you can set environment variables in your pod's specification:
Secrets:
Secrets are similar to ConfigMaps but are designed for storing sensitive data, such as passwords, tokens, and keys. They ensure data security by encoding and encrypting the stored information, providing an additional layer of protection. Here's how to create a basic Secret:
In this example:
- apiVersion: We're using the v1 API version for Secrets.
- kind: The resource type is a Secret.
- metadata: Name your Secret as my-secret.
- data: Encode sensitive information in base64.
To use Secret values in your application, you can set environment variables in your pod's specification similar to how you use ConfigMaps.
Applying ConfigMaps and Secrets:
To apply ConfigMaps or Secrets, use the kubectl apply command:
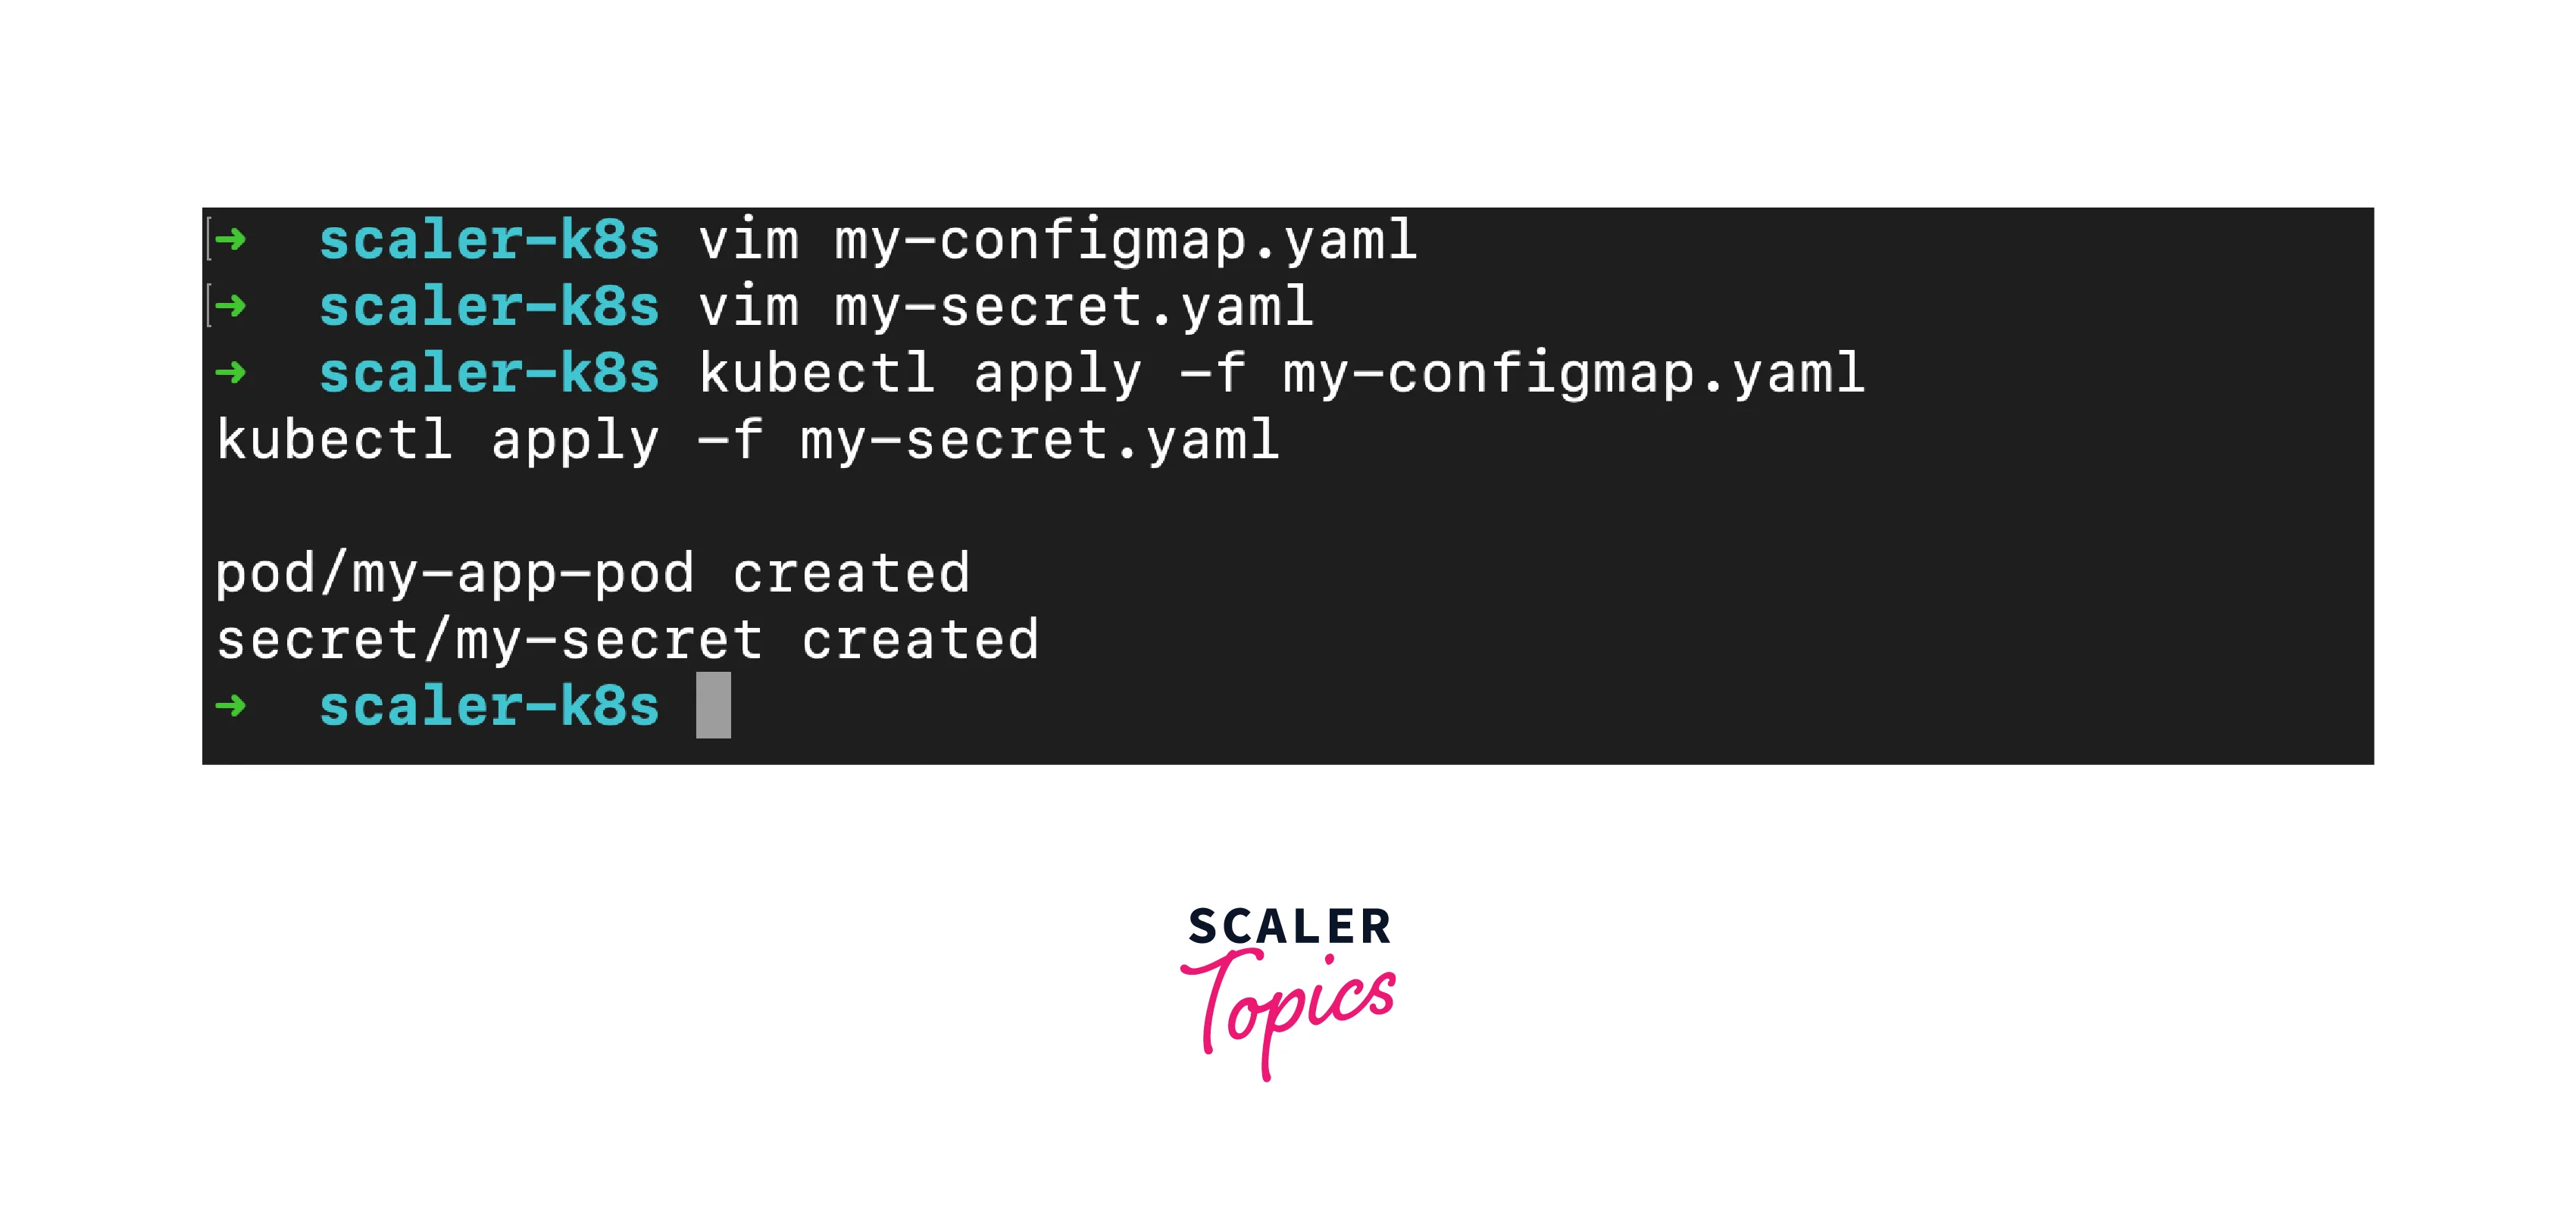
These resources will be available to your pods, allowing your applications to access environment-specific variables or sensitive data securely.
Managing Application Updates and Rollbacks
Keeping applications up-to-date while ensuring minimal disruption is a challenge in any deployment scenario. Kubernetes offers robust mechanisms for updating and rolling back applications smoothly.
Rolling Updates:
Rolling Updates are the default update strategy in Kubernetes, ensuring zero-downtime deployments by gradually transitioning from old to new instances. Here's how to perform a rolling update:
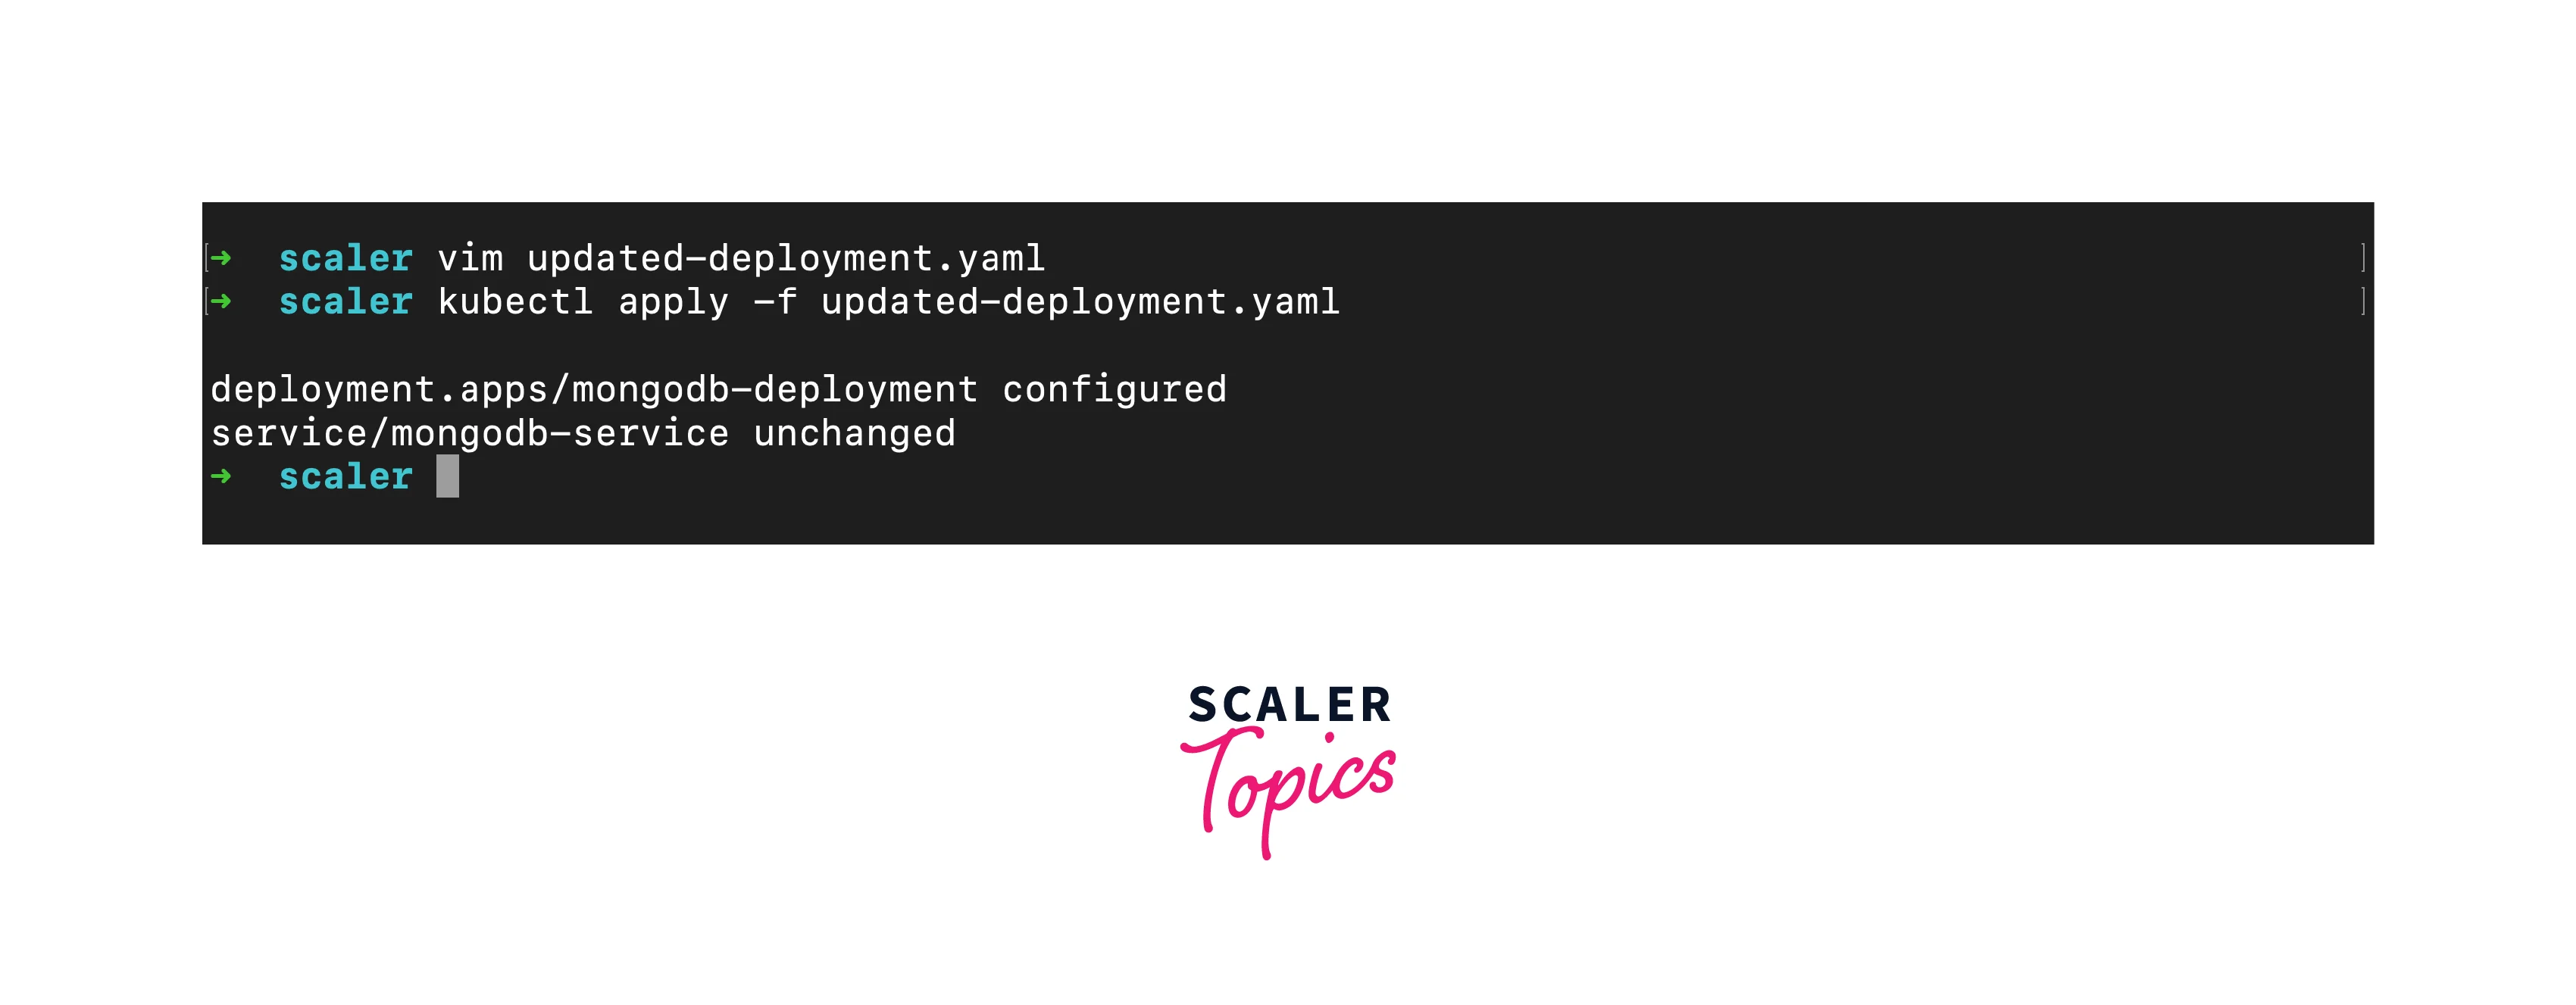
- Modify Deployment: Update your deployment manifest with the desired changes (e.g., new image version).
- Apply Update: Use kubectl apply to apply the updated manifest:
- Rolling Update Configuration: You can adjust rolling update parameters like maxSurge and maxUnavailable to control the number of new and old pods during the update.
Performing Rollbacks in Kubernetes:
Rollbacks are crucial when an update introduces unexpected issues. Kubernetes enables you to seamlessly revert to a previous version using the following steps:
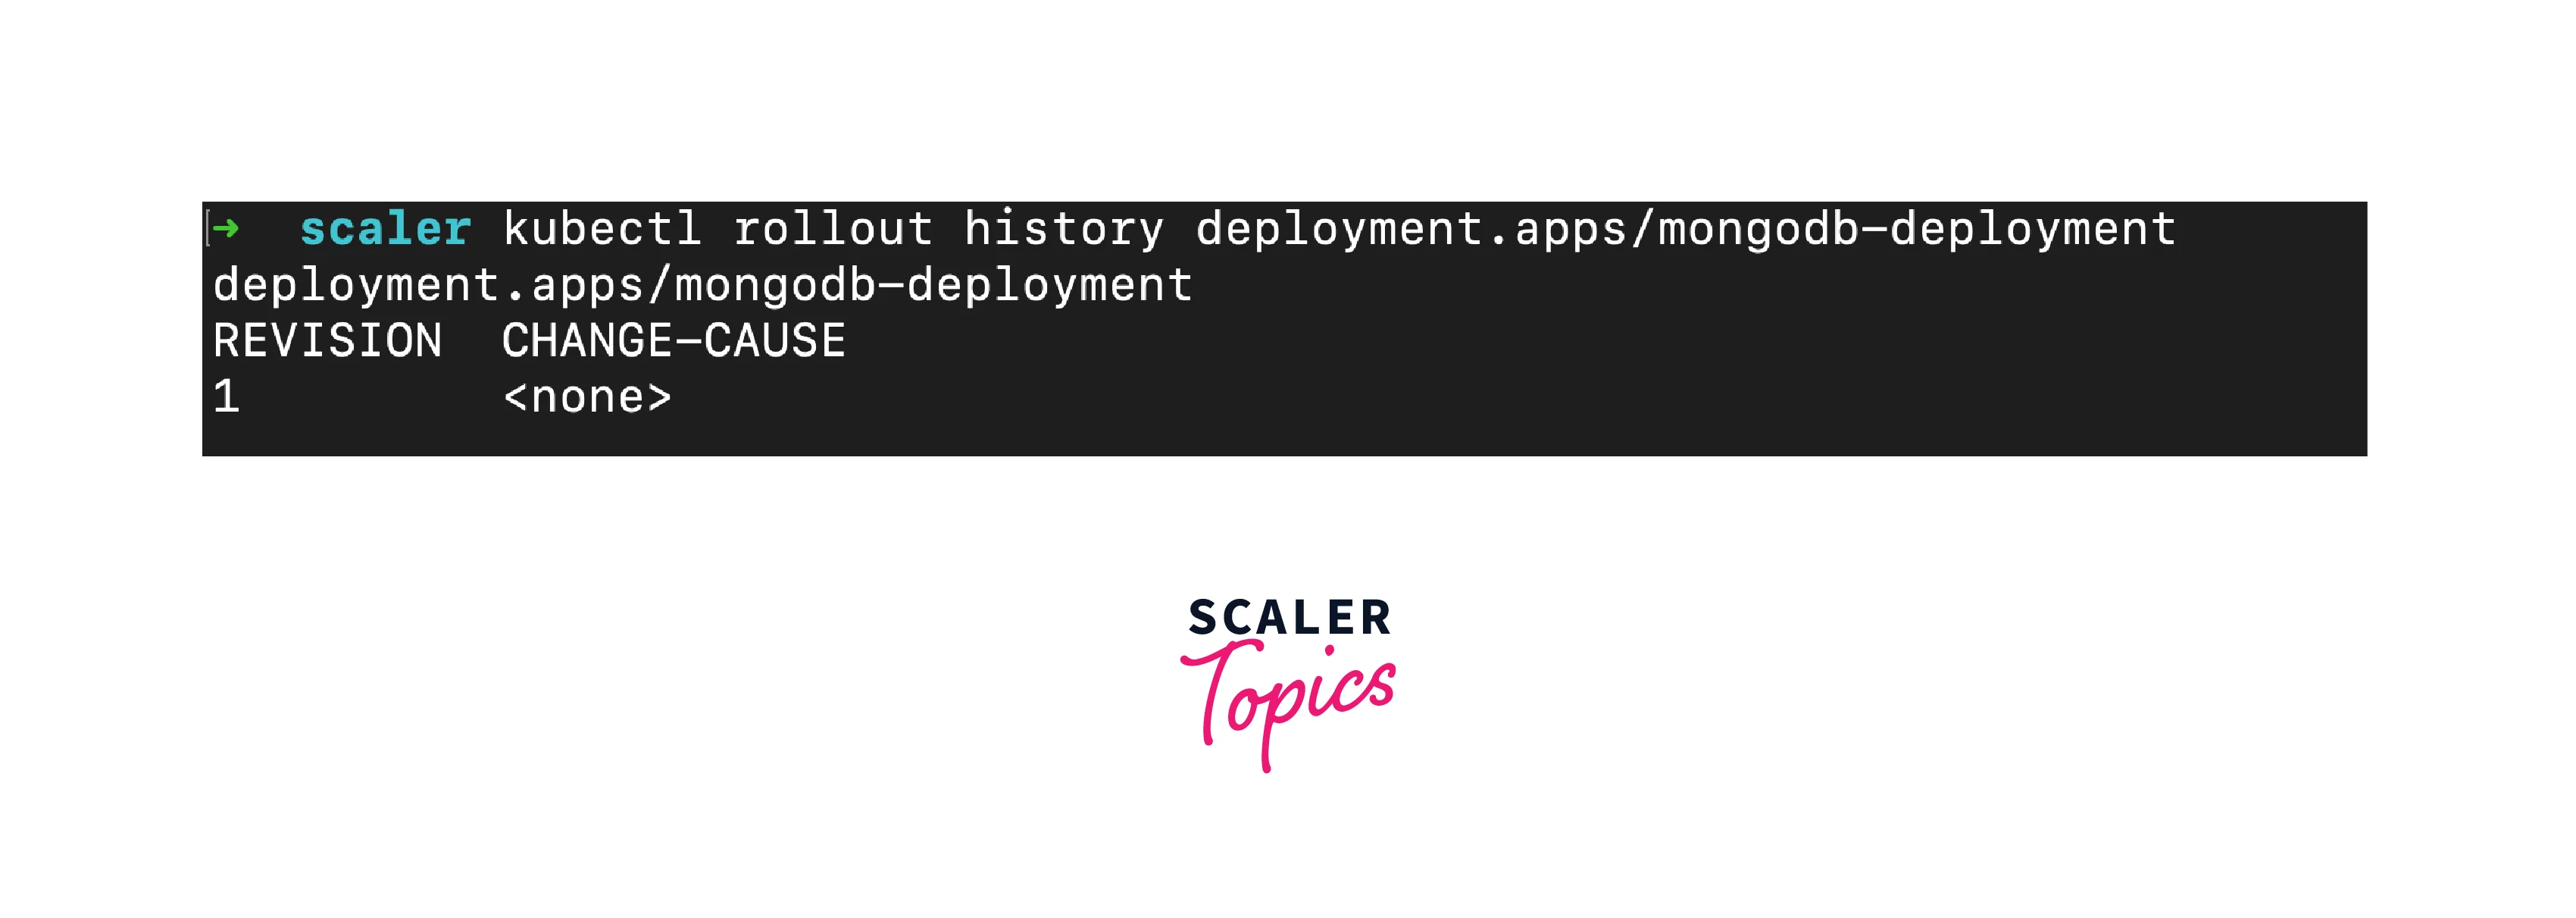
- View Revision History: Use kubectl rollout history to view revision history:
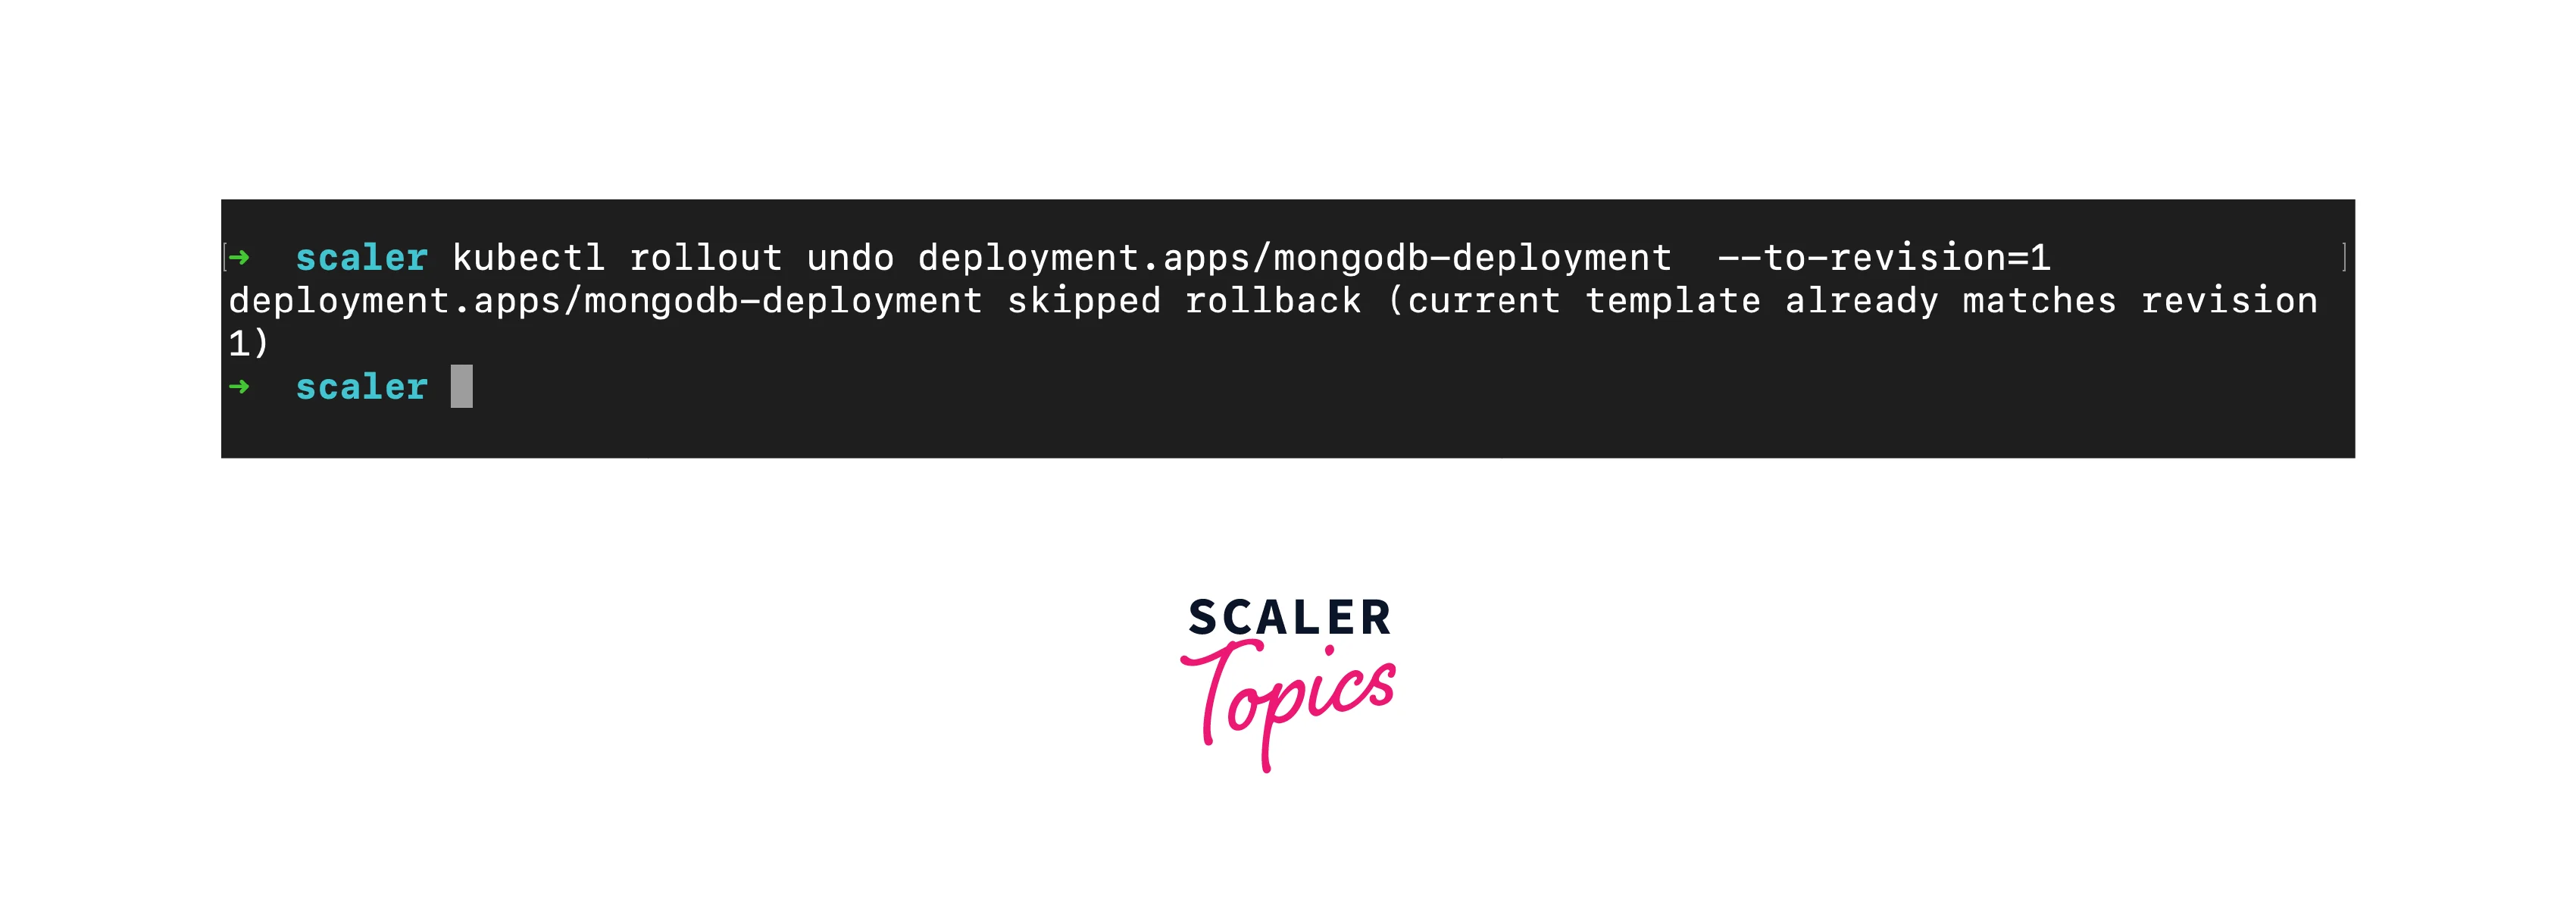
- Rollback to Previous Revision: Rollback to a specific revision using kubectl rollout undo:
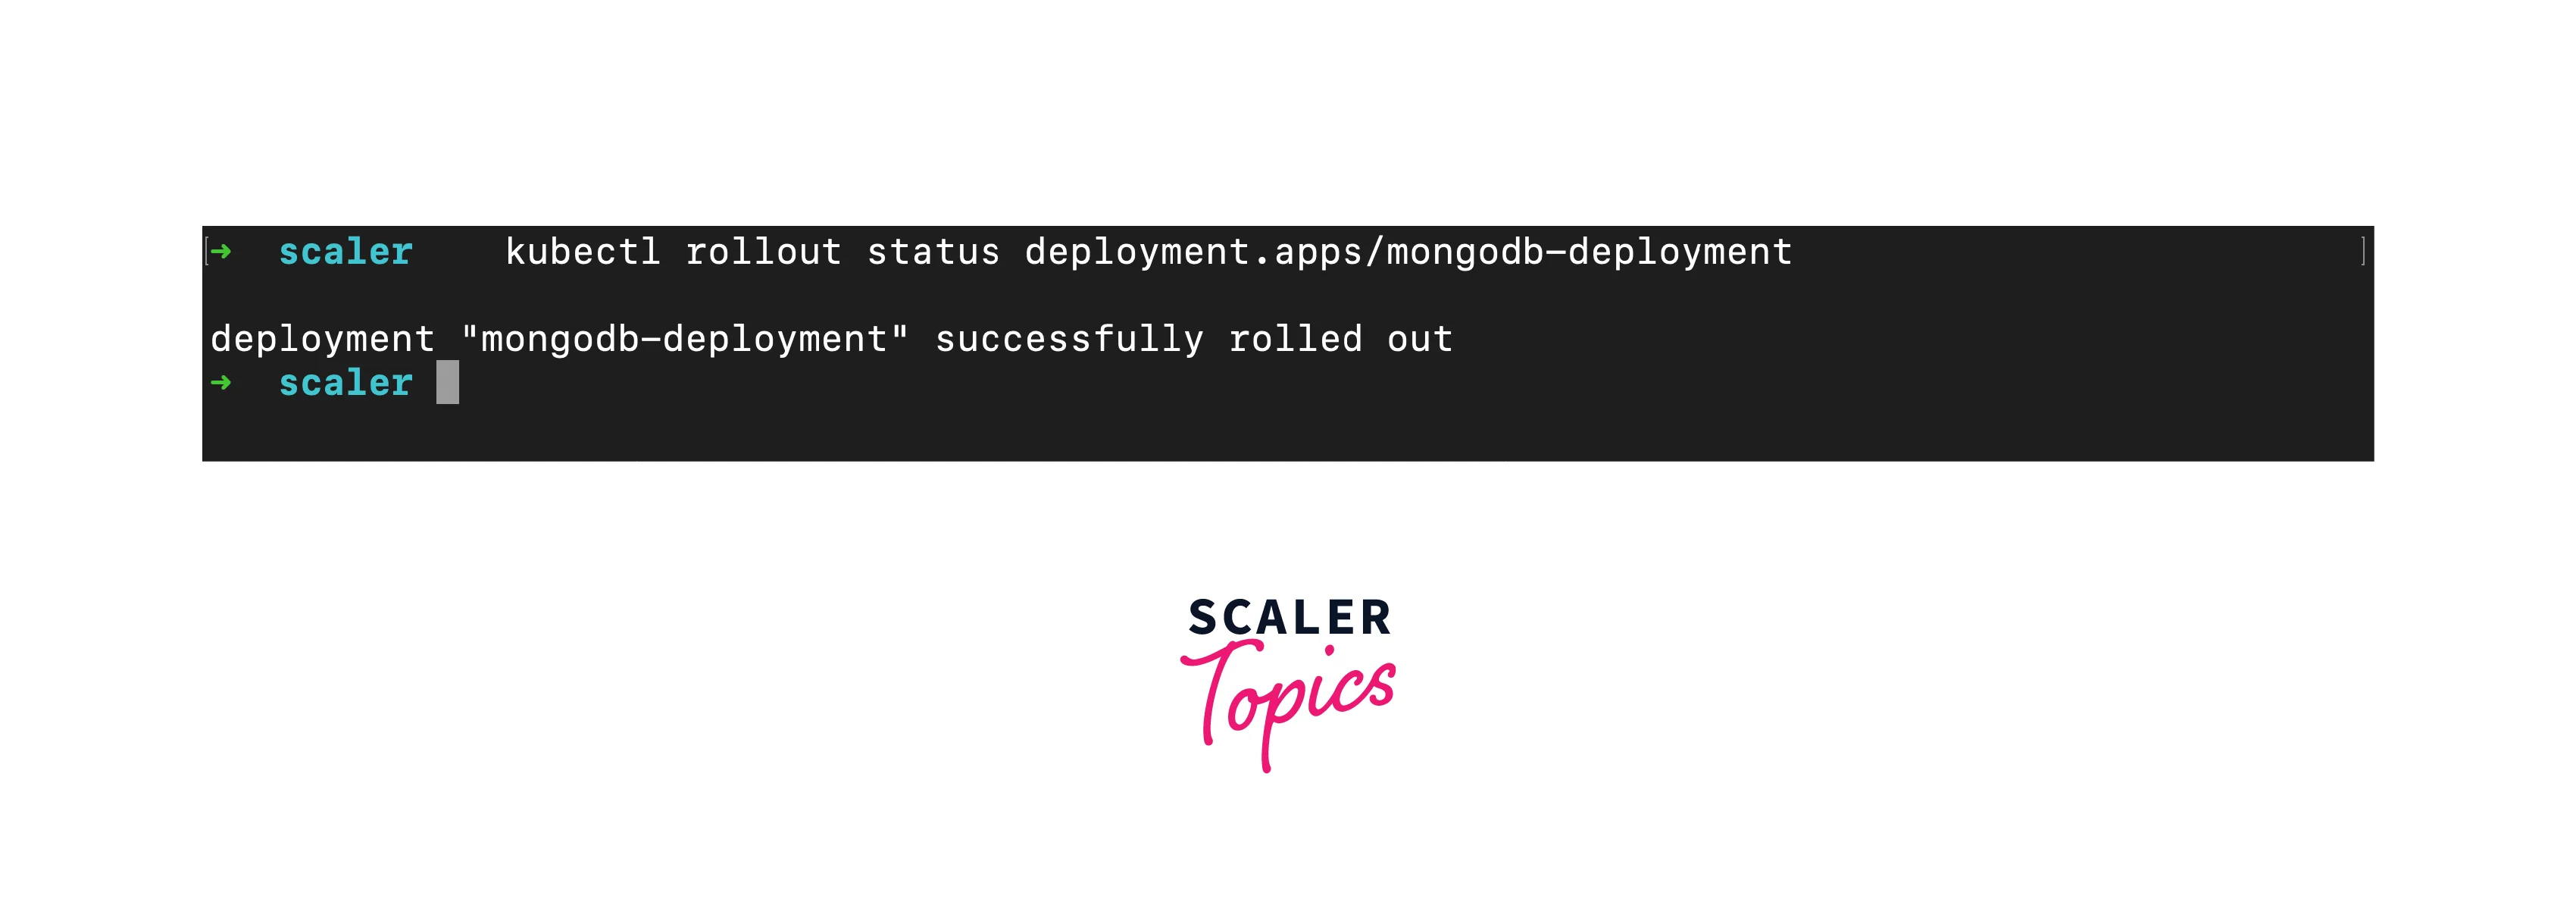
- Monitor Rollback: Monitor the rollback progress with kubectl rollout status:
Scaling Applications in Kubernetes
The ability to scale applications dynamically is a cornerstone of Kubernetes' power. Scaling allows your applications to handle increased demand while maintaining optimal performance and availability. In this guide, we'll explore the methods and strategies for scaling applications effectively within a Kubernetes cluster.
Horizontal Pod Autoscaling (HPA):
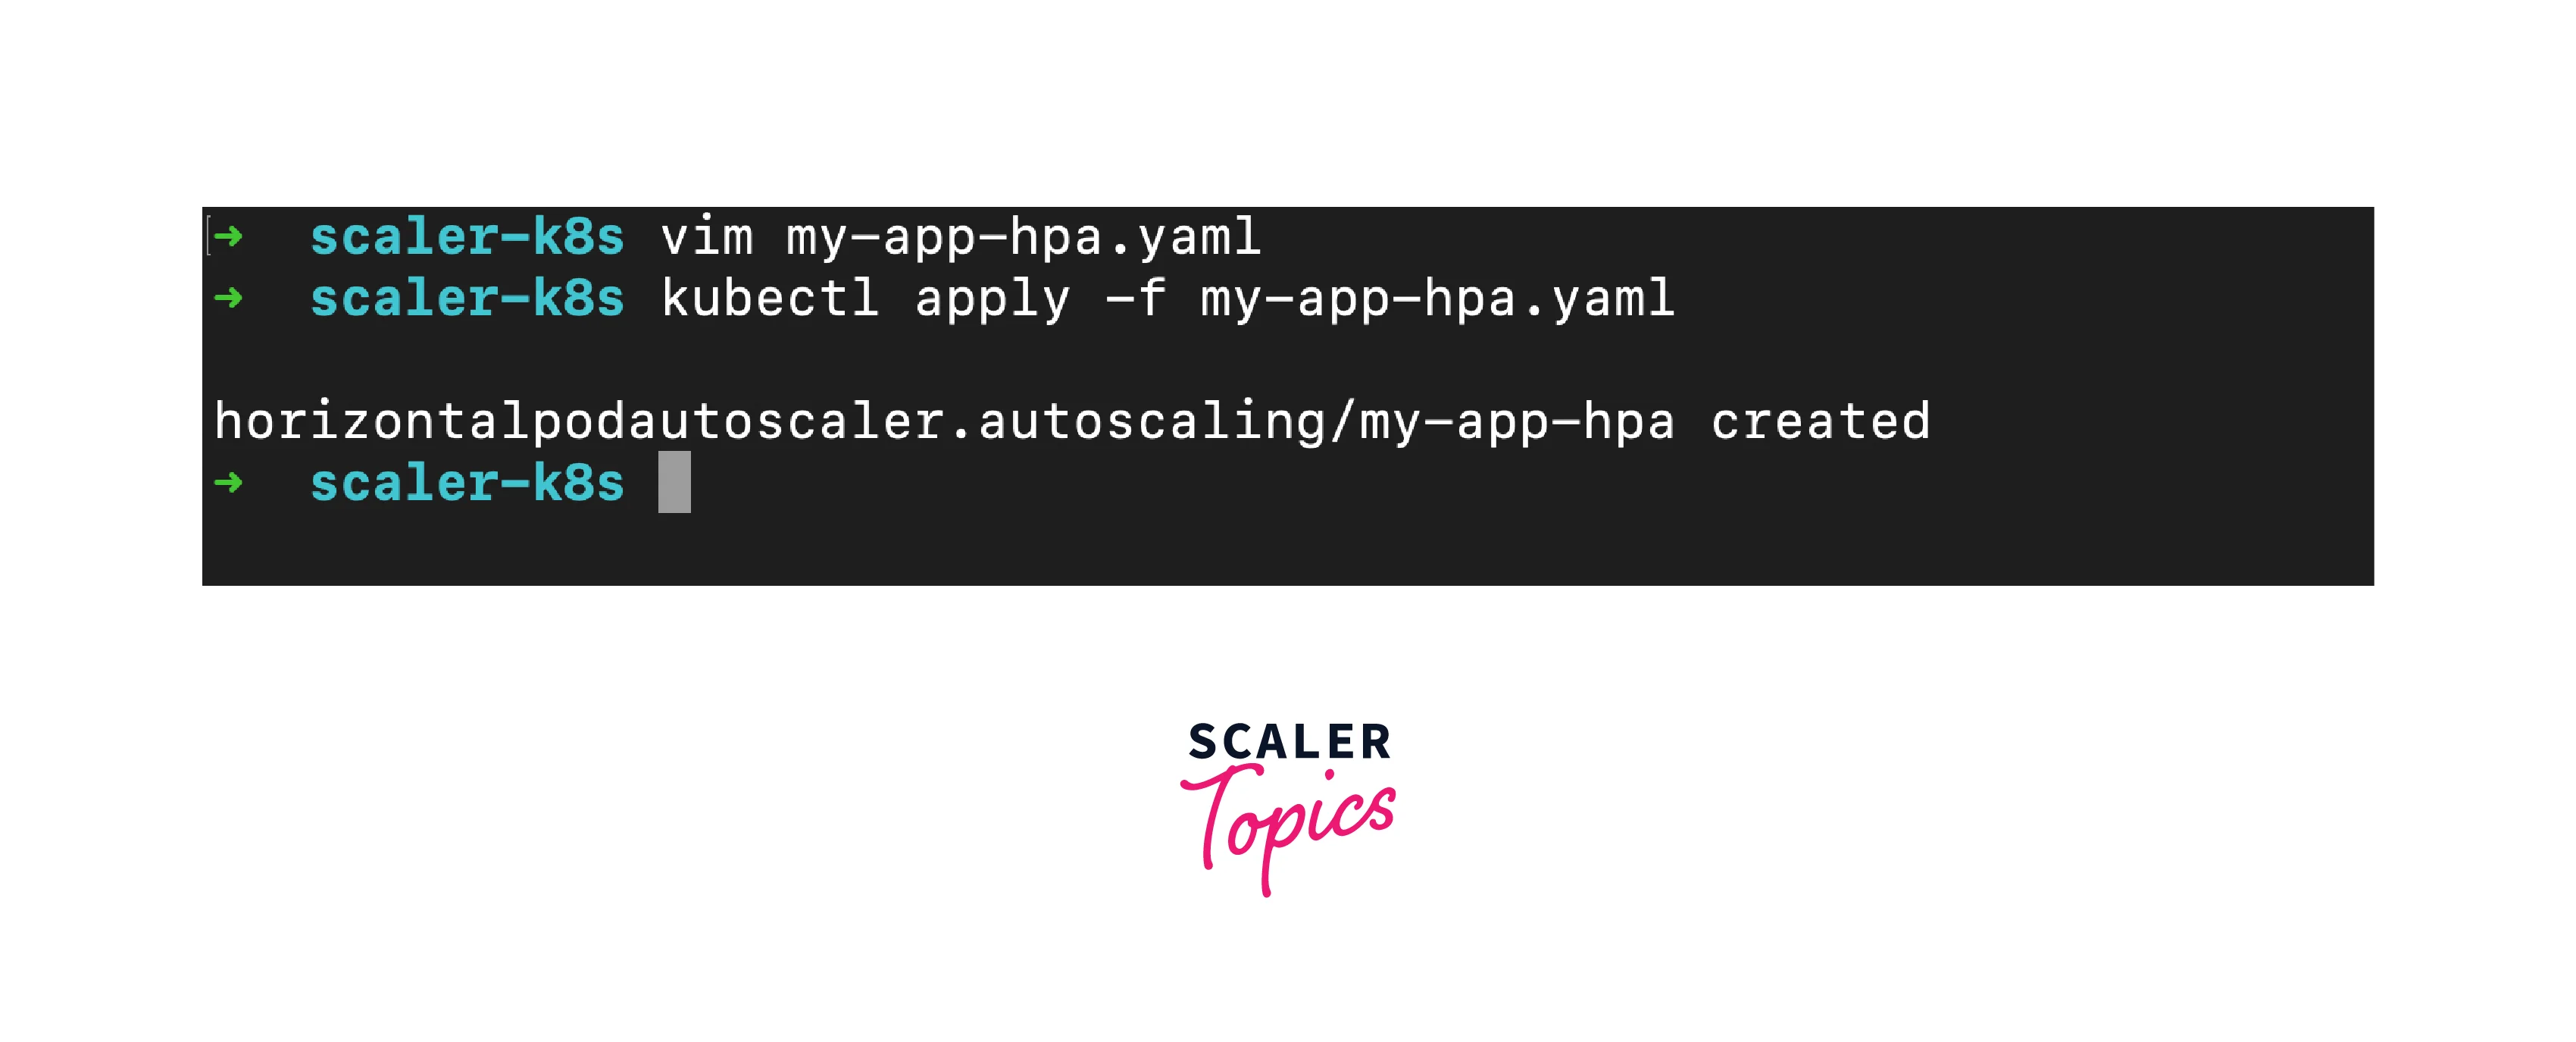
Horizontal Pod Autoscaling (HPA) is a Kubernetes feature that automatically adjusts the number of pod replicas based on observed CPU utilization or custom metrics. HPA ensures your application scales out when traffic increases and scales in during quieter periods, optimizing resource usage. Here's how to set up HPA for a deployment:
- Enable Metrics Server: Ensure the Kubernetes Metrics Server is installed and running in your cluster.
- Create HPA Definition: Define an HPA manifest, specifying the target deployment and desired metrics:
In this example, HPA maintains CPU utilization at 50% by adjusting replicas between 2 and 10.
- Apply HPA: Use kubectl apply to create the HPA:
Manual Scaling:
While HPA automates scaling, you can also manually scale pods using the kubectl scale command:
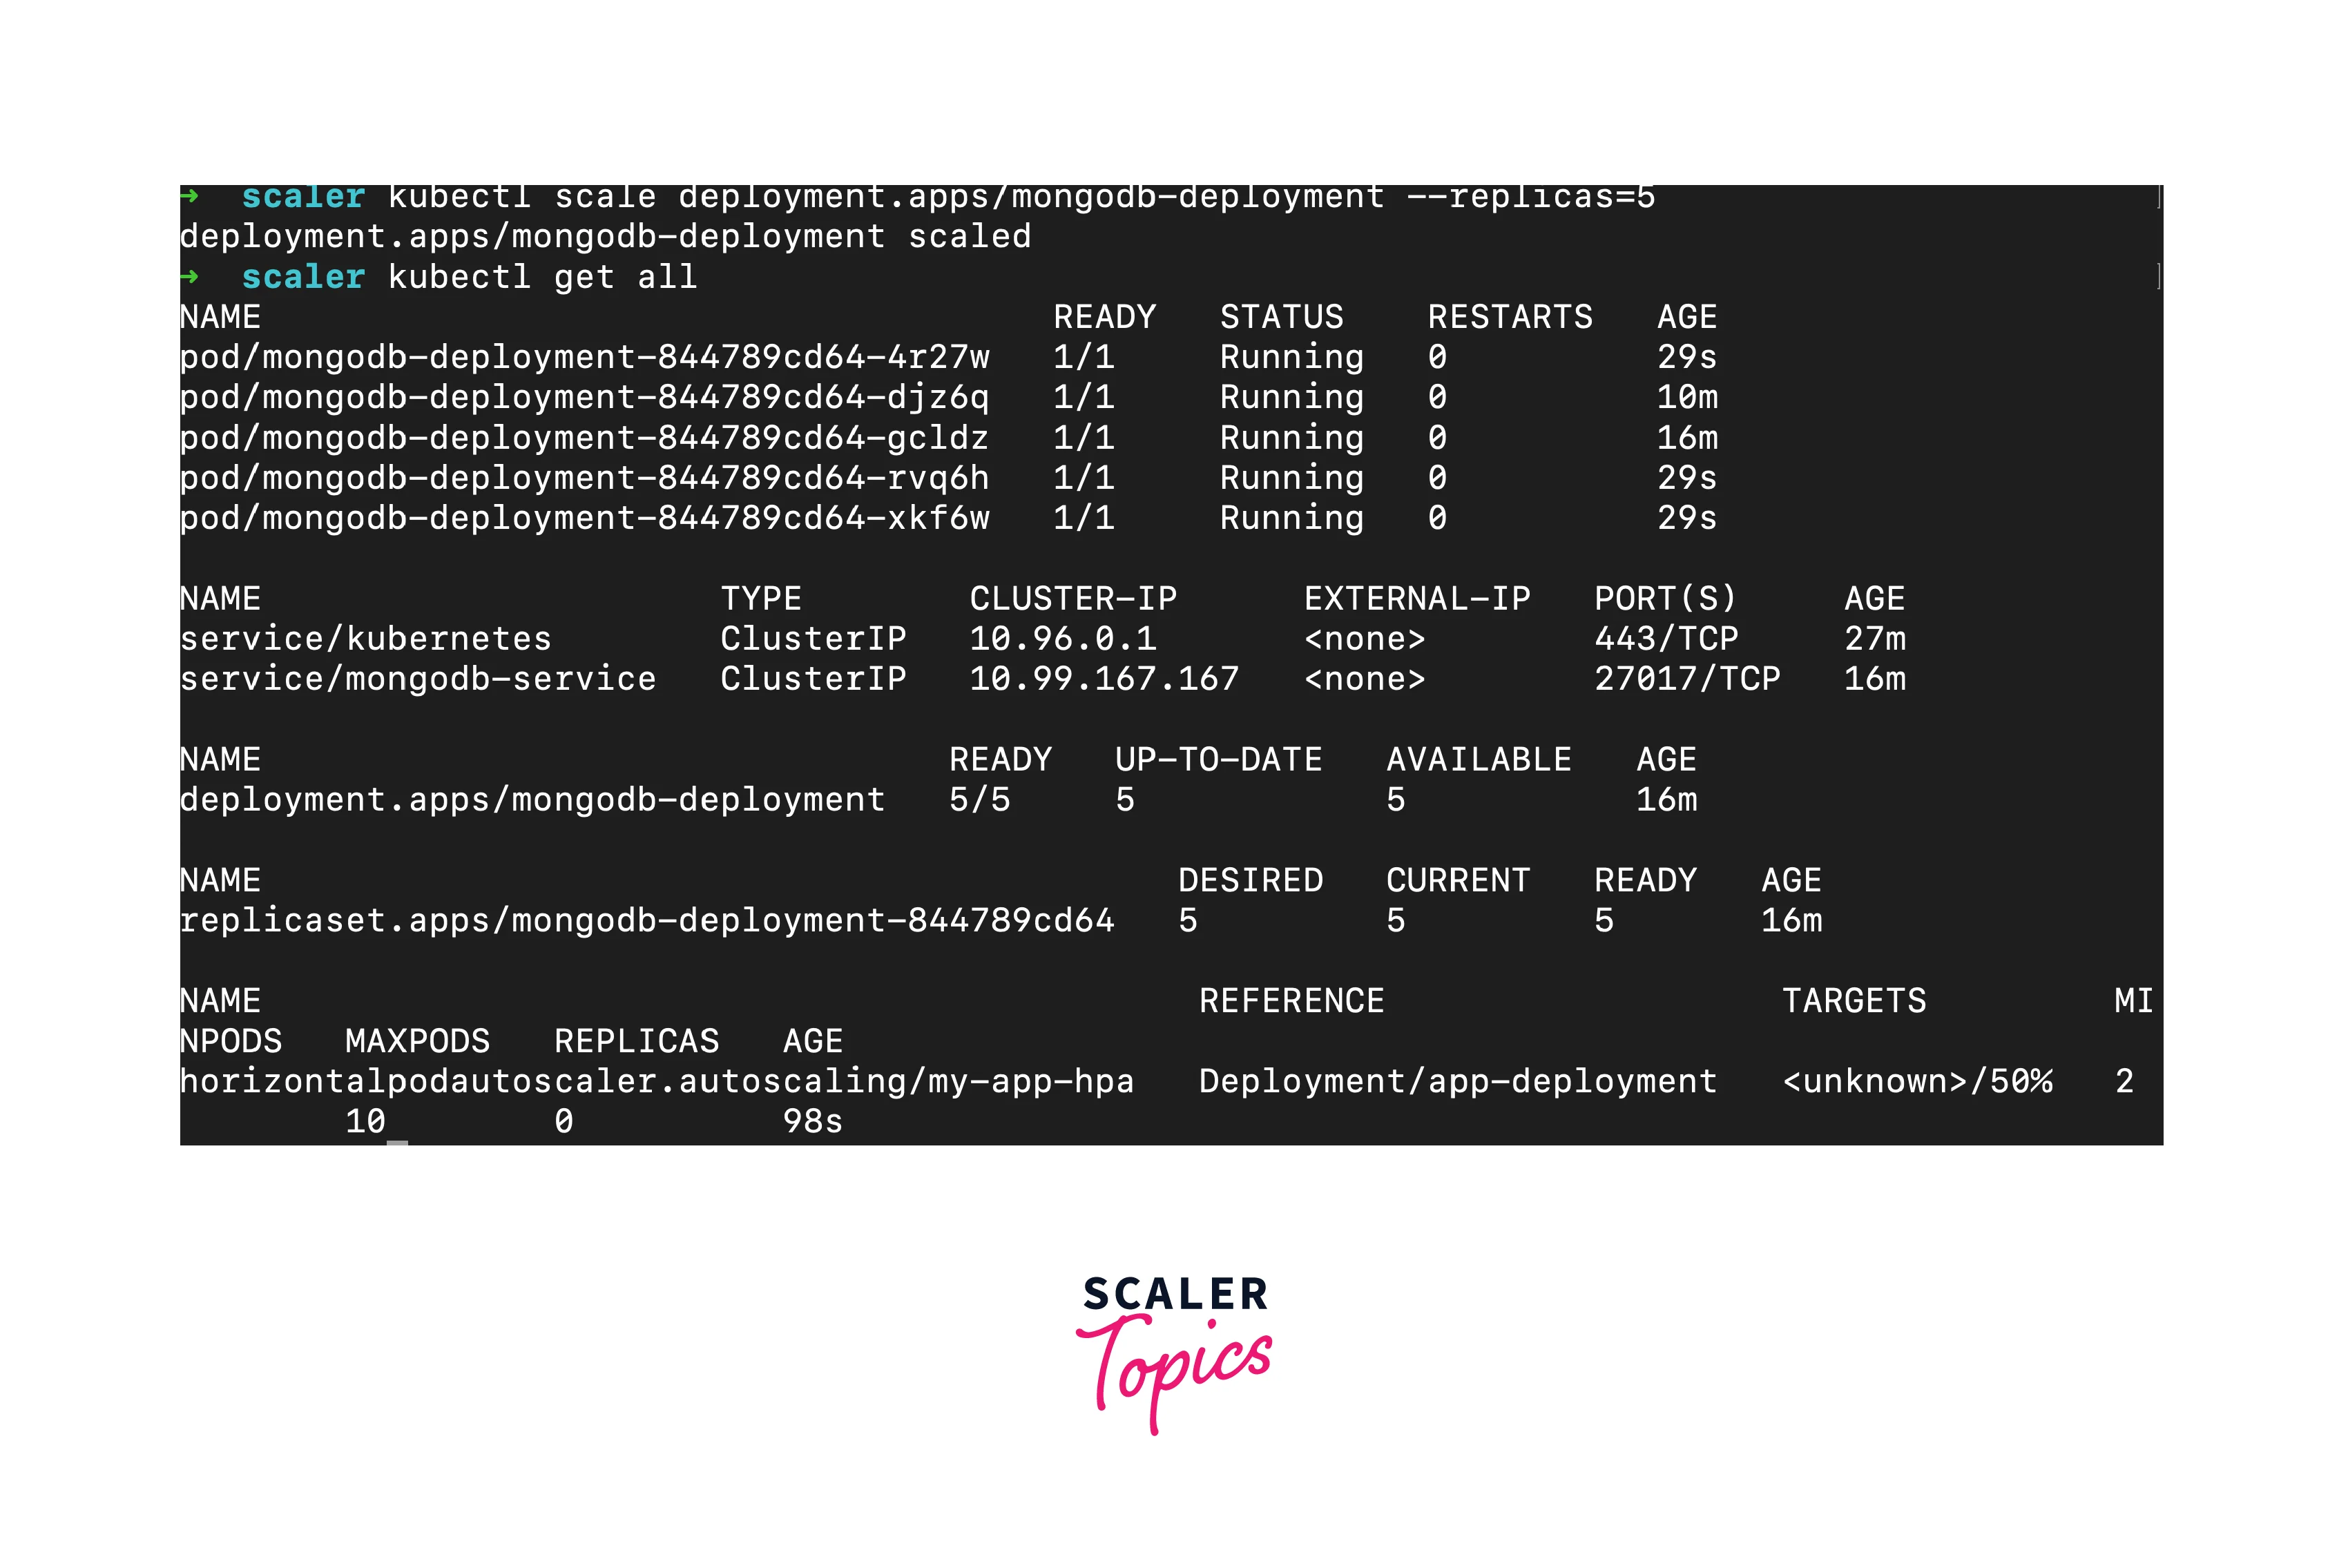
This command scales the deployment to have 5 replicas.
Application Security in Kubernetes
Securing applications in Kubernetes is paramount as it ensures your containerized workloads are protected from potential vulnerabilities and attacks. In this guide, we'll delve into key strategies and best practices for enhancing the security of your applications within a Kubernetes environment.
Container Image Security
1. Image Scanning:
Utilize image scanning tools to detect vulnerabilities and security issues within your container images before deployment.
2. Image Provenance:
Ensure images are sourced from trusted registries, avoiding unverified or untrusted images.
3. Regular Updates:
Keep container images up-to-date by frequently patching known vulnerabilities and using the latest base images.
Pod Security
1. Least Privilege:
Configure container runtime security settings to ensure pods have only the necessary permissions.
2. Pod Security Policies:
Implement Pod Security Policies to enforce security constraints, such as preventing privilege escalation.
Network Security
1. Network Policies:
Define Network Policies to control network traffic between pods, ensuring only necessary communication is permitted. 2. Service Mesh:
Consider using a service mesh like Istio to enhance network security with features like traffic encryption and access control. 3. Secrets Management:
- Secrets Usage:
Avoid hardcoding sensitive information. Store credentials, keys, and tokens in Kubernetes Secrets.
- Secret Encryption:
Enable encryption at rest for secrets stored in etcd, Kubernetes' key-value store.
Role-Based Access Control (RBAC)
1. Fine-Grained Access:
Implement RBAC to grant permissions based on roles and responsibilities, minimizing the attack surface. 2. Principle of Least Privilege:
Ensure users and service accounts have only the permissions necessary for their tasks.
Conclusion
- In conclusion, deploying an application on Kubernetes is a strategic process that entails careful consideration and effective execution.
- By assessing application compatibility with Kubernetes, evaluating architecture alignment, and addressing statefulness concerns, you establish a foundation for successful deployment.
- Containerization through Docker offers enhanced manageability and consistency, facilitated by crafting a well-defined Dockerfile.
- Creating a local Kubernetes cluster using Minikube allows for experimentation and development, while the creation of manifests for pods and services shapes the deployment blueprint.
- Utilizing pods and services as pivotal components ensures robust communication and encapsulation. By separating application configuration from code and harnessing ConfigMaps, you achieve a dynamic and adaptable setup.
- Rolling updates provide a seamless transition during deployment, with the safety net of easy rollbacks to previous versions.
- The implementation of Horizontal Pod Autoscaling (HPA) automates resource adjustments, while manual scaling offers precise control over resource allocation.
- Security stands as a paramount concern, highlighted by prioritizing container image security through thorough scanning and updates.
- Embracing the principle of least privilege enhances pod security, complemented by Network Policies that manage network traffic and Secrets for safeguarding sensitive data.
- Role-Based Access Control (RBAC) guarantees controlled access, fostering a secure and controlled environment.
In essence, the deployment of applications on Kubernetes demands a strategic blend of technical expertise and best practices.