Kubernetes Scheduling
Overview
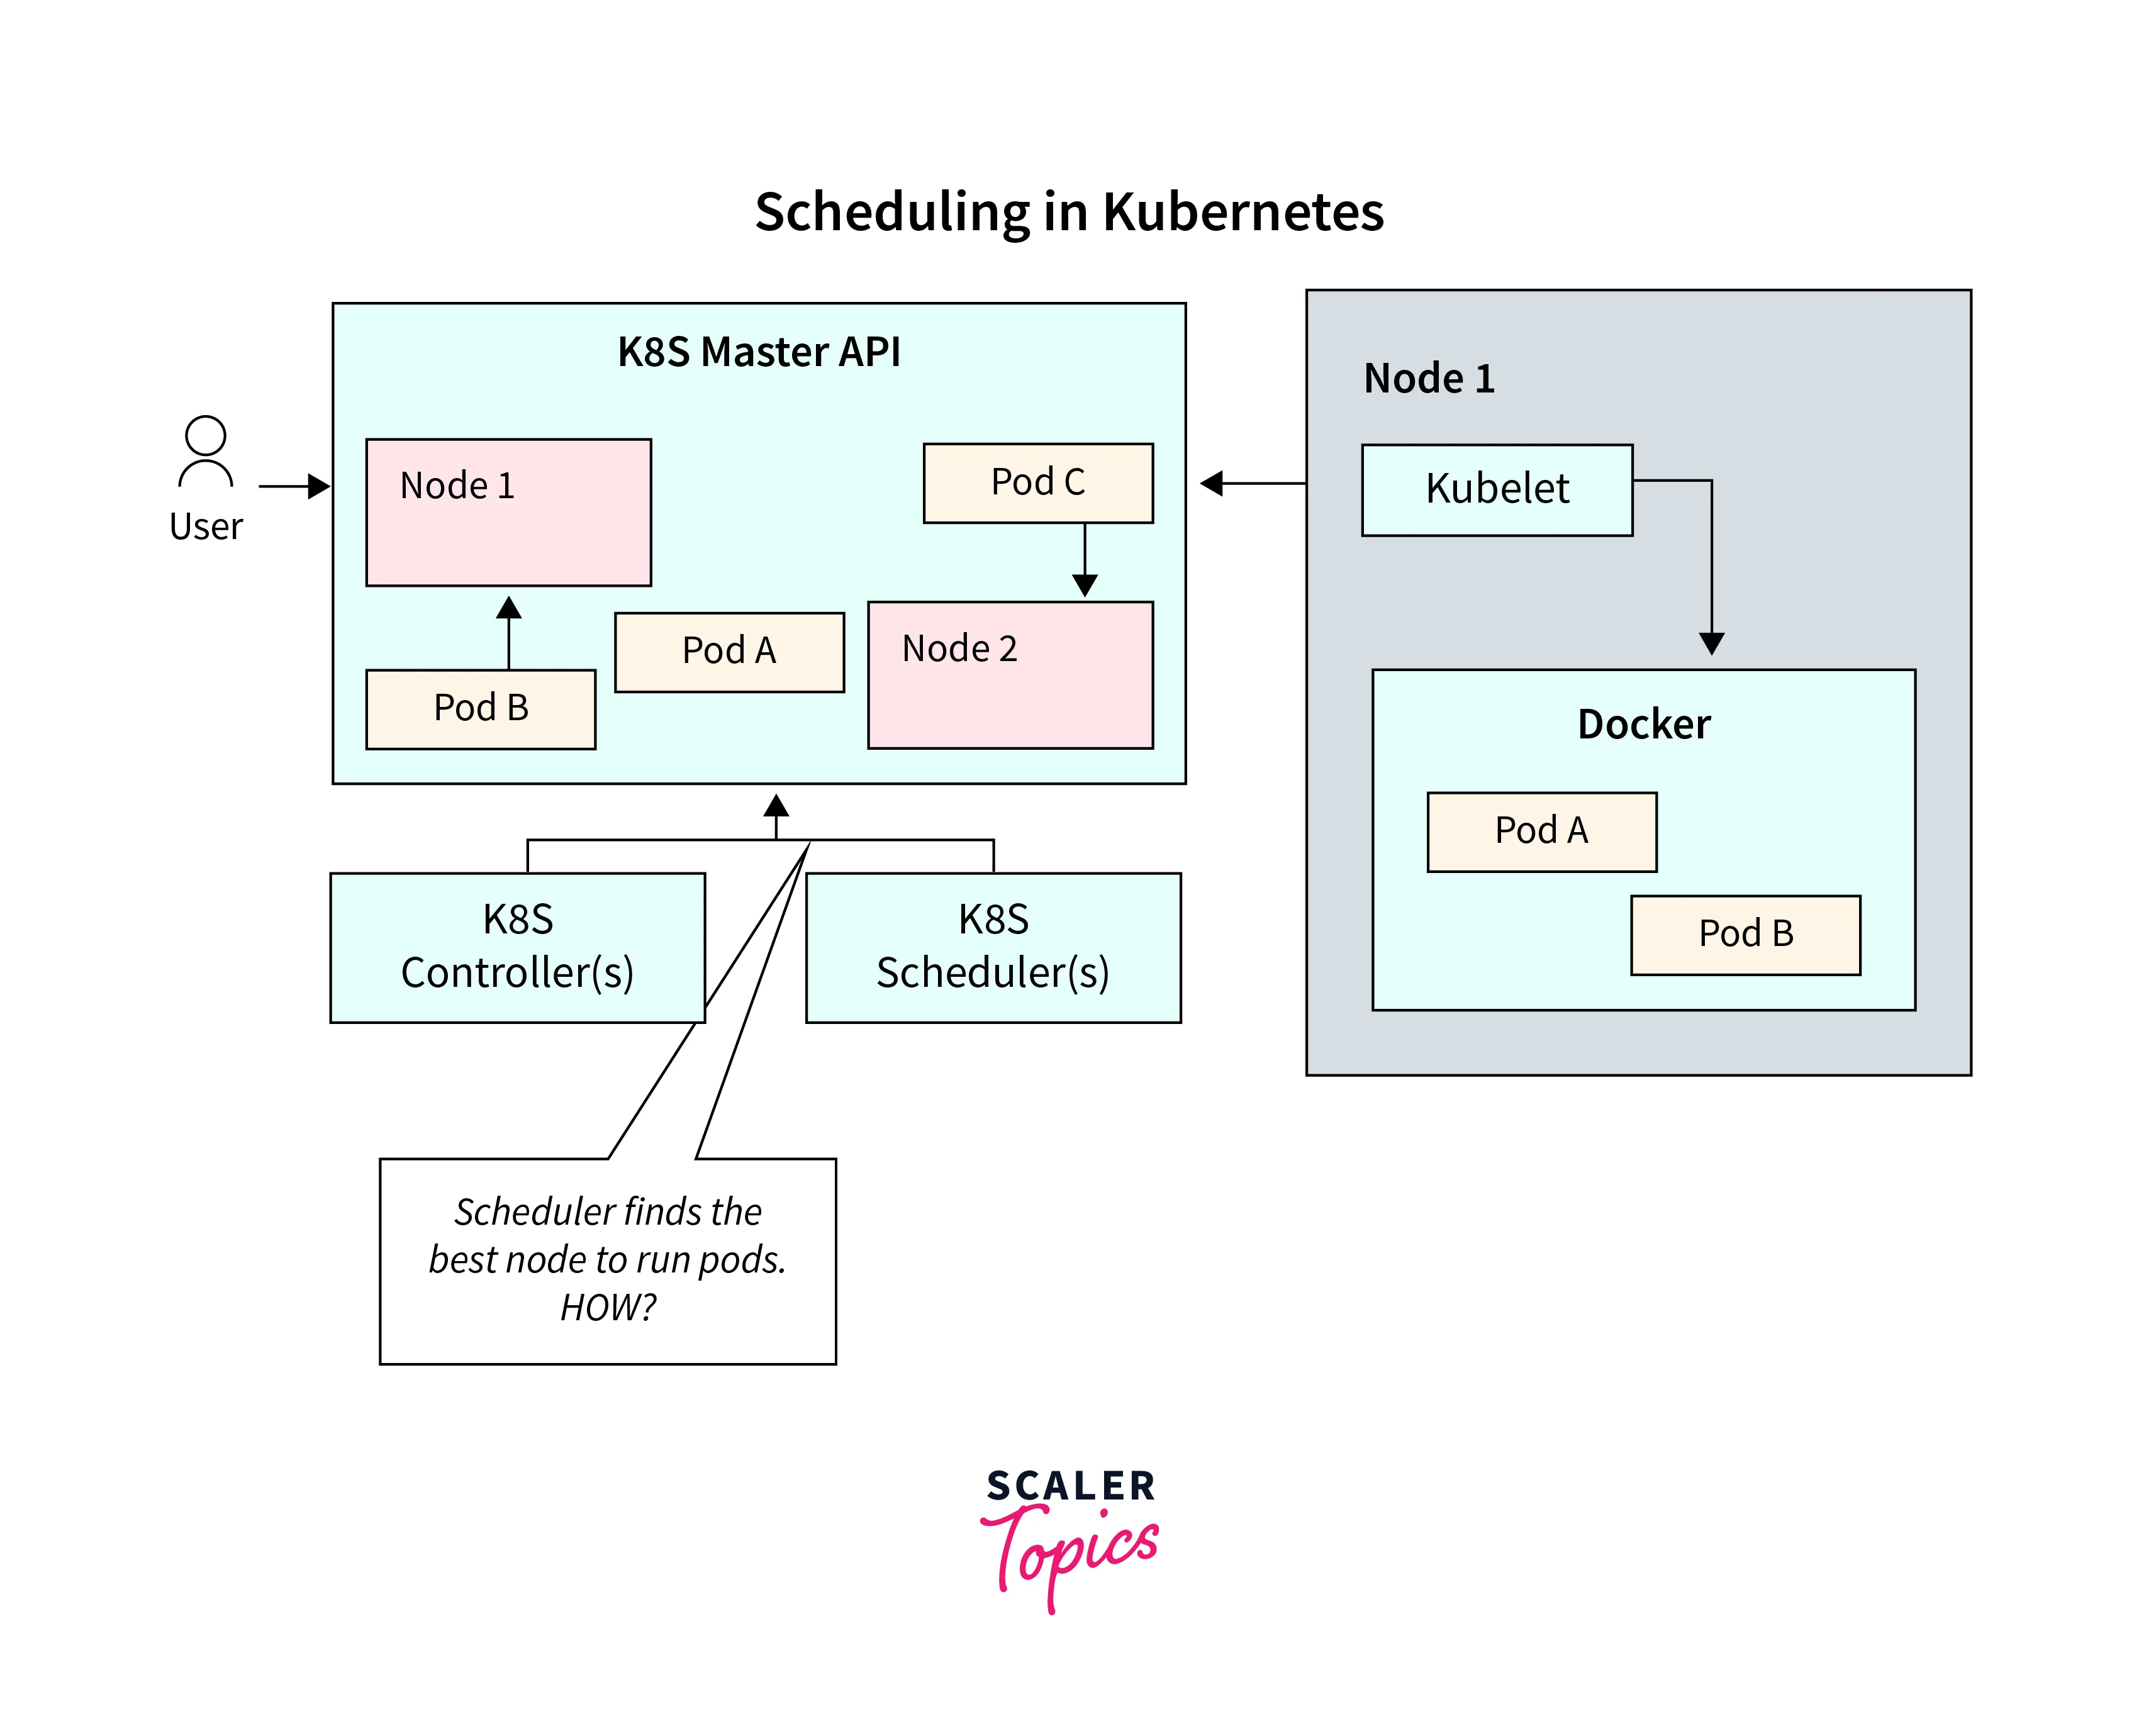
Kubernetes scheduling is a crucial aspect of managing containerized applications within a Kubernetes cluster. It involves determining which nodes (individual servers within the cluster) should run specific pods (the smallest deployable units in Kubernetes, containing one or more containers). The scheduling process ensures efficient resource utilization, high availability, load balancing, and optimal performance of applications.
Understanding Kubernetes Scheduling
Kubernetes scheduling is a sophisticated process involving factors like resource requirements, constraints, and communication needs. The scheduler's intelligent decisions lead to optimal resource utilization, high availability, and efficient application execution in a Kubernetes cluster.
Let's delve deeper into Kubernetes scheduling by exploring its components, processes, and considerations:-
Components of Kubernetes Scheduling
-
Scheduler:
The scheduler is a control plane component responsible for making decisions about pod placement. Its primary function is to match available resources on nodes with the requirements specified in pod definitions and assign pods to appropriate nodes.
-
Nodes:
Nodes are the worker machines within a Kubernetes cluster where containers are executed. Each node has its own set of resources (CPU, memory, storage, etc.) that are available for running pods.
-
Pods:
Pods are the smallest deployable units in Kubernetes, often containing one or more containers that share the same network and storage resources. Pods are scheduled as a unit and are placed on nodes.
Scheduling Process
-
Submission of Pod to API Server:
When you create a pod definition and submit it to the Kubernetes API server, the scheduler watches for new pod creations.
-
Node Selection:
The scheduler evaluates each pod against a set of nodes to find a suitable match.
-
Scoring and Ranking:
The scheduler assigns a score to each node based on the factors above Nodes with lower scores are better fits for the pod. This score is influenced by how well the node meets the pod's requirements and preferences.
-
Filtering and Selection:
After scoring, nodes are filtered based on other criteria like resource availability and node constraints The scheduler then selects the node with the highest score as the placement for the pod.
-
Binding:
Once a node is selected, the scheduler notifies the Kubernetes API server to bind the pod to that node The API server updates the pod's status to reflect the assigned node.
Advanced Scheduling Techniques:
-
Node Selector:
Allows you to limit pod placement to nodes with specific labels.
-
Resource Requests and Limits:
Specifying resource requests and limits helps the scheduler make more informed decisions about resource allocation.
-
Custom Schedulers:
You can create custom schedulers to implement specific placement policies.
-
Affinity and Anti-Affinity:
Used to control how pods are scheduled in relation to each other.
-
Taints and Tolerations:
Useful for reserving nodes for specific types of workloads.
Rescheduling
Kubernetes monitors pods and nodes continuously. If a node fails, becomes unreachable, or is marked unsuitable for some reason, the scheduler reschedules affected pods onto healthy nodes, maintaining application availability.
Node Selection and Filtering
Node selection and filtering are essential steps in the Kubernetes scheduling process, where the scheduler evaluates the suitability of nodes for placing pods based on various criteria. These steps involve scoring nodes, ranking them, and finally choosing the most appropriate node for pod placement.
Node Selection Process
-
Scoring Nodes:
The kubernetes scheduler assigns a score to each node based on factors such as resource availability, affinity rules, taints, tolerations, QoS classes, and other considerations. The scoring mechanism varies depending on the scheduler and the specific configuration.
-
Ranking Nodes:
After scoring, the kubernetes scheduler ranks the nodes in ascending order based on their scores. Lower scores indicate better suitability for a pod. Nodes that satisfy the pod's requirements and preferences more closely receive higher ranks.
-
Filtering Nodes:
The scheduler applies additional filters to the ranked list of nodes. These filters eliminate nodes that don't meet certain criteria, narrowing down the options.
Common filtering criteria include:
-
Resource Availability:
Nodes with insufficient available resources to meet the pod's requests and limits are filtered out.
-
Node Constraints:
Nodes that violate certain constraints (e.g., node affinity, anti-affinity, taints, tolerations) specified in the pod's definition are filtered out.
-
Node Conditions:
Nodes with certain adverse conditions, like network connectivity issues or disk failures, might be filtered out.
-
Pod Interference:
If scheduling a pod on a node would violate pod affinity or anti-affinity rules with existing pods on that node, it might be filtered out.
-
Node Selector:
If a pod specifies node selector rules, nodes that don't match those rules will be filtered out.
Node Filtering and Selection Example:
Let's consider an example scenario to illustrate the node filtering and selection process:
i. Pod Definition:
You have a pod definition that specifies the following:
- Resource Requests: 2 CPU units, 4 GB of memory
- Node Affinity: Should be placed on nodes with the label "app=backend."
- Tolerations: Tolerate nodes with the taint "critical=true."
- Anti-Affinity: Avoid being placed on nodes with pods that have the label "env=production."
- Node Selector: Require nodes with the label "zone=us-east."
ii. Node Scoring and Ranking:
The scheduler scores and ranks nodes based on the criteria mentioned above. Nodes with available resources, matching affinity, and tolerating the taint will receive higher scores.
iii. Node Filtering:
The scheduler applies filters based on constraints and conditions.
- Nodes without the "app=backend" label are filtered out.
- Nodes with the "critical=true" taint and no corresponding toleration are filtered out.
- Nodes with existing "env=production" pods (the anti-affinity rule) are filtered out.
- Nodes without the "zone=us-east" label are filtered out.
iv. Node Selection:
After scoring, ranking, and filtering, the scheduler selects the node with the highest score that remains in the list. This node is deemed the most suitable for placing the pod.
Node Affinity and Anti-Affinity
Node affinity and anti-affinity are Kubernetes concepts that allow you to influence the scheduling of pods based on the presence or absence of certain labels on nodes. These features help you control where pods are placed within a cluster, enabling you to optimize resource allocation, ensure high availability, and separate or co-locate related workloads.
Node Affinity:
Node affinity allows you to express preferences for scheduling pods on nodes that match certain labels. It encourages pods to be placed on nodes that have specific characteristics or resources. Node affinity can be "soft" or hard."
-
Soft Node Affinity:
With soft affinity, you express a preference for pods to be scheduled on nodes with specific labels, but the scheduler can still place pods on nodes that don't meet the affinity rules if necessary. Soft affinity is useful when you want to encourage but not enforce a specific placement.
-
Hard Node Affinity:
Hard affinity enforces that pods are only scheduled on nodes that meet the specified affinity rules. If no suitable nodes are available, the pod will remain unscheduled until a compatible node becomes available. Hard affinity ensures strict placement based on labels.
Node Anti-Affinity:
Node anti-affinity, on the other hand, is used to prevent pods from being scheduled on nodes with specific labels. It's particularly useful when you want to separate certain workloads or ensure that critical services are distributed across different physical or virtual machines for improved fault tolerance and availability.
Inter-Pod Affinity and Anti-Affinity
Inter-Pod Affinity:
Inter-pod affinity ensures that pods are scheduled on the same node or nodes with specific characteristics. It encourages pods to be colocated to improve performance or reduce network latency between related services. Inter-pod affinity can be "soft" or hard."
-
Soft Inter-Pod Affinity:
With soft affinity, you express a preference for colocating pods on the same node or nodes that meet the affinity rules. However, the scheduler can still place pods on separate nodes if necessary.
-
Hard Inter-Pod Affinity:
Hard affinity enforces that pods must be colocated on the same node or nodes that meet the affinity rules. If suitable nodes aren't available, the pods will remain unscheduled until a compatible node becomes available.
Inter-Pod Anti-Affinity:
Inter-pod anti-affinity, on the other hand, is used to prevent pods from being colocated on the same node or nodes with specific labels. This separation can improve availability and fault tolerance by ensuring that related services are distributed across different nodes.
Taints and Tolerations
Taints and tolerations are Kubernetes concepts that provide a way to influence the scheduling of pods onto nodes by marking nodes with taints and allowing pods to tolerate those taints. This mechanism helps you control which pods can be placed on which nodes based on certain attributes, ensuring better isolation and resource allocation within the cluster.
Taints:
A taint is a label applied to a node to indicate a certain characteristic or condition that might affect pod scheduling. Taints are used to repel pods from nodes unless the pods specifically tolerate the taints. Taints have three components:
- Key: The name of the taint, which is a descriptive label (e.g., special node).
- Value: An optional value associated with the key (e.g., gpu).
- Effect: Specifies the effect the taint has on pods.
- NoSchedule: Pods without tolerations are not scheduled on nodes with this taint.
- PreferNoSchedule: The scheduler will try to avoid scheduling pods without tolerating nodes with this taint, but it's not a strict rule.
- NoExecute: Similar to NoSchedule, but existing pods on nodes without tolerations will be evicted.
Tolerations:
A toleration is defined in the pod specification to indicate that the pod can be scheduled onto nodes with specific taints. By adding tolerations, you allow pods to "tolerate" certain taints and be scheduled on nodes that might have otherwise been avoided.
Use Cases:
-
Resource Specialization:
Taints and tolerations are useful for ensuring that pods requiring specific resources (like GPUs) are scheduled on appropriate nodes.
-
Node Isolation:
You can use taints to segregate nodes for different types of workloads, enhancing security and performance isolation.
-
Node Maintenance:
When a node requires maintenance, applying a taint with the NoSchedule effect ensures that new pods are not scheduled on that node until the maintenance is complete.
-
Soft Constraints:
Tolerations can also be used to express soft preferences for certain nodes, allowing pods to be scheduled elsewhere if necessary.
DaemonSet and NodeSelector
DaemonSet
A DaemonSet is a type of workload controller in Kubernetes that ensures a copy of a specified pod runs on every node within a cluster. It's commonly used for system-level or infrastructure-related tasks that need to be present on all nodes, such as log collectors, monitoring agents, and network proxies. DaemonSets ensures that a specific pod instance is running on every node, regardless of the number of nodes in the cluster.
Let's explore an example of a DaemonSet that utilizes a node selector in Kubernetes YAML.
Imagine you have a specific type of node in your Kubernetes cluster, labeled with disk=ssd indicating that these nodes have SSD storage. You want to deploy a DaemonSet that runs a storage-intensive application only on nodes with SSD storage. Here's how you could define the DaemonSet with a node selector:
In this example, the DaemonSet named "storage-app" is configured to run only on nodes labeled with disk=ssd. The nodeSelector field specifies the node selector criteria. The DaemonSet will ensure that a pod with the label "app: storage-app" runs on each node that meets the node selector condition.
The containers section allows you to define the container(s) within the pod, including the image and any other configuration specific to your storage-intensive application
Key Features and Use Cases:
-
Pod Distribution:
DaemonSets distribute pods across all nodes in the cluster, ensuring that every node has an instance of the specified pod.
-
Node Addition and Removal:
When nodes are added to the cluster, the DaemonSet ensures that the specified pods are deployed to those new nodes. Similarly, when nodes are removed, the associated pods are gracefully terminated.
-
Node Maintenance:
DaemonSets play a crucial role during node maintenance. When a node is taken down for maintenance, the associated pod is rescheduled to other available nodes, maintaining the desired pod count.
-
System-Level Services:
DaemonSets are ideal for running system-level services that need to be present on every node, such as monitoring agents or network components.
NodeSelector
NodeSelector is a field in the pod specification that allows you to specify criteria for selecting nodes where a pod should be scheduled. It uses node labels to determine which nodes are eligible for pod placement. By defining a NodeSelector, you can ensure that pods are placed on nodes with specific attributes that match your requirements.
Key Concepts and Use Cases:
-
Node Labels:
Nodes are labeled with key-value pairs to represent their attributes (e.g., env=production, zone=us-east).
-
Pod Specification:
When defining a pod, you can specify a NodeSelector with label requirements. This ensures that the pod is scheduled only on nodes that match those labels.
-
Resource Allocation:
NodeSelector is commonly used to allocate resources based on node characteristics, such as memory, CPU, or specific hardware capabilities.
-
Node Affinity:
While NodeSelector enforces hard constraints on pod placement, you can also use Node Affinity rules to express more complex placement preferences.
Resource Requests and Limits
Resource Requests:
Resource requests are the minimum amount of CPU and memory that a container within a pod requires to start and run effectively. When a pod is scheduled, the Kubernetes scheduler takes these resource requests into account to find a suitable node with enough available resources to accommodate the pod.
- Pods with higher resource requests are likely to be placed on nodes with sufficient resources, preventing resource starvation.
- Resource requests are used by the scheduler to make initial scheduling decisions and ensure that pods have enough resources to start and run.
Resource Limits:
Resource limits, on the other hand, define the maximum amount of CPU and memory that a container can consume. They are used to prevent containers from using excessive resources and potentially affecting the stability of the node and other pods. Containers that exceed their resource limits may be throttled or terminated by the Kubernetes resource management mechanisms.
- Limits help ensure that no container can monopolize all available resources on a node.
- They allow you to create a more predictable and stable environment by preventing noisy neighbors from impacting other workloads.
Use cases and benefits:
-
Fair Resource Sharing:
Resource requests and limits ensure that each pod gets its fair share of resources and is not starved or overprivileged.
-
Resource Optimization:
By setting appropriate resource requests and limits, you can optimize the utilization of CPU and memory resources within your cluster.
-
Performance Guarantees:
Resource requests help ensure that pods have the necessary resources to perform well, reducing the likelihood of performance issues due to resource contention.
-
Predictable Behavior:
Resource limits prevent any single pod from consuming excessive resources, leading to more predictable and stable cluster behavior.
Custom Schedulers and External Scheduling
Custom schedulers and external scheduling in Kubernetes provide advanced control over pod placement and scheduling decisions beyond what the default scheduler offers. They allow you to tailor scheduling logic to meet specific requirements and integrate external decision-making systems into the Kubernetes ecosystem.
Custom Schedulers
A custom scheduler is a scheduling component that you develop to replace or work alongside the default Kubernetes scheduler. It gives you the flexibility to implement specialized scheduling policies and behaviors that align with your organization's needs. Custom schedulers are implemented as standalone programs or services that interact with the Kubernetes API server.
Key Concepts:
-
Pod Binding:
Custom schedulers make pod placement decisions based on various factors, similar to the default scheduler. They evaluate node resources, labels, affinities, and constraints to determine the optimal placement for each pod.
-
Kube-Scheduler Framework:
Kubernetes provides a scheduler framework that you can use to develop custom schedulers. This framework handles communication with the Kubernetes API server and other components.
-
Extensibility:
Custom schedulers can implement complex placement logic, integrate with external systems, and adapt to unique scheduling requirements.
Use Cases:
-
Advanced Placement Policies:
Custom schedulers are valuable when you need to enforce specific placement policies that the default scheduler cannot handle.
-
Multi-Cluster Scheduling:
They can be used to coordinate pod scheduling across multiple Kubernetes clusters or even across cloud providers.
-
Resource Allocation Algorithms:
If you have unique algorithms for optimizing resource utilization, a custom scheduler can implement those algorithms.
External Scheduling
External scheduling is the practice of delegating scheduling decisions to an external system or service. Instead of relying solely on Kubernetes' internal scheduling mechanisms, you integrate an external entity to decide where pods should be placed.
Key Concepts:
-
Scheduler Interface:
The external scheduler interacts with the Kubernetes API server through a well-defined interface. It observes unscheduled pods and makes scheduling decisions based on custom criteria.
-
Kube-Scheduler Configuration:
You configure the Kubernetes scheduler to delegate certain scheduling decisions to the external scheduler.
Use Cases:
- It can be used to integrate policy engines that make scheduling decisions based on complex business rules or regulatory requirements.
- It is suitable when you want to maintain specialized scheduling logic outside of the Kubernetes cluster.
Best Practices for Kubernetes Scheduling
Here are some best practices for Kubernetes scheduling to help you optimize resource utilization, enhance application performance, and ensure efficient management of your containerized workloads:
a. Resource Requests and Limits:
Set appropriate resource requests and limits for containers within pods to ensure fair sharing of resources and prevent resource contention.
b. DaemonSets:
Use DaemonSets for deploying system-level services or infrastructure components that need to run on every node.
c. NodeSelector:
Utilize node selectors to ensure pods are placed on nodes that meet specific label requirements.
d. Custom Schedulers and External Scheduling:
Consider developing custom schedulers or leveraging external scheduling systems when the default scheduler's capabilities are insufficient for your requirements.
e. Efficient Resource Utilization:
Strive for efficient resource utilization by monitoring and adjusting resource requests and limits based on actual application requirements.
Troubleshooting Scheduling Issues
Troubleshooting Scheduling Issues in Kubernetes:
-
Resource Requests and Limits:
Confirm reasonable resource configurations in pod specs to avoid insufficient resources.
-
Node Resource Availability:
Ensure nodes have ample CPU and memory capacity for new pods.
-
Node Selector and Affinity:
Validate node selectors and affinity rules match pod requirements.
-
Taints and Tolerations:
Check for taints on nodes and corresponding tolerations in pods.
-
Unschedulable Nodes:
Address reasons for nodes being marked "unschedulable."
-
Inspect Events:
Review pod and node events for insights into scheduling failures.
-
Resource Quotas and Limits:
Prevent quota violations that might block pod scheduling.
-
Scheduler Logs:
Analyze scheduler logs for placement decisions and errors.
-
Pod Priority and Preemption:
Ensure lower-priority pods don't hinder higher-priority scheduling.
-
Network Constraints:
Check network policies and service references that could affect scheduling.
-
Custom Schedulers:
Validate custom scheduler functionality and conflicts.
-
Namespace Quotas:
Avoid resource limit breaches within namespaces.
-
External Factors:
Consider cloud provider issues or infrastructure outages impacting scheduling.
Systematically addressing these aspects helps identify and resolve scheduling challenges in Kubernetes, promoting seamless application operation. Utilize Kubernetes tools for diagnostics and solutions
Conclusion
- Kubernetes scheduling optimizes resource utilization in container orchestration.
- Affinity, anti-affinity, and node selection strategies enhance workload deployment.
- Custom scheduling supports specific application requirements and constraints.
- Efficient scheduling improves fault tolerance and hardware efficiency.
- Vital for scalable, resilient, and high-performance application environments.