How to Use Linux Terminal in Windows
How to Use Linux Terminal in Windows?
The Linux terminal, also known as the command line interface (CLI), is a powerful tool that allows users to interact with their operating system through text-based commands. Traditionally, Linux terminals have been exclusive to Linux-based operating systems. However, with the advancement of technology and the increasing popularity of Linux, it is now possible to use a Linux terminal in Windows environment.
- Windows Subsystem for Linux (WSL):
One of the most popular methods to use the Linux terminal in Windows is by utilizing the Windows Subsystem for Linux (WSL). WSL is a compatibility layer that enables users to run a full-fledged Linux environment directly on their Windows system. With WSL, you can choose from various Linux distributions, such as Ubuntu, Debian, or Fedora, and install them as a subsystem on your Windows machine. Once installed, you can access the Linux terminal for windows by launching the chosen distribution from the Start menu. - Cygwin:
Cygwin is another option for using a Linux-like terminal in a Windows environment. It provides tools that emulate a Unix-like environment on Windows, including a terminal emulator. Cygwin allows you to run many Linux command-line utilities on your Windows system. By installing Cygwin, you gain access to a terminal that supports most of the common Linux commands, providing a similar experience to using a native Linux terminal in windows. - Git Bash:
Git Bash is a command-line interface bundled with Git for Windows. While primarily designed as a version control system, Git Bash also provides a terminal that emulates a Unix-like environment. It includes a collection of Unix tools and utilities, making it a convenient option for running Linux commands on a Windows machine. Git Bash integrates well with Windows, allowing you to navigate directories and execute Linux commands easily. - Virtual Machines:
Another way to use the Linux terminal in Windows is by setting up a virtual machine (VM). With virtualization software such as Oracle VirtualBox or VMware Workstation, you can create a virtual environment and install a Linux distribution of your choice. Once the VM is up and running, you can open a terminal window within the Linux guest operating system and interact with it as if you were using a physical Linux machine. - Online Linux Terminals:
If you need temporary access to a Linux terminal for windows 10 without installing software on your Windows system, you can use online Linux terminals. Several websites provide virtual Linux environments accessible through a web browser. These platforms allow you to run Linux commands and perform various tasks without local installations. However, remember that your activities may be limited, and the online terminal's performance might depend on your internet connection.
Enable Windows Subsystem for Linux (WSL)
The Windows Subsystem for Linux (WSL) is a compatibility layer provided by Microsoft that allows users to run a Linux environment directly on their Windows system. By enabling WSL, you can access a full-fledged Linux terminal and use Linux command-line tools and utilities without needing a separate virtual machine or dual-boot setup.
- Check System Requirements:
Before enabling WSL, ensuring that your system meets the requirements is essential. WSL is supported on Windows 10 and Windows Server 2019 or later versions. Additionally, your Windows installation should be 64-bit and have virtualization capabilities enabled in the BIOS settings. - Enable WSL Feature:
The first step is to enable the WSL feature on your Windows system. Follow these steps:- Open the Start menu, search for "Turn Windows features on or off," and click on the corresponding result.
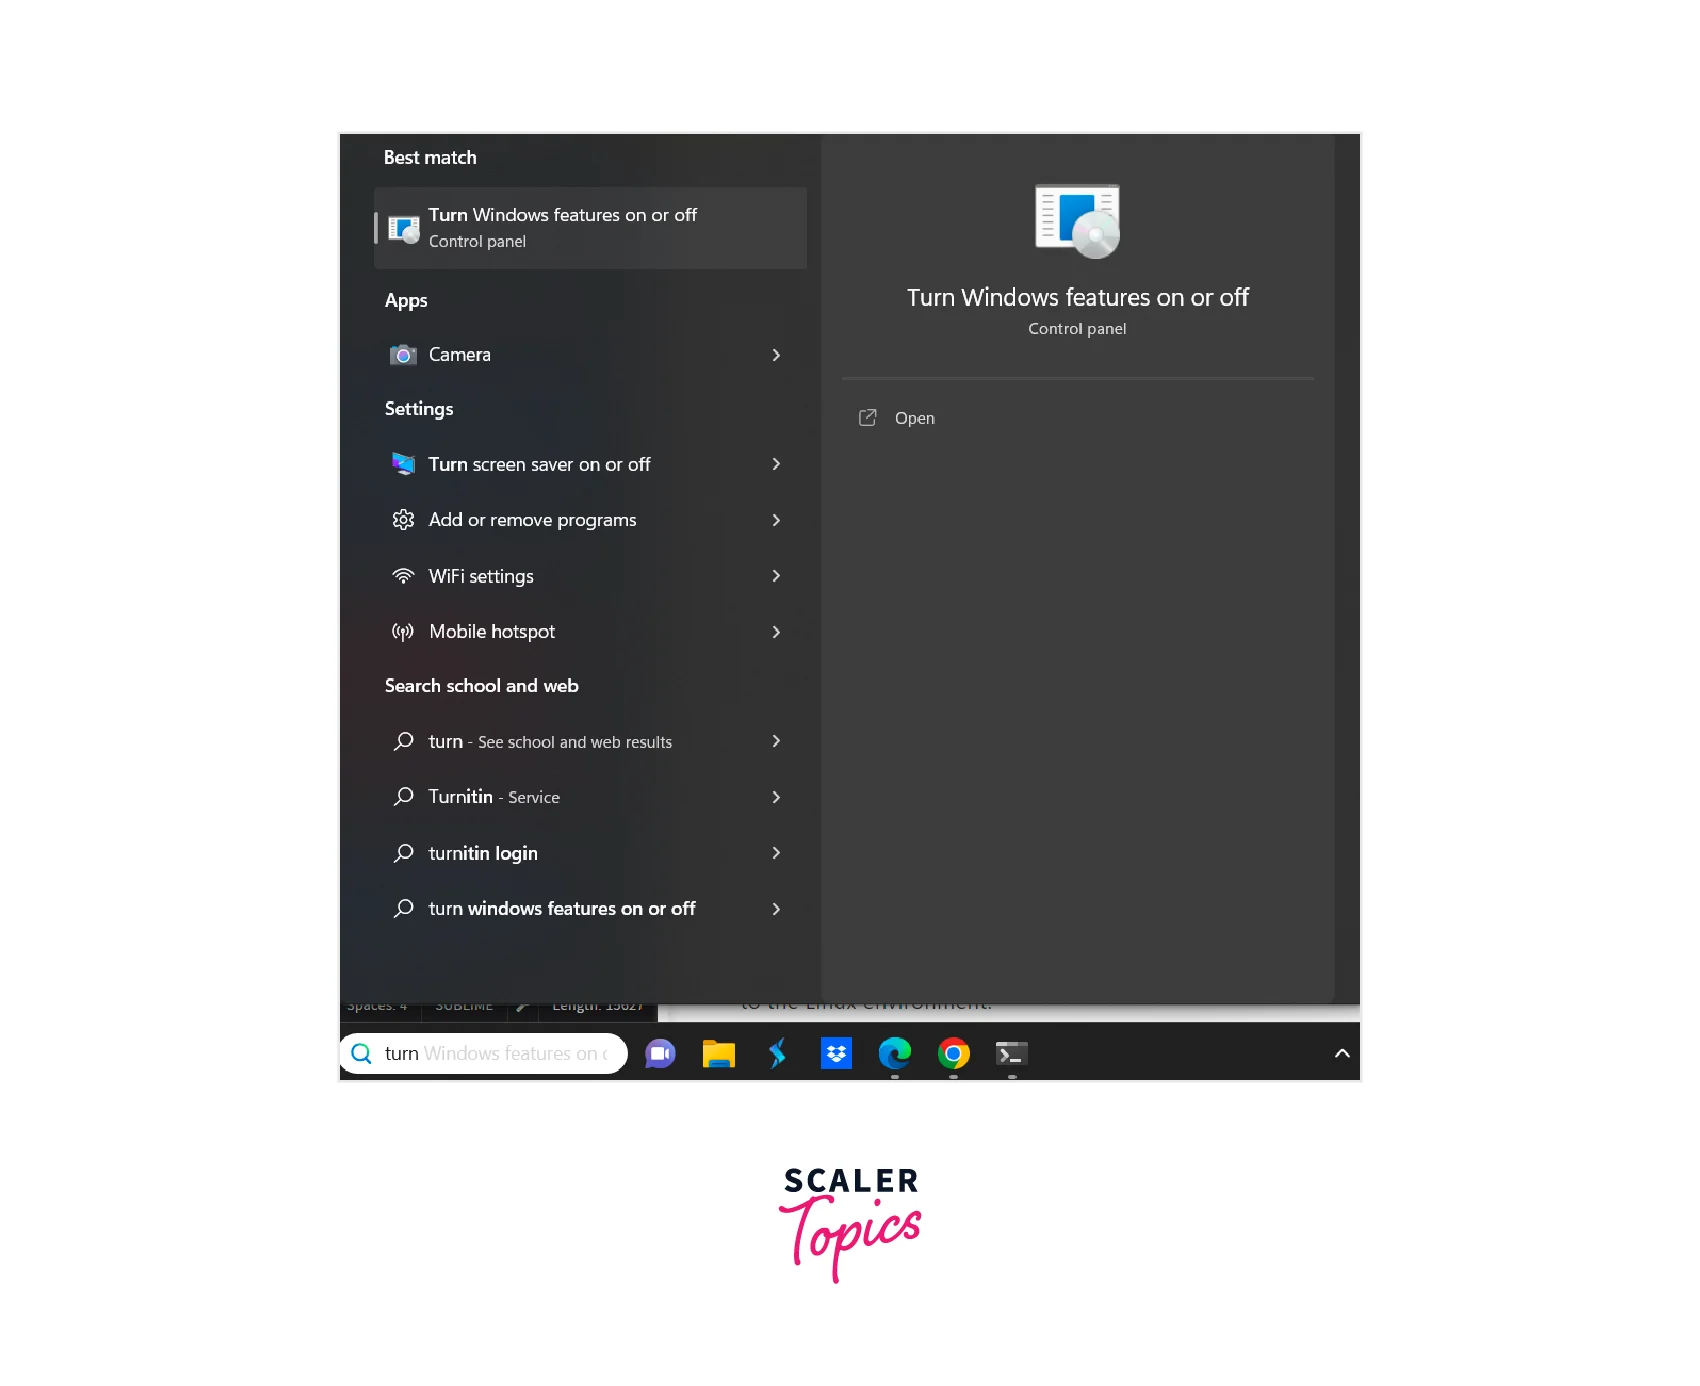
- In the Windows Features dialog box that appears, scroll down and locate "Windows Subsystem for Linux."
- Check the box next to "Windows Subsystem for Linux" and click "OK."
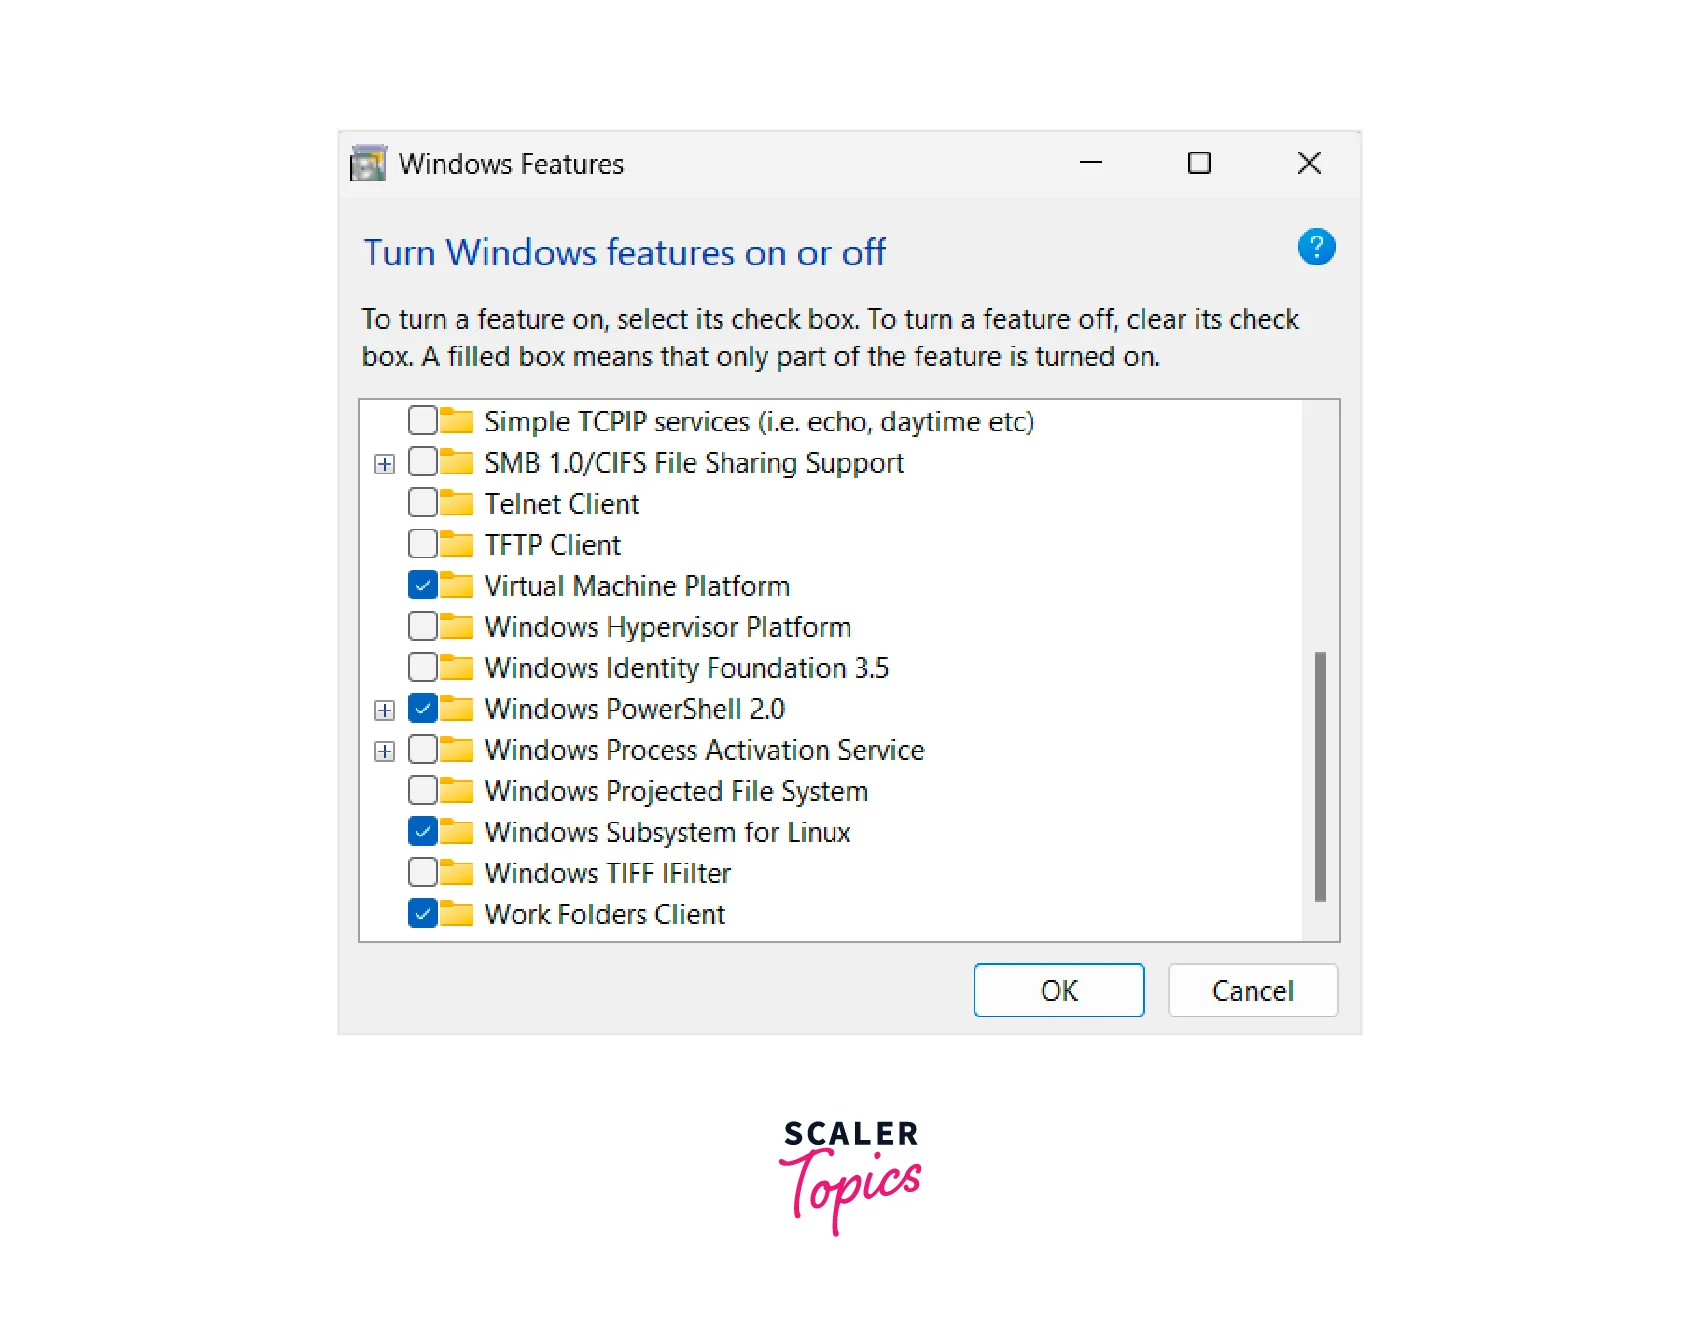
- Windows will now install the necessary files and may require a system restart.
- Open the Start menu, search for "Turn Windows features on or off," and click on the corresponding result.
- Choose a Linux Distribution:
After enabling the WSL feature, you must select a Linux distribution to install. Microsoft provides several official distributions through the Microsoft Store, including Ubuntu, Debian, and Fedora. Follow these steps to install a Linux distribution:- Open the Microsoft Store on your Windows system.
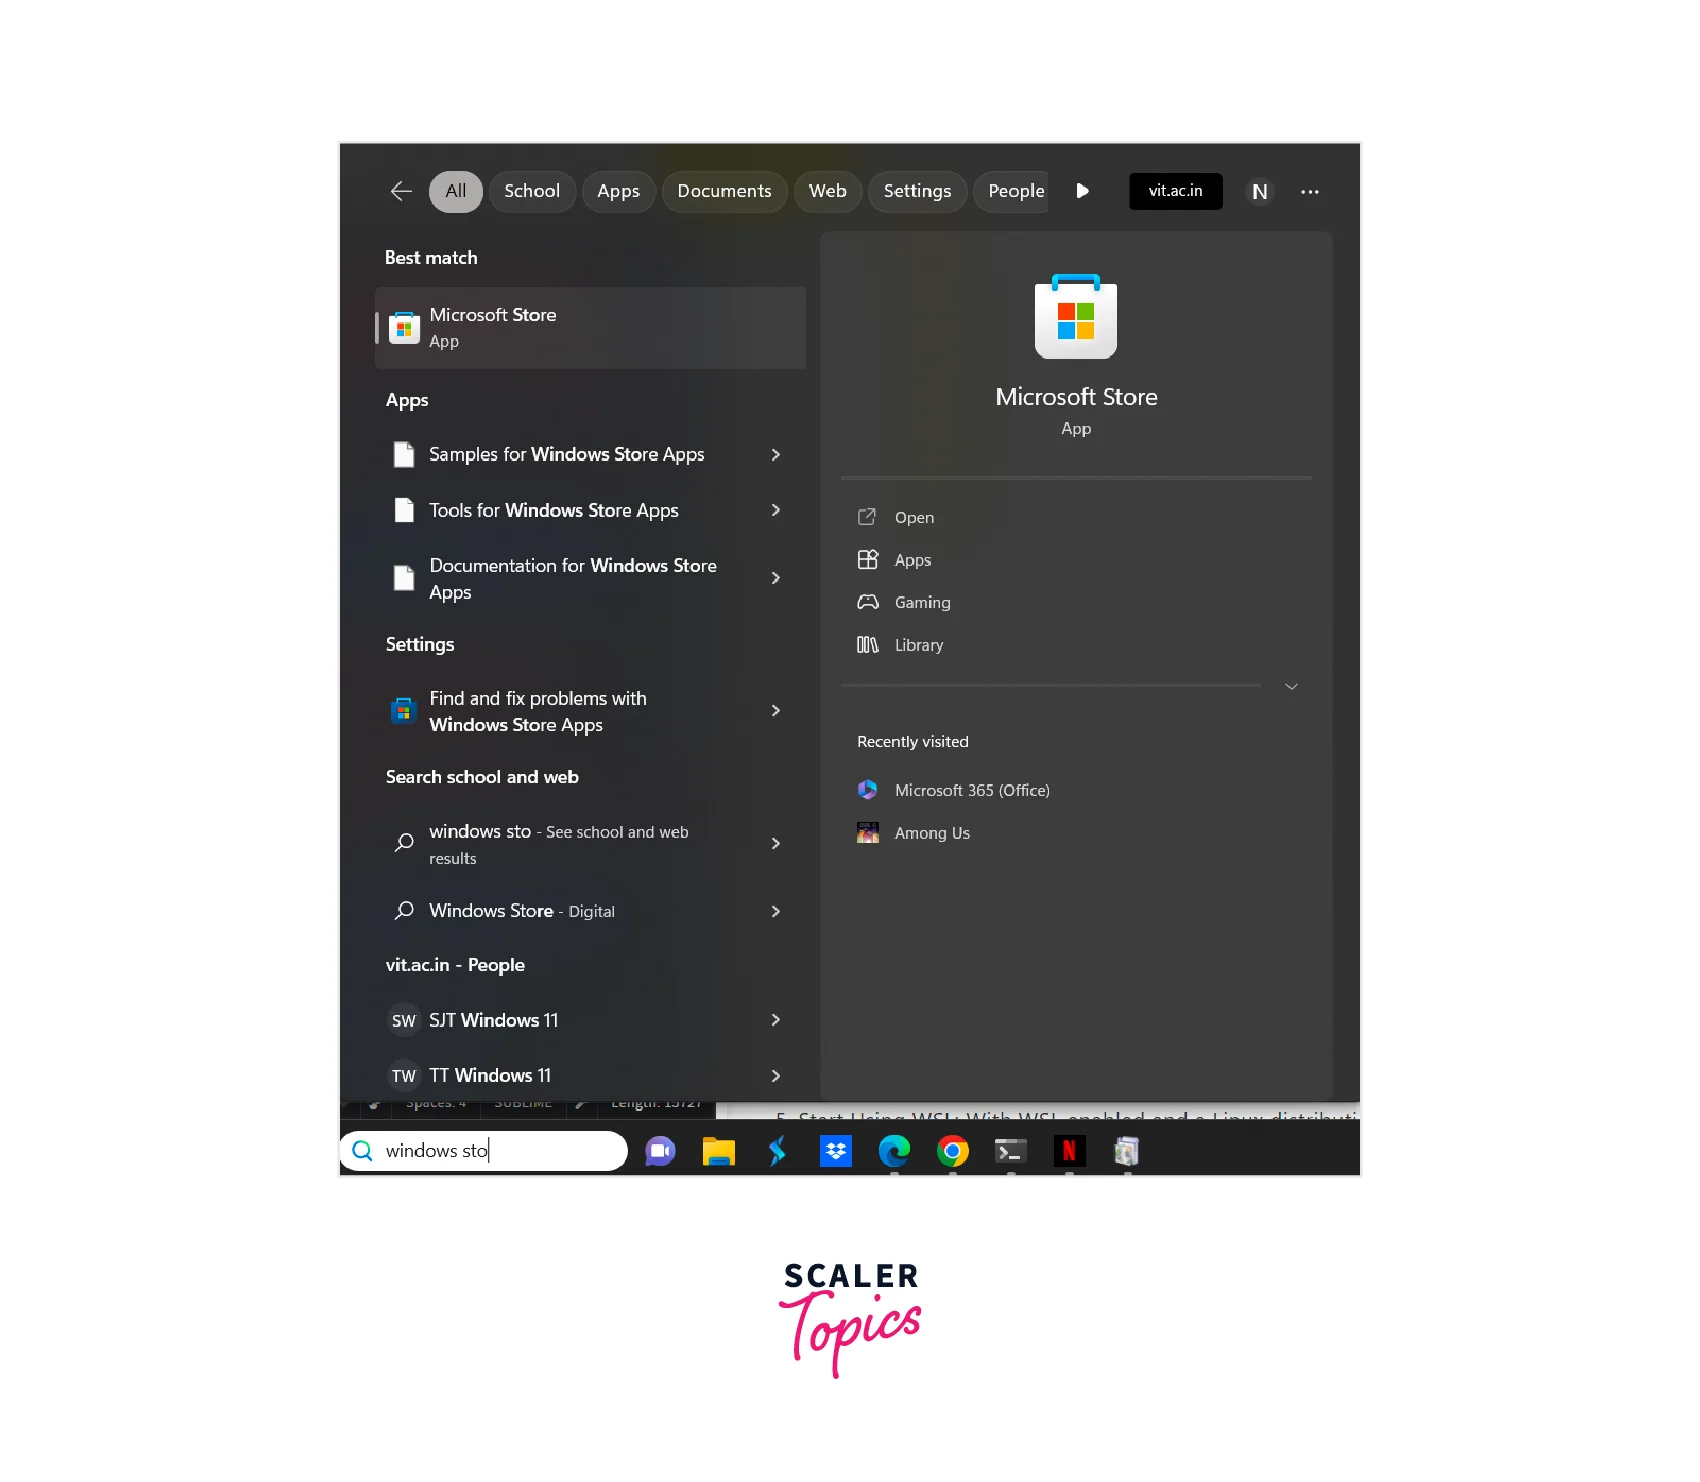
- Select the desired Linux distribution (e.g., "Ubuntu") from the search results.
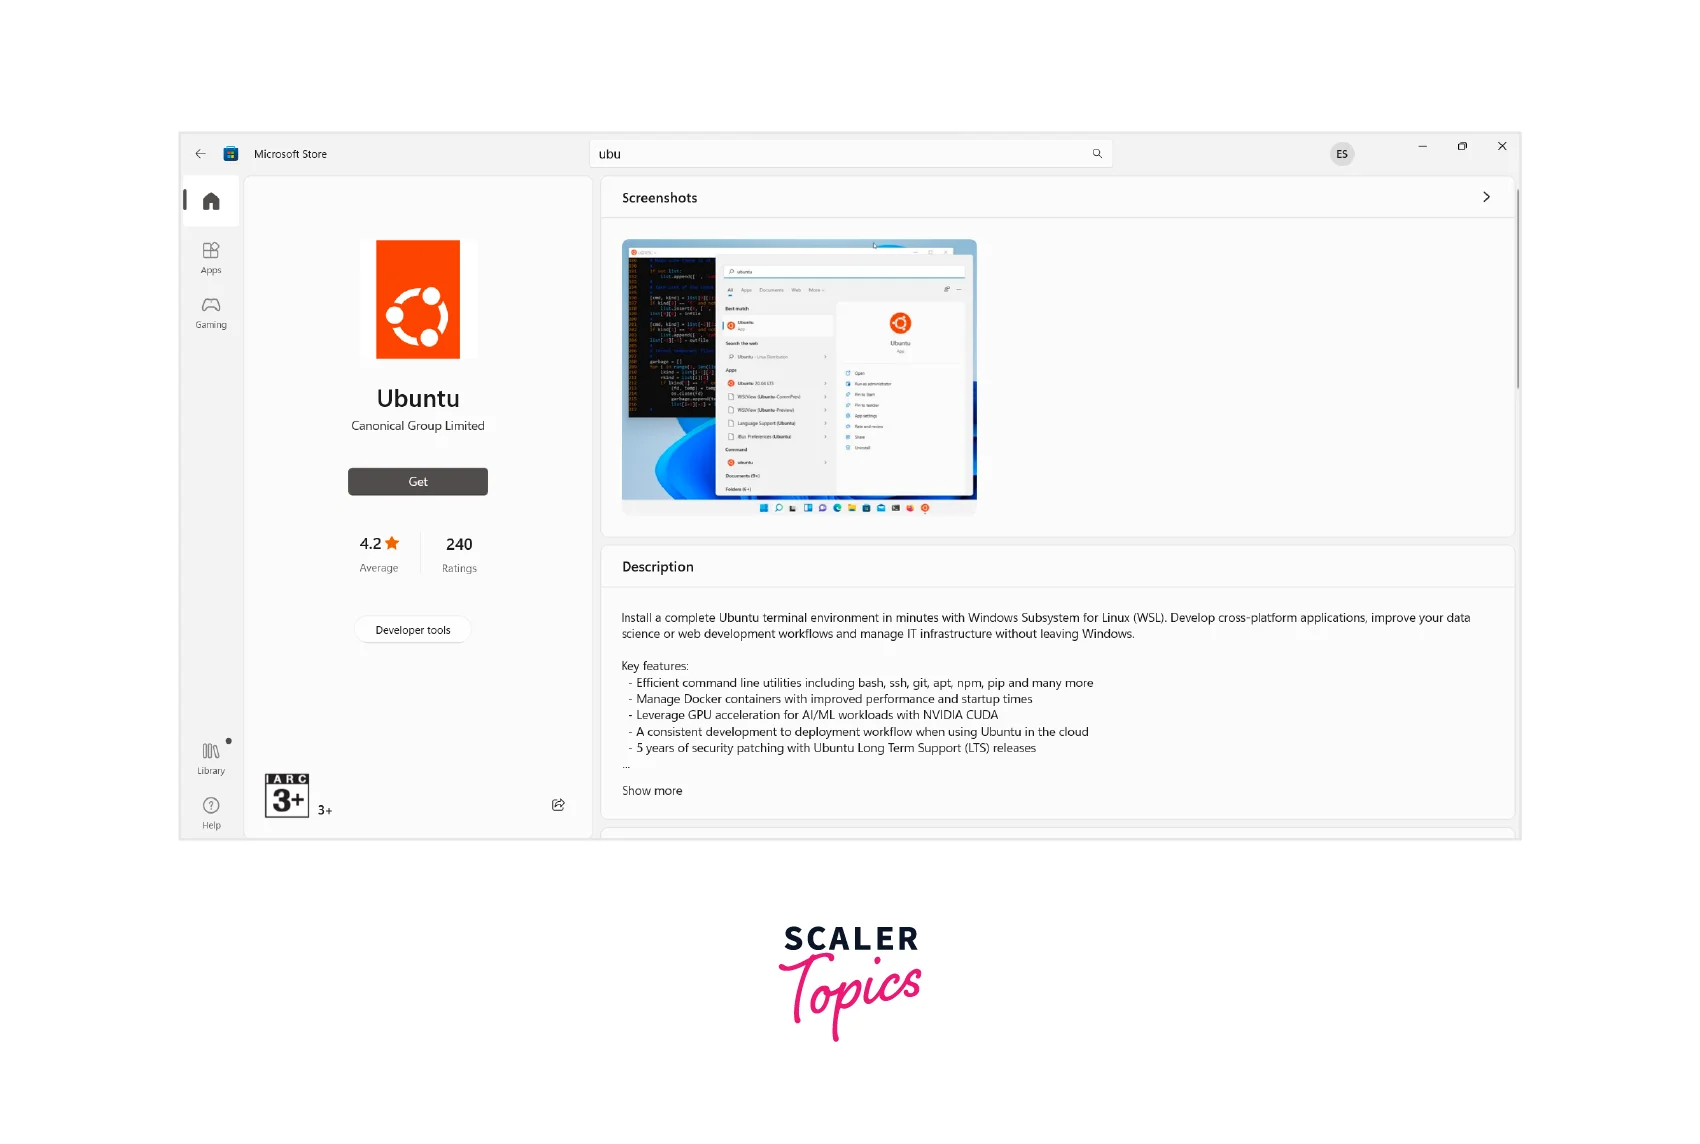
- Click on the "Install" button to start the installation process.
- Once the installation is complete, you can launch the Linux distribution from the Start menu.
- Open the Microsoft Store on your Windows system.
- Set Up Linux Username and Password:
When launching a newly installed Linux distribution for the first time, you will be prompted to set up a username and password. Enter the desired username and password, which will be used to log in to the Linux environment. - Start Using WSL:
With WSL enabled and a Linux distribution installed, you can now start using the Linux terminal on your Windows system. Open the Linux distribution from the Start menu or by running the distribution's executable file from the command prompt.
Upgrade WSL1 to WSL 2
Windows Subsystem for Linux (WSL) 2 is an enhanced version of WSL that brings significant performance improvements and full system call compatibility with Linux. If you're currently using WSL1 and want to take advantage of the benefits offered by WSL2, you can upgrade your existing installation.
To upgrade WSL1 to WSL2, follow these steps:
- Enable Virtual Machine Platform feature:
- Open the Start menu, search for "Turn Windows features on or off," and select the corresponding result.
- In the Windows Features dialog box, scroll down and locate "Virtual Machine Platform."
- Check the box next to "Virtual Machine Platform" and click "OK."
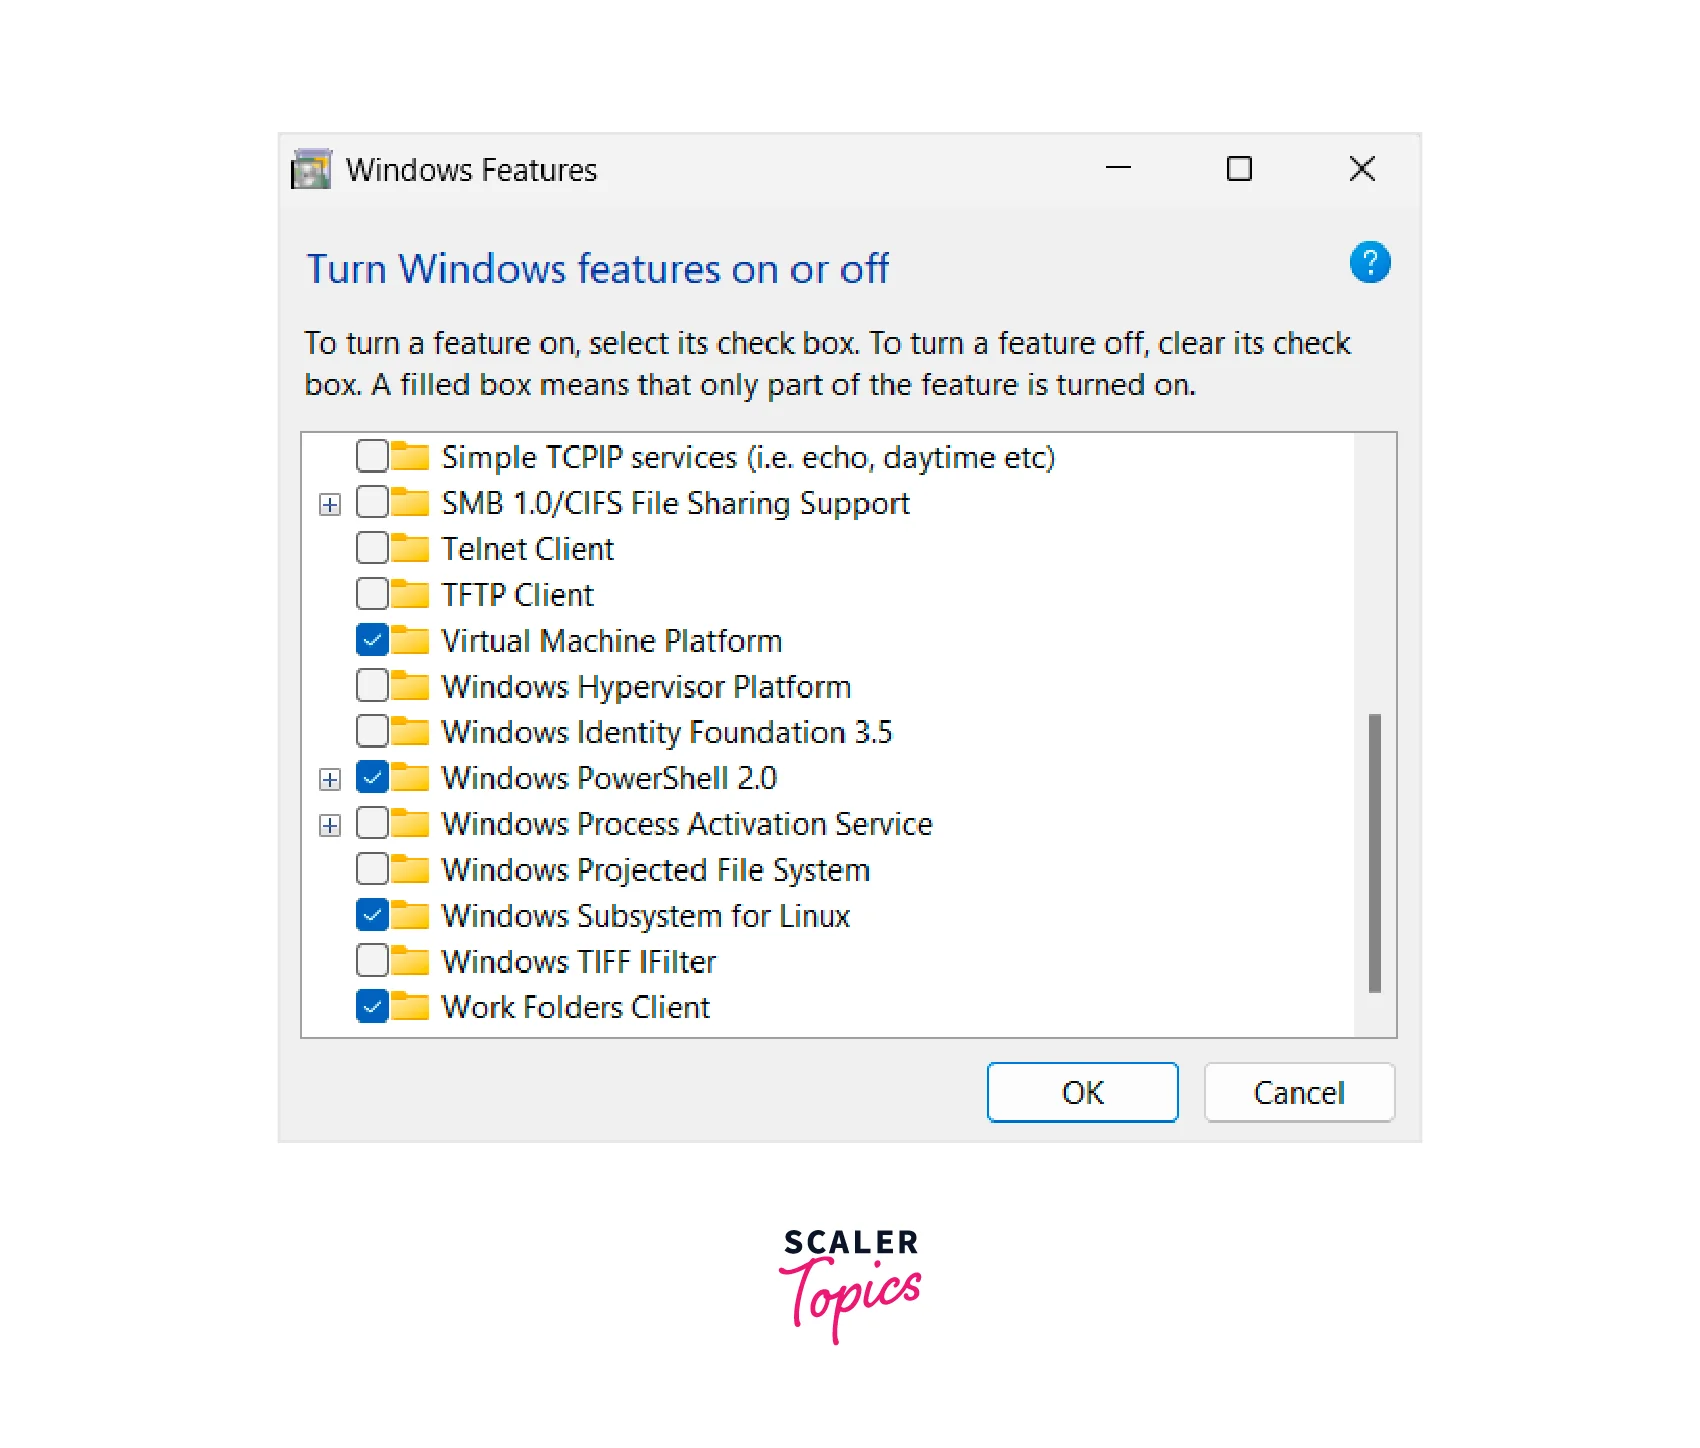
- Windows will install the necessary files, and you may be prompted to restart your system.
- Set WSL default version to 2:
- Open a PowerShell window as an administrator. To do this, right-click the Start menu, and select "Windows PowerShell (Admin)."
- In the PowerShell window, enter the following command and press Enter:
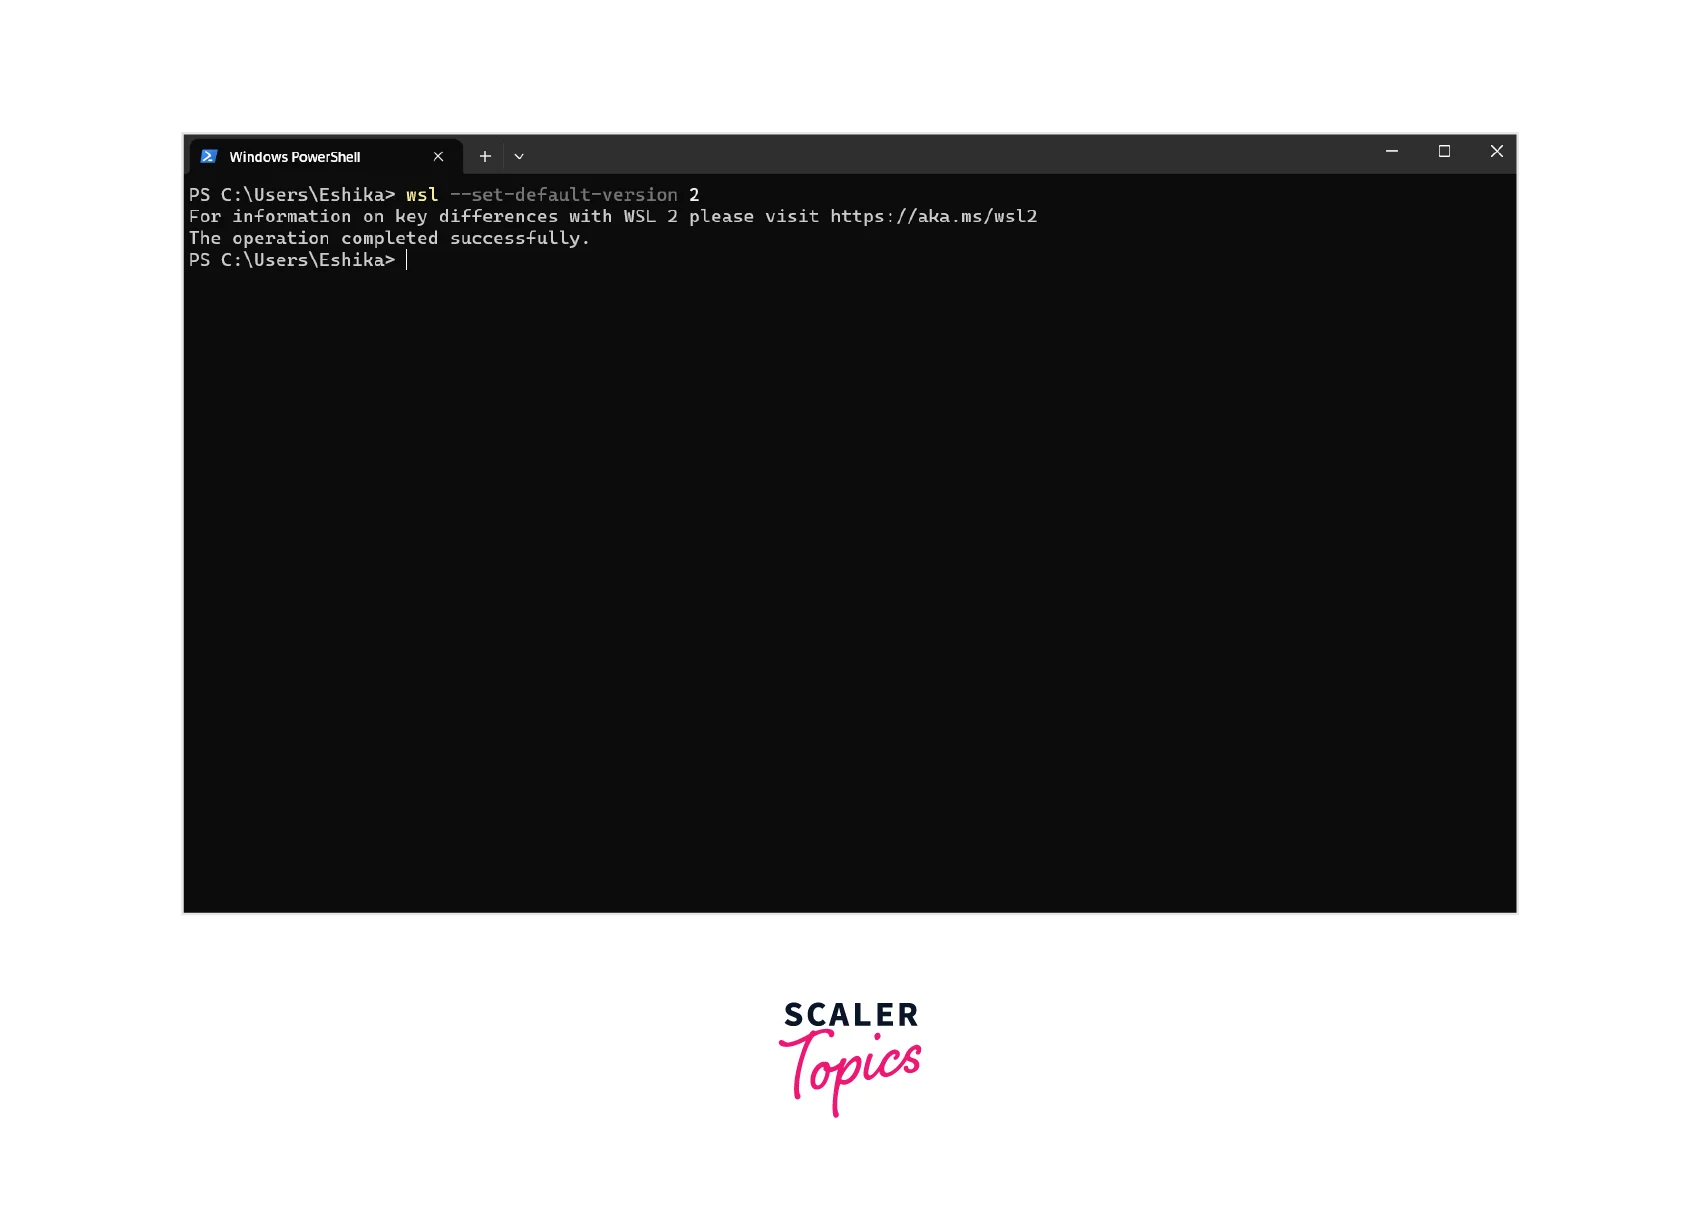
Verify the WSL version:
To verify that the conversion was successful, run the following command:
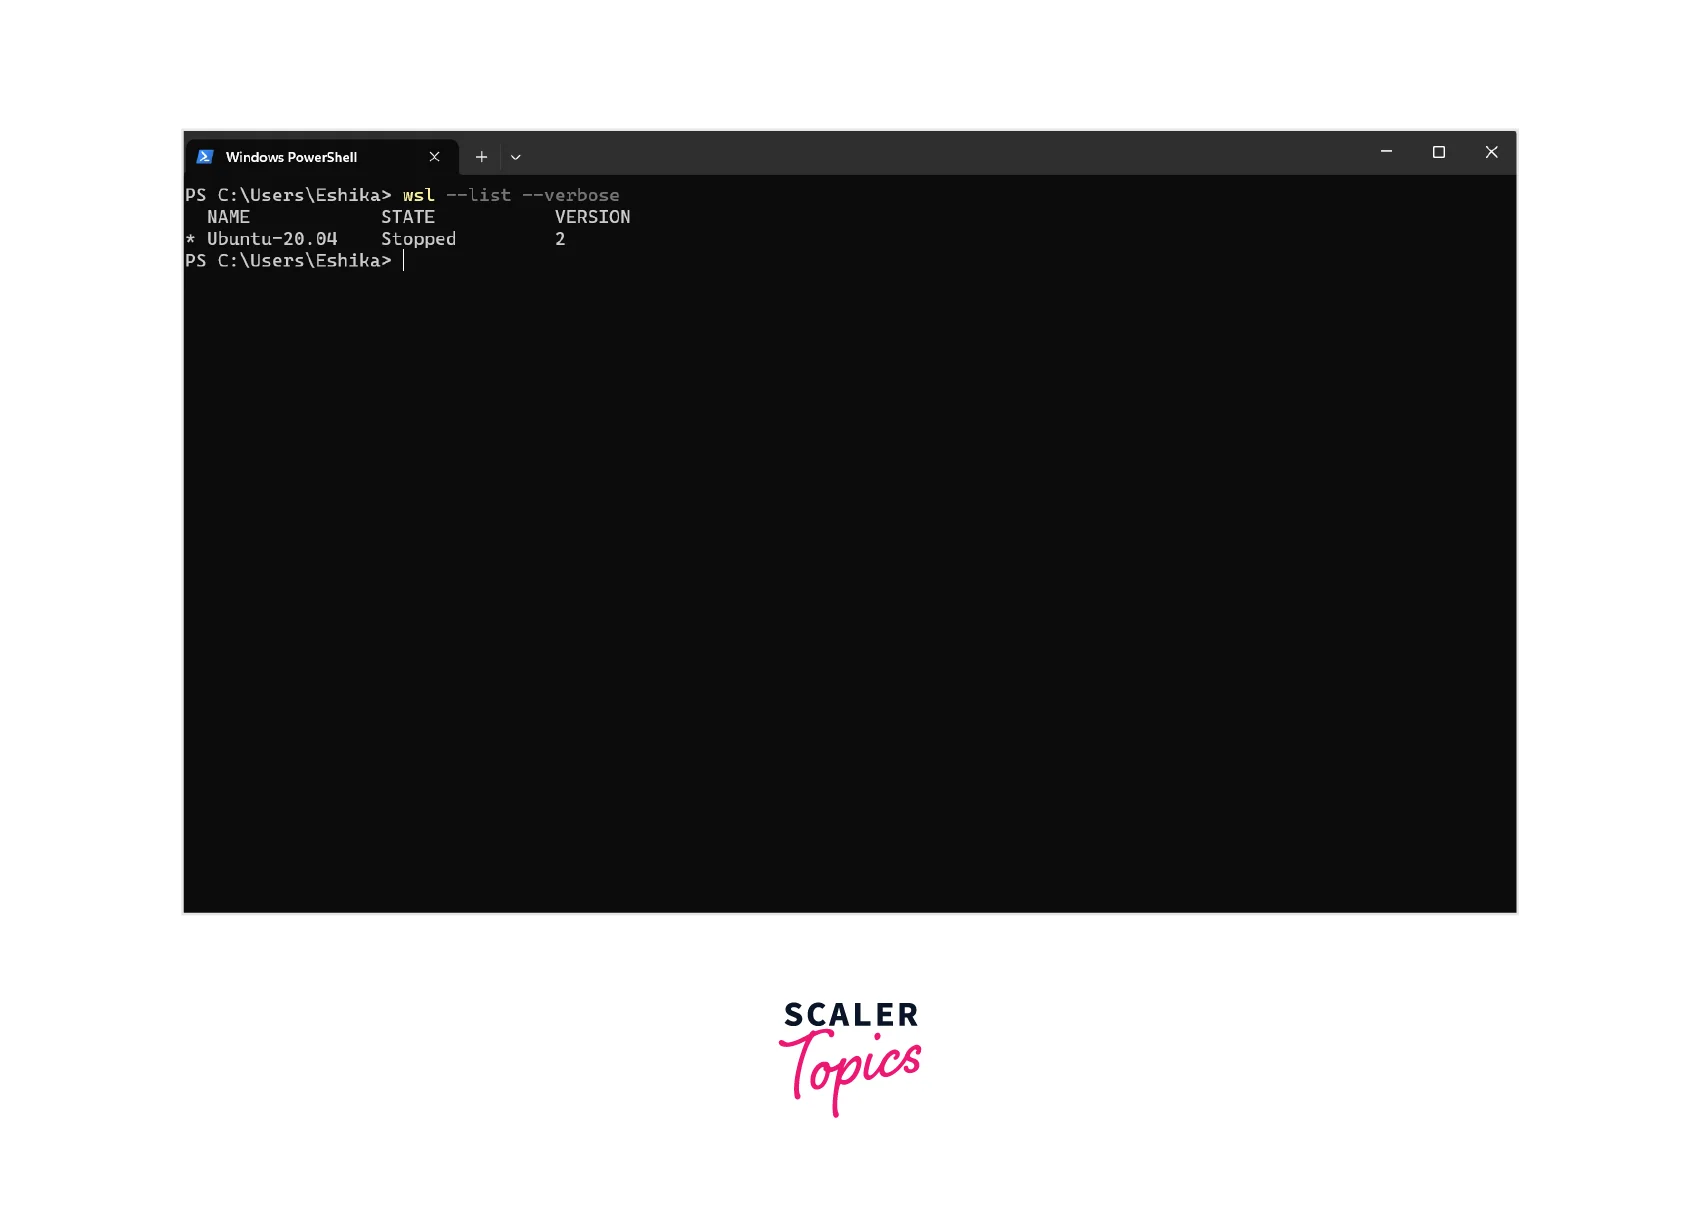
The output will display the WSL distributions installed on your system and their respective versions. Make sure that the desired distribution is listed with version 2.
Once you have successfully upgraded WSL1 to WSL2, you can start using the enhanced features and performance improvements offered by WSL2.
Install Ubuntu Linux Distribution
Ubuntu is one of the most popular and widely used Linux distributions, known for its user-friendly interface and extensive software ecosystem.
- Windows Subsystem for Linux (WSL):
The Windows Subsystem for Linux (WSL) allows you to run a Linux environment directly on your Windows system. With WSL, you can install the Ubuntu distribution as a subsystem. Follow these steps to install Ubuntu using WSL:- Enable WSL by following the steps outlined in this article's "Enable Windows Subsystem for Linux (WSL)" section.
- Open the Microsoft Store on your Windows system.
- Search for "Ubuntu" and select the "Ubuntu" app from Canonical.
- Click on the "Install" button to start the installation process. e. Once installed, launch the Ubuntu distribution from the Start menu or by searching for "Ubuntu" in the Start menu search bar.
- Dual-Boot Installation:
You can perform a dual-boot installation if you want Ubuntu as a separate operating system alongside Windows. This method requires partitioning your hard drive to allocate space for Ubuntu. To install Ubuntu as a dual-boot:- Download the Ubuntu ISO file from the official Ubuntu website.
- Create a bootable USB drive using tools like Rufus or balenaEtcher.
- Restart your computer and boot from the USB drive.
- Follow the Ubuntu installation wizard, selecting "Install Ubuntu" and choosing the appropriate options based on your preferences.
- During the installation, you will be prompted to partition your hard drive. Choose the option to install Ubuntu alongside Windows, allocating the desired space for Ubuntu.
- Complete the installation by following the remaining on-screen instructions.
- After the installation is complete, you can choose between Windows and Ubuntu when booting your system.
- Virtual Machine Installation:
Using a virtual machine (VM) allows you to run Ubuntu within a virtualized environment on your Windows system. This method provides a convenient way to try Ubuntu without modifying your Windows installation. To install Ubuntu using a virtual machine:- Download and install virtualization software such as Oracle VirtualBox or VMware Workstation.
- Download the Ubuntu ISO file from the official Ubuntu website.
- Open the virtualization software and create a new virtual machine.
- Follow the virtual machine creation wizard, specifying the desired settings, such as RAM allocation and disk size.
- When prompted to choose the installation media, select the Ubuntu ISO file you downloaded.
- Start the virtual machine and perform the Ubuntu installation by following the on-screen instructions.
- After the installation, you can launch the virtual machine to access the Ubuntu Linux distribution within the virtualized environment.
Choose the method that best suits your needs and preferences, and enjoy the benefits of using Ubuntu alongside your Windows environment.
Conclusion
- Windows Subsystem for Linux (WSL):
WSL enables running a Linux environment directly on a Windows system. It provides access to a Linux terminal in Windows and allows users to use Linux command-line tools and utilities seamlessly. - Ubuntu Linux Distribution:
Ubuntu is a popular Linux distribution known for its user-friendly interface and extensive software ecosystem. It can be installed on Windows through WSL, dual-boot installation, or virtual machines. - WSL2 Upgrade:
Upgrading from WSL1 to WSL2 brings significant performance improvements and full system call compatibility with Linux. Users can follow the steps outlined in the "Upgrade WSL1 to WSL2" section to take advantage of these enhancements. - Dual-Boot Installation:
Installing Ubuntu as a dual-boot alongside Windows allows users to have a separate operating system. It involves partitioning the hard drive and selecting Ubuntu during system boot. - Virtual Machine Installation:
Virtual machine software such as VirtualBox or VMware allows running Ubuntu within a virtualized environment on a Windows system. This method provides a safe and isolated way to experience Ubuntu without modifying the existing Windows installation. - Benefits of Linux Terminal:
The Linux terminal for Windows 10 provides a command-line interface that allows users to execute commands, automate tasks, and access a wide range of Linux utilities and tools. It is particularly useful for developers, system administrators, and users who prefer the command line over graphical interfaces. - Compatibility and Performance:
Linux terminal for Windows 10, such as WSL and virtual machines, offer compatibility with Linux software and applications. They allow users to seamlessly switch between Windows and Linux environments, enabling efficient workflow and development processes. - Flexibility and Customization:
Linux terminals provide extensive customization options, allowing users to configure their environments according to their preferences. Users can install additional packages, customize shell settings, and create personalized workflows.
