What is LVM?
Overview
To manage storage devices, Linux-based operating systems frequently employ a software component called LVM, or Logical Volume Manager. By converting physical storage into logical volumes, it offers a flexible and dynamic method of managing disc space allocation. Volume groups, which can include several physical discs or partitions, are virtual storage pools that administrators can build using LVM. The underlying data may therefore be readily scaled or transferred without interruption by dividing these volume groups into logical volumes, which are comparable to partitions. LVM includes functions like mirroring for redundant data storage and snapshots for point-in-time backups. LVM improves the overall scalability, flexibility, and dependability of storage management in Linux systems. In Linux and other Unix-like operating systems, a complex storage management system called LVM, or Logical Volume Manager, is used. In managing storage devices, it offers cutting-edge capabilities that improve flexibility, scalability, and dependability.
LVM's key functionality is the ability for administrators to abstract logical volumes from physical storage devices like hard drives or solid-state drives. In comparison to conventional partitioning systems, this abstraction layer makes it easier to manage storage resources and has several advantages.
The capability of LVM to establish volume groups is one of its main benefits. The physical storage devices that make up a volume group are assembled into a single storage entity. Volume groups, which combine several discs, can enhance storage capacity and boost performance through parallel disc access. Administrators can effectively manage and distribute storage resources thanks to this consolidation of physical storage into a logical volume pool.
Logical volumes are generated inside a volume group. A logical disc can be formatted with a file system to store data and functions as a virtual partition. Logical volumes are not associated with particular physical discs, in contrast to conventional partitions. This indicates that they don't require manual repartitioning or data migration and may be quickly scaled, relocated, or allocated among several physical devices. Administrators may adjust storage resources to changing needs thanks to this flexibility, resulting in efficient disc space utilization.
LVM also offers a range of additional features that enhance data management and reliability. One such feature is snapshots, which provide a point-in-time copy of a logical volume. Snapshots can be used for various purposes, such as creating backups or providing a consistent view of data for analysis. They allow administrators to capture the state of a logical volume at a specific moment without interrupting ongoing operations.
Another notable feature of LVM is mirroring. Mirroring involves creating duplicate copies of logical volumes across multiple physical disks. This redundancy ensures that data remains accessible even in the event of disk failures. If one disk fails, the data can still be accessed from the mirrored copy on the remaining disks. Mirroring provides an added layer of data protection and reliability in storage systems.
Components of LVM
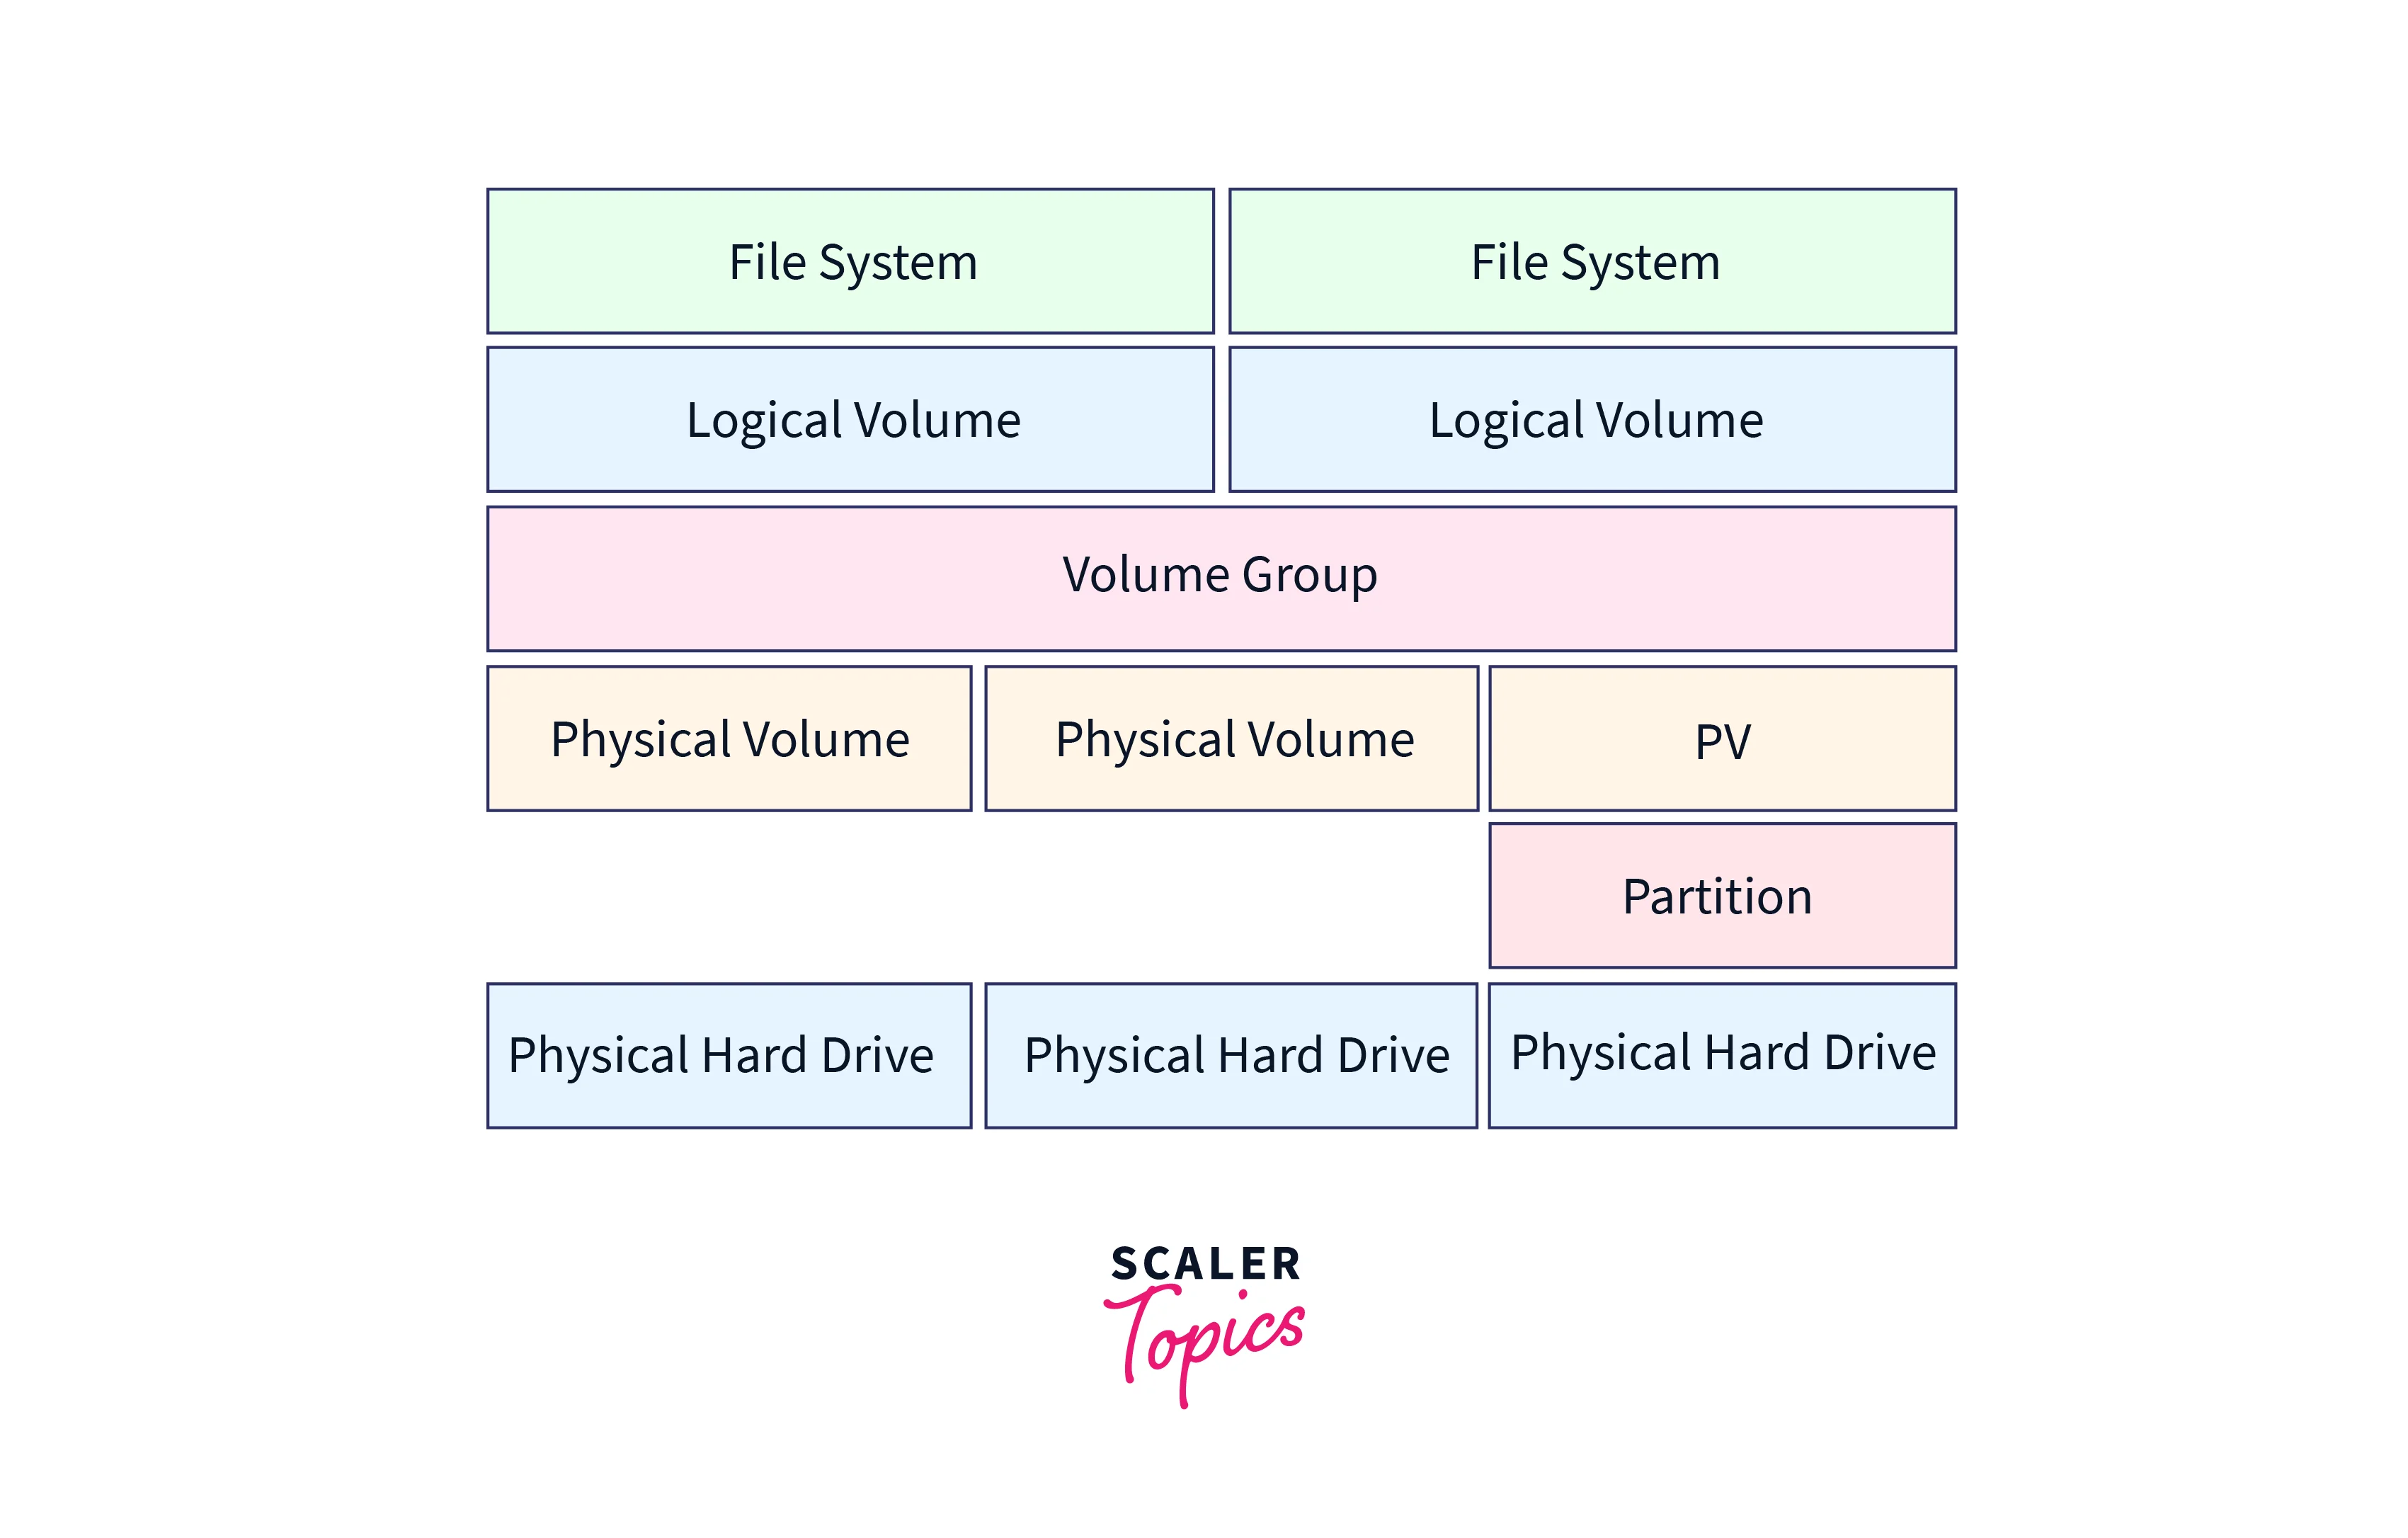
 The Logical Volume Manager (LVM) is composed of several key components that work together to provide advanced storage management capabilities in Linux and other Unix-like operating systems. Understanding these components is crucial for effectively utilizing and managing storage resources with LVM. Let's explore the main components of LVM:
- Physical Volumes (PVs): A physical volume is a storage device, such as a hard disk drive or solid-state drive, that is integrated into the LVM infrastructure. PVs contain physical extents (PEs), which are the smallest unit of allocation in LVM. Multiple PVs can be combined to create a volume group.
- Volume Groups (VGs): A volume group is a pool of physical volumes that are grouped to form a logical storage entity. VGs provide the foundation for creating logical volumes. They allow administrators to aggregate storage space from multiple physical devices into a single pool. VGs are flexible and dynamic, allowing for easy expansion and contraction by adding or removing physical volumes.
- Logical Volumes (LVs): A logical volume is a virtual partition created within a volume group. LVs can be formatted with a file system and are used to store data. They offer greater flexibility than traditional partitions because they are not tied to specific physical disks. LVs can be dynamically resized, moved, or allocated across multiple physical volumes within the same volume group, providing administrators with the ability to adapt storage resources as needed without disrupting data.
- Physical Extents (PEs): A physical extent is the smallest unit of allocation in LVM. It represents a fixed-sized block of storage on a physical volume. PEs are aggregated to create logical volumes and can be dynamically allocated or deallocated to meet the storage requirements of LVs.
- Extent Mapper: The Extent Mapper is responsible for mapping the logical extents of a logical volume to the physical extents of the physical volumes in a volume group. It keeps track of which physical extents are allocated to each logical volume and facilitates data access and management.
- Metadata: LVM utilizes metadata to store information about the configuration and layout of volume groups and logical volumes. This metadata includes details such as the physical volumes comprising a volume group, the mapping of logical extents to physical extents, and other configuration parameters. Metadata is critical for maintaining the integrity of the LVM configuration and is typically stored on each physical volume in a designated metadata area.
- Snapshots: LVM provides snapshot functionality, which allows for the creation of point-in-time copies of logical volumes. Snapshots enable administrators to preserve the state of a logical volume at a specific moment, which can be useful for backups, testing, or data analysis. Snapshots are implemented as thin volumes that track changes made to the original logical volume, allowing for efficient storage utilization.
- Mirroring: LVM supports mirroring, which involves creating duplicate copies of logical volumes across multiple physical volumes. Mirroring enhances data reliability by providing redundancy. If one physical volume fails, data can still be accessed from the mirrored copy on the remaining physical volumes. LVM supports various mirroring configurations, including RAID 1, RAID 4, RAID 5, and RAID 6.
- Striping: LVM also supports striping, which distributes data across multiple physical volumes in a round-robin fashion. Striping improves storage performance by enabling parallel read and writes operations. LVM allows administrators to configure the stripe size, which determines the amount of data written to each physical volume before moving to the next.
- Online Resizing: LVM supports online resizing, which means that logical volumes can be resized while the system is running and actively using the data stored on them. Online resizing eliminates the need for system downtime or interruptions, making it convenient for managing storage resources in production environments.
Advantages and Disadvantages of LVM
LVM (Logical Volume Manager) offers several advantages and disadvantages in storage management. Understanding these pros and cons can help administrators decide whether to implement LVM in their Linux or Unix-like systems. Let's explore the advantages and disadvantages of LVM:
Advantages of LVM:
- Dynamic and Flexible Storage Allocation: One of the key advantages of LVM is its dynamic and flexible storage allocation capabilities. LVM allows administrators to allocate storage resources on-demand, enabling them to easily create, resize, move, or delete logical volumes without the need for repartitioning or disrupting data. This flexibility makes it simpler to adapt storage resources to changing needs, optimizing disk space utilization.
- Aggregation of Storage Space: LVM enables the aggregation of multiple physical volumes into a single volume group, providing a consolidated storage pool. This aggregation allows for efficient management of storage resources and simplifies the allocation of logical volumes across multiple physical devices. By combining disks into a volume group, administrators can increase storage capacity and improve performance through parallel disk access.
- Online Resizing: LVM supports online resizing, which means that logical volumes can be resized while the system is running and actively using the data stored on them. This eliminates the need for system downtime or interruptions, making it convenient for managing storage resources in production environments. Online resizing allows administrators to dynamically adjust storage capacity based on current demands without disrupting ongoing operations.
- Snapshots for Data Protection: LVM provides snapshot functionality, allowing for the creation of point-in-time copies of logical volumes. Snapshots capture the state of a logical volume at a specific moment, providing a consistent view of data for backups, testing, or data analysis purposes. Snapshots are space-efficient and enable efficient utilization of storage resources by tracking only the changes made since the snapshot creation.
- Mirroring for Data Redundancy: LVM supports mirroring, which involves creating duplicate copies of logical volumes across multiple physical volumes. Mirroring provides data redundancy and improves data reliability. If one physical volume fails, data can still be accessed from the mirrored copy on the remaining physical volumes. LVM offers various mirroring configurations, such as RAID 1, RAID 4, RAID 5, and RAID 6, allowing administrators to choose the level of redundancy required.
- Striping for Enhanced Performance: LVM supports striping, which distributes data across multiple physical volumes in a round-robin fashion. Striping improves storage performance by enabling parallel read and writes operations. By spreading data across multiple disks, striping enhances data access speed and throughput. Administrators can configure the stripe size to optimize performance based on their specific requirements.
Disadvantages of LVM:
- Complexity: LVM introduces additional complexity to the storage management process. Administrators need to have a good understanding of LVM concepts and commands to effectively manage storage resources. The learning curve can be steep for beginners, and improper use of LVM commands can lead to data loss or system instability.
- Overhead: LVM introduces a certain level of overhead due to the added abstraction layer. This overhead can result in slightly decreased performance compared to traditional partitioning schemes. However, the impact is usually minimal and may not be noticeable in most scenarios. It is important to consider the trade-off between flexibility and performance based on specific use cases.
- Dependency on LVM: Once a file system is created on a logical volume managed by LVM, the file system becomes dependent on LVM. If the LVM metadata is damaged or the LVM configuration is lost, it can be challenging to recover the file system. Administrators must ensure regular backups of LVM metadata and maintain appropriate recovery mechanisms to mitigate this risk.
- Increased Management Complexity: While LVM offers flexibility, it also introduces additional management complexity. Administrators need to carefully plan and manage logical volume allocation and resizing to prevent storage fragmentation and ensure efficient use of available resources. Monitoring and managing storage across multiple physical volumes and volume groups require proper planning and monitoring tools.
- Compatibility and Portability: LVM is primarily used in Linux and Unix-like operating systems. While some compatibility tools exist, direct portability of LVM configurations to other operating systems may be limited. This can pose challenges when migrating data between different platforms or collaborating with systems that do not support LVM.
Get Started with LVM
To get started with LVM (Logical Volume Manager), you need to understand how to work with physical volumes. Physical volumes are the storage devices, such as hard disk drives or solid-state drives, that you integrate into the LVM infrastructure. Here's a detailed step-by-step guide on creating, listing, and removing physical volumes.
Physical Volumes
Creating Physical Volumes:
To create a physical volume, follow these steps:
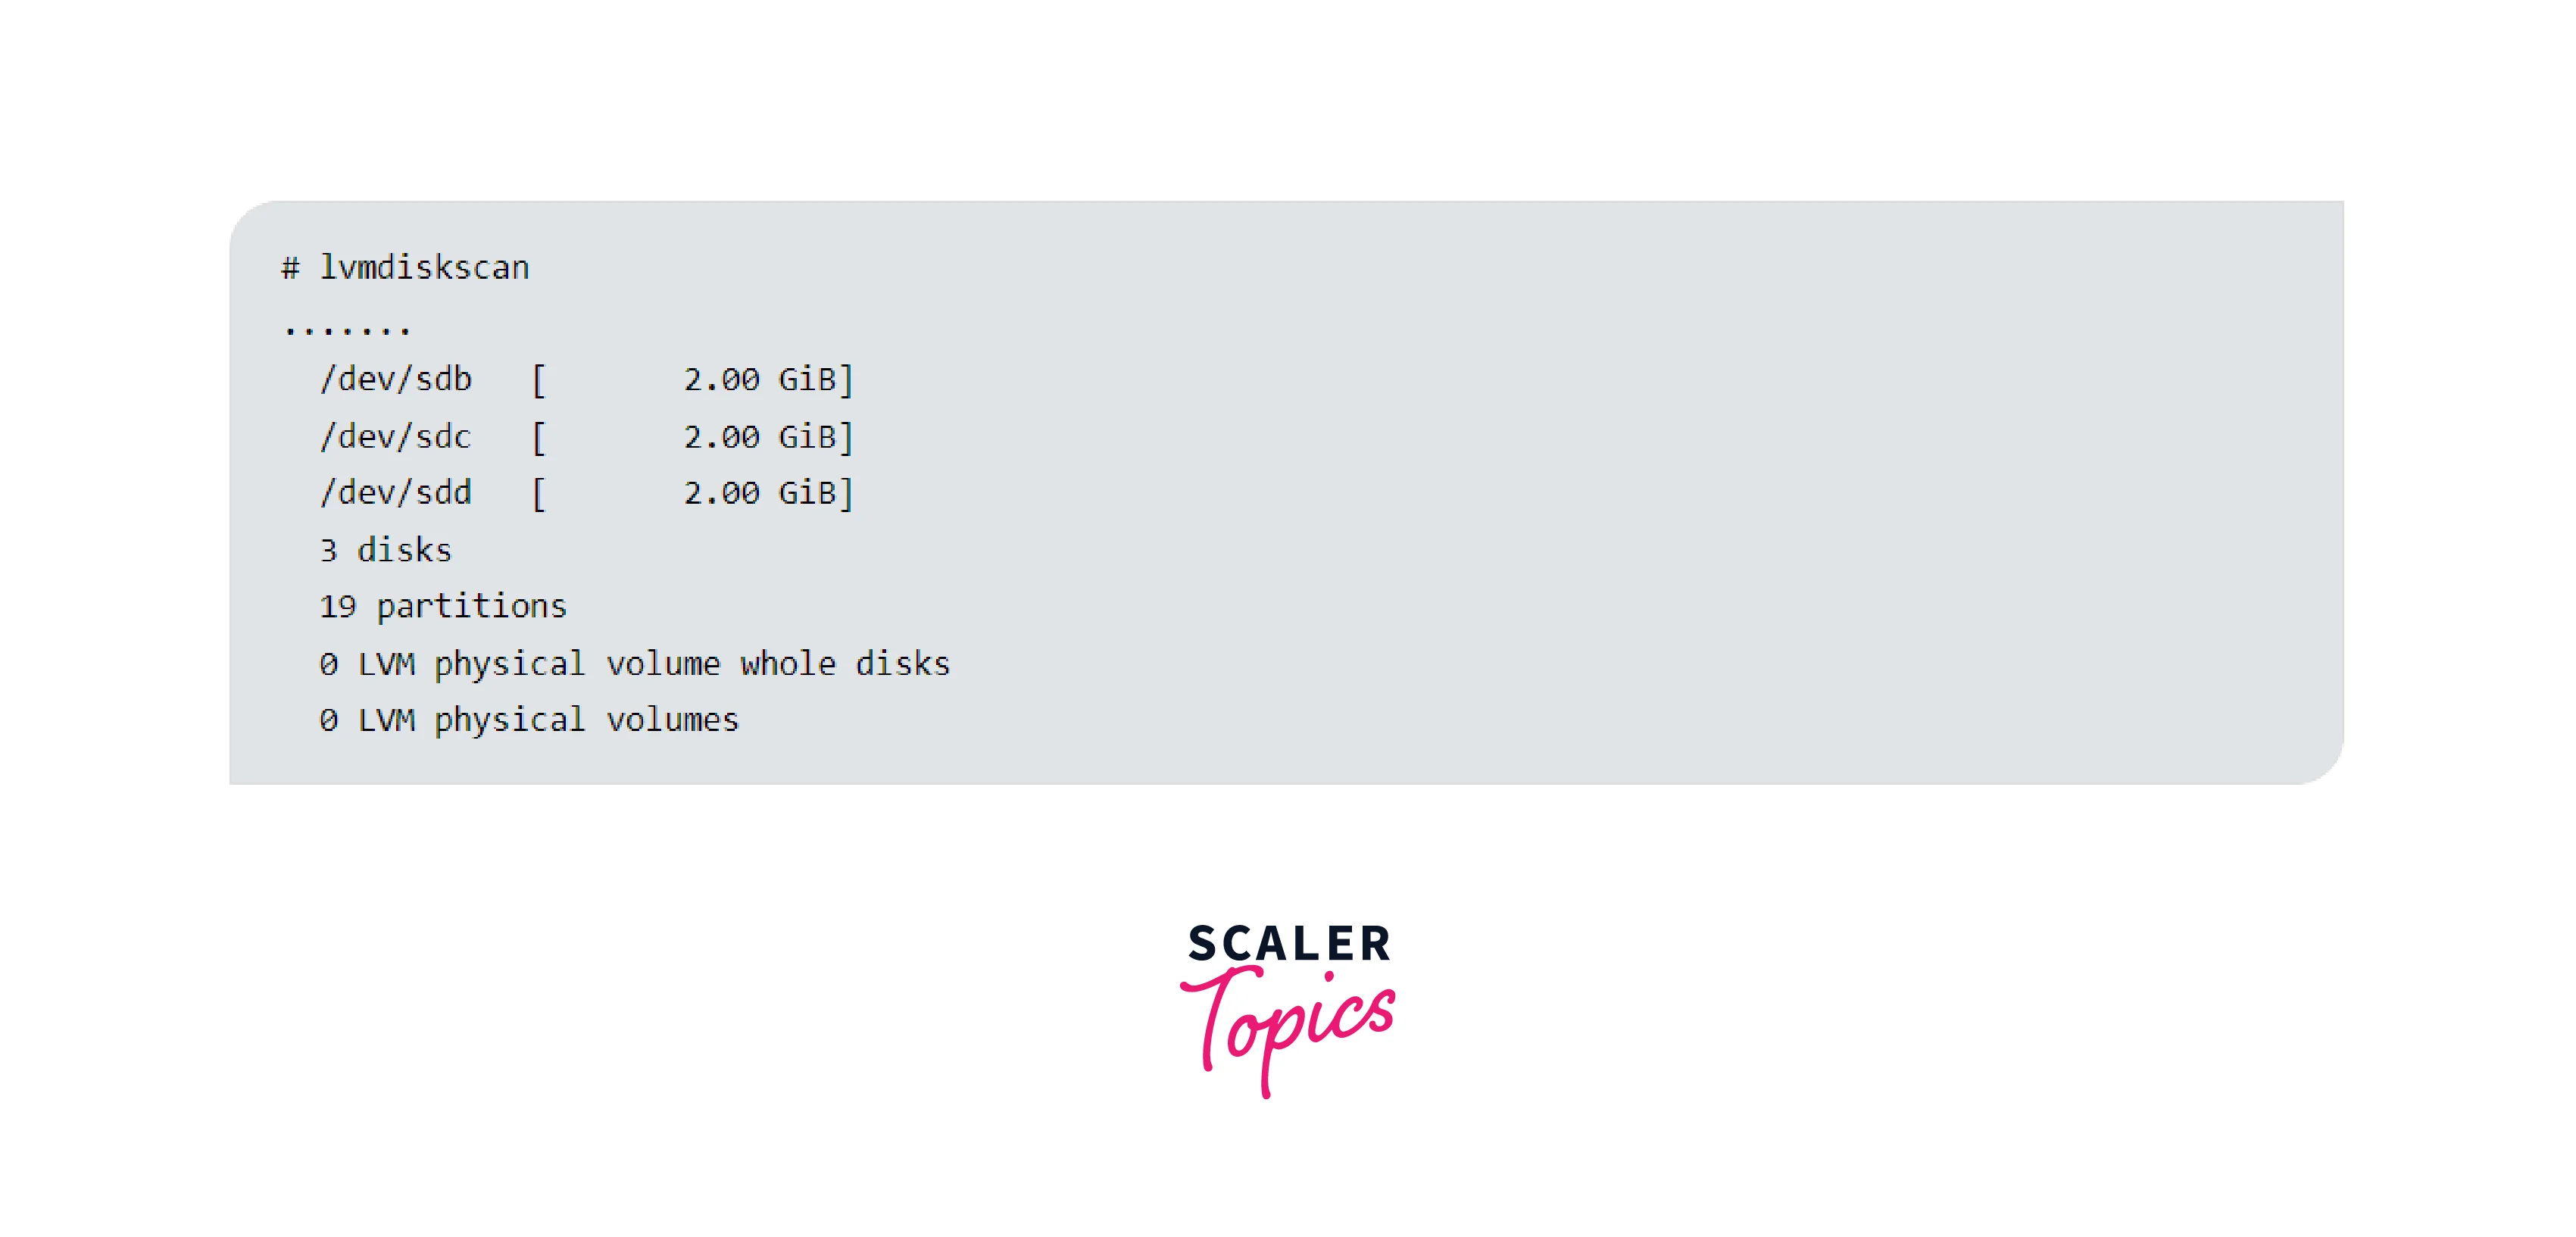
- Identify the storage device you want to use as a physical volume. For example, if you have an additional hard disk, it may be identified as /dev/sdb.
- Open a terminal or command prompt and run the following command as the root user or with sudo privileges: pvcreate /dev/sdb Replace "/dev/sdb" with the appropriate device name for your system.
- The command above initializes the storage device as a physical volume. LVM will recognize it as a valid component for further configuration.
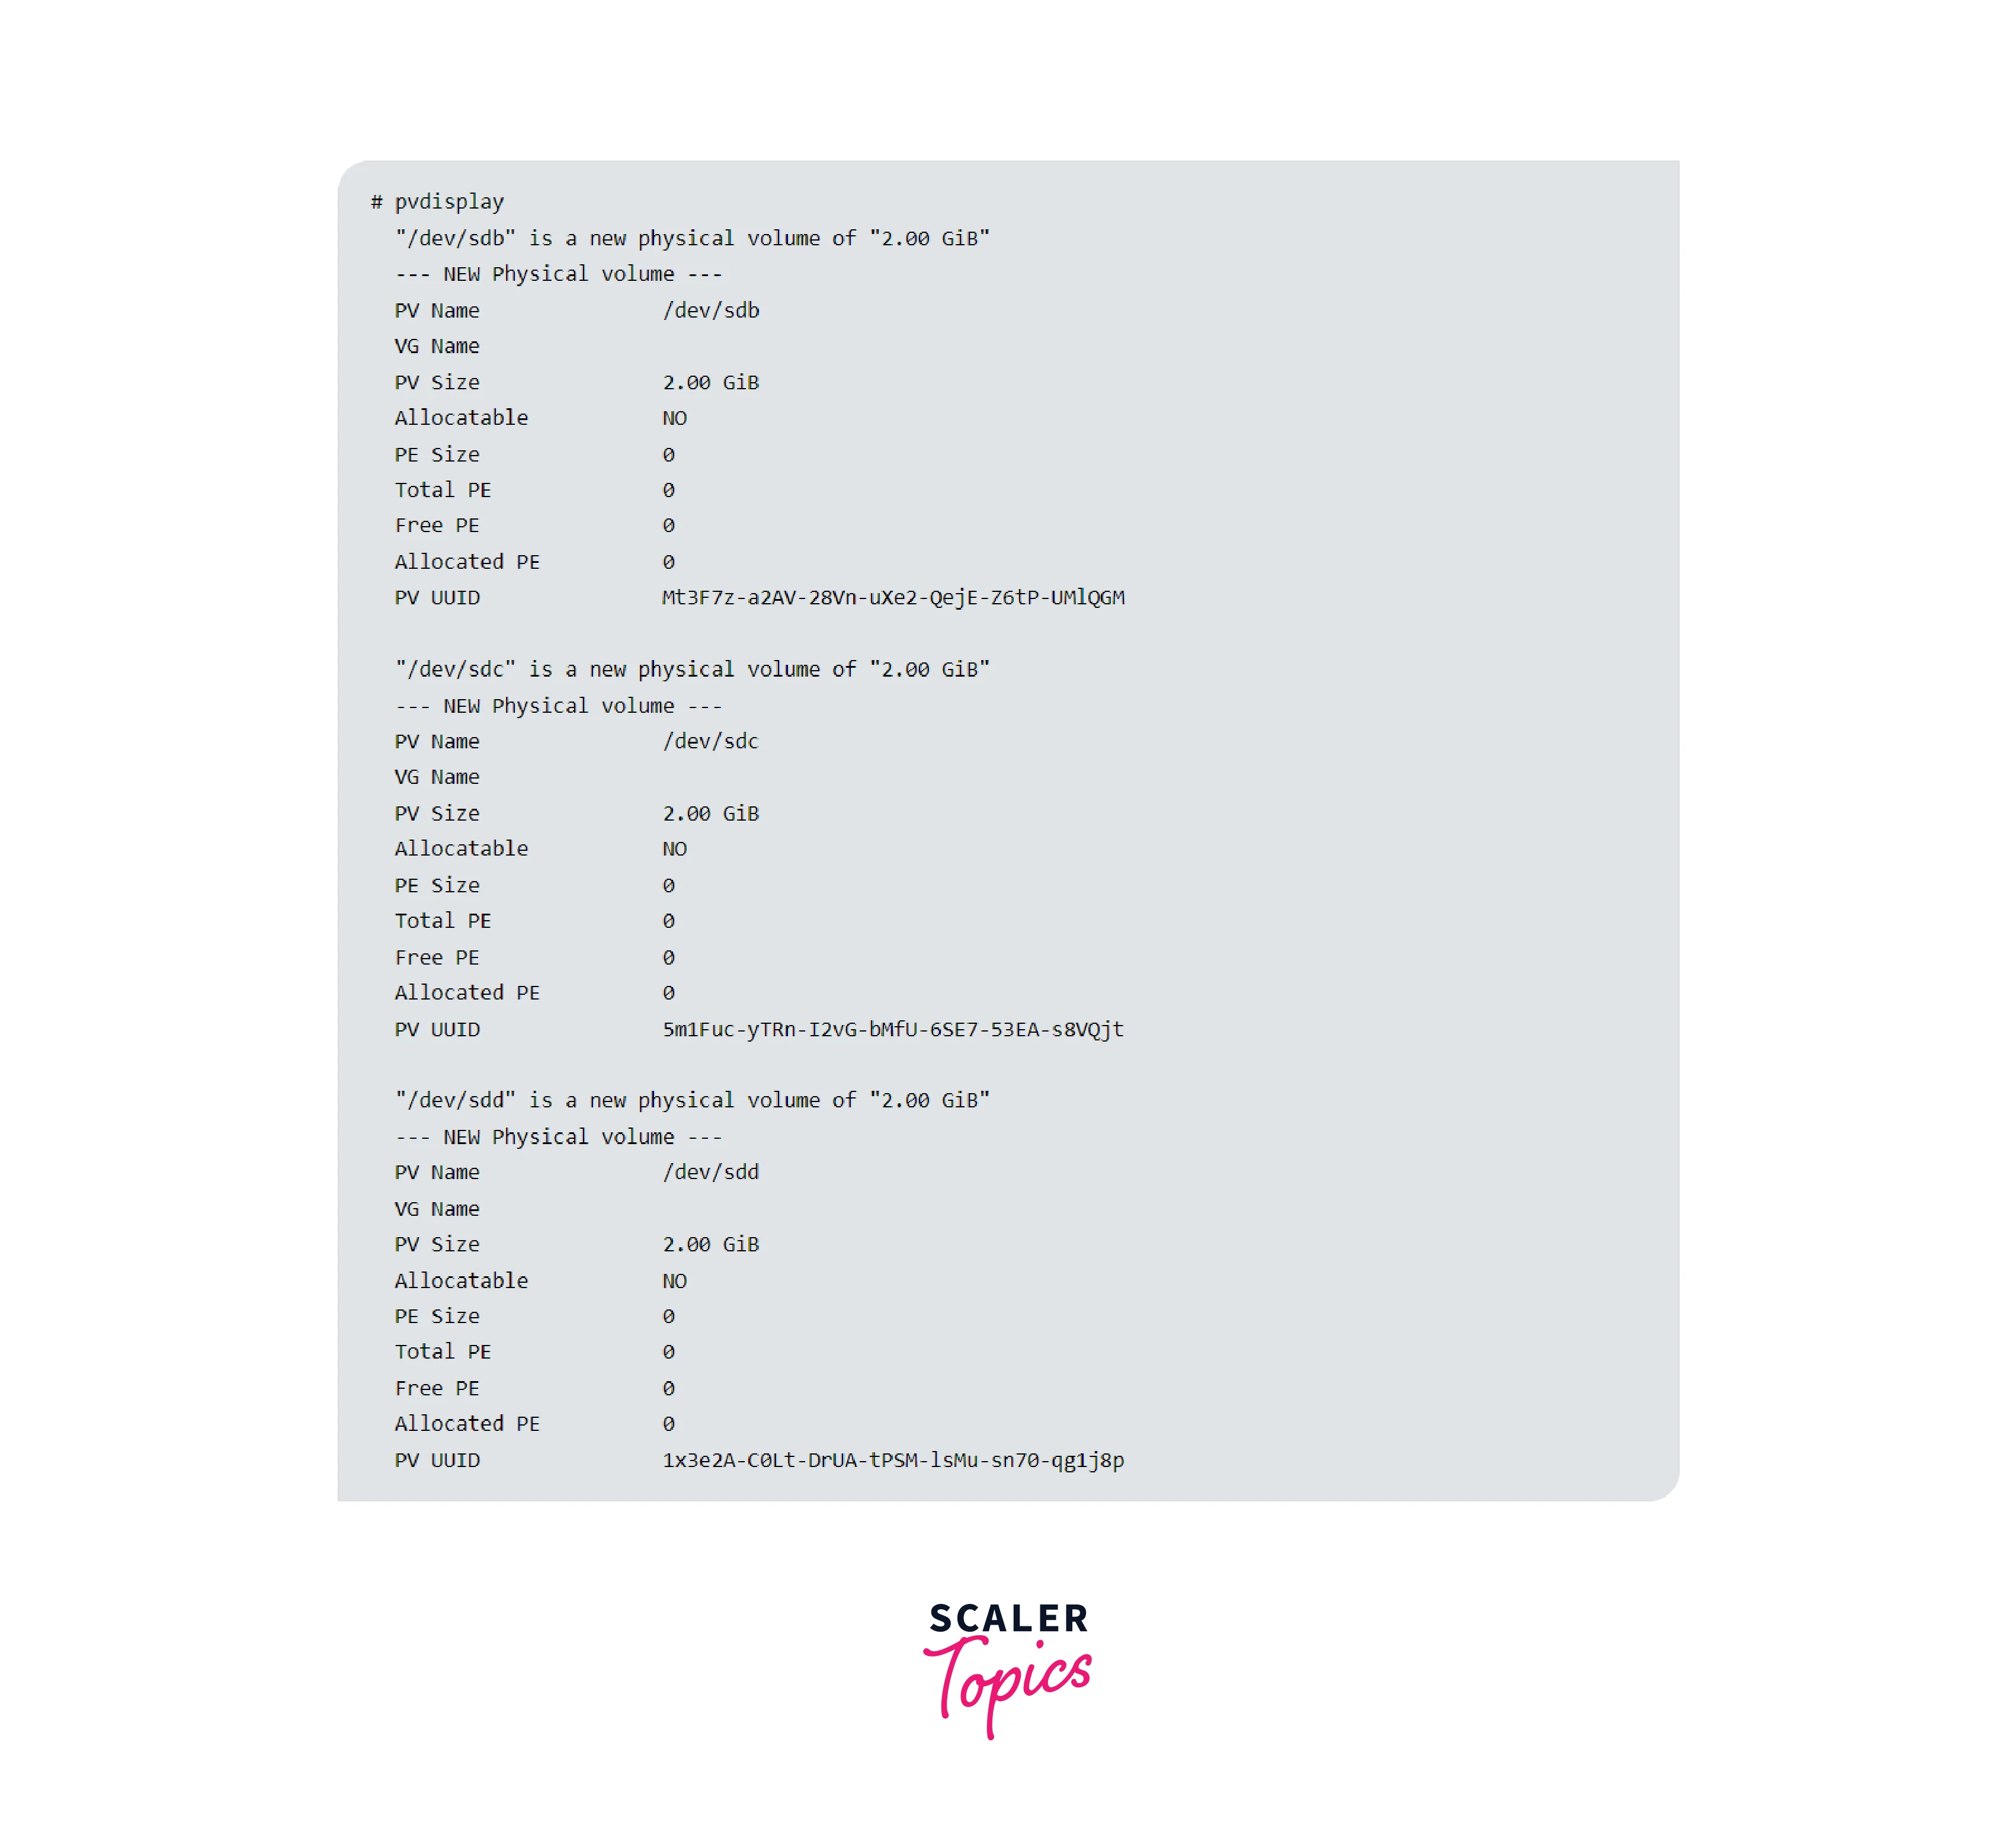
- You can verify the successful creation of the physical volume by running the pvdisplay command. It will display detailed information about all the physical volumes in your system, including their size, allocation, and metadata.

Listing All Available Physical Volumes:
Once you have created one or more physical volumes, you may want to list them to verify their existence. To do this:
- Open a terminal or command prompt and run the following command: pvdisplay This command displays detailed information about all the physical volumes in your system, including their size, allocation, and metadata.
- You can also use the following command for a more concise output: pvs This command displays a summary of the physical volumes, including their names, sizes, and free space.
- The output will provide essential information about the physical volumes you have created, allowing you to confirm their presence and evaluate available storage resources.

Removing a Physical Volume:
If you need to remove a physical volume from your LVM setup, follow these steps:
- Ensure that no logical volumes or volume groups are using the physical volume you want to remove. Use the appropriate commands to remove any logical volumes or volume groups associated with the physical volume.
- Open a terminal or command prompt and run the following command as the root user or with sudo privileges: pvremove /dev/sdb Replace **/dev/sdb** with the appropriate device name for the physical volume you want to remove.
- Confirm the removal by running the pvdisplay or pvs command to verify that the physical volume is no longer listed.
- It's crucial to exercise caution when removing a physical volume, as this action erases all data on that volume. Therefore, ensure that you have proper backups and take precautions to prevent data loss before removing a physical volume.
- Additionally, it's worth noting that once you remove a physical volume, the storage space associated with it becomes unavailable for use in LVM. If you intend to reuse the physical volume or its storage space, you would need to recreate it as a new physical volume.
It's important to note that the steps outlined here assume a Linux or Unix-like operating system with LVM support. The device names and commands may vary slightly depending on your specific system configuration. It's always recommended to consult the documentation or man pages specific to your distribution for accurate and detailed instructions.
Volume Groups
Volume groups are an essential component of the Logical Volume Manager (LVM) that allow you to group multiple physical volumes into a single logical unit. This provides flexibility and scalability in managing storage resources. In this guide, we'll cover the steps involved in creating, listing, extending, reducing, and removing volume groups.
Creating Volume Groups: To create a volume group, follow these steps:
- Open a terminal or command prompt and run the following command as the root user or with sudo privileges: vgcreate myvg /dev/sdb /dev/sdc Replace "myvg" with the desired name for your volume group. "/dev/sdb" and "/dev/sdc" represent the physical volumes you want to add to the volume group. You can specify multiple physical volumes separated by spaces.
- The command above creates a volume group named "myvg" and adds the specified physical volumes to it.
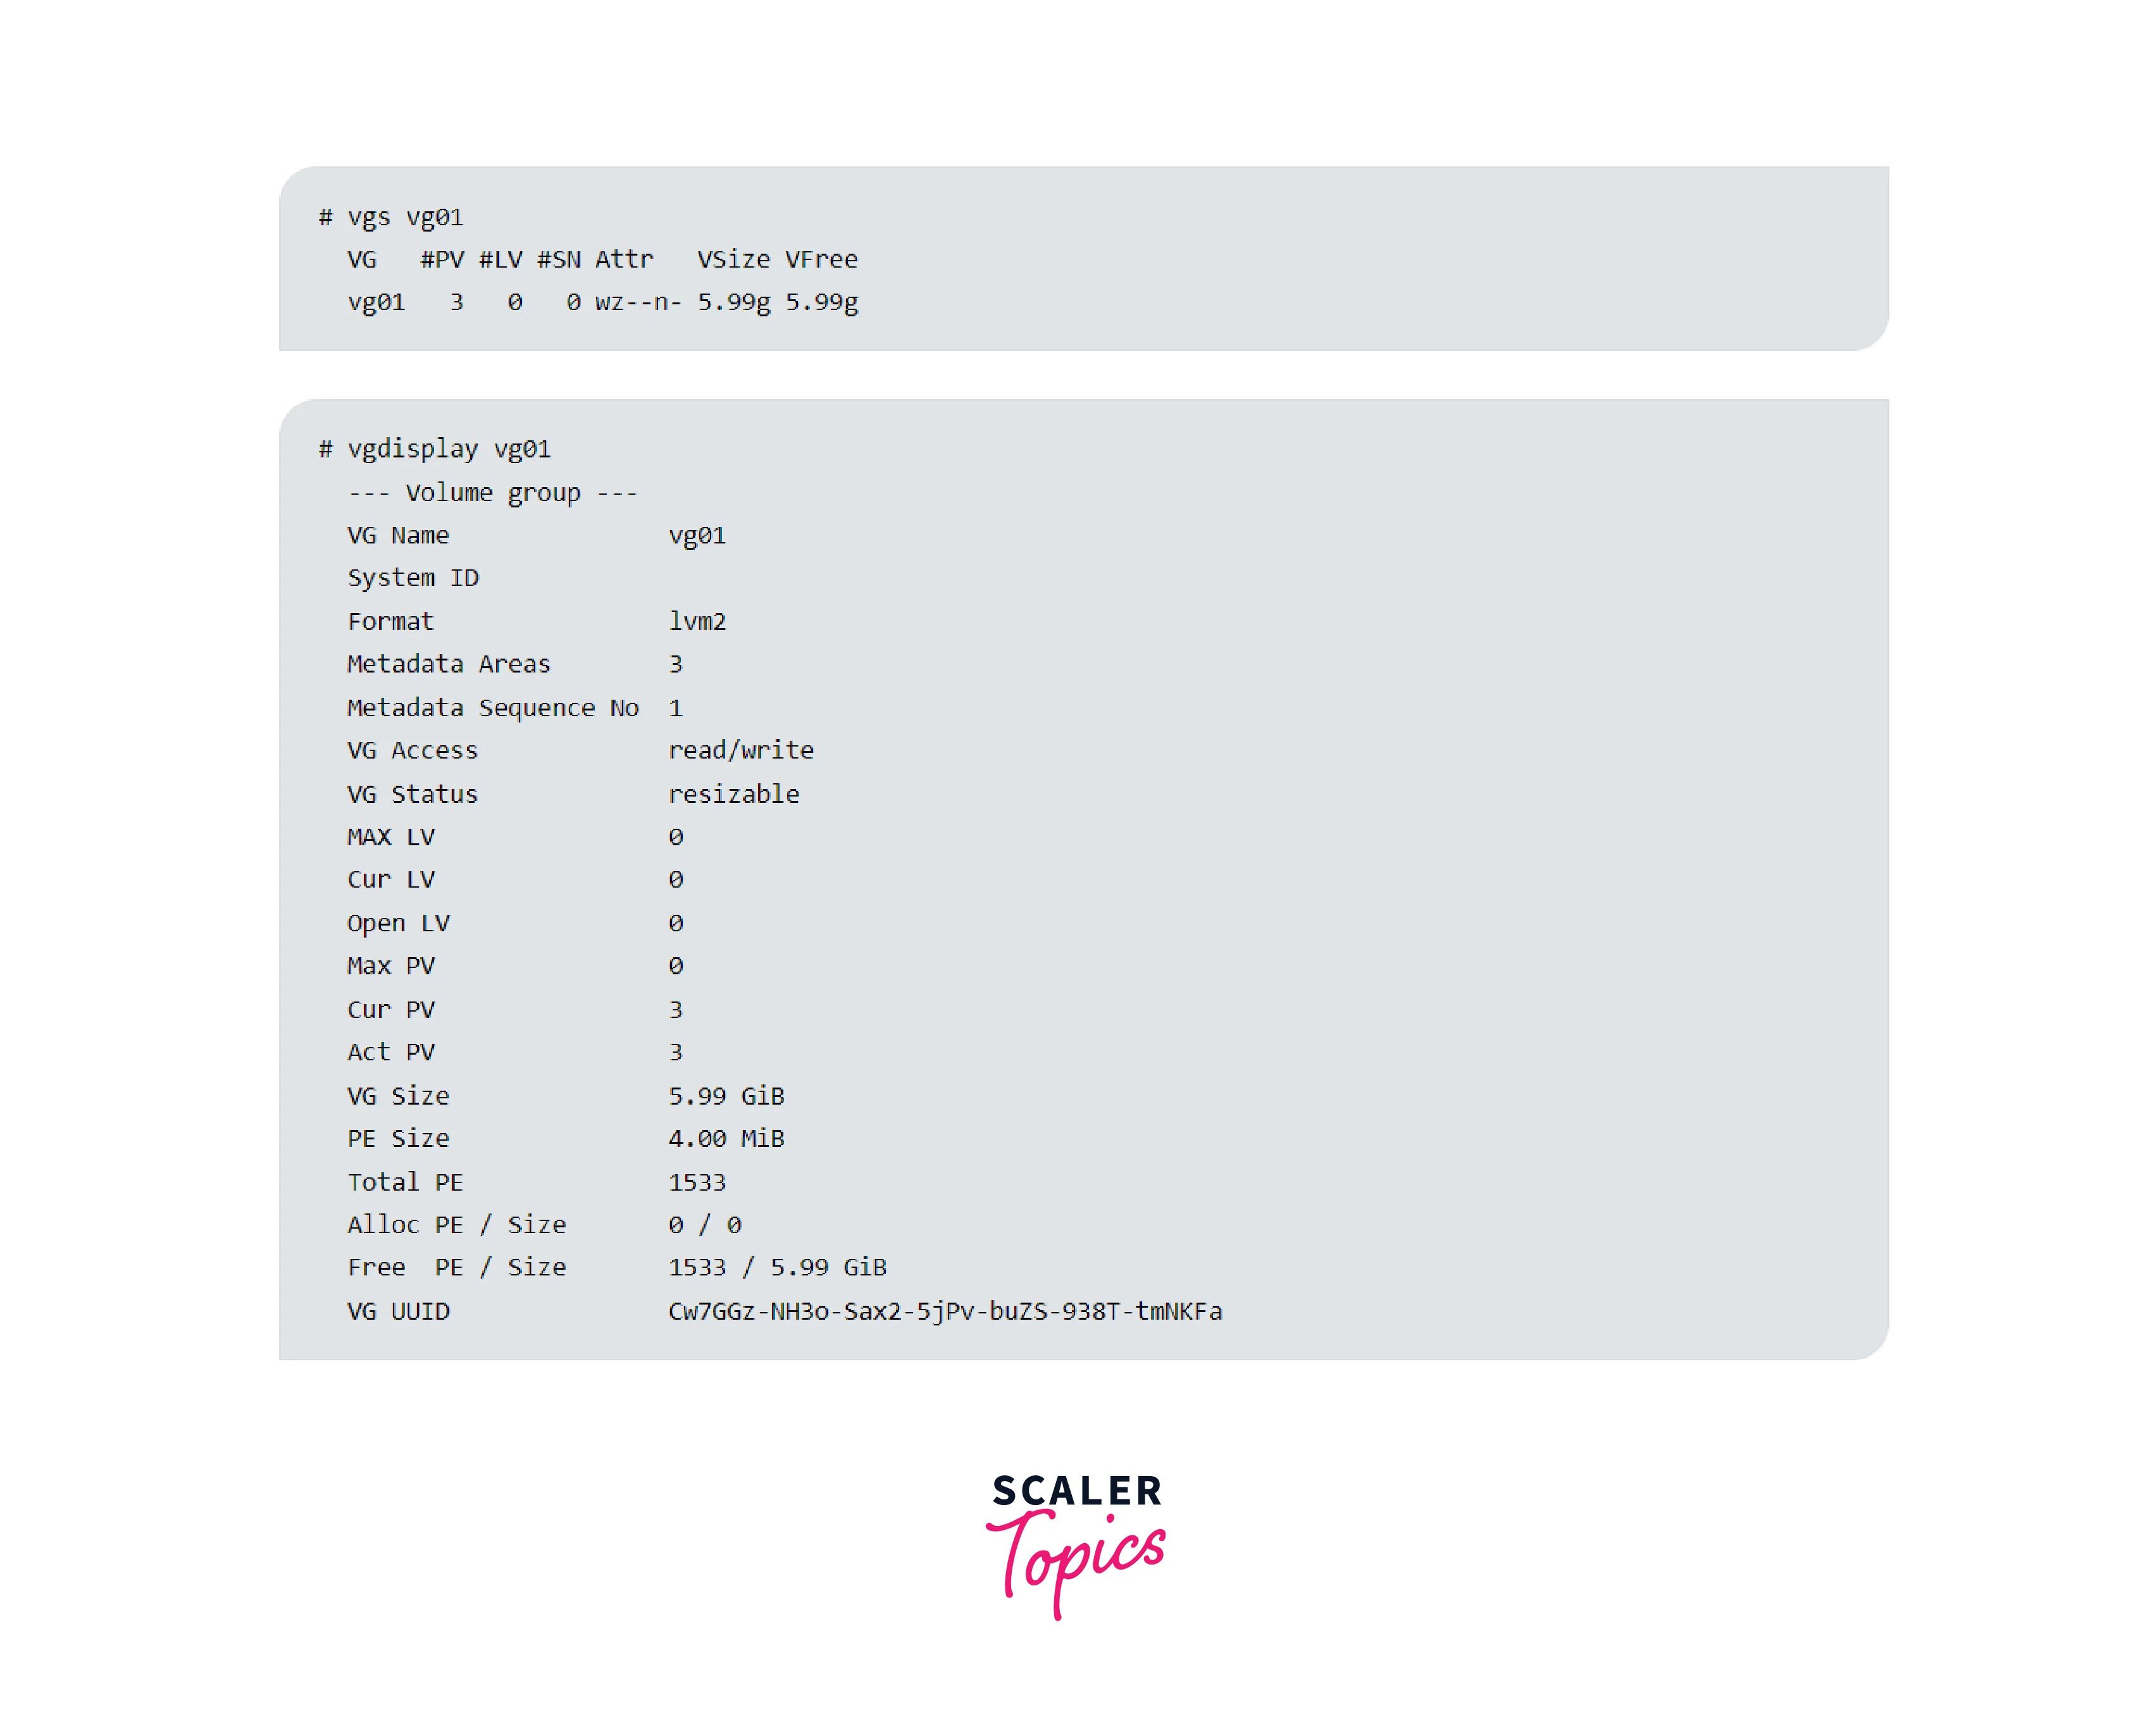
- To verify the successful creation of the volume group, you can use the following command:
vgdisplay myvg
This command displays detailed information about the volume group, including its size, physical volumes, and metadata.

Listing Volume Groups: To list all volume groups in your system, run the following command:
- vgdisplay This command provides a detailed summary of all the volume groups, including their names, sizes, physical volumes, and metadata.
- Alternatively, you can use the following command for a more concise output:
vgs
This command displays a summary of the volume groups, including their names, sizes, and free space.

Listing the Physical Volumes Attached to a Volume Group: To list the physical volumes attached to a specific volume group, use the following command:
- pvdisplay -C myvg Replace "myvg" with the name of the volume group you want to query. This command provides detailed information about the physical volumes attached to the specified volume group, including their names, sizes, allocation, and metadata.
Extending a Volume Group:
If you need to add more physical volumes to an existing volume group, follow these steps:
- Identify the physical volume you want to add to the volume group. For example, "/dev/sdd".
- Open a terminal or command prompt and run the following command: vgextend myvg /dev/sdd Replace "myvg" with the name of the volume group you want to extend. "/dev/sdd" represents the physical volume you want to add.
- The command above adds the specified physical volume to the existing volume group, expanding its storage capacity.
- You can verify the successful extension of the volume group by running the vgdisplay myvg command.
Reducing a Volume Group: If you need to remove physical volumes from a volume group, follow these steps:
- Ensure that the physical volumes you want to remove are not being used by any logical volumes. Use the appropriate commands to remove or migrate any logical volumes associated with the physical volumes.
- Open a terminal or command prompt and run the following command: vgreduce myvg /dev/sdd Replace "myvg" with the name of the volume group you want to reduce. "/dev/sdd" represents the physical volume you want to remove.
- The command above removes the specified physical volume from the volume group, reducing its storage capacity.
- You can verify the successful reduction of the volume group by running the vgdisplay myvg command.
Logical Volumes
Logical volumes are an integral part of the Logical Volume Manager (LVM) that allow you to allocate and manage storage space within volume groups. In this guide, we'll cover the steps involved in creating, performing common operations, resizing, and removing logical volumes.
Creating Logical Volumes:
To create a logical volume, follow these steps:
- Open a terminal or command prompt and run the following command as the root user or with sudo privileges: lvcreate -n mylv -L 10G myvg Replace "mylv" with the desired name for your logical volume. "-L 10G" specifies the size of the logical volume (in this case, 10GB). "myvg" represents the volume group in which you want to create the logical volume.
- The command above creates a logical volume named "mylv" with a size of 10GB within the volume group "myvg".
- To verify the successful creation of the logical volume, you can use the following command: lvdisplay /dev/myvg/mylv This command displays detailed information about the logical volume, including its size, allocation, and metadata.
Common Operations on a Logical Volume:
Once you have created a logical volume, you can perform various operations on it, including:
- Formatting: Before you can use a logical volume, you may need to format it with a file system. For example, to format a logical volume with the ext4 file system, run the following command: mkfs.ext4 /dev/myvg/mylv
- Mounting: After formatting, you can mount the logical volume to a directory in your file system. For example, to mount the logical volume at /mnt/mylv, run the following command: mount /dev/myvg/mylv /mnt/mylv
- Access Control: You can set permissions and ownership for the logical volume using the chmod and chown commands, respectively.
- Data Backup and Restoration: Regularly backing up data stored in logical volumes is essential. You can use various backup tools and techniques to create backups and restore data when needed.
Resizing a Logical Volume:
If you need to resize a logical volume, follow these steps:
- Open a terminal or command prompt and run the following command as the root user or with sudo privileges: lvresize -L +2G /dev/myvg/mylv Replace "``/dev/myvg/mylv`" with the path to your logical volume. The "-L +2G" option increases the size of the logical volume by 2GB.
- The command above resizes the logical volume, increasing its size by the specified amount.
- You can verify the successful resizing of the logical volume by running the lvdisplay /dev/myvg/mylv command.
Removing a Logical Volume: To remove a logical volume, follow these steps:
- Ensure that the logical volume is not being used or mounted. Unmount it if necessary.
- Open a terminal or command prompt and run the following command as the root user or with sudo privileges: lvremove /dev/myvg/mylv Replace "/dev/myvg/mylv" with the path to your logical volume.
- The command above removes the specified logical volume from the system.
- You can verify the successful removal of the logical volume by attempting to display its information using the lvdisplay command. If the logical volume does not exist, it means the removal was successful.
Learn More
Conclusion
- LVM is a flexible storage management system that allows you to manage storage devices and allocate storage space more dynamically and efficiently.
- LVM operates using key components such as physical volumes (PVs), volume groups (VGs), and logical volumes (LVs).
- Physical volumes are the underlying storage devices, such as hard disk drives or solid-state drives, that are incorporated into the LVM infrastructure.
- Volume groups are created by combining multiple physical volumes, providing a way to manage storage collectively and allocate it as needed.
- Logical volumes are the logical partitions within volume groups, offering a more flexible and dynamic approach to allocating storage space.
- To work with LVM, you need to understand how to create, list, and remove physical volumes. This involves initializing storage devices, verifying their existence, and managing them within the LVM framework.
- Volume groups can be created by combining physical volumes, allowing for centralized management of storage resources and enabling flexible allocation to logical volumes.
- Once volume groups are created, you can perform operations such as extending or reducing them to add or remove physical volumes, respectively.
- Logical volumes are created within volume groups, providing a logical partition for data storage. They can be formatted with file systems, mounted, and used for various data management operations.
- Resizing logical volumes enables you to adjust their storage capacity to meet changing requirements. You can increase or decrease the size of logical volumes to accommodate changing storage needs.
- Common operations on logical volumes include formatting them with file systems, mounting them to directories, managing access control permissions, and performing data backup and restoration.
- Removing logical volumes involves unmounting them and using the appropriate command to remove them from the LVM system, freeing up storage space.
