Kubernetes Namespace
Overview
Kubernetes Namespace is a virtual cluster abstraction that allows users to create distinct environments within a single physical cluster. It enables better resource management, isolation, and organization by segregating applications and services. Each Namespace has its own set of resources, including pods, services, and configurations, making it a powerful tool for multi-tenancy and workload separation. By defining access controls and policies, namespaces promote secure and efficient collaboration among different teams or projects. Overall, Kubernetes Namespace is a crucial feature that enhances scalability and simplifies the management of complex containerized applications in a shared Kubernetes environment.
What are Kubernetes Namespaces?
Kubernetes Namespaces serve as a means to divide and categorize a single cluster within an organization into multiple manageable sub-clusters. These sub-clusters function as distinct modules where users from various teams can collaborate and exchange information as needed. Although each cluster operates independently, they remain interconnected and can even support nesting. By default, all resources reside in the default namespace, and commands apply to it unless otherwise specified.
When to Use Kubernetes Namespace?
Namespace in Kubernetes is utilized in diverse scenarios for specific purposes:
-
Sandbox Development:
To test new microservices for operational projects, isolating the testing environment is vital. This enables iterative improvements without affecting live processes visibly.
-
Project Compartmentalization:
Organizations run multiple projects with different departments working concurrently. Creating a dedicated space for each project and team is essential to protect resources and restrict access to non-team members.
-
Resource Control:
Efficiently dividing resources among teams, projects, and modules helps avoid resource contention and performance degradation caused by memory leaks or excessive resource demands.
-
Access and Permissions:
Implementing Role-Based Access Controls (RBAC) is crucial for secure application development. Namespaces can impose additional restrictions, preventing unauthorized access and safeguarding microservices and overall security.
Using Multiple Namespaces
Using multiple namespaces in Kubernetes allows for better organization, resource management, and isolation of applications and services within a cluster. By creating distinct namespaces, you can logically separate different projects, teams, or environments, preventing potential conflicts and promoting secure collaboration. Some benefits of using multiple namespace in Kubernetes include:
-
Isolation:
Each namespace operates as a separate virtual cluster, providing isolation and minimizing interference between different applications. This isolation enhances security and stability.
-
Resource Allocation:
By partitioning resources across namespaces, you can ensure that applications within each namespace have access to the necessary computing power, memory, and storage without affecting others.
-
Access Control:
Kubernetes supports Role-Based Access Control (RBAC), allowing you to define granular access policies for each namespace. This means you can control which users or teams have permission to view, modify, or delete resources within a specific namespace.
-
Multitenancy:
Using multiple namespaces facilitates the implementation of multi-tenancy, where multiple users or teams share the same Kubernetes cluster while operating independently.
-
Environment Segregation:
You can have namespaces for different deployment environments (e.g., development, staging, production), enabling consistent application promotion from one environment to another.
-
Namespace Quotas:
Kubernetes allows setting resource quotas per namespace, preventing resource abuse and ensuring fair allocation.
-
Namespace Scoping:
Some Kubernetes resources are only accessible within the same namespace, providing a level of scoping that helps avoid naming collisions and promotes cleaner configurations.
Working with Namespaces in Kubernetes
1. Viewing Namespaces
Namespace in Kubernetes serve as virtual clusters, allowing the logical separation of resources. To view the existing namespaces in your cluster, you can use the kubectl get namespaces command. This will list all available namespaces along with their basic information like status, age, and labels.
2. Setting the Namespace for a Request
When interacting with Kubernetes resources through kubectl or API clients, you can specify the target namespace for your operations. To do this, use the --namespace flag followed by the desired namespace name. For example, to deploy a pod in the my-namespace namespace, run: kubectl create pod my-pod --namespace my-namespace.
3. Setting the Namespace Preference
To avoid repeatedly specifying the --namespace flag, you can set a default namespace preference. This way, all subsequent kubectl commands will be executed in the specified namespace. Use the kubectl config set-context command to set the default namespace. For instance: kubectl config set-context --current --namespace=my-namespace.
a) Namespaces and DNS
Kubernetes assigns a unique DNS name to each service within a namespace. This enables communication between services using their DNS names, which follow the format:
Example:
1. Create Namespaces:
2. Deploy Services:
In the frontend Namespace, you deploy a frontend service:
Similarly, in the backend Namespace, you deploy a backend service:
3. DNS Communication:
Now, since Kubernetes assigns a unique DNS name to each service within a Namespace, you can access these services using their DNS names.
To access the frontend service within the frontend Namespace:
For the backend service within the backend Namespace:
The DNS names follow the format <service-name>.<namespace-name>.svc.cluster.local.
By utilizing these DNS names, services within the same Namespace can communicate with each other seamlessly without needing to remember IP addresses or ports.
b) Not all Objects are in a Namespace
Some Kubernetes objects, like Nodes and PersistentVolumes, are not bound to any specific namespace and are available cluster-wide. They are shared resources accessible from any namespace.
c) Automatic Labelling
Kubernetes automatically assigns a label called namespace to all resources created within a namespace. This label allows you to filter and manage resources based on their namespaces efficiently.
Creating a Namespace in Kubernetes
In Kubernetes, you can create namespaces to logically isolate and organise resources. Namespaces provide a way to group related objects, such as pods, services, and deployments, within a virtual cluster. This segregation helps prevent naming conflicts and allows for better resource management and access control.
1. Creating Namespace with YAML
To create a namespace using the YAML manifest, you can follow these steps:
Create a file (e.g., namespace.yaml) with the following content:
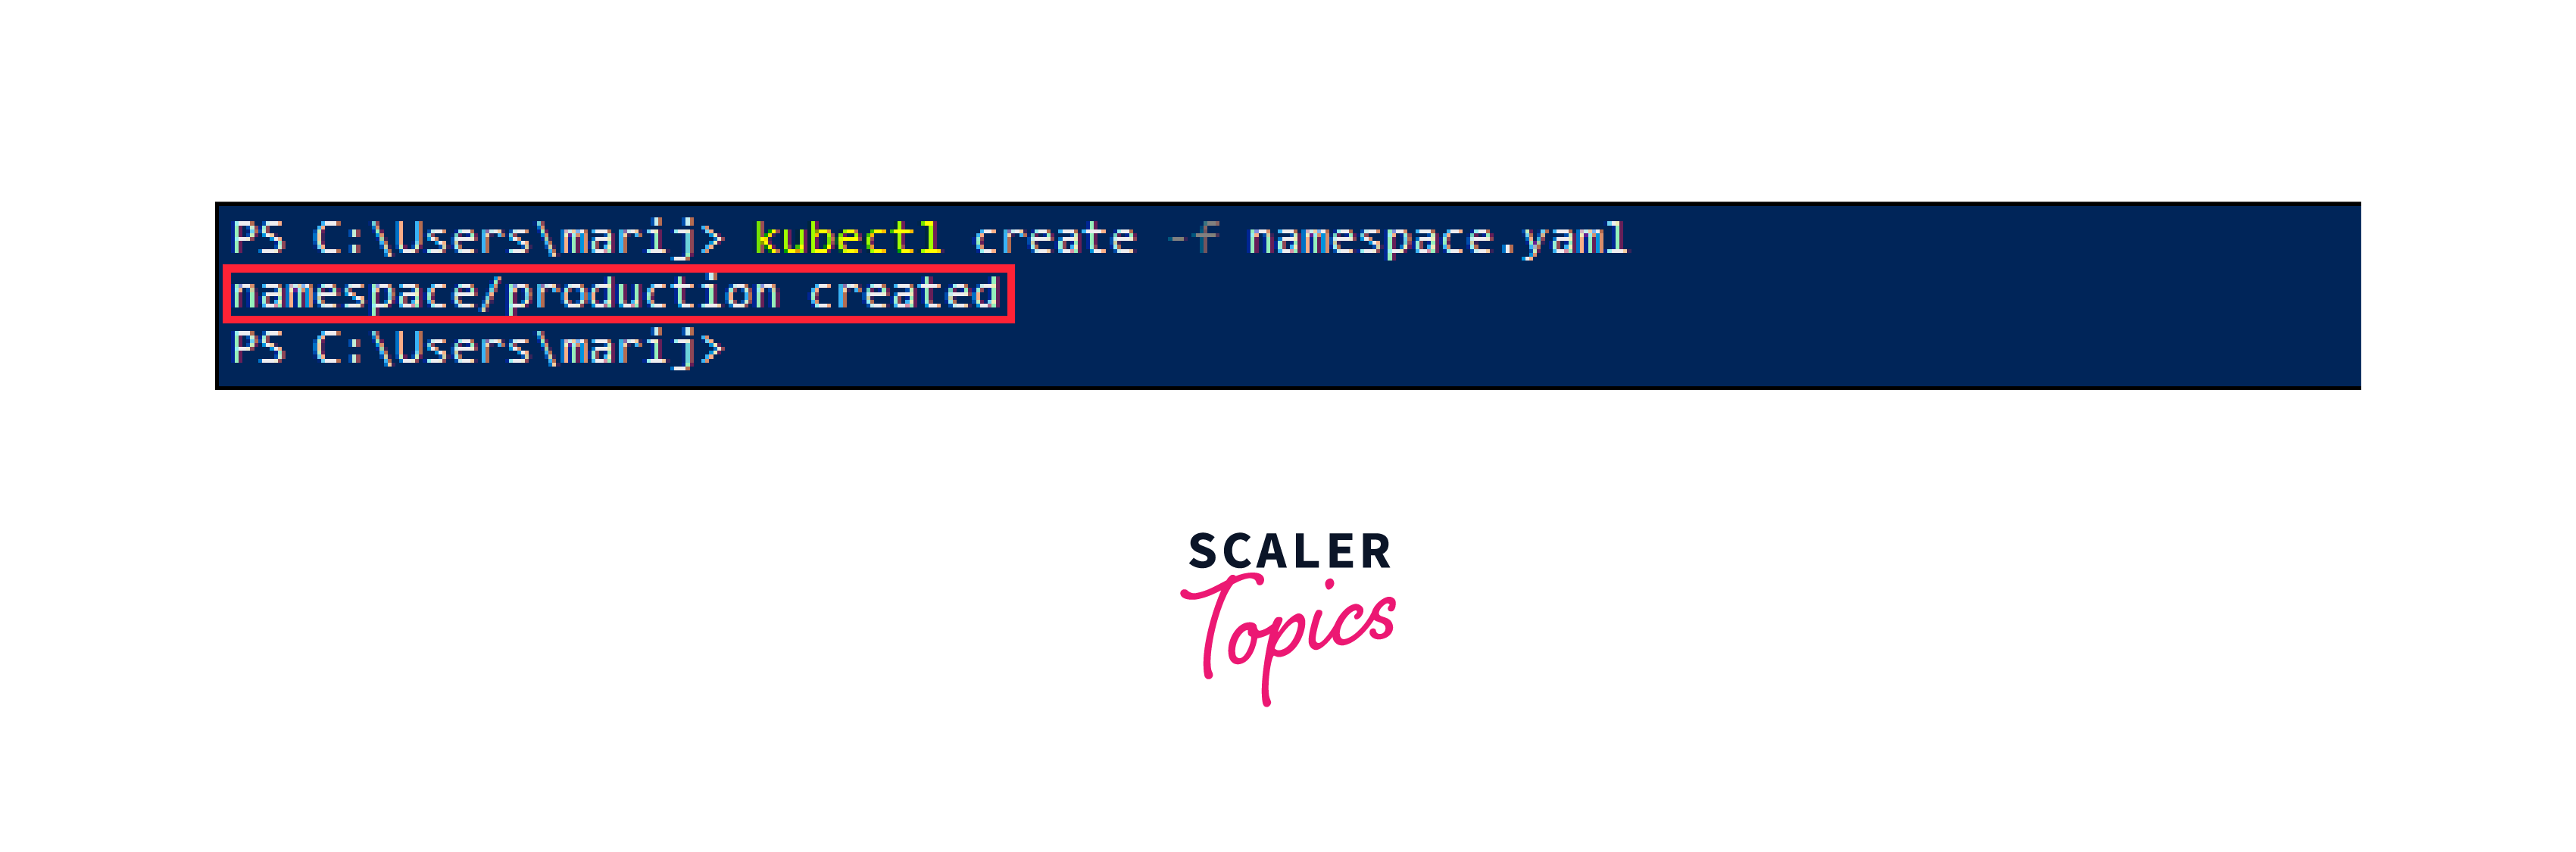
Save the file, and then apply the YAML manifest using kubectl:
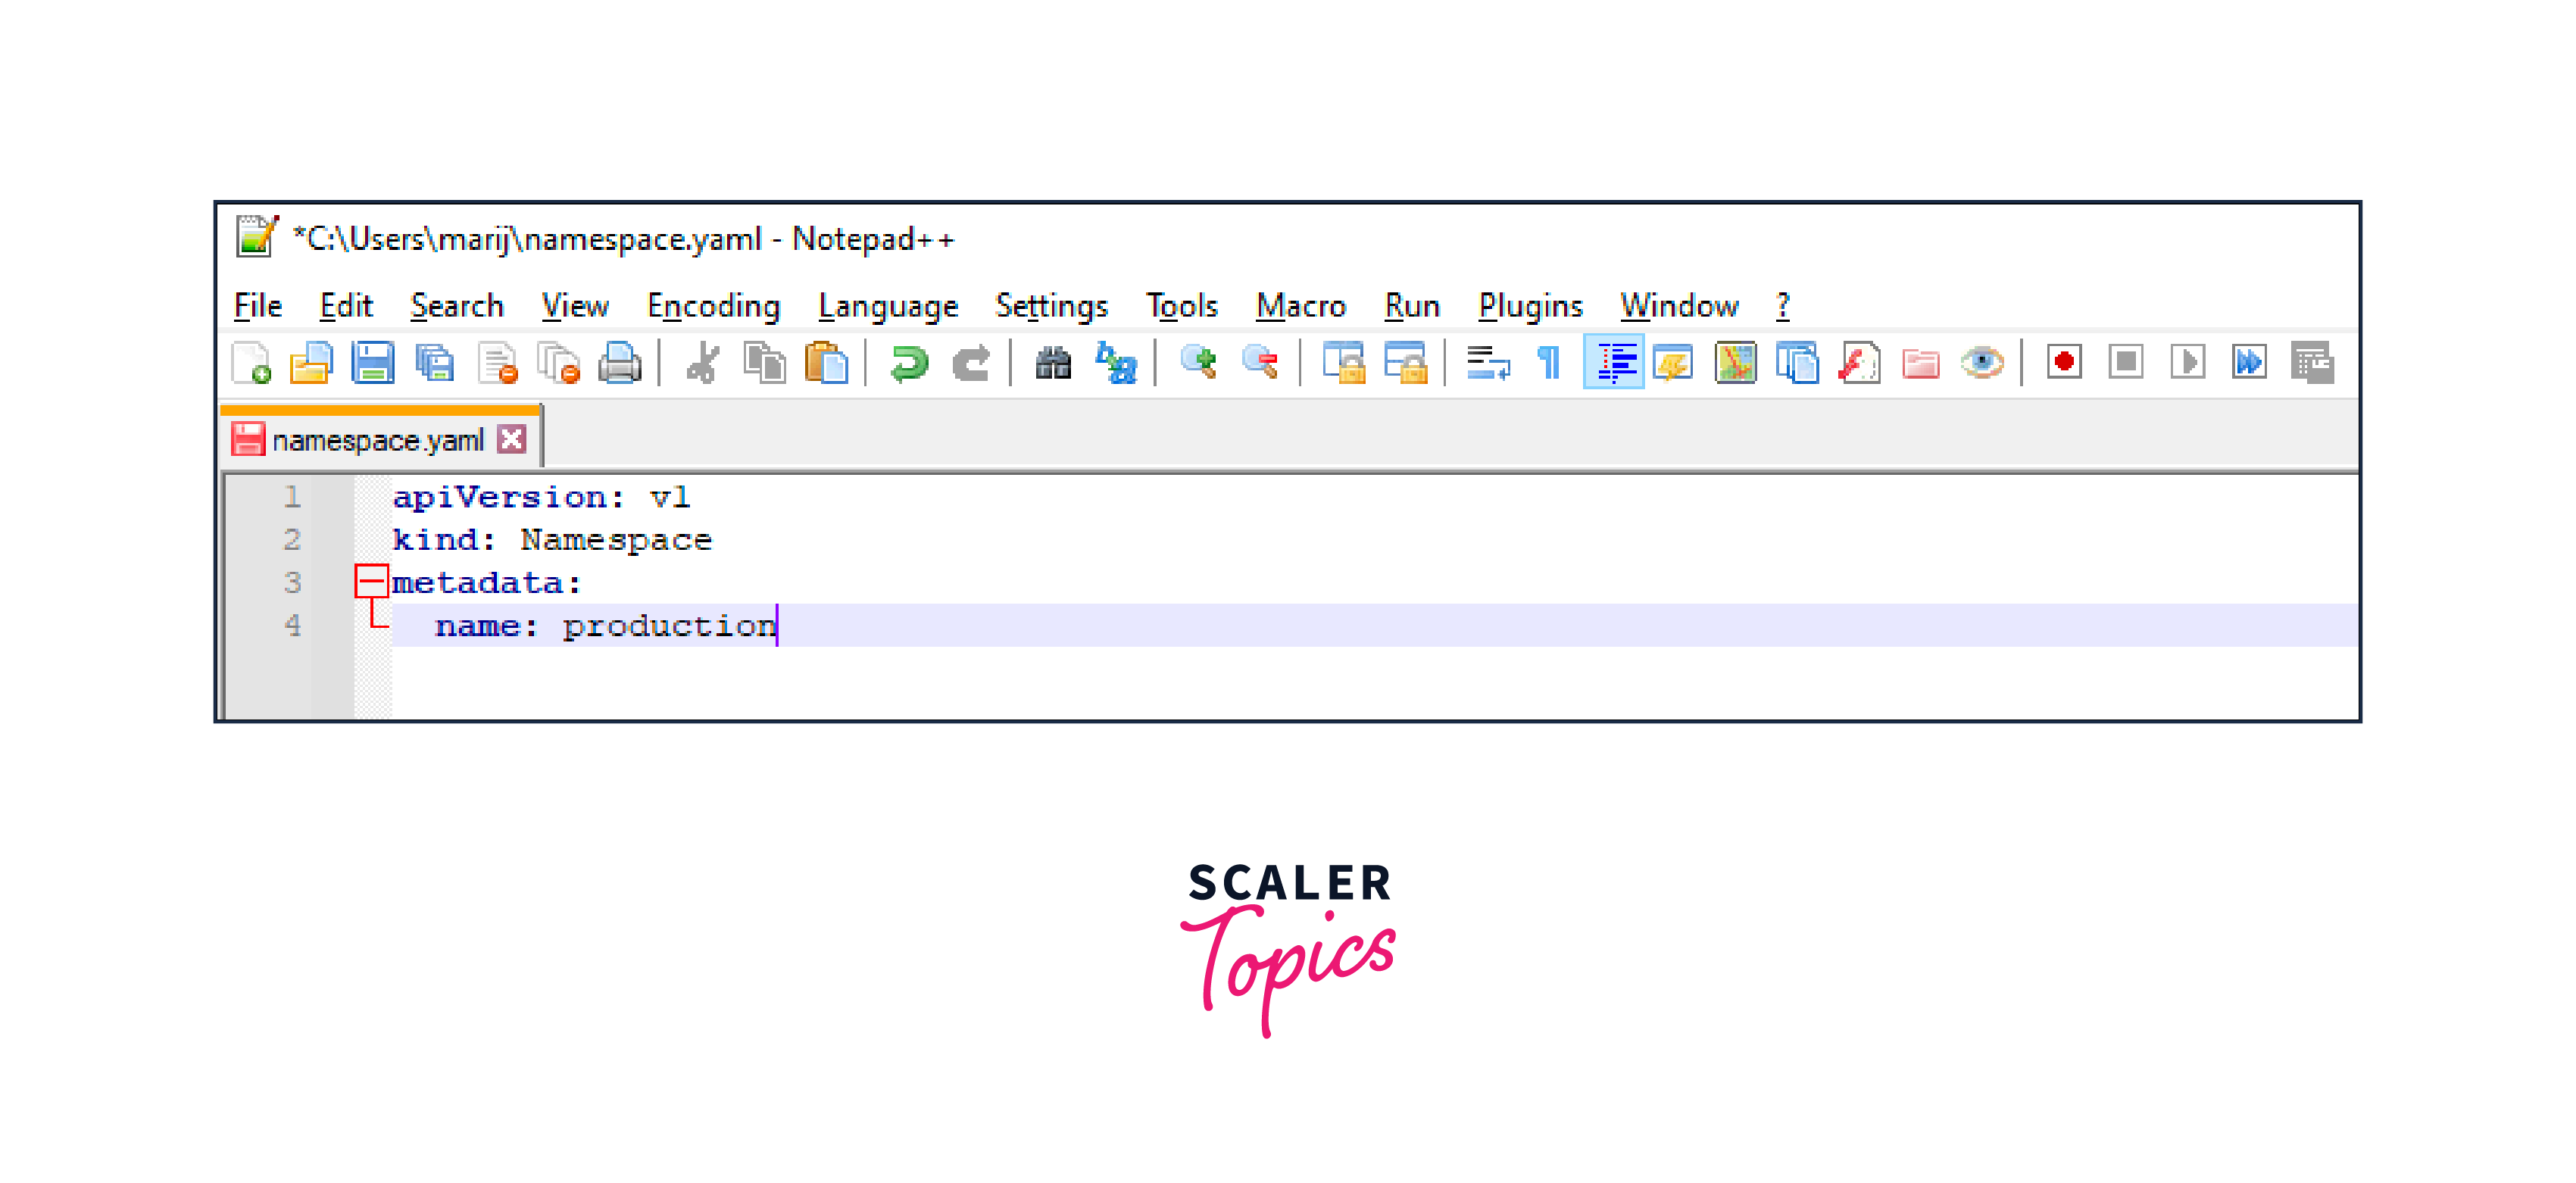
kubectl apply -f namespace.yaml
This will create a new namespace named production. You can verify its existence using kubectl get namespaces:
kubectl get namespaces
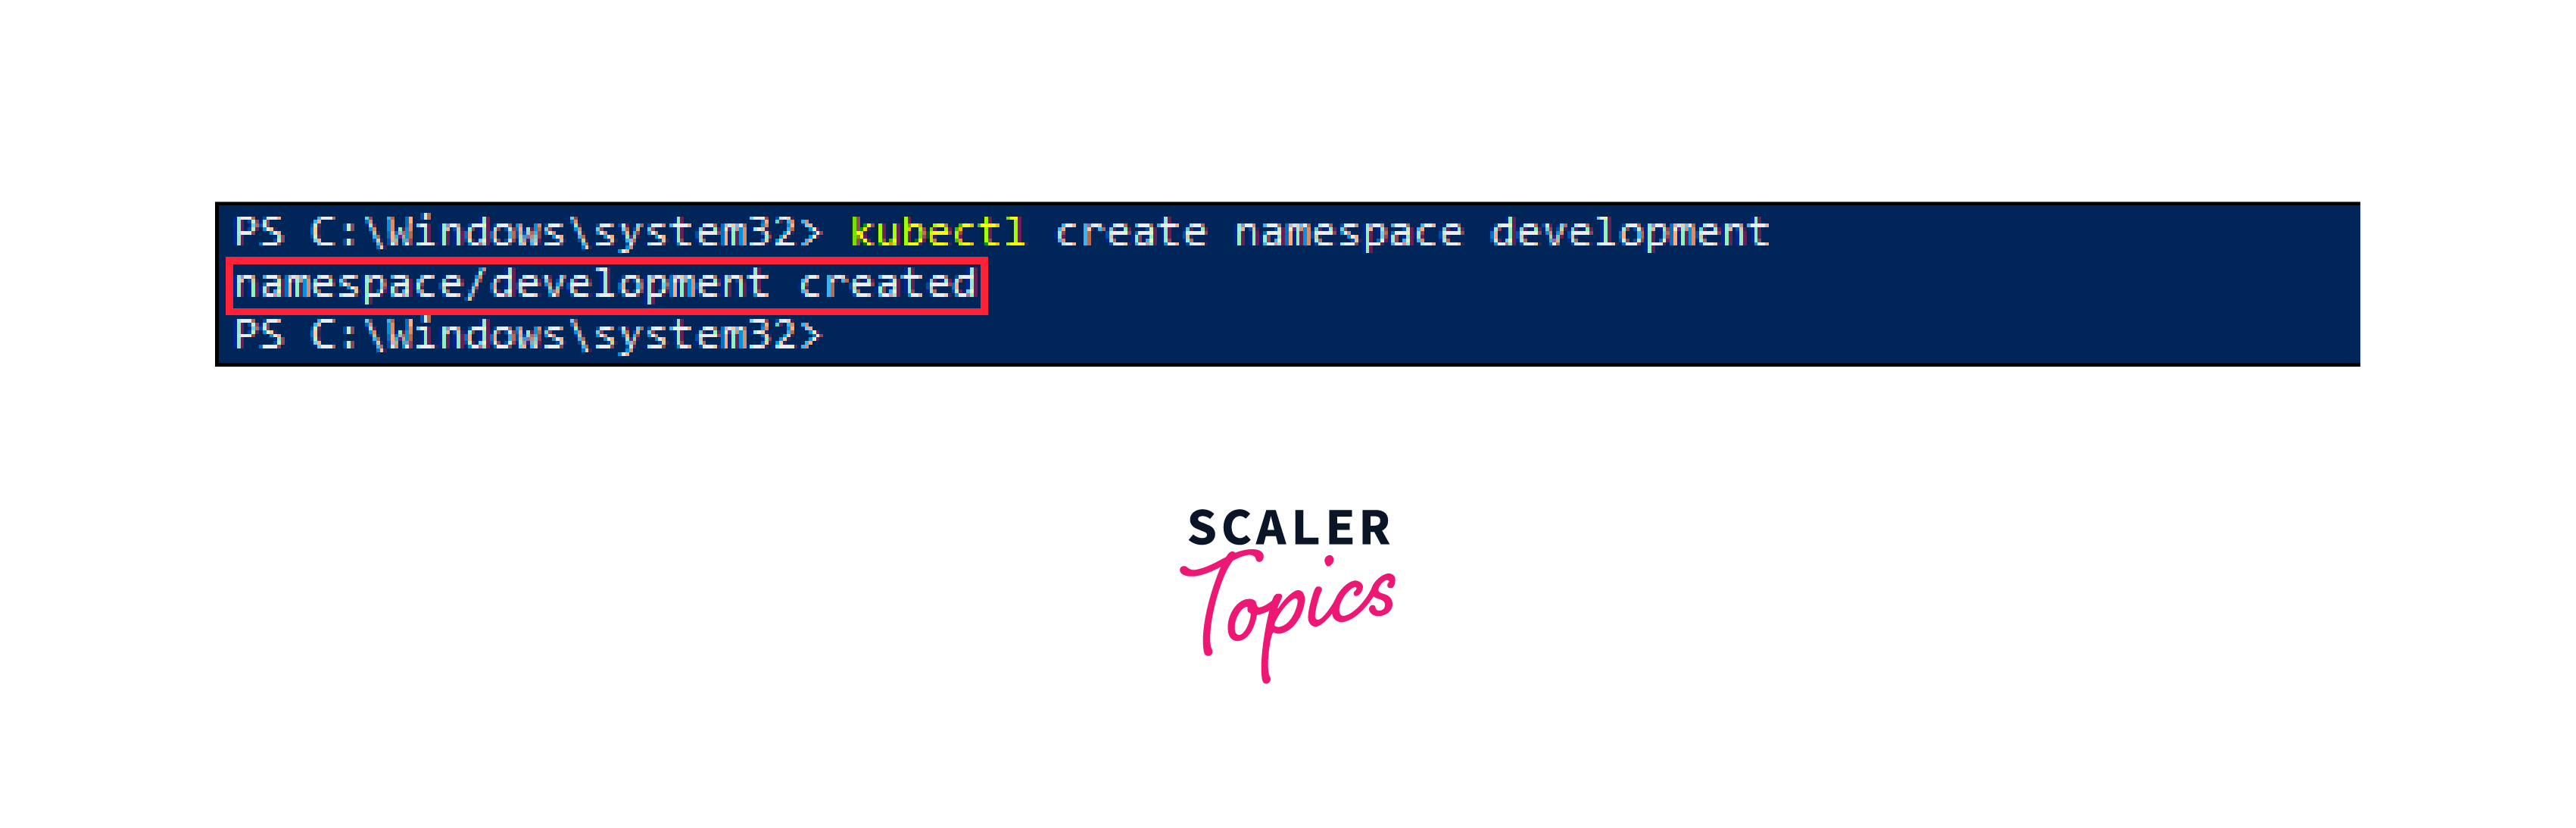
2. Creating Namespace without YAML
You can also create a namespace directly using the kubectl create namespace command. For example, to create a namespace called development, run:
kubectl create namespace development
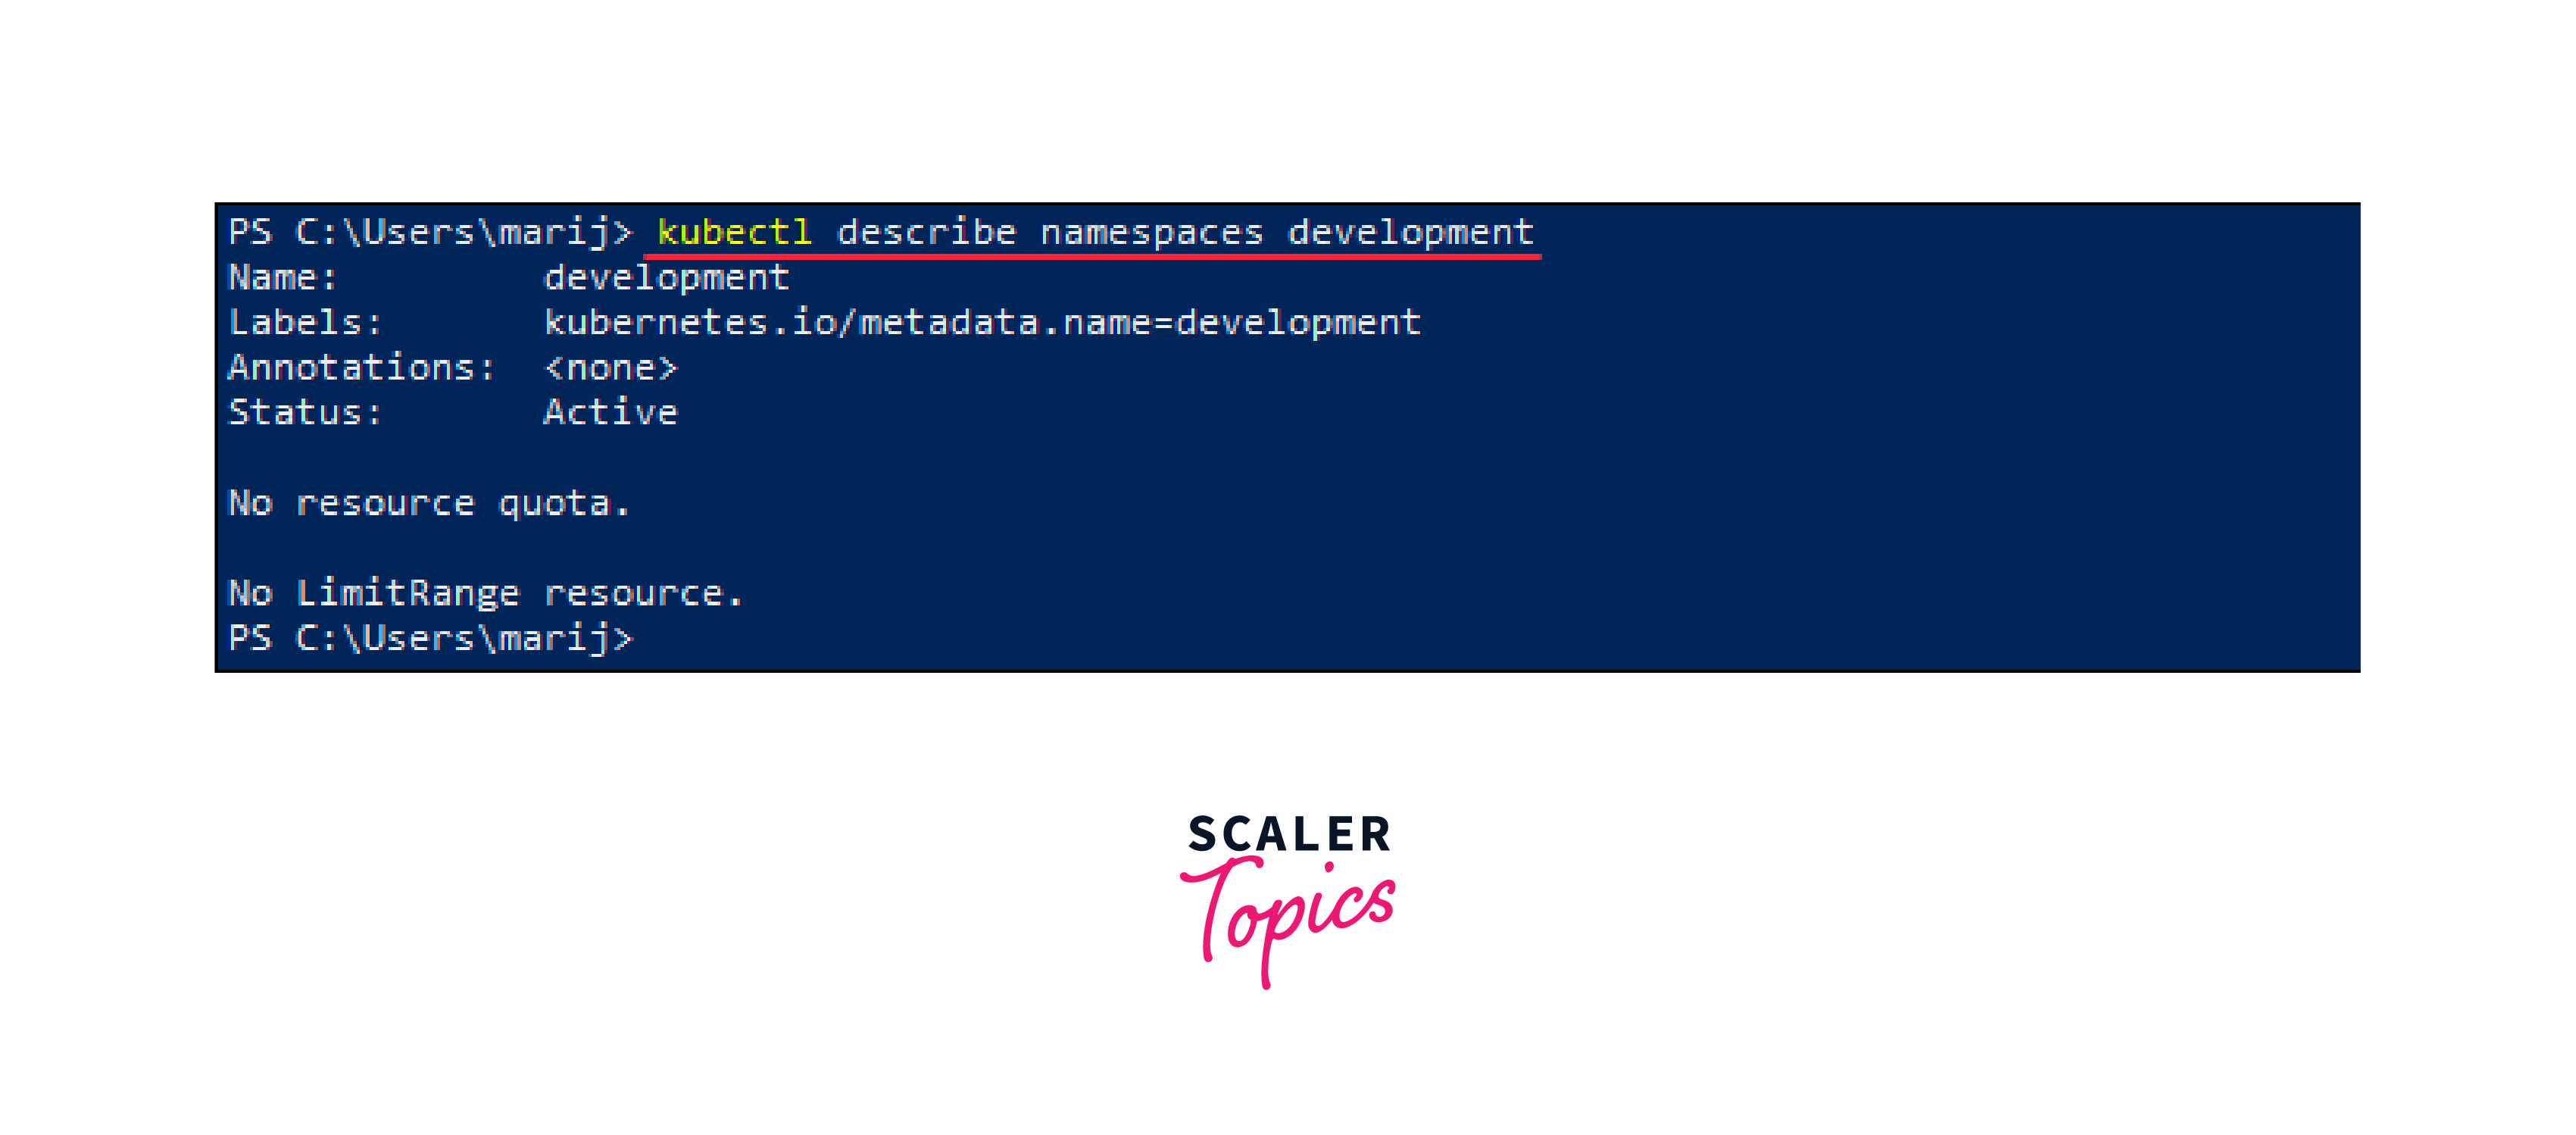
To confirm that the namespace in Kubernetes was created successfully, you can again use kubectl to get namespaces:
kubectl get namespaces
Creating namespaces is a fundamental aspect of Kubernetes resource management. By using namespaces effectively, we can better organise your resources, enhance security, and facilitate collaborative development within your Kubernetes cluster.
Benefits of Namespace in Kubernetes
Namespaces in Kubernetes offer several benefits that are crucial for managing and organizing resources within a cluster. Some of the key advantages include:
-
Resource Isolation:
Namespace in Kubernetes provides a virtual cluster abstraction, allowing you to isolate different applications and services logically. This isolation prevents naming conflicts and ensures that resources within one namespace do not interfere with resources in other namespaces.
-
Access Control and Security:
Kubernetes supports Role-Based Access Control (RBAC) at the namespace level. This means you can define specific access policies and permissions for different teams or users, limiting their actions to only the resources within their assigned namespace. This enhances security and reduces the risk of unauthorized access.
-
Resource Management:
By using namespaces, you can allocate resources efficiently to different teams or projects. This helps prevent resource contention and ensures that each application or service gets the necessary computing power, memory, and storage to function optimally.
-
Organisational Structure:
Namespaces enable the better organization of resources based on projects, environments (e.g., development, staging, production), or teams. This logical grouping simplifies the management and maintenance of complex applications and facilitates collaboration among different teams.
-
Namespace Quotas:
Kubernetes allows you to set resource quotas per namespace. This ensures that no single namespace can consume excessive resources, avoiding resource hogging and promoting fair resource distribution across the cluster.
-
DNS-Based Service Discovery:
Each namespace has its own DNS domain, which allows services within a namespace to communicate using their DNS names. This simplifies service discovery and communication between different components of applications within the same namespace.
-
Multitenancy Support:
Namespace in Kubernetes enables multi-tenancy, allowing multiple users or teams to share the same Kubernetes cluster while keeping their resources and configurations separate. This promotes efficient resource utilization in a shared environment.
-
Sandbox and Testing Environments:
Namespaces are ideal for creating sandbox environments and testing new features or applications without affecting the production environment. This promotes experimentation and iterative development.
FAQs
Q1. What is namespace in Kubernetes?
Ans: A Namespace in Kubernetes is a virtual cluster abstraction that allows you to logically divide and isolate resources within a single physical cluster. It provides a way to organize and manage different applications, services, and deployments, ensuring better resource allocation and access control.
Q2. Are there any default Namespaces in Kubernetes?
Ans: Yes, Kubernetes comes with some default Namespaces, including default, kube-system, and kube-public. The default Namespace is where resources exist if no other Namespace is specified explicitly.
Q3. Can I delete a Namespace and all its resources?
Ans: Yes, you can delete a Namespace and all its resources using kubectl delete namespace my-namespace. This will remove all resources associated with the Namespace, but be cautious, as this action is irreversible.
Q4. Can I apply resource quotas to limit resource usage in a Namespace in Kubernetes?
Ans: Yes, Kubernetes allows you to set resource quotas per Namespace. This feature prevents a Namespace from consuming excessive resources and helps in fair resource allocation across the cluster.
Conclusion
- Kubernetes Namespace is a virtual cluster abstraction that allows the logical separation of resources within a single physical cluster.
- Namespaces provide resource isolation, preventing naming conflicts and interference between different applications and teams.
- Namespaces are created using YAML manifests or the kubectl create namespace command.