Database Connection
Overview
Power BI has emerged as a powerful business intelligence tool for extracting valuable and actionable insights from data in the ever-evolving landscape of data analysis and visualization. This article explores the vital aspect of database connections within Power BI. In this article, we'll delve into the key Power BI data connections and how to connect to them using Power BI, empowering users to harness the full potential of Power BI's data connectivity capabilities. Whether you're a beginner or an experienced user, this article will equip you with the knowledge to efficiently connect, transform, and visualize data from diverse databases.
What are Databases?
Databases are organized collections of structured data designed to store, retrieve, and manage information efficiently. They serve as digital warehouses where data is stored in tables, each with defined fields/schemas and relationships. This structured approach makes it easier to access and manipulate data for various purposes, such as analysis, reporting, and decision-making. Databases come in various types, including relational databases (e.g., Microsoft SQL Server, MySQL), NoSQL databases (e.g., MongoDB, Cassandra), and cloud-based databases (e.g., Amazon RDS, Azure Cosmos DB).
Types of Database Systems
Databases come in various forms to accommodate different data storage and management needs. Three primary types of database systems are SQL (Structured Query Language) databases, NoSQL databases, and Cloud-Based databases.
-
SQL Databases -
SQL databases are relational database management systems (RDBMS) that use structured tables with predefined schemas. They excel in handling structured data, ensuring data integrity through ACID (Atomicity, Consistency, Isolation, Durability) transactions. Examples include Microsoft SQL Server, MySQL, and PostgreSQL. SQL databases are ideal for applications with well-defined data structures, like financial systems or traditional business applications.
-
NoSQL Databases -
NoSQL databases are designed for unstructured or semi-structured data and offer flexibility in data modeling. They are suitable for handling large volumes of data with varying formats, making them prevalent in modern web and mobile applications. Examples include MongoDB (document-oriented), Cassandra (column-family), and Redis (key-value store). NoSQL databases can efficiently manage data like social media posts, sensor data, and user-generated content.
-
Cloud-Based Databases -
Cloud-based databases are hosted on cloud platforms like Amazon Web Services (AWS), Microsoft Azure, or Google Cloud Platform (GCP). They provide scalable and cost-effective solutions for data storage and management. Cloud-based databases can be either SQL or NoSQL, offering options like Amazon RDS (SQL), Azure Cosmos DB (NoSQL), and Google Cloud Bigtable (NoSQL). These databases allow organizations to offload infrastructure management and scale resources according to their needs.
Different Database Data Sources in Power BI
SQL
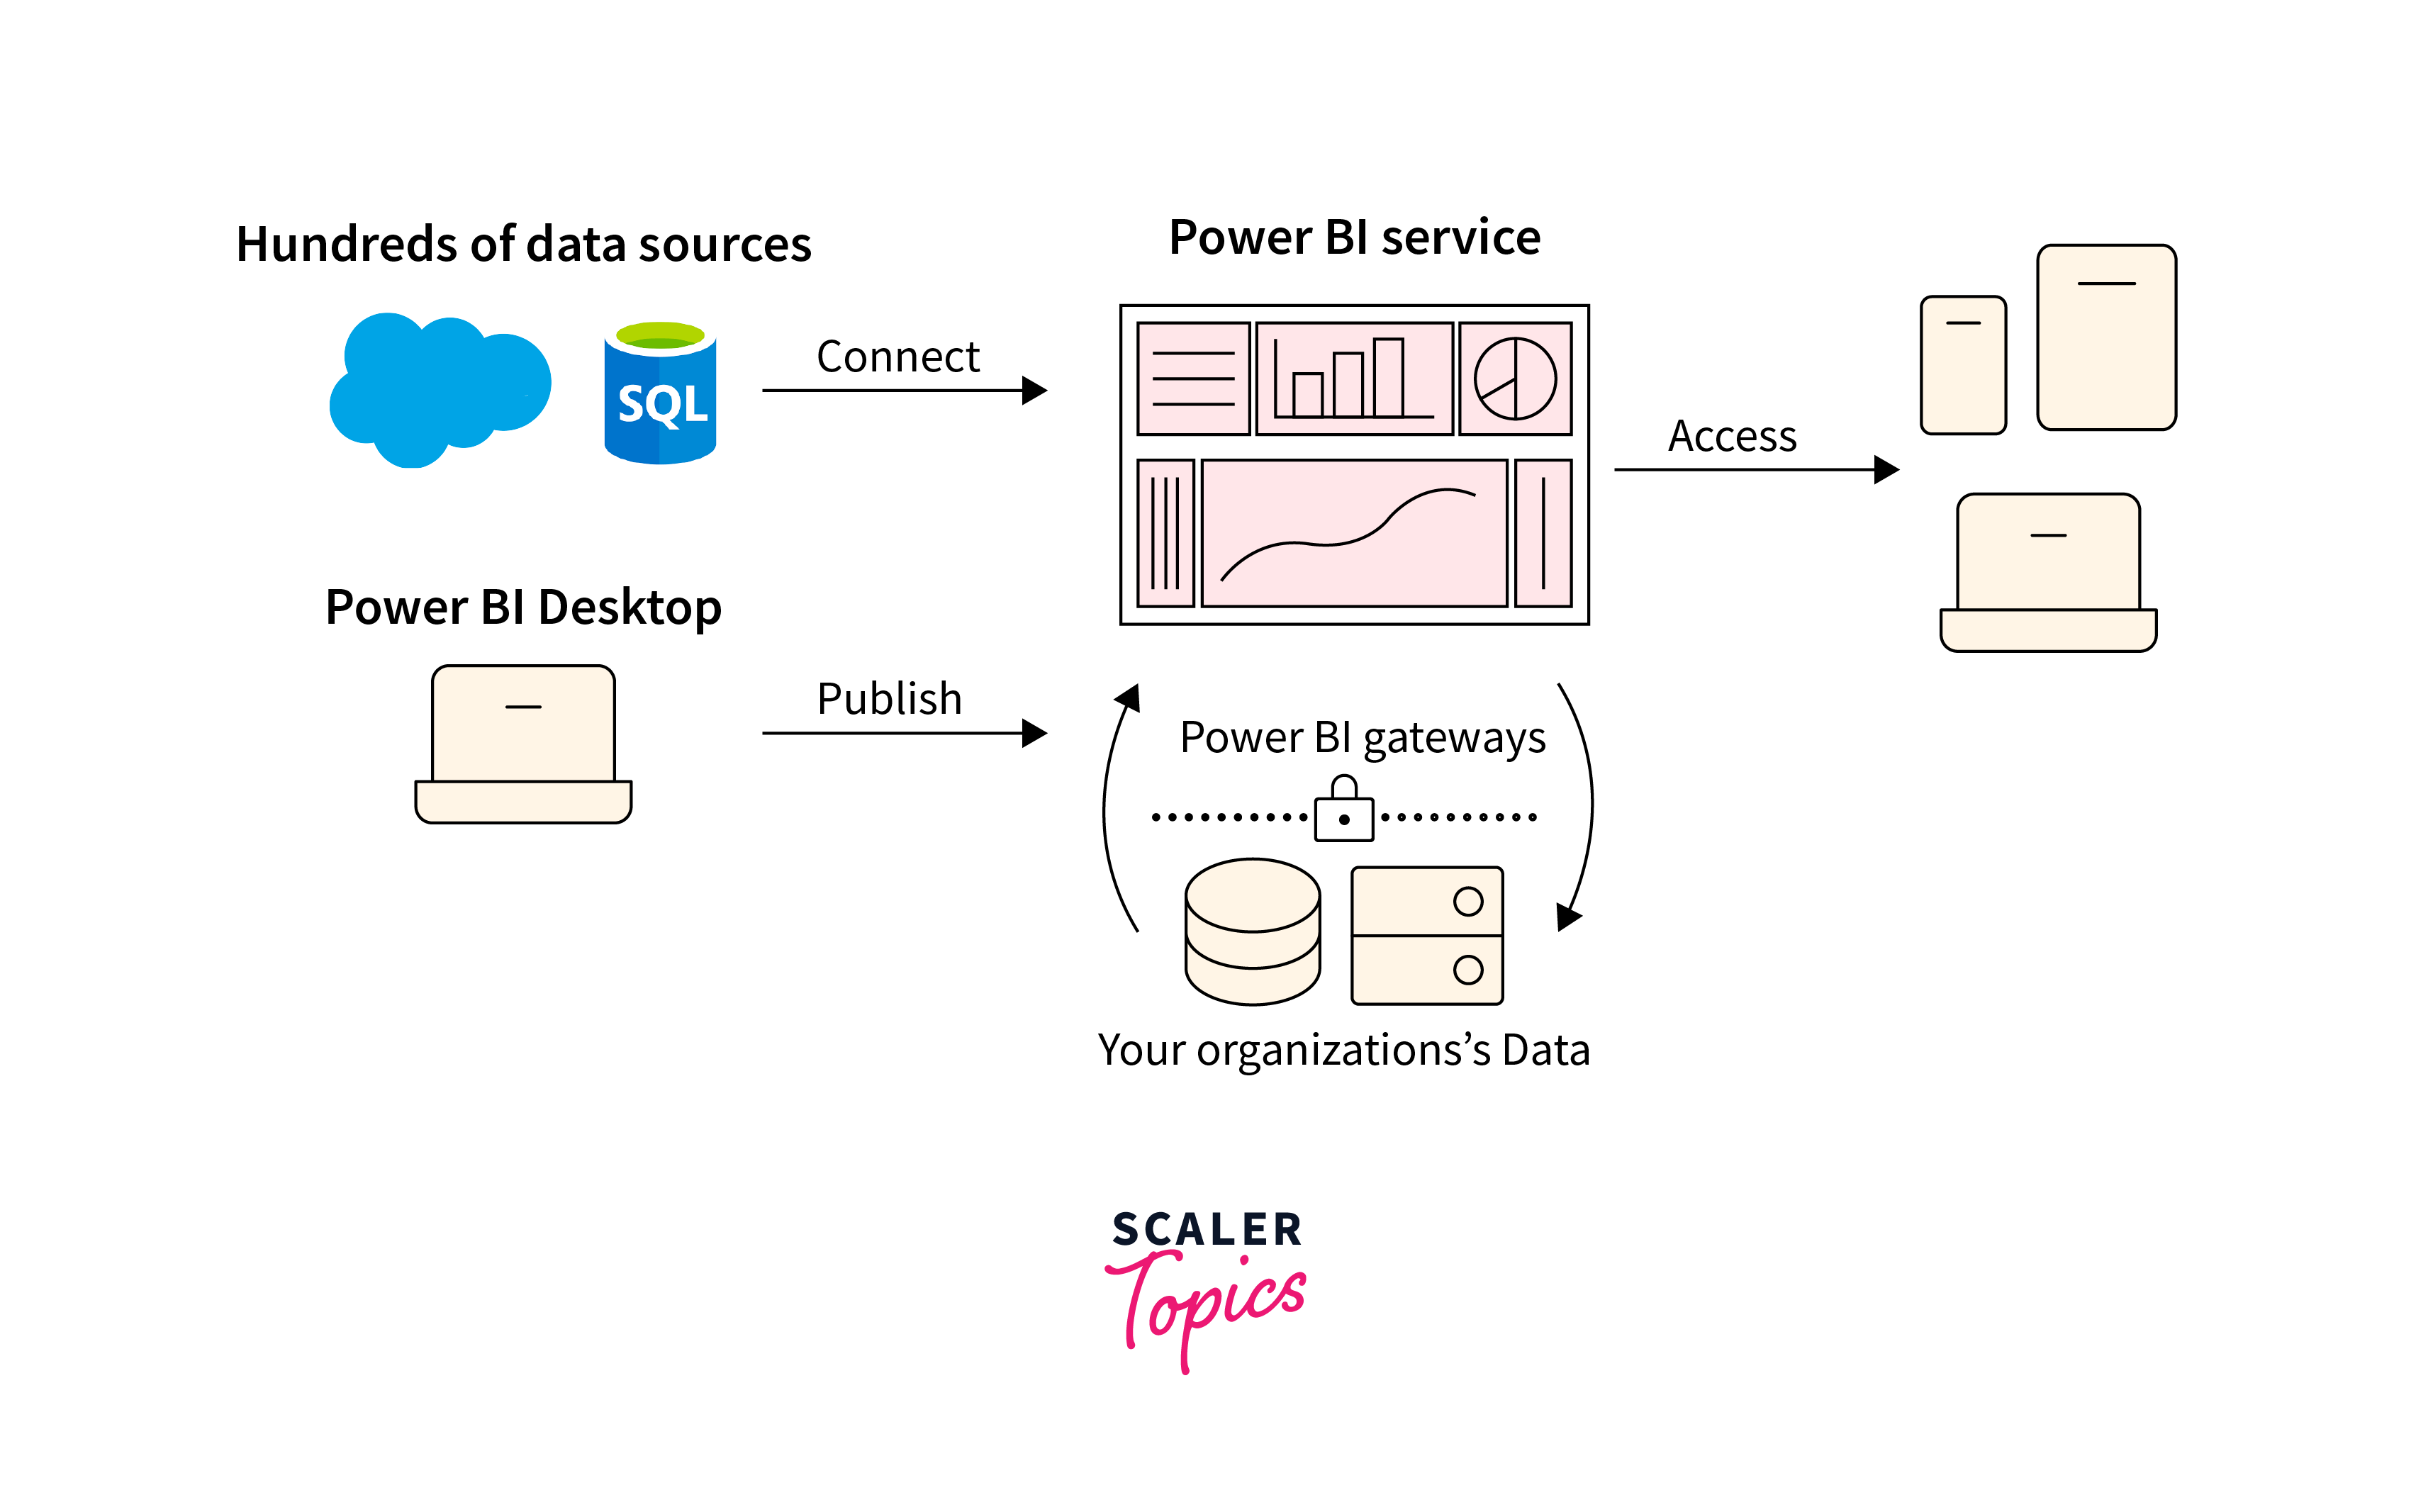
Power BI offers seamless connectivity to SQL databases, including popular systems like Microsoft SQL Server, MySQL, and PostgreSQL. SQL databases are structured and ideal for storing well-defined data. With Power BI, you can establish connections to these databases, extract data, and create dynamic visualizations and reports. This integration enables businesses to leverage their structured data efficiently for data analysis, reporting, and decision-making within the Power BI environment.
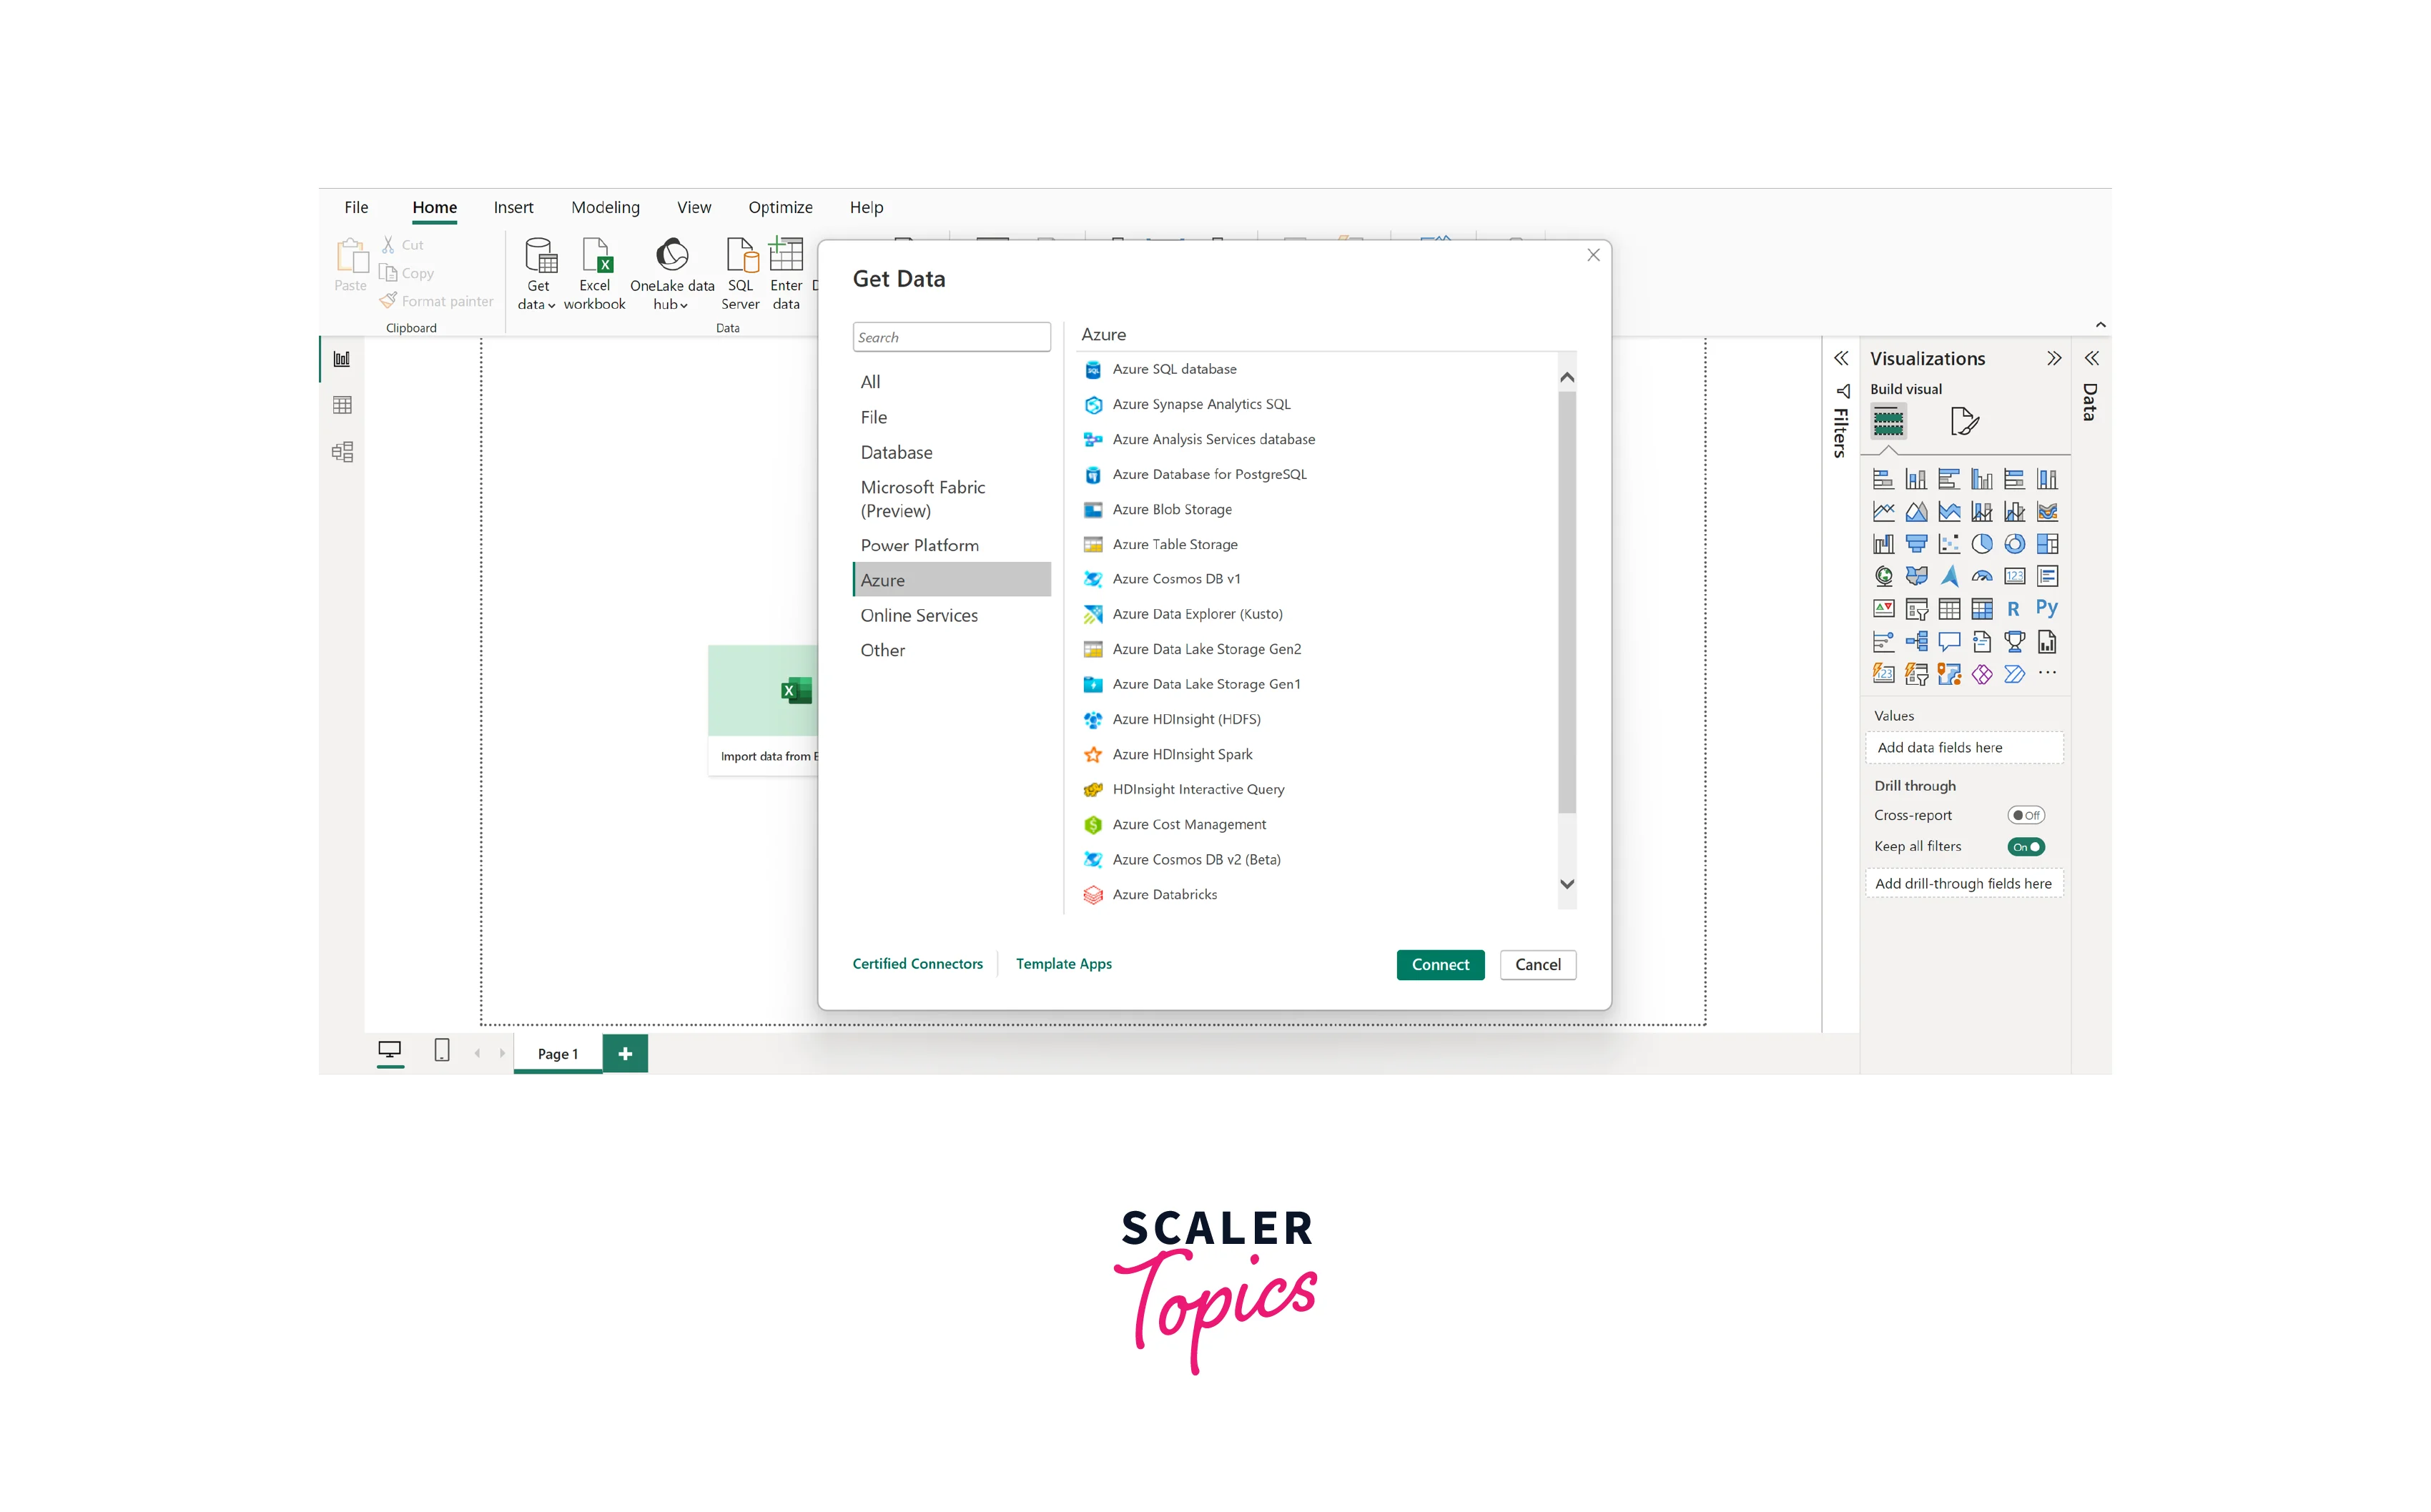
Azure
Power BI provides native support for Azure data sources, making it effortless to connect and analyze data stored in Azure services. Azure offers a broad spectrum of data services, including Azure SQL Database, Azure Cosmos DB, and Azure Data Lake Storage. Power BI's integration with Azure allows users to access and visualize data from these cloud-based sources seamlessly.
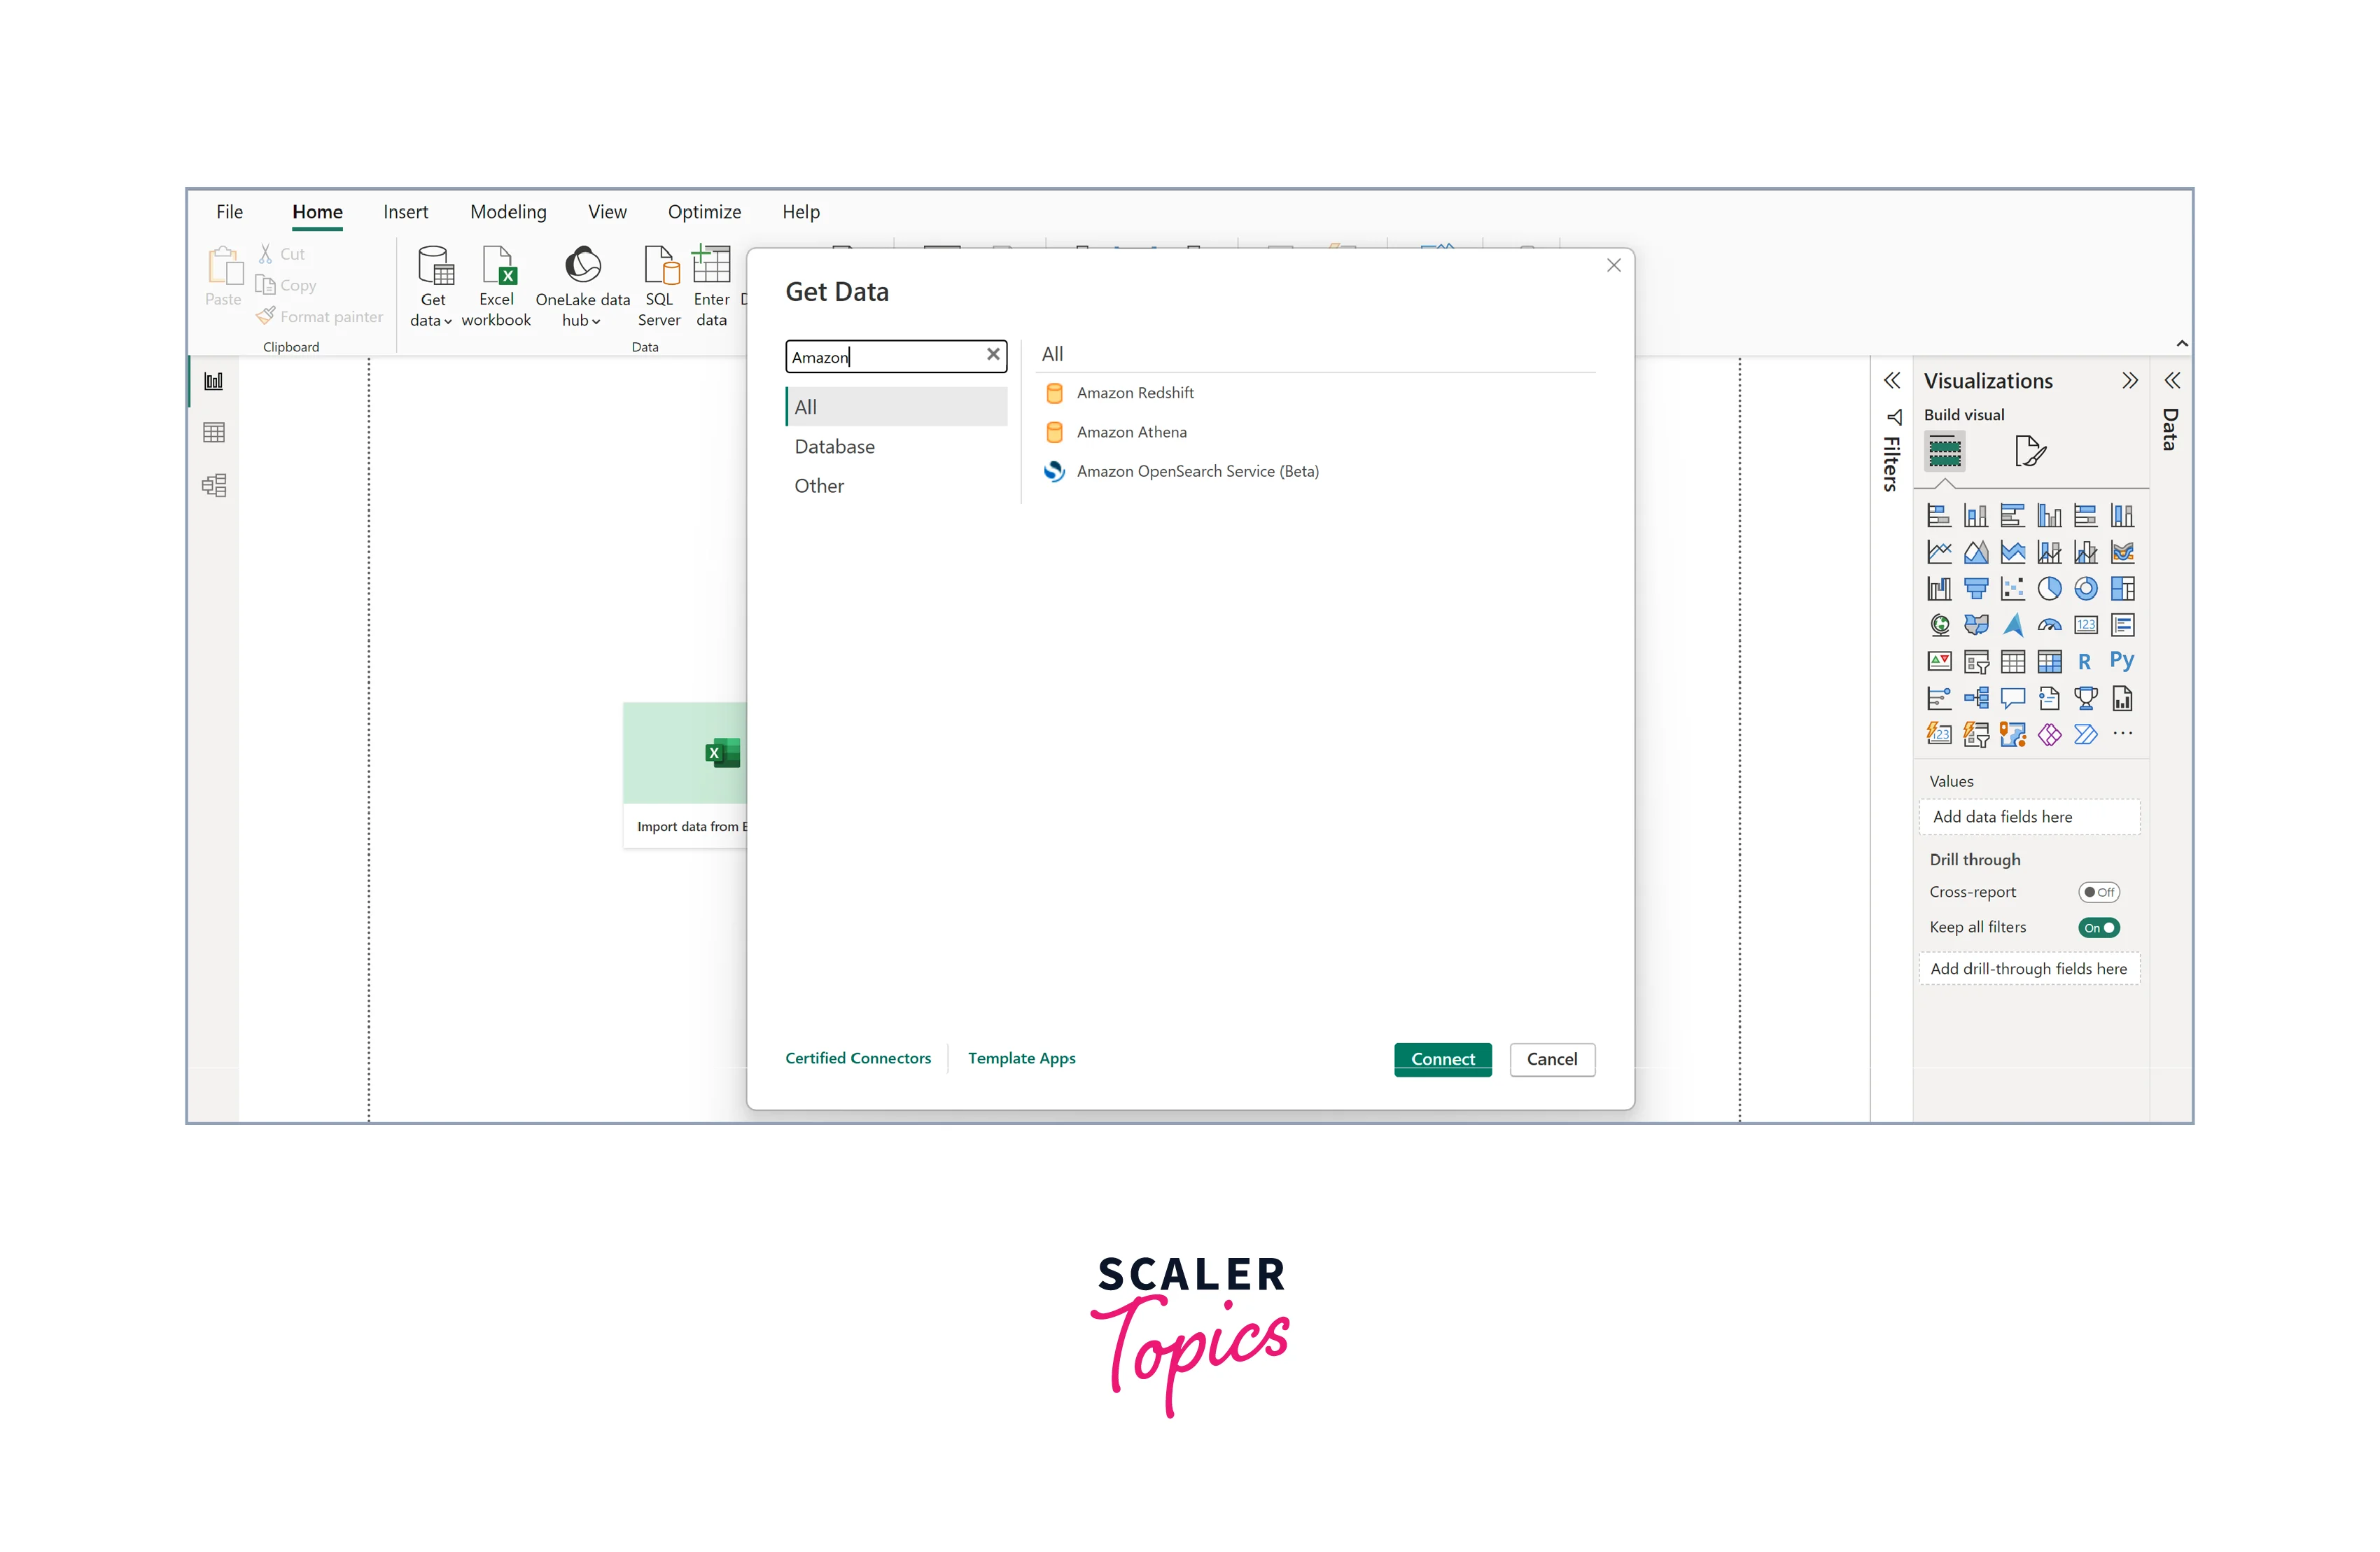
AWS
Power BI extends its compatibility to Amazon Web Services (AWS) data sources, enabling users to tap into data stored within the AWS ecosystem. Whether Amazon RDS (Relational Database Service), Amazon Redshift (data warehousing), or data lakes in Amazon S3, Power BI offers connectivity to these AWS services. This integration streamlines data extraction, analysis, and visualization processes, allowing businesses to leverage AWS's cloud infrastructure and Power BI's reporting capabilities for comprehensive insights and informed decision-making.
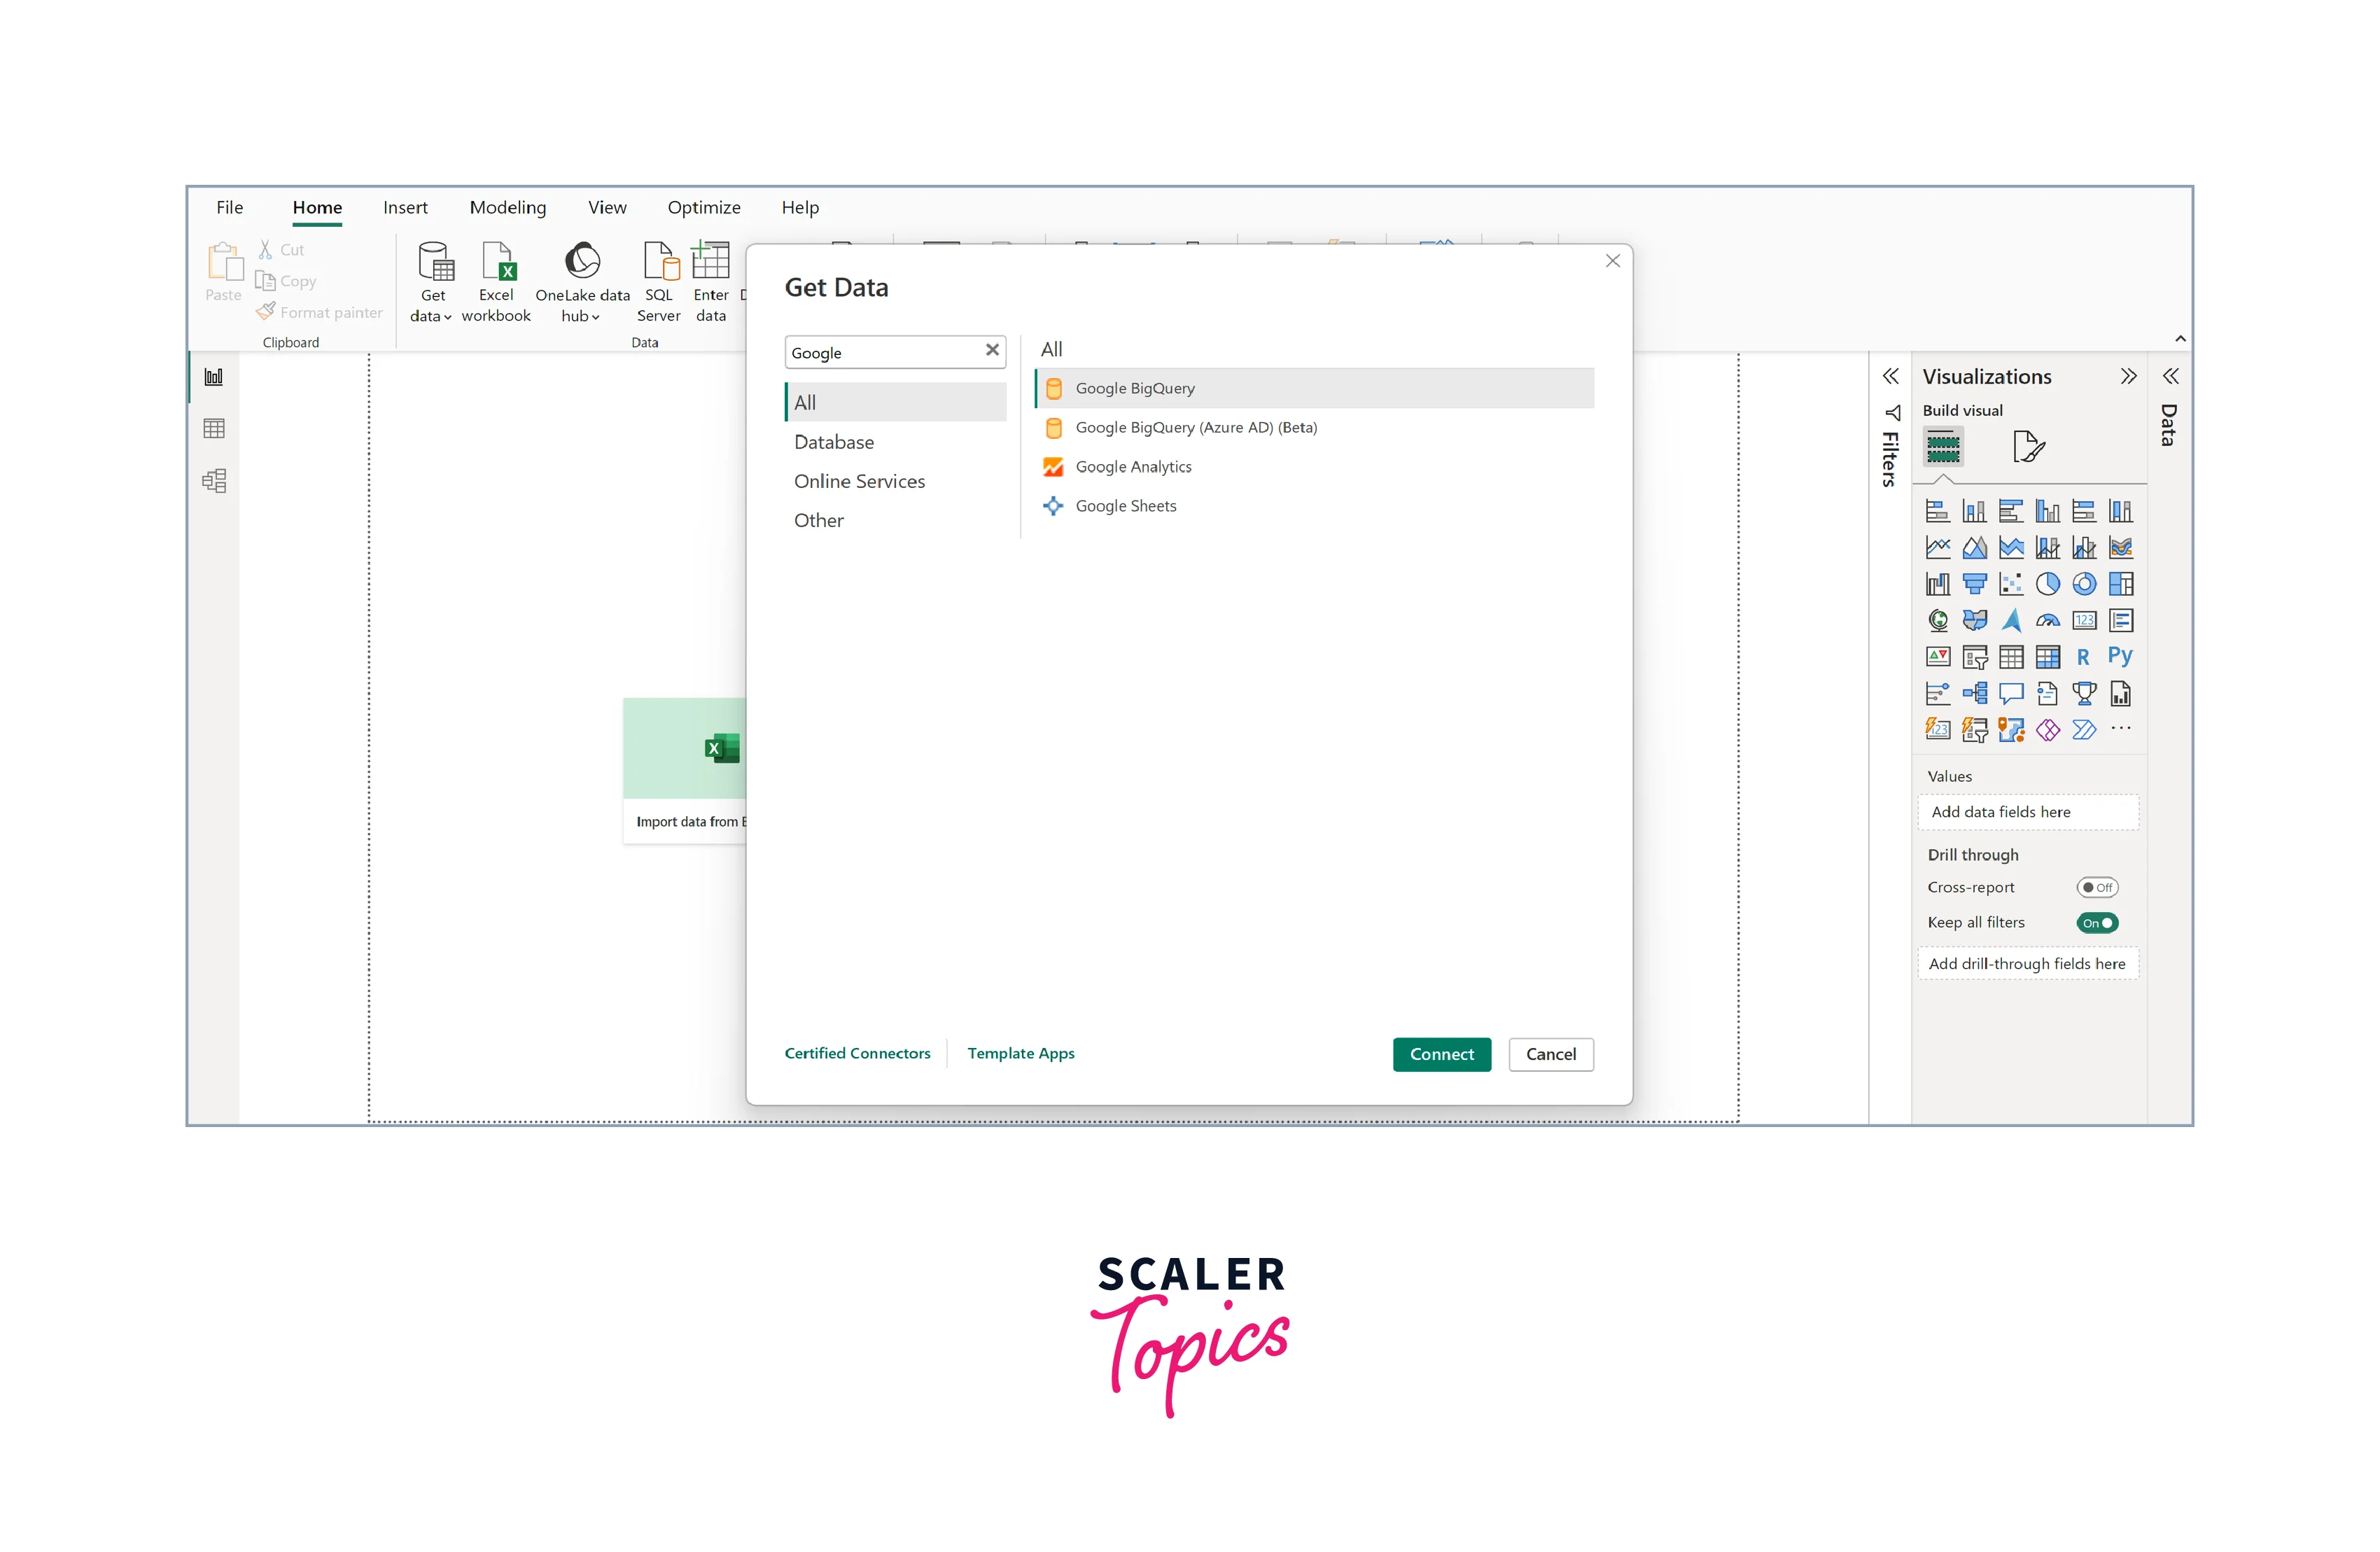
GCP
Power BI integrates seamlessly with Google Cloud Platform (GCP), offering users access to data stored within GCP's diverse array of services. Whether your data resides in BigQuery, Cloud SQL, or Cloud Storage, Power BI provides robust connectivity options. This collaboration allows organizations to harness the scalability, security, and advanced data analytics capabilities of GCP while leveraging Power BI's data visualization and reporting prowess. By effortlessly connecting GCP data sources to Power BI, users can easily unlock valuable insights, streamline decision-making, and create dynamic reports and dashboards.
How to Connect to a Database Source in Power BI
Connecting Power BI to a database source is a straightforward process that involves several key steps -
Step 1. Launch Power BI Desktop -
Start by opening Power BI Desktop, the application for creating and designing reports and dashboards.
Step 2. Get Data -
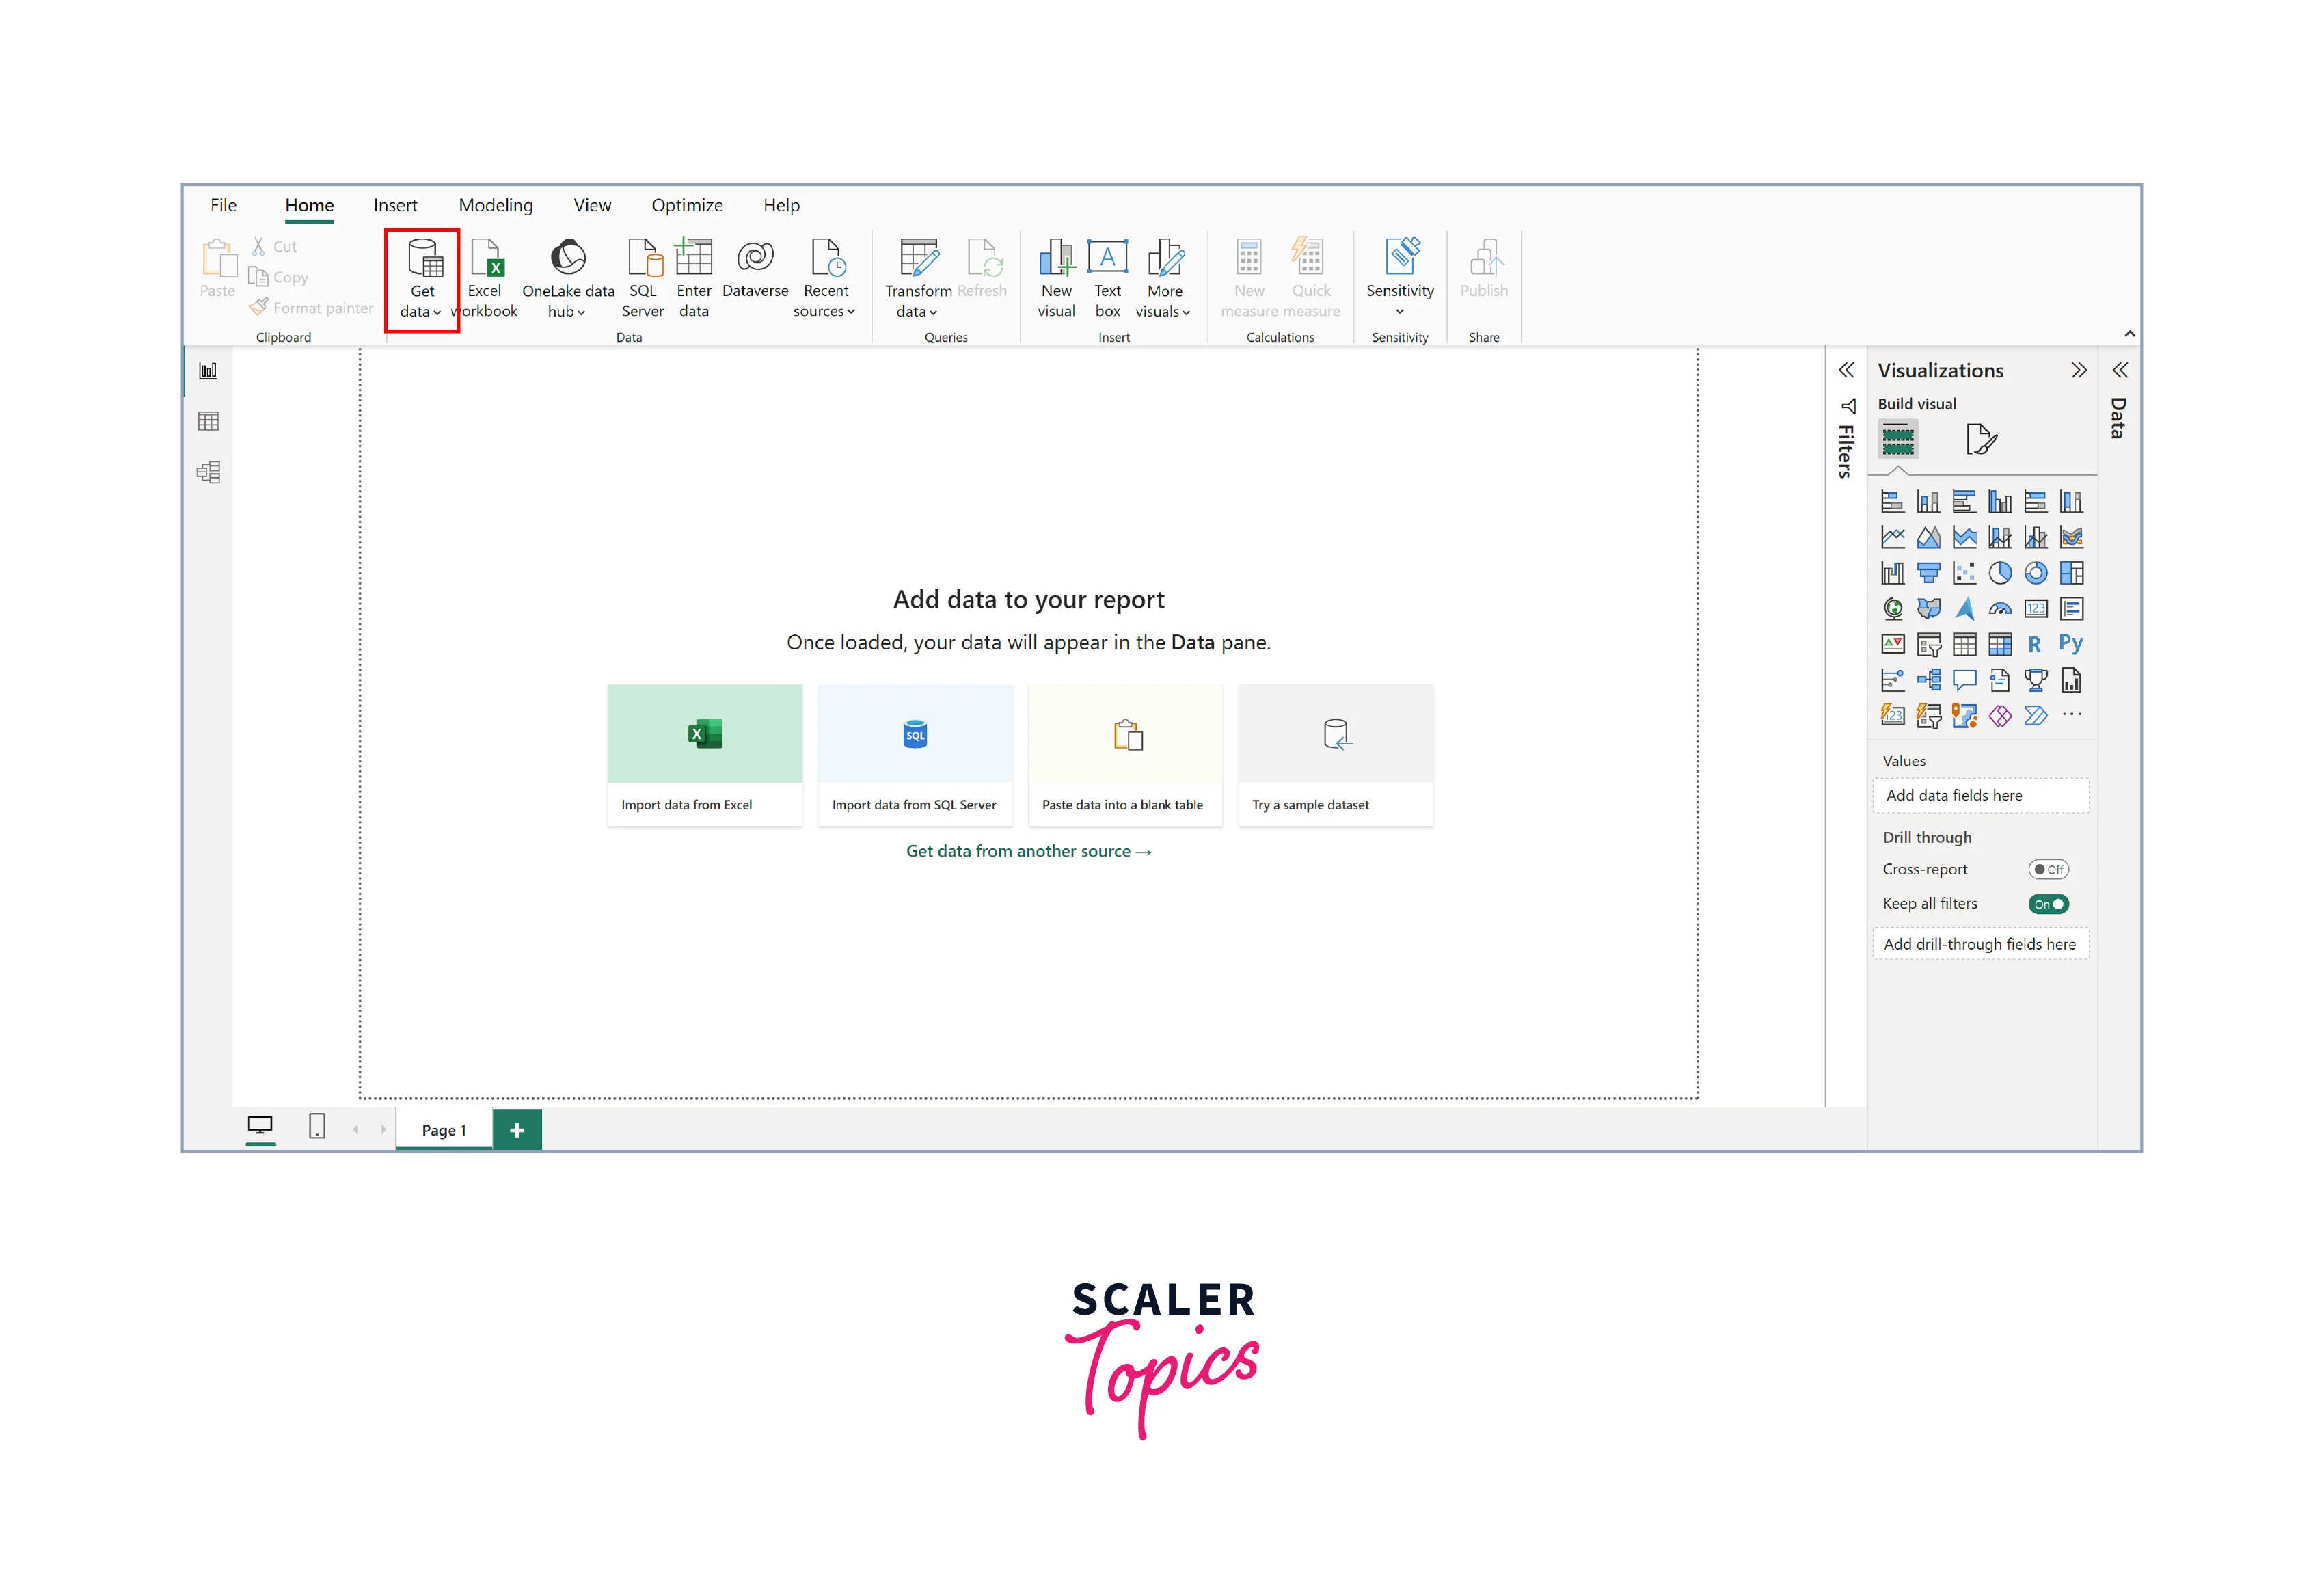
In Power BI Desktop, click on the "Home" tab in the ribbon menu, then select "Get Data." This action opens a dialog box with various data source options.
Step 3. Choose a Database Source -
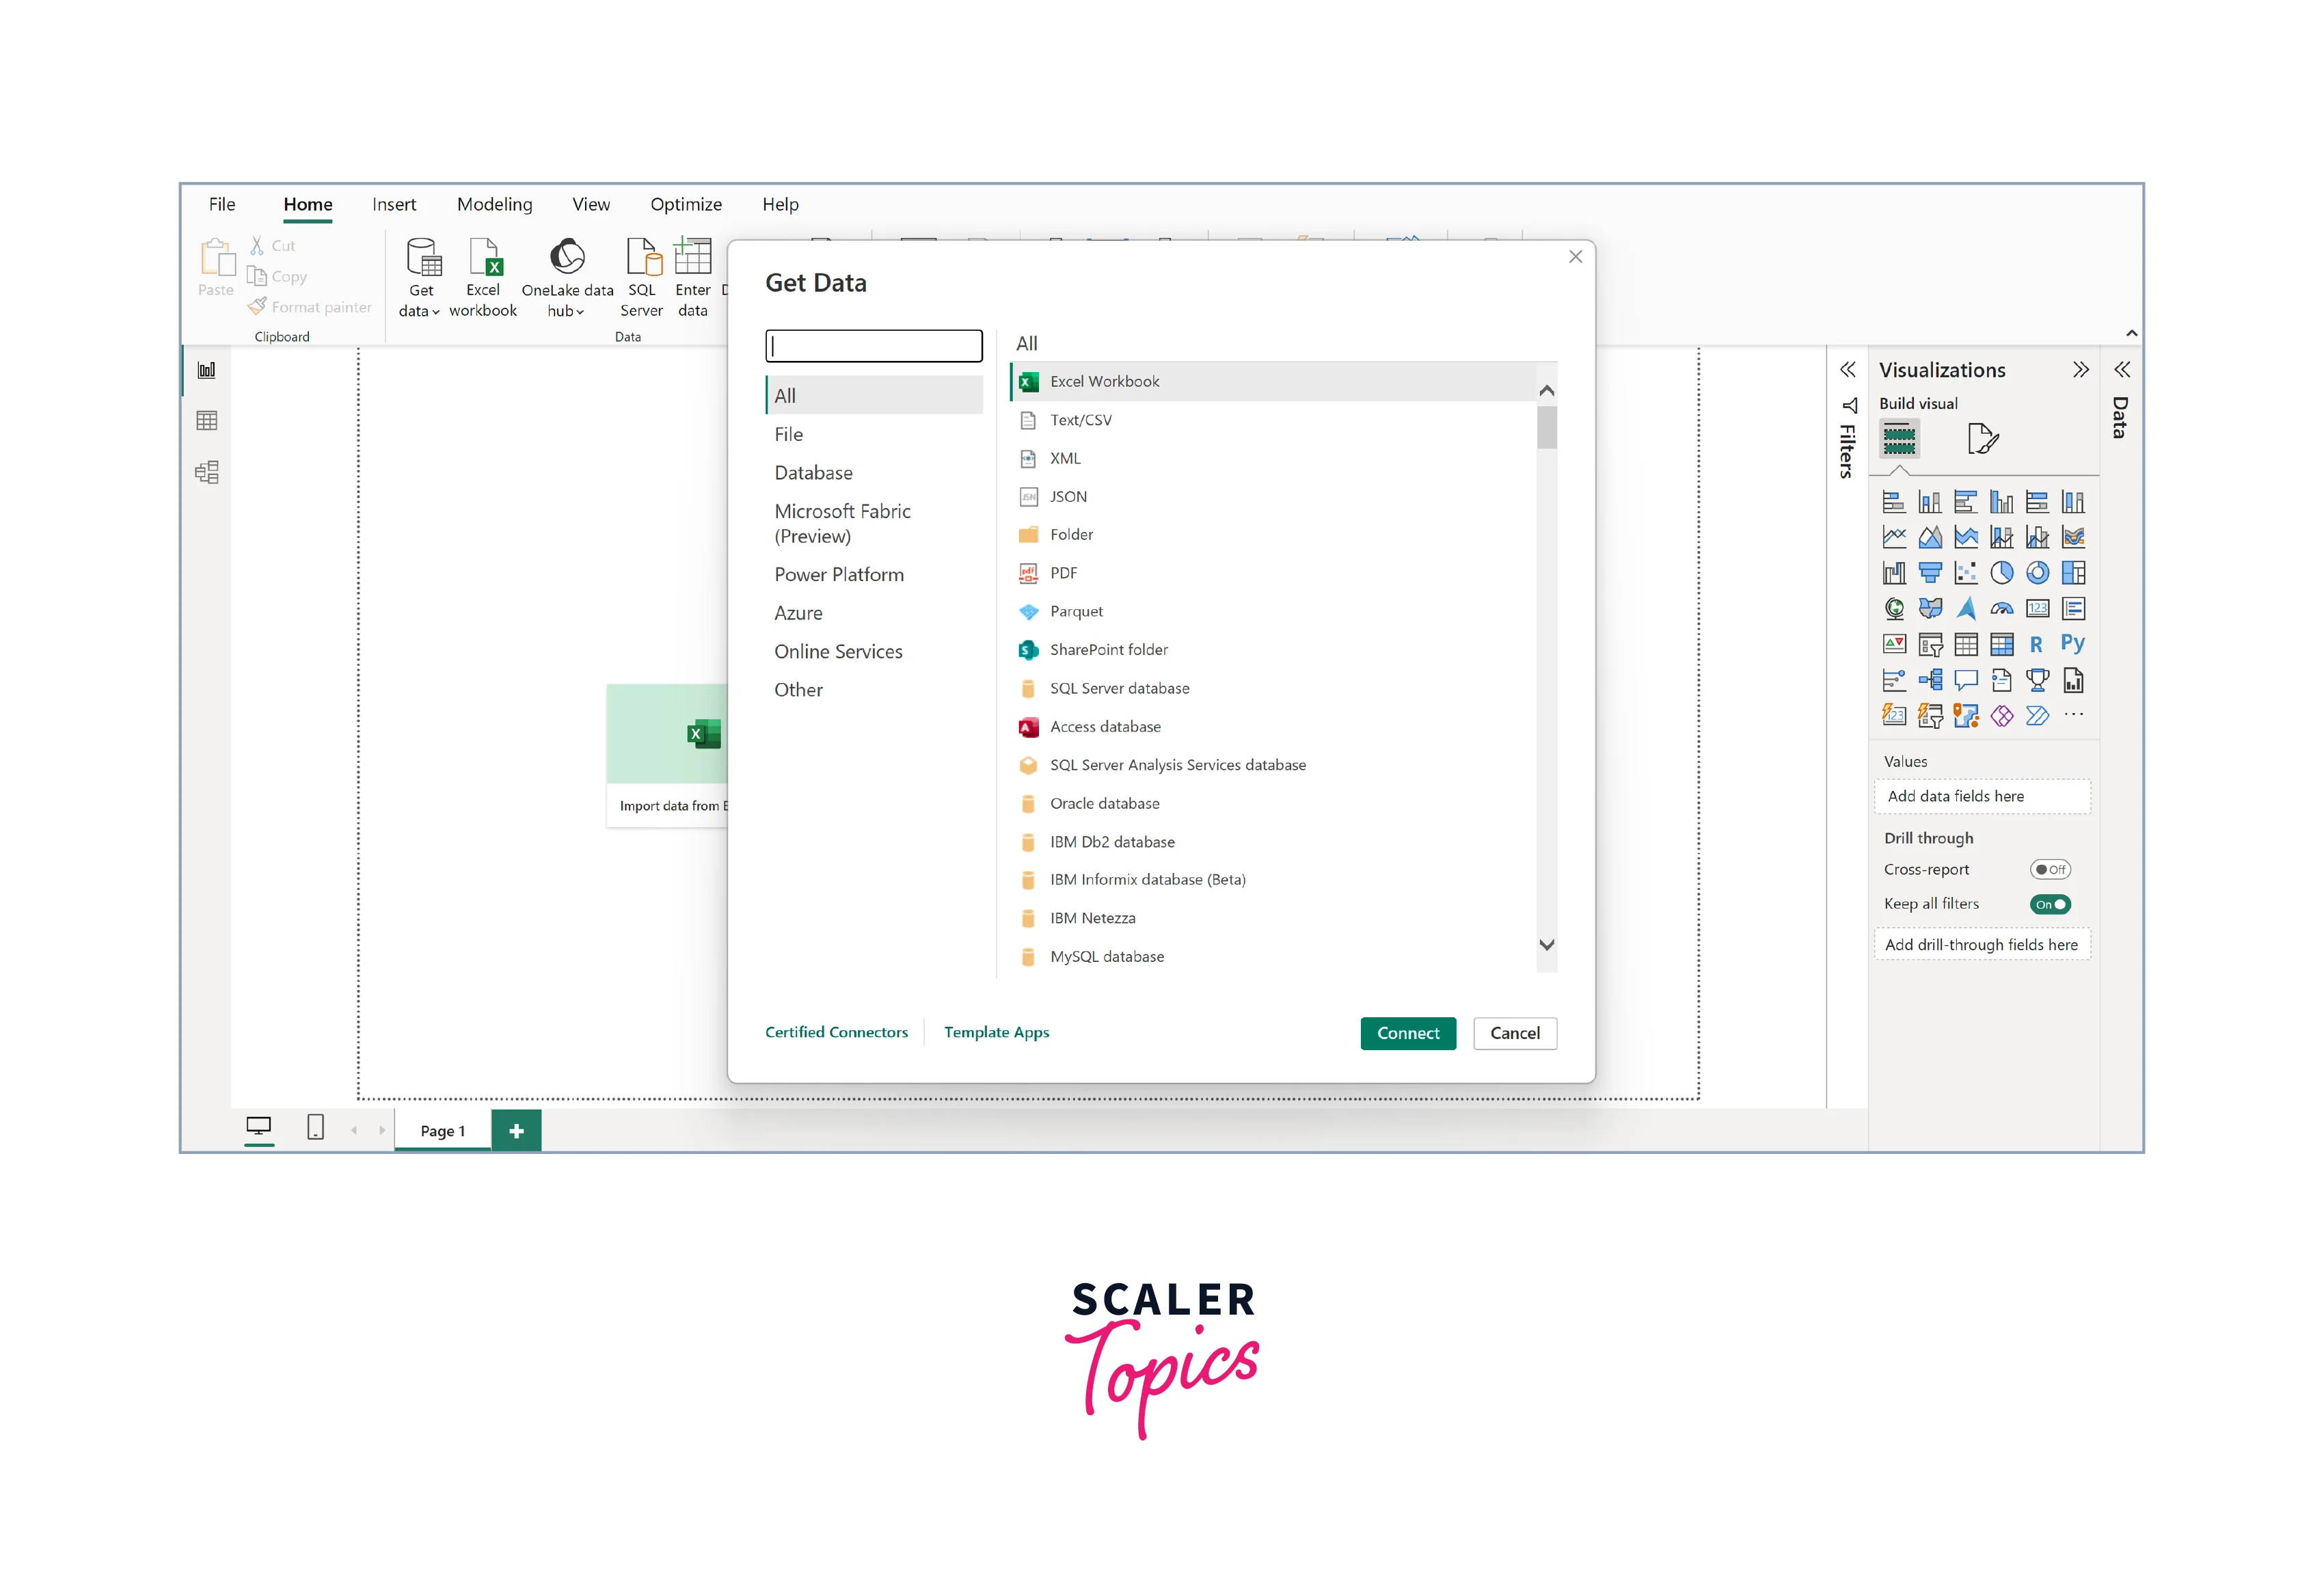
In the "Get Data" dialog box, select the type of database source you want to connect to. Options may include SQL Server, MySQL, Azure, AWS, Web, CSV, Excel, or other databases.
Step 4. Provide Connection Details -
Depending on your selected data source, you'll need to enter connection details. This typically includes locating the files, web URLs, the server or database name, credentials (username and password), or authentication method. Ensure the connection details are accurate to establish a successful connection.
Step 5. Access Data -
Once connected, you will be presented with a navigator or query editor interface. Here, you can choose which tables, views, or specific data you want to import into Power BI. You can also apply transformations or filters to shape the data as needed.
Step 6. Load Data -
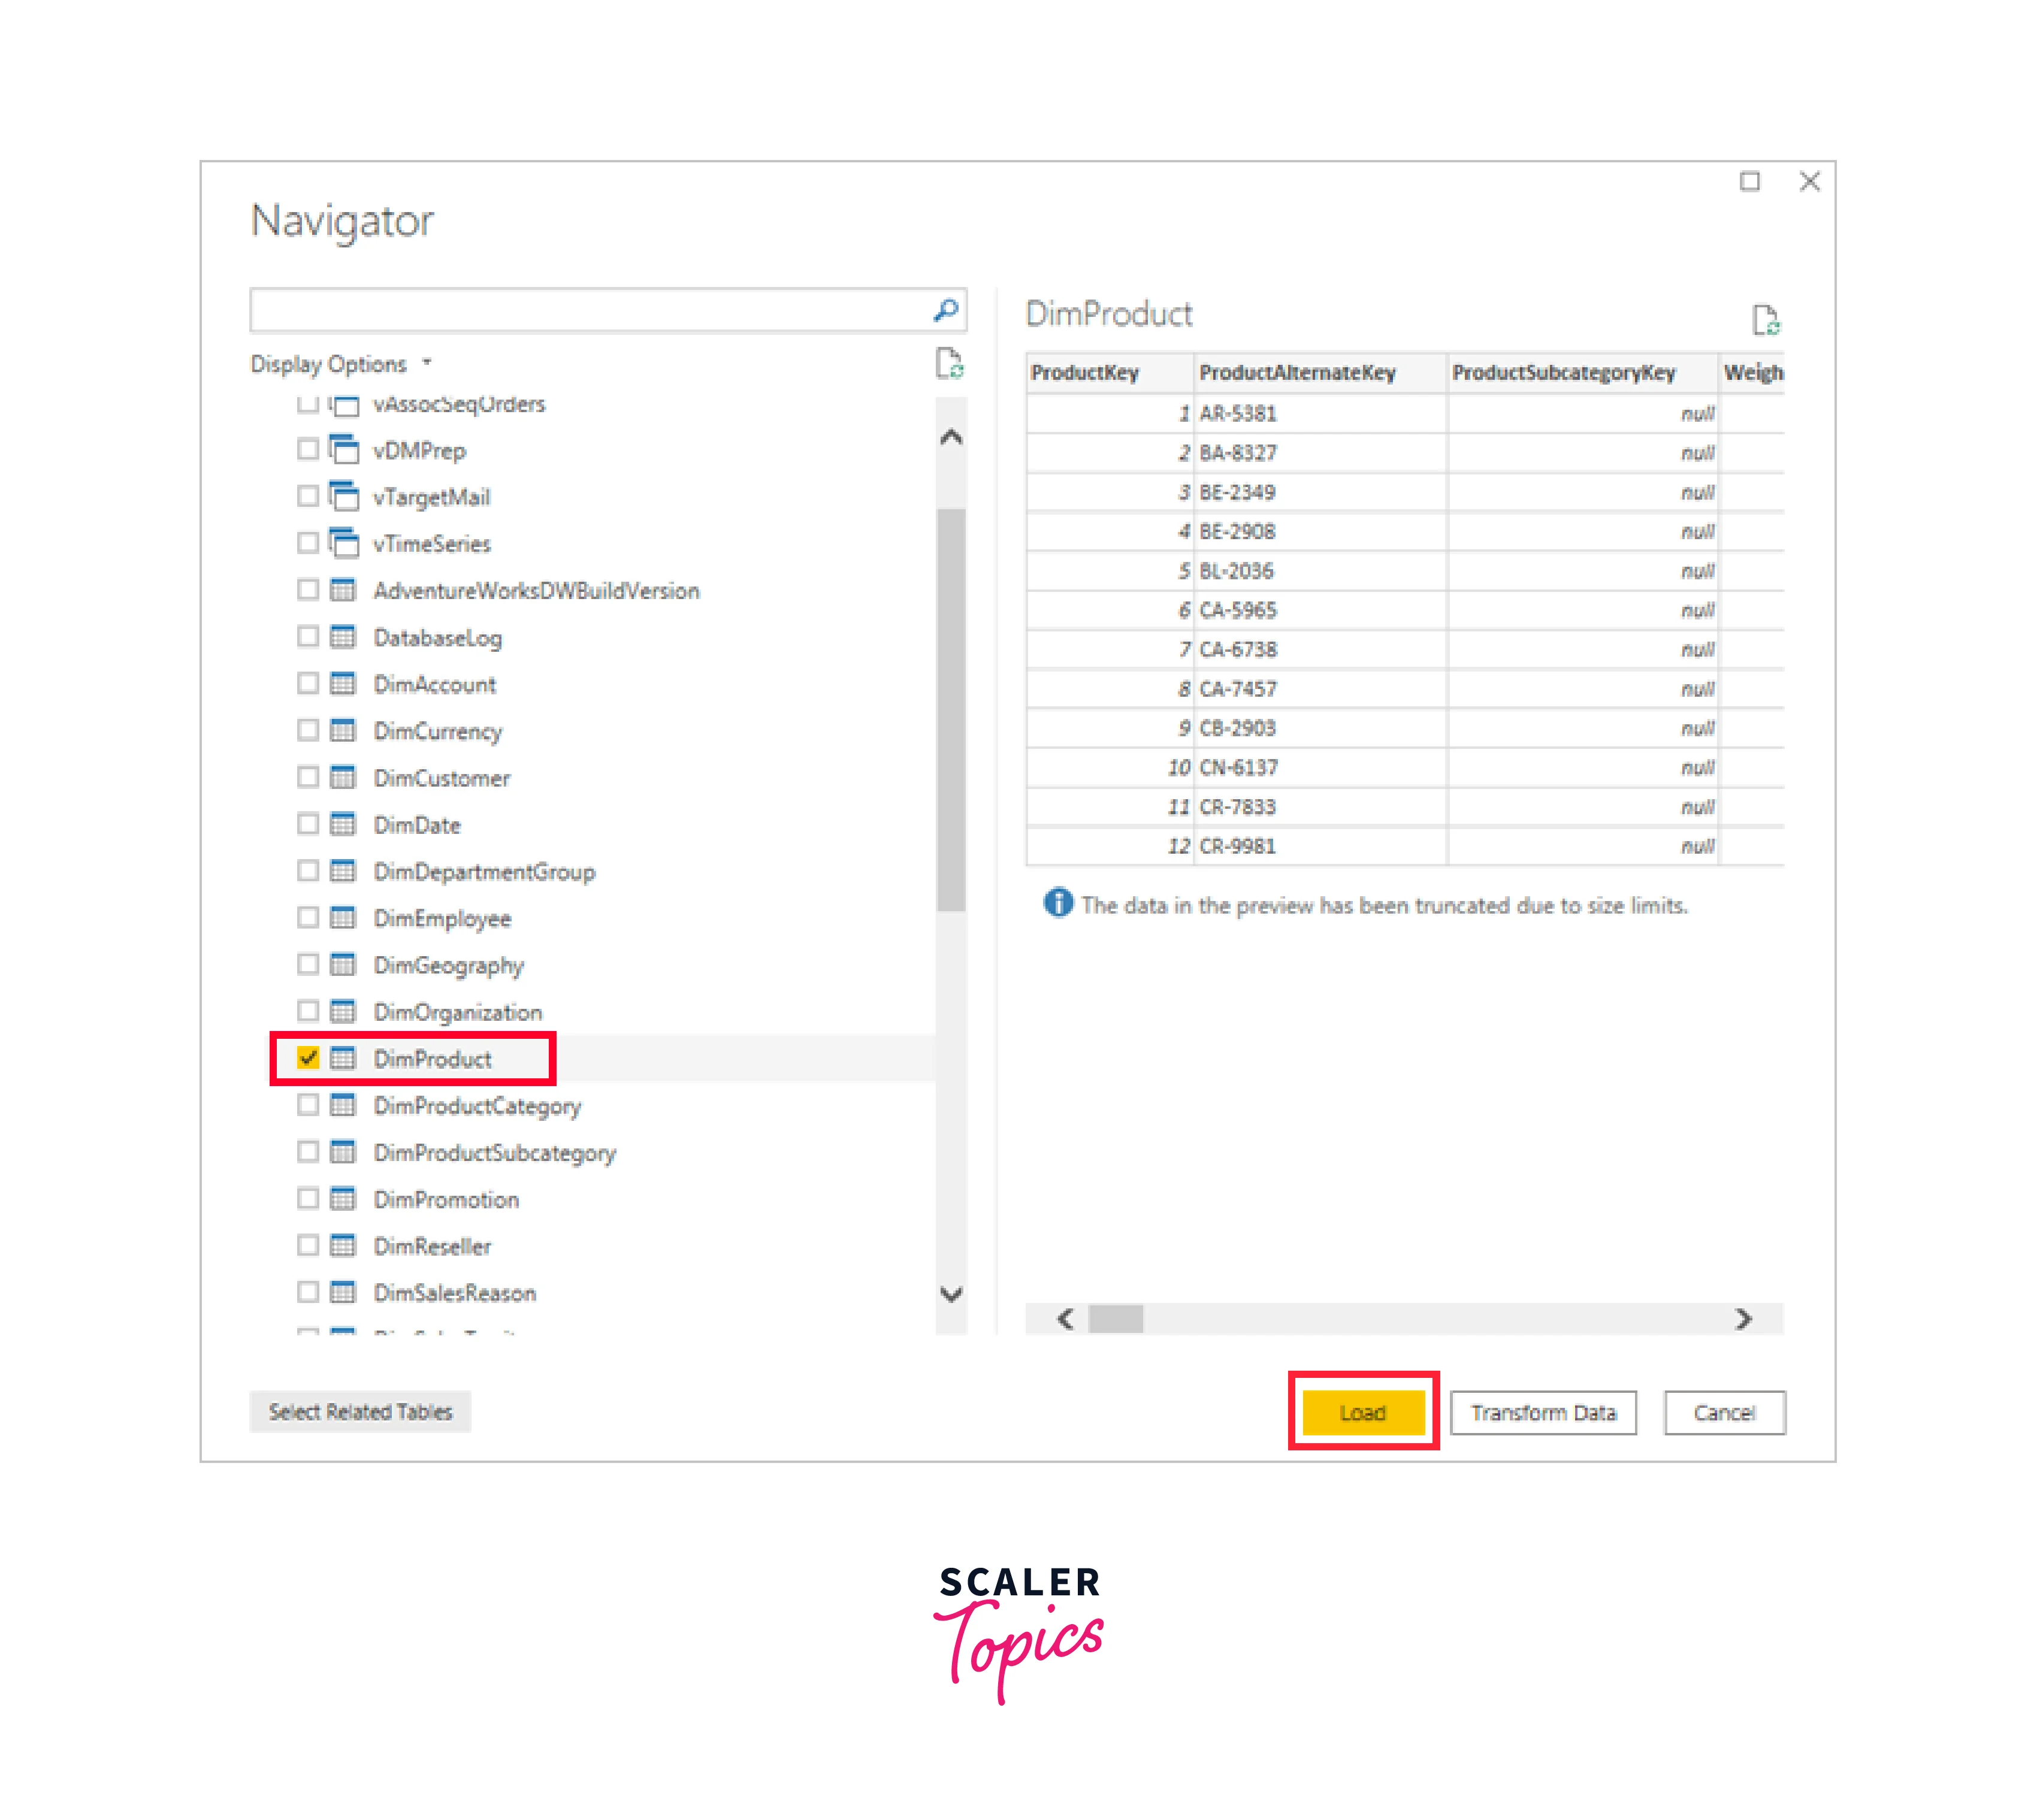
After selecting and configuring your data, click the "Load" button. Power BI will fetch the data from the database and load it into your Power BI project.
Use PBIDS Files to Get Data
PBIDS files, identified by their .PBIDS extension, are specially structured Power BI Desktop files designed to simplify the data retrieval process, particularly for new or less experienced report creators within your organization. Creating a PBIDS file can be immensely helpful when aiming to streamline the data acquisition process for beginner report authors. Generating a PBIDS file based on existing reports makes it significantly easier for these authors to initiate new reports using the same data source.
Upon opening a PBIDS file, Power BI Desktop initiates a user authentication prompt to establish a connection with the specified data source. This action leads to the appearance of the Navigator dialog box, where users must choose the specific tables they wish to load into their data model. Depending on the PBIDS file, users may also need to select the associated database(s) and connection mode if this information was not included in the file.
From here, users can then proceed to construct visualizations or opt to load a fresh set of tables into their model by selecting "Recent Sources." It's crucial to note that PBIDS files currently support only a singular data source within a single file. Attempting to specify multiple data sources within one PBIDS file will result in an error.
PBIDS File Examples
This section offers some instances sourced from frequently used data connections. It's important to note that PBIDS files are compatible with data connections that Power BI Desktop supports, with the exceptions being Wiki URLs, Live Connect, and Blank Query. It's essential to understand that PBIDS files do not encompass authentication details, table information, or schema specifications.
Below are code snippets showcasing a selection of common PBIDS file examples, but these snippets are neither exhaustive nor comprehensive. For alternative data sources, you can consult the Data Source Reference (DSR) format on the Git repository for protocol and address details.
Azure AS
Folder
SQL Server
Web
Text File
How to Connect to SQL Server
Prerequisites
- Sign up for a free Power BI trial if you don't have an account and install Power BI Desktop on your local computer.
- Set up SQL Server on your local machine and restore the AdventureWorksDW2017 sample database from a backup.
- Install SQL Server Management Studio (SSMS).
- Install an on-premises data gateway on the same local computer as SQL Server. Note that the gateway is typically installed on a separate machine in a production environment.
Create and Publish a Power BI Desktop File
Follow these steps to create a Power BI report using the AdventureWorksDW2017 sample database. Once created, publish it to the Power BI service to set up a Power BI dataset for later configuration and refreshing.
-
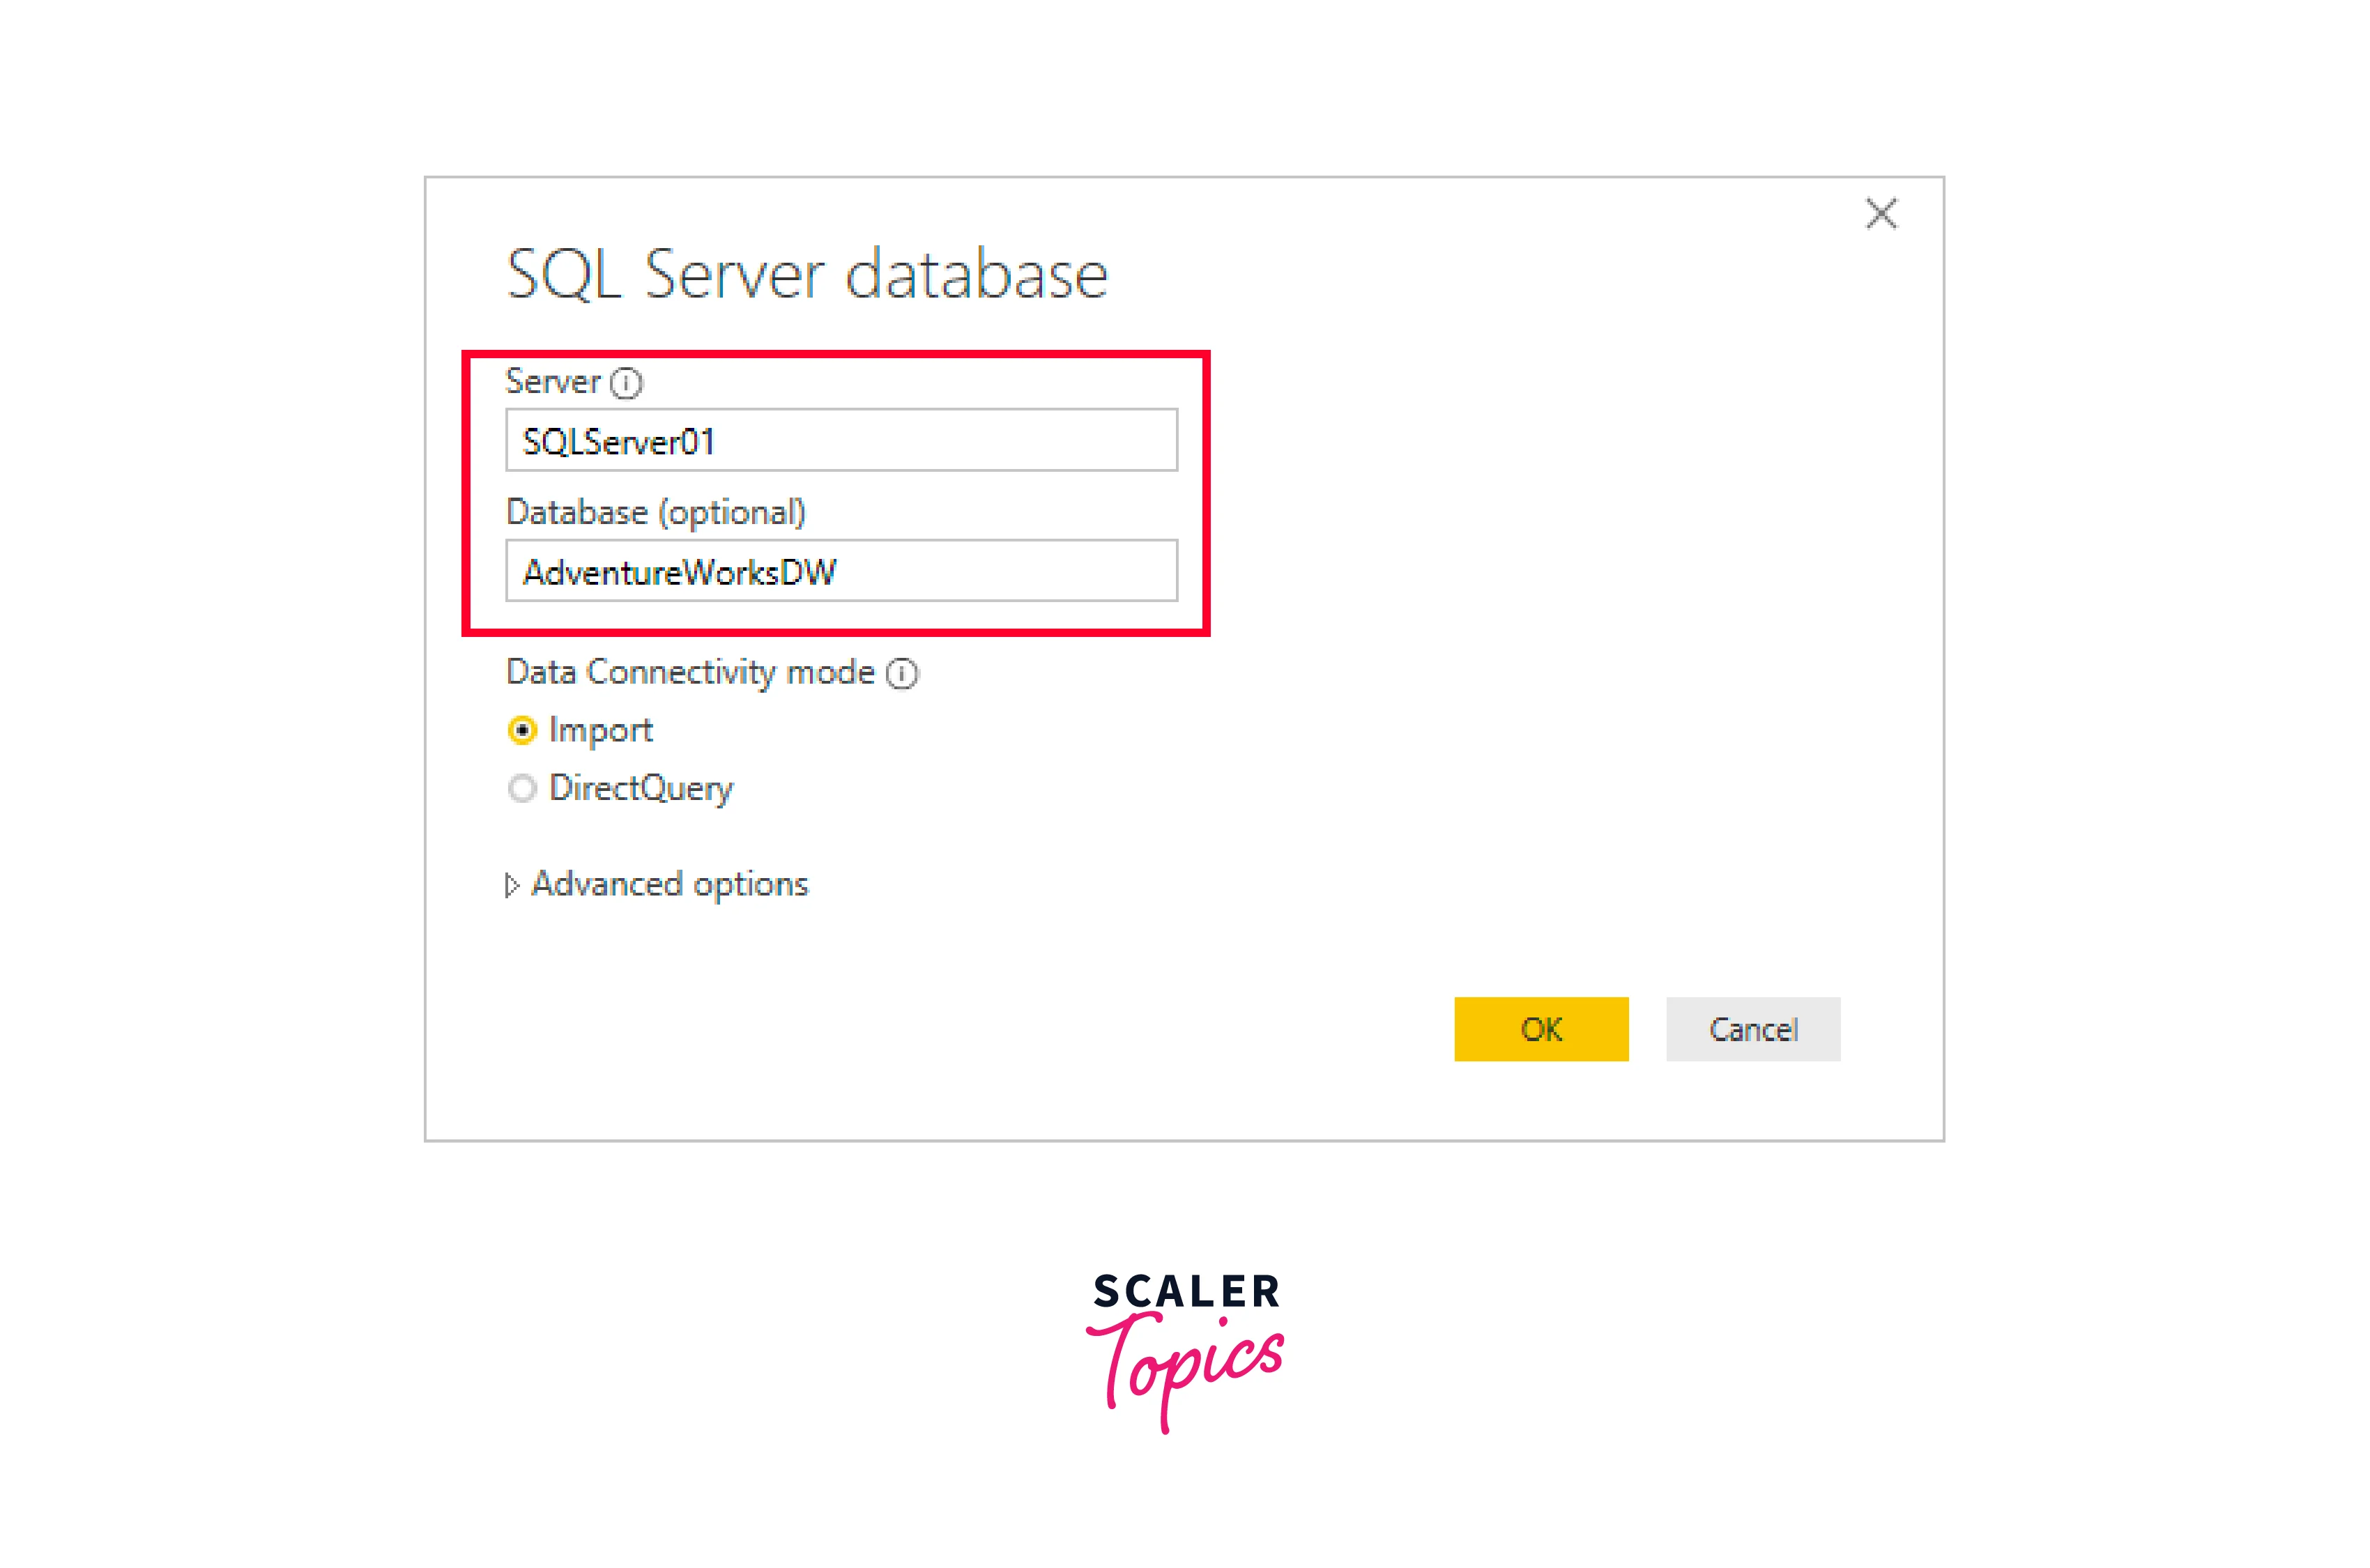
In Power BI Desktop, go to the Home tab, choose "Get data", then select "SQL Server". Within the SQL Server database dialog, input the Server and optionally the Database names, and ensure that Data Connectivity mode is configured to Import. If needed, you can use the Advanced options to specify an SQL statement and configure additional settings, such as SQL Server Failover.
-
Click OK. On the following screen, confirm your credentials, and then click Connect. Within the Navigator dialog, pick the DimProduct table and then click Load.
-
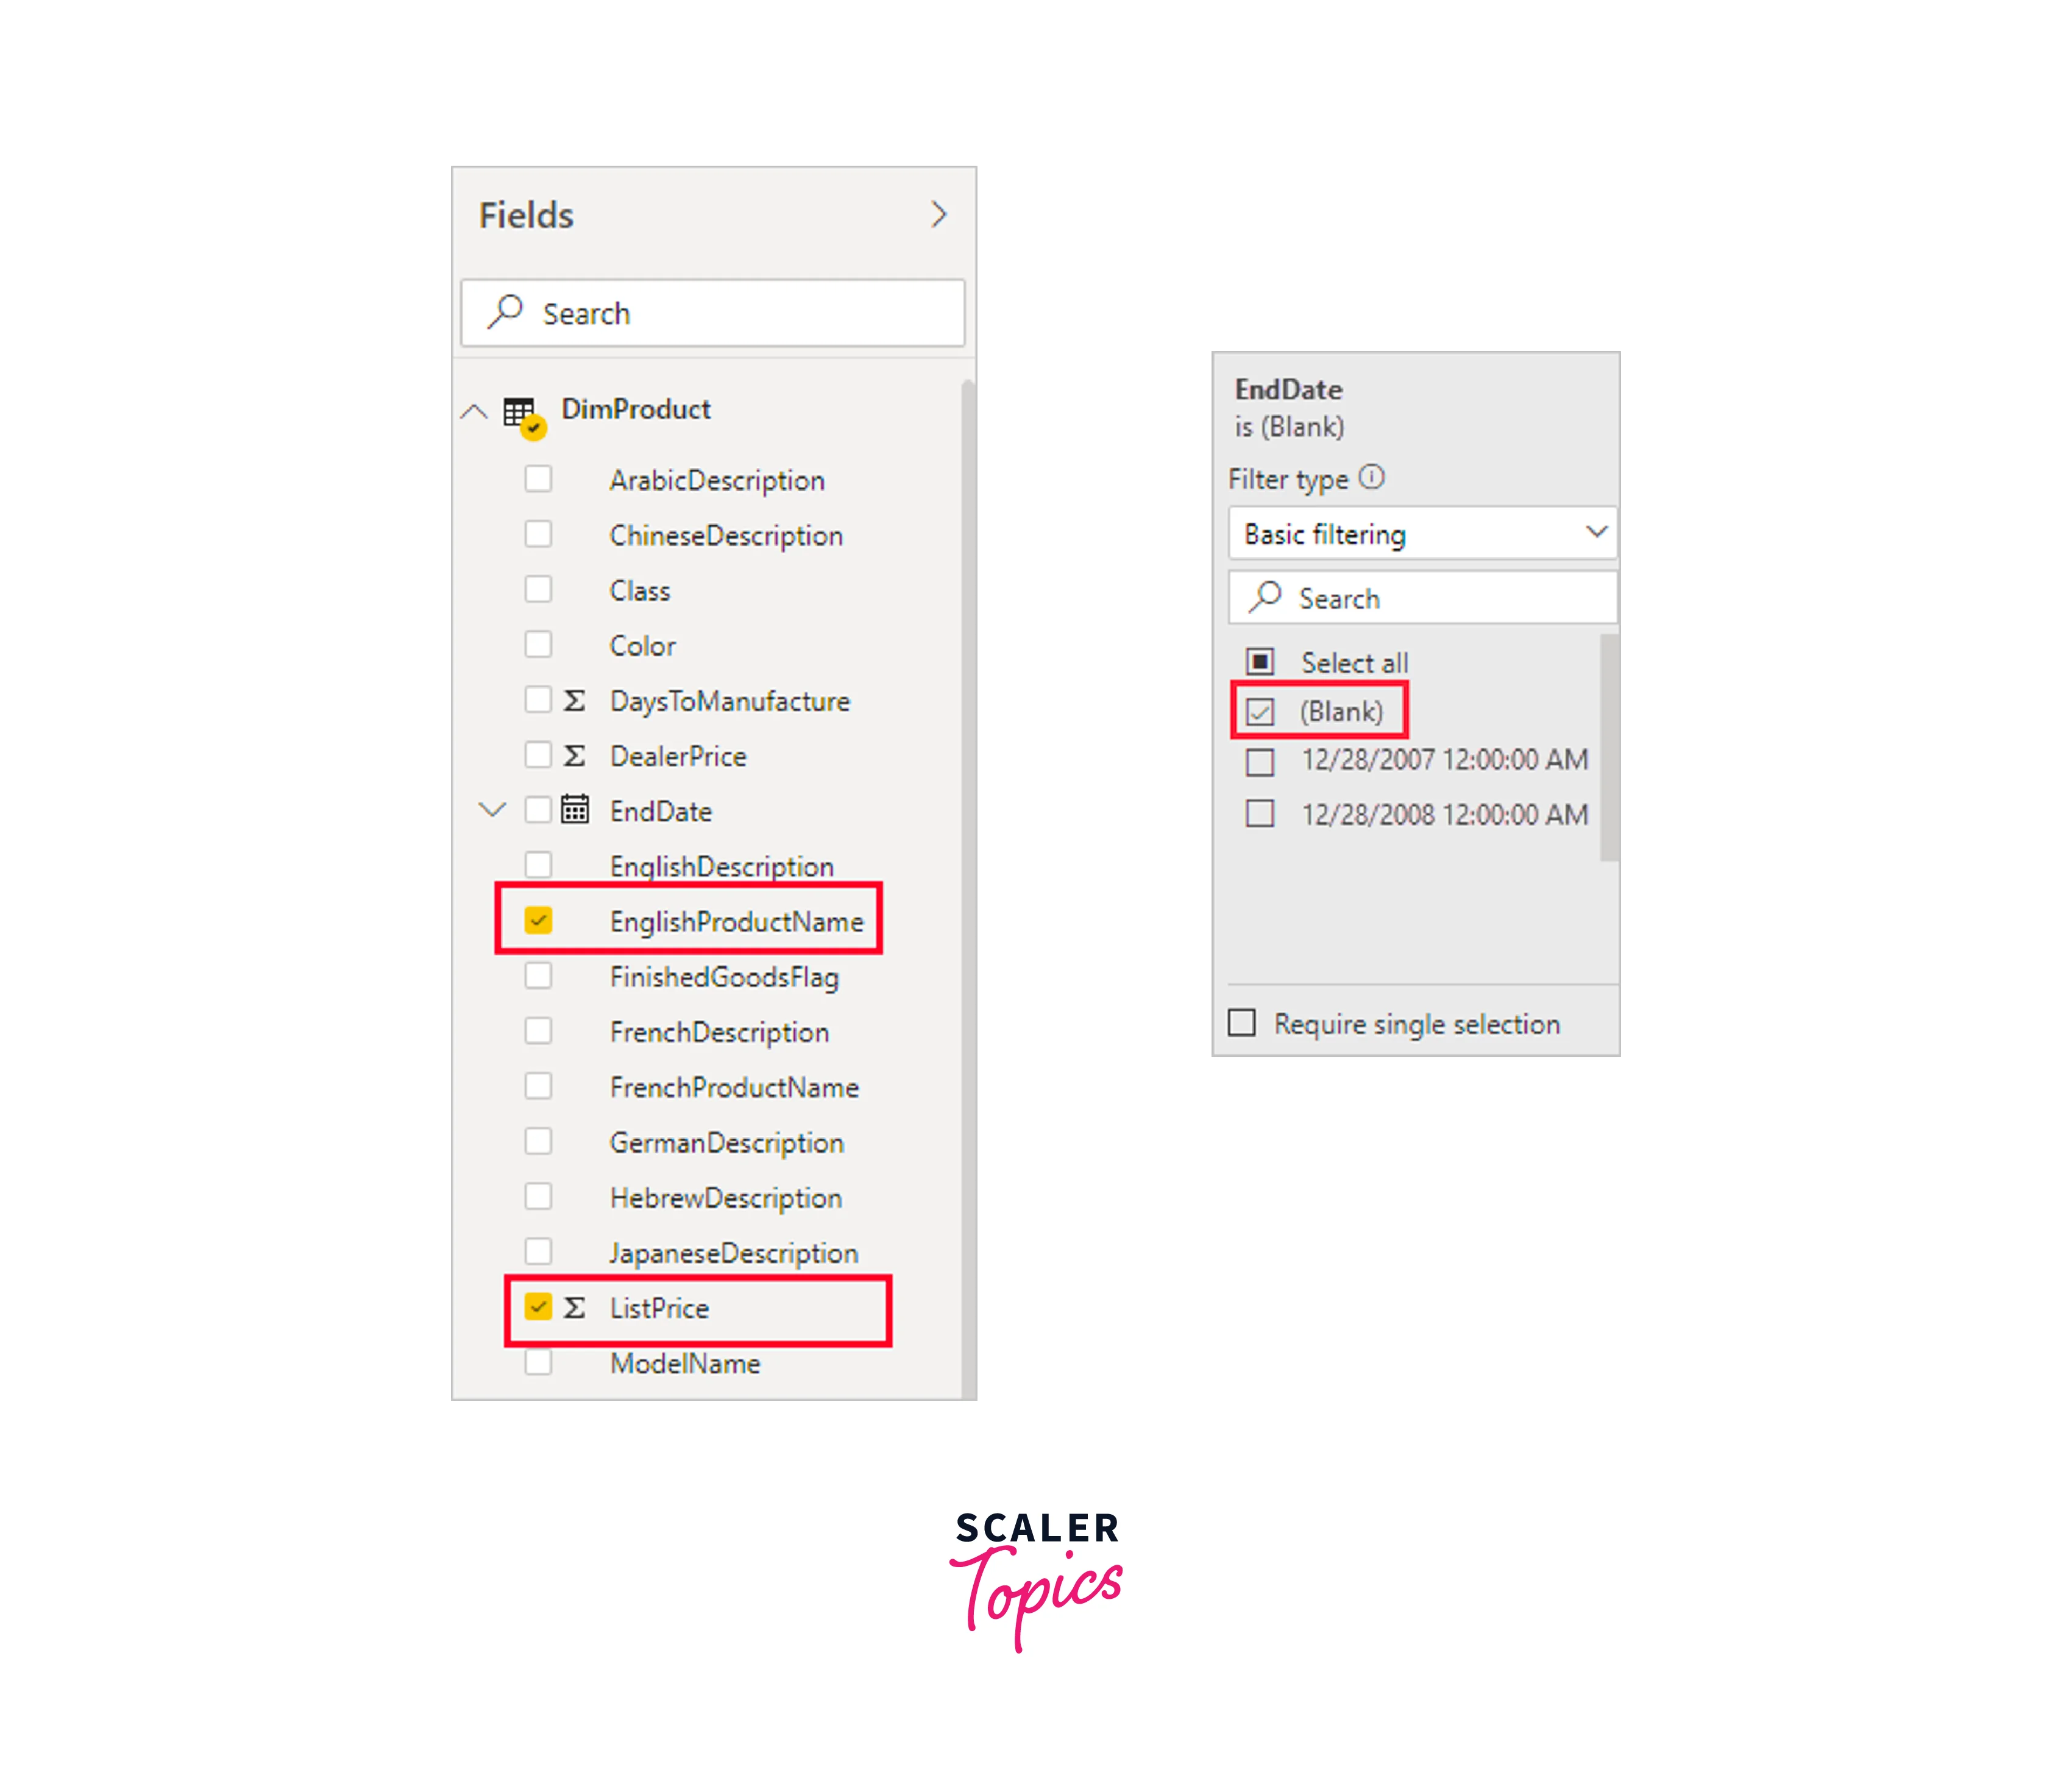
In Power BI Desktop's Report view, go to the Visualizations pane and choose the Stacked column chart. While the new column chart is selected on the report canvas, in the Fields pane, choose the EnglishProductName and ListPrice fields. Drag EndDate from the Fields pane onto Filters on this page in the Filters pane, and in Basic filtering, check the box for (Blank).
-
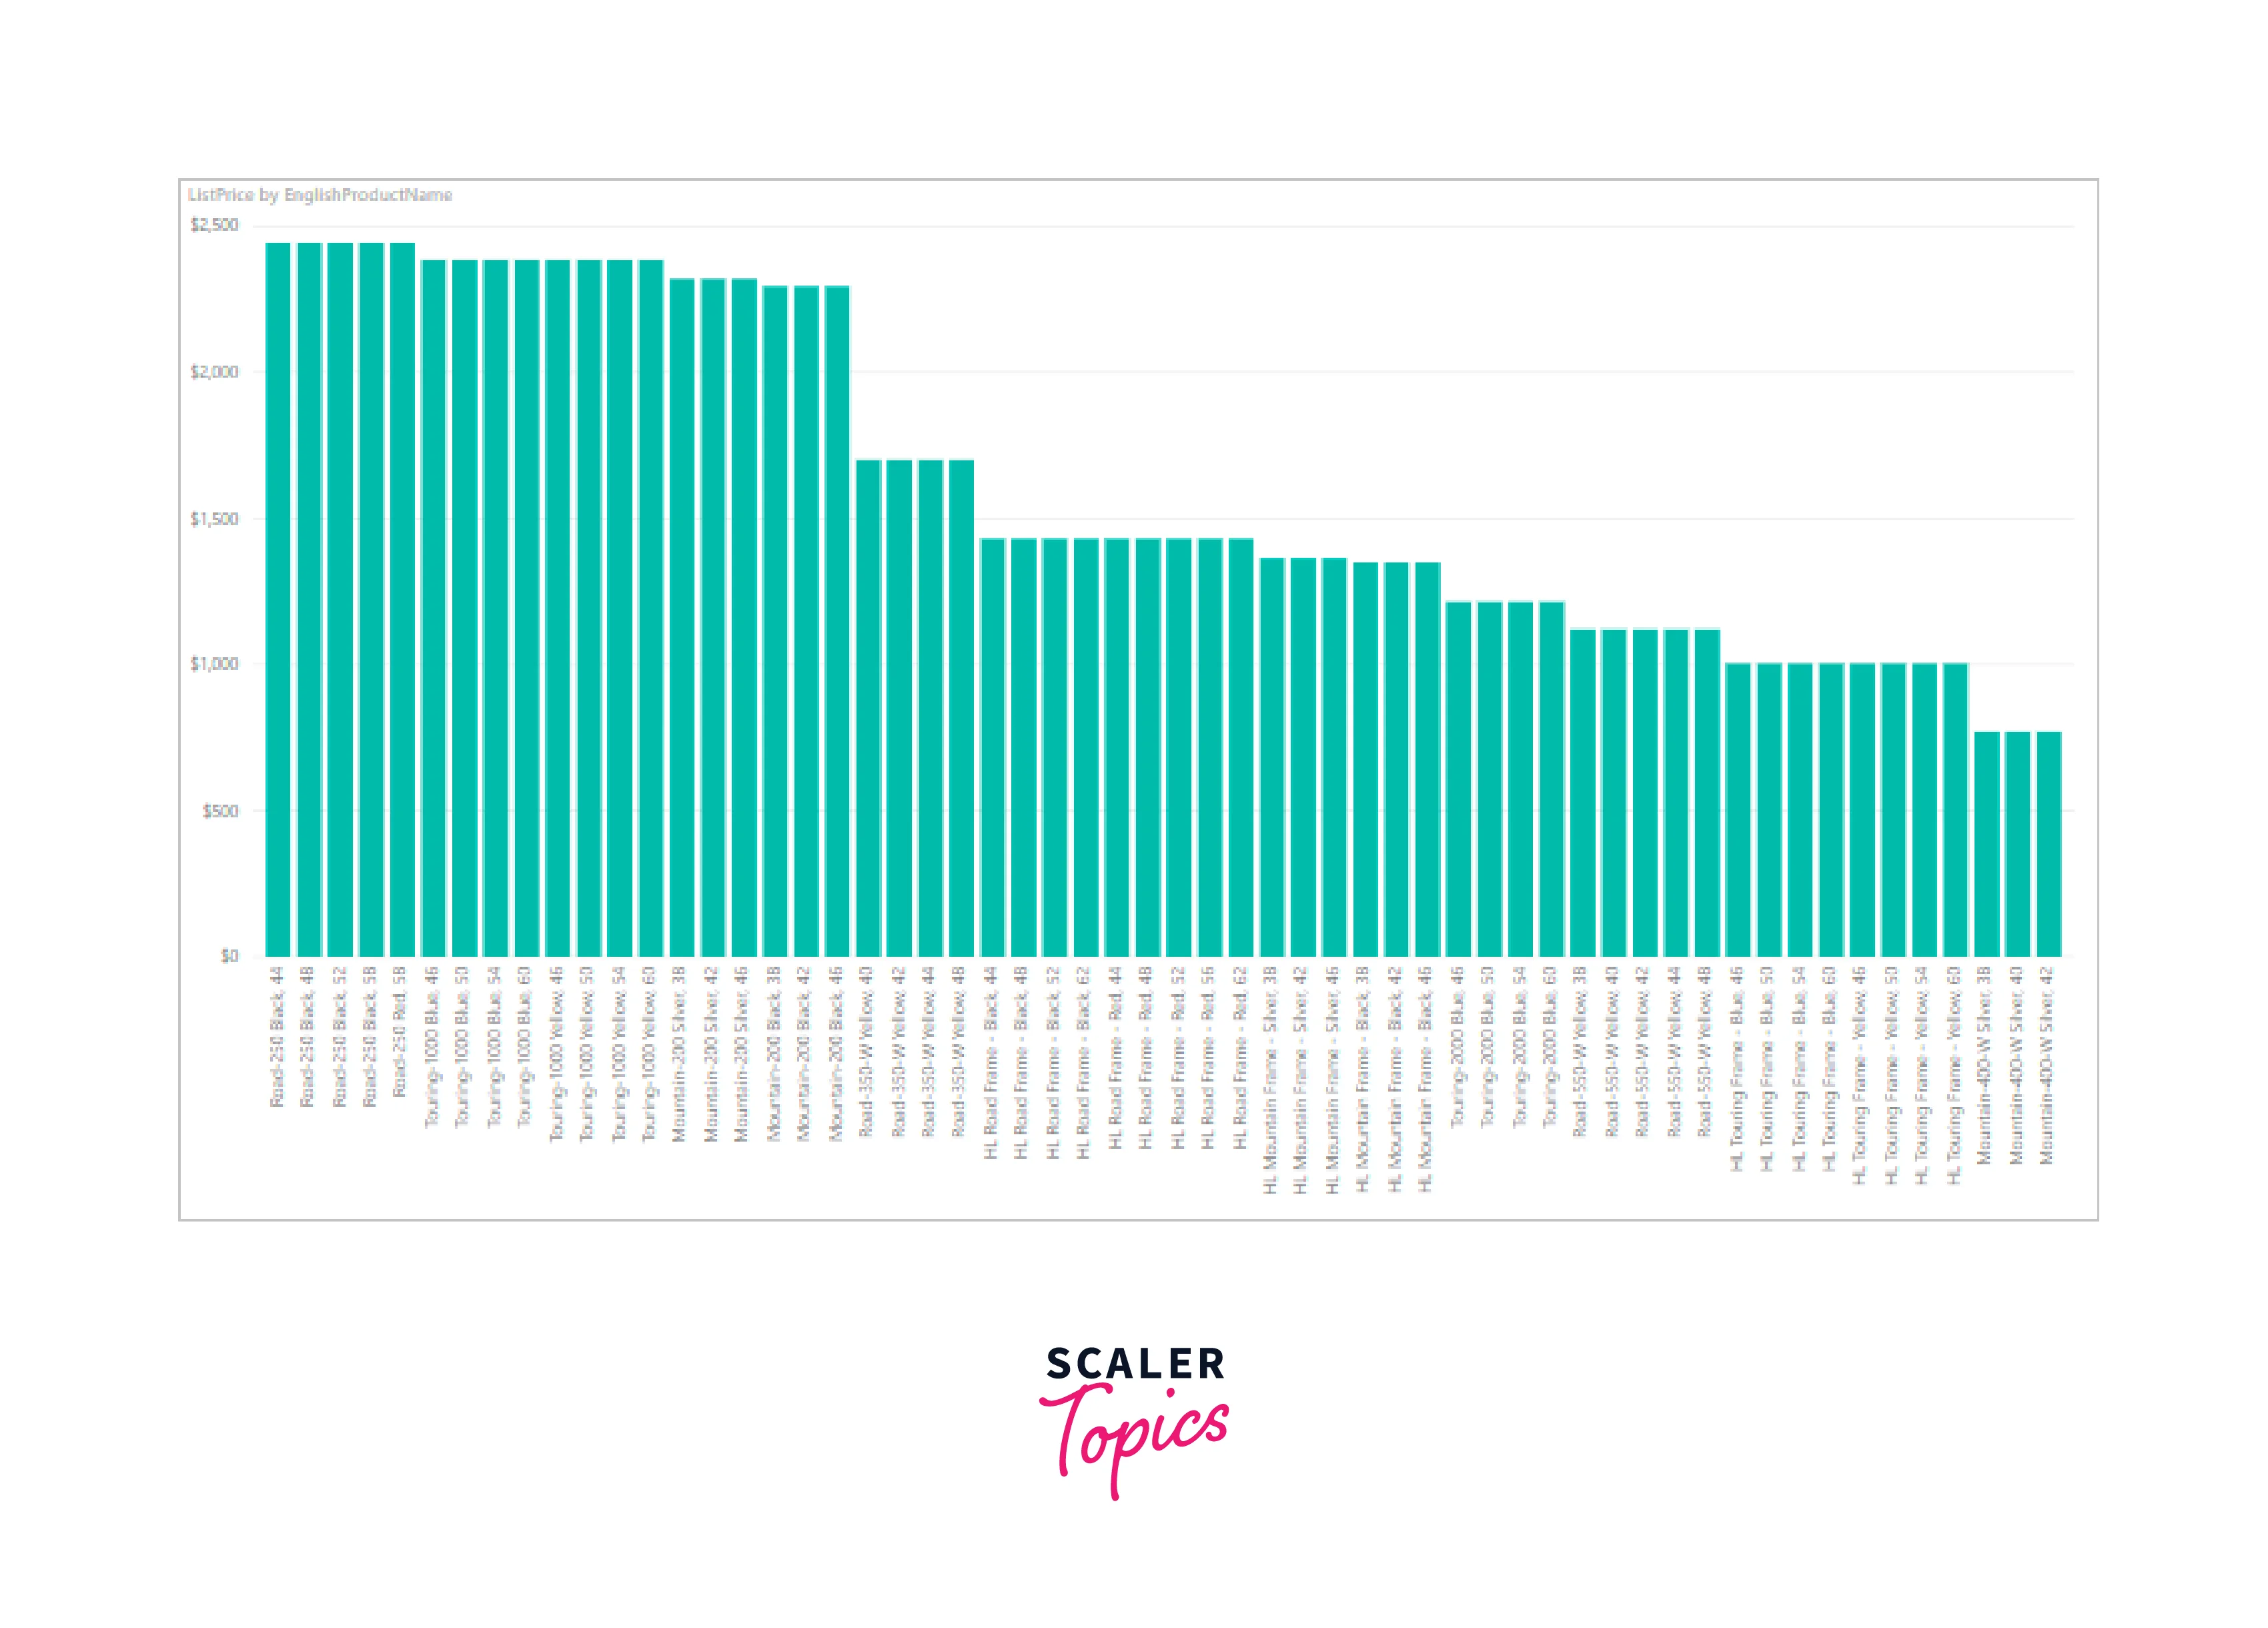
Your visualization should now resemble the chart shown below. Save the report as "AdventureWorksProducts.pbix."
-
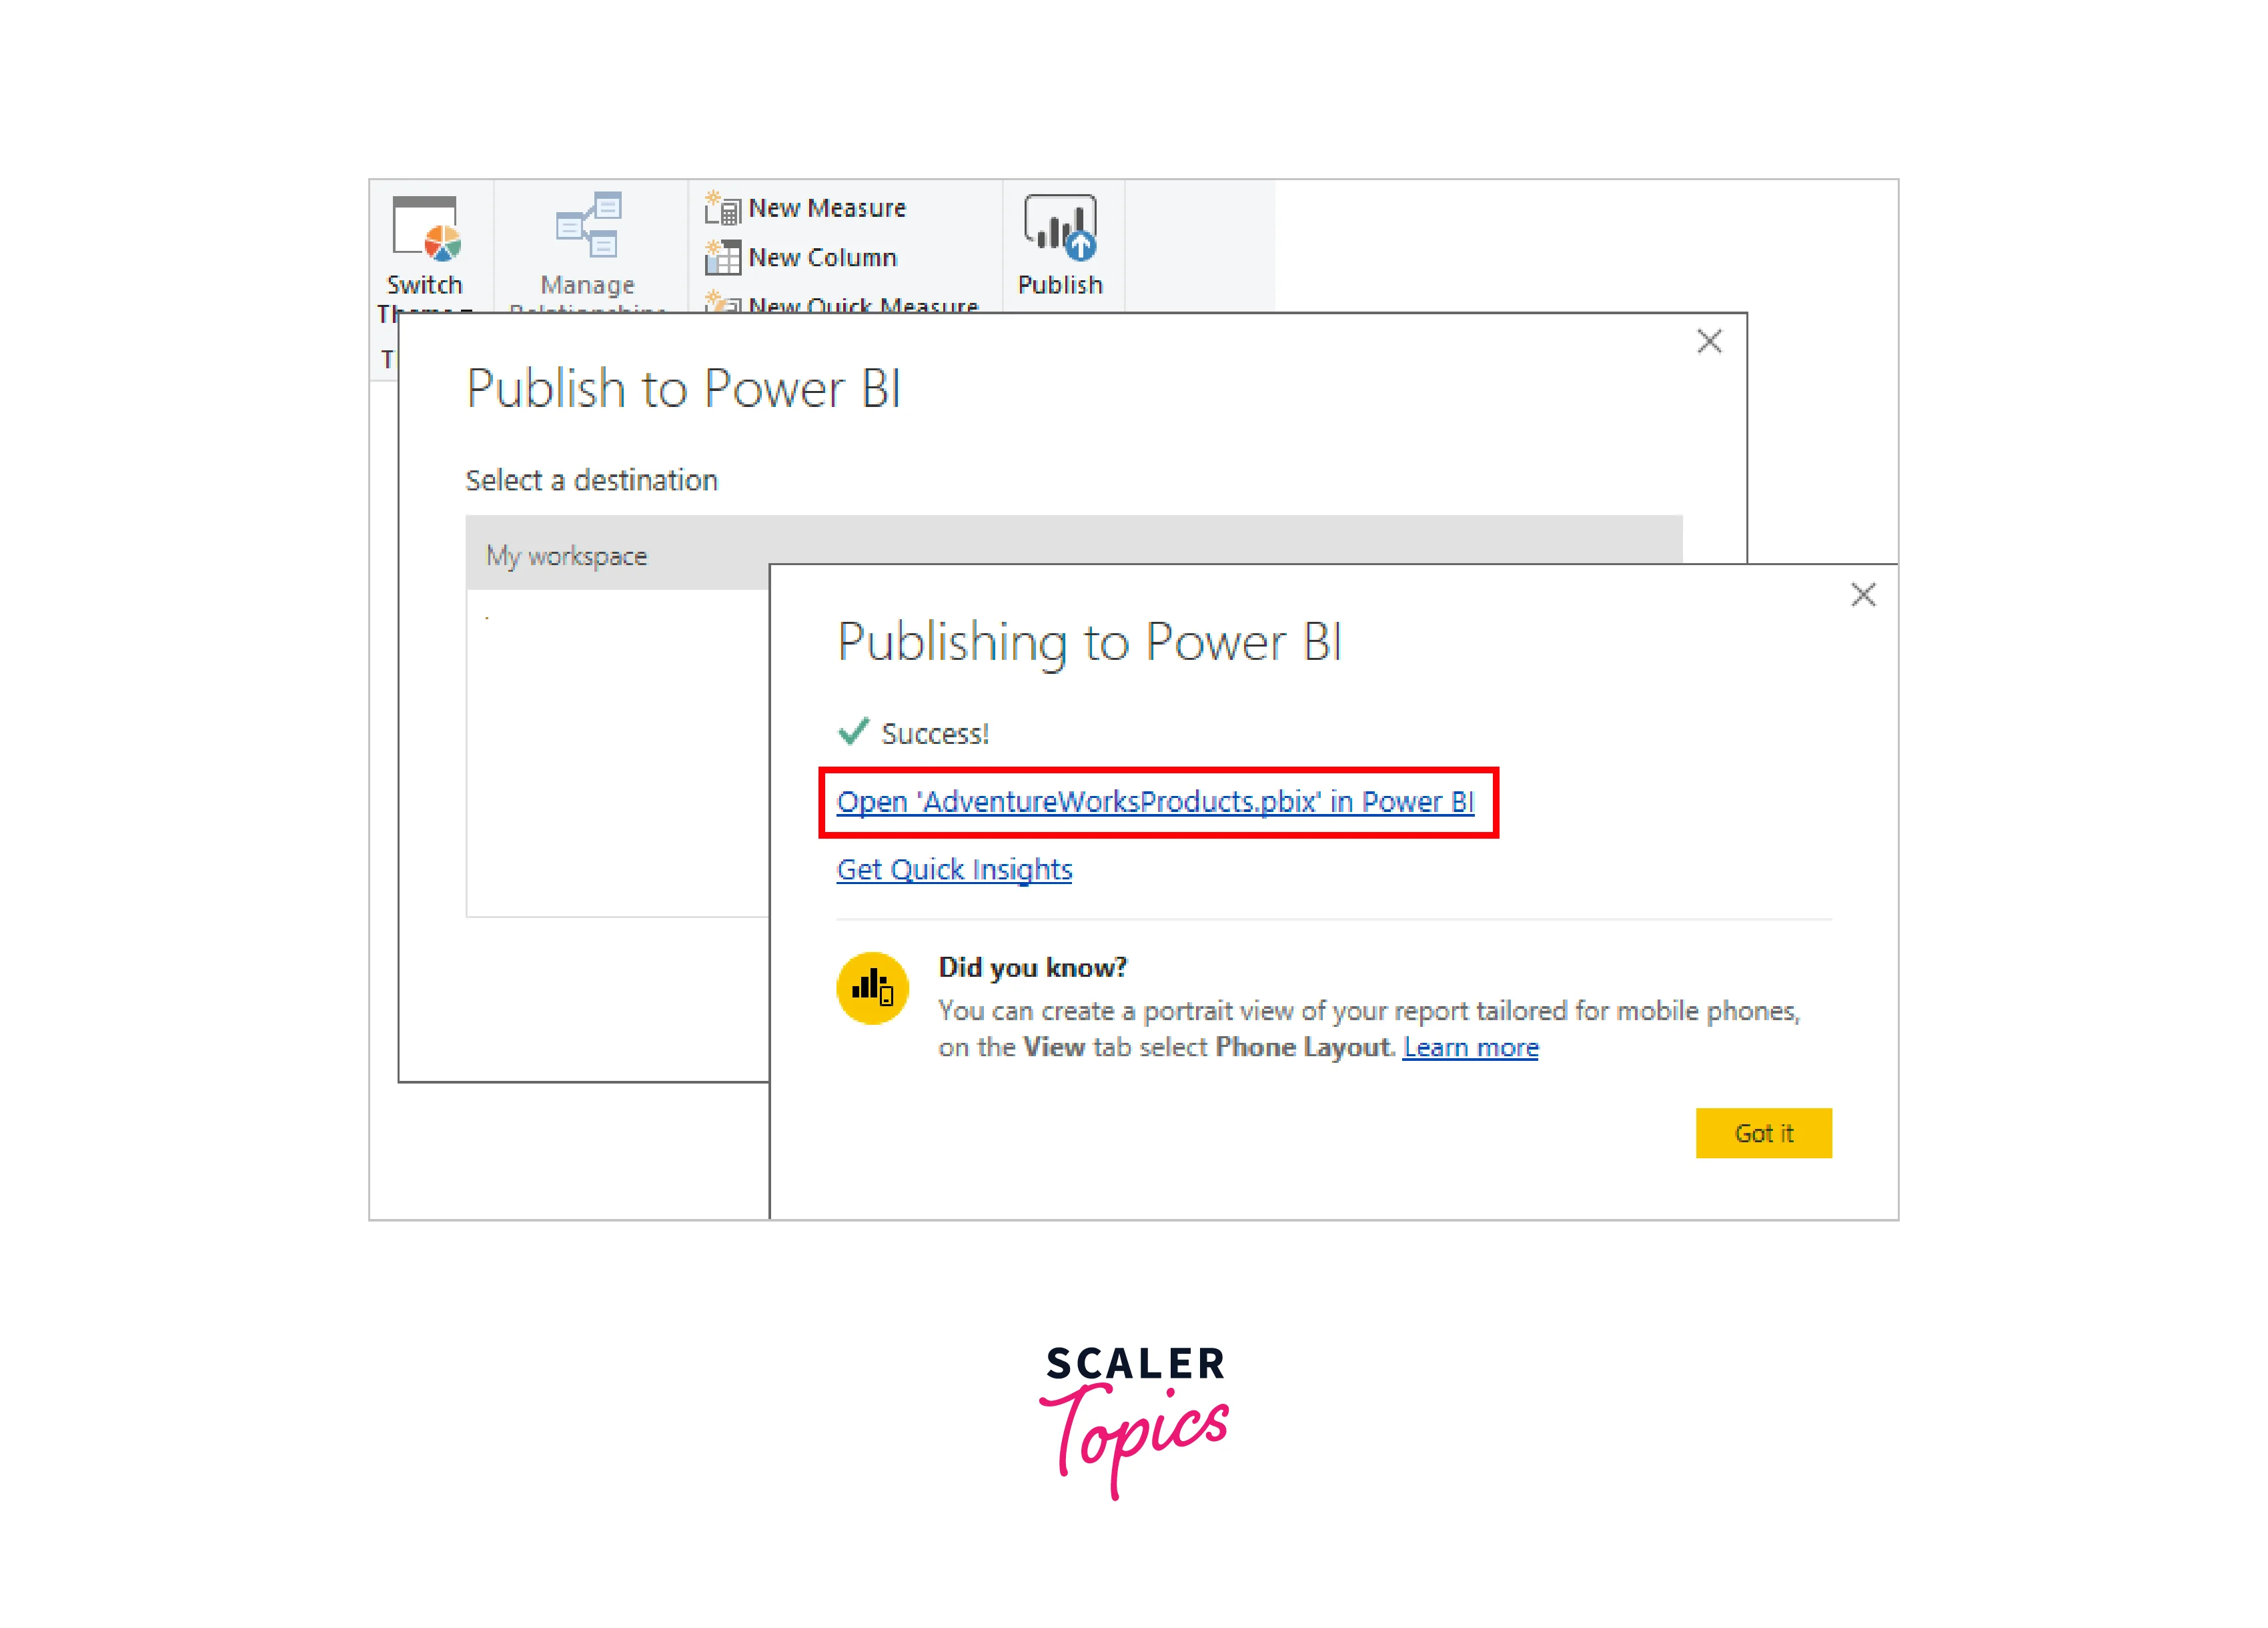
Go to the Home tab and click on "Publish." In the Publish to Power BI window, opt for "My Workspace", and then select "Select". Sign in to the Power BI service if required. Once the Success message appears, click on "Open 'AdventureWorksProducts.pbix' in Power BI".
Connect the Dataset to the SQL Server Database
In Power BI Desktop, you connected directly to your on-premises SQL Server database. To enable this connection in the Power BI service, you'll require a data gateway to facilitate communication between the cloud and your on-premises network. Follow these steps to add your on-premises SQL Server database as a data source to a gateway and establish a connection between your dataset and this data source.
-
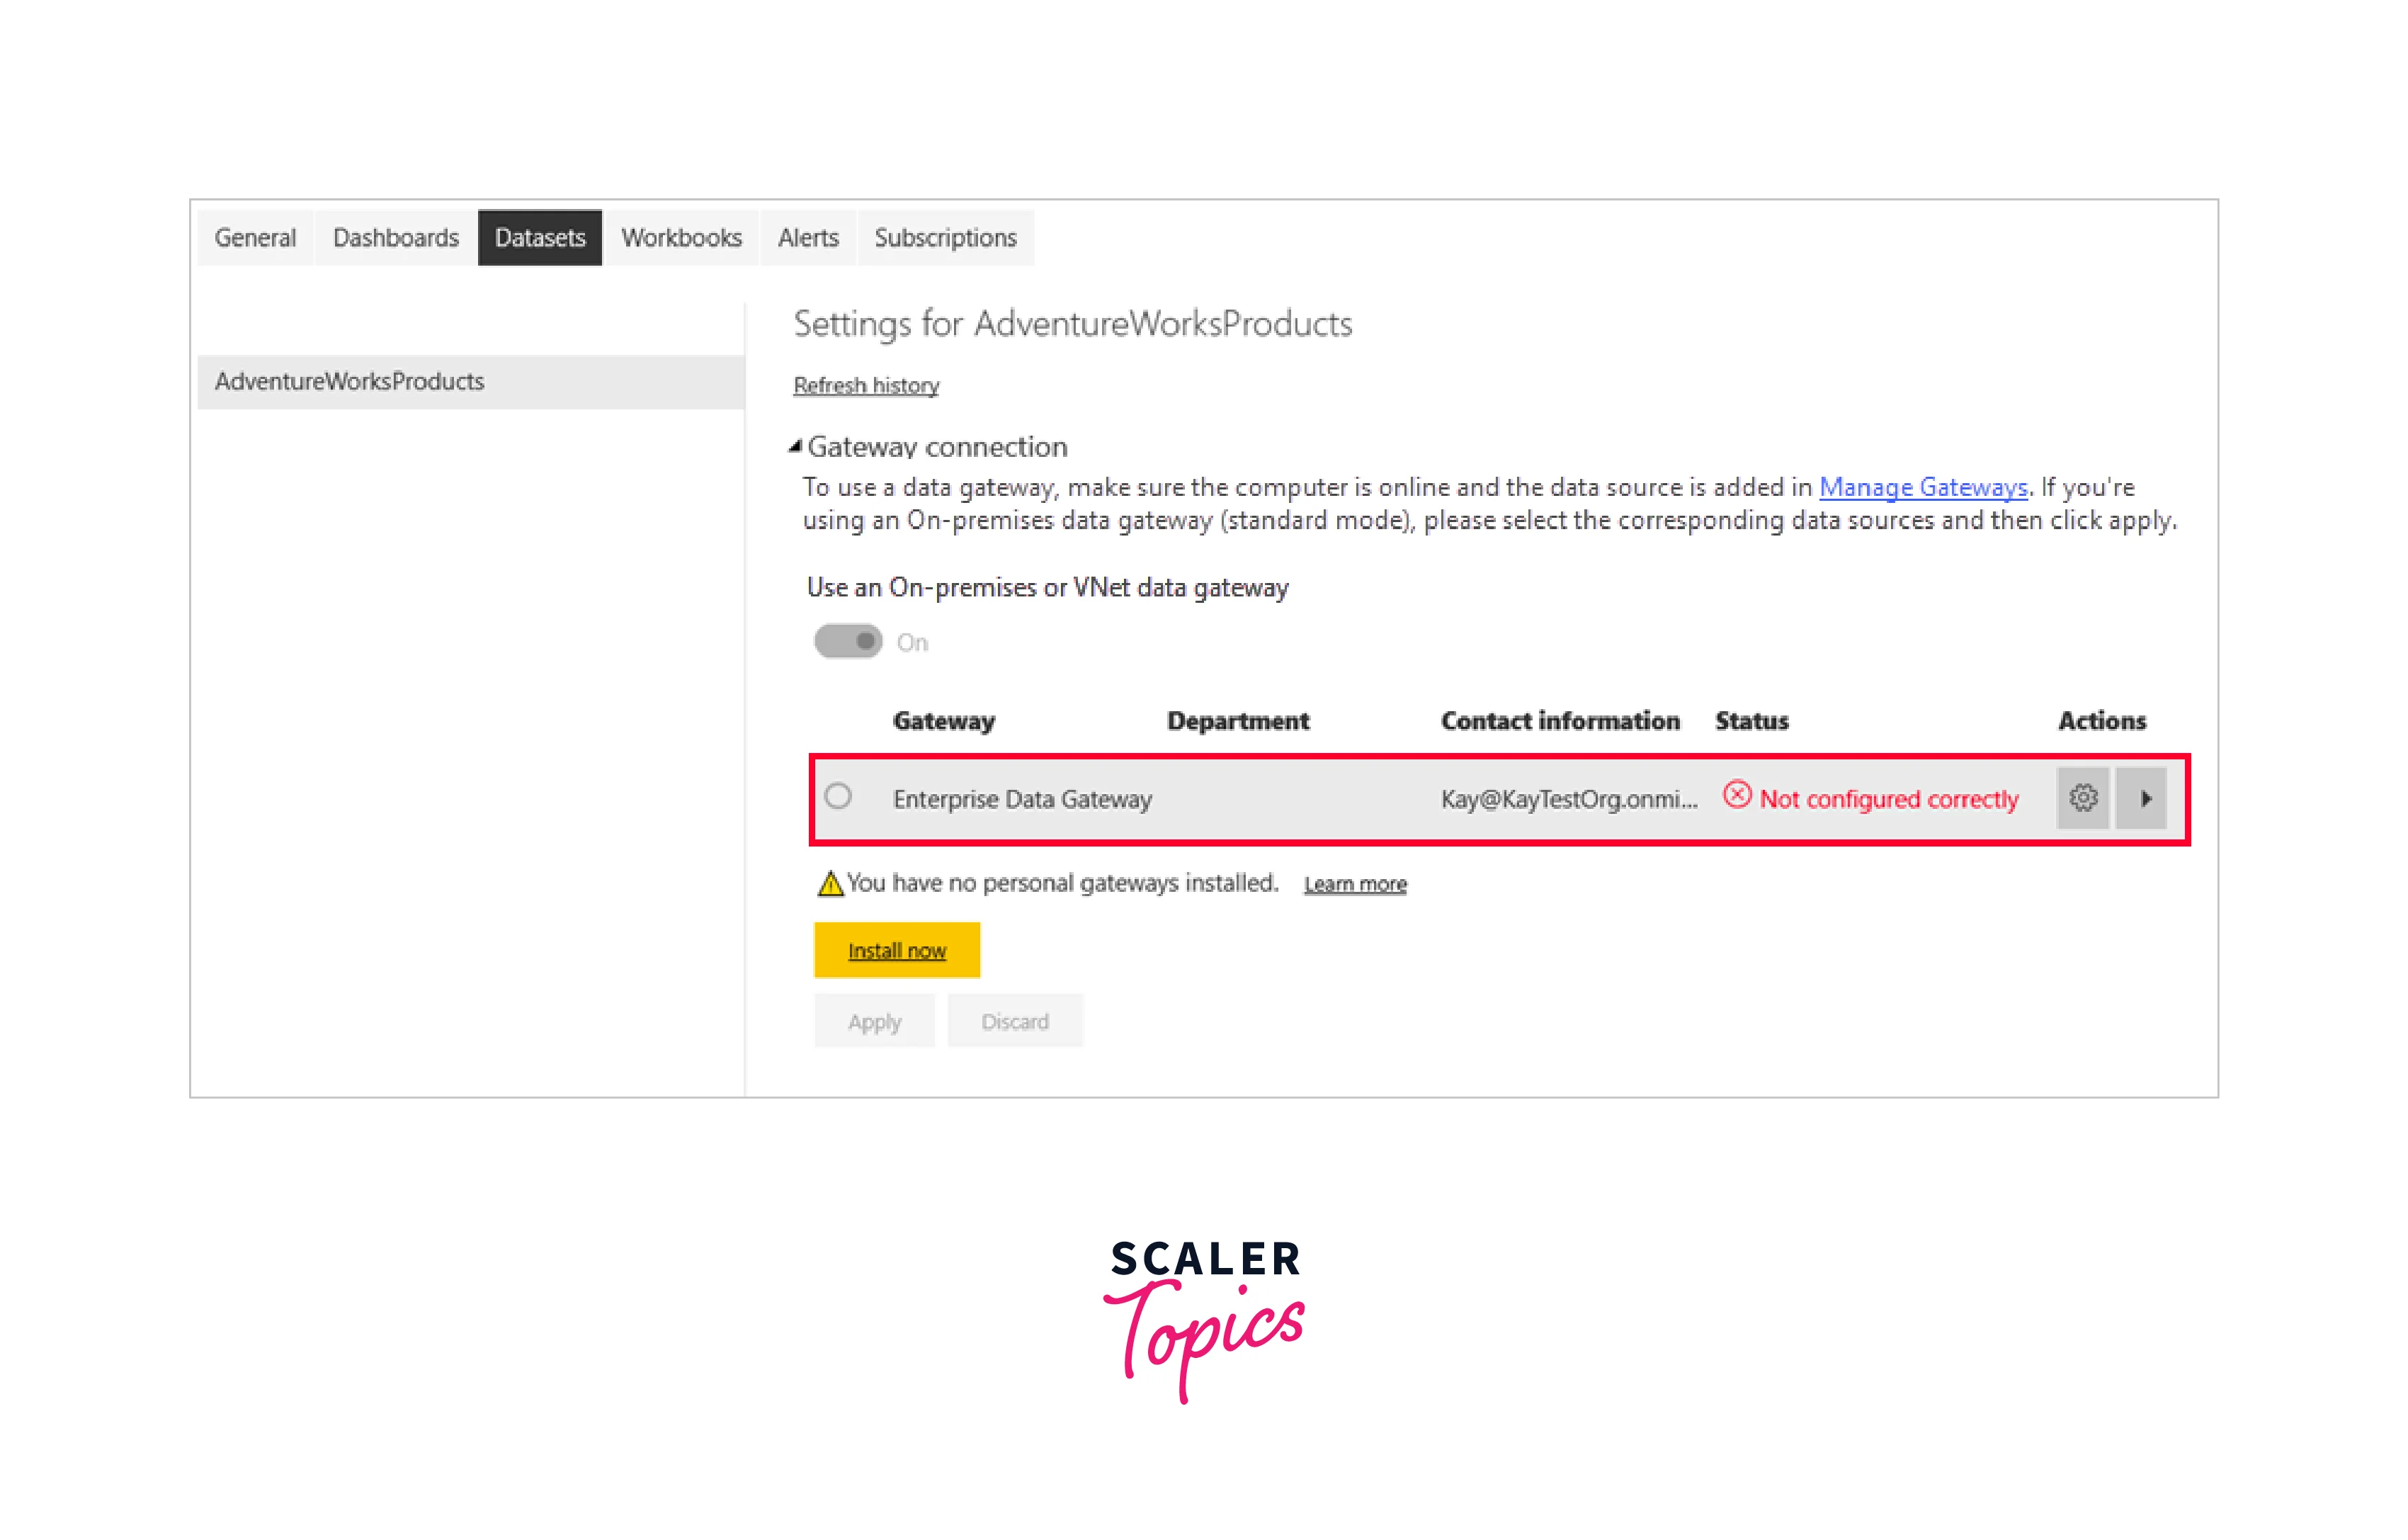
In the Power BI service, click the settings gear icon in the screen's upper-right corner, and then choose "Settings". Navigate to the Datasets tab, and from the list of datasets, choose the AdventureWorksProducts dataset. Expand the Gateway connection section and confirm that at least one gateway is displayed. If you do not see a gateway, ensure you've followed the instructions to install an on-premises data gateway.
-
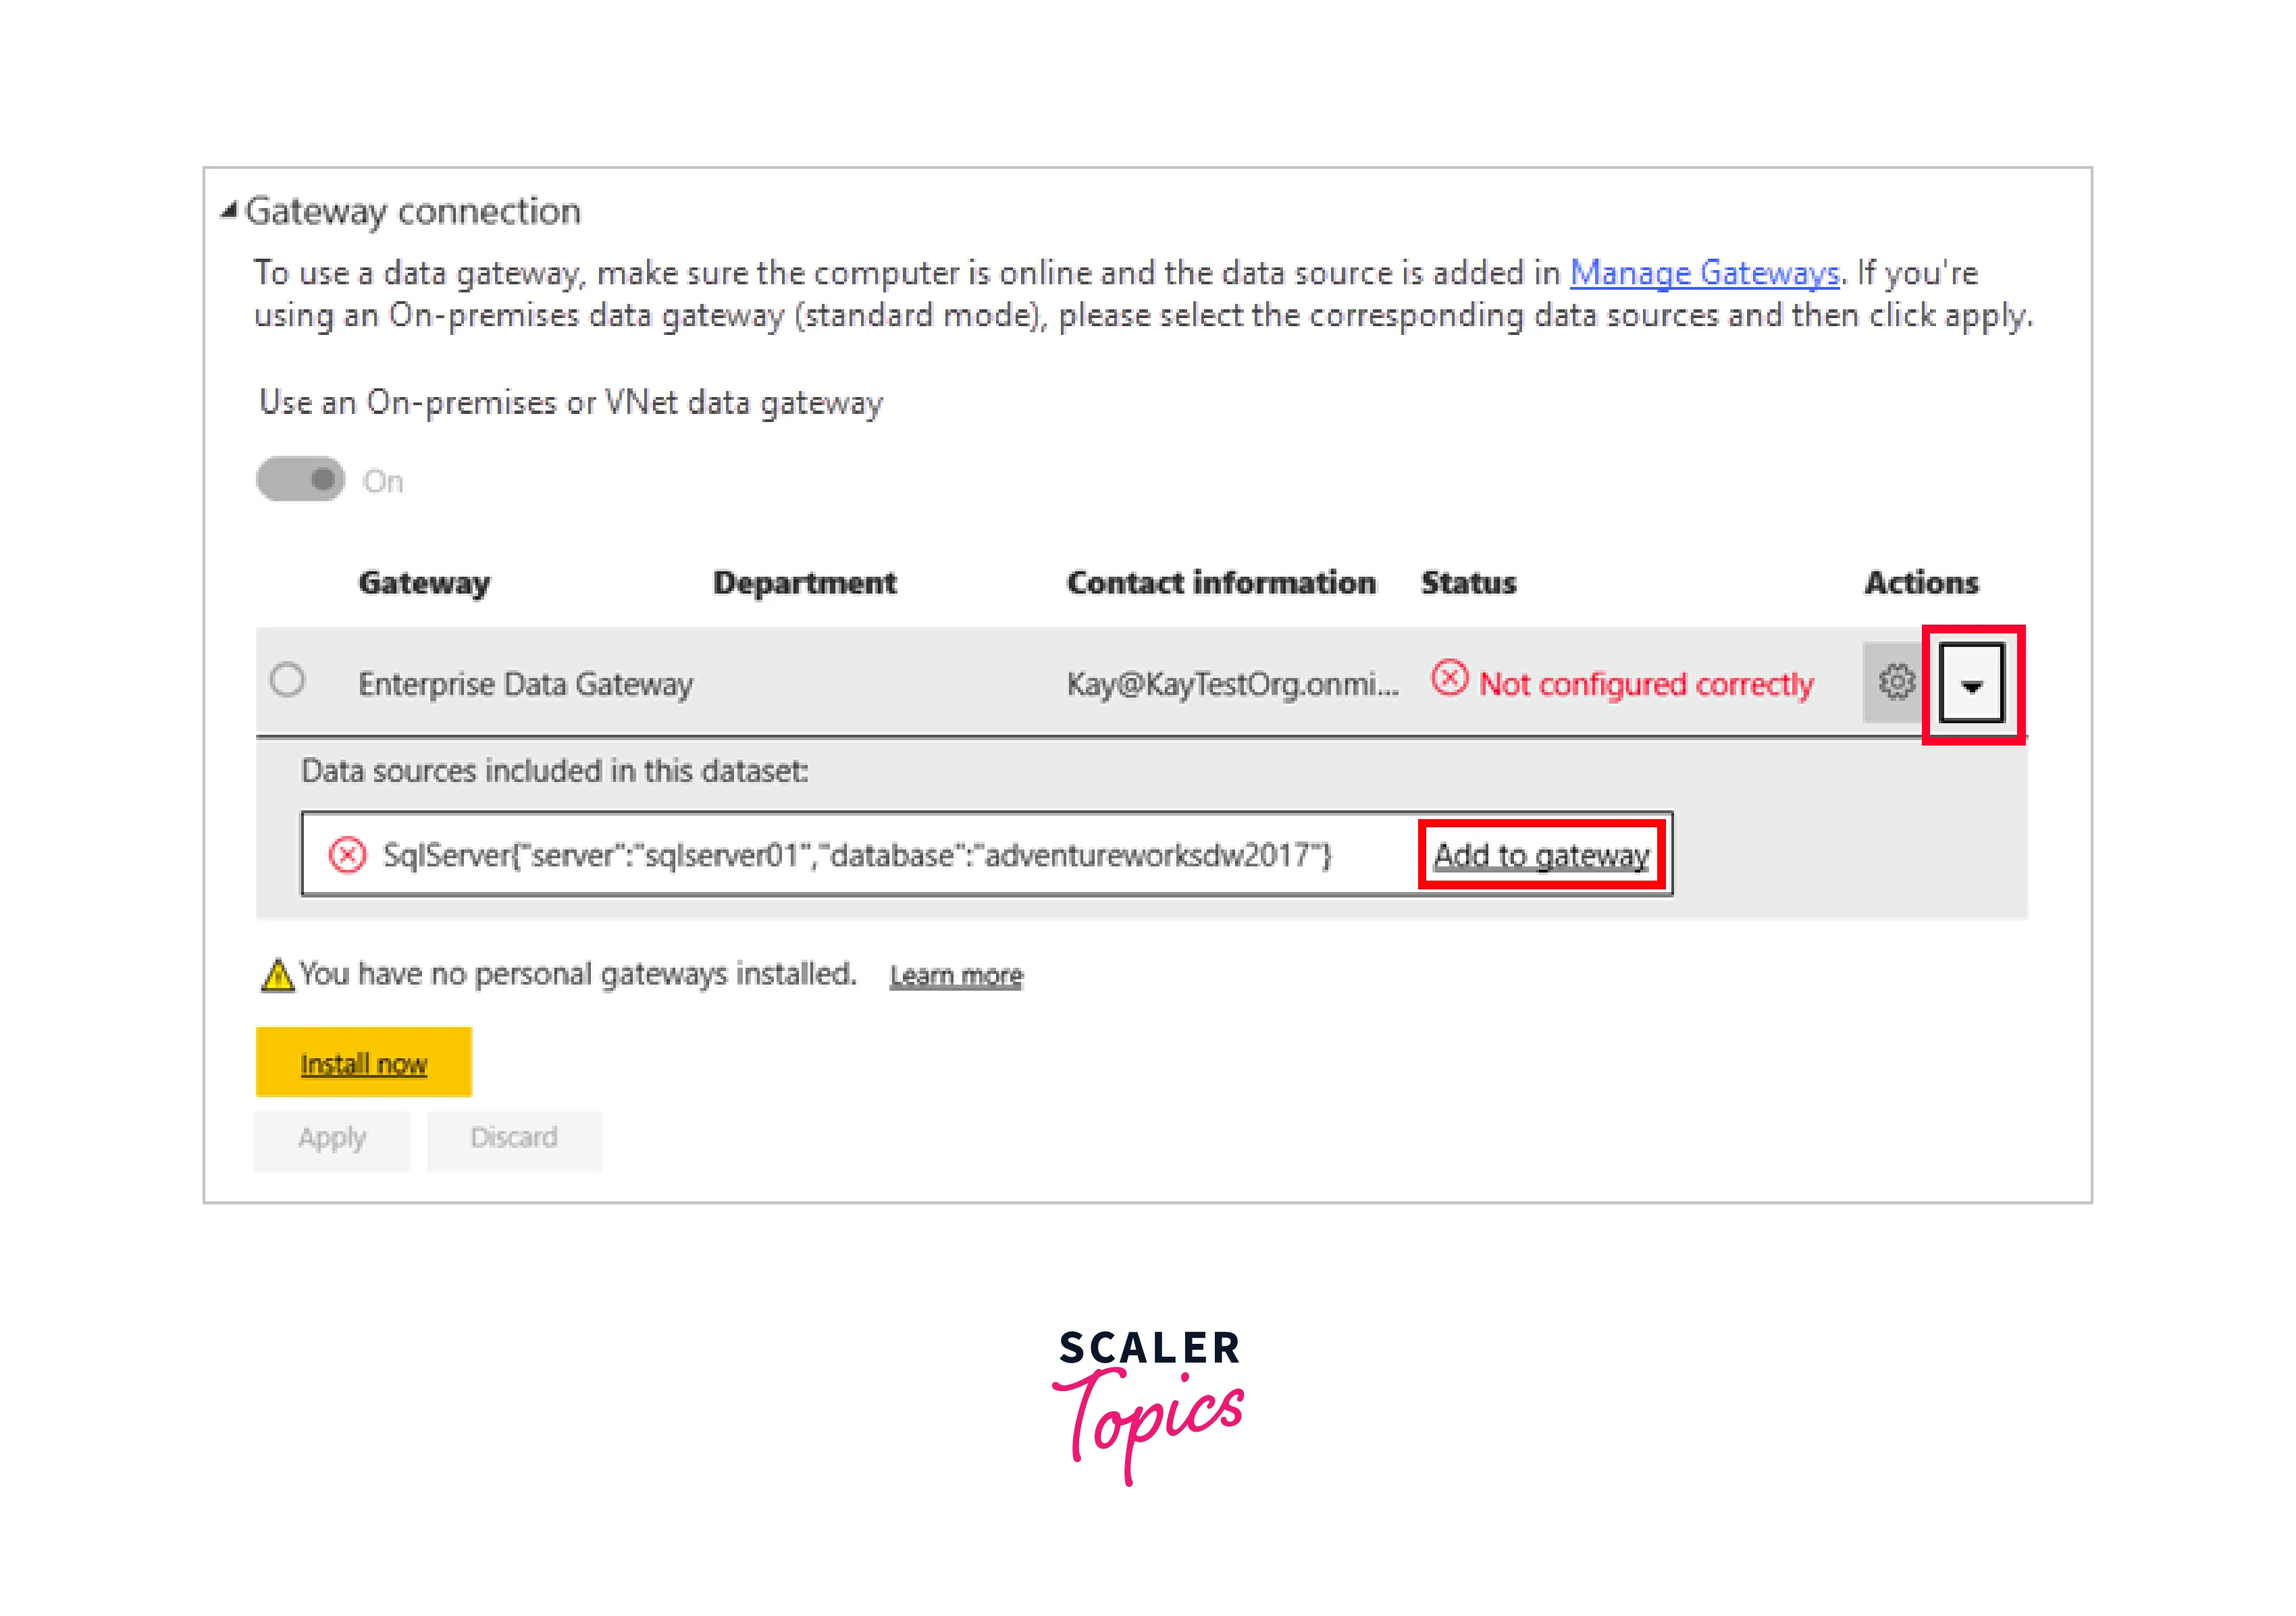
Expand the data sources section by clicking the arrow toggle under Actions, and then select the "Add to gateway" link next to your data source.
-
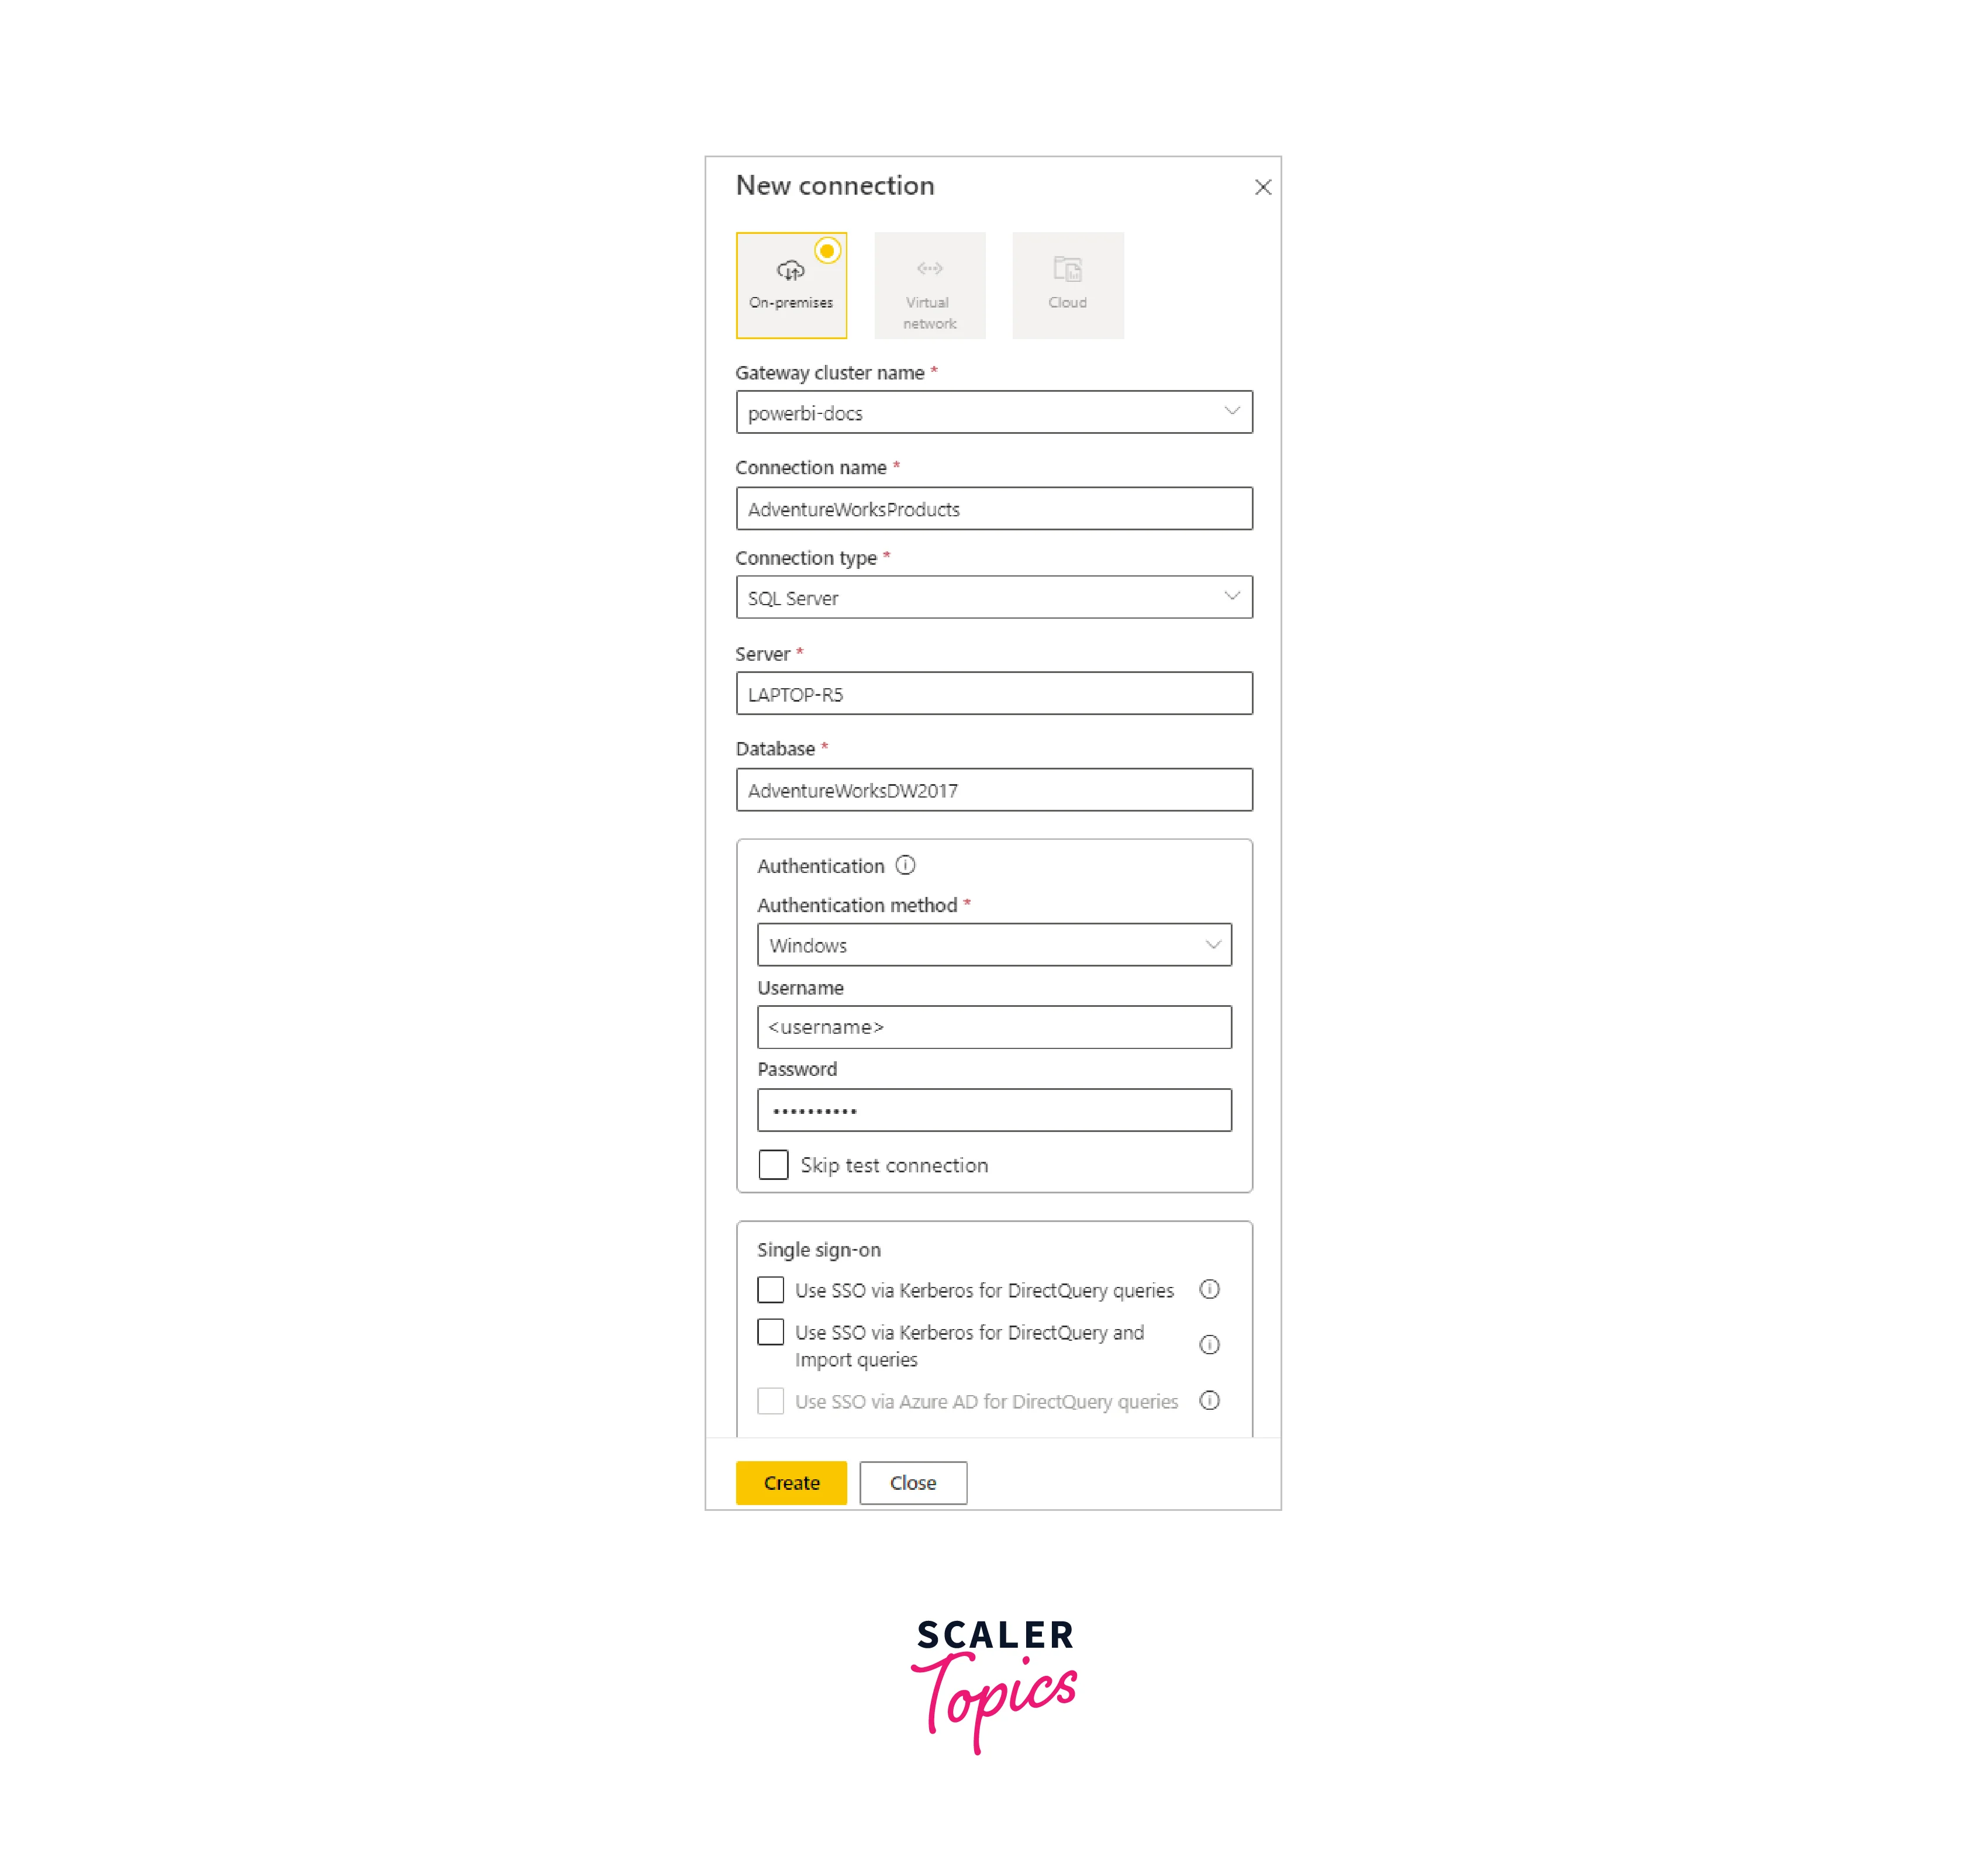
On the New connection screen with "On-premises" selected, ensure that the following fields are either completed or verified -
- Gateway cluster name - Confirm or input the gateway cluster name.
- Connection name - Provide a name for the new connection, like "AdventureWorksProducts".
- Connection type - If not already selected, choose "SQL Server".
- Server - Validate or enter your SQL Server instance name, which must match what you specified in Power BI Desktop.
- Database - Validate or enter your SQL Server database name, such as "AdventureWorksDW2017", which must match what you specified in Power BI Desktop.
Under Authentication -
- Authentication method - Select either Windows, Basic, or OAuth2, typically "Windows".
- Username and Password - Input your credentials to connect to SQL Server.
-
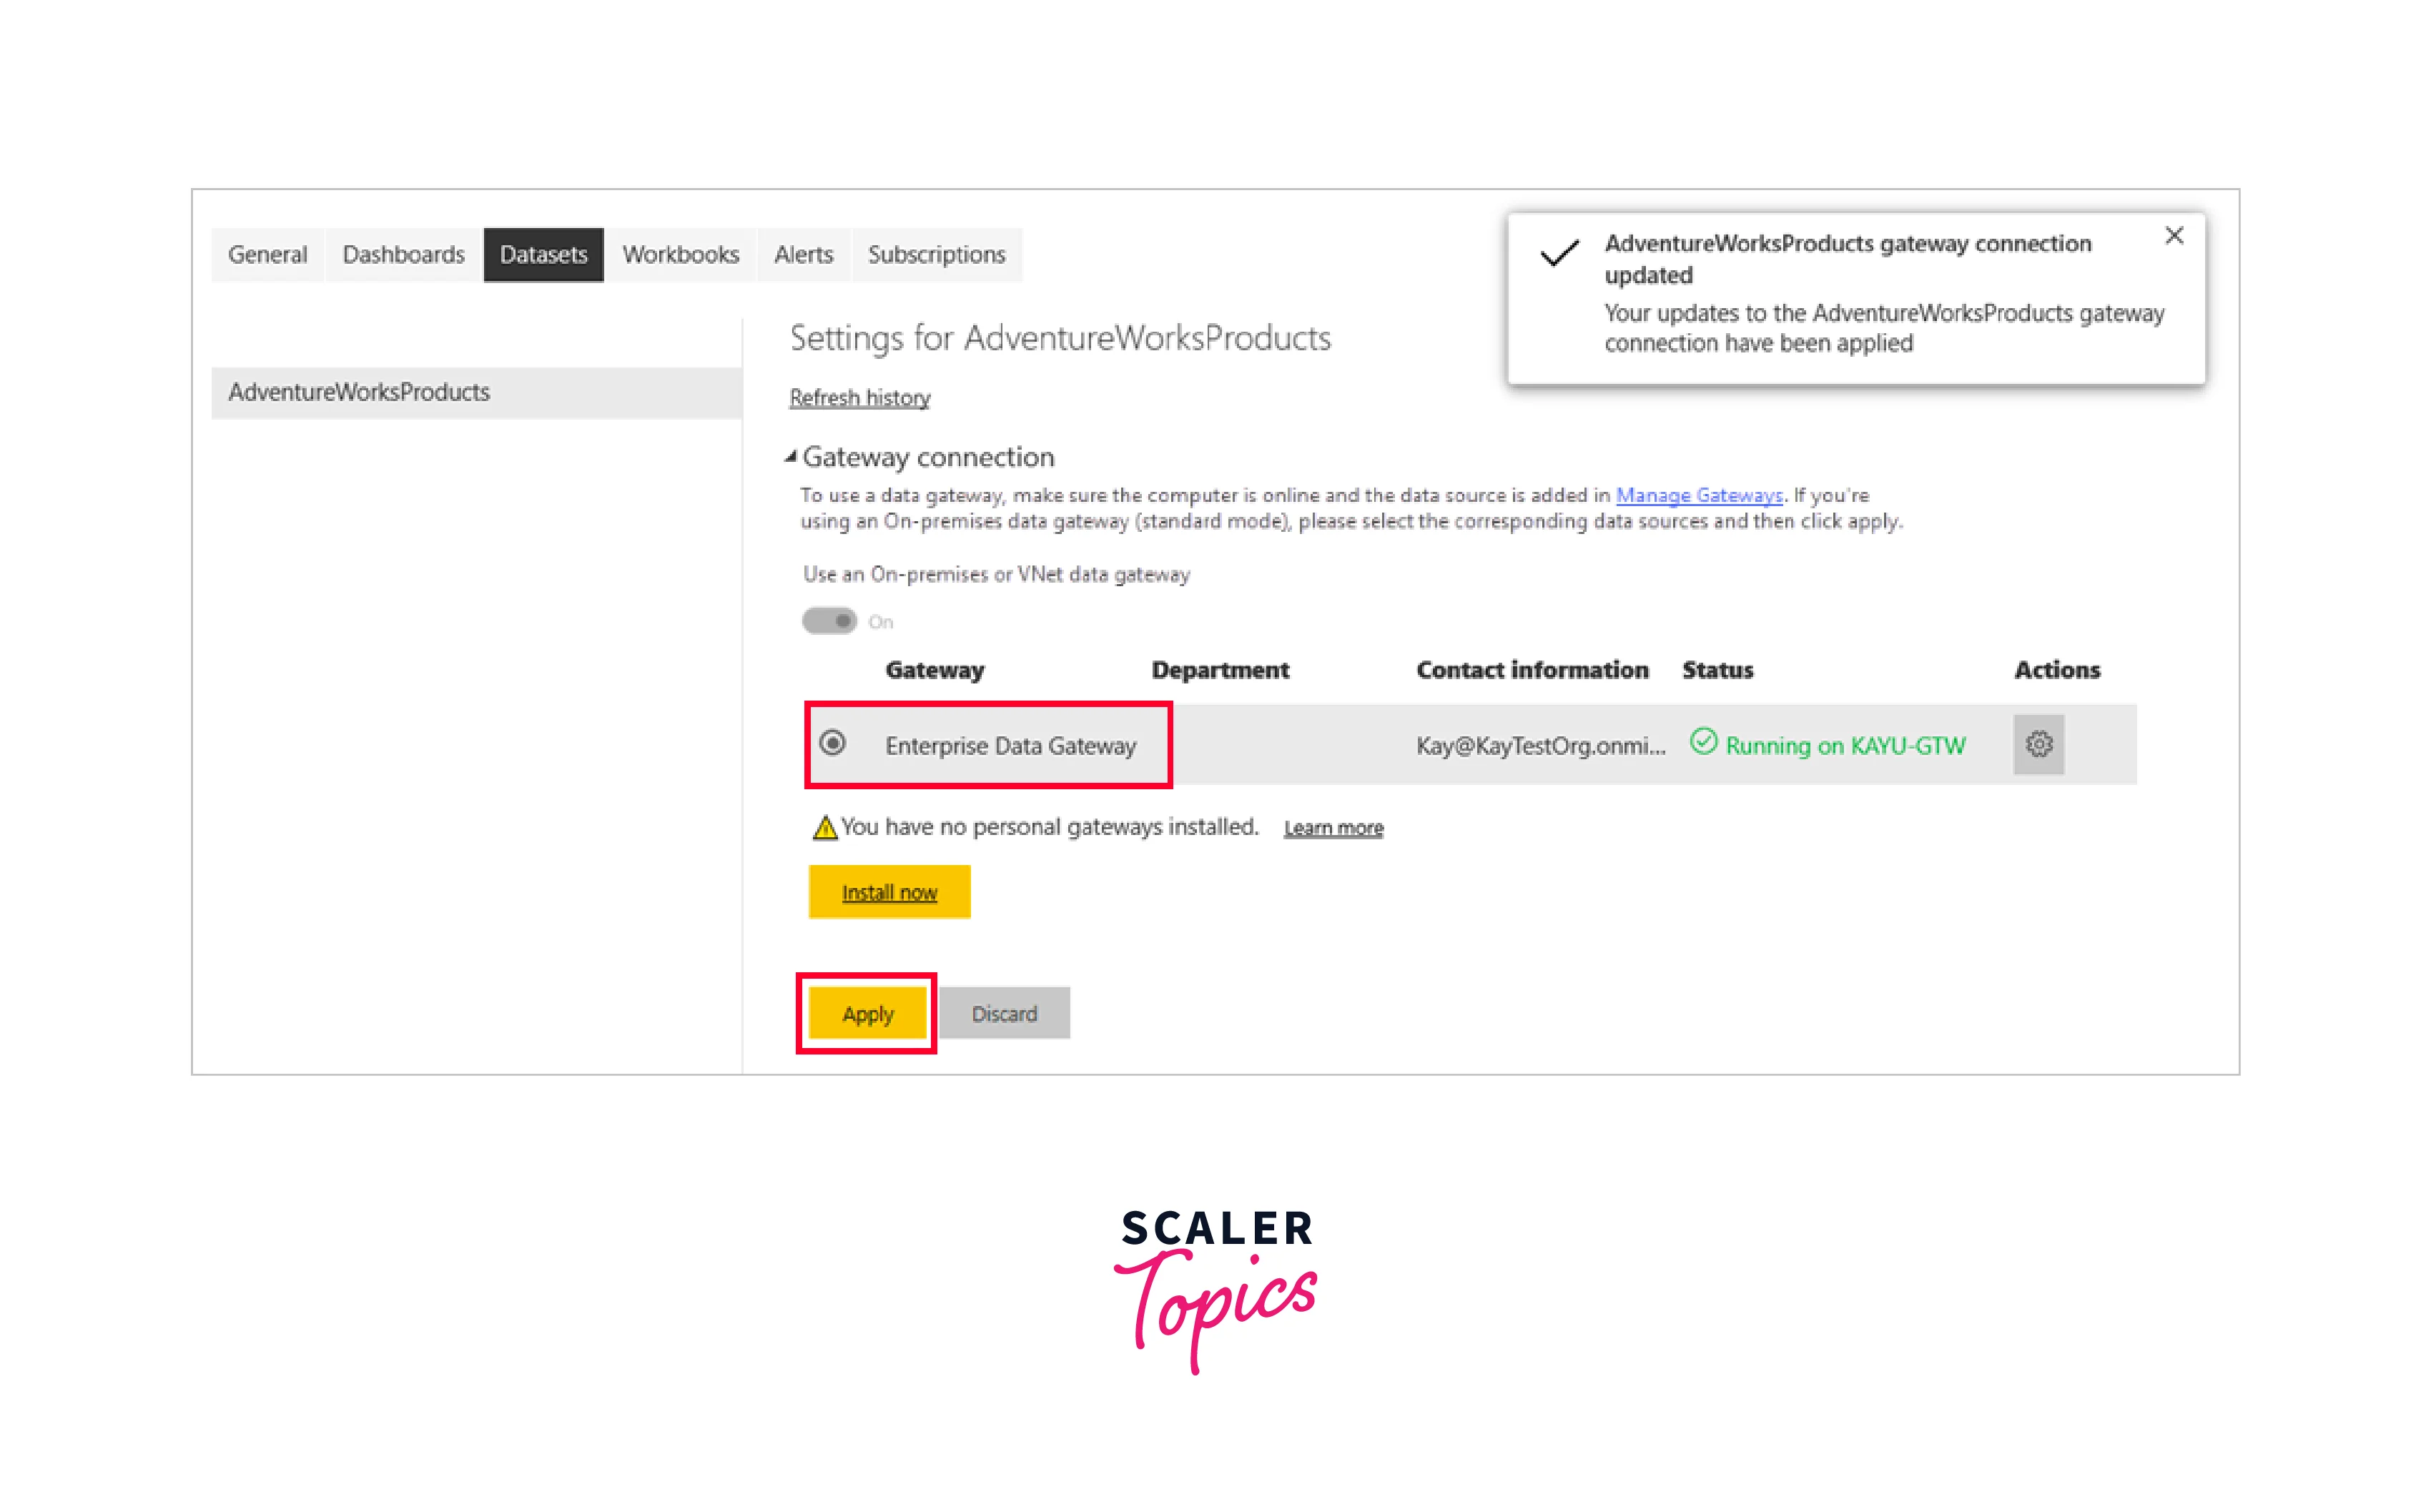
Click on "Create". Return to the Settings screen, and expand the Gateway connection section. Confirm that the data gateway you configured now displays a Status of "running" on the machine where you installed it. Then, select "Apply".
How to Connect to Azure?
To connect to any databases in Azure, you can follow the below-mentioned steps -
-
In Power BI Desktop, click "Get data" and choose your Azure data source.

-
Enter your Azure credentials and specify the data you want to import.
-
Create your report in Power BI Desktop.
-
Publish the report to Power BI Service for sharing and collaboration.
How to Connect to GCP?
To connect to any databases in GCP, you can follow the below-mentioned steps -
-
In Power BI Desktop, select your GCP data source.

-
Provide GCP authentication details and data source specifics.
-
Design your report in Power BI Desktop.
-
Publish the report to Power BI Service for sharing and collaboration.
How to Connect to AWS?
To connect to any databases in AWS, you can follow the below-mentioned steps -
-
In Power BI Desktop, select your AWS data source.

-
Provide AWS authentication details and data source specifics.
-
Design your report in Power BI Desktop.
-
Publish the report to Power BI Service for sharing and collaboration.
Conclusion
- Power BI is a versatile tool for data analysis, offering seamless Power BI database connections to various data sources, including on-premises databases and cloud platforms like Azure and AWS.
- Using various Power BI database connection options, businesses can harness the power of their data, transforming it into actionable intelligence for improved operations and competitiveness.
- PBIDS files streamline data source setup, making it easier for novice report creators to access and analyze data efficiently.
- Leveraging gateways ensures secure connectivity to on-premises databases, expanding the range of data sources accessible in the Power BI service.
