Using Razor Pay in Flutter
Overview
There are a lot of payment gateways that you can integrate into your app, one of them is Razorpay. Razorpay is a popular payment gateway service for online payment solutions for businesses. Razor Pay allows us to accept credit cards, debit cards, net banking, wallets, and UPI payments, with the Mobile App integration offering a range of features and APIs. This plays an important role in our Flutter applications, as online payment has become a part of our daily lives. It is a popular and one of the most used payment gateways out there. In this article, we will see how to integrate RazorPay into the Flutter app.
Introduction
Razorpay is a leading online payment gateway service that offers secure payment solutions for businesses. This payment gateway has a variety of features and APIs that can be integrated into Flutter applications, and we can perform different operations accordingly. Razorpay allows you to process various types of payments, including credit and debit cards, net banking, UPI (Unified Payments Interface), digital wallets, and EMI (Equated Monthly Installments). We can customise the payment UI to match our app's branding. We can modify the payment screen, logos, colours, and other visuals to provide a consistent user experience. Razorpay ensures the security of transactions by employing encryption and tokenization techniques. After a payment is processed, Razorpay provides callbacks to notify our app about the payment status, and we can update the UI based on the payment outcome.
Initializing Razorpay in Flutter
There are few steps to be followed for integrating or initializing the Razorpay in our Flutter applications.
First of all, we will see how we are going to make our profile on the RazorPay dashboard to get the key and track all other activities.
- We will create our account in Razorpay, and there you need to give your mobile number. After that, you will be directed to the Razorpay dashboard, which will look like this. This will be in test mode.
- The Razorpay Test mode is a replica of Razorpay in a sandbox environment. This allows you to test all aspects of your integration before you go live. After thoroughly testing your integration, you can switch to live mode and start accepting payments from customers.
To use the Live Mode, select it from the right-corner profile section. Also, to use this mode, you need to fill out a KYC form.

- From the left menu bar, select Account & Settings option, and there you will see API Keys. After that, you can copy the key from there and use it in your project.
- Checkout settings =>Branding:
Inside the Checkout Settings option, choose the Branding option to change the theme colour, a different logo (image file size to be max 1MB or a square image of minimum dimensions 256x256 px) or select any language. Also, you can collect the email address of the person if you want or keep it as an option. You can see the preview of your colours and logo there on the dashboard and this is how it will look.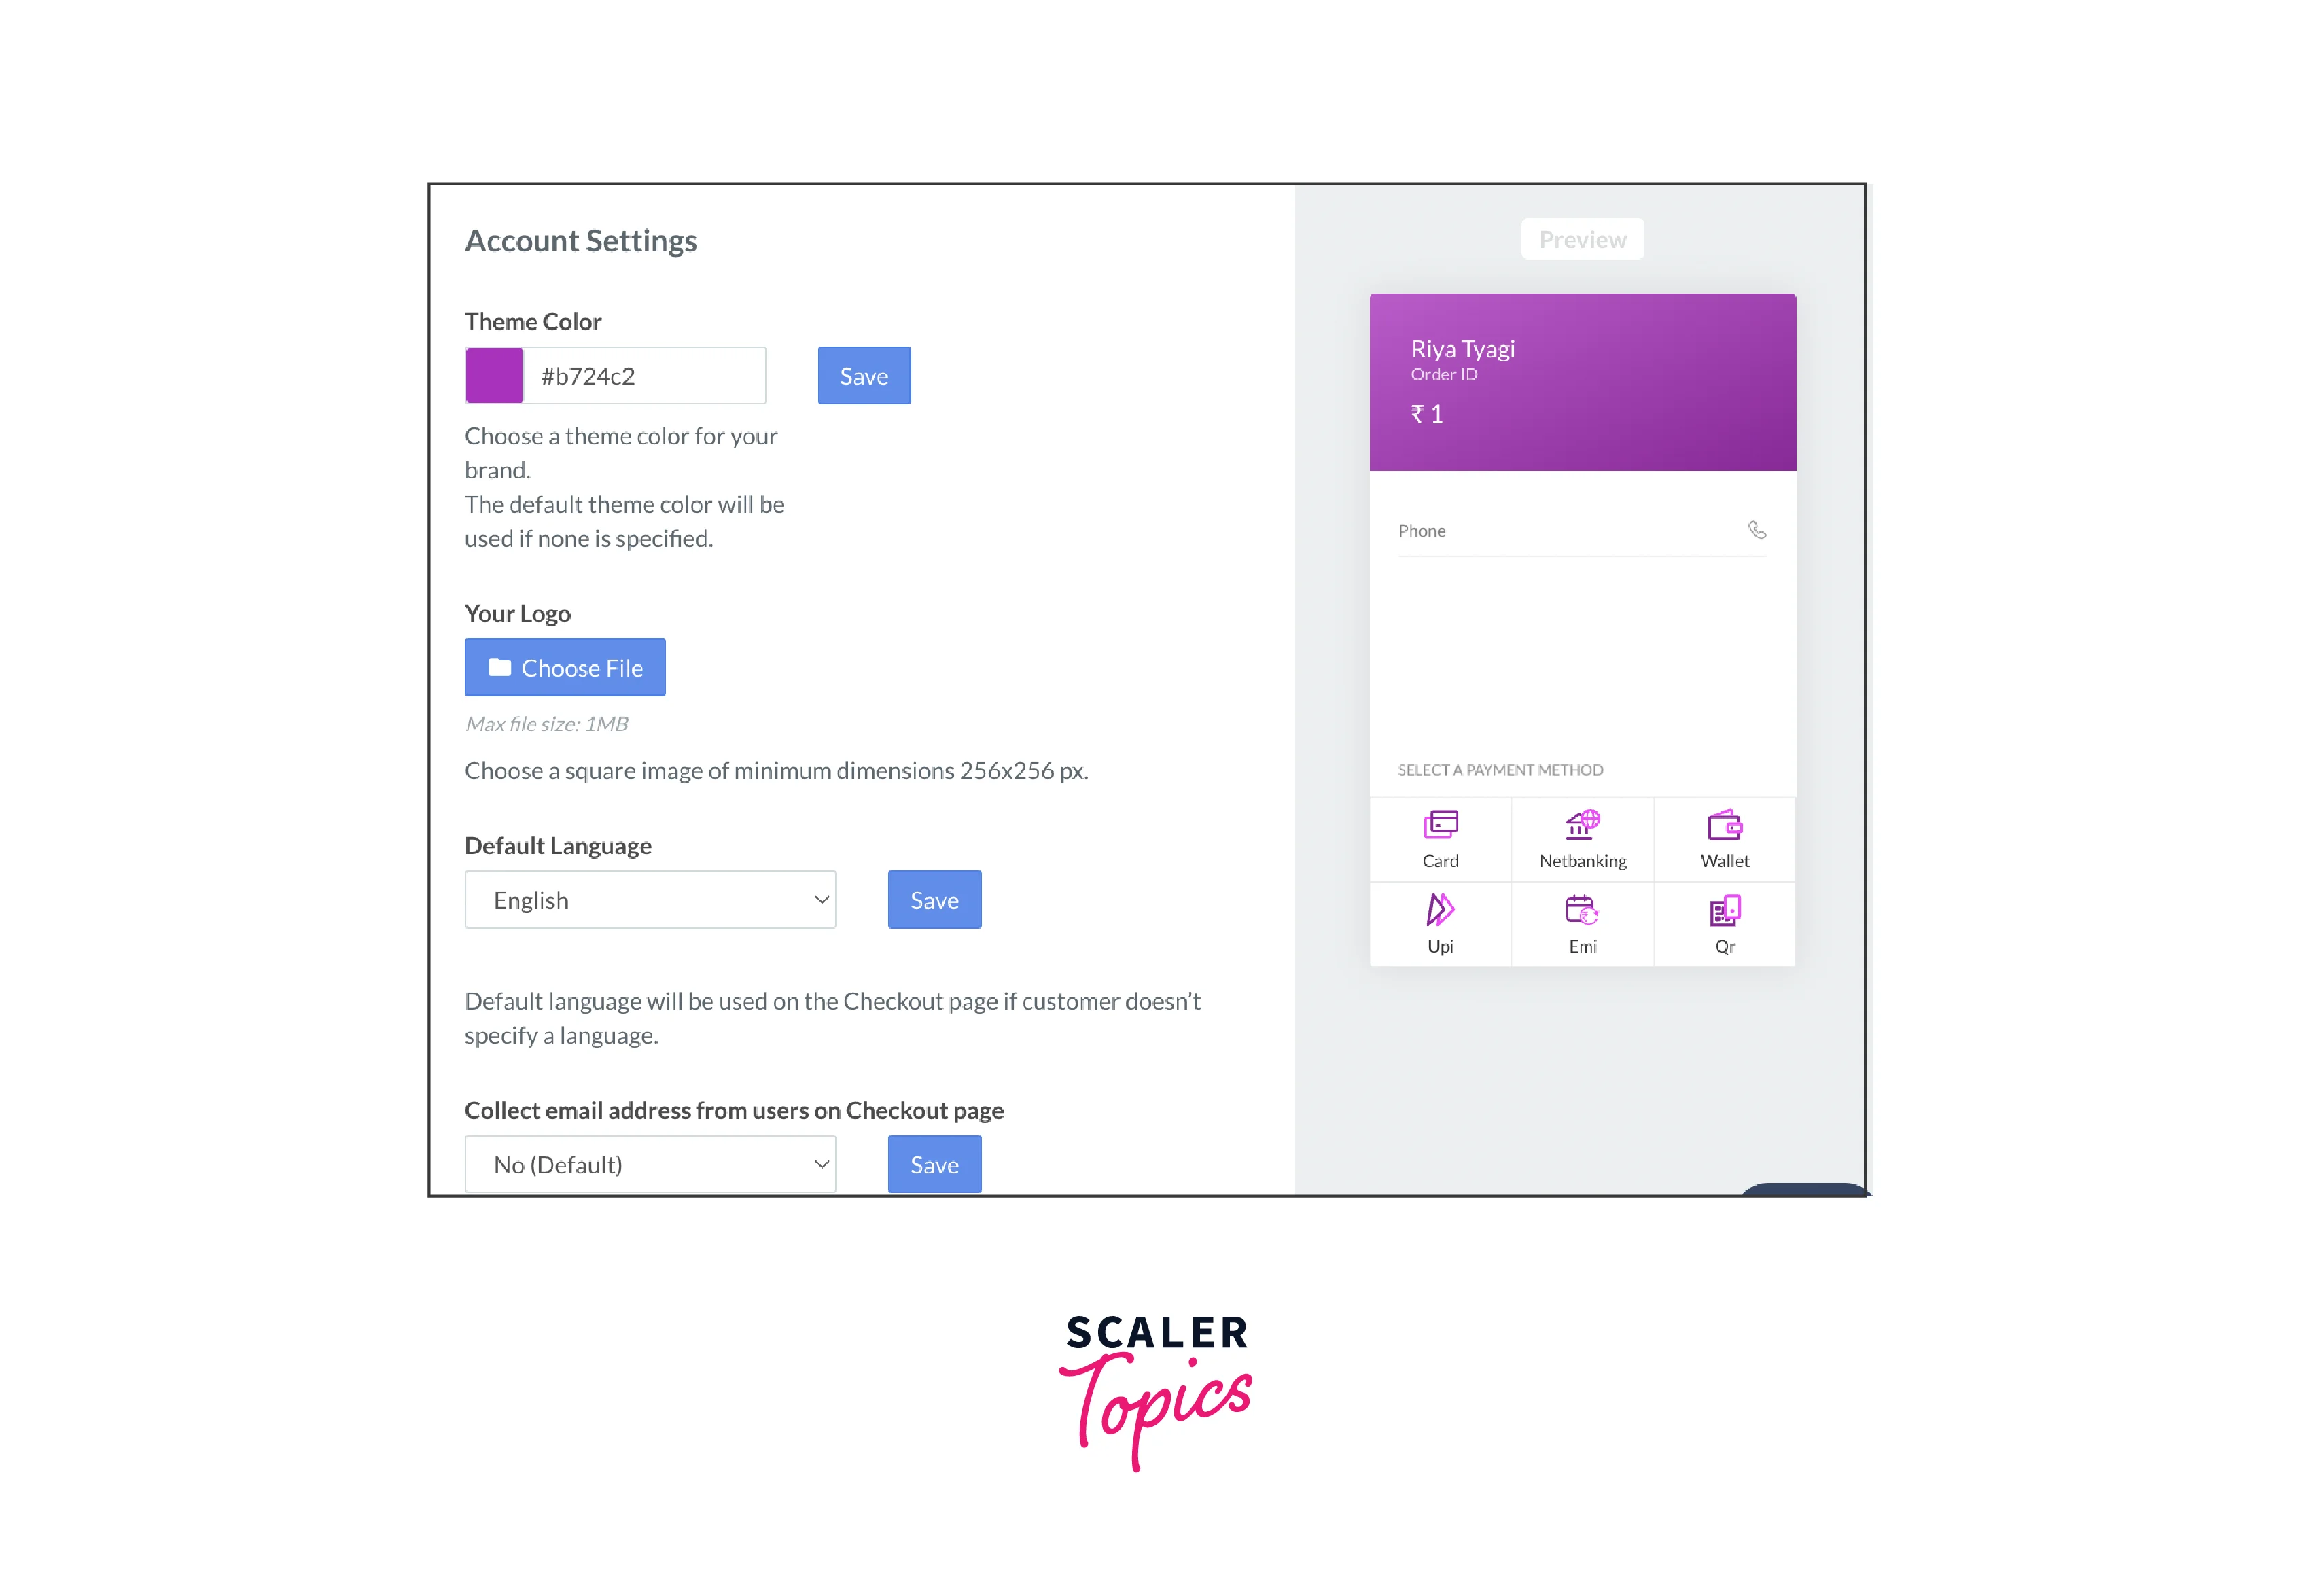
- Capture and refund settings =>Default Refund Speed
This section is about the refund process. If you want free service, you can choose Normal Refund, which will take 5-7 days. If you choose Instant Refund, this will have some cost, but customers will get refunds instantly.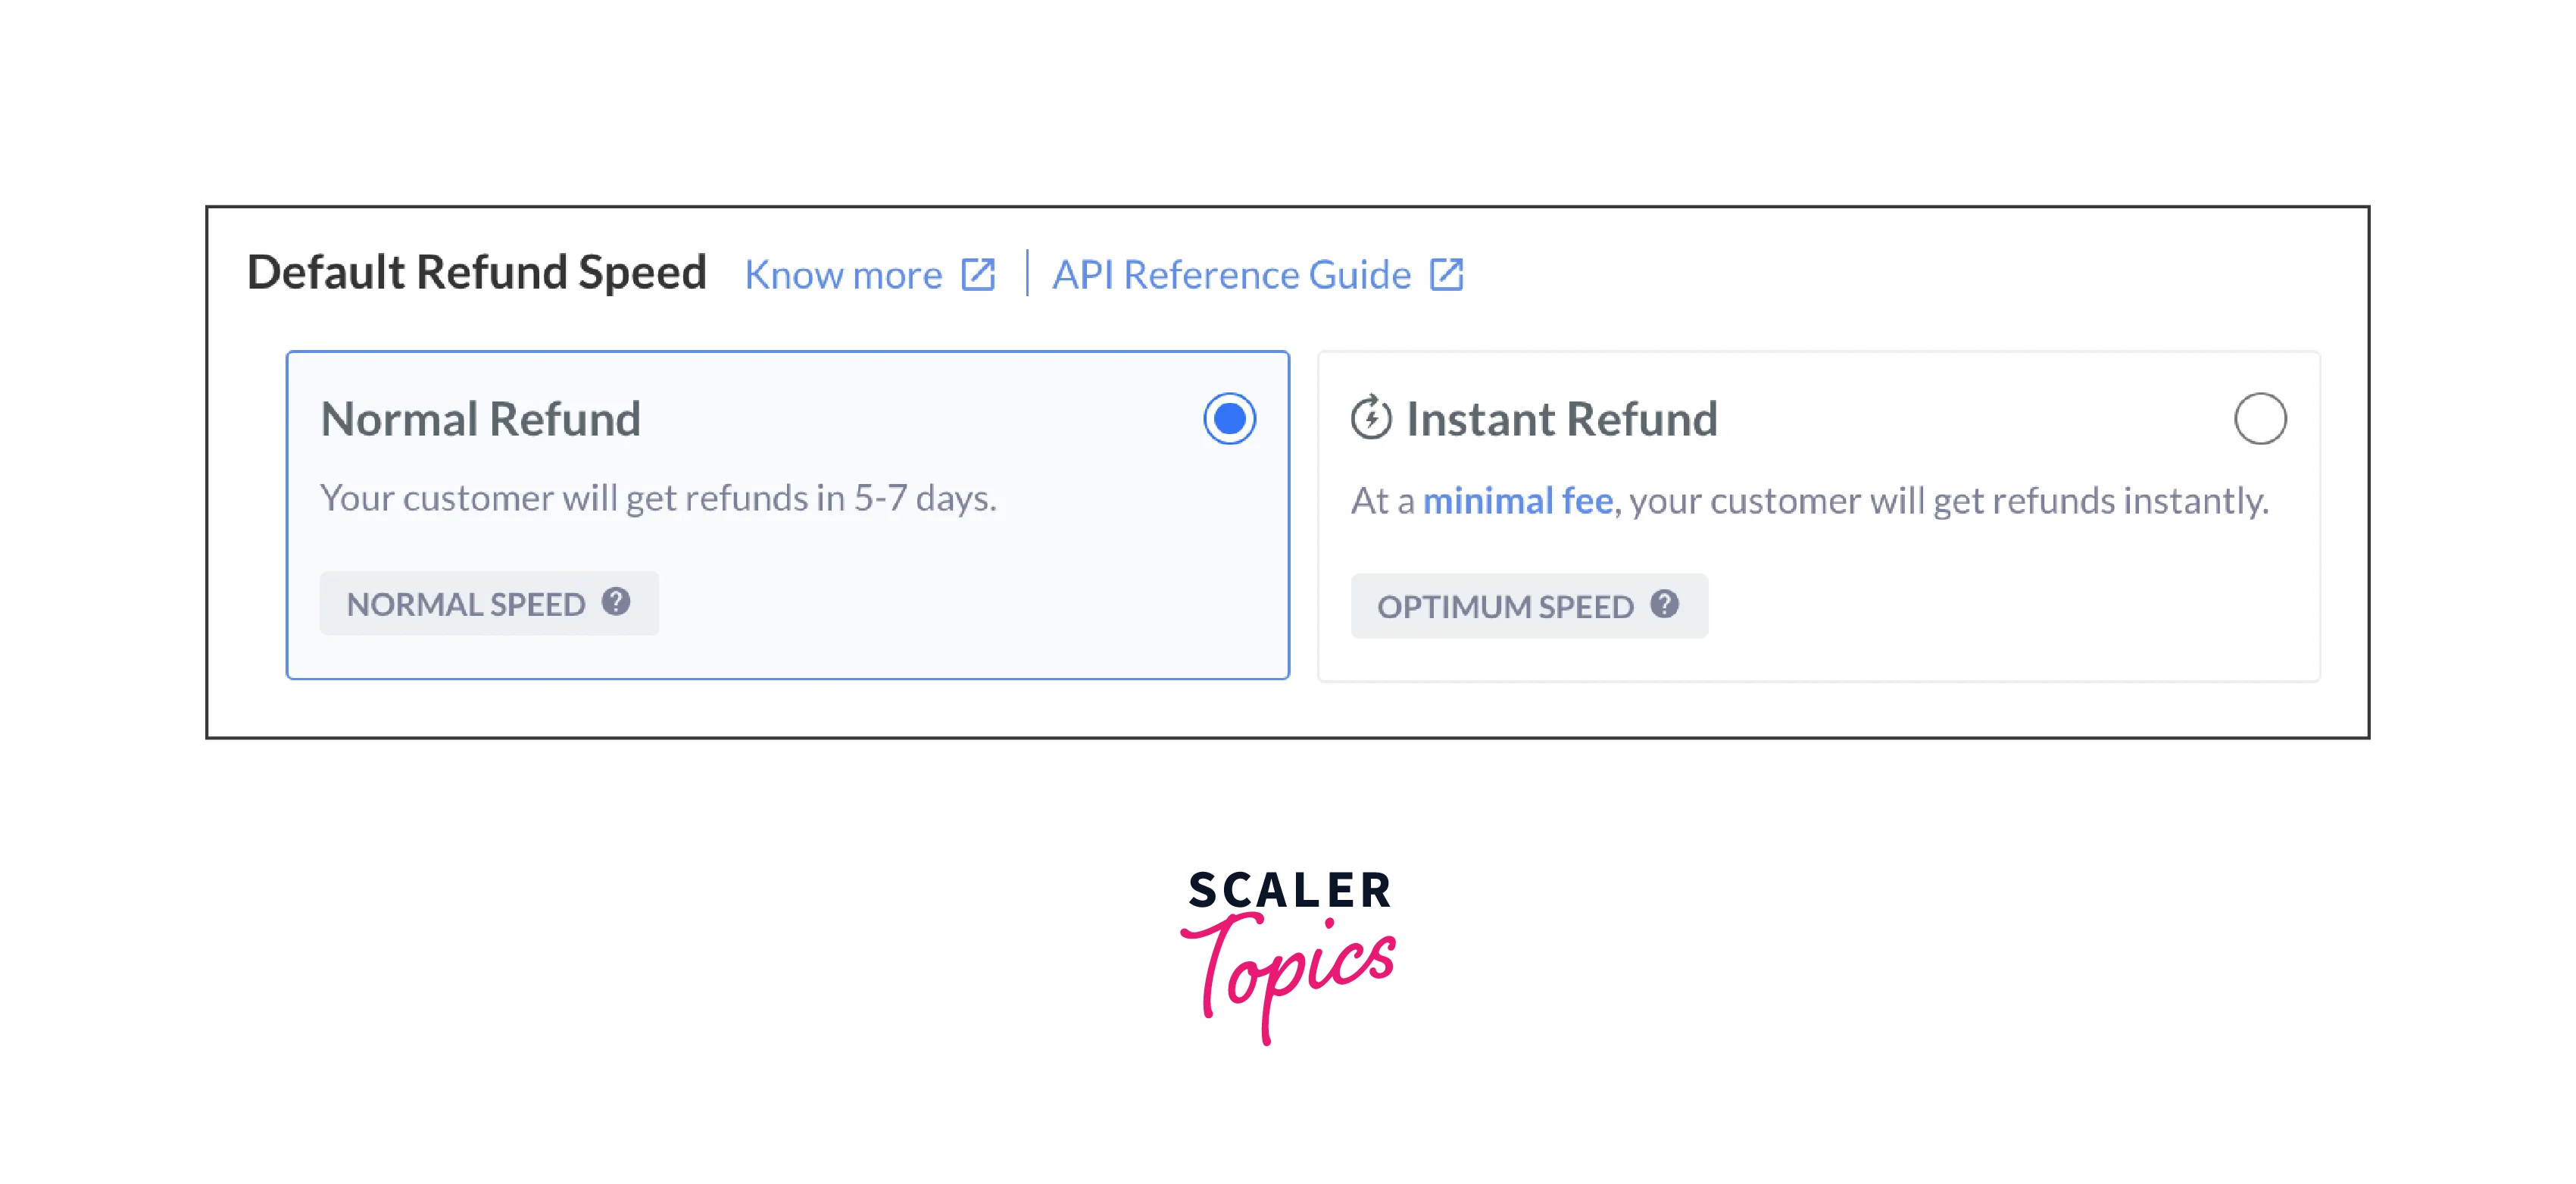
- Account & Settings=> Email
Enter email addresses that will receive email notifications regarding payments, settlements, daily payment reports, webhooks, etc. (You can enter multiple email addresses separated by a comma.) inside the Email Section.
There are many other options available, and you can customise them according to your needs and check other available data available.
Now, we are going to follow the steps to integrate Razorpay in our application by writing Dart code.
- Add Dependencies
We will open pubspec.yaml file and will add the Razorpay dependency over there under the dependencies section. You can use the latest version of Razorpay and pub get it to fetch the dependency. - OS versions
- Android
For Android, ensure that the minimum API level for your app is 19 or higher. To change this, open android/app/build.gradle, find minSdkVersion in defaultConfig and set it to at least 19.- Proguard rules
If you are using proguard for your builds, you need to add the following lines to proguard files. Make proguard-rules.pro file inside android/app folder.
- Proguard rules
- iOS
For iOS, ensure that the minimum deployment target for your app is iOS 10.0 or higher. Also, don’t forget to enable bitcode for your project.
- Enabling Bitcode
Open ios/Podfile and find this section:
Set config.build_settings['ENABLE_BITCODE'] = 'YES'.
Setting Swift version
Add the following line below - Android
- Import classes:
Import the necessary classes from the Razorpay Flutter SDK in the Dart file where you want to use Razorpay. - Razorpay Initialize:
Create an instance of the Razorpay class and initialize it with your Razorpay API key. You can obtain your API key from the Razorpay Dashboard. Initialize it inside the initState() method of your Flutter widget.Remember to put your API Key from the dashboard.
- Attach Event Listener
This package uses event-based communication and emits events when payments fail, succeed or for external wallet. The event names are exposed via the constants EVENTPAYMENTSUCCESS, EVENTPAYMENT_ERROR and EVENTEXTERNALWALLET from the Razorpay class. To perform or emit these events, we have to use the on(String event, Function handler) method on the Razorpay instance to attach event listeners.- eventName:
The name of the event. - listener:
The function to be called. The listener should accept a single argument of the following type:
Hence this way we will implement these methods to handle the respective events based on your app's logic.
- eventName:
- Handle Event listeners:
We will define the handlers used above in the following manner.- handlePaymentSuccess() -
We will handle the successful event in the following handler. - handlePaymentError()-
This will be called if payment fails and we can show the error or anything according to our need on failure event. - handleExternalWallet() -
So, this handler will be called if an external wallet is selected and perform your further operations accordingly.
- handlePaymentSuccess() -
- Dispose listeners:
It is very important to clear the event listeners, use the clear method on the Razorpay instance. So, dispose the Razorpay instance to avoid memory leaks when the widget is disposed. This razorpay.clear() method will remove all the attached listener. - Use Razorpay for Payments
With Razorpay initialized, you can now use it to process payments. Use the razorpay.open() method to start the payment process by passing the payment details and options. The options map has some mandatory properties like key,name,amount,orderId. All other properties are optional.Open payment gateway for checkout.
This is all about initailizing the Razorpay in your Flutter application for both android and iOS.
Creating Payment Requests
Here, we will learn how we are going to make payment request through Razorpay in Flutter applications.
Follow all the above steps and focus on wrting dart code in options variable and handling different event handlers for success and failure.
So, on clicking a button, you have to get the entered amount by user and this will open Razorpay dialog and continue selecting your card and enter the PIN and it will make the successful payment.
Make a TetEditingController to take the user input of amount and pass this to amount property. This accepts the smallest unit of currency like We Indians have, paisa. So multiply the amount by 100, when you pass in the options .
Error Handling and Troubleshooting
- You can log and debug your application and print the debug information to the console.
- Wrap your Razorpay code or error-prone operations with try-catch blocks to catch and handle exceptions gracefully. Razorpay APIs may throw exceptions in certain scenarios, such as network issues or invalid data.
- Ensure that the device has a stable internet connection before making any API calls to Razorpay. Handle scenarios where there is no network connectivity, and provide appropriate feedback to the user for better user experience.
- Utilize Razorpay's test environment to simulate different payment scenarios and verify the behavior of your Flutter app under various conditions. Perform thorough testing before deploying your app to production to catch any potential errors or issues.
Error Code
- Razorpay provides error codes and messages in its response objects when an error occurs during payment processing. Make sure to check these error codes and messages and handle them accordingly.
- Display user-friendly error messages based on the error codes received from Razorpay. This helps users understand the issue and take appropriate actions.
| Error Code | Description |
|---|---|
| INVALID_OPTIONS | An issue has occured with options passed in Razorpay.open |
| PAYMENT_CANCELLED | This code is if user has cancelled the payment |
| TLS_ERROR | This error code is if device does not support TLS v1.1 or TLS v1.2 |
| UNKNOWN_ERROR | This is for an unknown error occurred. |
| NETWORK_ERROR | This is for when there is a network error, for example loss of internet connectivity |
Event names
The event names have been given by the Razorpay class. You can handle each event and display the information to user accordingly.
| Event Name | Description |
|---|---|
| EVENT_PAYMENT_SUCCESS | The payment was successful |
| EVENT_PAYMENT_ERROR | The payment was not successful |
| EVENT_EXTERNAL_WALLET | An external wallet was selected |
PaymentSuccessResponse
| Field Name | Type | Description |
|---|---|---|
| orderId | String | The order ID if the payment was for an order, null otherwise. |
| signature | String | The signature to be used for payment verification. (Only valid for orders, null otherwise) |
| paymentId | String | The ID for the payment. |
PaymentFailureResponse
| Field Name | Type | Description |
|---|---|---|
| code | int | The error code. |
| message | String | The error message. |
ExternalWalletResponse
| Field Name | Type | Description |
|---|---|---|
| walletName | String | The name of the external wallet selected. |
Troubleshoot
- If you get this kind of error while running the application-
What went wrong:
A problem occurred evaluating project '
'. No signature of method:
Then just remove useProguard true & proguardFiles() code from app/build.gradle file.
- You may also get this kind of error-
For this, just check your options map and you might be passing some wrong data.
If you still face some other errors, just keep logging everywhere and you will see something wrong somewhere and just find out that and get the successful result.
Example Application
So, this application will include two files, main.dart & razorpay.dart. Follow all the integration part discussed in the above section and then write this dart code to run the application for payment process.
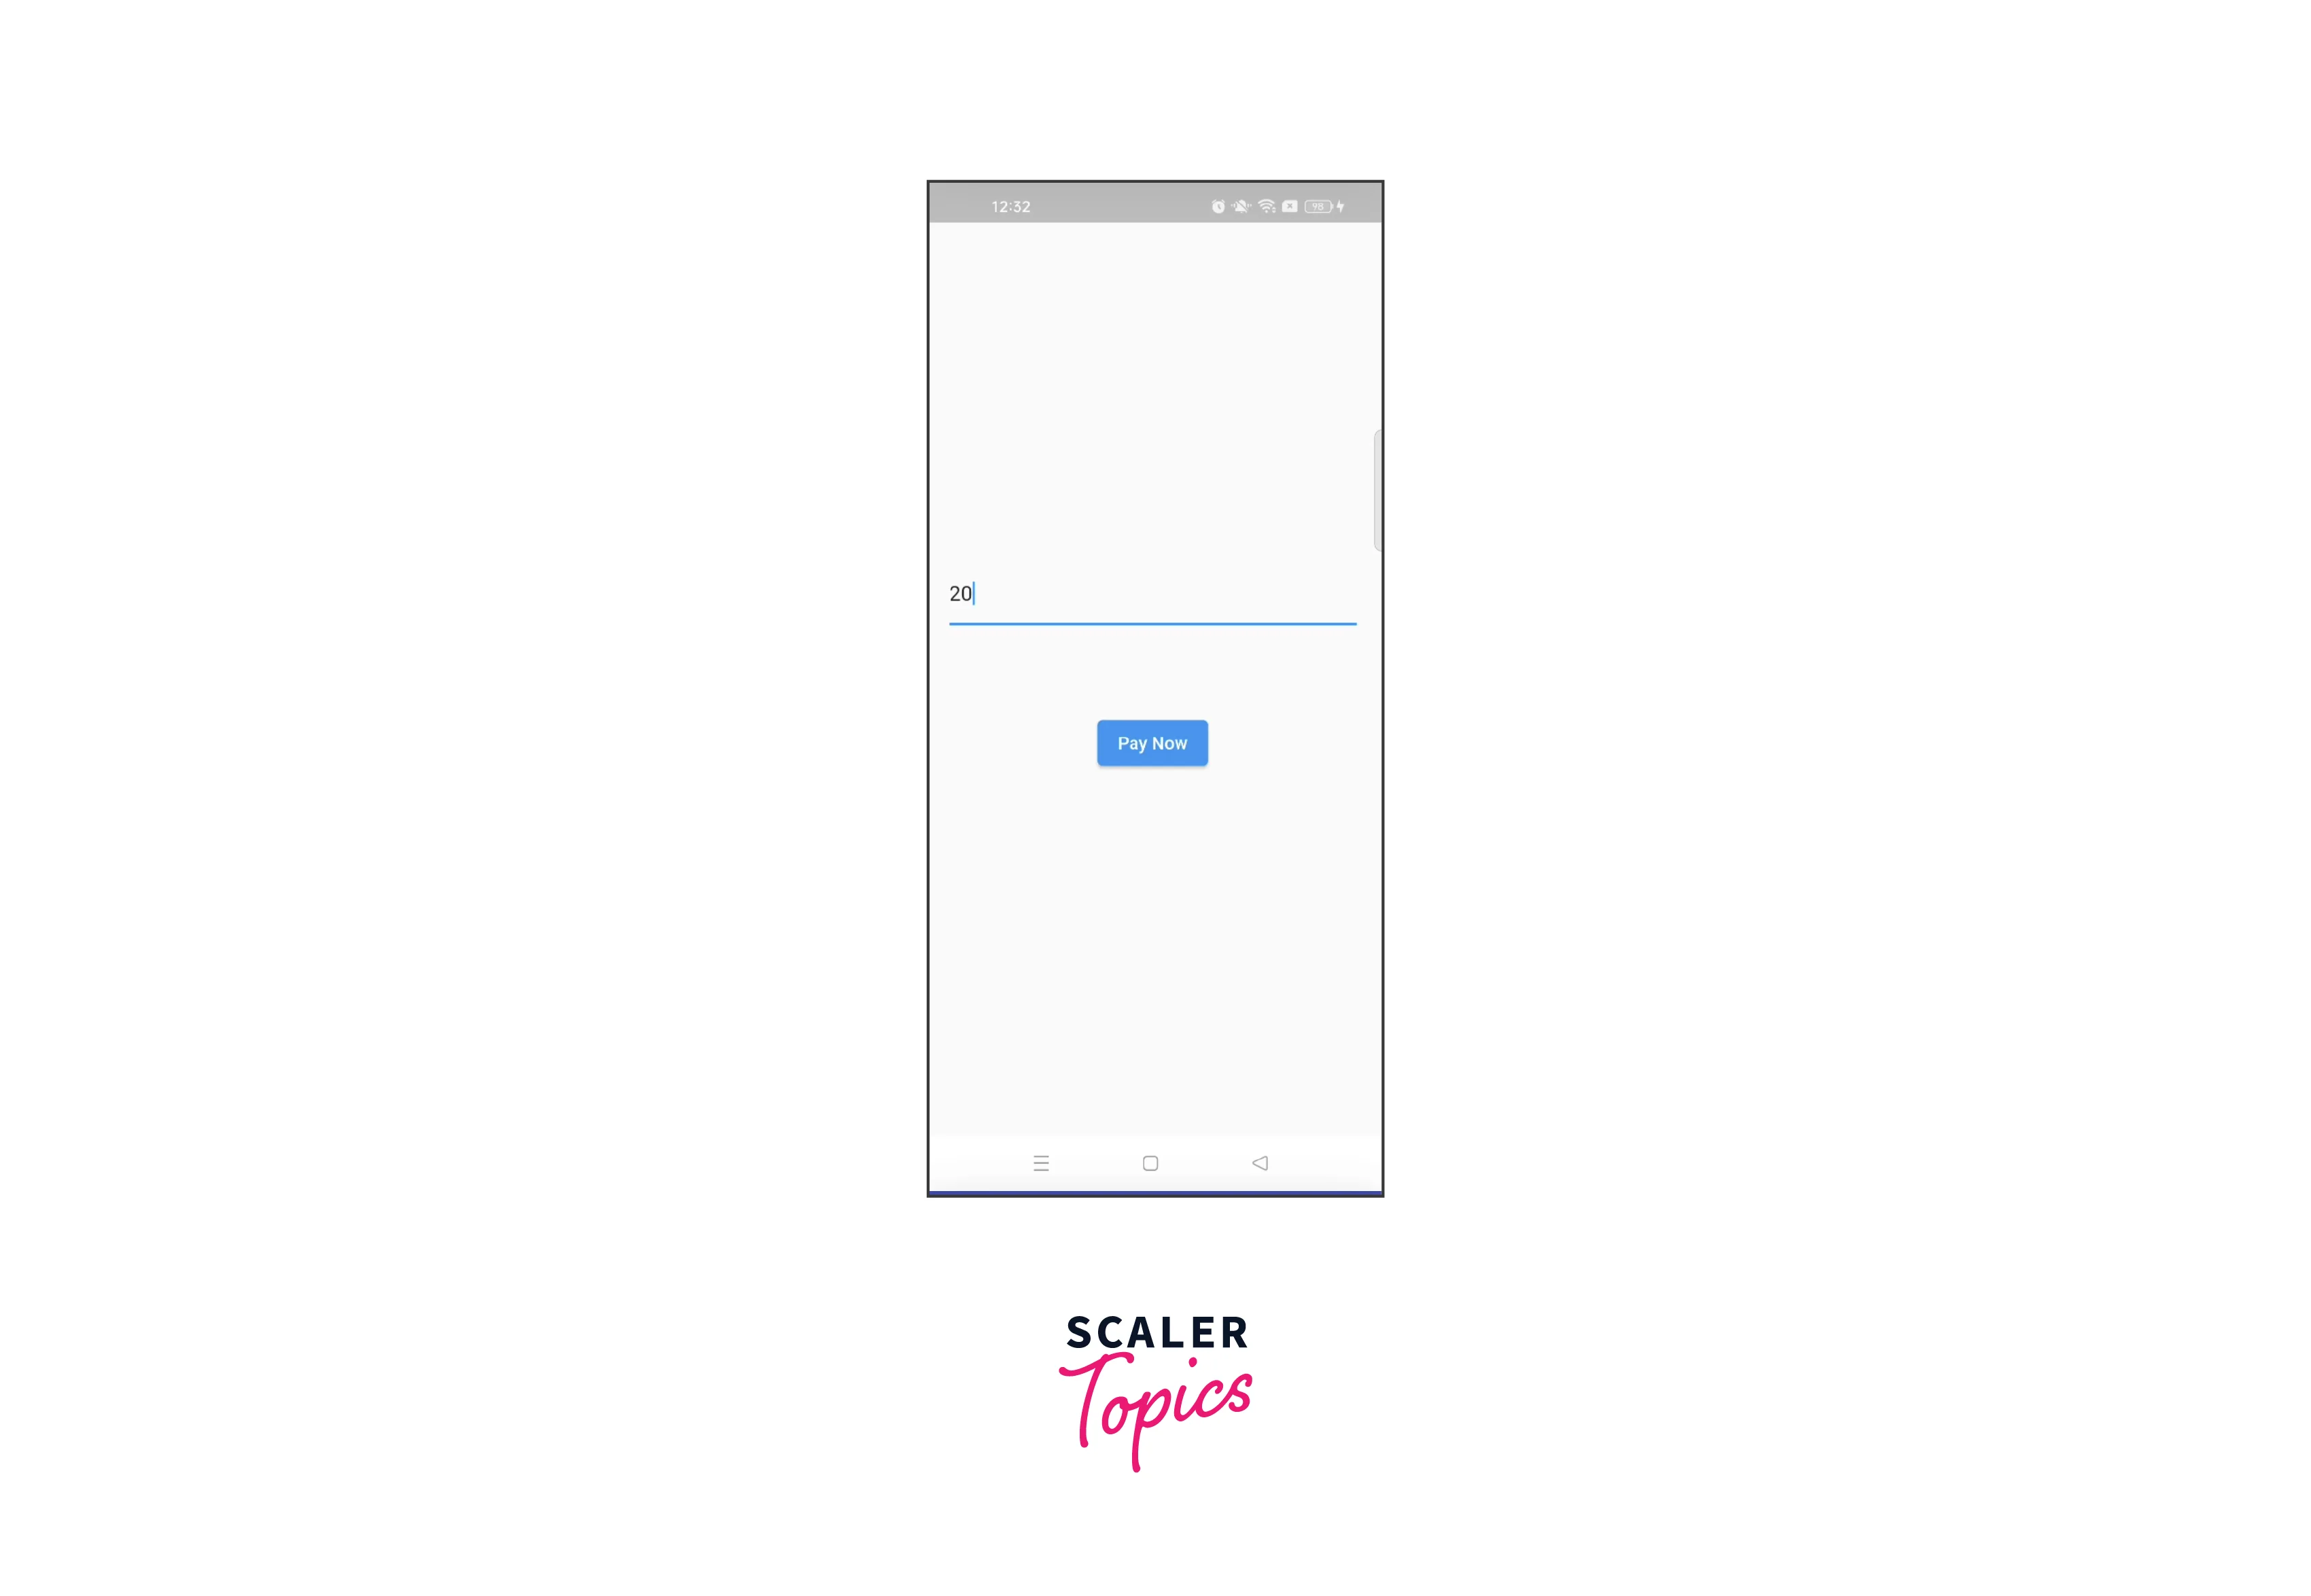
So, for asking the amount from user, screen will look like this and you can decorate it more to give good look and feel accordingly.
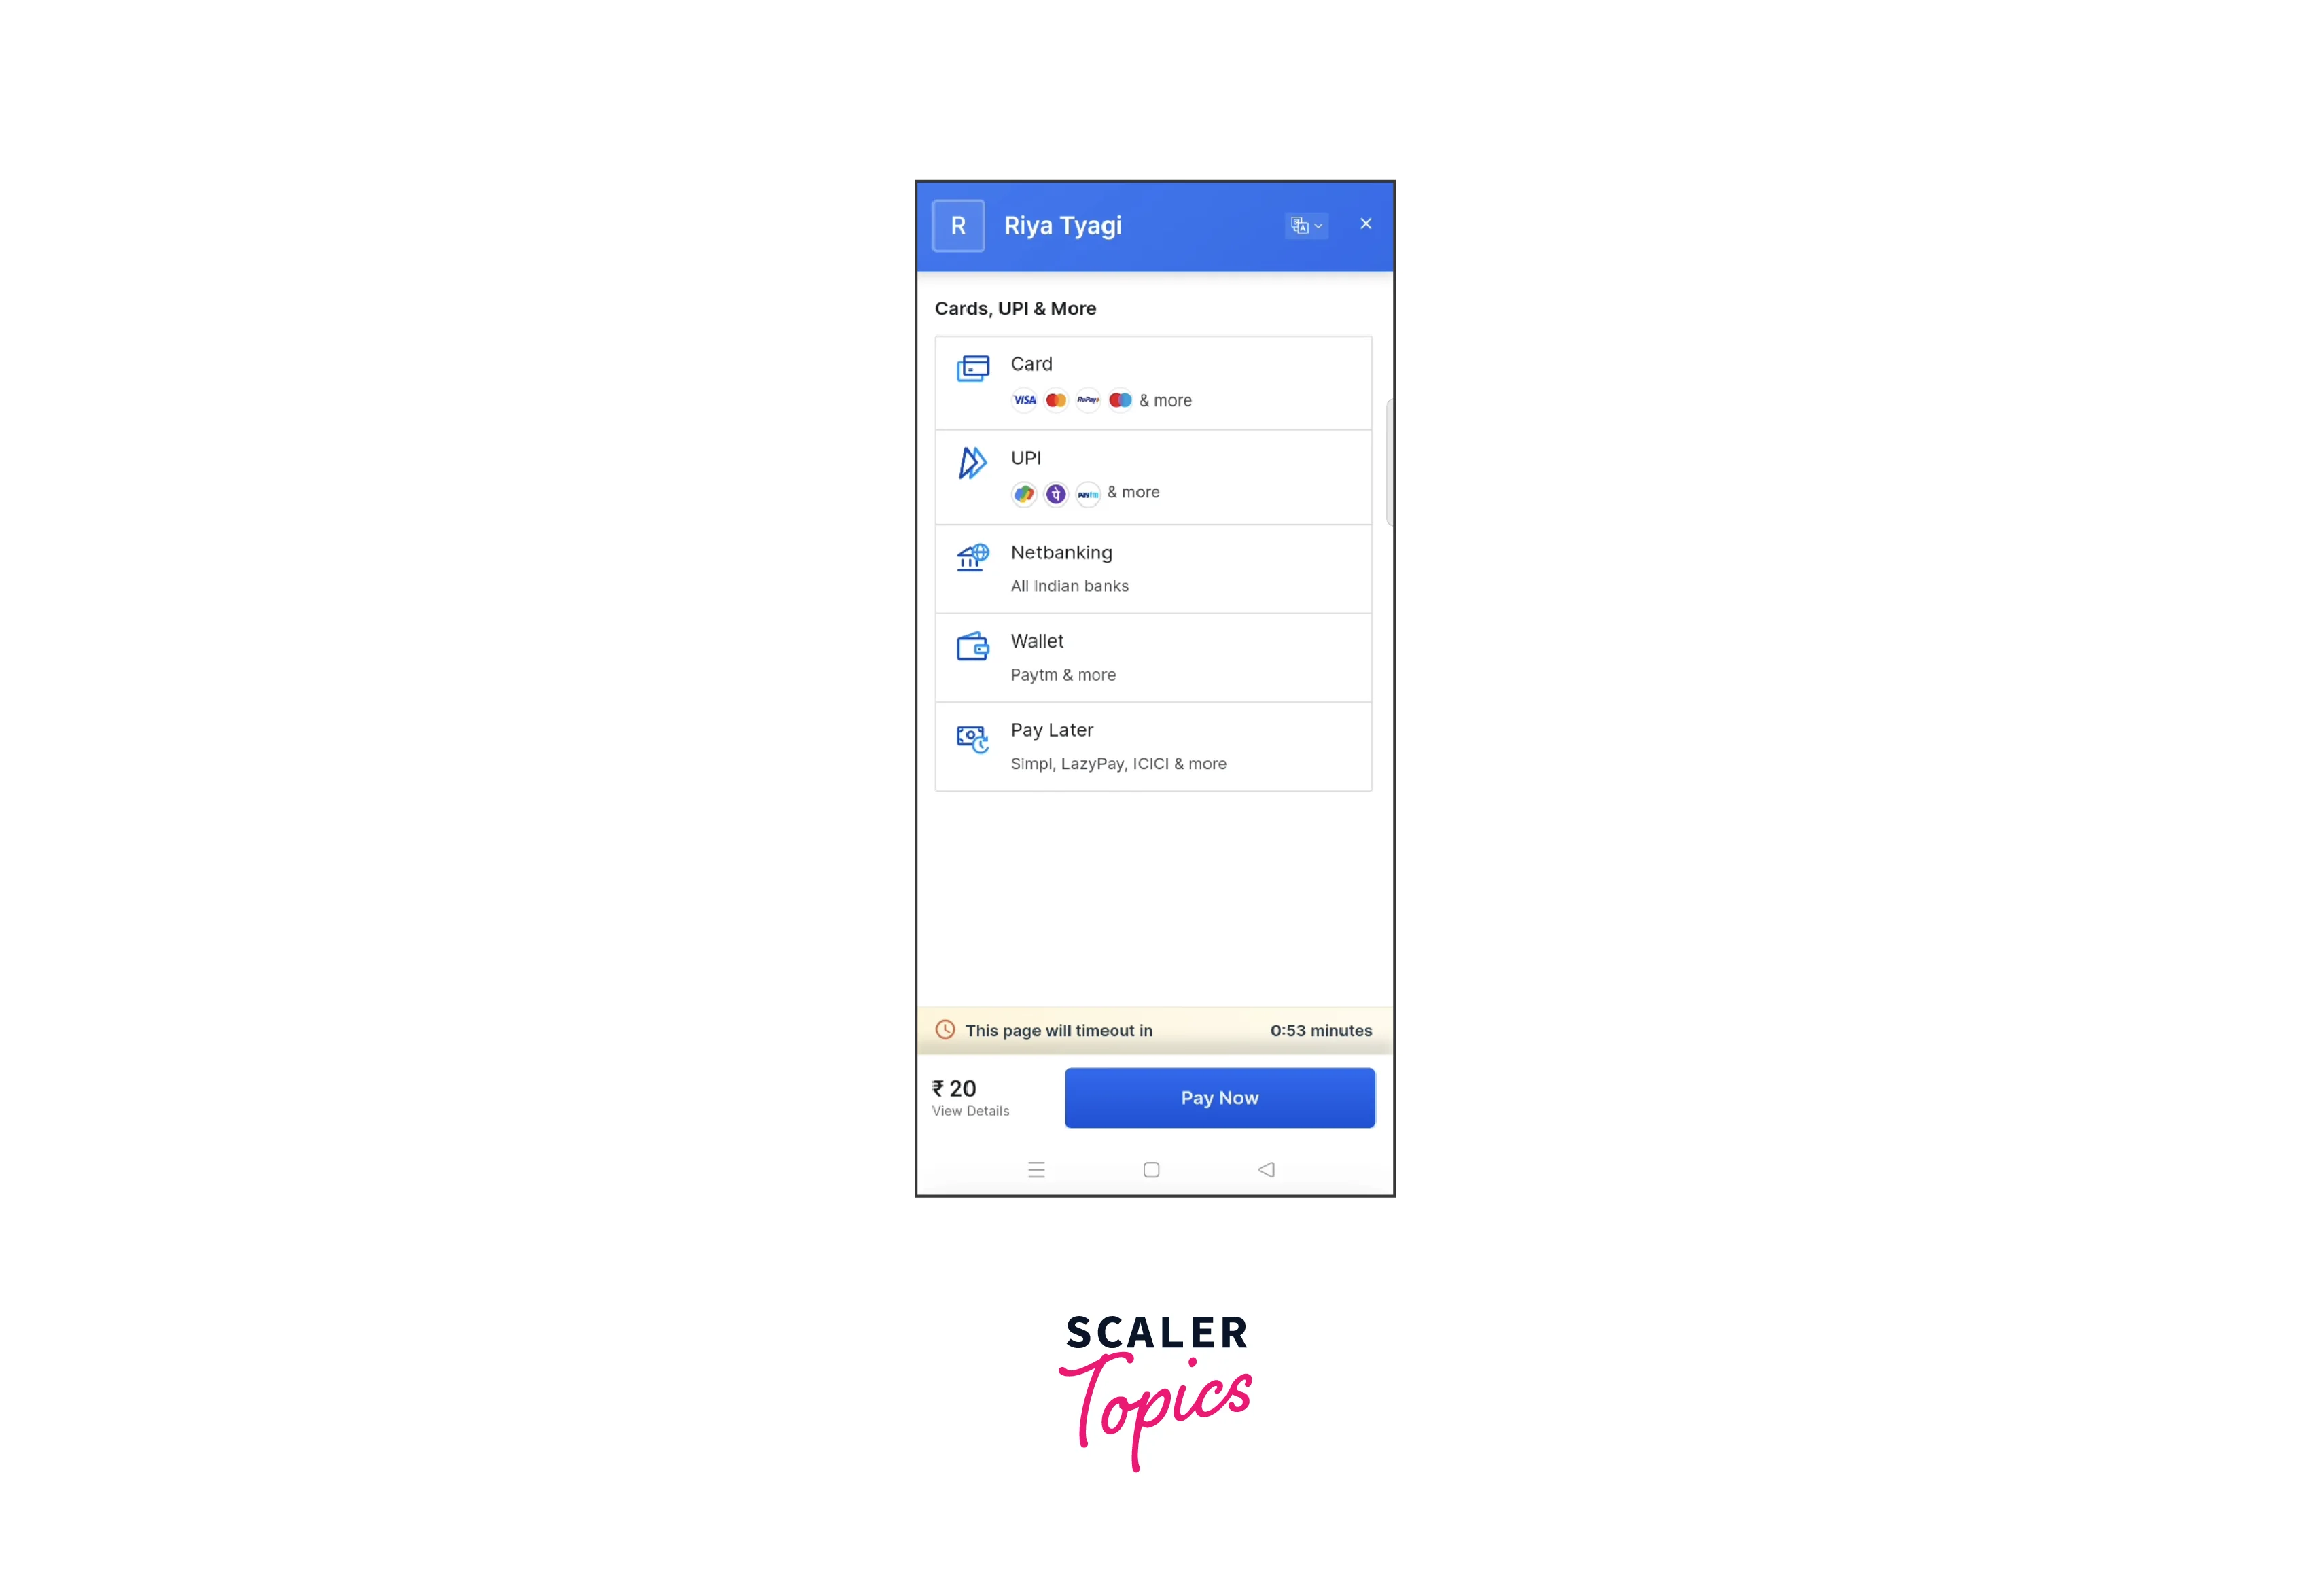
After entering the amount, you will be directed to the Razorpay screen, where you can select the mode of payment, like net banking, card, wallet, etc. and pay the amount. For different options selected, different steps will be there, like card details for selecting a card option, selecting a bank for Net banking, a mobile number or UPI ID for UPI, various wallet options for Wallet etc. You will also see time running down at the bottom to make the payment quickly; otherwise, this will cancel the payment. You can also change the language for your preference, like Hindi, Marathi, Punjabi, etc., which is in the top right corner.
Advanced Features and Customizations
We can do a lot more with Razorpay and customize different things to give a better user experience. Let us discuss more features and customizations.
- We can customise the payment UI by using custom colours, fonts, and images to match our app design.
- Razorpay offers advanced options for handling payments, such as capturing payments automatically or using webhooks for asynchronous payment confirmation. Explore the capture and webhook.
- Various payment methods are available, like credit/debit card, UPI, net banking, etc., and you can enable or disable the options. Use the method parameter in the payment options to specify the desired payment methods.
- Razorpay also provides APIs for managing subscription plans, creating subscriptions, and handling recurring payments. Read the RazorPay API documentation for more information.
- You can use the notes parameter in the payment options to include additional information related to the transaction.
- Razorpay also supports international payments, allowing you to accept payments from customers around the world, and you can set the currency and country accordingly.
- You can also verify the authenticity of the response using the verifyPaymentSignature method to ensure the response is not tampered with.
Conclusion
- Razorpay is a payment gateway service used in Flutter applications to make online transactions for customers.
- You must have a Razorpay account to use its services and see different activities happening. You get the API Key from the dashboard.
- Different payment methods are supported by Razorpay, like Credit/Debit Cards, Net Banking, and UPI.
- You can customize the user interface for Razopay payments, like theme, logo, language etc.
- The event which is triggered when the user cancels a payment using Razorpay is onCancel.
- You can handle success, failure, and external wallet functions and pass the data according to your requirements.
- You can use the razorpay_flutter package to integrate Razorpay into your Flutter application
- Remember to paste the API key in your code and change the Android and iOS configuration to make it work as already discussed in the article.