React Native for Web, How it Works?
Overview
When embarking on a new project, a crucial decision is selecting the appropriate development stack. It is essential to choose a platform that aligns with the majority of your users, yet isn't overly restrictive. It's important to anticipate future growth and the possibility of expanding to different platforms. Therefore, your initial stack should possess the versatility to accommodate such growth requirements.
Regarding adaptable technologies, React Native for Web empowers developers to utilize React Native Components and APIs on the Web. This innovation significantly impacts the competition among mobile-first frameworks, given React Native's widespread popularity for cross-platform mobile app development.
In this article, we will delve into the excitement surrounding React Native for Web and provide a demonstration project setup.
Can we Use React Native for Web Development?
By utilizing React Native for Web, developers can develop a unified React Native application that can be executed on Android and iOS devices, as well as web browsers using standard web technologies.
However, it's worth examining the necessity of such technology, considering that React, the fundamental predecessor of React Native, is primarily designed for web development.
The truth is that the foundation of a mobile app differs significantly from that of a web app. For example, React employs basic HTML5 elements such as div and span to construct its layout, while React Native utilizes custom UI APIs like View and Text. Consequently, there are only a few technologies available that support the development of applications for both web and mobile platforms.
React Native for Web aims to bridge this gap. Its purpose is to facilitate the creation of genuinely cross-platform applications by employing a single React Native codebase. Now, let's explore how it accomplishes this goal.
How to Work with React Native Web ?
Web apps and mobile apps have distinct foundations, each with its own set of APIs for tasks such as UI rendering. The aim of frameworks that bridge this gap is to utilize the APIs of one platform to create equivalents for the other. This is precisely what React Native for Web accomplishes.
React Native for Web offers browser-compatible versions of React Native components. For instance, if React Native mobile uses a <View> to render views, React Native for Web provides a compatible <View> that can be compiled into a web <div>.
It's important to note that not all native components can be easily adapted for the browser. Certain components rely on mobile hardware APIs that are not directly accessible in web browsers.
As a result, React Native for Web cannot fully port an app into its web version. However, a significant portion of the app can still be successfully ported, which is often sufficient.
Another distinction between React and React Native lies in styling. In React, various styling solutions like CSS, Sass, and CSS-in-JS can be employed. On the other hand, React Native exclusively uses CSS-in-JS for styling. React Native for Web embraces the CSS-in-JS approach of React Native, ensuring that the same set of styles can be effectively used in both mobile and web environments.
Who Should Use React Native Web?
React Native for Web provides a convenient solution for individuals who wish to swiftly transform their native app into a web app. It is particularly suitable when the web app is intended to closely mirror the native app in terms of functionality without any substantial differences. However, if the objective is to incorporate fundamentally distinct features into web apps compared to their mobile or native counterparts, React Native for Web may not be the most suitable choice.
Limitations and Alternatives Important Integrations
If React Native for Web seems too good to be true, there are certain limitations you should be aware of. These limitations include:
Limited support for web APIs: Not all APIs available in React Native can be used in React Native for Web. This may require you to re-implement certain functionalities or exclude them altogether when targeting the web. For example, the Image Editor functionality may not be available, and accessing mobile hardware APIs like the accelerometer is not possible in the browser.
Missing core components: Some core components found in React Native are not supported in React Native Web. However, third-party developers may create separate web versions of these components. For instance, React Native Web Refresh Control can be used as an alternative.
Styling challenges: React Native for Web inherits the styling limitations of React Native itself. Styling in React Native is more limited compared to using HTML and CSS. It lacks certain capabilities, such as styling child components, selecting sibling elements, and utilizing pseudo-classes like
Compatibility issues: Some popular React Native libraries may not have proper support or compatibility with React Native for Web. For example, React Native Google Autocomplete might not work as expected.
Important Integrations
The React Native Directory is a resource where you can explore various React Native packages that offer web compatibility. Additionally, several widely-used web frameworks, such as Docz, Gatsby, Next.js (including example recipes), Razzle, and Styleguidist, provide APIs for seamless integration.
Getting Started with React Native Web
After gaining theoretical knowledge of the principles underlying this new addition to the React Native API lineup, let's proceed with the installation steps to learn how to configure our React Native application for web compatibility.
There are two available approaches to setting up React Native for web applications: Expo and Create React App.
Create React App
Create React App (CRA) is widely used for quickly setting up web-based React applications. While it offers built-in functionality for mapping react-native-web to react-native, it is advisable to utilize Expo for a better experience. Nevertheless, we can still initialize a React Native for Web project using CRA by following these instructions: Initialize create-react-app project.
Installing react-native-web for npm users:
For yarn users:
Creating a React Native App for Web
After installing the necessary packages, we can proceed to register our App root component in React Native. This can be done through the utilization of React Native's AppRegistry.registerComponent function. It is important to mention that if you are using expo-cli, this step is not necessary.
AppRegistry serves as the entry point for executing all React Native applications in JavaScript. To register the App root component, simply replace the code in the index.js file with the provided snippet.
Preparing the Application
Now, let's try some standardized code that utilizes the React Native CLI. Replace the existing code in the App component with the following code snippet.
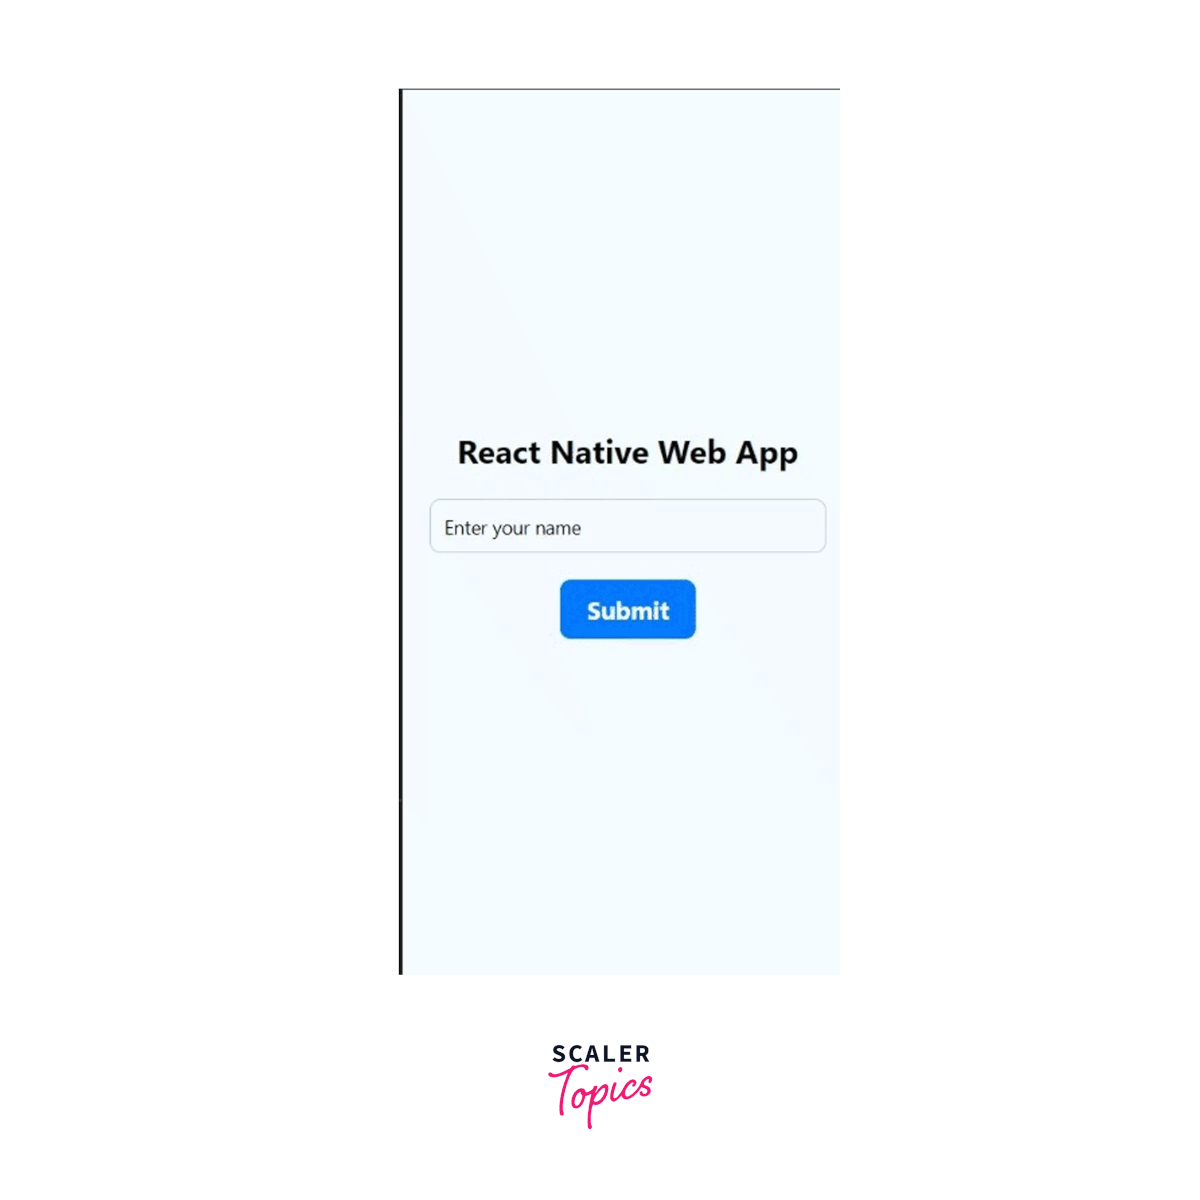
Explanation
Inside the App function, two state variables, name and message, are initialized using the useState hook. The name state stores the user's input, and the message state holds the welcome message to be displayed.
- The handleInputChange function is responsible for updating the name state when the user enters their name in the input field.
- The handleButtonPress function is triggered when the user taps the submit button. It sets the message state by using the name state value to create a personalized welcome message.
- Inside the View component, there is a Text component displaying the title, followed by a TextInput component for entering the name. The value prop of the TextInput is set to the name state, and the onChangeText prop is assigned the handleInputChange function to update the name state when the user types.
- Below the TextInput, there is a TouchableOpacity component representing the submit button. When pressed, it triggers the handleButtonPress function.
- If the message is not an empty string, a Text component displays the welcome message.
Output
Using Webpack and Babel to Customize and Enhance
CRA offers several beneficial features, including package aliasing and optimized webpack configuration.
By default, CRA includes support for aliasing React Native for Web to React Native through webpack's resolve.alias. Consequently, when we import React Native, it resolves to React Native for Web.
Additionally, CRA incorporates an internally optimized webpack configuration. However, for developers with specific requirements like utilizing Babel for transpilation or enhancing the build process, it is recommended to bootstrap the application using Expo. Remember to include your custom web pack configurations in the webpack.config.js file, as illustrated in the example below.
The provided code utilizes webpack's babel-loader to transform ES2015 and JSX code into JavaScript compatible with web browsers. To establish package aliasing, we have configured resolve.alias in webpack. The symbol "$" denotes an exact match.
To employ the aforementioned configuration, it is important to manually install the necessary dependencies as illustrated below.
Babel offers module aliasing functionality through the utilization of the babel-plugin-module-resolver.
More Suggestions
While CRA offers certain built-in features, it is advisable to initiate your application with Expo, particularly when developing a multi-platform app.
To optimize the build process, it is suggested to utilize the babel-plugin-react-native-web plugin. You can easily install it as a development dependency by following these steps:
Plus, platform-specific code can be added using the platform module:
FAQs
Q. How does React Native WebView work?
A. React Native WebView uses a native WebView component provided by the platform to render web content within the app. It provides a bridge between the JavaScript code in your React Native app and the web content displayed in the WebView.
Q. What are some common use cases for React Native WebView?
A. React Native WebView is commonly used for displaying web pages, integrating web-based features, showing ads, embedding interactive maps, or incorporating external web content into your app.
Q. Are there any alternatives to React Native WebView?
A. Yes, there are alternative packages and libraries available for displaying web content within a React Native app, such as react-native-inappbrowser-reborn or react-native-webview-bridge. These alternatives offer additional features or different approaches depending on your specific requirements.
Conclusion
-
As discussed in this article, React Native Web provides a bridge between React Native and web technologies, enabling the seamless integration of web content within a React Native app. It offers a familiar development experience and allows developers to reuse code and components, increasing efficiency and productivity.
-
While React Native Web has its advantages, it's important to consider its limitations and alternatives. As mentioned in the article, there may be cases where other solutions such as React Native InAppBrowser or React Native WebView Bridge better suit specific requirements.
-
Important integrations were highlighted in the article, demonstrating how React Native Web can be extended and enhanced with various libraries and packages. These integrations provide additional functionality and enable developers to integrate features like maps, ads, or analytics seamlessly.