How to Send Notifications in React Native?
Overview
Push notifications are essential for engaging users and providing timely information in mobile applications. In React Native, integrating push notifications involves connecting with popular service providers like Firebase Cloud Messaging (FCM) or OneSignal. React Native also offers convenient libraries such as react-native-push-notification to streamline the implementation process.
In this article, we will delve into the architecture of push notifications, exploring their functionality and how to handle them effectively in React Native. Through comprehensive examples and code snippets, you will gain a solid understanding of how to harness the power of push notifications in your React Native applications.
What are Push Notifications in React Native?
React Native push notifications are a way to deliver messages or alerts to a user's device, even when the user is not actively using the app. They allow you to engage and communicate with users by sending timely and relevant information.
Push notifications in react native can be sent using various cloud messaging services, such as Firebase Cloud Messaging (FCM) for Android and Apple Push Notification service (APNs) for iOS. These services handle the process of delivering notifications to the appropriate devices based on the user's preferences and the device's operating system.
Installation of react-native-push-notification
Implementing React Native push notifications enhances user engagement and keeps users informed. To install the react-native-push-notification package for handling push notifications in your React Native project, follow these steps:
- Open a terminal or command prompt and navigate to your project's root directory. Then, run the following command to install the react-native-push-notification package:
- In your android/build.gradle, make the following changes:
- In your android/app/src/main/AndroidManifest.xml file, add or modify the following elements:
- If you're not using a built-in Android color for the notification_color, create a new file named in the android/app/src/main/res/values/ directory and define your custom color there.
- If your app has an onNewIntent override in the MainActivity.java file, make sure to include a call to super.onNewIntent(intent) within the function.
- Now, install the react-native-firebase package by running the following command:
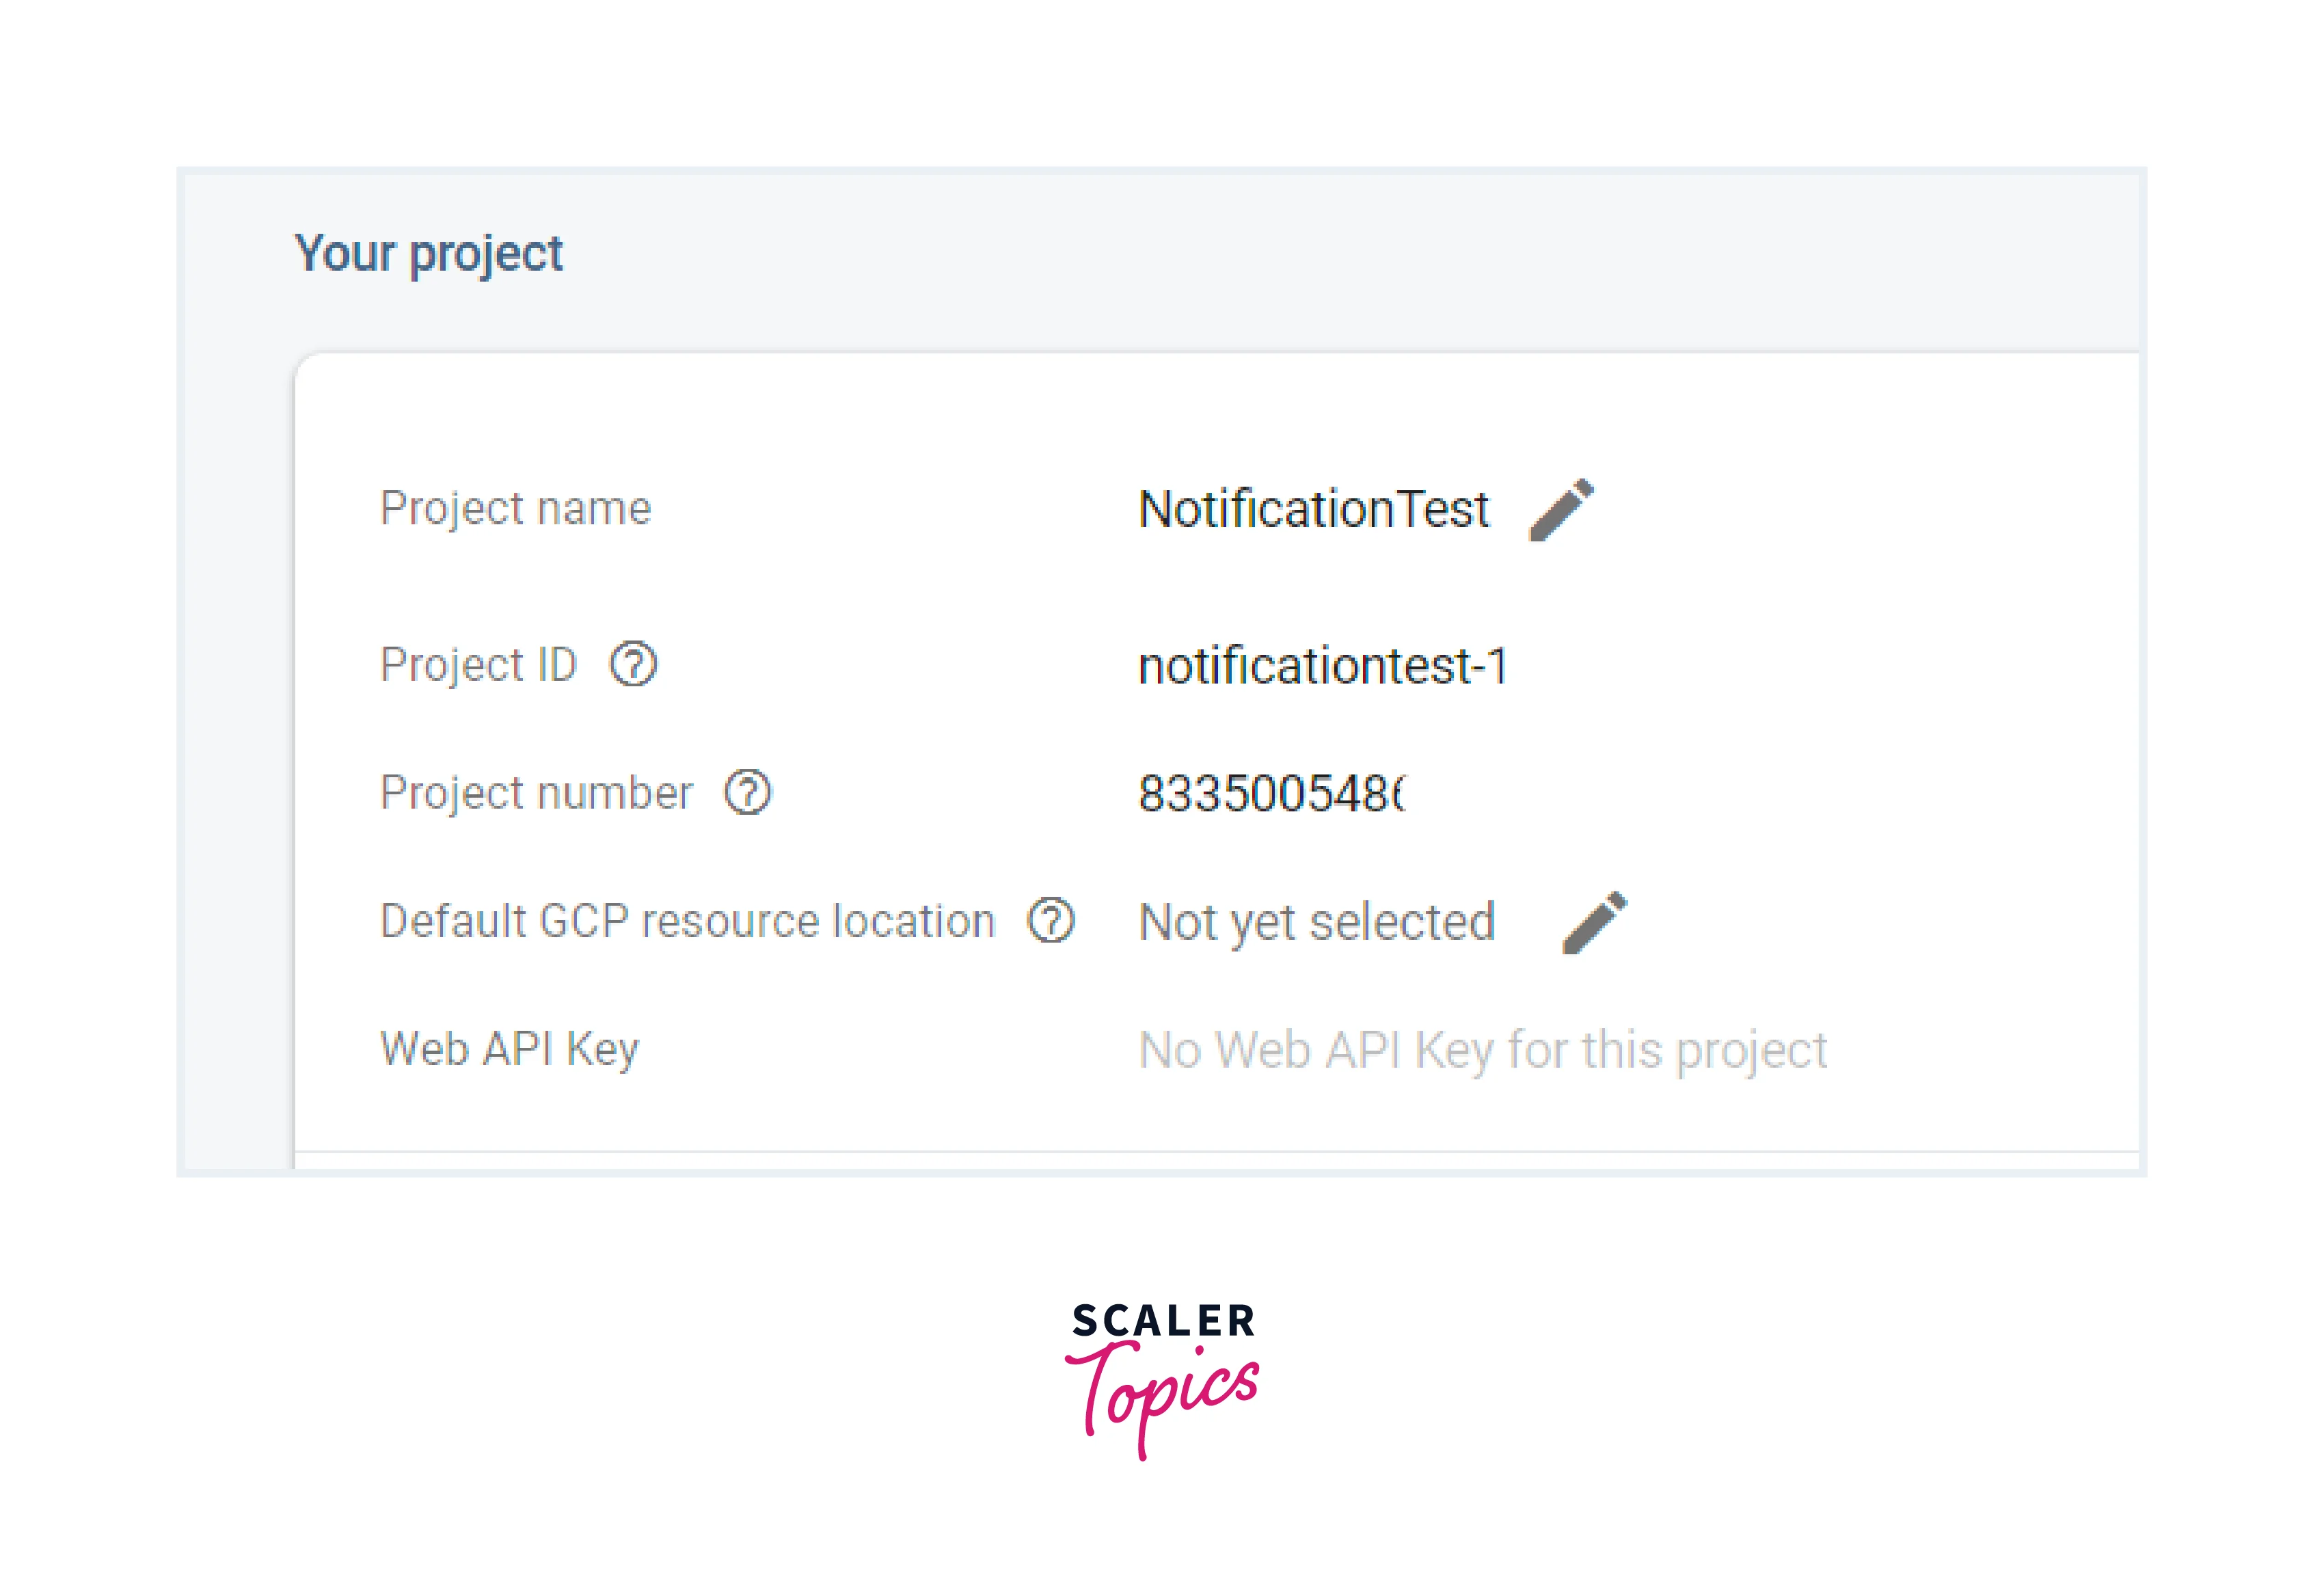
- On the Firebase console, add a new Android application and enter your project's details. Make sure the Android package name matches the package name defined in the AndroidManifest.xml file of your project.
-
Download the google-services.json file from the Firebase console and place it in the /android/app/ directory of your project.
-
To allow Firebase on Android to use the credentials, the google-services plugin must be enabled on the project. This requires modification to two files in the Android directory. First, add the google-services plugin as a dependency inside of your /android/build.gradle file:
- Lastly, execute the plugin by adding the following to your /android/app/build.gradle file:
React Native Push Notification Architecture
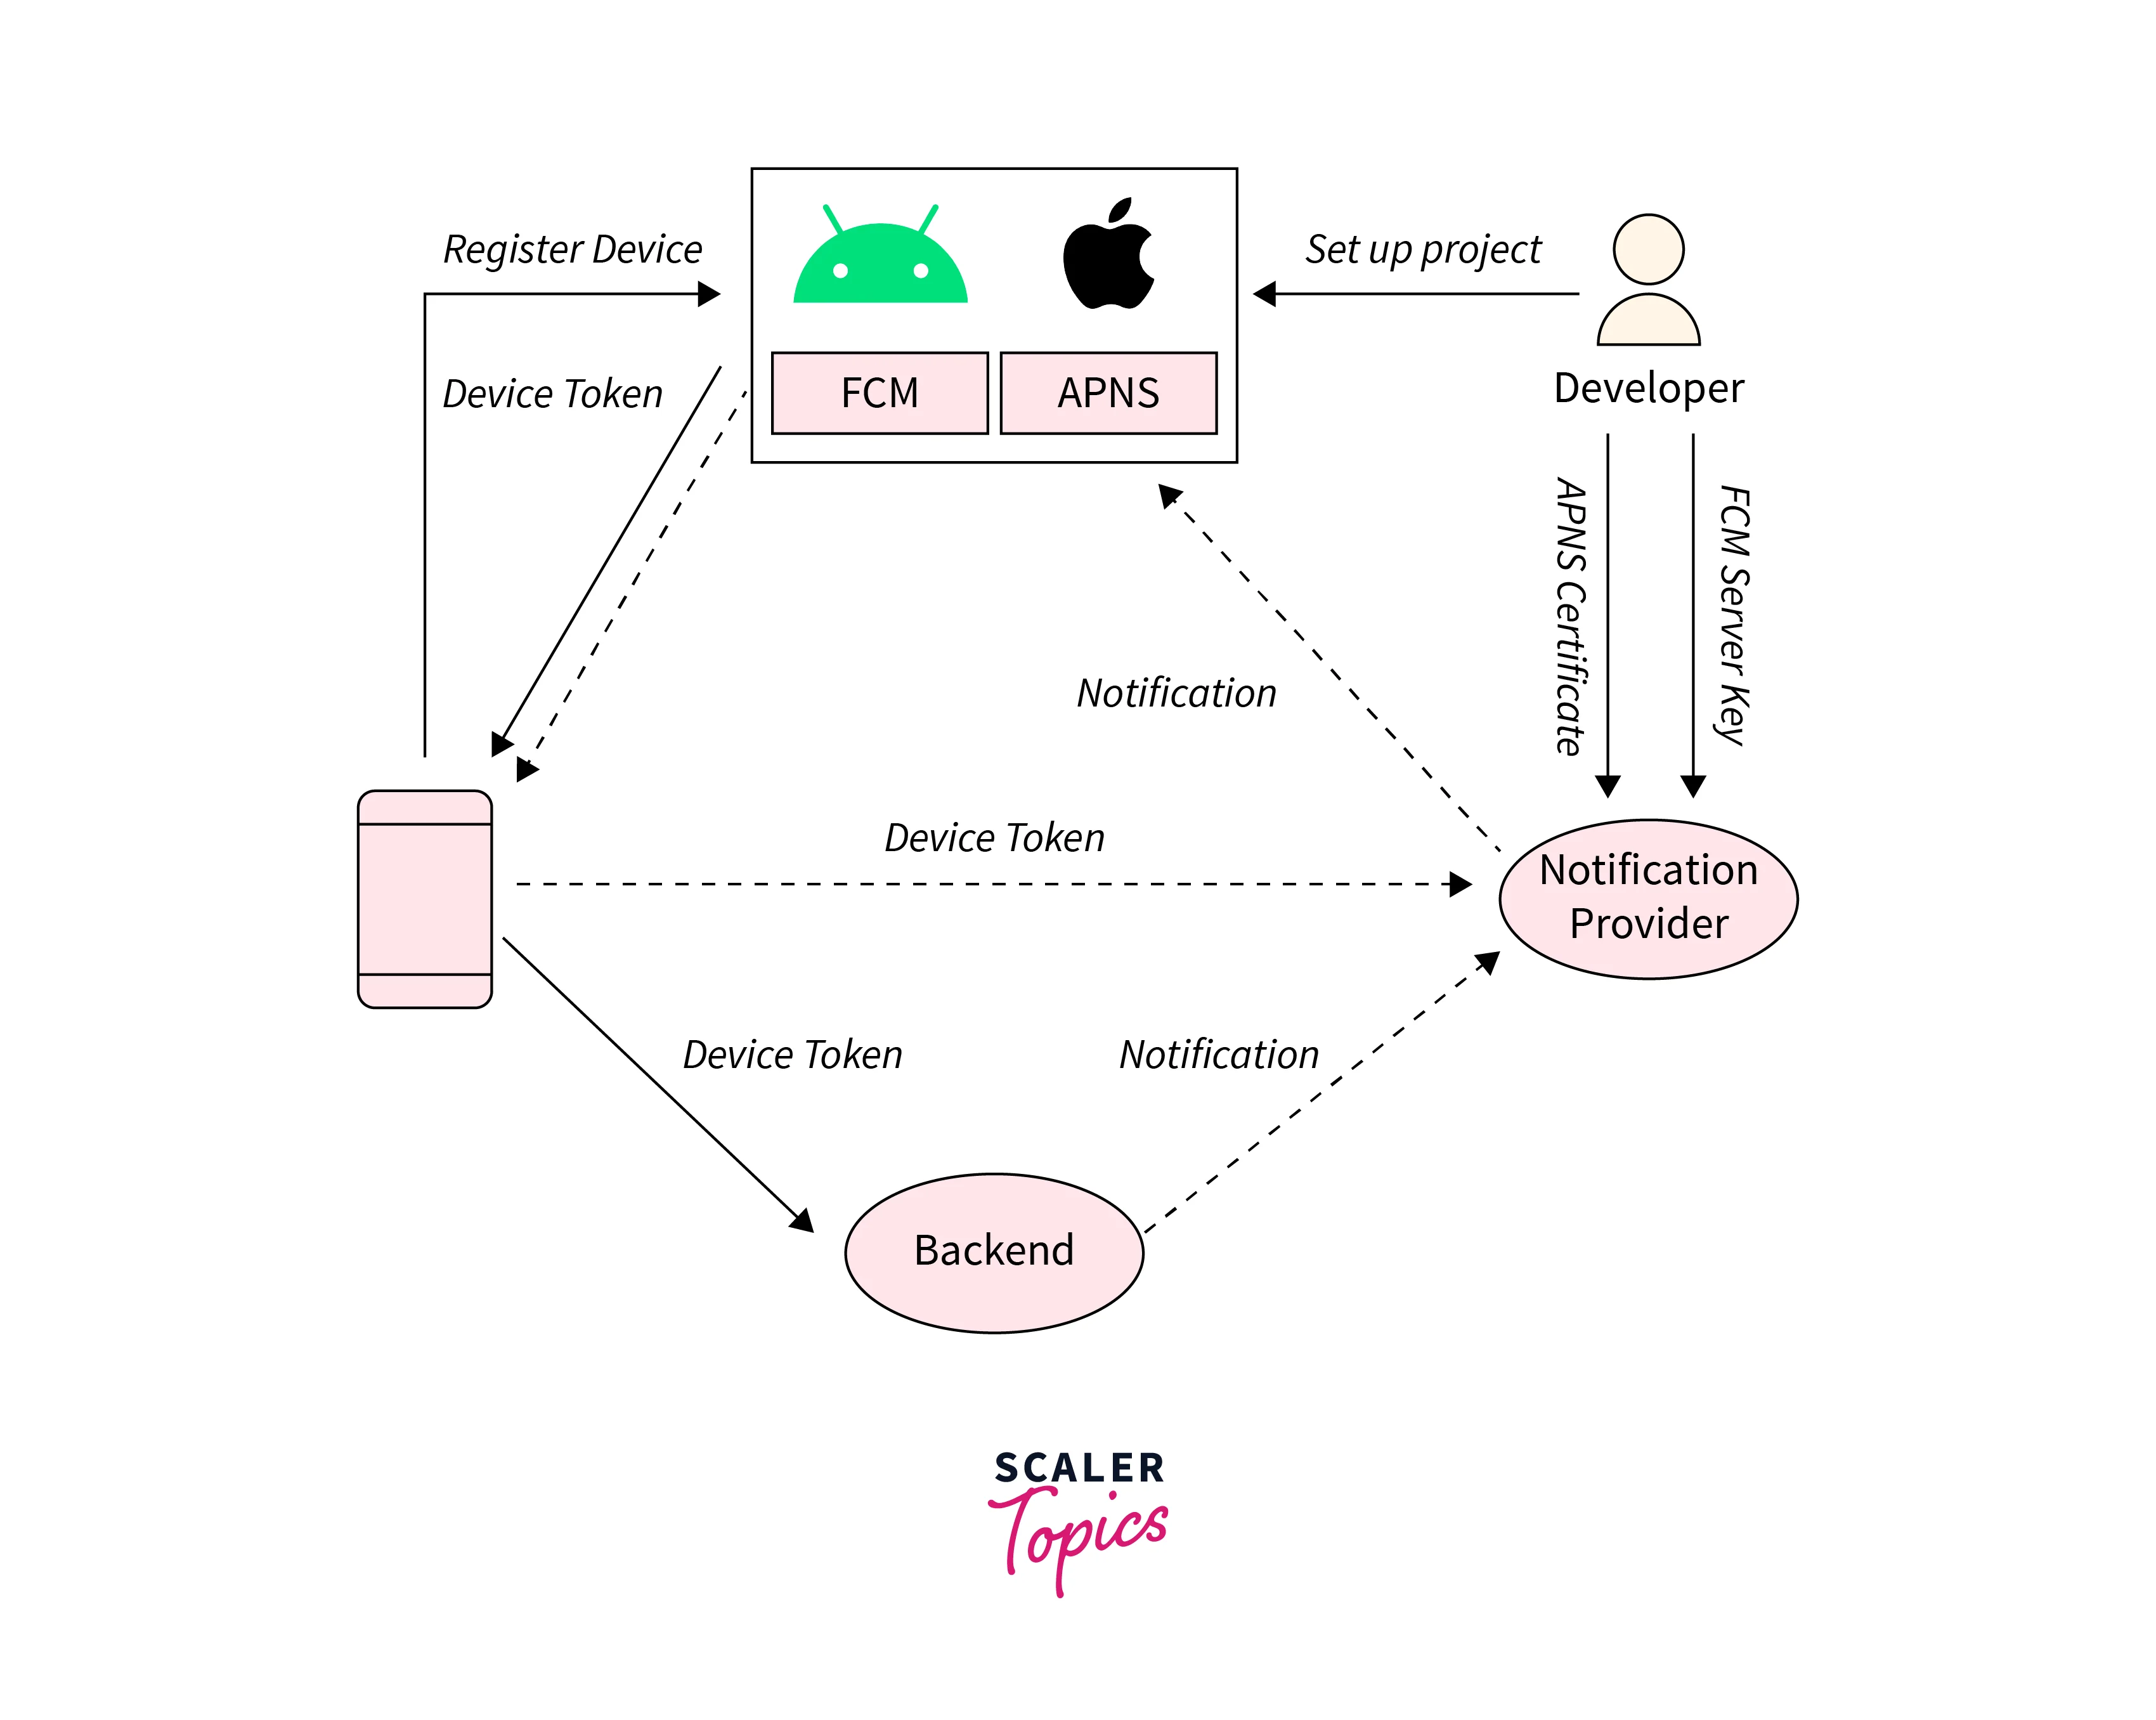
With React Native push notifications, you can send targeted messages to specific devices or user segments. The architecture of React Native Push Notification involves several components and modules working together to enable push notifications in a React Native app.
Here's an overview of the key components:
-
React Native App: This is the main application built using React Native framework. It runs on the user's device and handles user interactions and UI rendering.
-
Push Notification Service Provider: This is a third-party service provider that manages the delivery of push notifications. Examples of popular service providers includeFirebase Cloud Messaging (FCM),Apple Push Notification Service (APNs), and OneSignal.
-
react-native-push-notification: This is a React Native push notification library that provides an interface for handling push notifications in the app. It acts as a bridge between the React Native app and the underlying platform-specific push notification APIs.
-
Native Push Notification APIs: These are the platform-specific APIs provided by Android and iOS for handling push notifications. The react-native-push-notification library utilizes these APIs to register the app for push notifications, receive and process incoming notifications, and handle user interactions with notifications.
-
Device Token: When the app is installed and launched, it registers with the push notification service provider to obtain a unique device token. The device token is a platform-specific identifier for the user's device, which is used by the service provider to route notifications to the correct device.
-
Push Notification Payload: The push notification in react native can contain a payload. The payload is the data sent by the service provider to the user's device. It typically includes information such as the notification title, message, actions, and custom data. The payload can be customized by the app developer based on their specific requirements.
-
Event Handlers and Callbacks: The react-native-push-notification library provides event handlers and callbacks that allow the app to respond to different push notification-related events. These events include receiving a new notification, opening a notification, dismissing a notification, and handling user interactions with actions in the notification.
The Push notification in react native support both Android and iOS platforms, ensuring broad device compatibility.
Understanding Push Notification in React Native with a Demo APP
Understanding push notification in React Native is essential for effectively engaging users and delivering timely information. Push notifications allow you to send messages from a server to a user's device, even when the app is not actively running. In this article, we will explore the concept of push notifications in React Native through a demo app.
The demo app will showcase the entire process, from setting up the necessary dependencies to handling incoming notifications. We will cover key topics such as obtaining a device token, sending test notifications, and navigating within the app by clicking on notifications.
Receiving a Push Notification Token
When implementing push notifications in React native app, one crucial step is receiving the push notification token. The token is a unique identifier assigned to each device by the push notification service provider. The React Native push notification implementation requires obtaining and storing the notification token for each device.
Here's how you can receive the push notification token in React Native:
-
Request Permission for Push Notifications: In your app code, use the provided methods from the React Native push notification library to request permission for push notifications from the user. On iOS, use the requestPermissions method. On Android, this step is not necessary as permission is granted automatically.
-
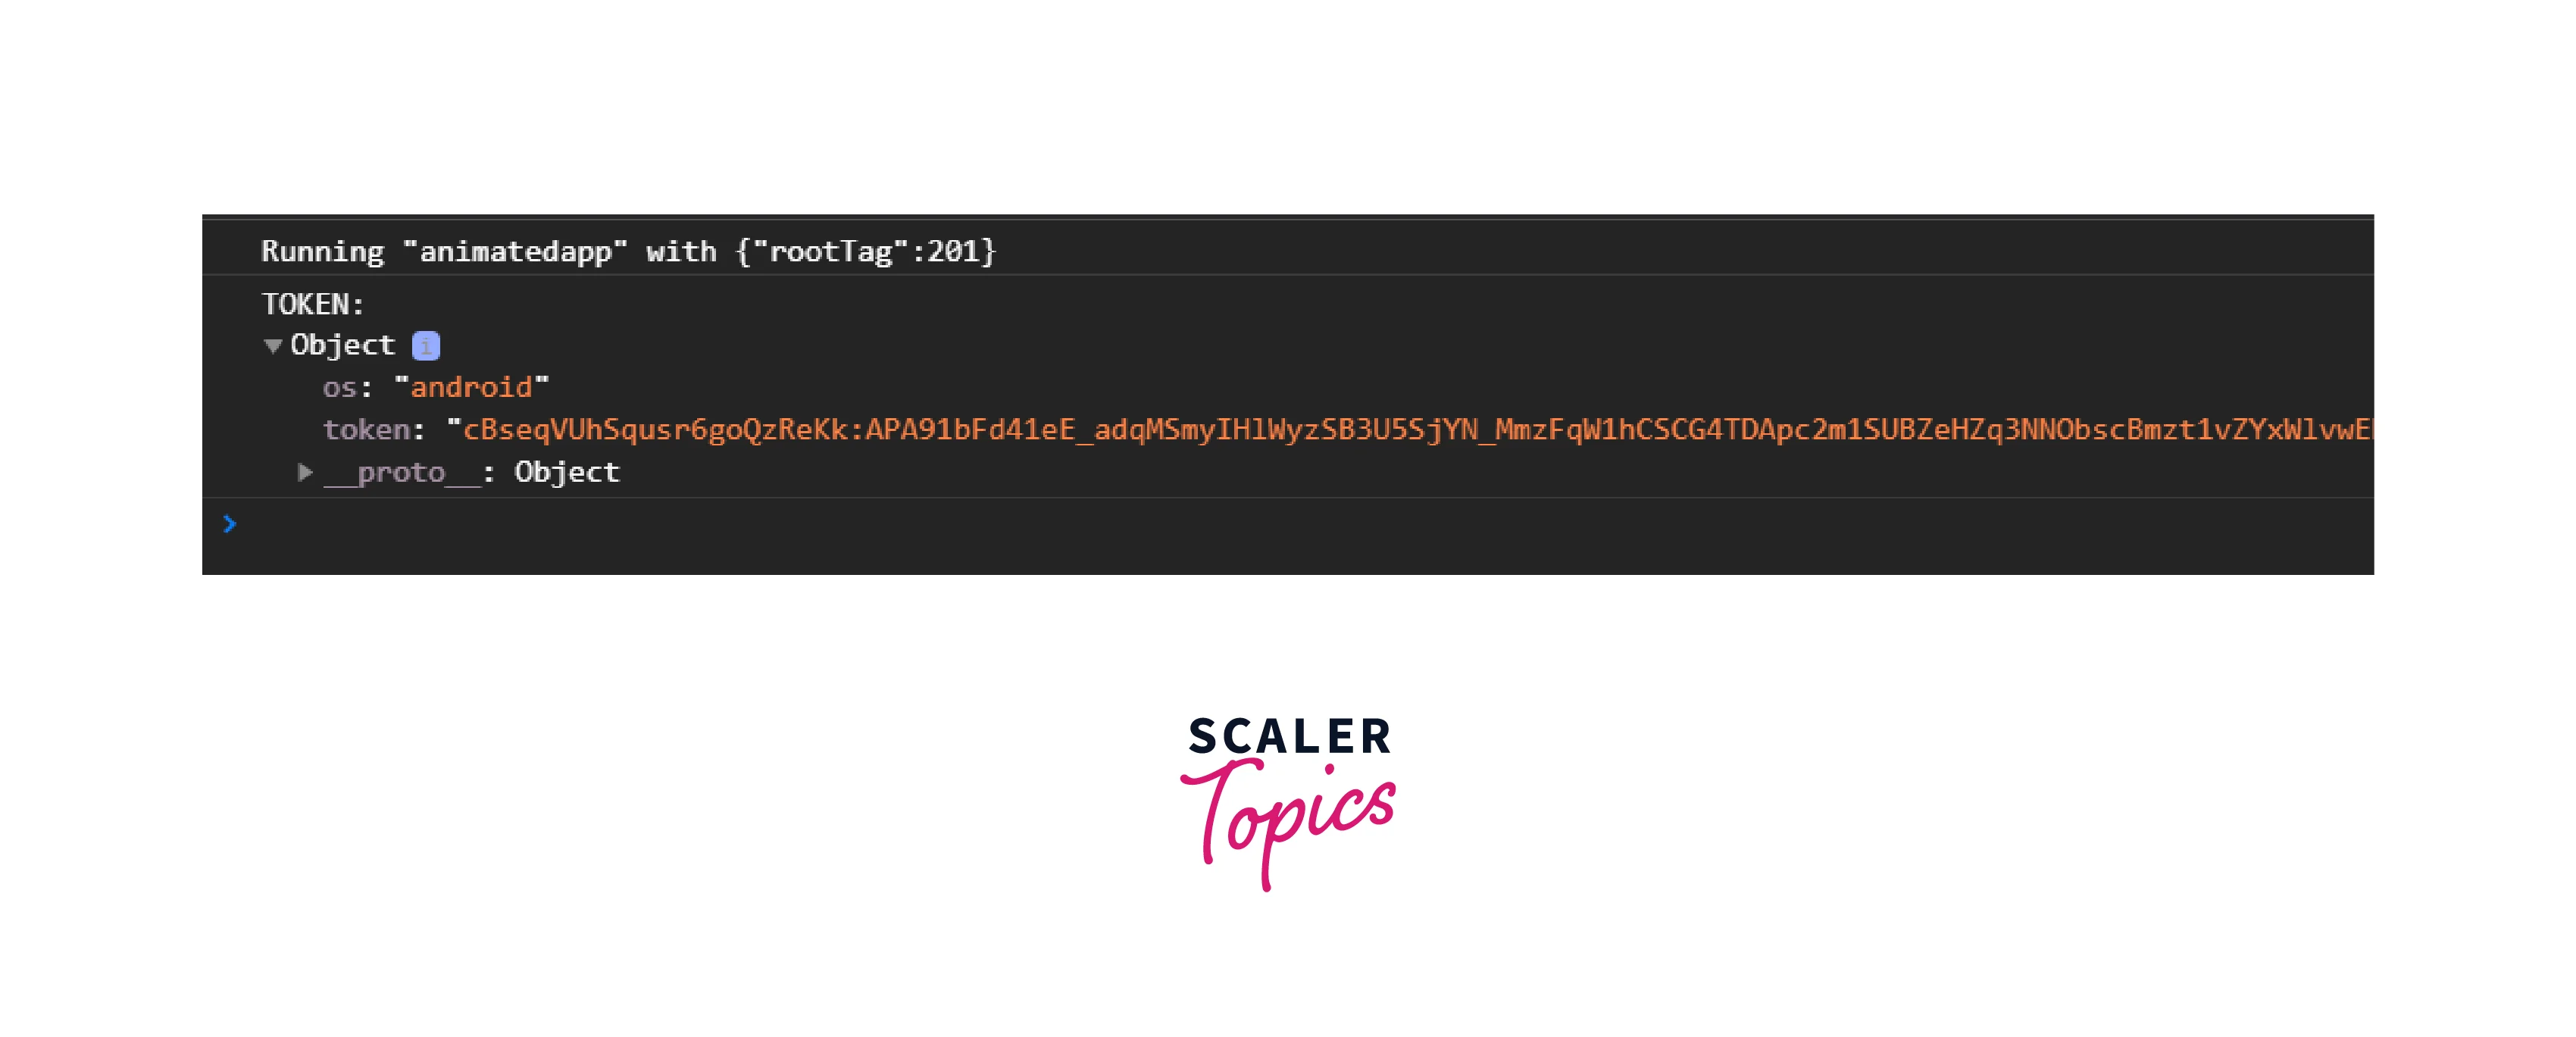
Register for Push Notifications: In the onRegister event handler provided by the React Native push notification library, you can access the received token. The token will be provided as a parameter to the onRegister event handler, allowing you to capture and store it for later use.
- After completing the steps mentioned earlier, refresh your app. You will notice that the push notification token is now logged in the terminal console.
React Native push notifications support both Android and iOS platforms, ensuring cross-platform compatibility.
How to Send a Test Notification
To test the React Native push notification & the library integration, you can follow these general steps:
-
Obtain the Push Notification Token: Make sure your app is registered for push notifications and has received a push notification token. Retrieve the push notification token either from the onRegister event handler.
-
Before proceeding, ensure that you have registered with a messaging service provider. In this case, we will be using Firebase as the messaging service provider.
-
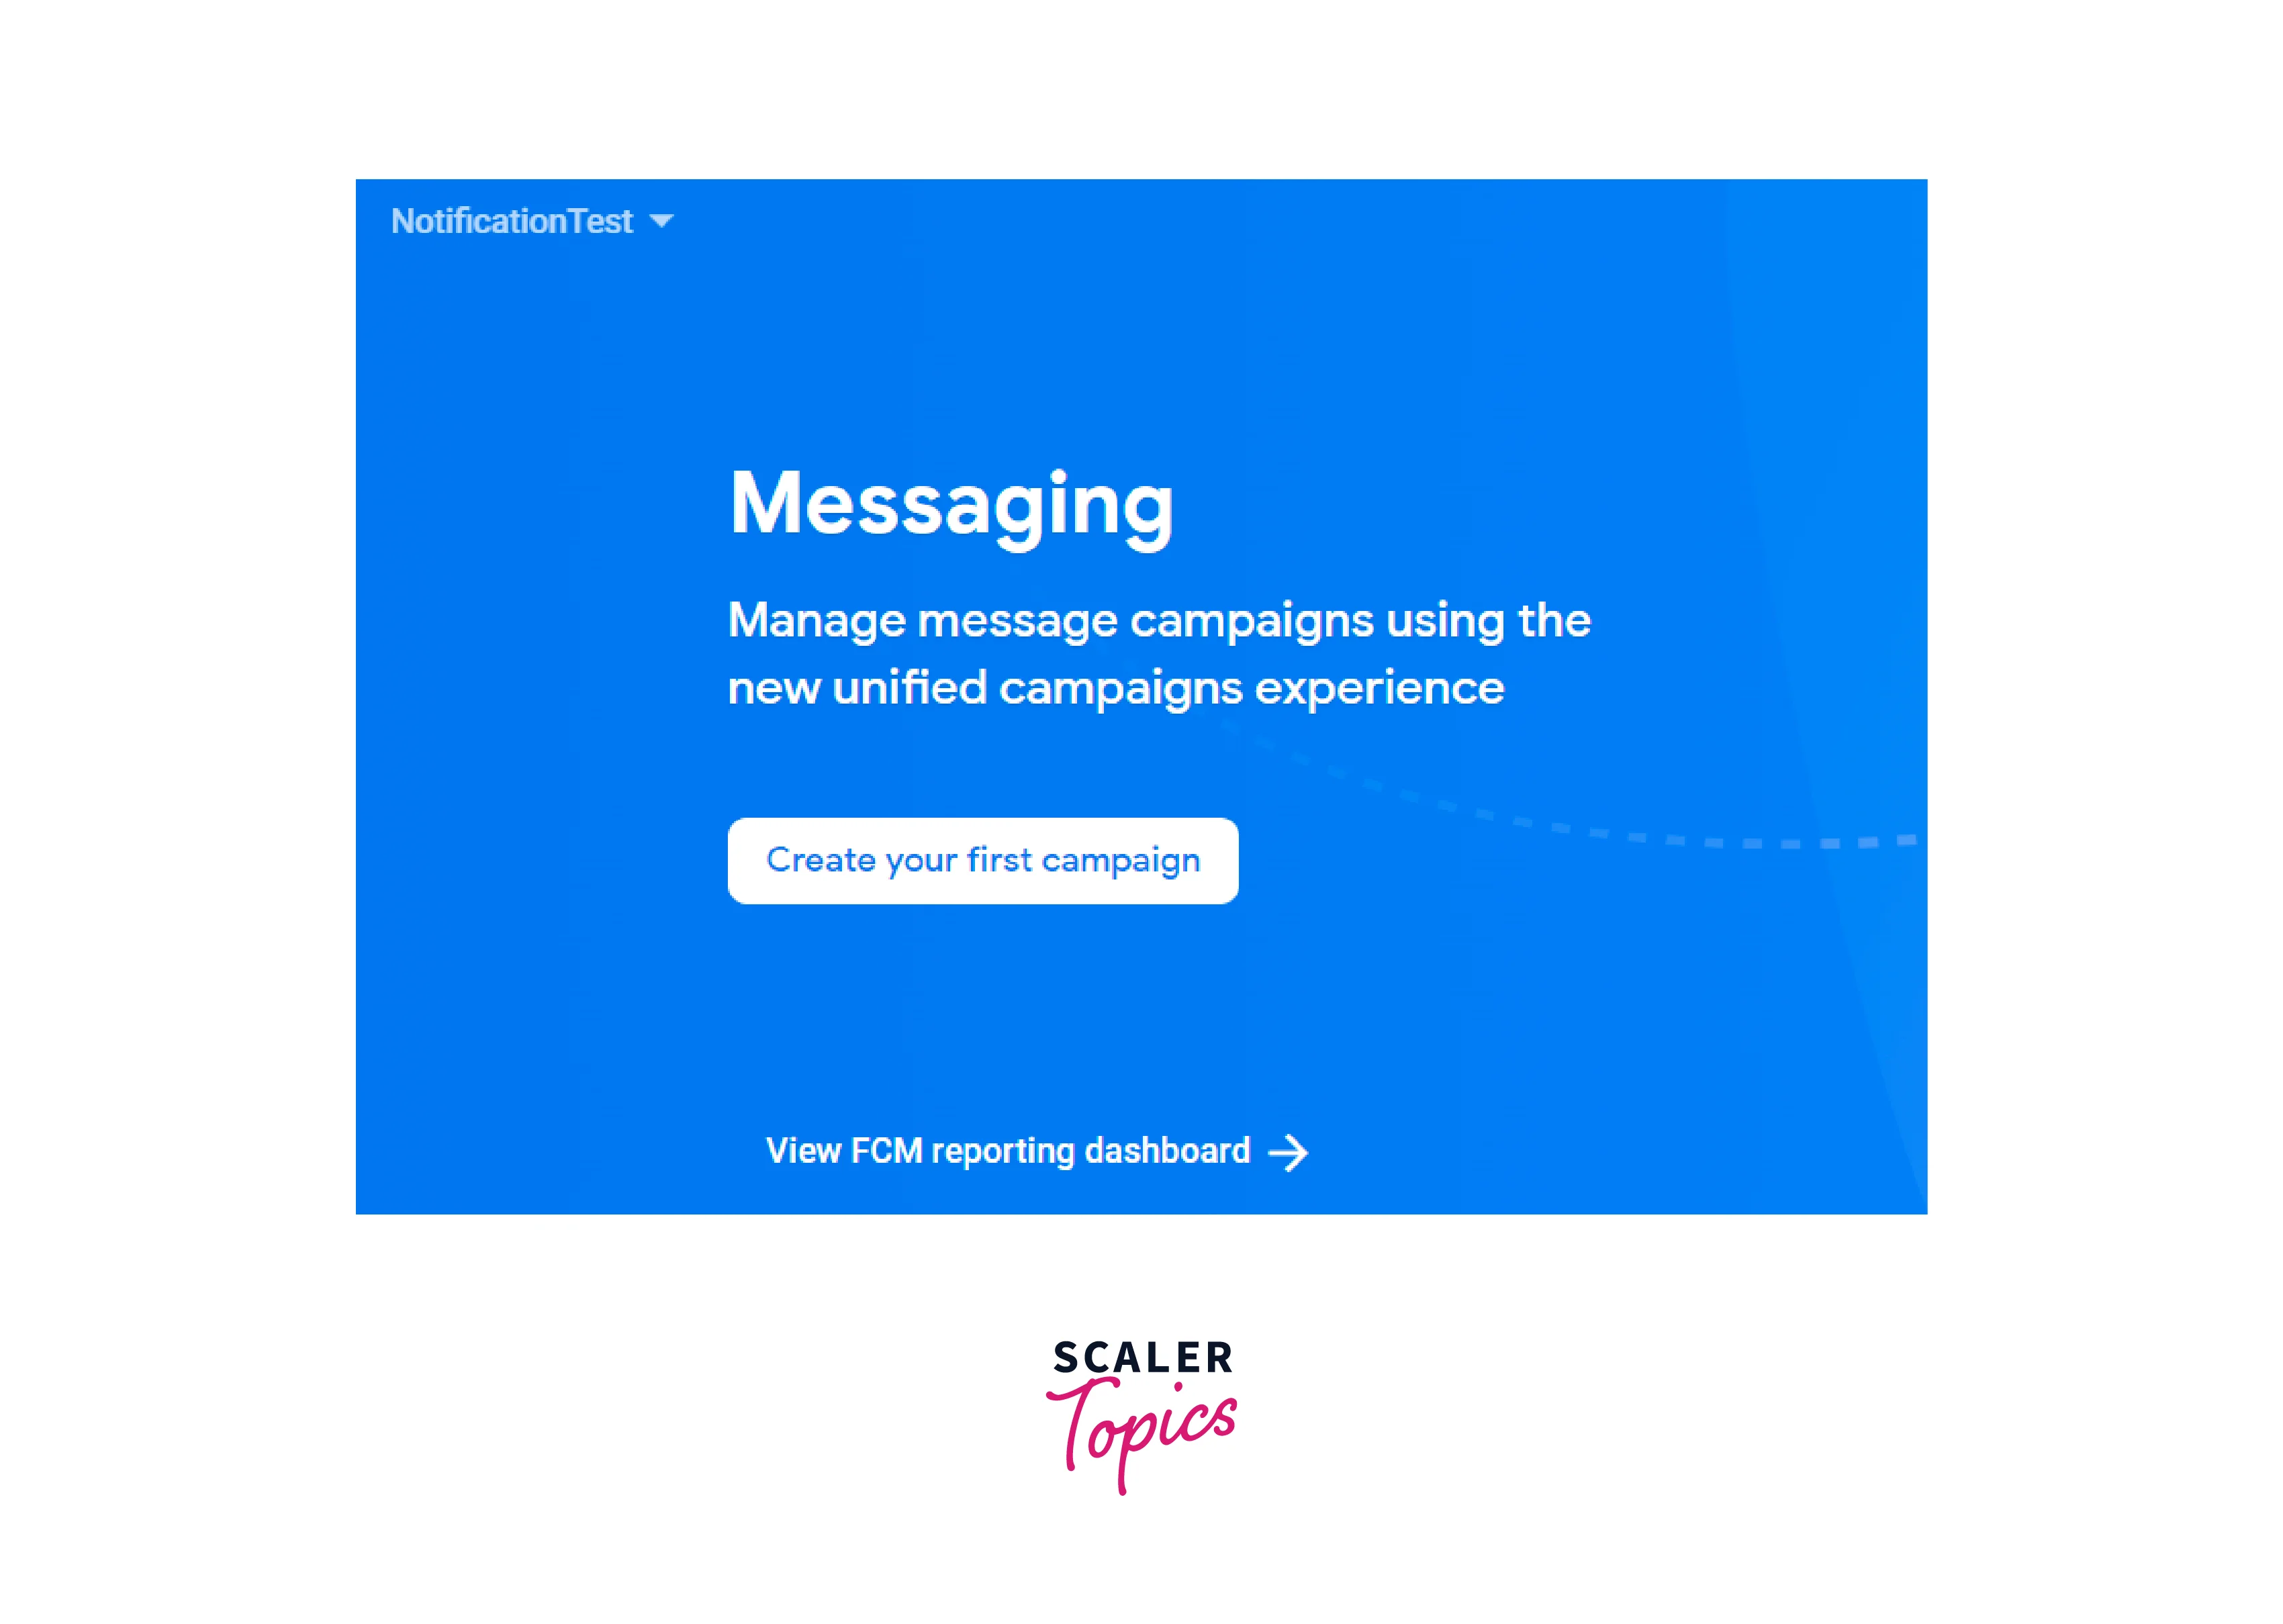
Now, go to the Firebase Messaging Console. Create a new campaign by clicking on Create your first campaign.
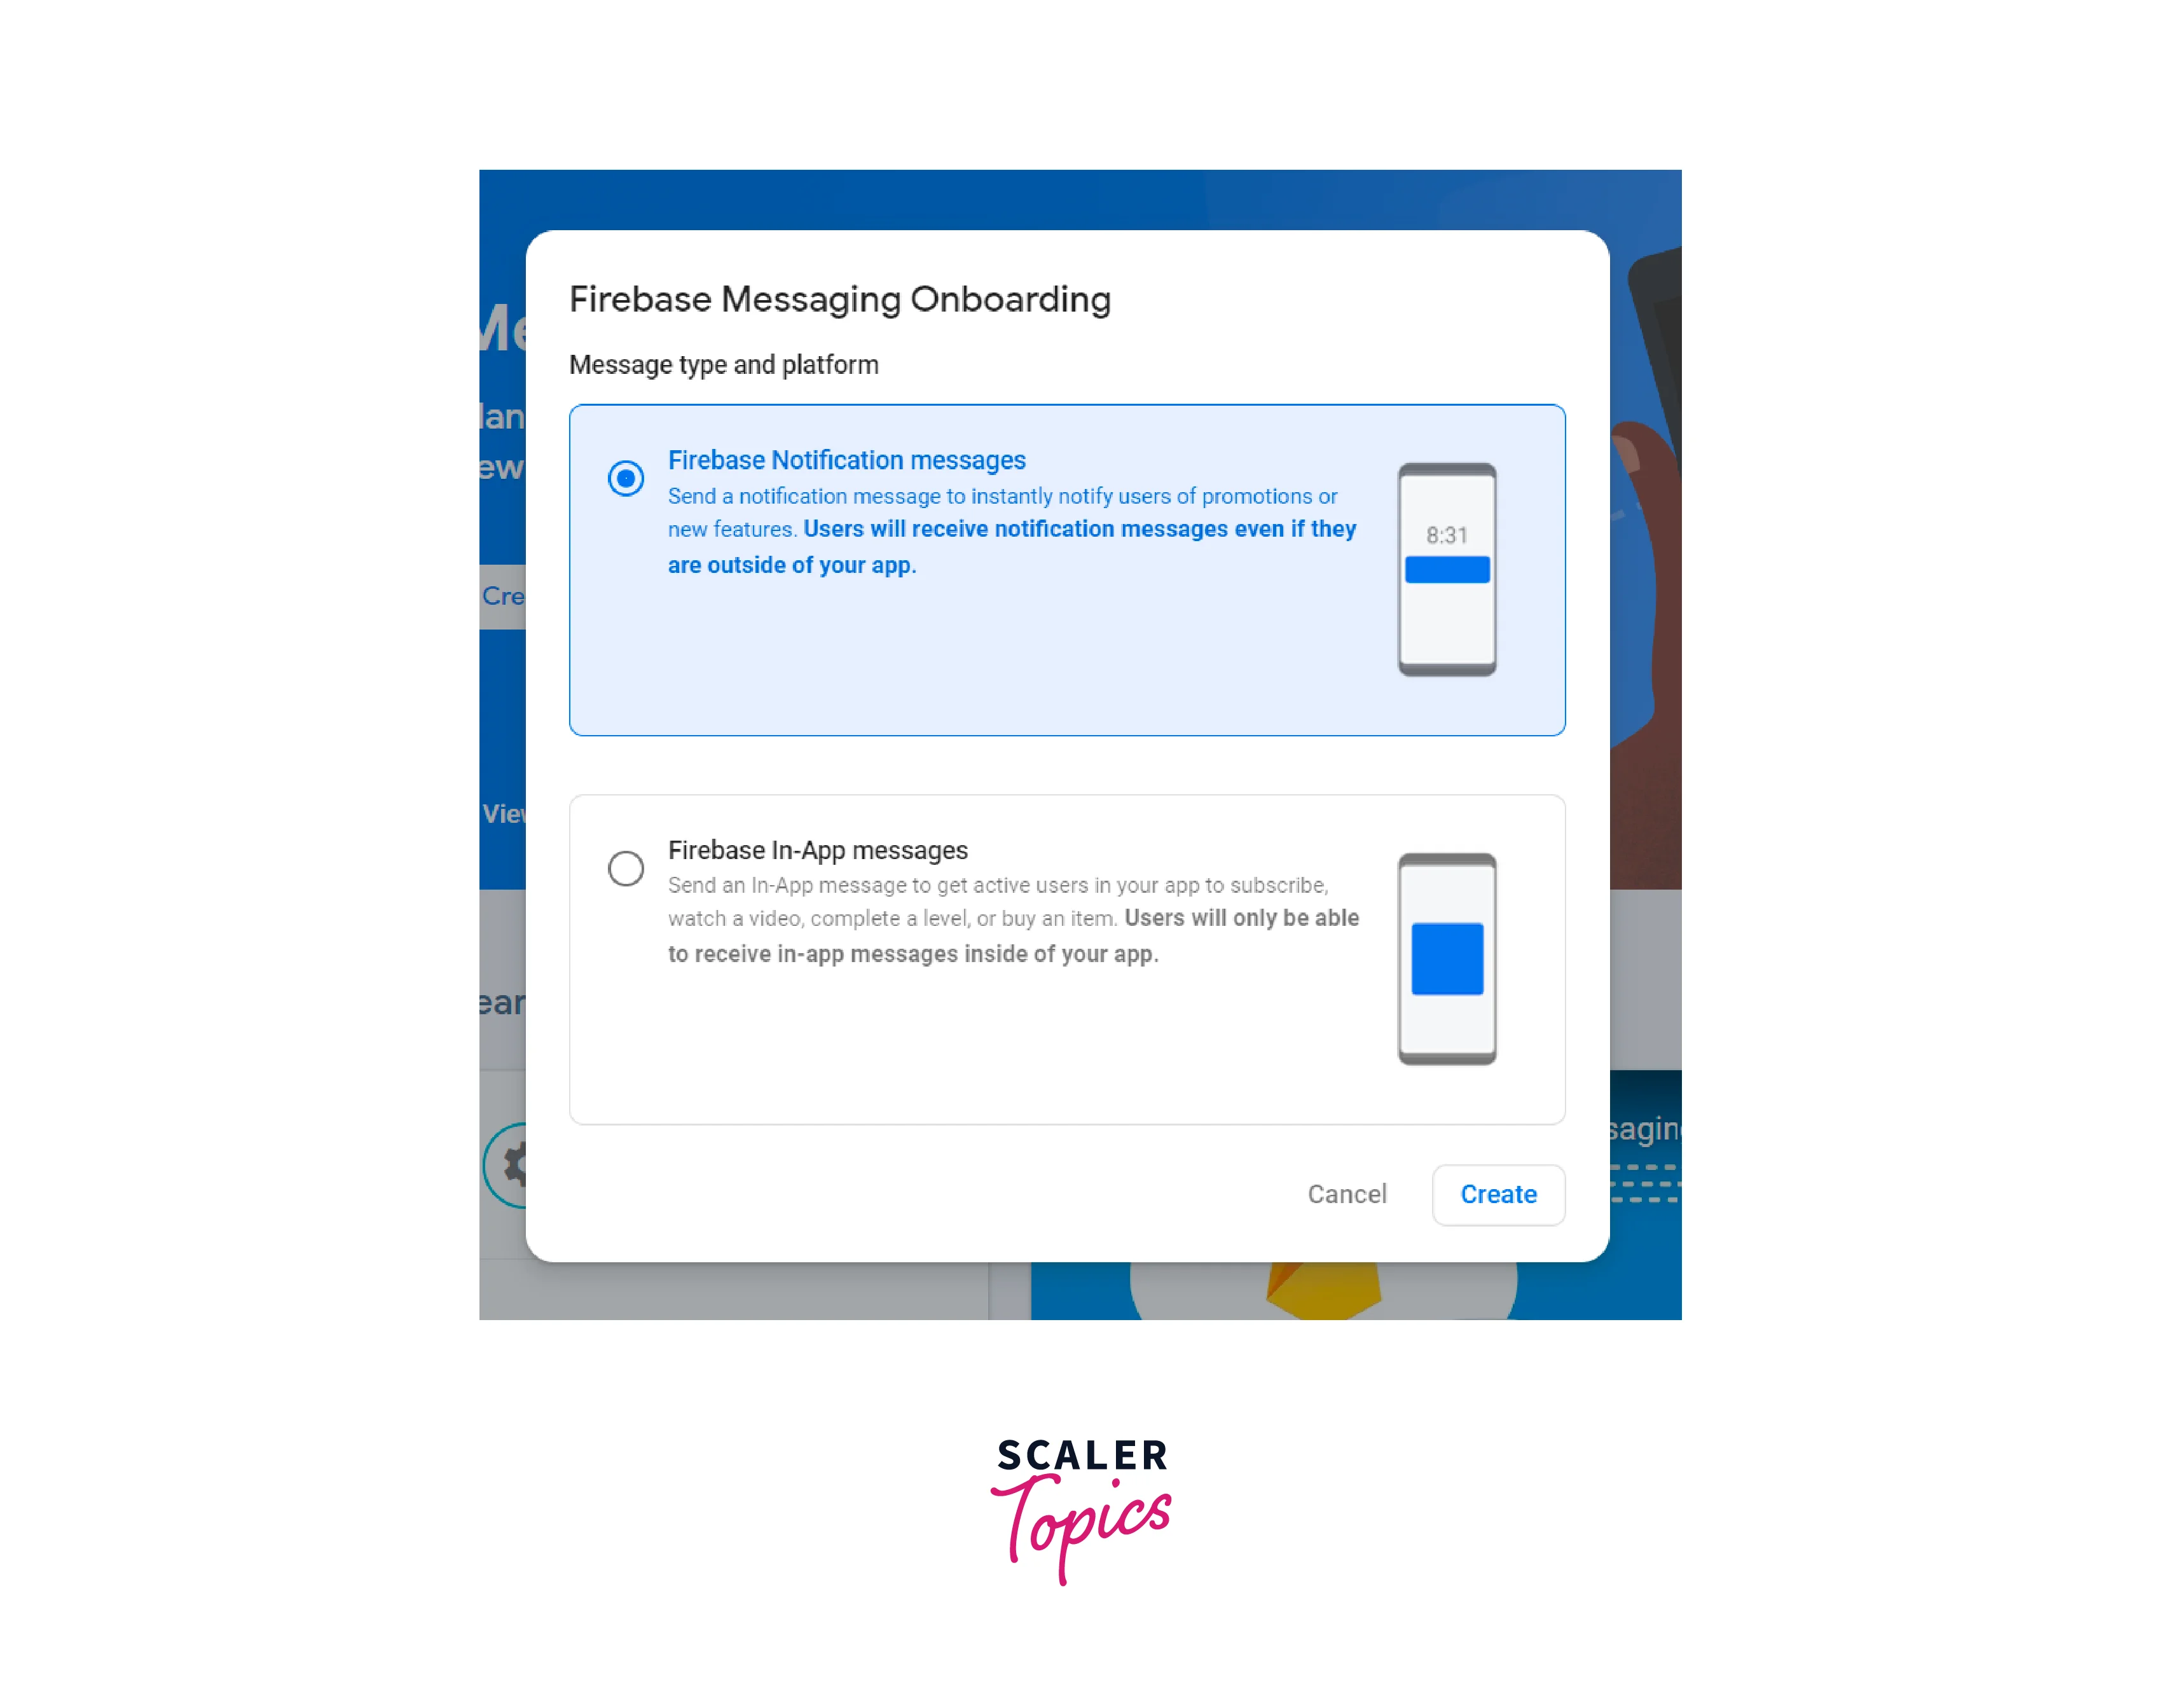
- After that, select Firebase Notification Messages and click Create.
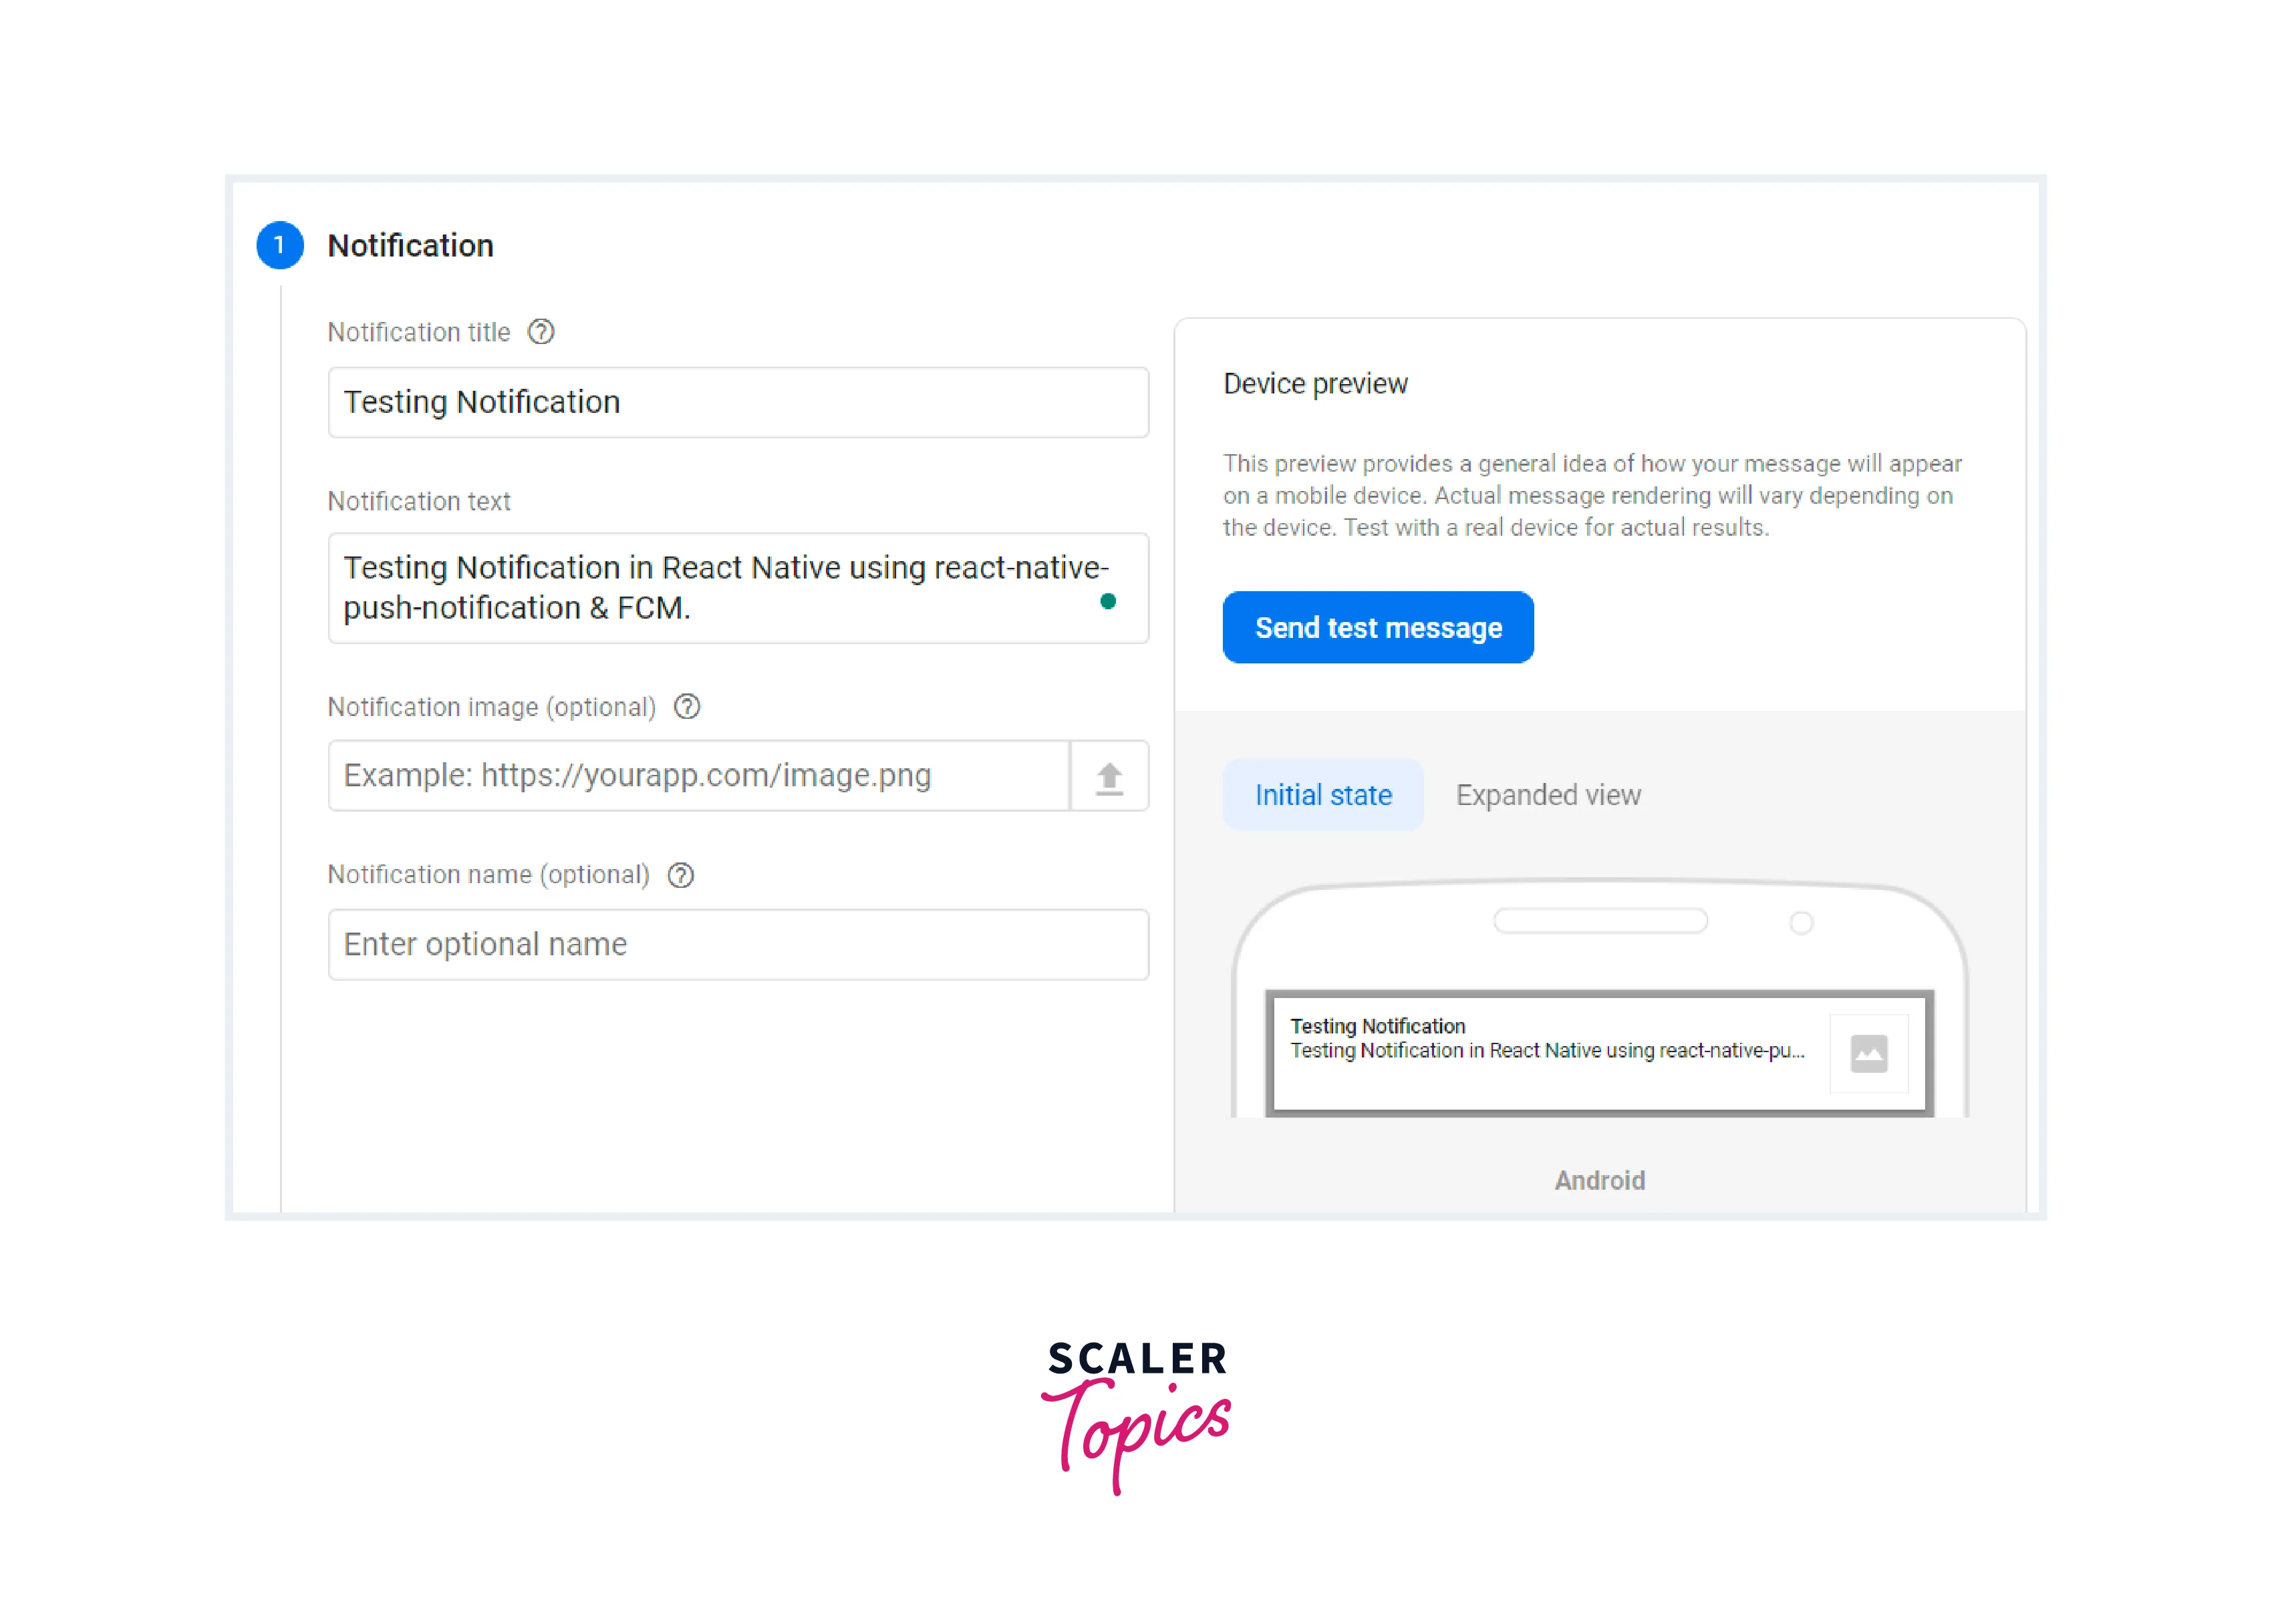
- Fill in the notification title and body fields with the desired content. This is essential for React Native push notification testing. Then click on Send test message to send a test notification.
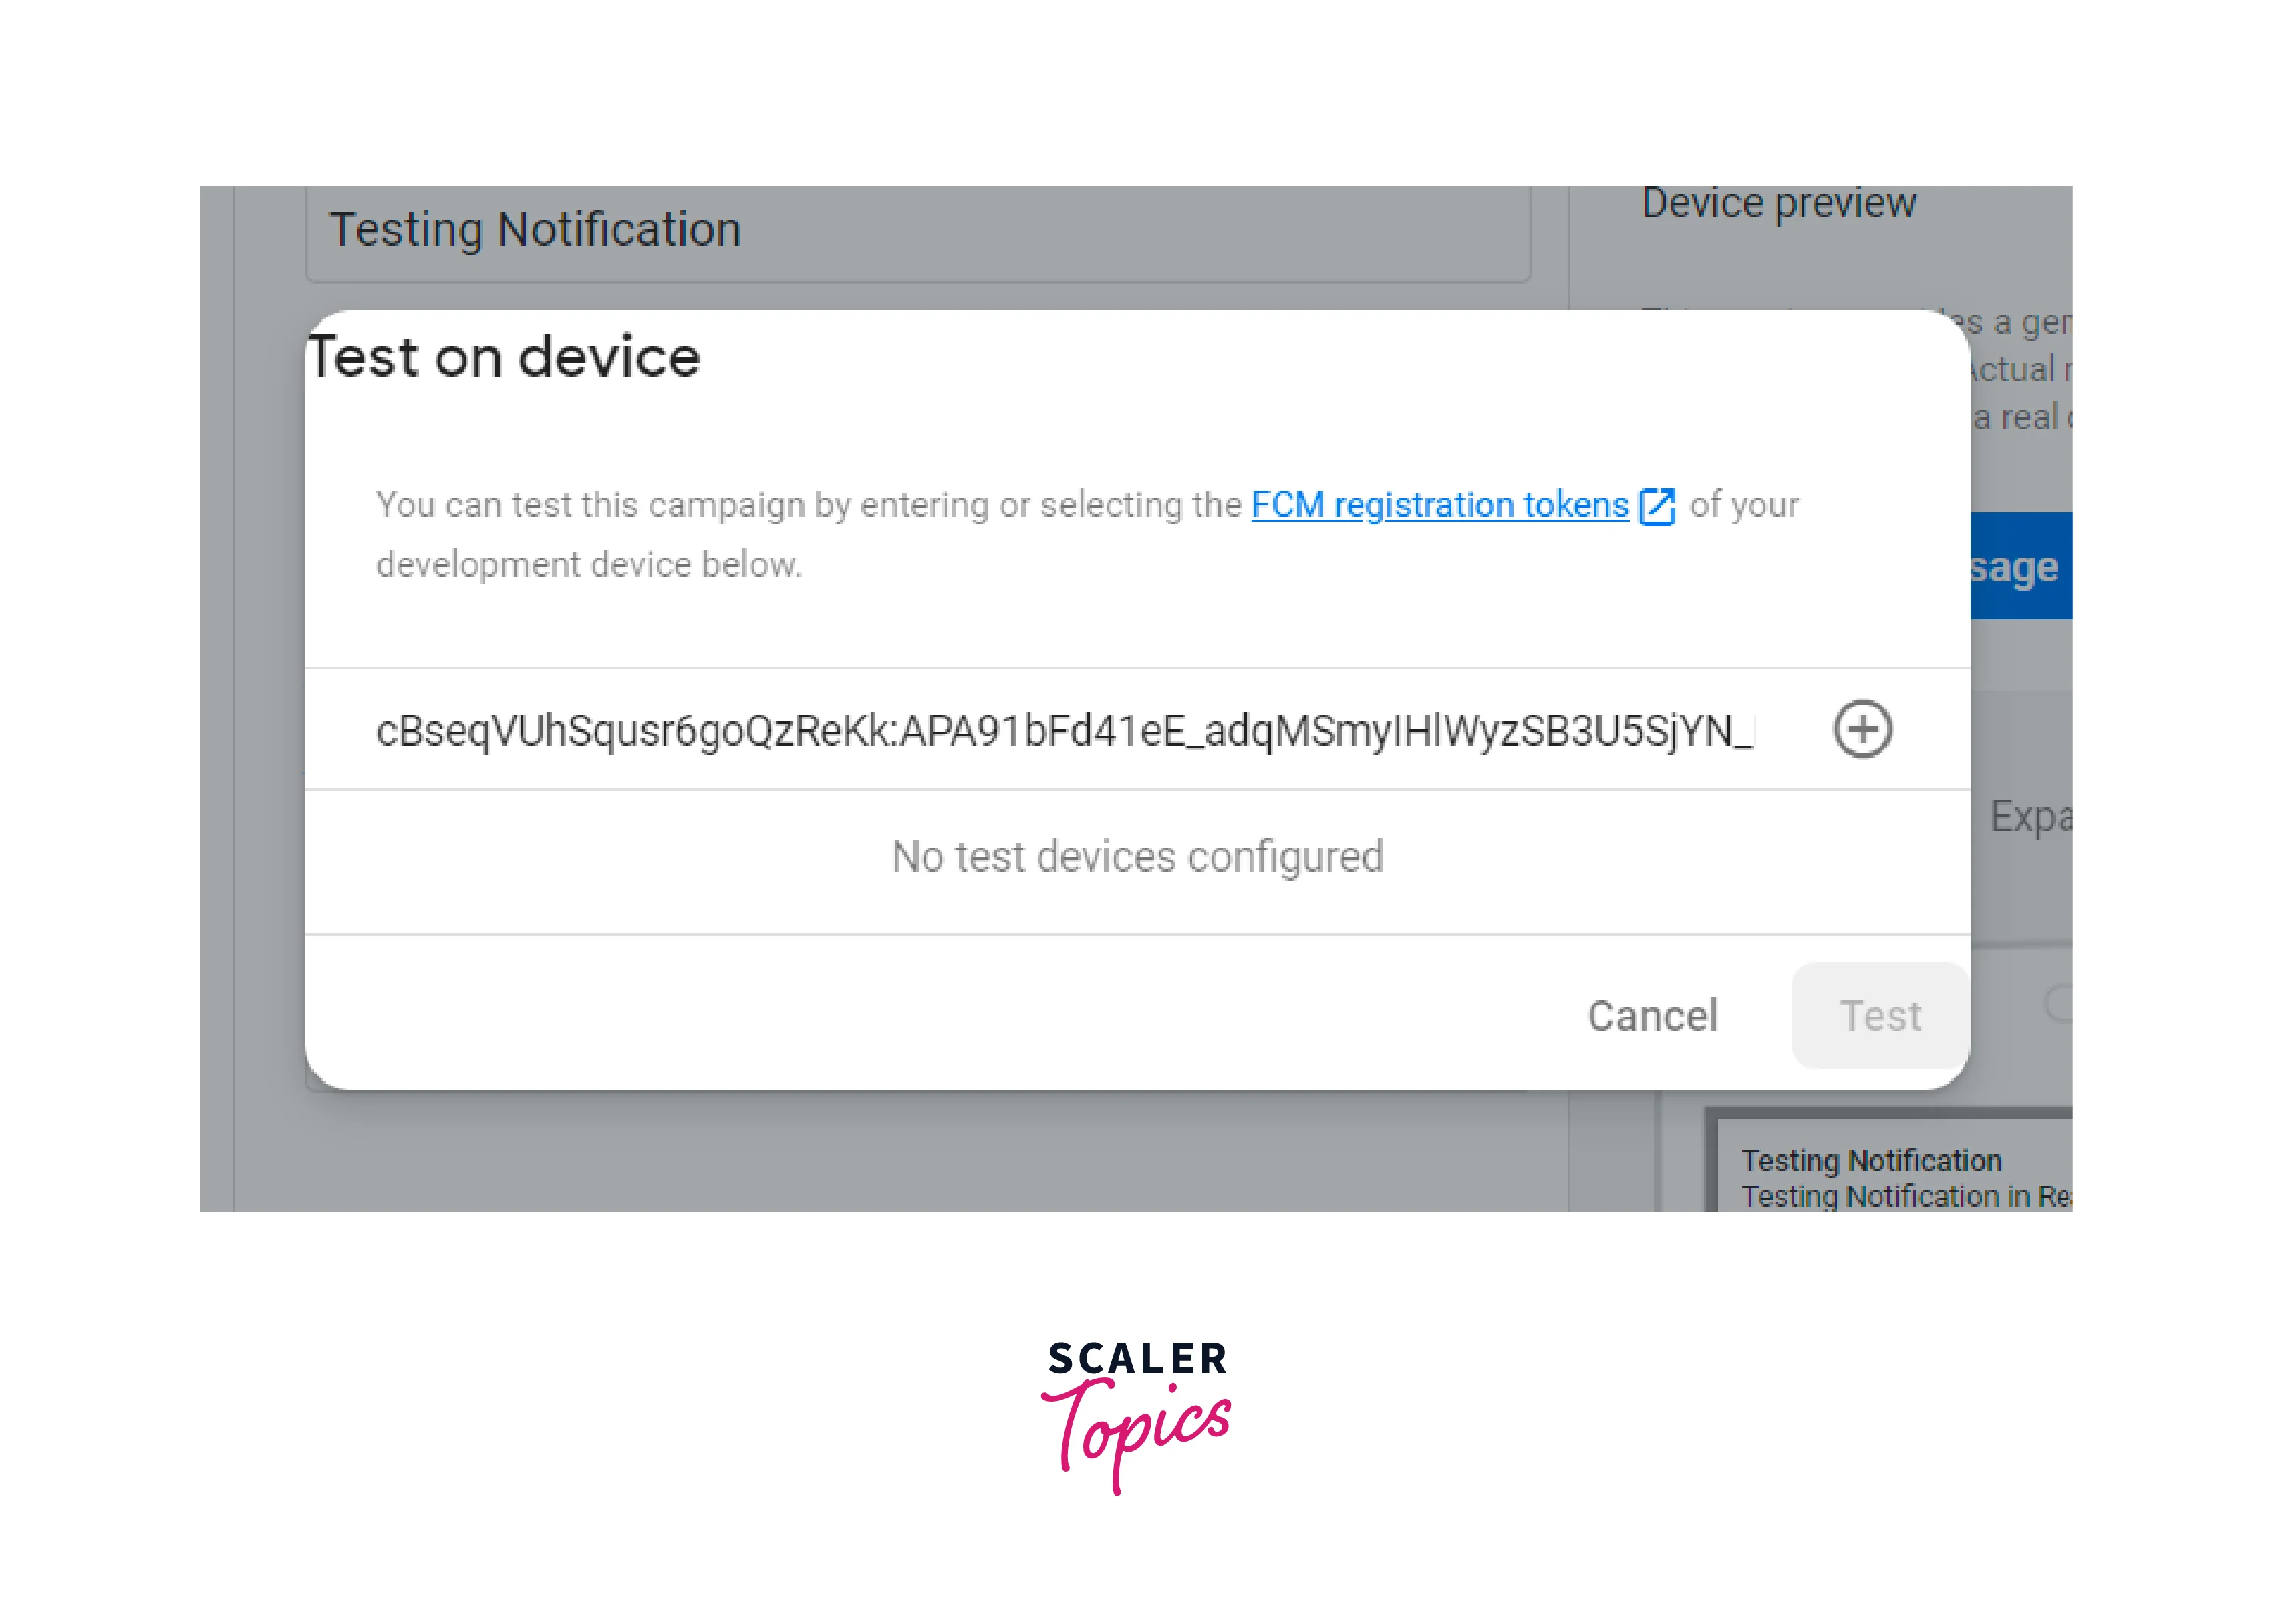
- In the recipient field, enter the FCM token that you obtained earlier from the console. Click Test to send the test notification to the specified token.
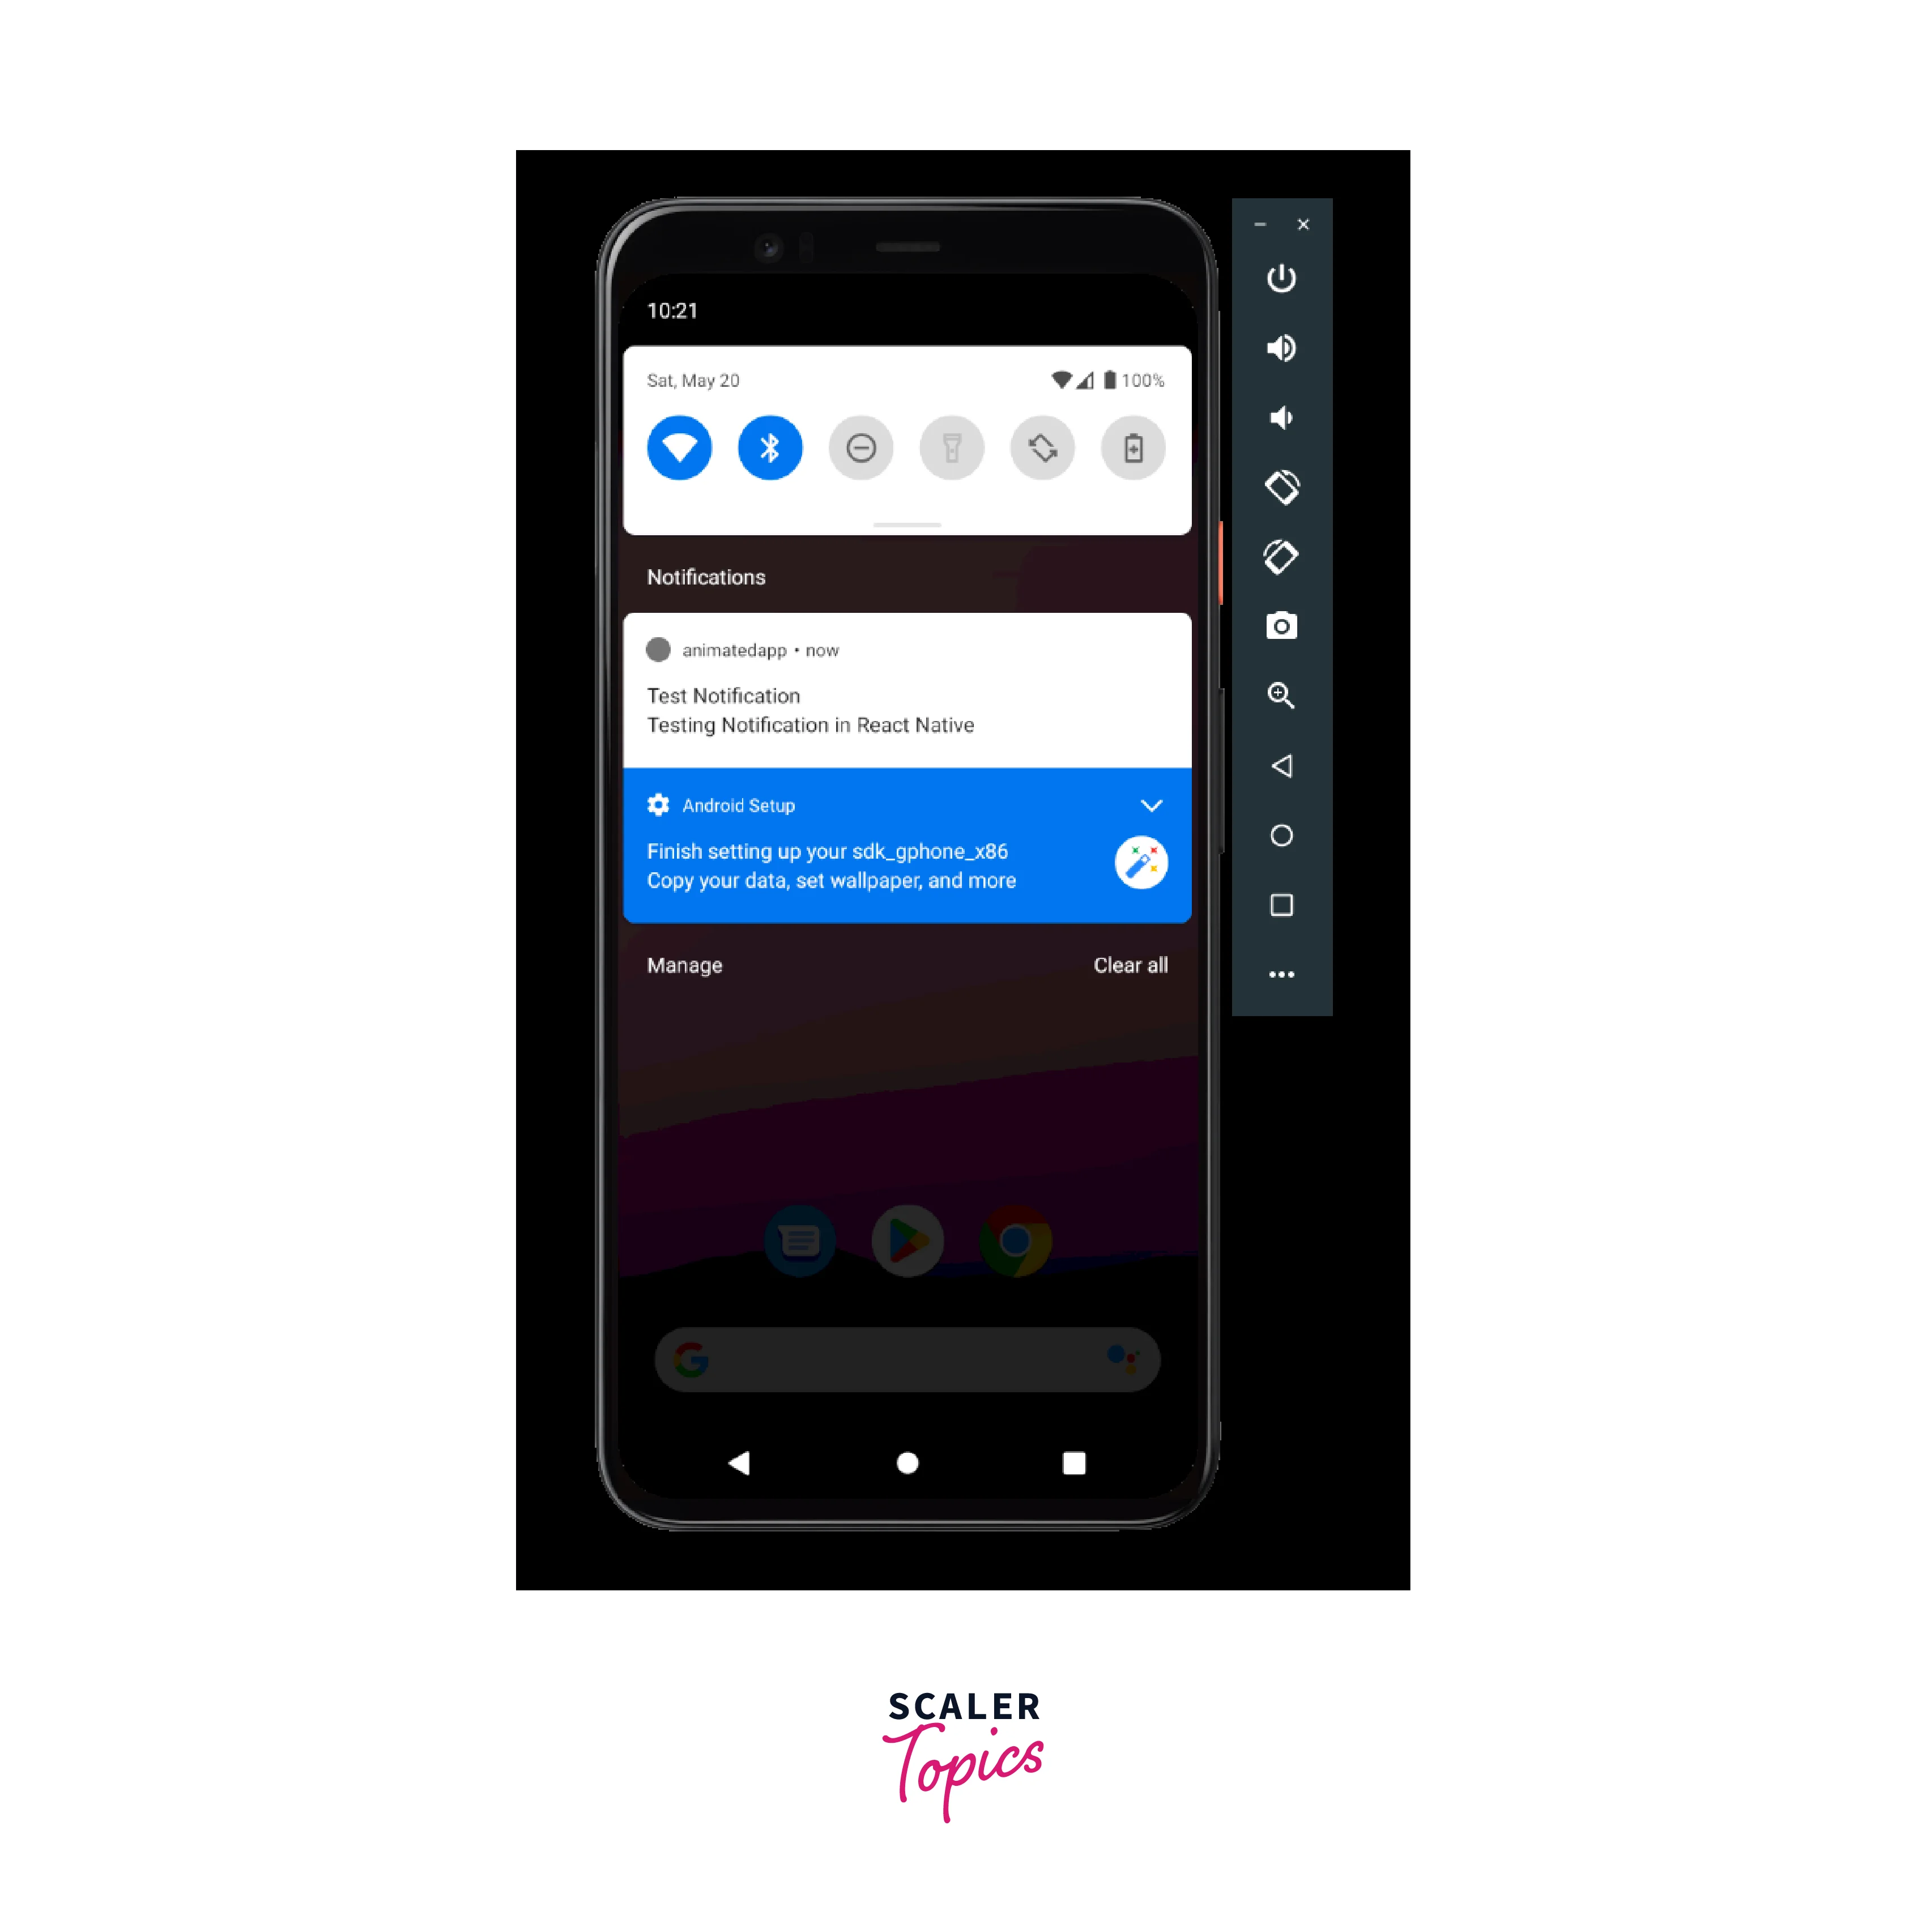
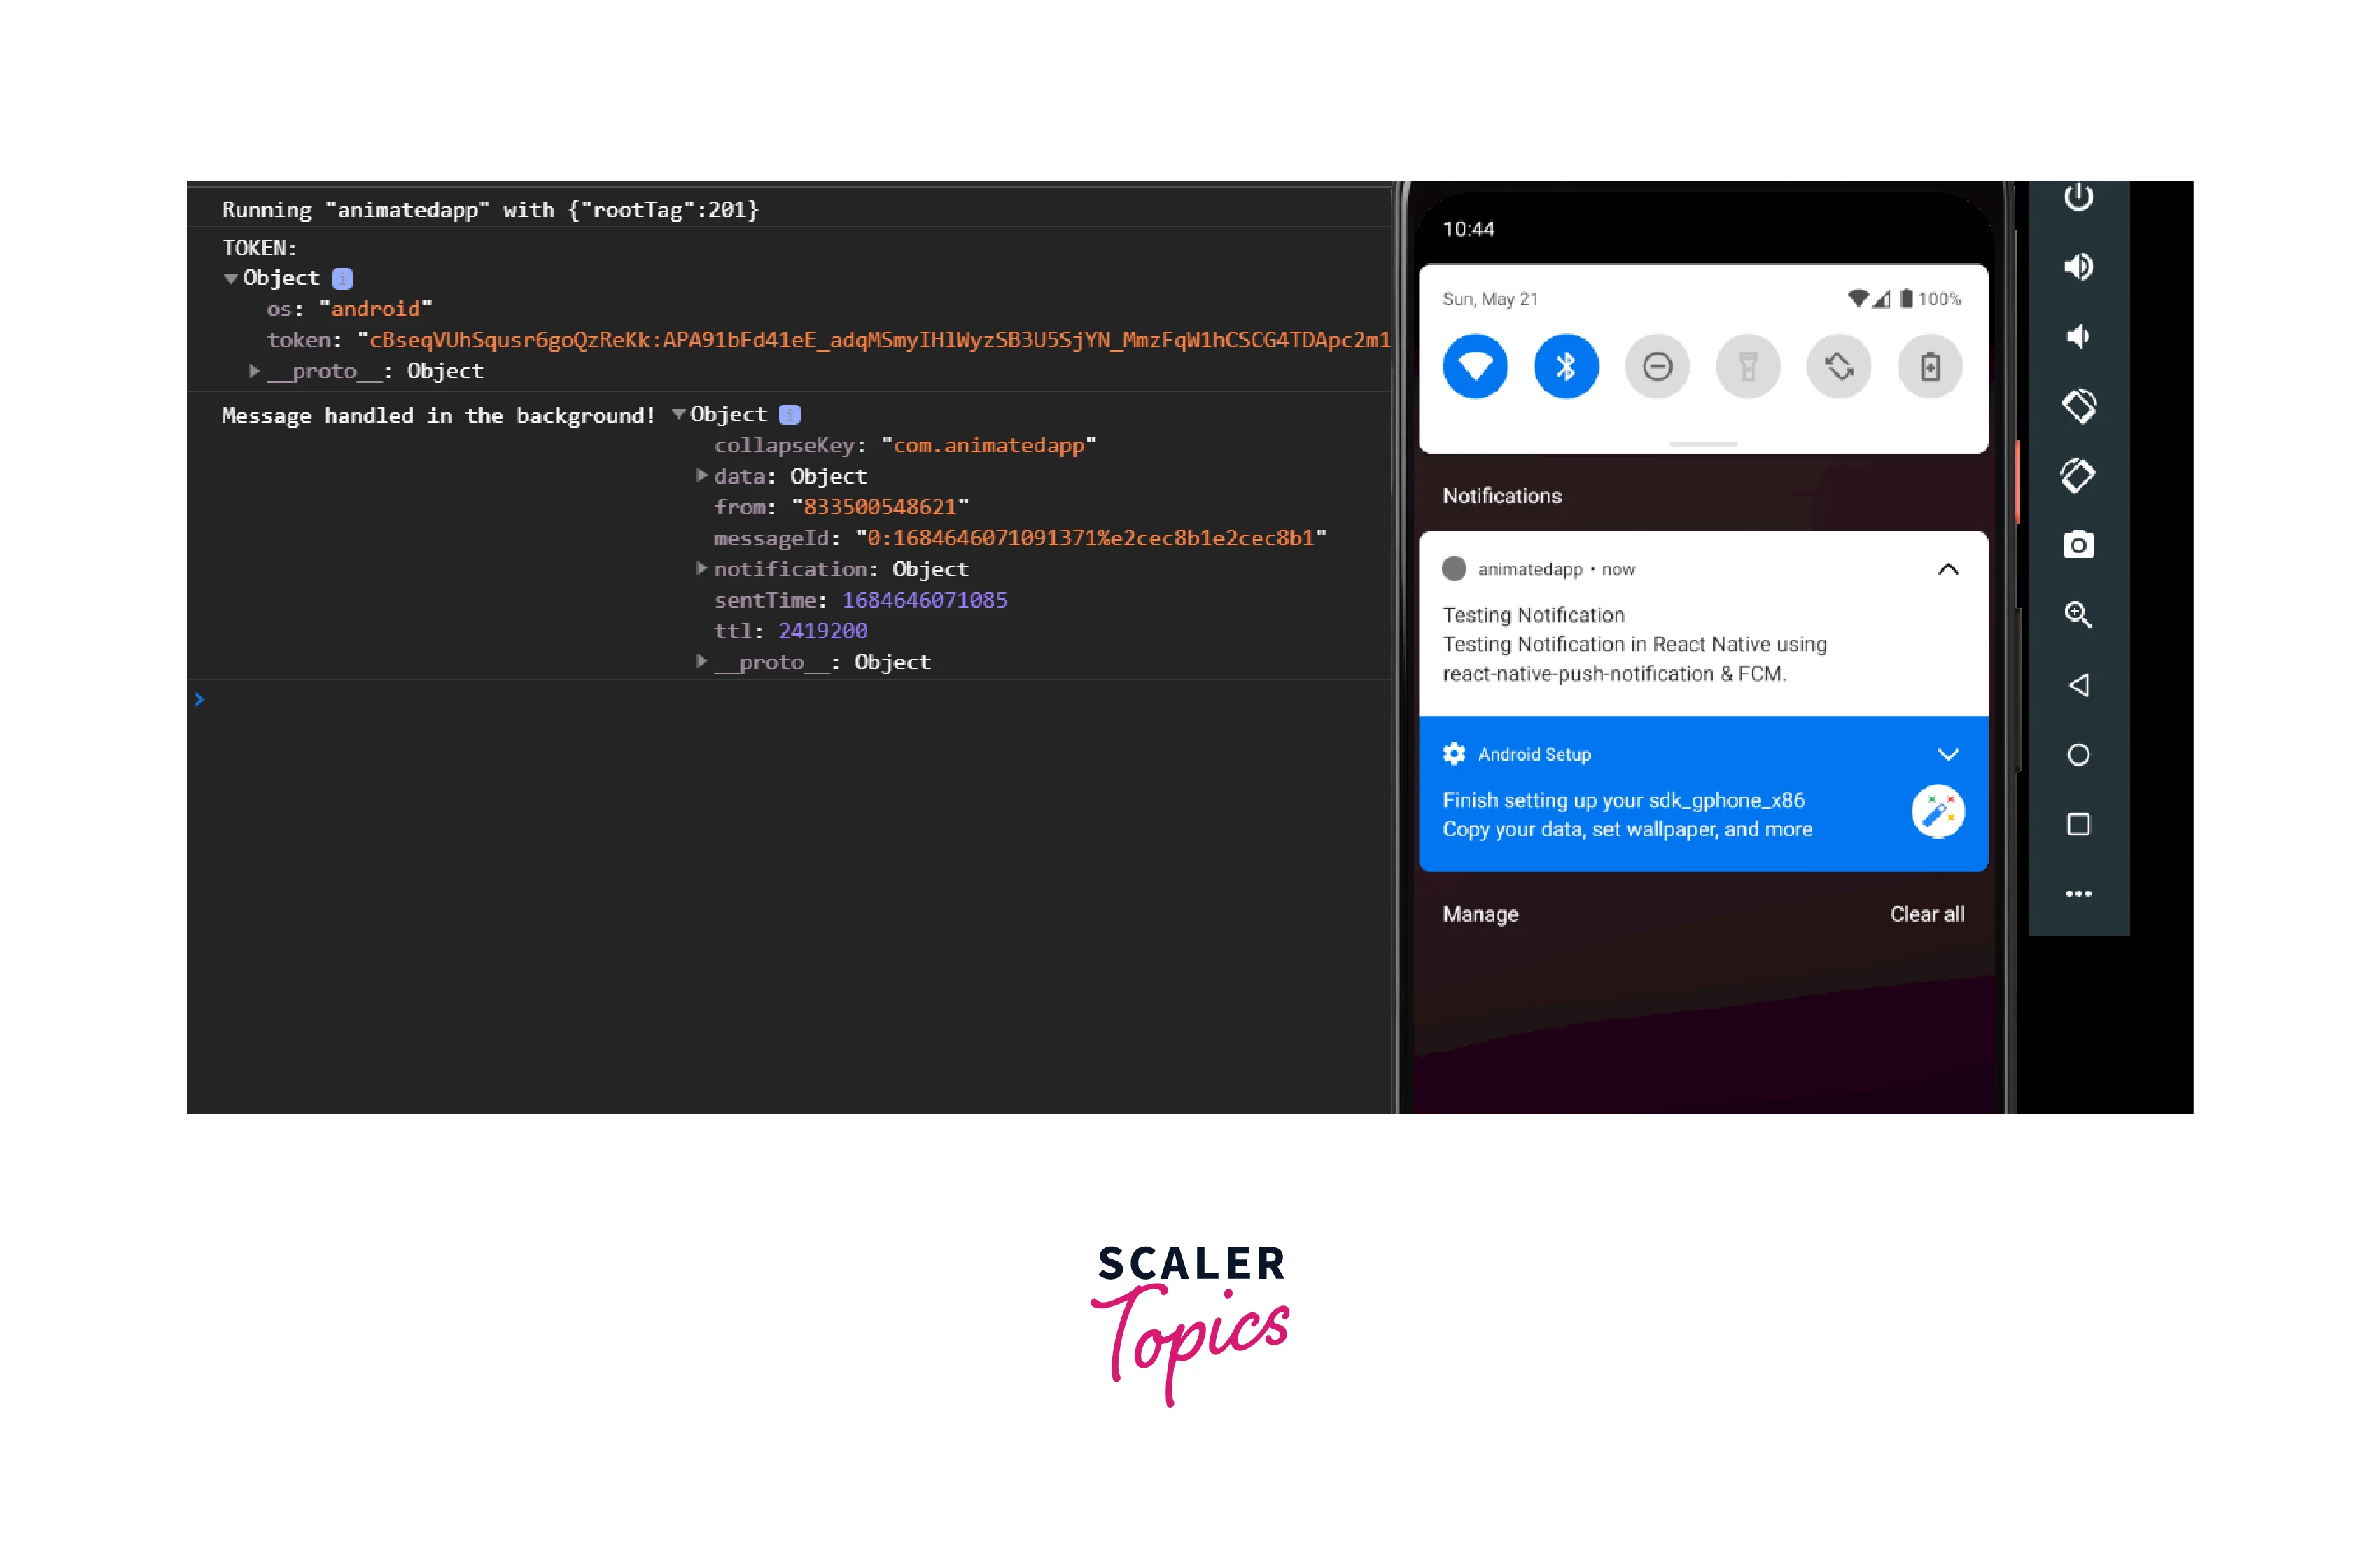
- You will receive a push notification in your emulator or device like this:
Storing a Push Notification Token
Storing a push notification token is an important step in implementing push notifications in a React Native app. The token is a unique identifier for each device that allows the push notification service provider to send notifications to the correct device. Here's how you can store the push notification token:
-
Receive the Token: Implement the necessary code to receive the push notification token in your app. This typically involves using the appropriate method provided by the push notification library, such as the onRegister event handler in the react-native-push-notification library. When the token is received, it will be passed as a parameter to the event handler.
-
Store the Token: Once you have received the push notification token, you need to store it for later use. The specific approach for storing the token depends on your app's requirements and architecture. Common methods for storing the token include using local storage (such as AsyncStorage or SecureStorage) or sending it to your server for storage in a user profile or database.
-
Storing token locally using AsyncStorage:
- Server-Side Storage: Alternatively, you can send the token to your server for storage. Implement an API endpoint or method on your server to receive and store the token in your backend database. When you need to send push notifications, retrieve the stored tokens from your server and use them to target the appropriate devices.
Remember to handle scenarios where the token may change, such as when a user reinstalls the app or switches devices. In such cases, you will receive a new token, and you should update the stored token accordingly.
By storing the push notification token, you can maintain a connection between your app and the push notification service provider, ensuring that your app can receive and handle push notifications effectively.
Managing Recieved Notifications
in React Native push notification implementation, we can also manage the received notifications. Managing received notifications involves handling incoming push notifications and responding to them appropriately. Here's an overview of how you can manage received notifications:
-
Register Event Handlers: Set up event handlers to handle various notification-related events in your app. Common event handlers include onNotification, onRegister, and onAction. These event handlers are typically provided by the push notification library you are using, such as react-native-push-notification.
-
Handle onNotification Event: The onNotification event handler is triggered when a push notification is received while the app is in the foreground or background. In this event handler, you can access the notification payload and perform actions based on the notification data. For example, you can display an in-app message, update the UI, or trigger specific functionality within your app based on the received notification.
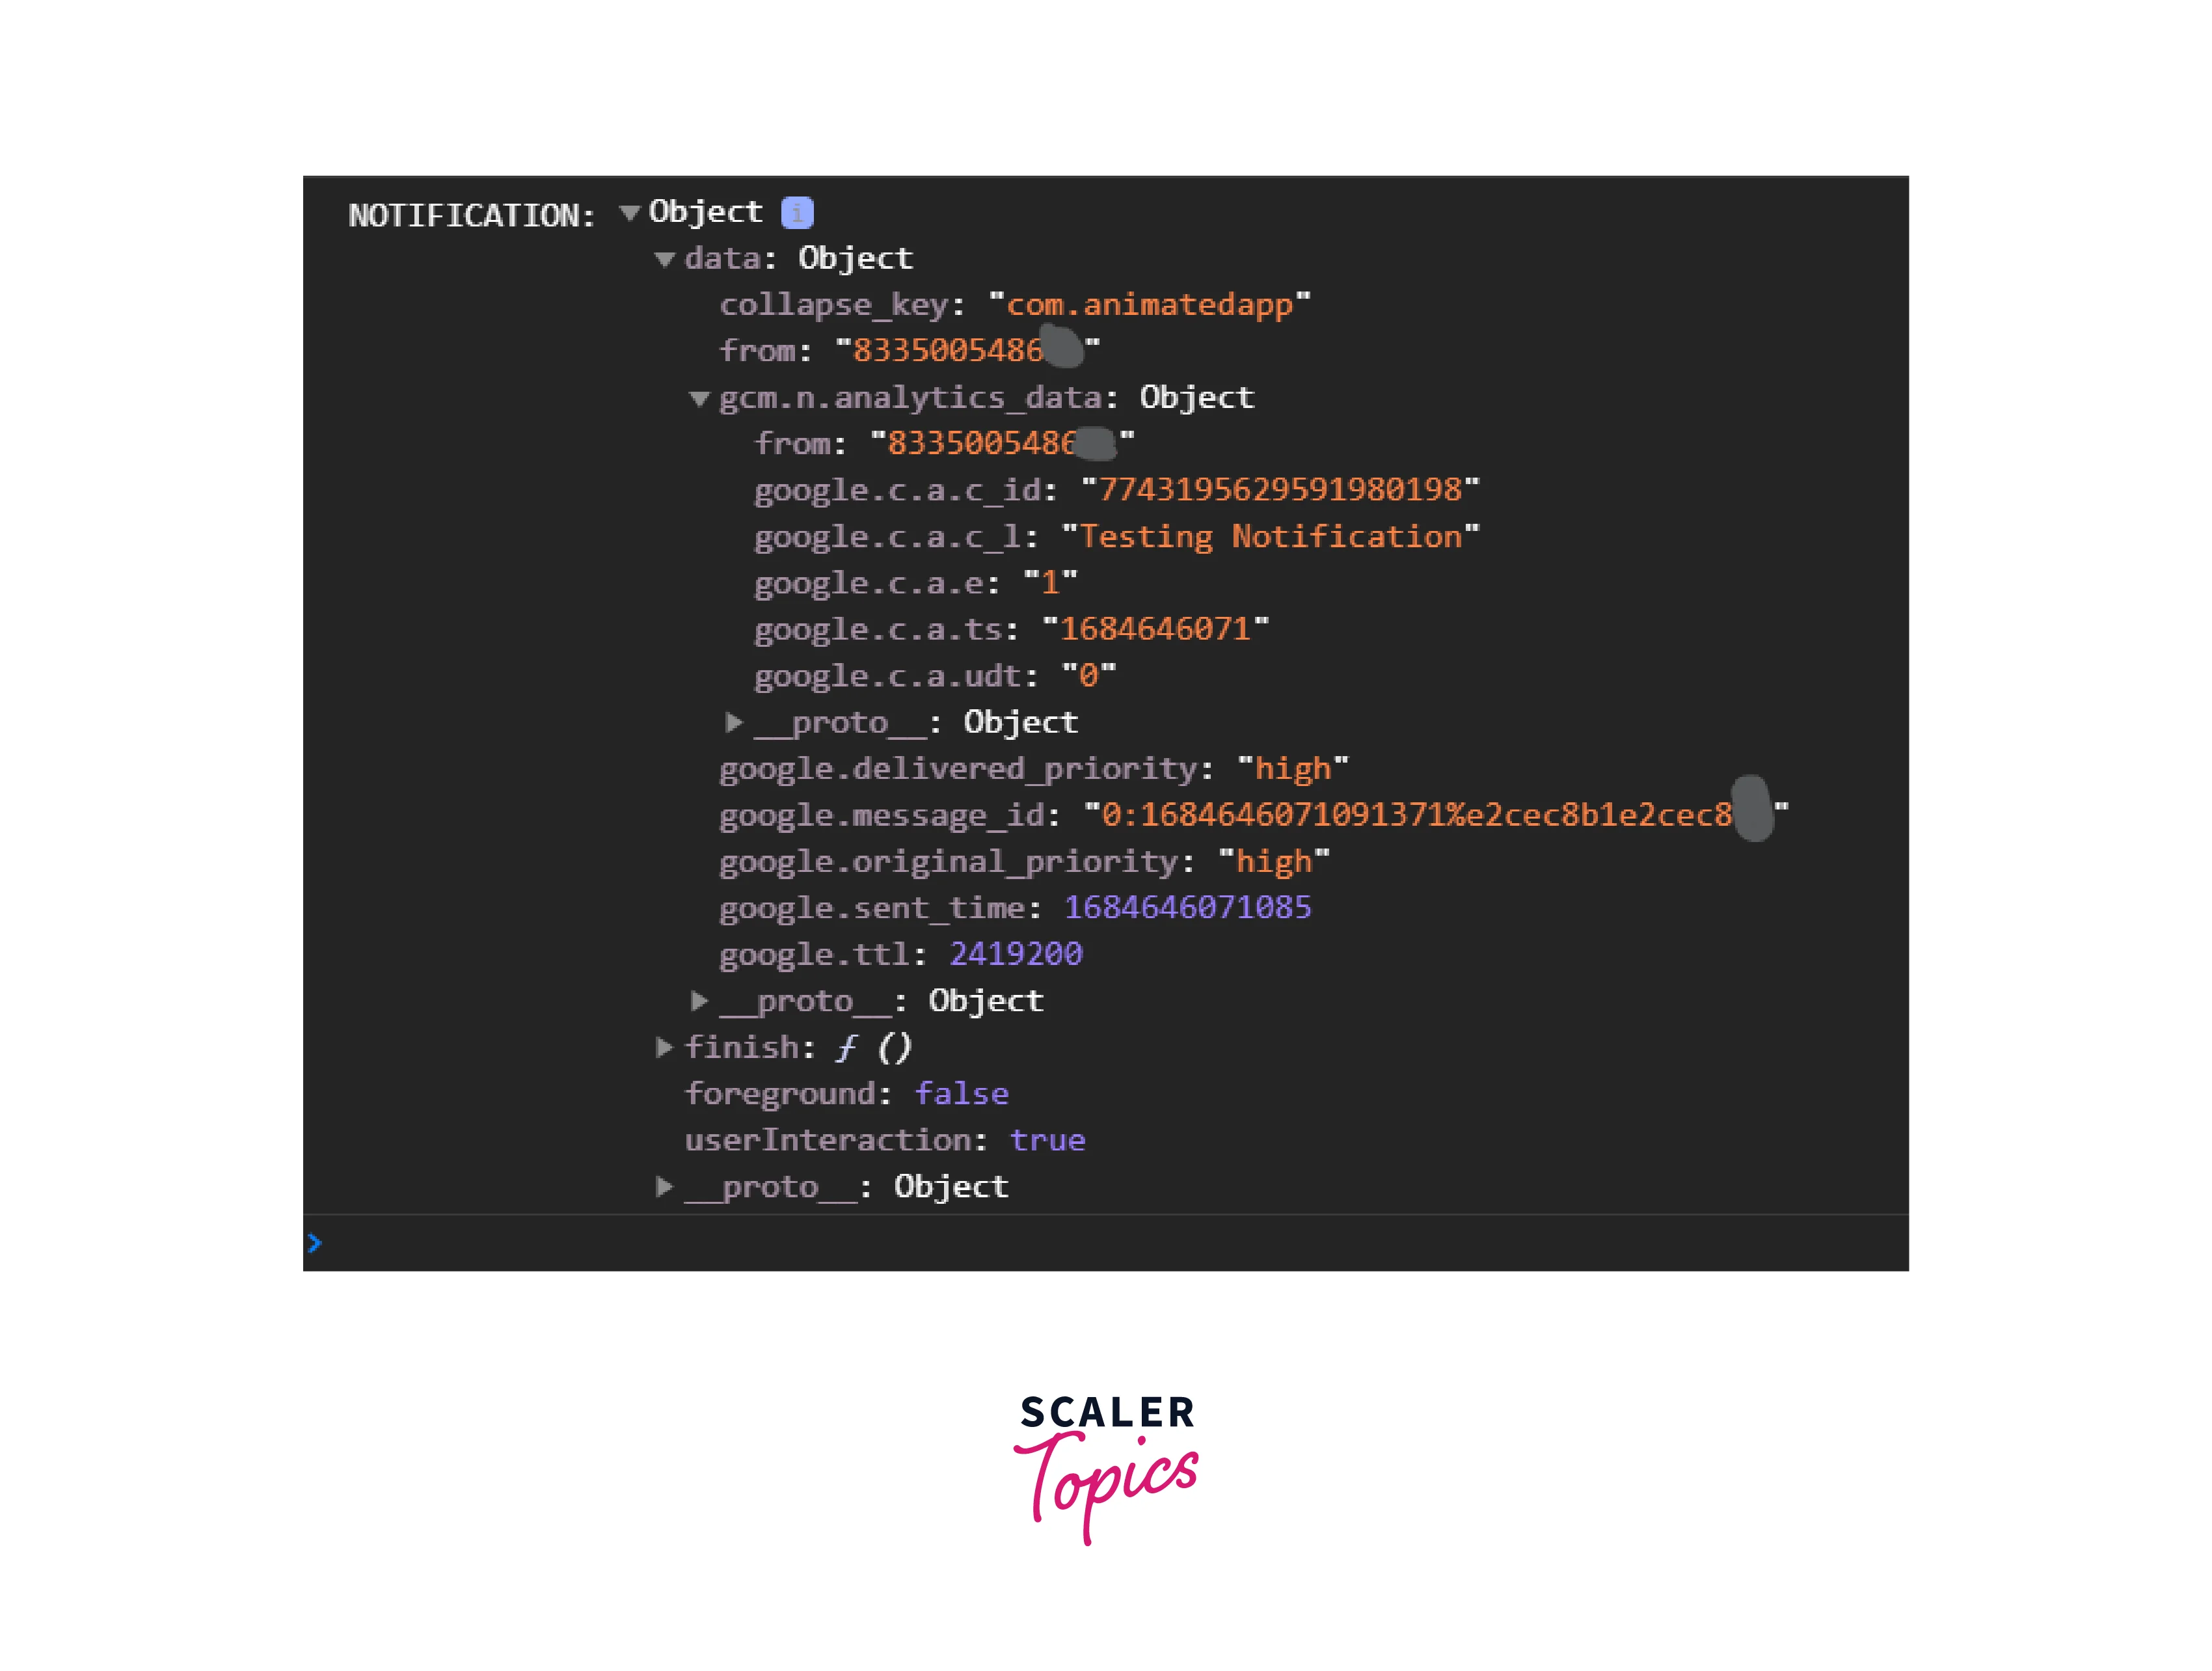
- Handle onAction Event: The onAction event handler is triggered when the user taps on a received notification, and the app is opened or brought to the foreground. In this event handler, you can perform specific actions based on the tapped notification. For example, you can navigate to a specific screen, fetch additional data related to the notification, or execute custom logic based on the notification payload.
- Customize Notification Handling: Depending on your app's requirements, you can customize how notifications are handled. You can modify the notification payload structure to include additional data or custom fields that you need to handle in your app. Implement specific logic to differentiate between various types of notifications and handle them differently based on their content.
React Native push notifications can be scheduled to be sent at specific times or triggered based on specific events or user behavior.
How to Send Notifications on Server
To send push notifications to devices from your server in a React Native app, you can follow these general steps:
-
Choose a Push Notification Service Provider: Select a push notification service provider that supports server-side integration. Common options include Firebase Cloud Messaging (FCM), OneSignal, or custom server-side implementations.
-
Set Up Server-Side Integration: Sign up for an account with your chosen push notification service provider. Follow the provider's documentation to set up server-side integration and obtain the necessary API keys, tokens, or credentials.
-
Install Server-Side Libraries: Install the appropriate server-side libraries or SDKs provided by your chosen push notification service provider. These libraries typically provide APIs or methods to send push notifications from your server to the target devices.
-
Set Up Authentication and Authorization: Configure authentication and authorization mechanisms to ensure secure communication between your server and the push notification service provider's API. Follow the provider's documentation to set up authentication methods, such as API keys or authentication tokens, to authenticate your requests.
-
Construct the Notification Payload: Prepare the notification payload with the necessary information such as title, message, and additional data to be included in the notification. The payload format may vary depending on the push notification service provider you are using. Refer to the provider's documentation for the required payload structure.
-
Implement Server-Side Notification Sending: Use the provided server-side libraries or SDKs to send push notifications to the target devices. Typically, you will need to call the appropriate method or API provided by the push notification service provider, passing in the notification payload and the target device tokens or identifiers.
-
Handle Server Response: Handle the response received from the push notification service provider's API after sending the notification. Check the response to determine if the notification was successfully delivered to the target devices or if any errors occurred during the process.
-
Testing and Error Handling: Test your server-side notification-sending functionality to ensure that notifications are being delivered correctly to the target devices. Implement error-handling mechanisms to handle scenarios where notifications cannot be sent, such as invalid tokens or connectivity issues.
How to Navigate in the App by Clicking the Notifications
To enable navigation within your React Native app by clicking on push notifications, you can follow these steps:
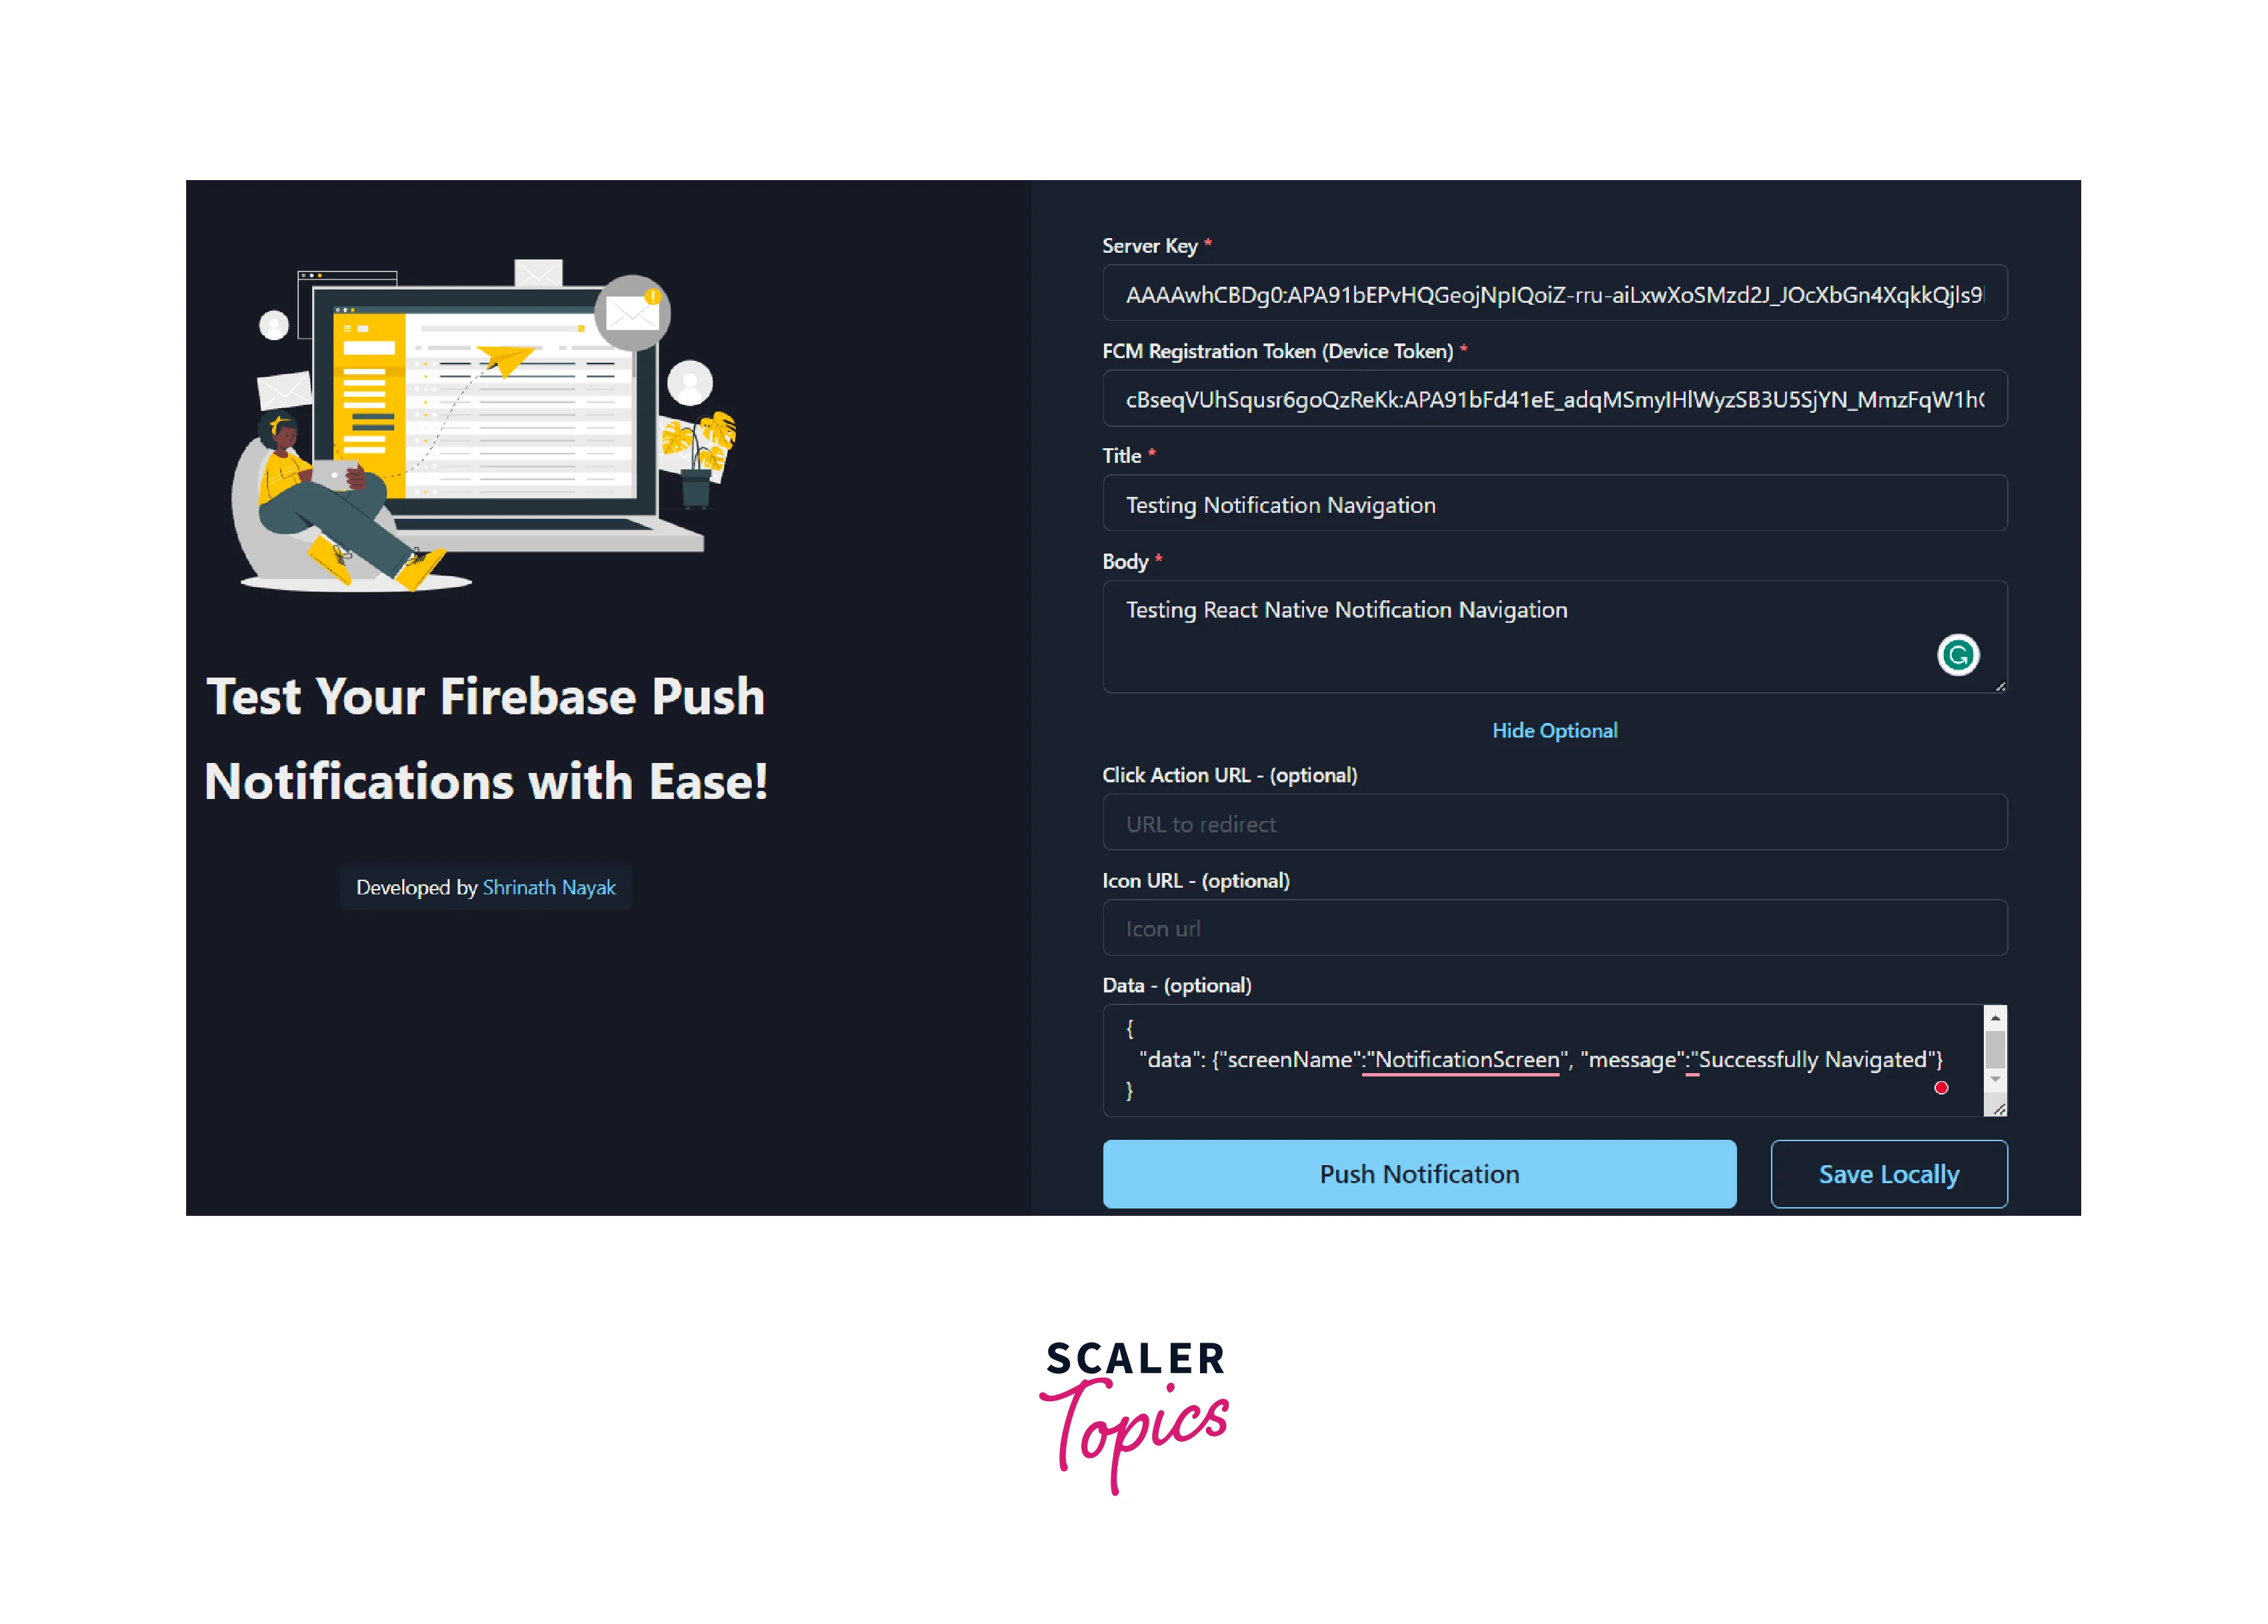
- Go to the testfcm.com website. Fill in the required fields like serverKey, fcmToken & the payload data (in JSON format) for the notification.
- To enable navigation functionality when an action is performed on the push notification, you can make the following modifications to your PushNotification configuration:

- Now, in your NotificationScreen component, you can access the data passed in the route:
With these changes, you can test the payload data in FCM notifications using the testfcm.com website, and upon clicking on an action within the notification, your app will navigate to the specified screen and access the notification data passed to it.
FAQs
Q. How can I handle notification actions, such as navigating to a specific screen, in React Native?
A. To handle push notifications in React Native, you can utilize the event handlers provided by your push notification library. When an action is performed on the notification (e.g., tapping on it), you can extract the necessary information from the notification payload and use a navigation library like React Navigation to navigate to the desired screen based on the extracted data.
Q. Are there any limitations or restrictions when sending notifications in React Native?
A. The limitations or restrictions when sending notifications in React Native depend on the push notification service provider you choose. Some common limitations include restrictions on the number of notifications that can be sent within a specific period, payload size limitations, and limitations on the type of content allowed in the notifications. It's important to review the documentation of your chosen service provider for specific details.
Q. Can I schedule or send personalized notifications to individual users in React Native?
A. Yes, most push notification service providers offer features to schedule or send personalized notifications to individual users in React Native. You can utilize features like targeting specific user segments, sending notifications at specified times, and customizing the notification payload with user-specific data. These features allow you to deliver tailored and timely notifications to your app users based on their preferences or behavior.
Conclusion
- Notifications play a crucial role in enhancing user engagement and keeping users informed about important updates in React Native apps.
- React Native provides various libraries and tools for implementing push notifications, such as react-native-push-notification and react-native-firebase.
- To send push notifications, you need to integrate with a push notification service provider like Firebase Cloud Messaging (FCM) or OneSignal.
- When receiving push notifications in react native, you can handle various actions such as opening specific screens, performing actions or displaying relevant content.
- Leveraging navigation libraries like React Navigation enables seamless navigation to different screens based on notification actions.
- With proper implementation and integration, React Native apps can effectively send and handle push notifications, improving user experience and engagement.
