Building Applications with the Model-View-Controller (MVC) Architecture in Rails
Overview
Building solid, maintainable applications is of utmost importance in the field of web development. Making use of the Model-View-Controller (MVC) architecture is one such preferred method. method for doing this. To improve code maintainability, scalability, and reuse, MVC offers a hierarchical framework for organising code and segregating roles and responsibilities. In this article, you will learn about the MVC architecture in Rails and how to create applications using it.

1. Model
The Model component represents the data and business logic of the application. It encapsulates the rules and operations related to data manipulation, storage, and retrieval. In other words, the Model is responsible for managing the application's data and its underlying behaviour.
In a Rails application, the Model is typically implemented using classes that interact with a database through an object-relational mapping (ORM) layer, such as ActiveRecord. The Model defines the structure of the data, establishes relationships between entities, and performs operations such as creating, reading, updating, and deleting records.
The Model is responsible for:
- Defining the data structure and attributes of entities.
- Establishing relationships between different entities.
- Validating data and enforcing business rules.
- Performing database operations and interacting with the ORM layer.
- Implementing methods and behaviors specific to the data entities.
NOTE: Active Record is an Object-Relational Mapping (ORM) framework provided by Ruby on Rails. It is a key component of Rails that simplifies database interactions by mapping database tables to Ruby objects and providing an intuitive API for performing database operations.
2. View
The View component is responsible for presenting the application's user interface to the end-users. It is concerned with how the data is rendered and displayed to the user, providing a visually appealing and interactive experience.
In Rails, Views are typically implemented as HTML templates combined with embedded Ruby (ERB) code. These templates define the structure, layout, and appearance of the user interface. Views interact with the data obtained from the Model to dynamically generate content and render it to the user.
The View is responsible for:
- Presenting data to the user in a readable and visually appealing format.
- Rendering HTML, CSS, and JavaScript to create the user interface.
- Incorporating dynamic content using embedded Ruby or other templating languages.
- Handling user interactions, such as form submissions or button clicks.
- Displaying error messages or success notifications to the user.
3. Controller
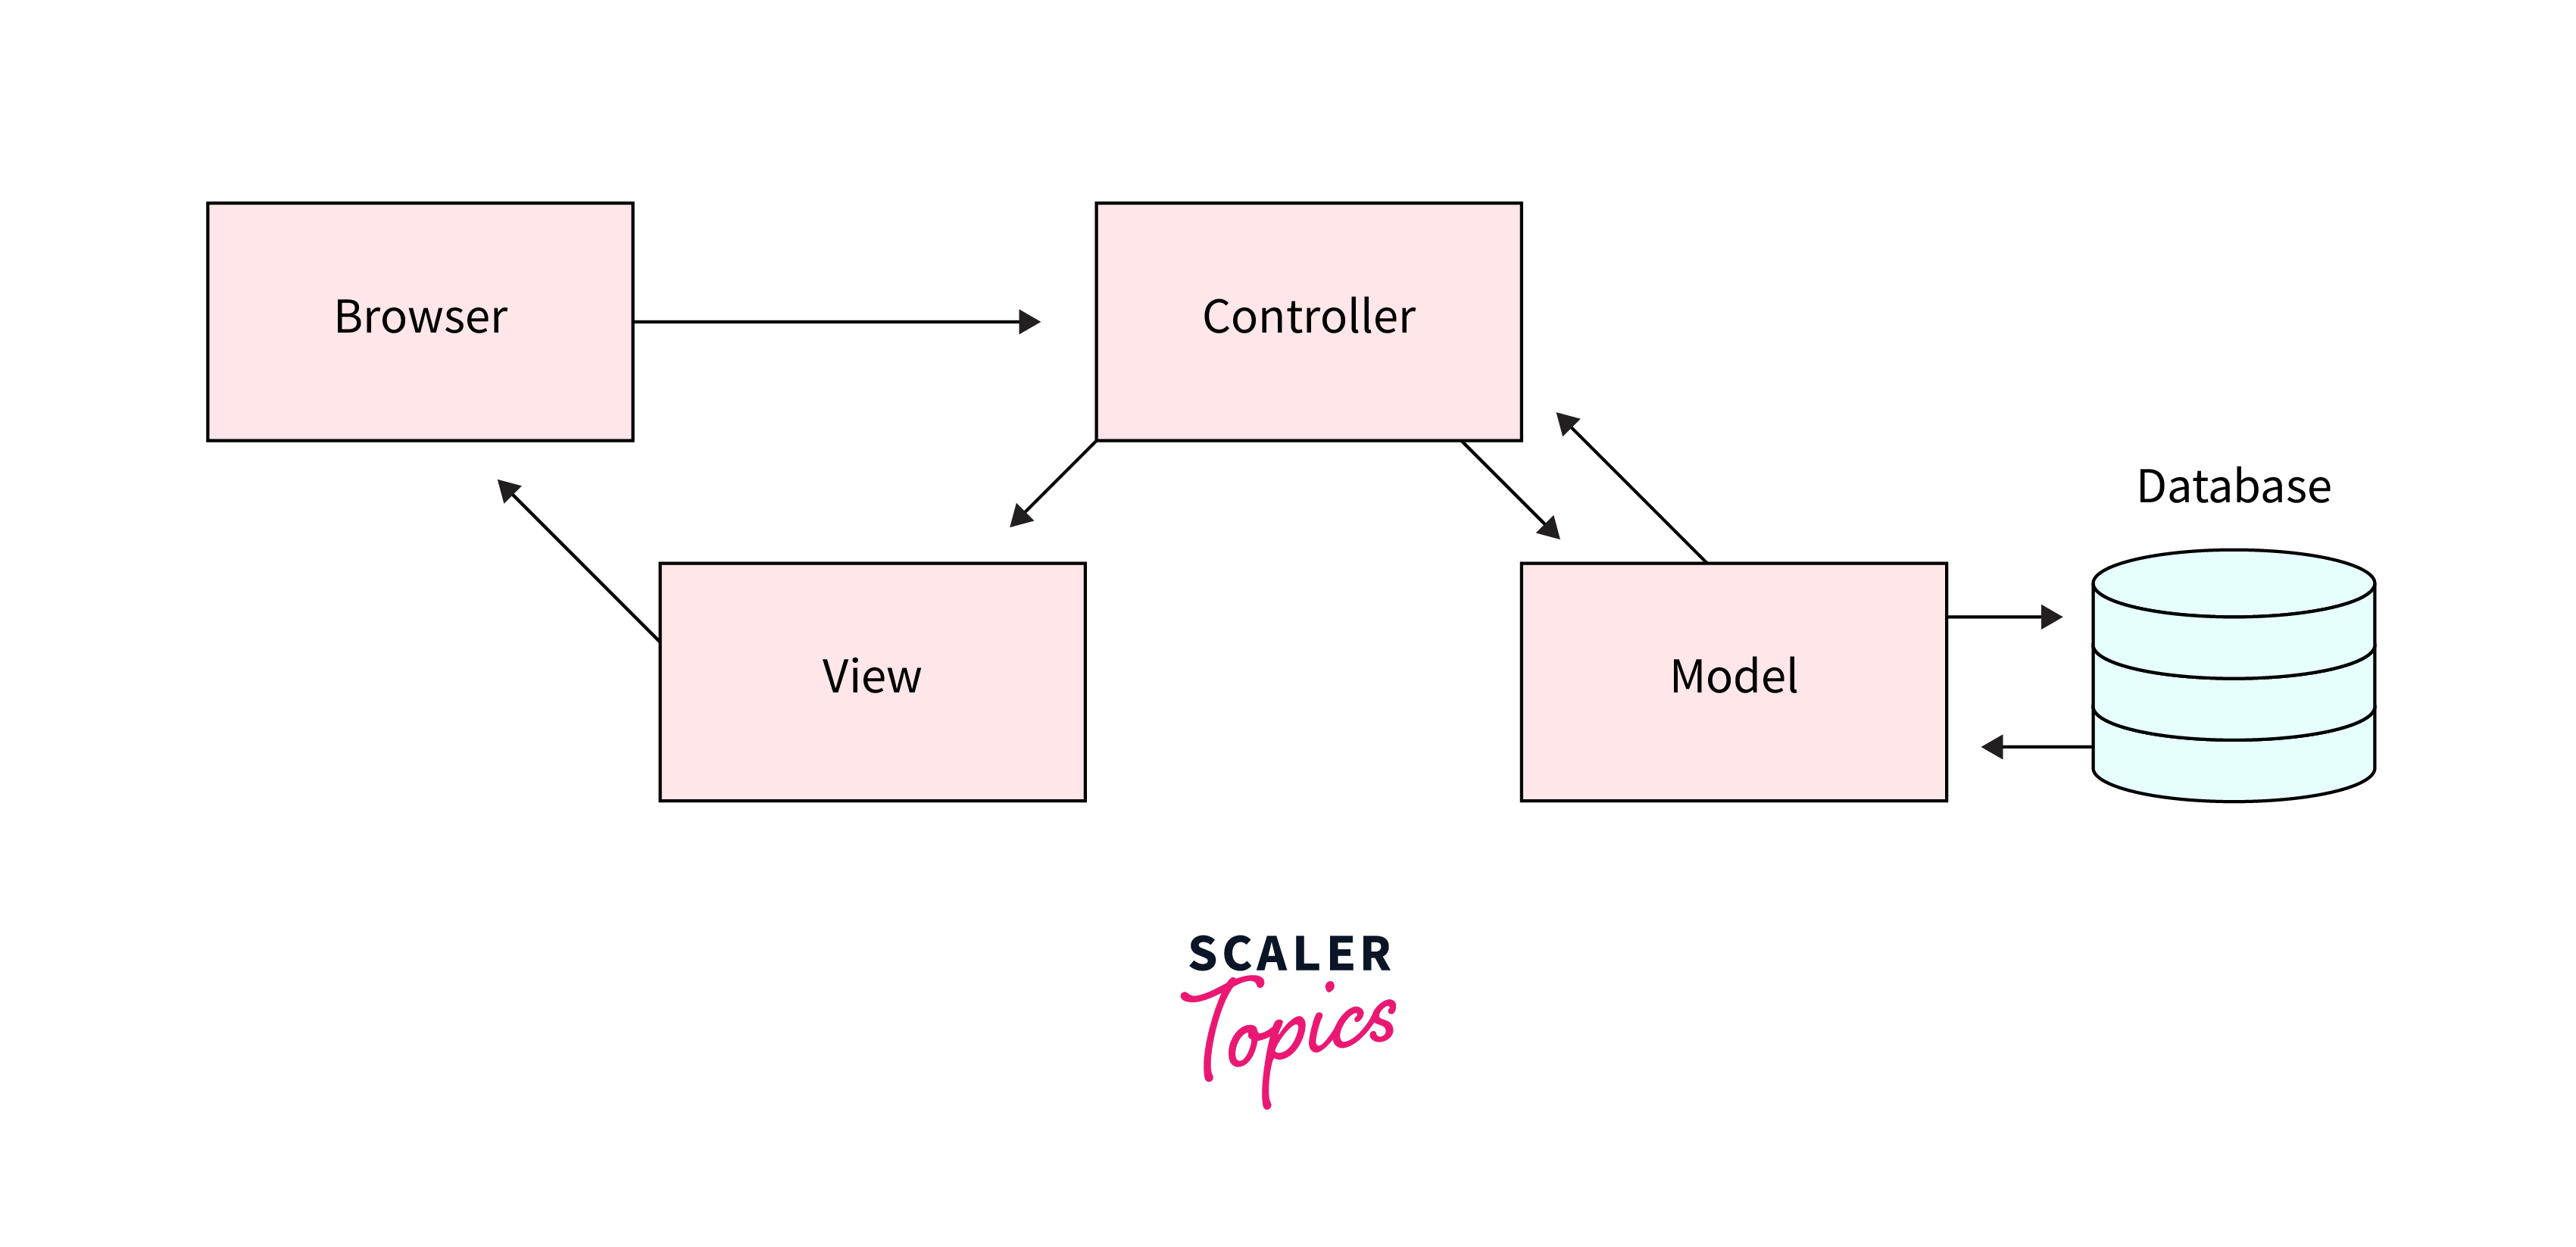
The Model and the View are connected through the Controller. It accepts user requests, analyses them, and chooses an appropriate response. The Controller is in charge of managing the logic and information flow between the Model and View components.
Controllers are implemented in Rails as Ruby classes. They respond to incoming requests, work with the Model to retrieve or modify data, and then transfer the data to the relevant View for display.
The Controller is responsible for:
- Receiving and interpreting user requests.
- Coordinating the flow of data and logic between the Model and View.
- Interacting with the Model to retrieve, update, or delete data.
- Applying business logic or data transformations before passing it to the View.
- Selecting the appropriate View to render based on the user request.
- Handling errors, redirects, and other response-related actions.
The primary purpose of the Model, View, and Controller components in the MVC architecture is to separate concerns and promote code organization, maintainability, and reusability. By dividing an application into these distinct components, developers can more easily manage complex applications, enhance collaboration, and make future modifications or additions with greater ease.

Creating Models
When building Rails applications, creating Models is the first step towards implementing the MVC architecture. Models represent the data structure of your application and define the business rules and relationships between different entities.
To create a Model in Rails, you can use the built-in generate command. For example, let's say you want to create a Model for managing blog posts. You can run the following command in the terminal:
This command generates a new Model file called post.rb under the app/models directory. The title and body attributes define the structure of the blog post. Once the Model is generated, you can define validations, associations, and custom methods within the Model to enhance its functionality.
Creating Controllers
Controllers act as the glue between Models and Views. They handle requests, interact with the Model to fetch or manipulate data, and pass the processed data to the appropriate View for rendering.
To create a Controller in Rails, you can again use the generate command. For instance, to generate a Controller for managing blog posts, you can run the following command:
This command generates a new Controller file called posts_controller.rb under the app/controllers directory. Inside the Controller, you define actions corresponding to different user interactions. For example, the index action retrieves all blog posts from the Model and passes them to the associated View for rendering.
In the above example, the index action retrieves all the blog posts using the Post.all method and assigns them to an instance variable (@posts). This variable can then be accessed in the associated View to display the retrieved data.
Creating Views
After setting up the Controllers, the next step is to create Views that will render the Model data and controller actions to the users. Views define the structure and layout of the user interface and present the data in a visually appealing manner.
In Rails, Views are typically created as HTML templates with embedded Ruby code. These templates have a .html.erb extension and reside in the app/views directory. To create a View for displaying blog posts, you can create a file called index.html.erb:
In the above example, you iterate over each blog post (@posts) and display its title, body, and formatted creation date using embedded Ruby tags (<%= %>). This allows you to dynamically render the content based on the data retrieved from the Model.

Example of Creating a Simple Rails Application Using MVC Architecture (Detailed)
In this section, you will walk through an example of creating a simple Rails application using the Model-View-Controller (MVC) architecture. We'll explore the step-by-step process of setting up the Model, View, and Controller components and demonstrate how they interact to build a functional web application.
Step 1: Creating the Rails Application
To begin, let's create a new Rails application. Open your terminal and run the following command:
This command creates a new Rails application with the necessary directory structure and initial files.
Once the application is created, navigate to its directory:
Step 2: Creating the Model
Run the following command to generate a Model:
This command creates a Model file called post.rb under the app/models directory. It defines the structure of the blog post, including attributes like title and body. Additionally, the command generates a migration file that sets up the corresponding database table.
Here's an example of how the post.rb file might look like:
In the above example, you define a Post Model with validations for the title and body attributes. You also establish associations with other Models, such as User and Comment. Additionally, you define a custom method formatted_date to format the creation date of the post.
Next, apply the migration to create the table in the database:
The Model is now set up, and you can interact with the "posts" table using the ActiveRecord ORM.
Step 3: Creating the Controller
Let's generate a Controller for managing blog posts:
This command creates a Controller file called posts_controller.rb under the app/controllers directory. Inside the Controller, you can define actions corresponding to different user interactions. For example, let's create an index action to display all blog posts:
In the above example, the index action retrieves all blog posts from the Model using Post.all and assigns them to an instance variable @posts. The instance variable is accessible in the associated View.
Step 4: Creating the View
Let's create a View to display the blog posts retrieved in the Controller's index action.
Create a file called index.html.erb in the app/views/posts directory:
In the above example, you iterate over each blog post using @posts.each and display its title and body using embedded Ruby tags. The content is dynamically generated based on the data retrieved from the Model.
Access the Application: Open your web browser and go to http://localhost:3000. You should see all posts listed in your Rails application.
Conclusion
- MVC architecture in Rails provides a structured approach to application development by separating the concerns of data management, user interface rendering, and user interaction handling.
- The Model component in Rails represents the data and business logic of the application, allowing for data manipulation and storage.
- Views in Rails handle the presentation of the user interface, rendering HTML templates, and incorporating dynamic content.
- Controllers act as the intermediaries between Models and Views, coordinating the flow of data and logic, handling user requests, and passing processed data to the appropriate Views.
- By adhering to the MVC architecture, developers can achieve better code organization, reusability, and maintainability, making it easier to collaborate and modify applications over time.
- Rails' ActiveRecord ORM simplifies database interactions by mapping database tables to Ruby objects and providing an intuitive API for CRUD operations.
