Websockets in Ruby on Rails
Overview
In today's digital age, users expect real-time updates and interactive experiences on web applications. Traditional HTTP request-response architecture falls short in meeting these expectations, leading to the rise of technologies like WebSockets and frameworks like Rails Action Cable. In this article, we will explore the world of Rails Action Cable, an integral part of Ruby on Rails, and discover how it empowers developers to build robust and efficient real-time web applications.
Intro to WebSockets
To understand WebSockets better, let's consider a simple analogy. Imagine you're having a phone conversation with a friend. In a traditional HTTP scenario, it would be like taking turns speaking and listening – you speak, then your friend listens, and vice versa. But with WebSockets, it's like having an open phone line where both you and your friend can speak and listen simultaneously, enabling a fluid and dynamic conversation.
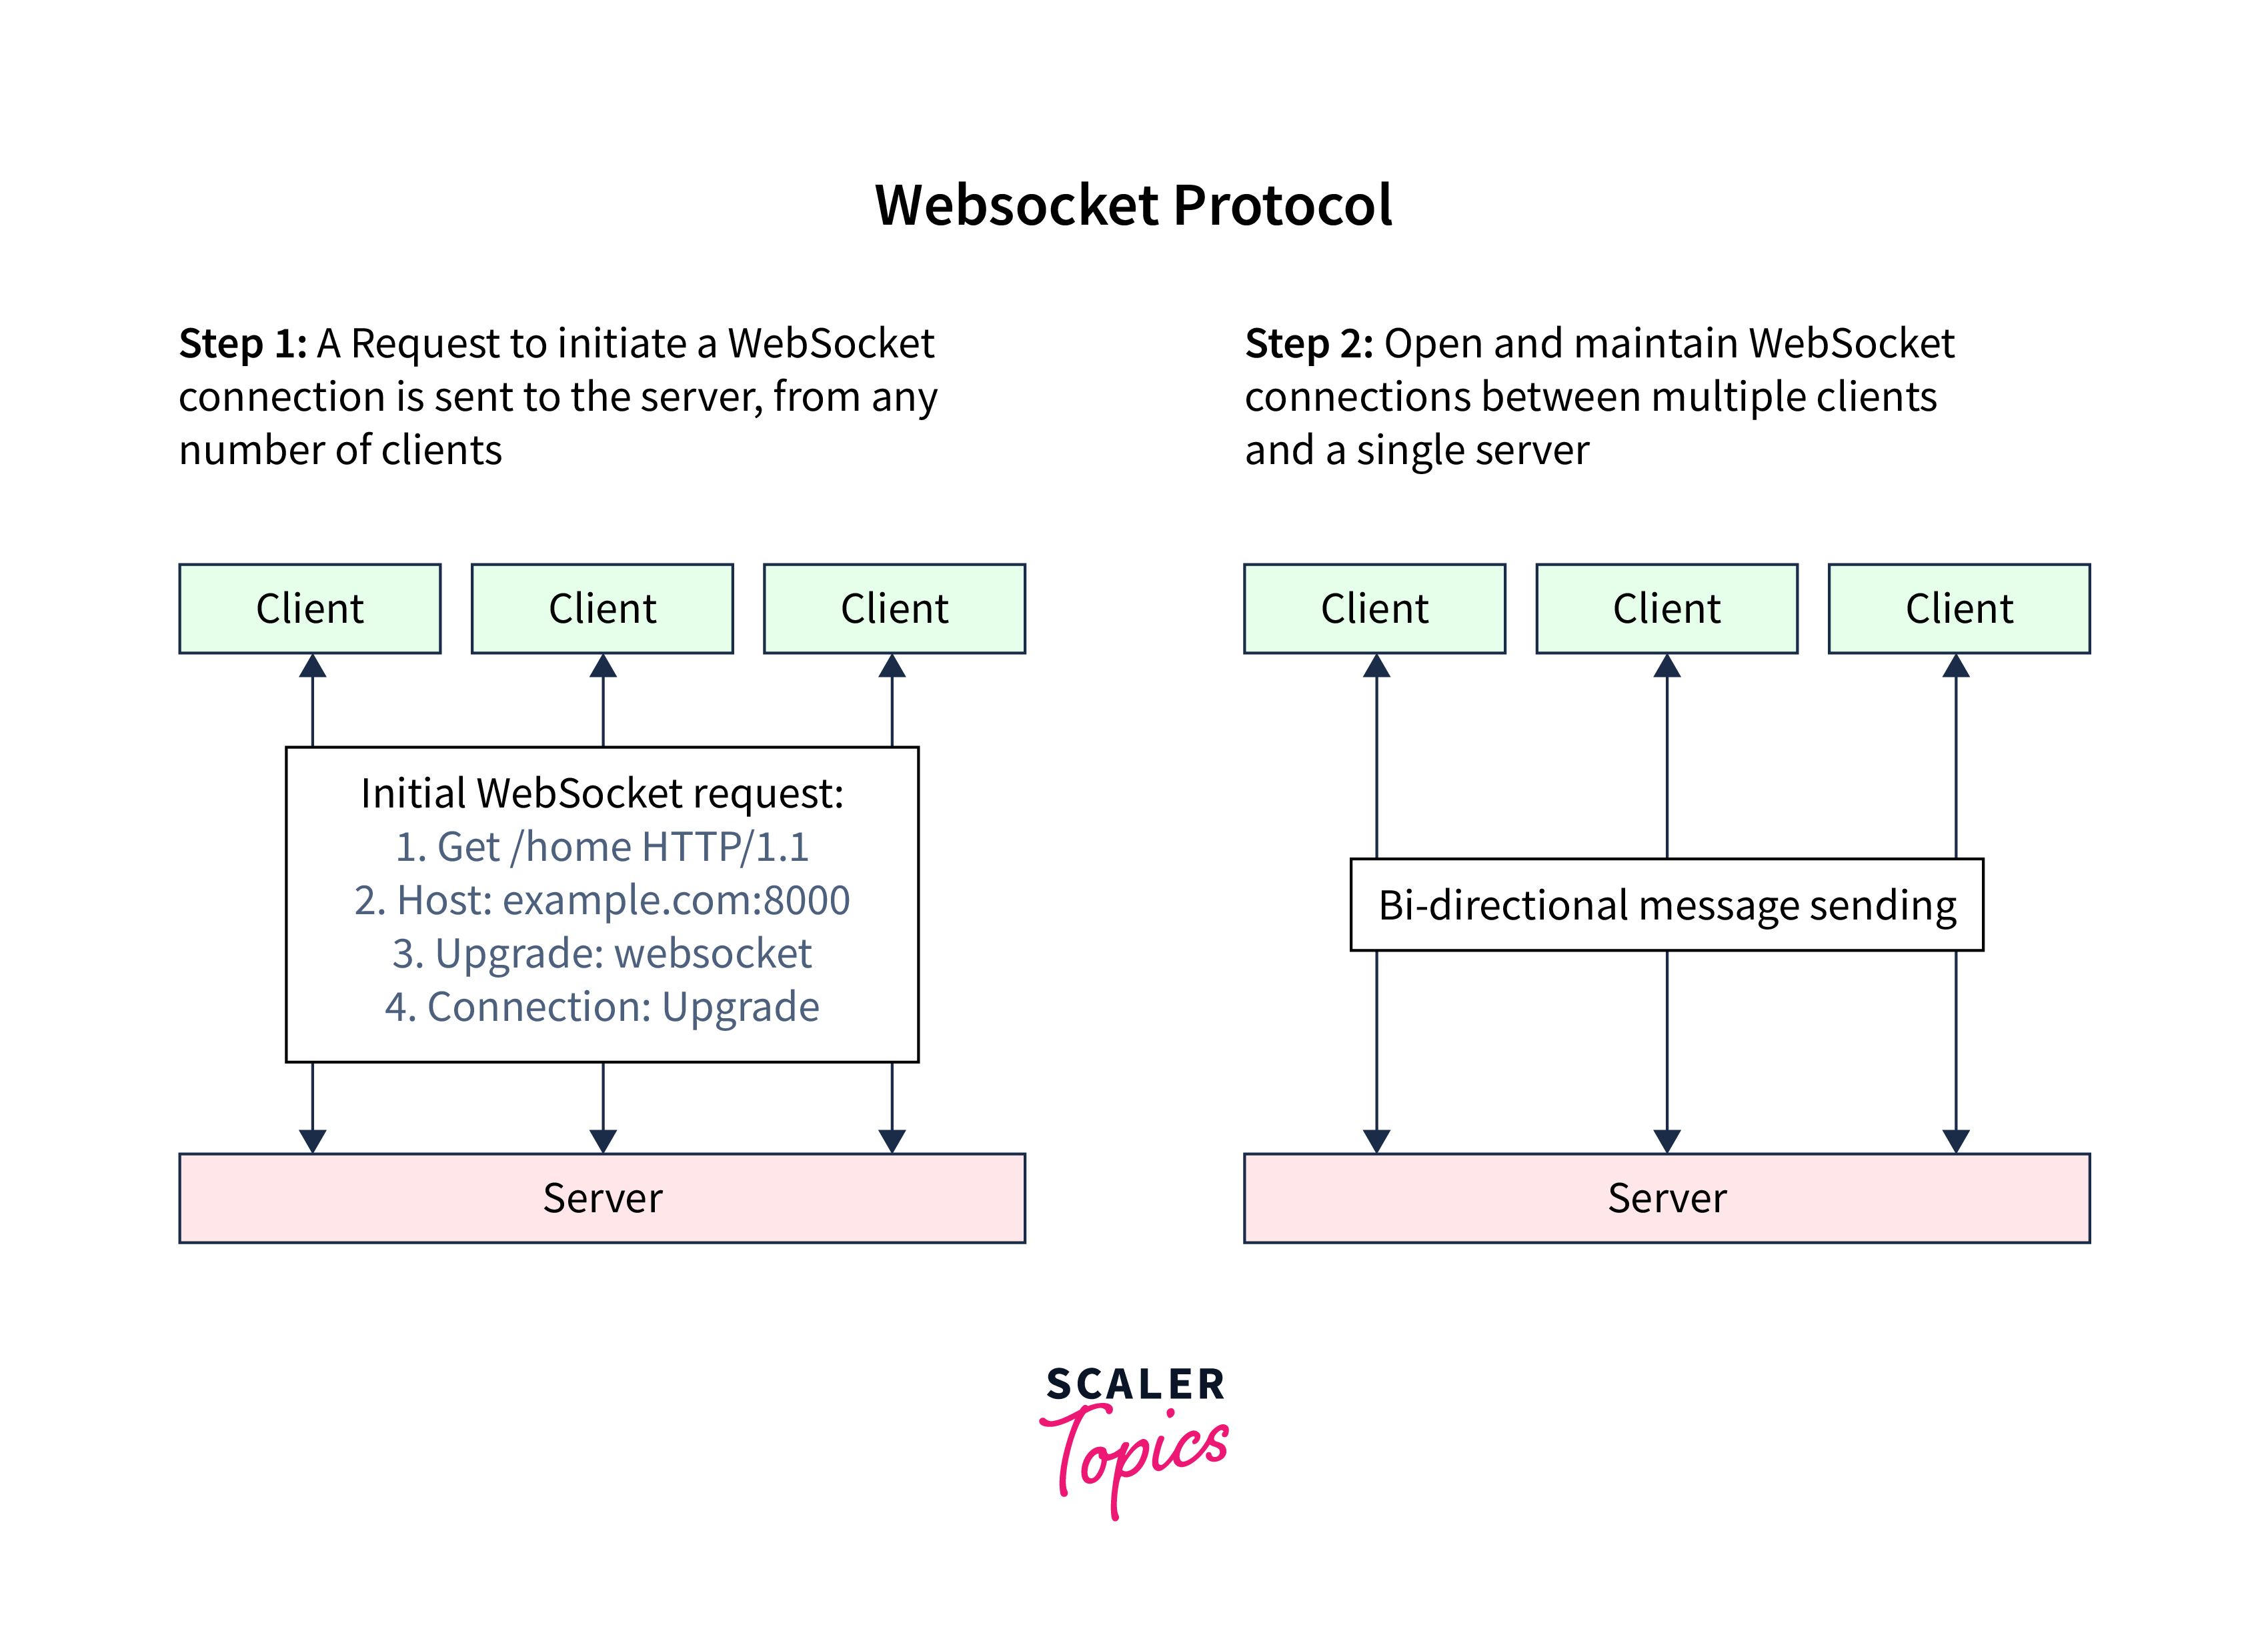
WebSockets achieve this real-time capability by using a different communication protocol than HTTP. While HTTP follows a request-response model where the client initiates a request and the server responds, WebSockets establish a persistent connection between the client and the server. This connection remains open as long as both parties want it to, allowing continuous communication.

In the WebSocket protocol, communication is established through a handshake process between the client and the server. Here's a step-by-step explanation of how communication is established in the WebSocket protocol:
- Opening a WebSocket Connection:
- The client initiates the WebSocket connection by sending an HTTP request to the server.
- The request includes a special header called "Upgrade" with the value "websocket", indicating the intention to upgrade the protocol.
- Server Response:
- Upon receiving the client's request, the server validates the request and checks if it supports WebSocket protocol.
- If the server supports WebSocket, it sends an HTTP response with a status code of 101 "Switching Protocols".
- The response includes a "Upgrade" header with the value "websocket" to confirm the protocol upgrade.
- Establishing the WebSocket Connection:
- Once the client receives the server's response, it confirms the upgrade by checking the response headers.
- If the response is valid and the "Upgrade" header value is "websocket", the client considers the connection upgraded.
- The client and server can now start communicating using the WebSocket protocol.
- Full-Duplex Communication:
- With the WebSocket connection established, both the client and server can send messages to each other at any time.
- Messages can be in either text or binary format.
- WebSocket provides a reliable, low-latency, full-duplex communication channel, enabling real-time data transfer.
- Closing the WebSocket Connection:
- Either the client or the server can initiate the closure of the WebSocket connection.
- To close the connection, a special WebSocket frame called "Close Frame" is sent.
- Upon receiving the "Close Frame", both the client and server can perform necessary cleanup tasks before terminating the connection.
Intro to ActionCable
Now that we have a basic understanding of WebSockets, let's explore Rails Action Cable and how it fits into the Ruby on Rails framework. Rails Action Cable is an official framework introduced in Rails 5 that seamlessly integrates WebSockets into your Ruby on Rails applications. It simplifies the process of building real-time features by providing a unified API and a set of conventions, that make it easy to implement bidirectional communication between clients and servers.
With Rails Action Cable, you don't have to worry about the complexities of low-level WebSocket programming. Instead, you can focus on building the real-time functionality your application needs.
Terminologies
To fully understand Rails Action Cable, it's crucial to familiarize yourself with some key terminologies:
Connections:
Connections represent individual WebSocket connections established between the client and the server. Each client that connects to your Rails application via WebSocket is represented by a connection object. You can track and manage these connections to facilitate real-time communication.
Subscribers:
Subscribers define logical units of communication within your application. They encapsulate specific functionality and handle incoming messages. A subscriber can be associated with one or more channels.
Channels:
Channels act as intermediaries between the server and the clients. They represent unique communication streams (pipelines) and encapsulate related functionality. Each channel corresponds to a specific subscriber and handles incoming and outgoing messages.
Pub/Sub (Publish/Subscribe):
Pub/Sub is a messaging pattern used in Action Cable to facilitate broadcasting messages to multiple subscribers. When a message is published to a channel, all subscribers connected to that channel receive the message.
Broadcasting:
Broadcasting is the process of sending messages from the server to subscribed clients. Rails Action Cable provides a simple and intuitive API to broadcast messages to specific channels or to all connected clients.
Redis:
In Rails Action Cable, Redis server acts as a message broker and facilitates communication between the server and connected clients. Redis helps in scaling the application and ensures that messages are reliably delivered to the appropriate subscribers, facilitating seamless and responsive real-time functionality in Rails applications.

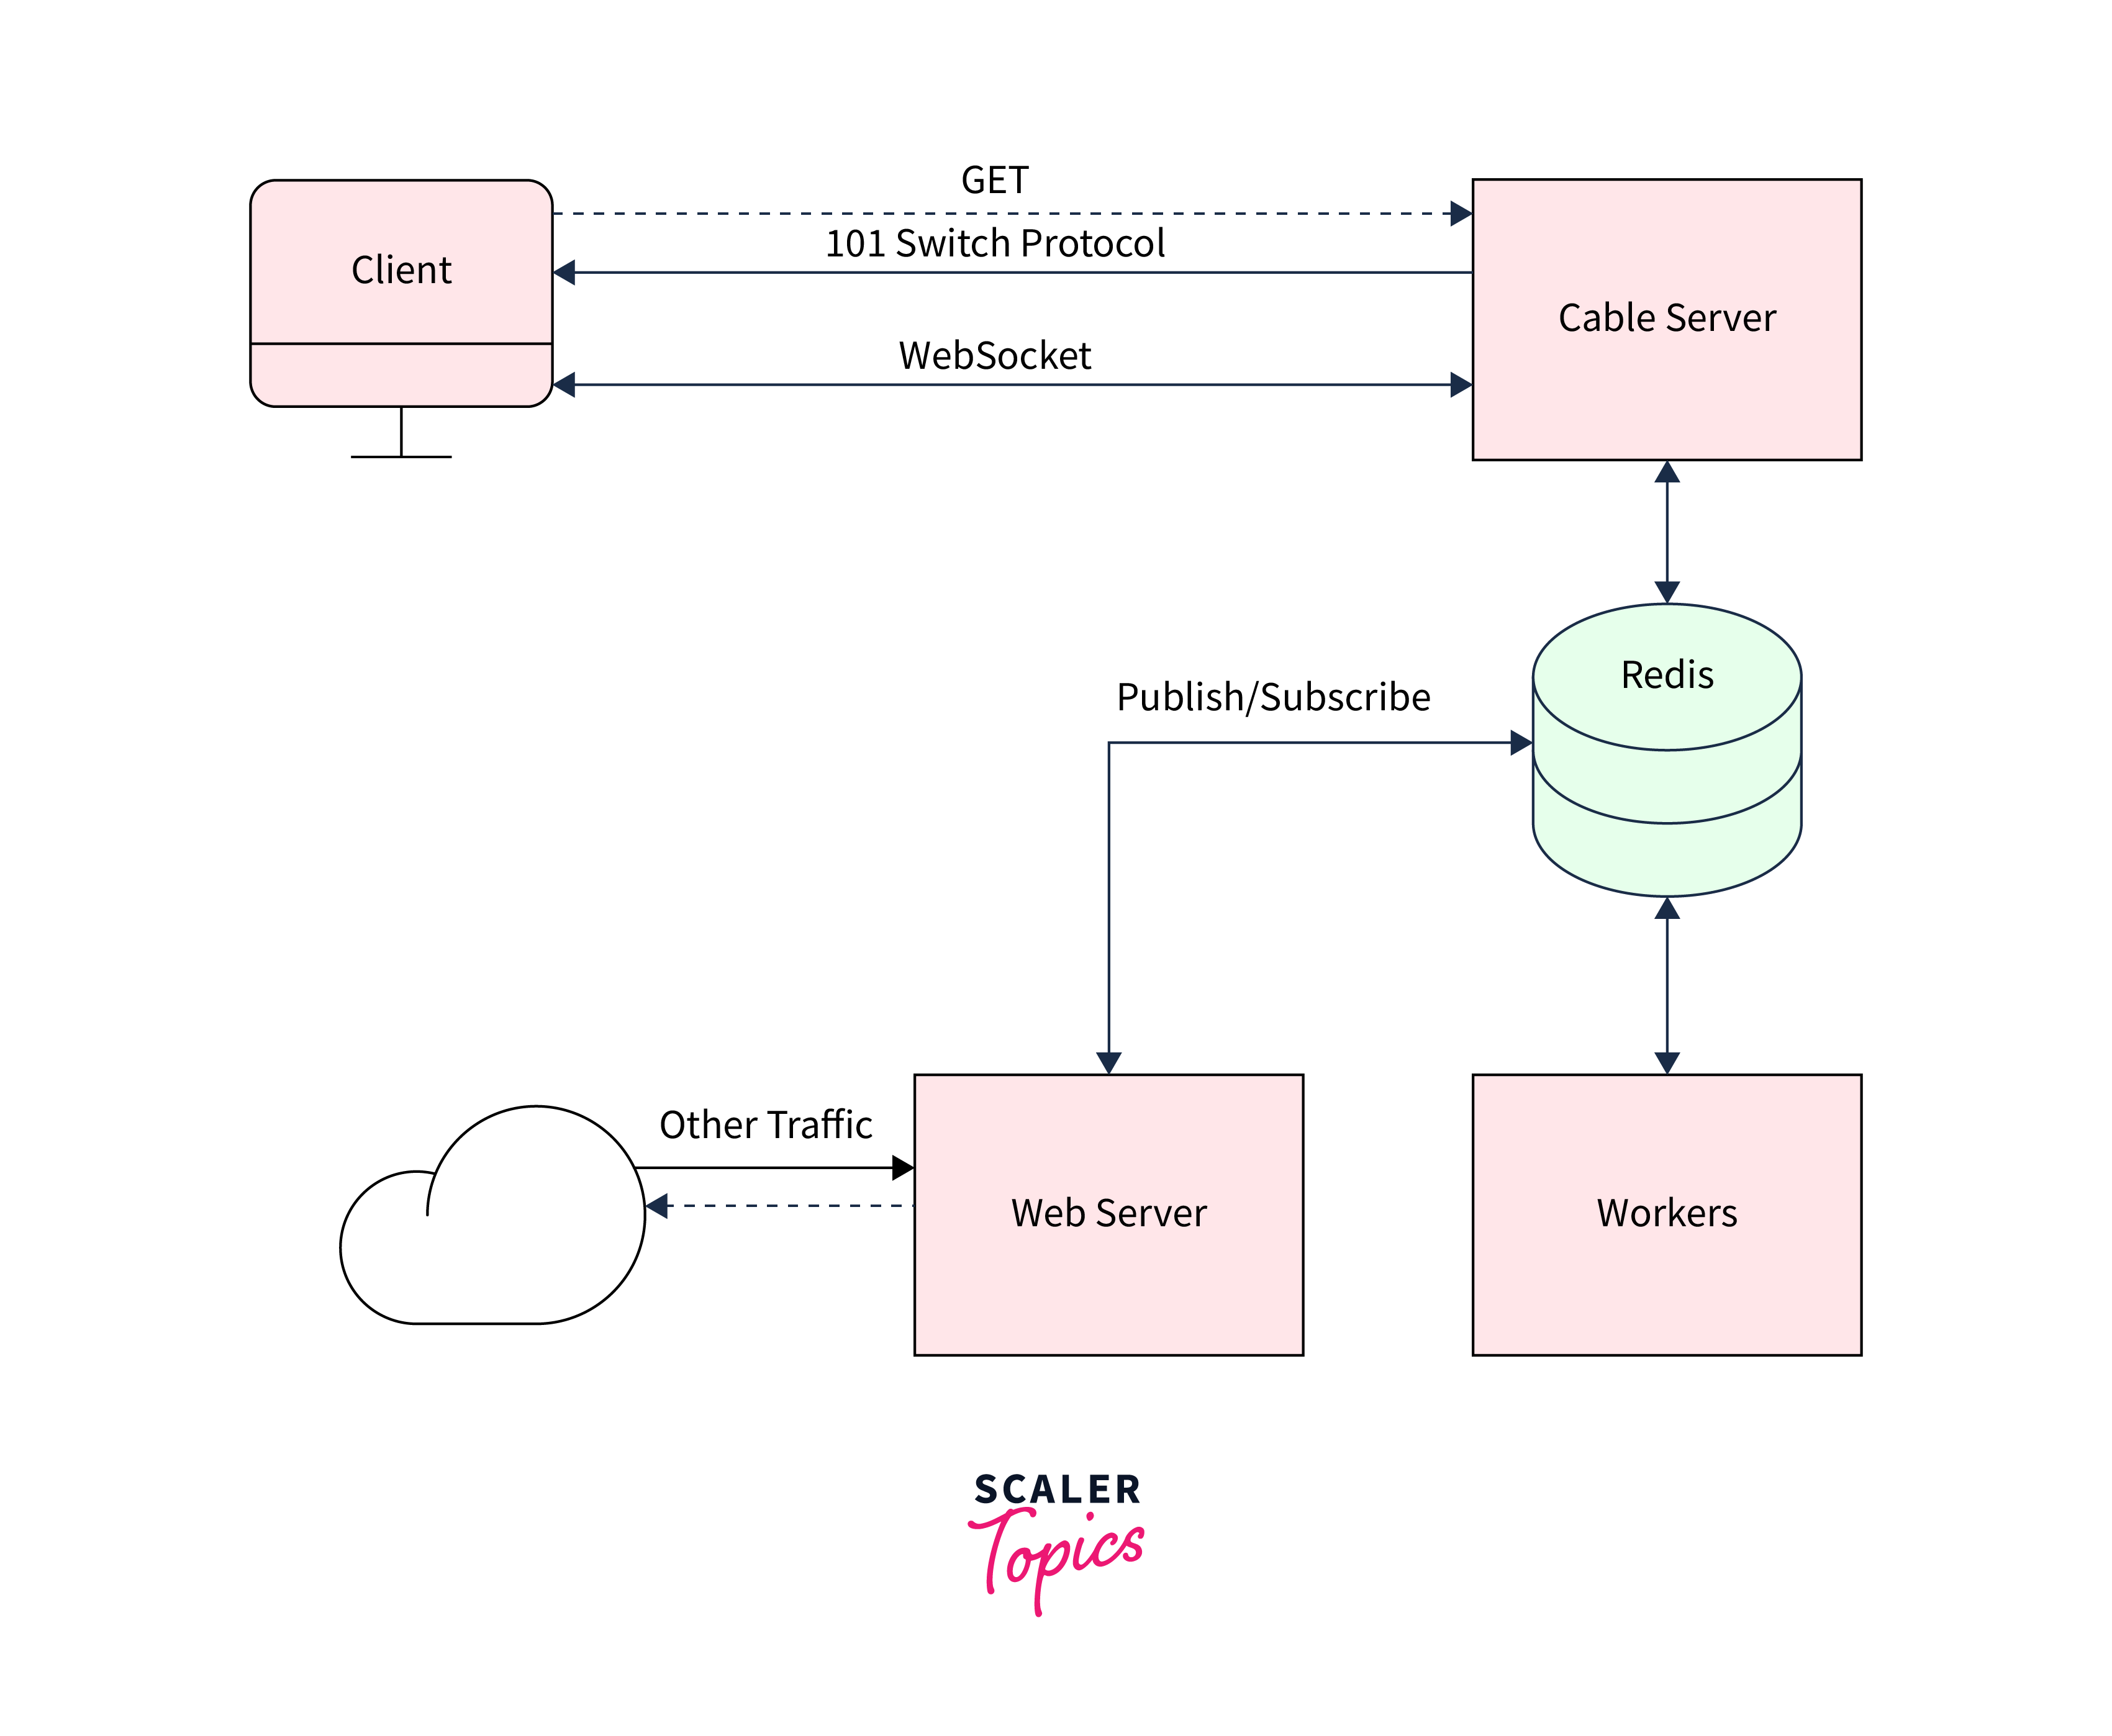
Let's explore how communication is established in Rails Action Cable:
- Client Connection:
- When a client (e.g., a web browser) accesses a Rails application that incorporates Action Cable, it establishes a WebSocket connection with the server.
- This connection is initiated through the Action Cable JavaScript library on the client-side.
- Subscription and Channel Creation:
- Once the WebSocket connection is established, the client subscribes to a specific channel or channels defined in the Action Cable server-side code.
- Each channel represents a distinct communication stream within the application.
- Action Cable Server:
- The Action Cable server component in Rails handles WebSocket connections, channel subscriptions, and message broadcasting.
- When a client subscribes to a channel, the server receives the subscription request and verifies it.
- Redis Message Broker:
- Redis acts as a message broker between the server and the connected clients in Rails Action Cable.
- When the web server receives a message for a specific channel, it publishes the message to the corresponding Redis channel.
- Message Broadcasting:
- Once a message is published to a Redis channel, Redis delivers the message to all subscribed clients connected to that channel.
- The message is then received by the Action Cable server, which forwards it to the WebSocket connection associated with the specific client.
- Client Update:
- On the client-side, when a message is received from the server via the WebSocket connection, the Action Cable JavaScript library triggers the appropriate callbacks or event handlers to show the message.
- Two-Way Communication:
- Clients can also send messages to the server via the WebSocket connection, which are then processed by the Action Cable server.
- The server can perform any required operations based on the received client message, such as updating the application's state, broadcasting messages to other clients, or invoking specific actions.
Implementing Real-Time Communication in Rails
Lets implement real-time communication in a Rails application using Action Cable. We'll cover both the server-side and client-side implementations.
Server-Side Implementation
Step 1: Generate a Channel
This command generates a channel called "Chat" and creates the necessary files for implementing real-time communication.
Step 2: Configure Routes
Open the config/routes.rb file and add the following line to mount the Action Cable server:
Step 3: Define Channel Behavior
Open the app/channels/chat_channel.rb file and modify the ChatChannel class:
In the subscribed method, we use stream_from to specify that we want to stream messages from the "chat" channel. This means that any messages sent to this channel will be received by all subscribed clients.
The receive method is called whenever the server receives a message from a client. Here, we simply broadcast the received data to all subscribed clients using ActionCable.server.broadcast.
Step 4: Redis Setup:
Action Cable uses Redis as a pub/sub backend by default.
- Add Redis Gem to Gemfile Open your Rails application's Gemfile and add the Redis gem:
Save the Gemfile and run bundle install in your terminal to install the Redis gem.
- Configure Redis Connection Open the config/cable.yml file and locate the development and test sections. Uncomment and modify the url line to specify the Redis connection for both environments:
Here, we've set the Redis URL to redis://localhost:6379/1, which assumes Redis is running on the default localhost address and port with database index 1. Modify these values if your Redis configuration differs.
- Start Redis Server Start the Redis server by running the following command in your terminal:
Make sure the Redis server is running and listening on the specified host and port. Action Cable will automatically use the Redis server for pub/sub functionality.
Client-Side Implementation:
Step 1: Include Action Cable JavaScript Library
Open your app/javascript/packs/application.js file and add the following line to include the Action Cable JavaScript library:
Step 2: Create a Subscription
Create a JavaScript file, let's name it chat.js, in the same directory and add the following code:
In this code, we import the consumer object from ./consumer, which is provided by Action Cable.
The consumer.subscriptions.create method establishes a connection to the "ChatChannel" on the server-side. Inside the subscription, we define various callback functions:
- connected:
Called when the WebSocket connection is established. - disconnected:
Called when the subscription is terminated by the server. - received:
Called whenever a message is received from the server. Here, we create a new <div> element to display the received message. - send:
A custom function that sends messages to the server by performing the "receive" action on the server-side.
We also add an event listener to the chatInput element to detect when the Enter key is pressed. When the Enter key is pressed, we retrieve the message from the input field and use the send function to send it to the server.
Testing the Real-Time Chat:
Step 1: Start the Rails Server
In your terminal, navigate to your Rails application directory and start the server:
Step 2: Create the Chat View
Create a new view file, such as app/views/chats/index.html.erb, and add the following code:
This code creates a basic chat interface with a container for displaying messages and an input field for typing messages.
Step 3: Test the Real-Time Chat
Open your web browser and visit the chat page at http://localhost:3000/chats.
The chat interface should be visible now. Open another browser window or a different device and access the same chat page. Any messages entered in one window should now appear in real-time in the other window.
Thats it! You have successfully implemented real-time communication using Rails Action Cable.
Conclusion
- WebSockets enable bidirectional, real-time communication between clients and servers, surpassing the limitations of traditional HTTP.
- Rails Action Cable seamlessly integrates WebSockets into Rails applications, simplifying the process of handling WebSocket connections, managing channels, and broadcasting updates.
- Understanding the terminologies such as connections, subscribers, channels, pub/sub, and broadcasting is essential to leverage the full potential of Action Cable.
- Implementing real-time communication in Rails involves setting up the server-side by generating channels, updating routes, and broadcasting messages, as well as setting up the client-side by creating subscriptions and handling received messages.
- With Rails Action Cable, you can create a wide range of real-time features such as chat applications, notifications systems, and collaborative tools.
- The provided code examples demonstrate a simple chat application using Rails Action Cable, showcasing the seamless integration of real-time functionality into a Rails application.
- With its simplicity and scalability, Rails Action Cable empowers developers to build engaging and interactive web applications that meet the growing demand for real-time experiences.
