Rest Controller Class
Overview
The article dives into the fundamental concepts and implementation of Spring Rest Controllers, a pivotal component within the Spring Framework for building robust and scalable RESTful web services. A Spring Rest Controller is a specialized class annotated with @RestController that seamlessly combines the @Controller and @ResponseBody annotations, streamlining the process of handling HTTP requests and producing RESTful responses.
The article explains the creation of Rest Controllers, using practical examples to illustrate the syntax and structure. It also emphasizes the importance of adhering to RESTful principles and outlines how these controllers facilitate the development of web applications that communicate efficiently over the HTTP protocol.
Target Audience
Whether you're a seasoned Spring developer or a newcomer to RESTful services, this article offers a concise yet comprehensive overview, equipping readers with the knowledge needed to harness the power of Spring Rest Controllers in their projects.
Prerequisites
- Before diving into Spring Rest Controllers, ensure that you have a foundational understanding of the Spring Framework and Java programming language.
- Familiarity with basic web development concepts, including HTTP protocols and RESTful principles, is advantageous.
- Additionally, make certain you have the necessary tools set up for Spring development, such as a compatible Integrated Development Environment (IDE) like IntelliJ IDEA or Eclipse.
- Ensure that you have a functional Java Development Kit (JDK) installed on your system, and consider using a build tool like Apache Maven or Gradle for managing dependencies.
- Finally, having a grasp of Spring MVC (Model-View-Controller) architecture is beneficial, as it forms the backbone for building web applications with Spring, of which the Rest Controller is a crucial component.
With these prerequisites in place, you'll be well-prepared to explore and implement Spring Rest Controllers effectively.
What is a Spring Rest Controller?
In the domain of Spring Framework, a Rest Controller serves as a specialized type of controller designed specifically for handling RESTful web service requests. To understand its significance, it's essential to grasp the roles of a typical controller and how the Rest Controller refines and extends these functionalities.
Controller
In a Spring application, a controller is responsible for processing user requests, interacting with the application's business logic, and determining the appropriate view to render as a response. Controllers are typically annotated with @Controller to signify their role in request handling.
RestController
Spring introduces the @RestController annotation, which goes a step further by amalgamating the @Controller and @ResponseBody annotations. While a traditional controller might return a view, a Rest Controller, annotated with @RestController, inherently assumes that the return values from its methods are serialized directly into the response body. This streamlining is particularly advantageous when developing RESTful services where data, often in JSON or XML format, is exchanged between the client and server.
Implementation
To leverage Spring Rest Controllers effectively, a step-by-step implementation is key. Follow the guide below to create a basic Spring application with Rest Controllers, covering the creation of a base class, a REST service class, implementing GET and POST methods, and launching the application.
Creating Base Class
Start by creating a base class for your Spring application. This class will serve as the entry point, containing the main method to launch the application. Annotate this class with @SpringBootApplication to enable auto-configuration and component scanning.
Creating REST Service Class
Now, create a Rest Controller class to handle RESTful service requests. Annotate the class with @RestController to signify its role as a Rest Controller. This class will house methods to handle various HTTP requests.
Creating GET Method
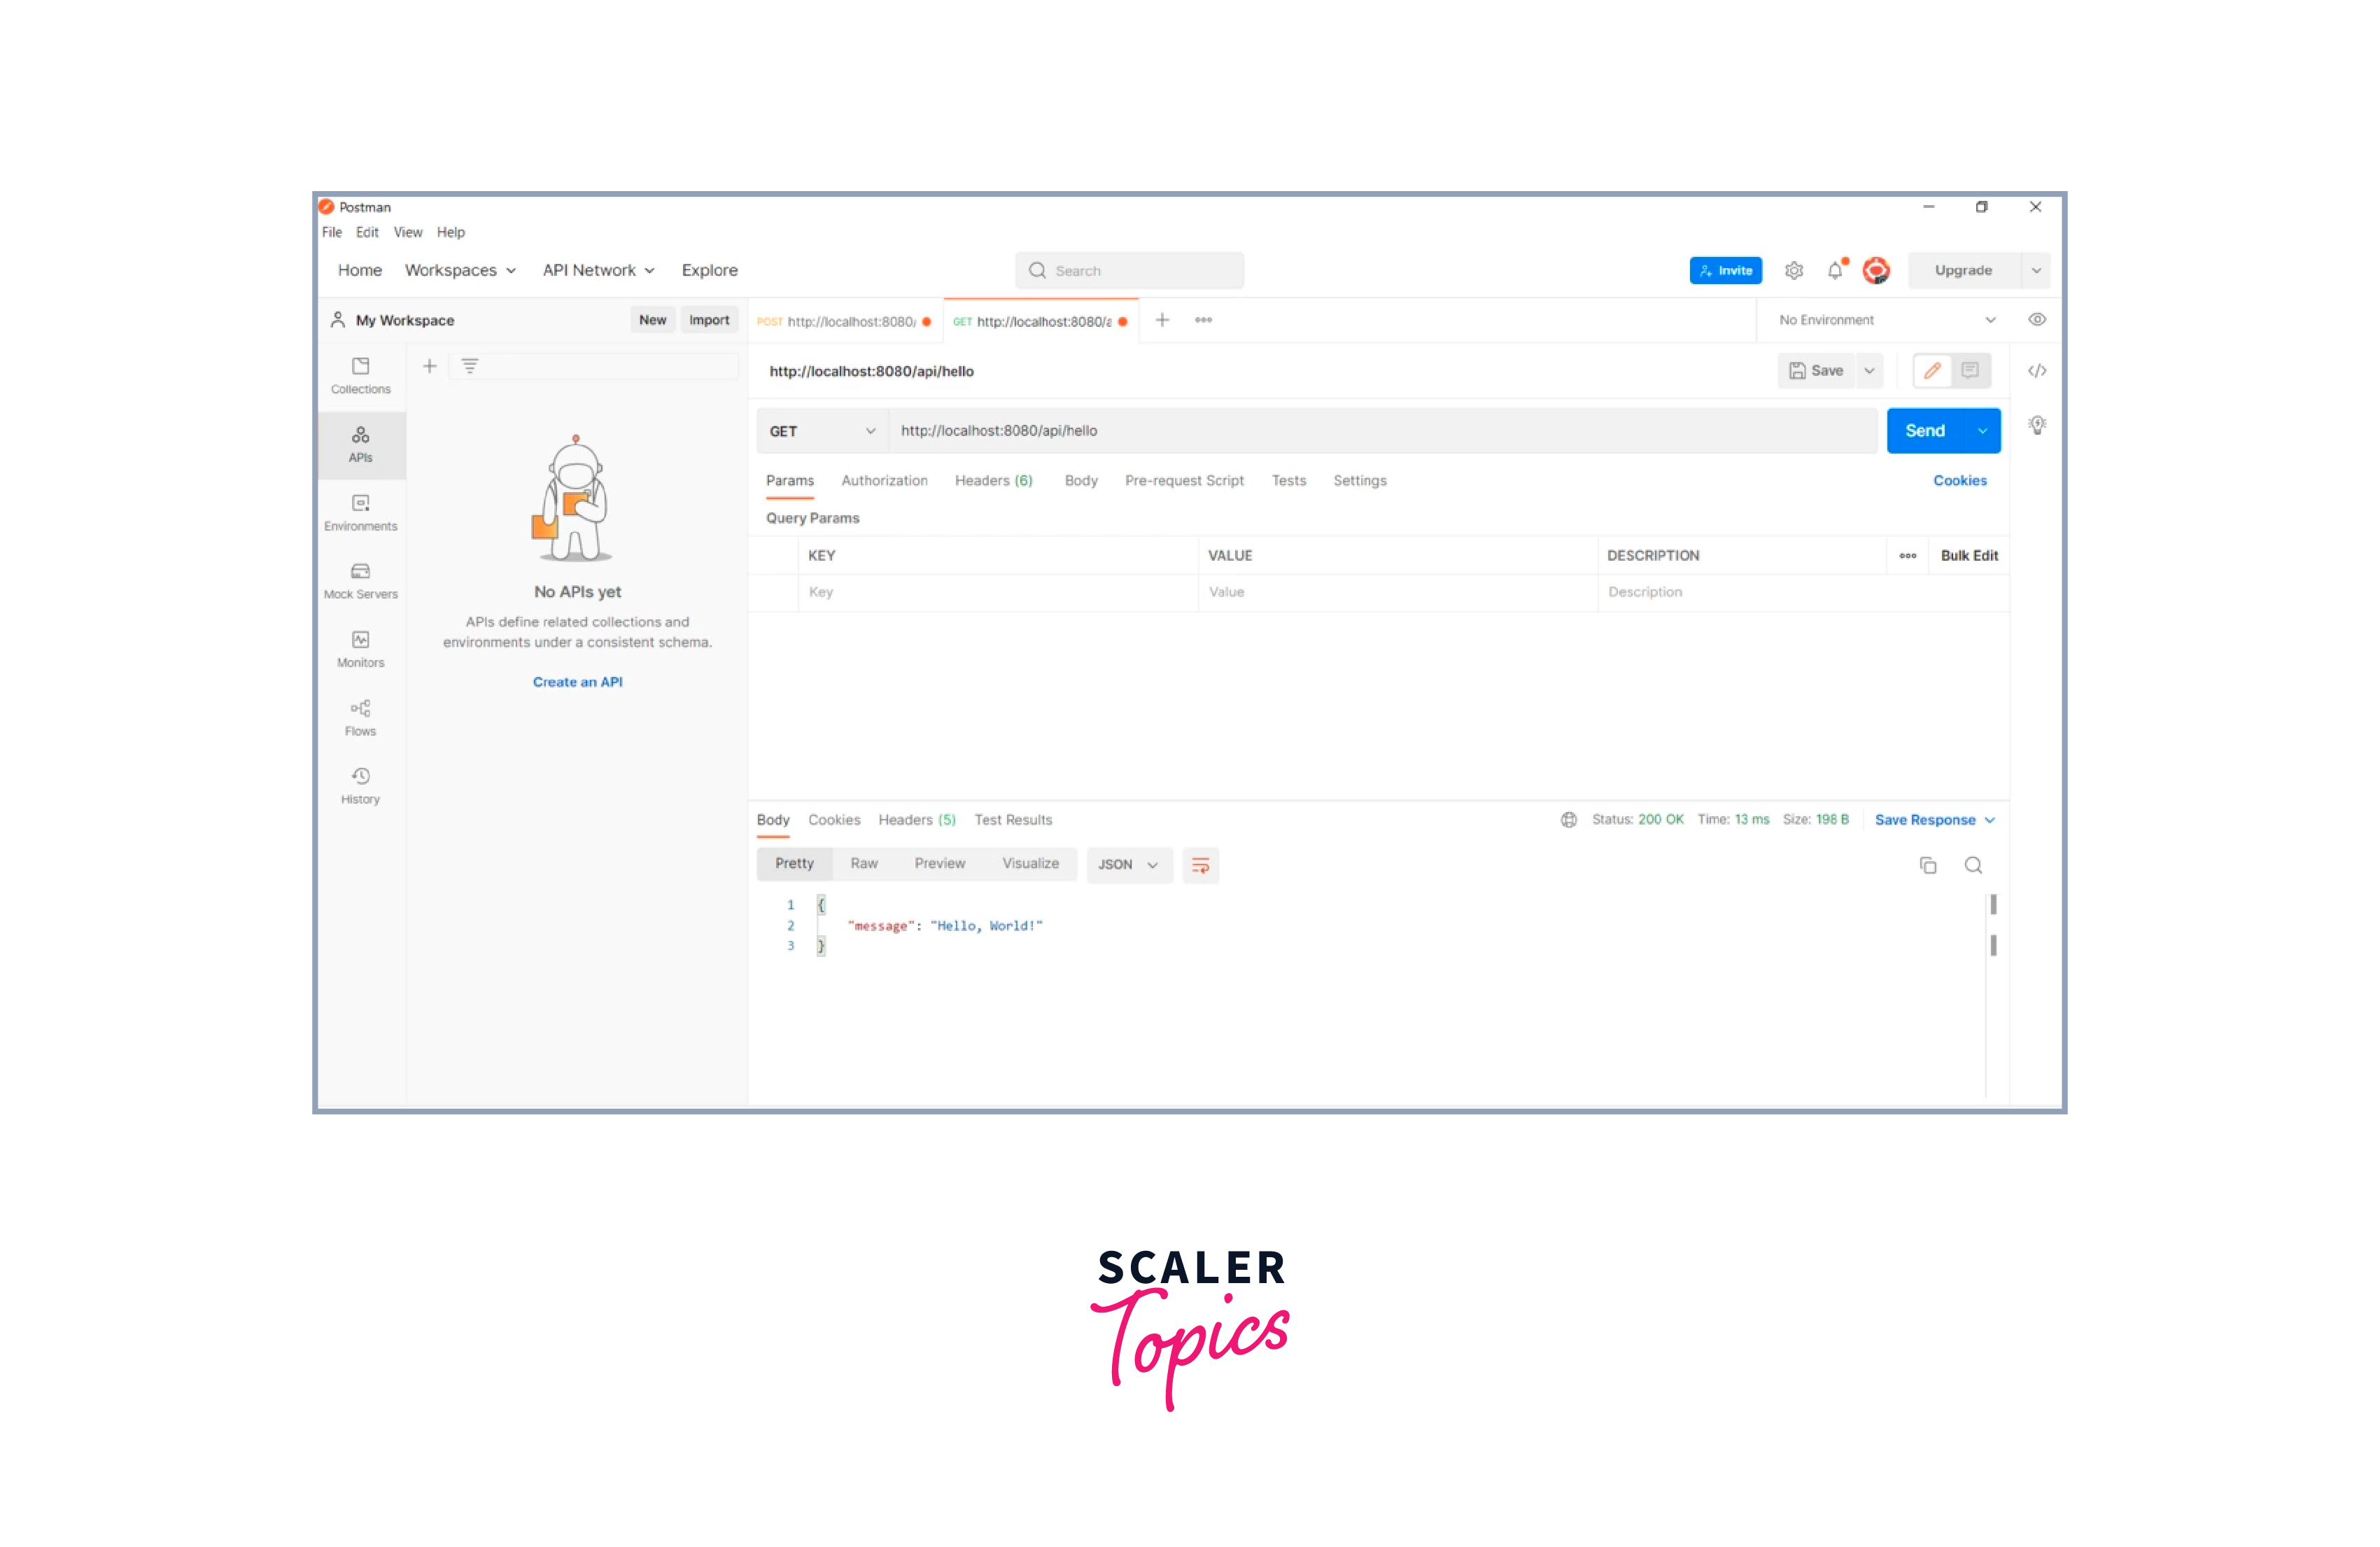
In this step, we are implementing a simple GET method within the Rest Controller class. This method is designed to handle HTTP GET requests and respond accordingly. The @GetMapping annotation is crucial here, as it specifies the endpoint for which this method will act as the handler. In this specific example, the endpoint is set to "/hello." When a client makes a GET request to the "/hello" endpoint, the sayHello method will be invoked.
Creating POST Method
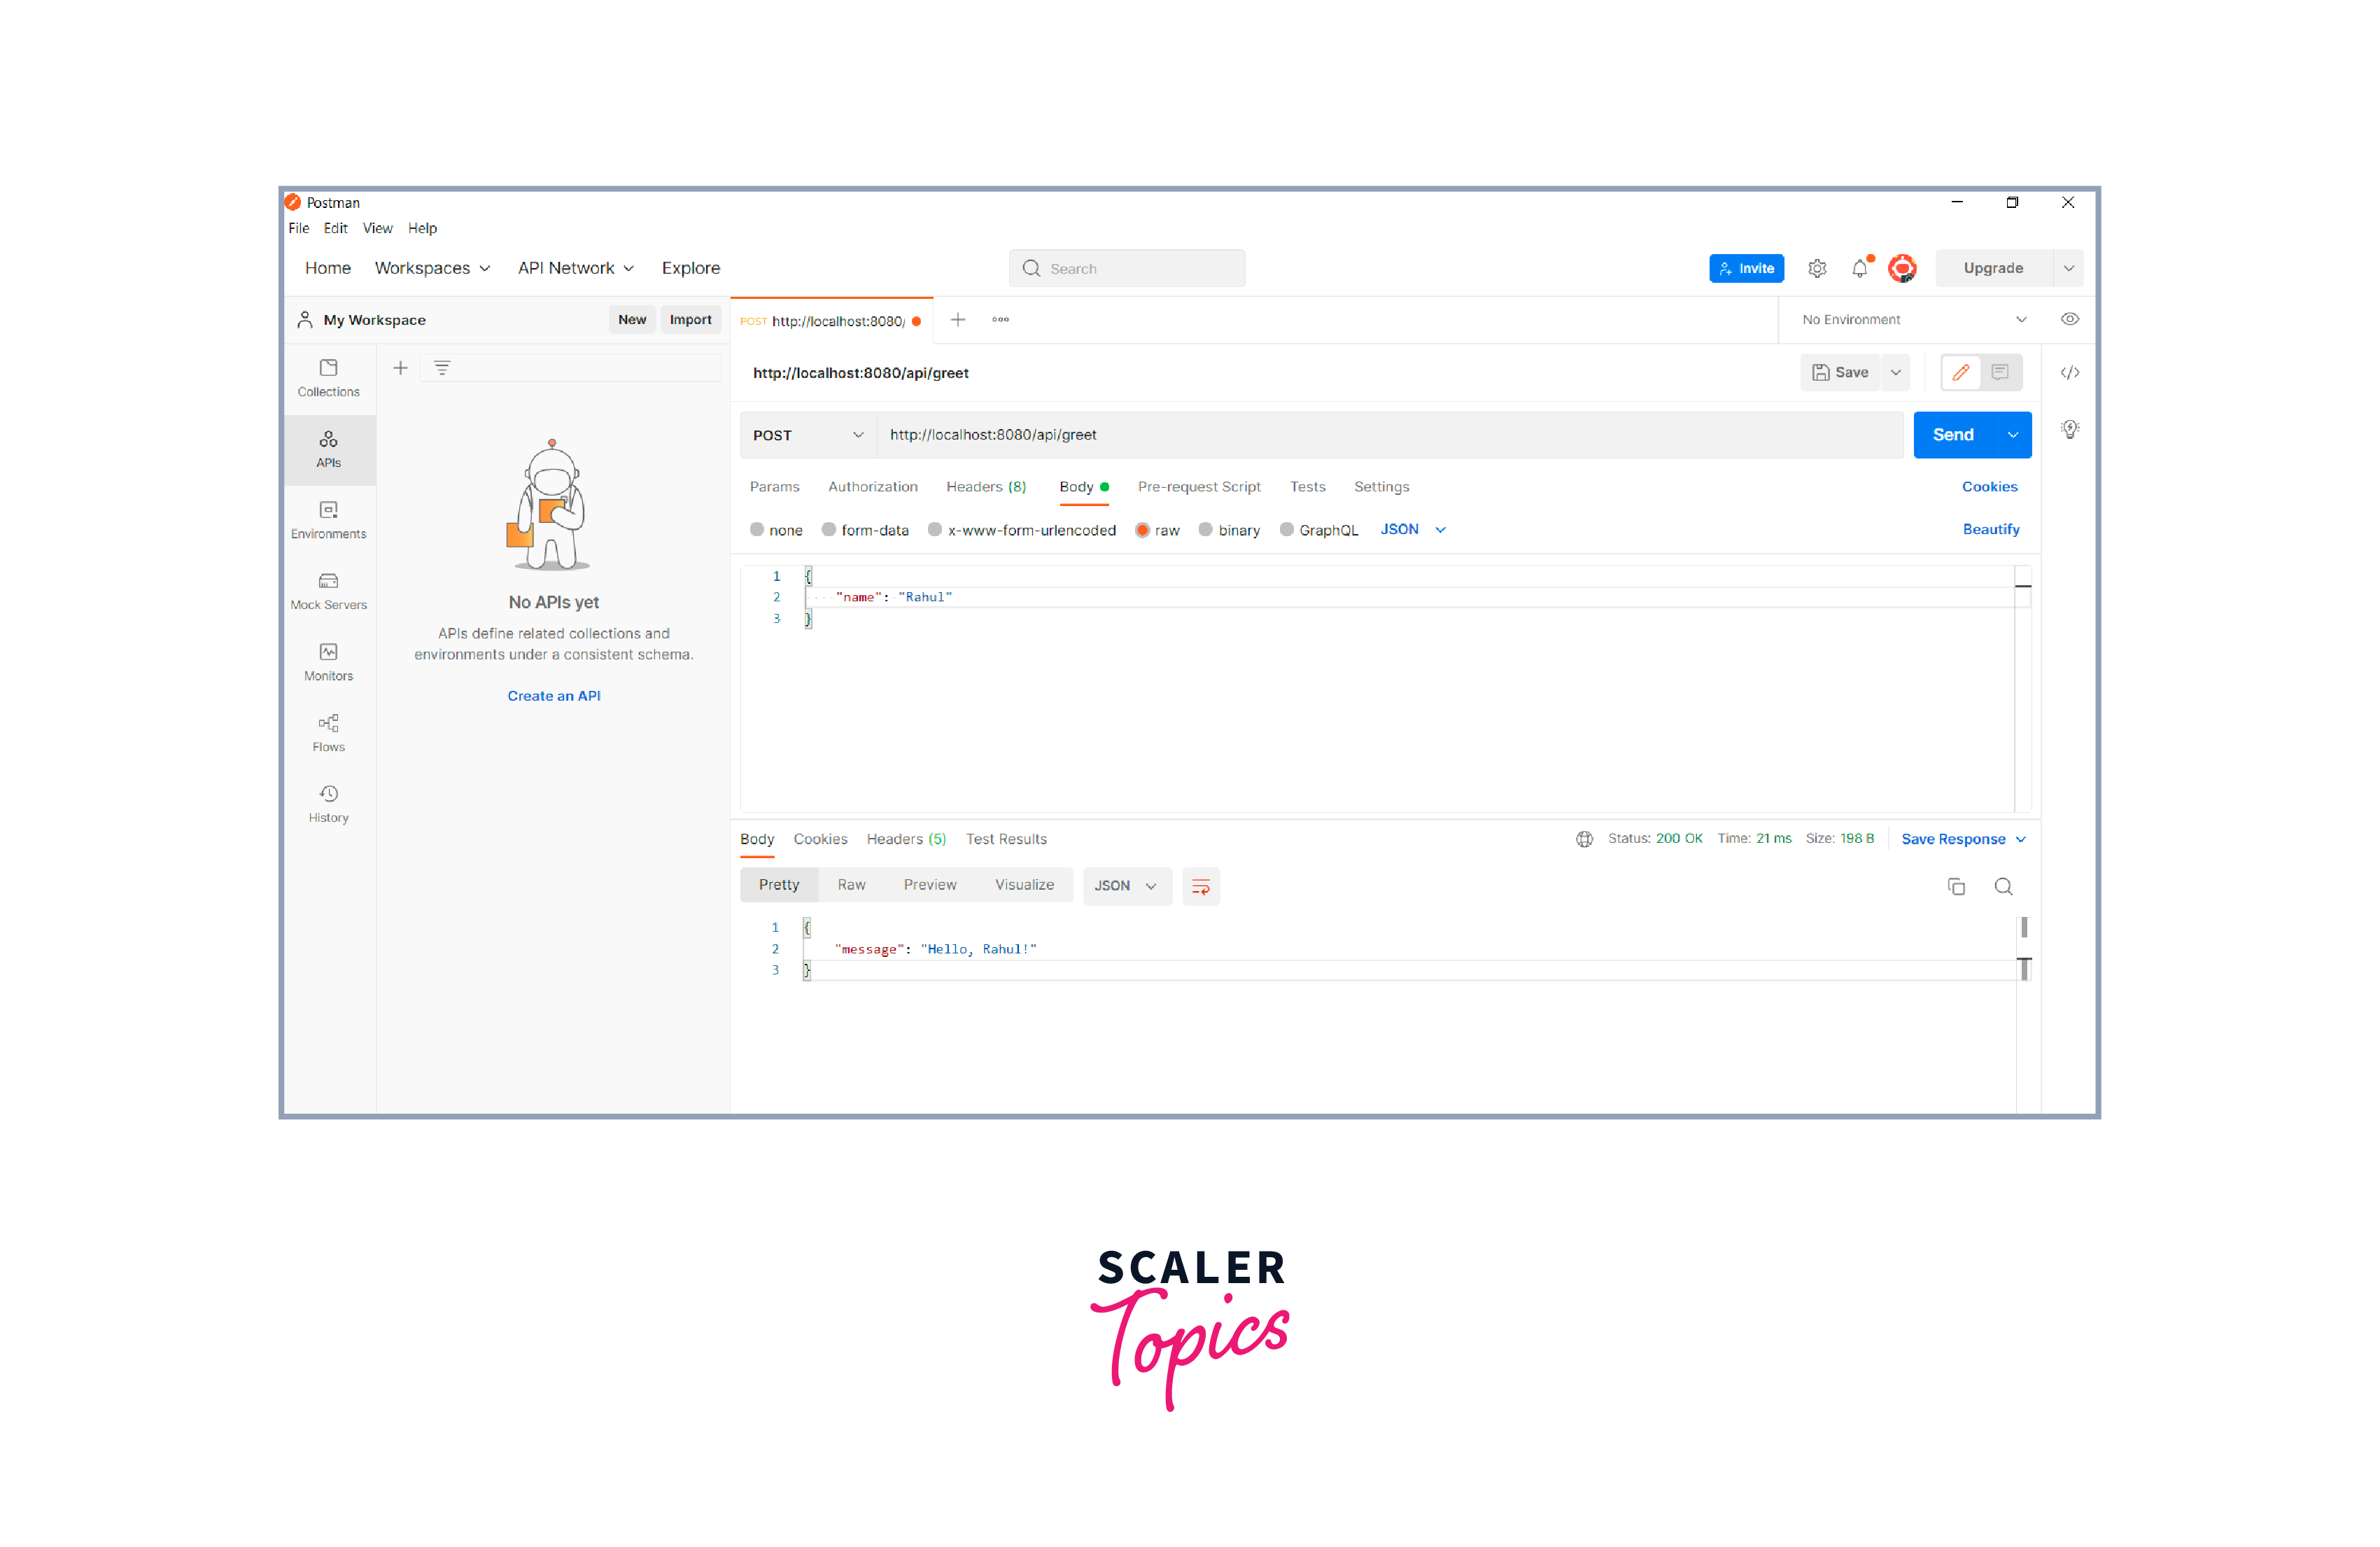
In this step, we are extending the Rest Controller class to implement a POST method, which is designed to handle incoming HTTP POST requests. The @PostMapping annotation is used to specify the endpoint for this method, indicating that it will be invoked when a client sends a POST request to the "/greet" endpoint.
Breaking it down:
- @PostMapping("/greet"): This annotation is designed to handle HTTP POST requests. It indicates that the following method will handle POST requests at the specified endpoint ("/greet").
- public String greetUser(@RequestBody String name): This method will be executed when a POST request is made to "/greet." The @RequestBody annotation indicates that the name parameter is expected to be part of the request body. In this case, it is assumed that the client will send a JSON or plain text body containing the name. The method then returns a greeting message incorporating the provided name.
Launching the Application
Finally, run the application. The main method in the base class (RestApplication) uses SpringApplication.run() to bootstrap the application, and the embedded Tomcat server will be started. Navigate to http://localhost:8080/api/hello to see the result of the GET method and use tools like Postman or cURL to test the POST method at http://localhost:8080/api/greet.
GET method API call using POSTMAN:

POST method API call using POSTMAN:

Difference between Controller and RestController
| Feature | @Controller | @RestController |
|---|---|---|
| Purpose | Handles general web requests and returns views. | Specialized for building RESTful web services. |
| Annotation | Annotated with @Controller. | Annotated with @RestController (combines @Controller and @ResponseBody). |
| Response Body Handling | Requires @ResponseBody for methods returning data. | Assumes all methods return data as the response body (eliminates the need for @ResponseBody). |
| Default Behavior | Methods return a view name (HTML page). | Methods directly return data to the client (e.g., JSON, XML). |
| Supported Media Types | Typically used for HTML, JSON, XML, etc. | Primarily designed for JSON (configurable for other formats). |
| View Resolution | Employs view resolver for rendering views. | Views are not resolved; direct data is returned. |
| Common Use Case | Rendering HTML pages in a traditional web application. | Exposing RESTful APIs for client-server communication. |
| Example | java @Controller public class MyController { @RequestMapping("/home") public String home() { return "home"; } } | java @RestController public class MyRestController { @GetMapping("/hello") public String sayHello() { return "Hello, World!"; } } |
Conclusion
- Spring Rest Controllers, a pivotal component within the Spring Framework for building robust and scalable RESTful web services.
- @Controller is suitable for traditional web applications that render views, while @RestController is designed specifically for building RESTful APIs.
- In a Spring application, you can create a Rest Controller by annotating a class with the @RestController annotation.
- The use of @RestController eliminates the need for @ResponseBody on individual methods, providing a more streamlined approach for RESTful service development.
- @Controller is typically used for rendering HTML pages in a traditional web application, while @RestController is used for exposing RESTful APIs for client-server communication.
